MERCEDES-BENZ E-CLASS COUPE 2011 Owners Manual
Manufacturer: MERCEDES-BENZ, Model Year: 2011, Model line: E-CLASS COUPE, Model: MERCEDES-BENZ E-CLASS COUPE 2011Pages: 353, PDF Size: 8.42 MB
Page 281 of 353
Frequencies for th
egarage door opener The radio typ
eapproval number and th efrequency range for th egarag edoor opener can be
foun dont heInternet at: http://www.mercedes-benz.de/betriebsanleitung. Floorma
tonthedriver's side G
WARNING
Mak esure that there is sufficien tclearance
around the pedals when floormats are used,
and that the floormats are properly secured.
The floormats must be correctly secured at all
times using retainer sand press-studs.
Before you drive off ,chec kthe floormats and
secure if necessary. Afloormat which is not
properly secured can slip and, thereby, inter-
fere with the movemen tofthe pedals.
Do not place floormats on top of one another. X
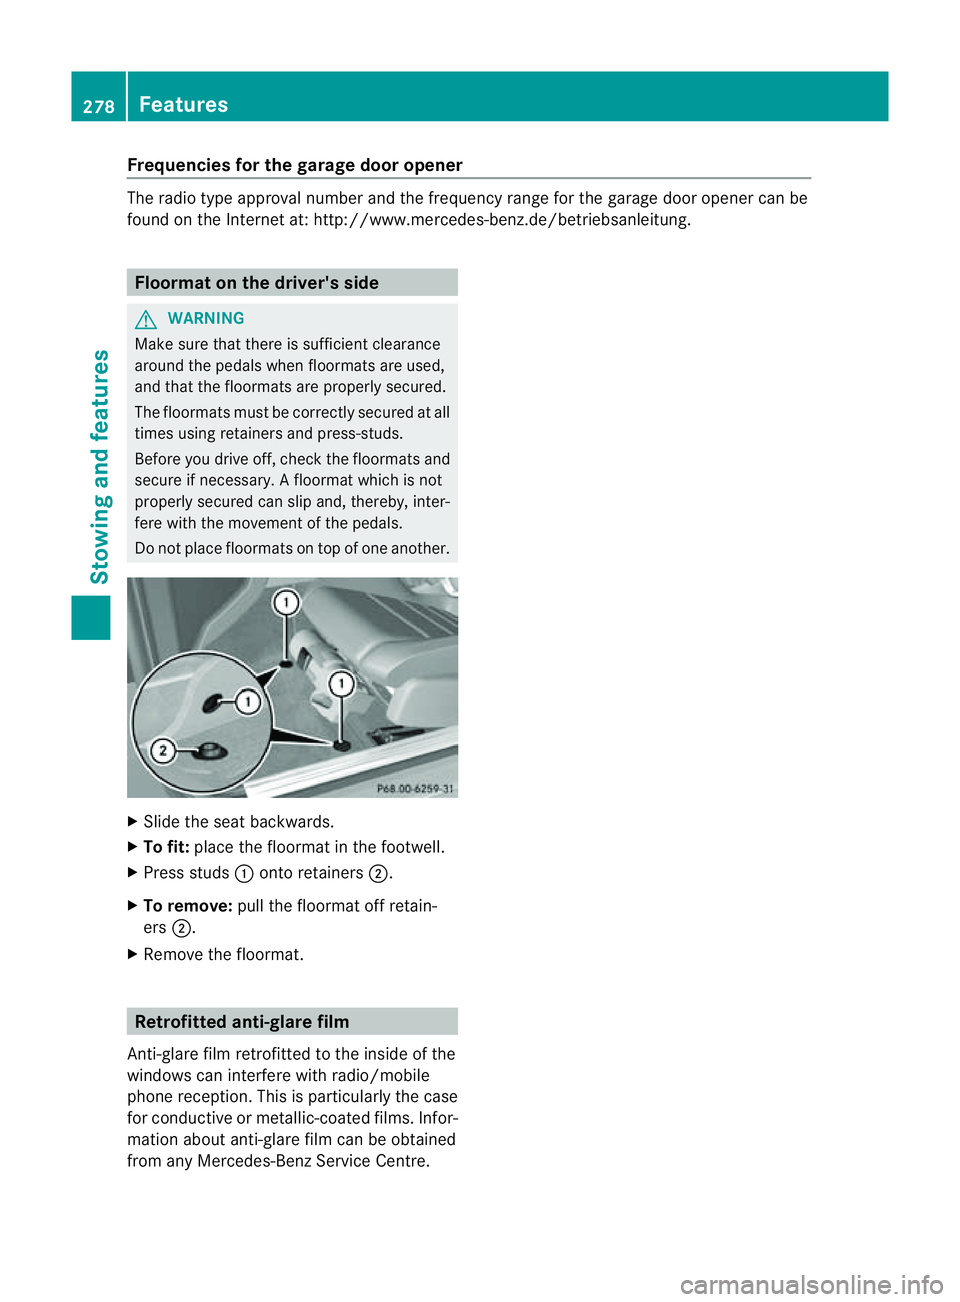
Slide the seat backwards.
X To fit: place the floormat in the footwell.
X Press studs :onto retainers ;.
X To remove: pull the floormat off retain-
ers ;.
X Remove the floormat. Retrofitted anti-glaref
ilm
Anti-glare film retrofitted to the inside of the
windows can interferew ith radio/mobile
phone reception. This is particularly the case
for conductive or metallic-coated films. Infor-
mation about anti-glare film can be obtained
from any Mercedes-Ben zService Centre. 278
FeaturesStowing and features
Page 282 of 353
Useful information
............................280
Engine compartment ........................280
Maintenance ...................................... 284
Care .................................................... 285 279Maintenance and care
Page 283 of 353
Useful information
i This Owner's Manual describes all models
and all standard and optional equipment
available to your vehicle at the time of pub-
lication of the Owner's Manual. Country-
specific deviation sare possible. Please
not ethat your vehicle may not be equipped
with all feature sdescribed. This also
applies to safety-relevan tsystems and
functions.
i Pleas ereadt he information on qualified
specialist workshop s(Ypage 22). Engin
ecompartment Bonnet
Active bonnet (pedestrian protection) Operating principle
i
The active bonne tisonly available in cer-
tain countries.
The active bonnet can reduce the risk of injury
to pedestrians in certain accident situations.
Raising the active bonnet increases the clear-
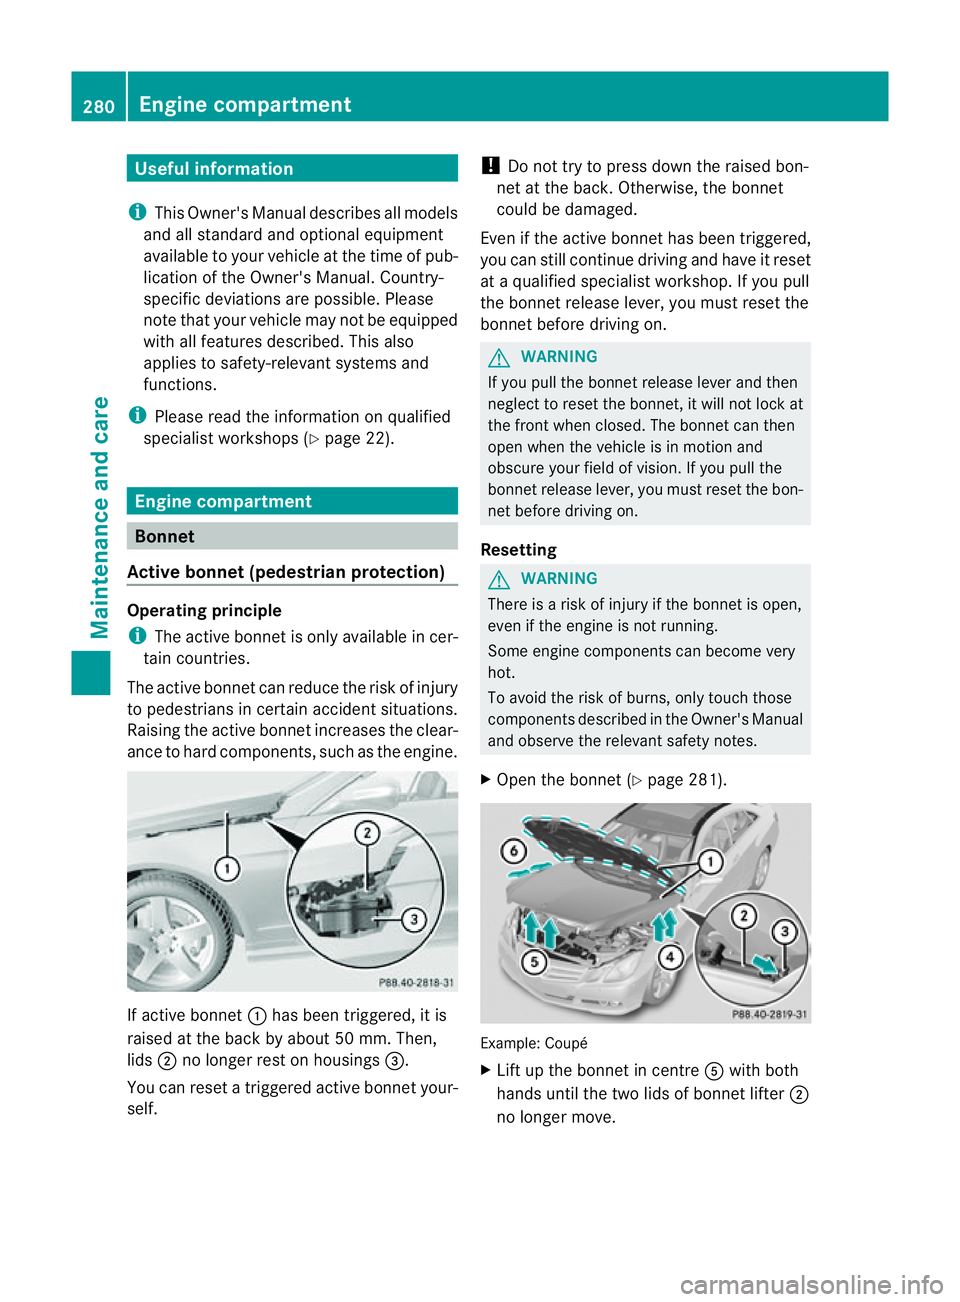
ance to hard components, such as the engine. If active bonnet
:has been triggered, it is
raised at the back by about50m m. Then,
lids ;no longer rest on housings =.
You can reset atriggered active bonnet your-
self. !
Do not try to press down the raised bon-
net at the back. Otherwise, the bonnet
could be damaged.
Even if the active bonnet has been triggered,
you can still continue driving and have it reset
at aq ualified specialist workshop. If you pull
the bonnet release lever, you must reset the
bonnet before driving on. G
WARNING
If you pull the bonnet release lever and then
neglect to reset the bonnet, it will not lock at
the front when closed. The bonnet can then
open when the vehicle is in motion and
obscure your field of vision. If you pull the
bonnet release lever, you must reset the bon-
net before driving on.
Resetting G
WARNING
There is arisk of injury if the bonnet is open,
even if the engine is not running.
Some engine componentsc an become very
hot.
To avoid the risk of burns, only touch those
componentsd escribed in the Owner's Manual
and observe the relevant safety notes.
X Open the bonnet (Y page 281). Example: Coupé
X
Lift up the bonnet in centre Awith both
hands until the two lids of bonnet lifter ;
no longer move. 280
Engine compartmentMaintenance and care
Page 284 of 353
If you push the lidsb
ack, you willnotice a
resistance.
X Release bonnet :.
X Check whether the lidsofb onnet lifter;
are resting on housings =(arrow).
X The lids of bonnet lifter ; are resting
on the housings: close bonnet:
(Y page 282).
or
X The lids of bonnet lifter ; are not rest-
ing on the housings: first lift up bon-
net :on left-hand side ?and then on
right-hand side B.Lift up bonnet :until
the respective lid of bonnet lifter ;no lon-
ger moves.
The lidsofb onnet lifter;must rest on
housings =(arrow).
X Close bonnet :(Ypage 282).
If you cannot close bonnet :or the L
symbola ppears in the multifunction display,
repeatt he steps. G
WARNING
If the bonnet can still not be engaged properly
or the Lsymbol appears in the multifunc-
tion display,don ot continue driving. The bon-
net can then open when the vehicle is in
motion and obscure your field of vision. Con-
sult aqualified specialist workshop. Other-
wise, you may cause an accident and injure
yourself and others.
Opening the bonnet G
WARNING
Do not pull the release lever while the vehicle
is in motion. If you do so, the bonnet may open
up and block your view. G
WARNING
There is arisk of injury if the bonnet is open,
even if the engine is not running.
Some engine components can become very
hot. To avoid the risk of burns, only touch those
components described in the Owner's Manual
and observe the relevant safety notes.
G
WARNING
The radiator fan between the radiator and the
engine can start automatically, even if the key
has been removed from the ignition lock. For
this reason, you must not reach into the fan
rotation area. You could otherwise be injured.
Vehicles with apetrol engine: The elec-
tronic ignitio nsystem uses high voltage. For
this reason ,you mus tnever touch ignition
system components( ignition coil, ignition
cables, spark plug connectors or test socket)
while:
R the engine is running
R the engine is being started
R the ignition is switched on and the engine
is being cranked by hand
You could otherwise suffer an electric shock
and be seriously or even fatally injured.
Vehicles with adiesel engine: The elec-
tronic injection control uses high voltage. For
this reason ,you must never touc hinjection
system components while:
R the engin eisrunning
R the engin eisbeing started
R the ignition is switched on
You could otherwise suffer an electric shock
and be seriously or even fatally injured.
X Make sure that the windscreen wipers are
switched off. G
WARNING
The windscreen wipers and wiper linkage
could be set in motion.
When the bonnet is open, you or others could
be injured by the wiper linkage.
Make sure that the windscreen wipers are
switched off. Remove the key or make sure
that no ignition position has been selected
with KEYLESS-GO. All indicator lamps must be
off in the instrumen tpanel. Engine compartment
281Maintenance and care Z
Page 285 of 353
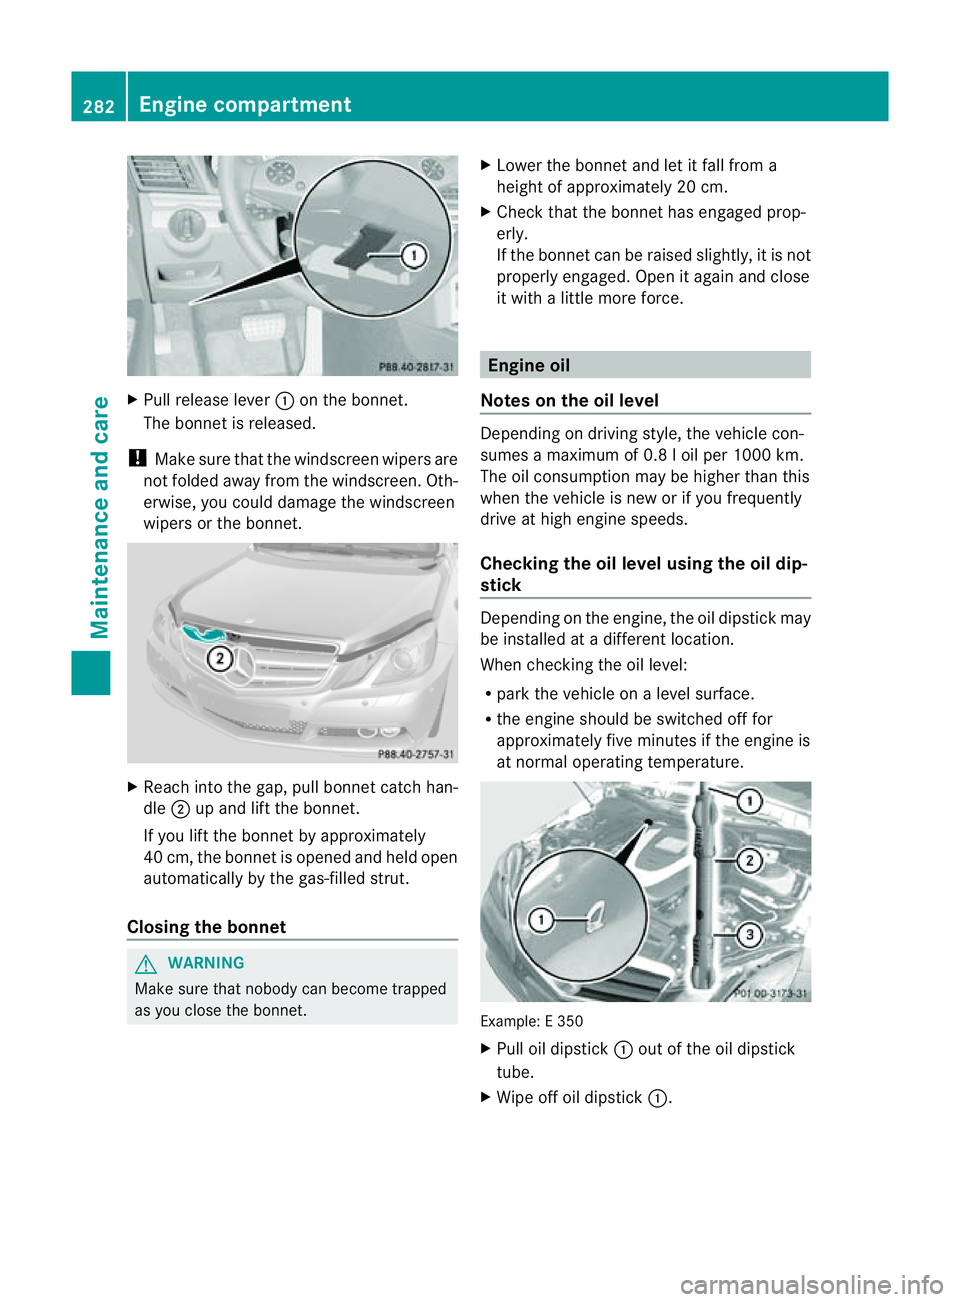
X
Pull release lever :on the bonnet.
The bonnet is released.
! Make sure that the windscreen wipers are
not folded away from the windscreen .Oth-
erwise, yo ucould damage the windscreen
wipers or the bonnet. X
Reach into the gap, pull bonnet catc hhan-
dle ;up and lift the bonnet.
If yo uliftt he bonnet by approximately
40 cm, the bonnet is opene dand held open
automaticall ybythe gas-filled strut.
Closin gthe bonnet G
WARNING
Make sure tha tnobody can become trapped
as you close the bonnet. X
Lower the bonnet and let it fall from a
height of approximately 20 cm.
X Check that the bonnet has engaged prop-
erly.
If the bonnet can be raised slightly, it is not
properly engaged. Open it again and close
it with alittle more force. Engine oil
Notes on the oil level Depending on driving style, the vehicle con-
sumes
amaximum of 0.8 loil per 1000 km.
The oil consumption may be higher than this
when the vehicle is new or if you frequently
drive at high engine speeds.
Checking the oil level using the oil dip-
stick Depending on the engine, the oil dipstick may
be installed at
adifferent location.
When checking the oil level:
R park the vehicle on alevel surface.
R the engine should be switched off for
approximately five minutes if the engine is
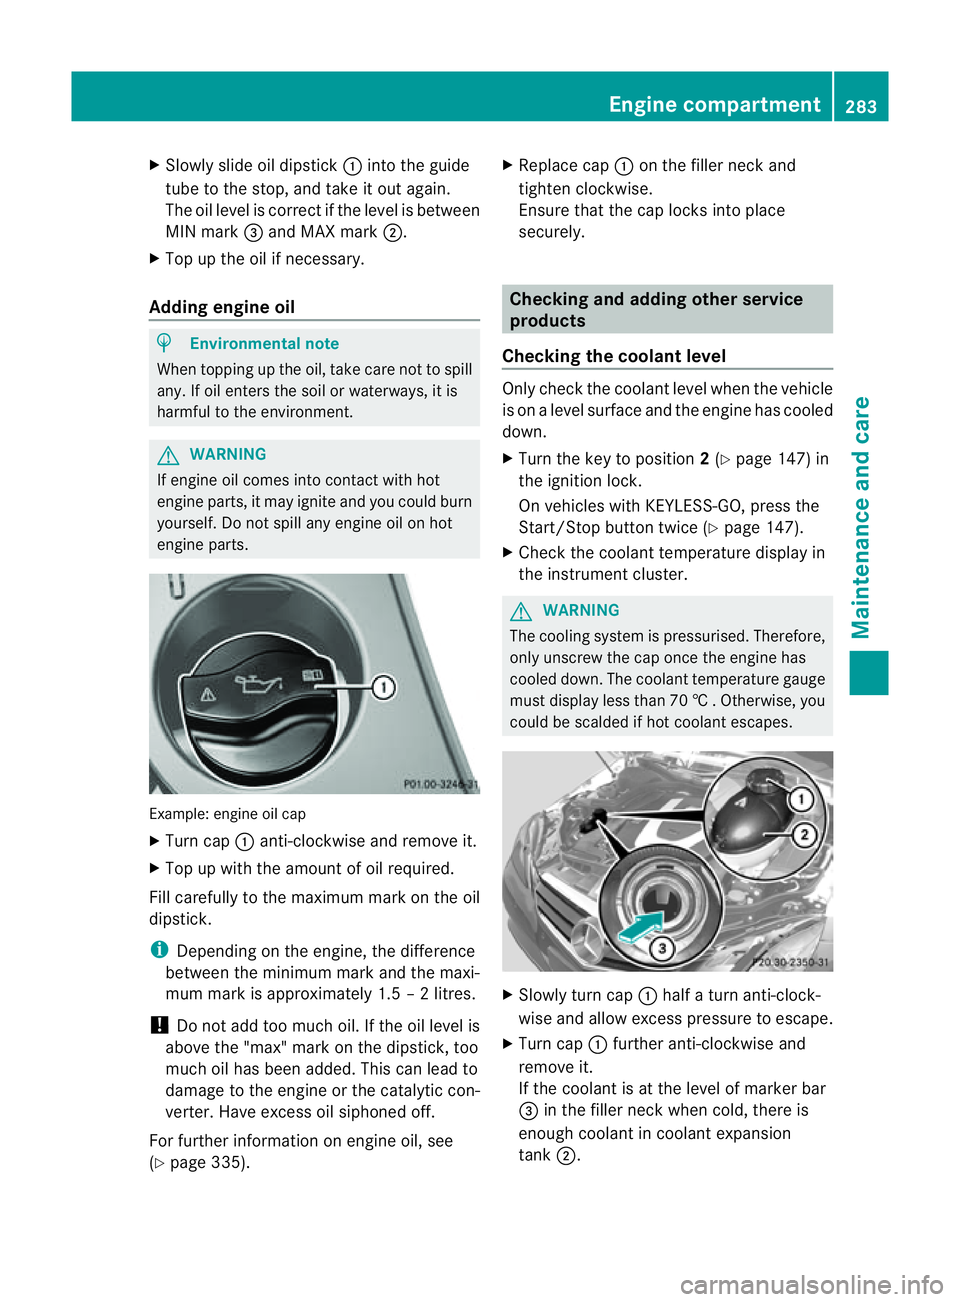
at normal operating temperature. Example:
E350
X Pull oil dipstick :out of the oil dipstick
tube.
X Wipe off oil dipstick :.282
Engine compartmentMaintenance and care
Page 286 of 353
X
Slowl yslide oi ldipstick :into the guide
tub etot he stop ,and take it ou tagain.
The oil level is correc tifthe level is between
MIN mark =and MAX mark ;.
X Top up the oil if necessary.
Adding engine oil H
Environmental note
When topping up the oil, take care not to spill
any. If oil enters the soil or waterways, it is
harmful to the environment. G
WARNING
If engine oil comes into contact with hot
engine parts, it may ignite and you could burn
yourself. Do not spill any engine oil on hot
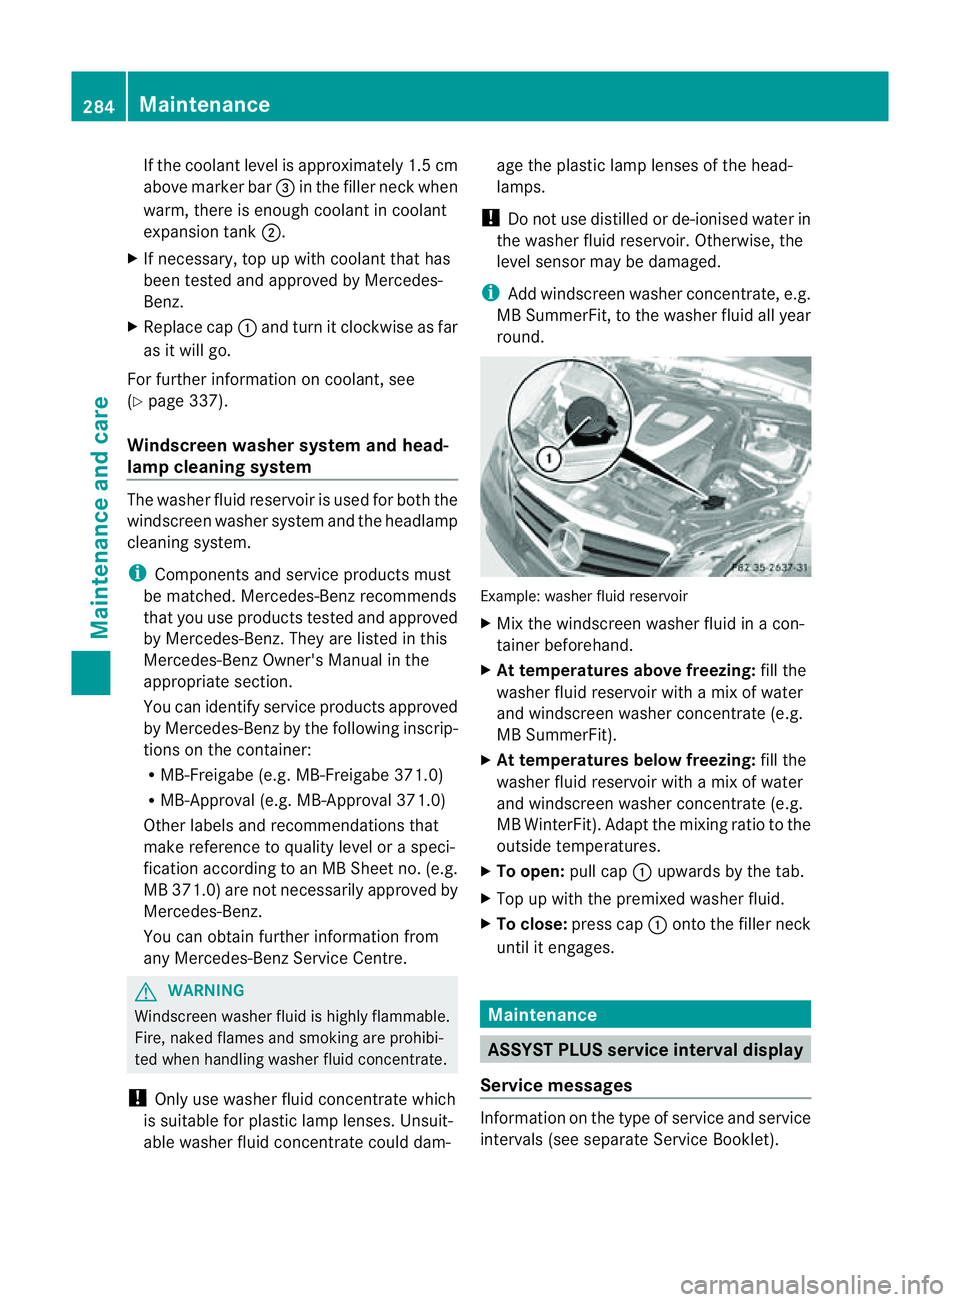
engine parts. Example: engine oil cap
X
Turn cap :anti-clockwise and remove it.
X Top up with the amount of oil required.
Fill carefully to the maximum mark on the oil
dipstick.
i Depending on the engine, the difference
between the minimum mark and the maxi-
mum mark is approximately 1.5 –2litres.
! Do not add too much oil. If the oil level is
above the "max" mark on the dipstick, too
much oil has been added. This can lead to
damage to the engine or the catalytic con-
verter. Have excess oil siphoned off.
For further information on engine oil, see
(Y page 335). X
Replace cap :on the filler neck and
tighten clockwise.
Ensure that the cap locks into place
securely. Checking and adding other service
products
Checking the coolant level Only check the coolant level when the vehicle
is on alevel surface and the engine has cooled
down.
X Turn the key to position 2(Y page 147) in
the ignition lock.
On vehicles with KEYLESS-GO, press the
Start/Stop button twice (Y page 147).
X Check the coolant temperature displayin
the instrumentc luster. G
WARNING
The cooling system is pressurised. Therefore,
only unscrew the cap once the engine has
cooled down. The coolant temperature gauge
must display less than 70 †.Otherwise, you
could be scalded if hot coolant escapes. X
Slowl yturnc ap : half aturna nti-clock-
wise and allow exces spressure to escape.
X Turn cap :further anti-clockwis eand
remove it.
If th ecoolan tisatt heleve lofm arkerbar
= in th efille rneck when cold, there is
enough coolant in coolant expansion
tank ;. Engine compartment
283Maintenance and care Z
Page 287 of 353
If the coolant level is approximately 1.5 cm
above marker bar =in the filler neck when
warm, there is enough coolant in coolant
expansio ntank ;.
X If necessary, to pupwithc oolan tthat has
been tested and approved by Mercedes-
Benz.
X Replace cap :and turn it clockwise as far
as it will go.
For further information on coolant, see
(Y page 337).
Windscreen washer system and head-
lamp cleanings ystemThe washer fluid reservoir is used for both the
windscreen washer system and the headlamp
cleaning system.
i
Components and service products must
be matched. Mercedes-Ben zrecommends
that you use products tested and approved
by Mercedes-Benz. They are listed in this
Mercedes-Ben zOwner's Manual in the
appropriat esection.
You can identif yservice product sapproved
by Mercedes-Ben zbythe followin ginscrip-
tions on the container:
R MB-Freigabe (e.g. MB-Freigabe 371.0)
R MB-Approval (e.g. MB-Approval 371.0)
Other labels and recommendations that
make reference to quality level or aspeci-
fication according to an MB Sheet no. (e.g.
MB 371.0) are not necessarily approved by
Mercedes-Benz.
You can obtain further information from
any Mercedes-Benz Servic eCentre. G
WARNING
Windscreen washer fluid is highly flammable.
Fire, naked flames and smokin gare prohibi-
ted when handling washer fluid concentrate.
! Only use washer fluid concentrate which
is suitable for plastic lamp lenses. Unsuit-
able washer fluid concentrate could dam- age the plastic lamp lenses of the head-
lamps.
! Do not use distilled or de-ionised water in
the washer fluid reservoir. Otherwise, the
level sensor may be damaged.
i Add windscreen washer concentrate, e.g.
MB SummerFit, to the washer fluid all year
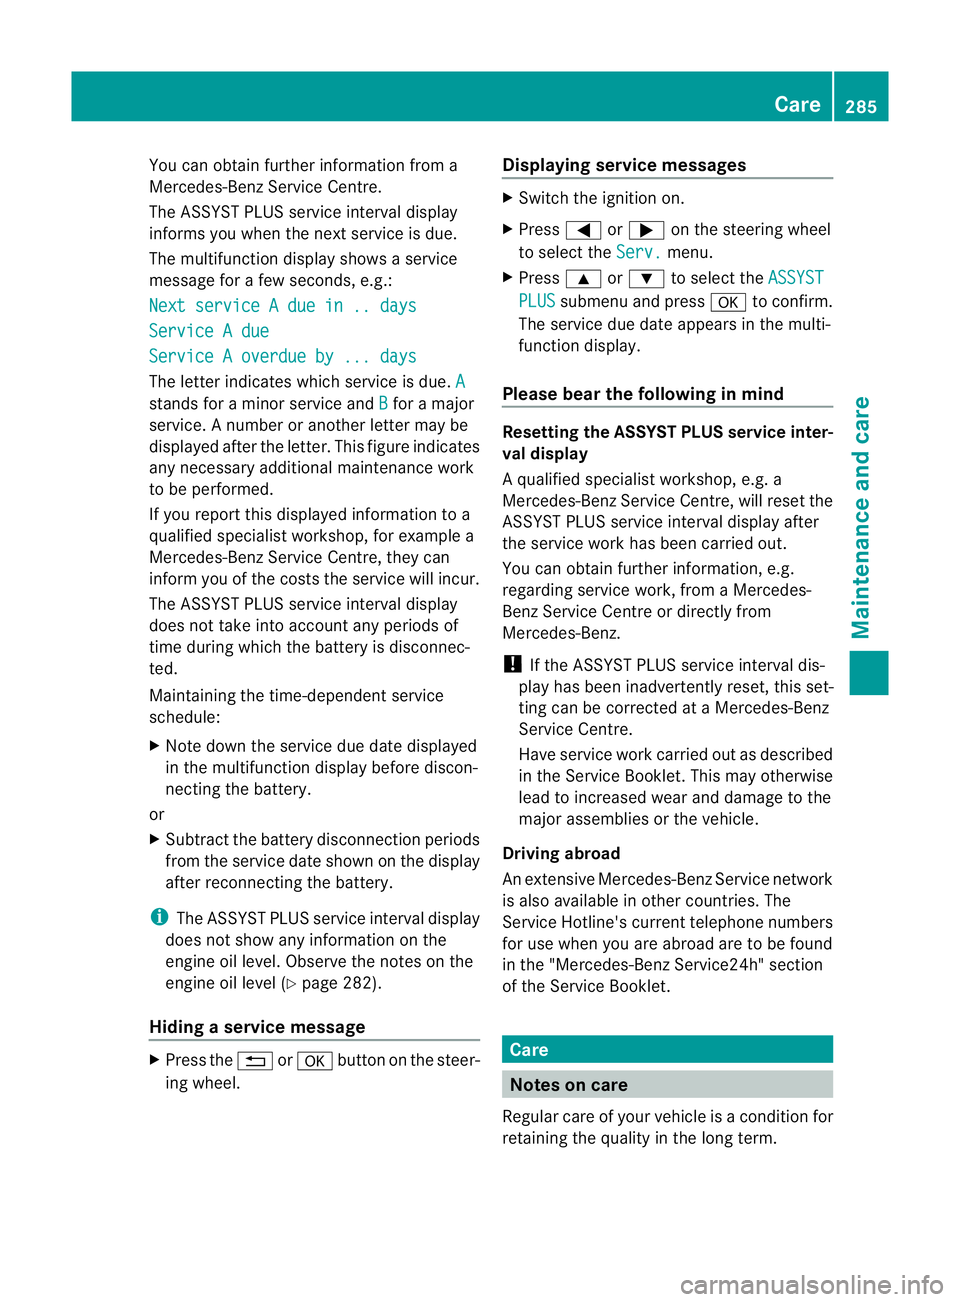
round. Example: washer fluid reservoir
X
Mix the windscreen washer fluid in acon-
tainer beforehand.
X At temperatures above freezing: fill the
washer fluid reservoir with amix of water
and windscreen washer concentrate (e.g.
MB SummerFit).
X At temperatures below freezing: fill the
washer fluid reservoir with amix of water
and windscreen washer concentrate (e.g.
MB WinterFit). Adapt the mixing ratio to the
outside temperatures.
X To open: pull cap:upwards by the tab.
X Top up with the premixed washer fluid.
X To close: press cap :ontothe filler neck
until it engages. Maintenance
ASSYST PLUS service interval display
Service messages Information on the type of service and service
intervals (see separat
eServic eBooklet). 284
MaintenanceMaintenance and care
Page 288 of 353
You can obtain further information fro
ma
Mercedes-Ben zService Centre.
The ASSYS TPLUS service interval display
informs you when the nex tservice is due.
The multifunction display shows aservice
message for afew seconds, e.g.:
Next service Adue in .. days Service
Adue Service
Aoverdue by ... days The letter indicates which servic
eisdue.A stands for
aminor servic eand B for
am ajor
service. Anumber or another letter may be
displayed after the letter. This figure indicates
any necessary additional maintenanc ework
to be performed.
If you report this displayed information to a
qualified specialist workshop, for example a
Mercedes-Benz Service Centre, they can
infor myou of the costst he service will incur.
The ASSYST PLUS service interval display
does not take into account any periods of
time during which the battery is disconnec-
ted.
Maintaining the time-dependent service
schedule:
X Note down the service due date displayed
in the multifunction display before discon-
necting the battery.
or
X Subtract the battery disconnection periods
from the service date shown on the display
after reconnecting the battery.
i The ASSYST PLUS service interval display
does not show any information on the
engine oil level. Observe the notes on the
engine oil level (Y page 282).
Hiding aservice message X
Pres sthe % ora button on th esteer-
ing wheel. Displaying service messages X
Switch th eignitio non.
X Press =or; on the steering wheel
to select the Serv. menu.
X Press 9or: to select the ASSYST PLUS submenu and press
ato confirm.
The servic eduedate appear sinthe multi-
functio ndisplay.
Please bear th efollowing in mind Resetting th
eASSYST PLUS service inter-
val display
Aq ualified specialist workshop, e.g. a
Mercedes-Ben zService Centre, will reset the
ASSYST PLUS servic einterval display after
the servic ework has been carried out.
You can obtain further information ,e.g.
regarding servic ework, from aMercedes-
Benz Service Centr eordirectly from
Mercedes-Benz.
! If the ASSYST PLUS servic einterval dis-
play has been inadvertently reset ,this set-
tingc an be corrected at aMercedes-Benz
Service Centre.
Have servic ework carried out as described
in the Service Booklet. This may otherwise
lead to increased wear and damage to the
major assemblies or the vehicle.
Driving abroad
An extensive Mercedes-Benz Service network
is also available in other countries. The
Service Hotline's curren ttelephone numbers
for use when you are abroad are to be found
in the "Mercedes-BenzS ervice24h" section
of the Service Booklet. Care
Notes on care
Regular care of your vehicle is acondition for
retaining the quality in the long term. Care
285Maintenance and care Z
Page 289 of 353
Use care products and cleaning agents rec-
ommended and approved by Mercedes-Benz.
! For cleaning your vehicle, do not use any
of the following:
R dry, rough or hard cloths
R abrasive cleaning agents
R solvents
R cleaning agents containing solvents
Do not scrub.
Do not touch the surfaces or protective
films with hard objects, e.g. aring or ice
scraper. You could otherwise scratch or
damage the surfaces and protective film. H
Environmental note
Dispose of empty packaging and cleaning
cloths in an environmentally responsible man-
ner.
! Do not park up the vehicle for an extended
period straight after cleaning it, particularly
after having cleaned the wheels with wheel
cleaner. Wheel cleaners could cause
increased corrosion of the brake discs and
brake pads/linings. For this reason, you
should drive for afew minutes after clean-
ing. Braking heats the brake discs and the
brake pads/linings, thus drying them. The
vehicle can then be parked up. Care of the exterior
Automatic car wash G
WARNING
Braking efficiency is reduced after washing
the vehicle. This could cause an accident. For
this reason, following acar wash, drive with
particular care until the brakes are dry. G
WARNING
The vehicle is braked when the HOLD function
or DISTRONIC PLUS is activated. Therefore,
deactivate the HOLD function and DISTRONIC PLUS before the vehicle is washed in an auto-
matic car wash.
You can wash the vehicle in an automatic car
wash from the very start.
! We recommend automatic car washes
with an adjustable 21
high-pressure pre-
cleaning program. In car washes that use
high water pressures, there is adanger that
as mall quantity of water may leak into the
vehicle.
! Cabriolet: do not treat the vehicle with
hot wax under any circumstances.
! Cabriolet: pull the key out of the ignition
lock when washing the vehicle. This
ensures that the wind deflector on the
windscreen is retracted. The wind deflector
may otherwise be damaged.
If the vehicle is very dirty, pre-wash it before
cleaning it in an automatic car wash.
! Make sure that the automatic transmis-
sion is in position Nwhen washing your
vehicle in atow-through car wash. The vehi-
cle could be damagedift he transmission is
in another position.
! Make sure that:
R the side windows and sliding sunroof or
soft top are closed completely.
R the blowerf or the ventilation/heatin gis
switched off (OFF button is depressed).
R the windscreen wiper switch is at posi-
tion 0.
The vehicle could otherwise be damaged.
After using an automatic car wash, wipe off
wax from the windscreen and the wiper
blades. This will prevent smears and reduce
wiping noises caused by residue on the wind-
screen.
21 In accordanc ewith the specification sfor Cabriolet programs. 286
CareMaintenance and care
Page 290 of 353
High-pressure cleaning equipment
G
WARNING
Do not use high-pressure cleaners with circu-
lar-jet nozzles (dirt grinders) to clea nyour
vehicle, in particular the tyres. You could oth-
erwise damage the tyres and cause an acci-
dent.
! Always maintain adistance of at least
30 cm between the vehicle and the high-
pressure cleaner nozzle. Information about
the correc tdistanc eisavailable fro mthe
equipment manufacturer.
Move the high-pressure cleaner nozzle
around when cleaning your vehicle.
Do not aim directly at any of the following:
R tyres
R door gaps, jointse tc.
R soft top (Cabriolet)
R wind deflector net (Cabriolet)
R electrical components
R battery
R connectors
R lights
R seals
R trim elements
R ventilation slots
Damaged seals or electrical components
can lead to leaks or failures.
Cleaningt he wheels !
Do not use acidic wheel cleaning products
to remove brake dust. This could damage
wheel bolts and brake components.
! Do not park up the vehicle for an extended
period straight after cleaning it, particularly
after having cleaned the wheels with wheel
cleaner. Wheel cleaners could cause
increased corrosion of the brake discs and
brake pads/linings. For this reason, you
should drive for afew minutes after clean-
ing. Braking heats the brake discs and the brake pads/linings, thus drying them. The
vehicle can then be parked up.
Cleaningt he paintwork Scratches, corrosive deposits, areas affected
by corrosion and damage caused by inade-
quate care cannot always be completely
repaired. In such cases, visit aqualified spe-
cialist workshop, e.g. aMercedes-Benz
Service Centre.
X Remove impurities immediately, where
possible, whilst avoiding rubbing too hard.
X Soak insect remains with insect remover
and rinse off the treated areas afterwards.
X Soak bird droppings with water and rinse
off the treated areas afterwards.
X Remove coolant, brake fluid, tree resin,
oils, fuels and greases by rubbing gently
with acloth soaked in petroleum ether or
lighter fluid.
X Use tar remover to remove tar stains.
X Use silicone remover to remove wax.
! Do not affix:
R stickers
R films
R magnetic plates or similar items
to painted surfaces. You could otherwise
damage the paintwork.
Care and treatment of mattp aintwork If your vehicle has
aclear matt finish, observe
the following instructions in order to avoid
damage to the paintwork due to incorrect
care.
These notes also apply to light alloy wheels
with aclear matt finish.
! Never polish the vehicle or the light alloy
wheels. Polishing makes the paintwork
shiny. Care
287Maintenance and care Z