exhaust MERCEDES-BENZ E-Class COUPE 2012 C207 Owner's Manual
[x] Cancel search | Manufacturer: MERCEDES-BENZ, Model Year: 2012, Model line: E-Class COUPE, Model: MERCEDES-BENZ E-Class COUPE 2012 C207Pages: 352, PDF Size: 14.48 MB
Page 10 of 352
Display message ............................ 237
Emergency locking ........................... 79
Emergency unlocking .......................79
Important safety notes ....................77
Opening (from inside) ......................78
Draft stop ............................................. 93
Drinking and driving ......................... 160
Drinks holder see Cup holder
Drive program
Automatic ...................................... 152
Display ........................................... 150
Manual ........................................... 154
Driver's door
see Doors
Driver's seat
see Seats
Driving abroad
Mercedes-Benz Service .................279
Symmetrical low beam ..................116
Driving on flooded roads .................. 163
Driving safety systems ABS (Anti-lock Braking System) .......61
ADAPTIVE BRAKE ............................. 65
BAS (Brake Assist System) ..............62
BAS PLUS (Brake Assist System
PLUS) ............................................... 62
Electronic brake force distribution ...64
ESP ®
(Electronic Stability
Program) .......................................... 63
ETS (Electronic Traction System) .....63
Important safety information ...........61
Overview .......................................... 60
PRE-SAFE ®
Brake ............................. 65
Driving systems
Active Blind Spot Assist .................189
Active Driving Assistance
package ......................................... 189
Active Lane Keeping Assist ............192
ATTENTION ASSIST ........................185
Blind Spot Assist ............................ 186
Cruise control ................................ 164
Display message ............................ 228
DISTRONIC PLUS ........................... 166
Dynamic handling package with
sports mode .................................. 175
HOLD function ............................... 176Lane Keeping Assist ......................188
Lane Tracking package ..................186
Parking Guidance ........................... 181
PARKTRONIC ................................. 178
Rear view camera .......................... 184
Driving tips
Automatic transmission .................151
Brakes ........................................... 161
Break-in period .............................. 144
DISTRONIC PLUS ........................... 174
Downhill gradient ........................... 161
Drinking and driving .......................160
Driving abroad ............................... 116
Driving in winter ............................. 163
Driving on flooded roads ................163
Driving on wet roads ......................163
Exhaust check ............................... 161
Fuel ................................................ 160
General .......................................... 160
Hydroplaning ................................. 163
Icy road surfaces ........................... 163
Limited braking efficiency on
salted roads ................................... 162
Pedals ............................................ 160
Snow chains .................................. 311
Symmetrical low beam ..................116
Wet road surface ........................... 162
DVD audio (on-board computer) ...... 204
DVD-Video (on-board computer) ...... 204
Dynamic handling package with
sports mode ....................................... 175
E
EASY-ENTRY feature Activating/deactivating .................211
Function/notes ............................. 109
EASY-EXIT feature
Crash-responsive ........................... 110
Function/notes ............................. 109
Switching on/off ........................... 211
EBD (electronic brake force
distribution) Display message ............................ 215
Function/notes ................................ 64
Electrical fuses
see Fuses
8Index
Page 11 of 352
Electronic brake force distributionsee EBD (Electronic Brake force
Distribution)
Electronic Stability Program
see ESP ®
(Electronic Stability Program)
Electronic Traction System
see ETS (Electronic Traction System)
Emergency closing (soft top) ............. 88
Emergency release Driver's door .................................... 79
Trunk ............................................... 82
Vehicle ............................................. 79
Emergency spare wheel
Storage location ............................ 290
Emergency Tensioning Devices
Function ........................................... 54
Safety guidelines ............................. 37
Emissions purification
Service and warranty information ....20
Engine
Check Engine warning lamp ........... 245
Display message ............................ 225
Emergency starting ........................303
Engine number ............................... 340
Irregular running ............................ 148
Starting problems ..........................148
Starting the engine with the
SmartKey ....................................... 146
Starting with KEYLESS-GO .............146
Switching off .................................. 158
Engine electronics
Problem (malfunction) ...................148
Engine oil
Adding ........................................... 275
Additives ........................................ 344
Checking the oil level ..................... 275
Checking the oil level using the
dipstick .......................................... 275
Display message ............................ 227
Filling capacity ............................... 342
Notes about oil grades ................... 343
Notes on oil level/consumption ....275
Viscosity ........................................ 344
ESP ®
(Electronic Stability
Program) Deactivating/activating .................206
Deactivating/activating (notes) .......64Display message ............................ 214
ETS .................................................. 63
Function/notes ................................ 63
Important safety information ...........63
Warning lamp ................................. 242
ETS (Electronic Traction System) ....... 63
Exhaust check ................................... 161
Exhaust tail pipe (cleaning
instructions) ...................................... 285
Exterior lighting see Lights
Exterior mirrors
Adjusting ....................................... 110
Dipping (automatic) .......................112
Folding in/out (automatically) .......111
Folding in/out (electrically) ...........111
Folding in when locking (on-board
computer) ...................................... 212
Out of position (troubleshooting) ...112
Setting ........................................... 111
Storing settings (memory
function) ........................................ 113
Storing the parking position ..........112
F
Filler cap see Fuel filler flap
First-aid kit ......................................... 290
Flat tire Changing a wheel/mounting the
spare wheel ................................... 291
MOExtended run-flat system .........295
Preparing the vehicle .....................291
Raising the vehicle .........................292
Floormat ............................................. 272
Front fog lamps ................................. 118
Display message ............................ 223
Switching on/off ........................... 118
Front windshield
see Windshield
Fuel
Additives ........................................ 343
Consumption statistics ..................201
Displaying the current
consumption .................................. 201
Displaying the range ......................201
Driving tips .................................... 160
Index9
Page 148 of 352
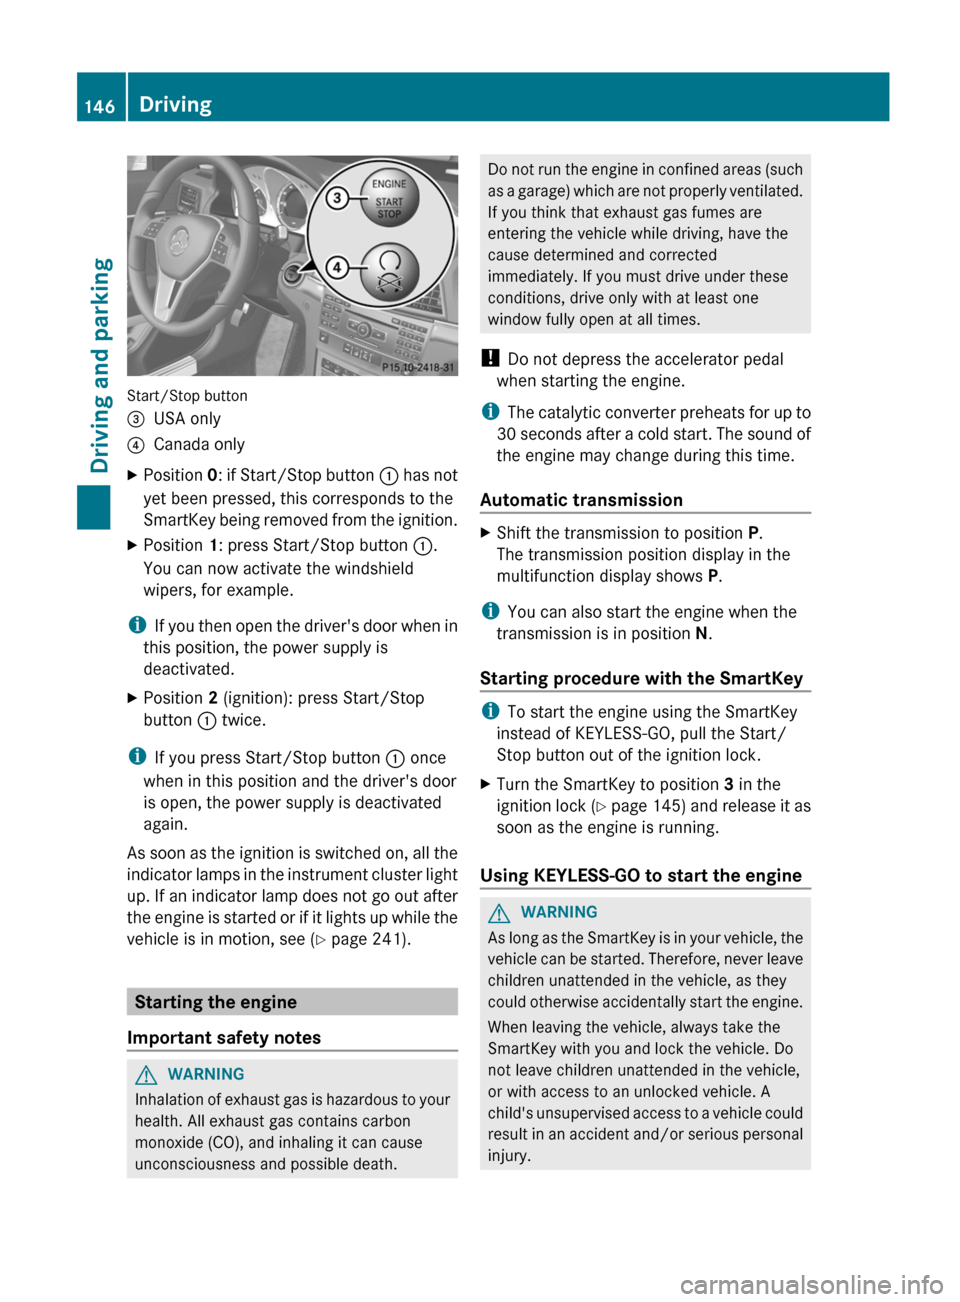
Start/Stop button
=USA only?Canada onlyXPosition 0: if Start/Stop button : has not
yet been pressed, this corresponds to the
SmartKey being removed from the ignition.XPosition 1: press Start/Stop button :.
You can now activate the windshield
wipers, for example.
i If you then open the driver's door when in
this position, the power supply is
deactivated.
XPosition 2 (ignition): press Start/Stop
button : twice.
i
If you press Start/Stop button : once
when in this position and the driver's door
is open, the power supply is deactivated
again.
As soon as the ignition is switched on, all the
indicator lamps in the instrument cluster light
up. If an indicator lamp does not go out after
the engine is started or if it lights up while the
vehicle is in motion, see ( Y page 241).
Starting the engine
Important safety notes
GWARNING
Inhalation of exhaust gas is hazardous to your
health. All exhaust gas contains carbon
monoxide (CO), and inhaling it can cause
unconsciousness and possible death.
Do not run the engine in confined areas (such
as a garage) which are not properly ventilated.
If you think that exhaust gas fumes are
entering the vehicle while driving, have the
cause determined and corrected
immediately. If you must drive under these
conditions, drive only with at least one
window fully open at all times.
! Do not depress the accelerator pedal
when starting the engine.
i The catalytic converter preheats for up to
30 seconds after a cold start. The sound of
the engine may change during this time.
Automatic transmissionXShift the transmission to position P.
The transmission position display in the
multifunction display shows P.
i
You can also start the engine when the
transmission is in position N.
Starting procedure with the SmartKey
i To start the engine using the SmartKey
instead of KEYLESS-GO, pull the Start/
Stop button out of the ignition lock.
XTurn the SmartKey to position 3 in the
ignition lock (Y page 145) and release it as
soon as the engine is running.
Using KEYLESS-GO to start the engine
GWARNING
As long as the SmartKey is in your vehicle, the
vehicle can be started. Therefore, never leave
children unattended in the vehicle, as they
could otherwise accidentally start the engine.
When leaving the vehicle, always take the
SmartKey with you and lock the vehicle. Do
not leave children unattended in the vehicle,
or with access to an unlocked vehicle. A
child's unsupervised access to a vehicle could
result in an accident and/or serious personal
injury.
146DrivingDriving and parking
Page 160 of 352
Problems with fuel and the fuel tankProblemPossible causes/consequences and M SolutionsFuel is leaking from the
vehicle.GRisk of explosion or fire
The fuel line or the fuel tank is defective.
XTurn the SmartKey to position 0(Y page 145) in the ignition lock
immediately and remove it.XDo not restart the engine under any circumstances.XConsult a qualified specialist workshop.The fuel filler flap
cannot be opened.The fuel filler flap is not unlocked.
or
The SmartKey battery is discharged.XUnlock the vehicle ( Y page 70).
or
XUnlock the vehicle using the mechanical key ( Y page 73).The fuel filler flap is unlocked, but the opening mechanism is
jammed.XConsult a qualified specialist workshop.Parking
Important safety notes
GWARNING
Do not park this vehicle in areas where
combustible materials can come into contact
with the hot exhaust system. Do not park the
vehicle on dry grassland or harvested grain
fields. Combustible materials, such as grass,
hay or leaves could be ignited by the hot
exhaust system and cause a vehicle fire.
Unintended vehicle movement can cause
serious personal injury or damage to the
vehicle or the vehicle drivetrain. To reduce
such risks, always do the following before
turning off the engine and leaving the vehicle:
R keep your right foot on the brake pedal.
R engage the parking brake.
R shift the automatic transmission to park
position P.
R slowly release the brake pedal.
Rwhen parked on an incline, always turn the
front wheels towards the road curb.
R turn the SmartKey in the ignition lock to
position 0 and remove the SmartKey from
the ignition lock, or press the KEYLESS-GO
Start/Stop button.
R take the SmartKey with you and lock the
vehicle when leaving.
Switching off the engine
Important safety notes
GWARNING
Do not turn off the engine before the vehicle
has come to a complete stop. With the engine
not running, there is no power assistance for
the brake and steering systems. In this case,
it is important to keep in mind that a
considerably higher degree of effort is
necessary to brake and steer the vehicle.
158ParkingDriving and parking
Page 161 of 352
Vehicles with manual transmissionXShift to either first gear or reverse gear R.XTurn the SmartKey to position 0 in the
ignition lock and remove it.
The immobilizer is activated.XApply the parking brake firmly.
Vehicles with automatic transmission
XApply the parking brake firmly.XShift the transmission to position P.
Using the SmartKey
XTurn the SmartKey to position 0 in the
ignition lock and remove it.
The immobilizer is activated.
i The SmartKey can only be removed if the
transmission is in position P.
Using KEYLESS-GO
XPress the Start/Stop button (Y page 145).
The engine stops and all the indicator
lamps in the instrument cluster go out.
i When the driver's door is closed, this
corresponds to SmartKey position 1. When
the driver's door is open, it corresponds to
SmartKey position 0 or "SmartKey
removed".
If you attempt to switch off the engine while
the selector lever is in a position other than
P , a message appears in the multifunction
display and you hear a tone.
Parking brake
GWARNING
Engaging the parking brake while the vehicle
is in motion can cause the rear wheels to lock
up. You could lose control of the vehicle and
cause an accident. In addition, the vehicle's
brake lights do not light up when the parking
brake is engaged.
GWARNING
When leaving the vehicle, always remove the
SmartKey from the starter switch, take it with
you, and lock the vehicle. Do not leave
children unattended in the vehicle, or with
access to an unlocked vehicle. Children could
release the parking brake and/or shift the
automatic transmission out of park position
P , either of which could result in an accident
and/or serious personal injury.
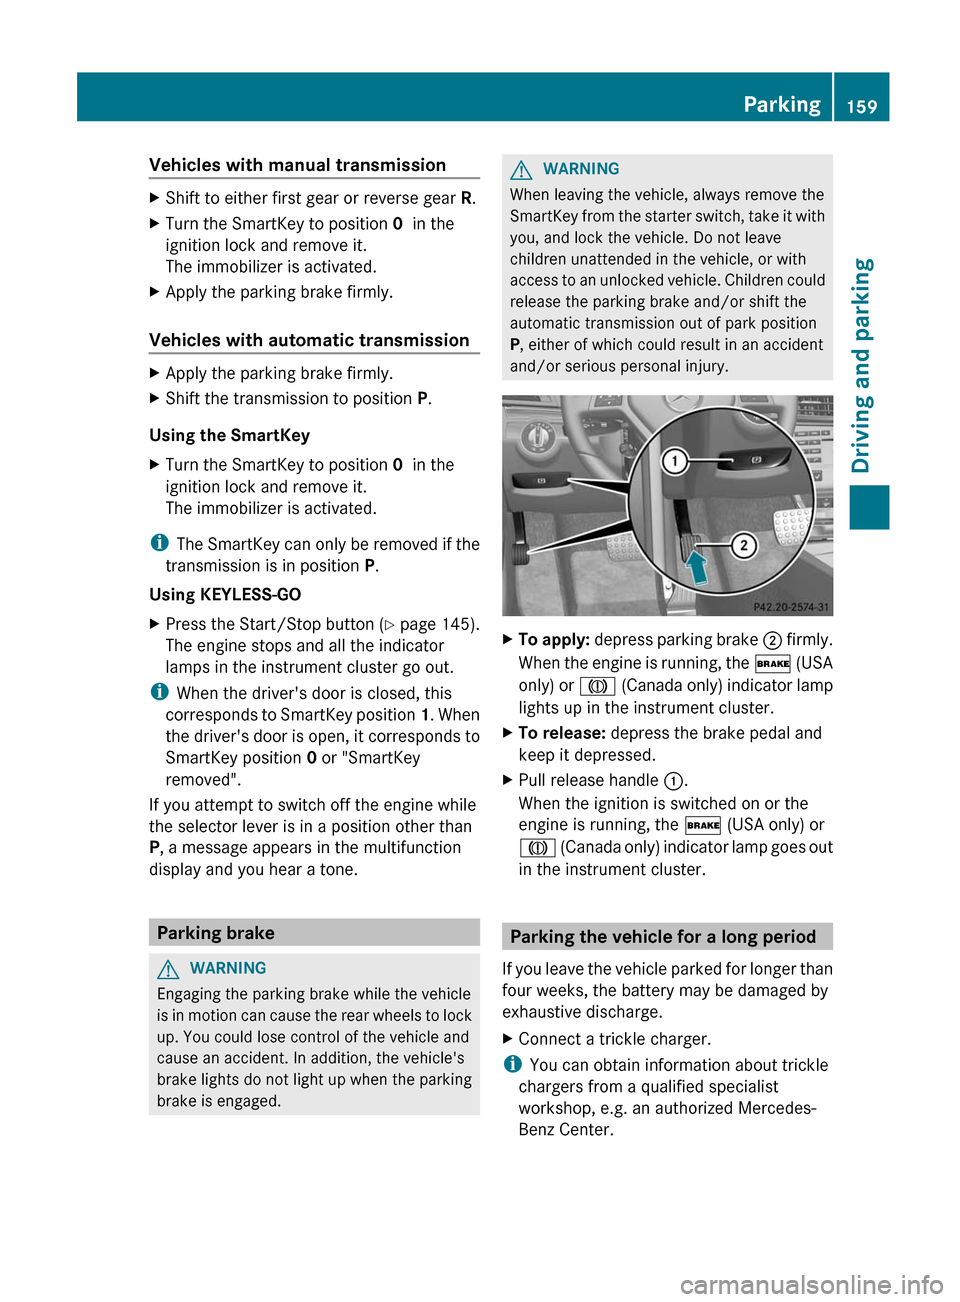
XTo apply: depress parking brake ; firmly.
When the engine is running, the $ (USA
only) or J (Canada only) indicator lamp
lights up in the instrument cluster.XTo release: depress the brake pedal and
keep it depressed.XPull release handle :.
When the ignition is switched on or the
engine is running, the $ (USA only) or
J (Canada only) indicator lamp goes out
in the instrument cluster.
Parking the vehicle for a long period
If you leave the vehicle parked for longer than
four weeks, the battery may be damaged by
exhaustive discharge.
XConnect a trickle charger.
i You can obtain information about trickle
chargers from a qualified specialist
workshop, e.g. an authorized Mercedes-
Benz Center.
Parking159Driving and parkingZ
Page 163 of 352
Rolling with the engine switched offGWARNING
There is no power assistance for the steering
and the brake when the engine is not running.
Steering and braking requires significantly
more effort and you could lose control of the
vehicle and cause an accident as a result.
Do not turn off the engine while the vehicle is
in motion.
Exhaust check
GWARNING
Inhalation of exhaust gas is hazardous to your
health. All exhaust gas contains carbon
monoxide (CO), and inhaling it can cause
unconsciousness and possible death.
Do not run the engine in confined areas (such
as a garage) which are not properly ventilated.
If you think that exhaust gas fumes are
entering the vehicle while driving, have the
cause determined and corrected
immediately. If you must drive under these
conditions, drive only with at least one
window fully open at all times.
Certain engine systems are designed to keep
the level of poisonous components in exhaust
fumes within legal limits.
These systems only work at peak efficiency
when they are maintained exactly in
accordance with the manufacturer's
specifications. For this reason, all work on the
engine must be carried out only by qualified
and authorized Mercedes-Benz technicians.
The engine settings must not be changed in
any circumstances. Furthermore, all specific
service work must be carried out at regular
intervals and in accordance with the
Mercedes-Benz service requirements. Details
can be found in the Service Booklet.
Brakes
Important safety notesGWARNING
On slippery road surfaces, never downshift in
order to obtain braking action. This could
result in drive wheel slip and reduced vehicle
control. Your vehicle's ABS will not prevent
this type of loss of control.
GWARNING
Make sure that you do not endanger other
road users when you apply the brakes.
Downhill gradients
! On long and steep gradients, you must
reduce the load on the brakes by shifting
early to a lower gear. This allows you to take
advantage of the engine braking effect and
helps avoid overheating and excessive
wear of the brakes.
When you take advantage of the engine
braking effect, a drive wheel may not turn
for some time, e.g. on a slippery road
surface. This could cause damage to the
drive train. This type of damage is not
covered by the Mercedes-Benz warranty.
Heavy and light loads
GWARNING
Depressing the brake pedal constantly results
in excessive and premature wear to the brake
pads.
It may also cause the brakes to overheat,
seriously impairing their effectiveness. It may
then not be possible to stop the vehicle in
sufficient time to avoid an accident.
If the brakes have been subjected to a heavy
load, do not stop the vehicle immediately, but
drive on for a short while. This allows the
airflow to cool the brakes more quickly.
Driving tips161Driving and parkingZ
Page 165 of 352
GWARNING
Make sure that you do not endanger other
road users when you apply the brakes.
You can find a description of Brake Assist
(BAS) on ( Y page 62) or of BAS PLUS on
( Y page 62).
Driving on wet roads
Hydroplaning
If water has accumulated to a certain depth
on the road surface, there is a danger of
hydroplaning occurring, even if:
R you drive at low speeds.
R the tires have adequate tread depth.
For this reason, in the event of heavy rain or
in conditions in which hydroplaning can occur
you must drive in the following manner:
R reduce your speed
R avoid ruts
R brake carefully
Driving on flooded roads
! Do not drive through flooded areas.
Check the depth of any water before driving
through it. Drive slowly through standing
water. Otherwise, water may enter the
vehicle interior or the engine compartment.
This can damage the electronic
components in the engine or the automatic
transmission. Water can also be drawn in
by the engine's air suction nozzles and this
can cause engine damage.
Winter driving
General notes
GWARNING
If the vehicle becomes trapped in snow,
ensure that snow is kept away from the
exhaust pipe and from around the vehicle as
long as the engine is running. Otherwise,
poisonous carbon monoxide (CO) may enter
the vehicle, resulting in loss of consciousness
and even death.
To assure sufficient fresh air ventilation, open
a window slightly on the side of the vehicle
not facing the wind.
At the onset of winter, have your vehicle
winterproofed at a qualified specialist
workshop, e.g. at an authorized Mercedes-
Benz Center.
Driving with summer tires
Observe the notes in the "Winter operation"
section ( Y page 310).
Slippery road surfaces
GWARNING
The outside temperature indicator is not
designed to serve as an ice-warning device
and is therefore unsuitable for that purpose.
Indicated temperatures just above the
freezing point do not guarantee that the road
surface is free of ice. The road may still be icy,
especially in wooded areas or on bridges.
GWARNING
On slippery road surfaces, never downshift in
order to obtain braking action. This could
result in drive wheel slip and reduced vehicle
control. Your vehicle's ABS will not prevent
this type of loss of control.
Drive particularly carefully on slippery road
surfaces. Avoid sudden acceleration, steering
and braking maneuvers. Do not use cruise
control or DISTRONIC PLUS.
If the vehicle threatens to skid or cannot be
stopped when moving at low speed:
XShift the transmission to position N.
i
For more information on driving with
snow chains, see ( Y page 311).
Driving tips163Driving and parkingZ
Page 247 of 352
EngineProblemPossible causes/consequences and M Solutions;
The yellow Check
Engine warning lamp
lights up while the
engine is running.There may be a malfunction, for example:
R in the engine management
R in the fuel injection system
R in the exhaust system
R in the ignition system
R in the fuel system
The emission limit values may be exceeded and the engine may
be running in emergency mode.XHave the vehicle checked as soon as possible at a qualified
specialist workshop.
i In some states, you are required by law to immediately visit a
qualified specialist workshop as soon as the yellow Check
Engine warning lamp lights up. If in doubt, check whether such
legal regulations apply in the state/province in which you are
currently driving.
8
The yellow reserve fuel
warning lamp flashes
while the vehicle is in
motion. In addition, the
yellow Check Engine
warning lamp ;
may light up.The fuel system pressure is too low. The fuel filler cap is not closed
correctly or the fuel system is leaking.XObserve the additional display messages in the multifunction
display.XCheck that the fuel filler cap is correctly closed.XIf the fuel filler cap is not correctly closed: close the fuel filler
cap.XIf the fuel filler cap is closed: visit a qualified specialist
workshop.8
The yellow reserve fuel
warning lamp lights up
while the engine is
running.The fuel level has dropped into the reserve range.XRefuel at the nearest gas station.Warning and indicator lamps in the instrument cluster245On-board computer and displaysZ
Page 270 of 352
Do not run the engine while programming the
integrated remote control. Inhalation of
exhaust gas is hazardous to your health. All
exhaust gas contains carbon monoxide (CO),
and inhaling it can cause unconsciousness
and possible death. All exhaust gas contains
carbon monoxide (CO), and inhaling it can
cause unconsciousness and possible death.
i USA only:
This device complies with part 15 of the
FCC Rules. Operation is subject to the
following two conditions:
1. This device may not cause harmful
interference, and
2. this device must accept any interference
received, including interference that may
cause undesired operation.
Any unauthorized modification to this
device could void the user's authority to
operate the equipment.
FCC ID: CB2HMIHL4
i Canada only:
This device complies with RSS-210 of
Industry Canada. Operation is subject to
the following two conditions:
1. This device may not cause interference,
and
2. this device must accept any interference
received, including interference that may
cause undesired operation of the device.
Any unauthorized modification to this
device could void the user's authority to
operate the equipment.
IC: 279B-HMIHL4
Programming the integrated garage
door opener on the rear-view mirror
Programming
GWARNING
Only press the transmitter button on the
integrated garage door opener if there are no
persons or objects present within the sweep
of the garage door. People could otherwise be
injured by the movement of the door.
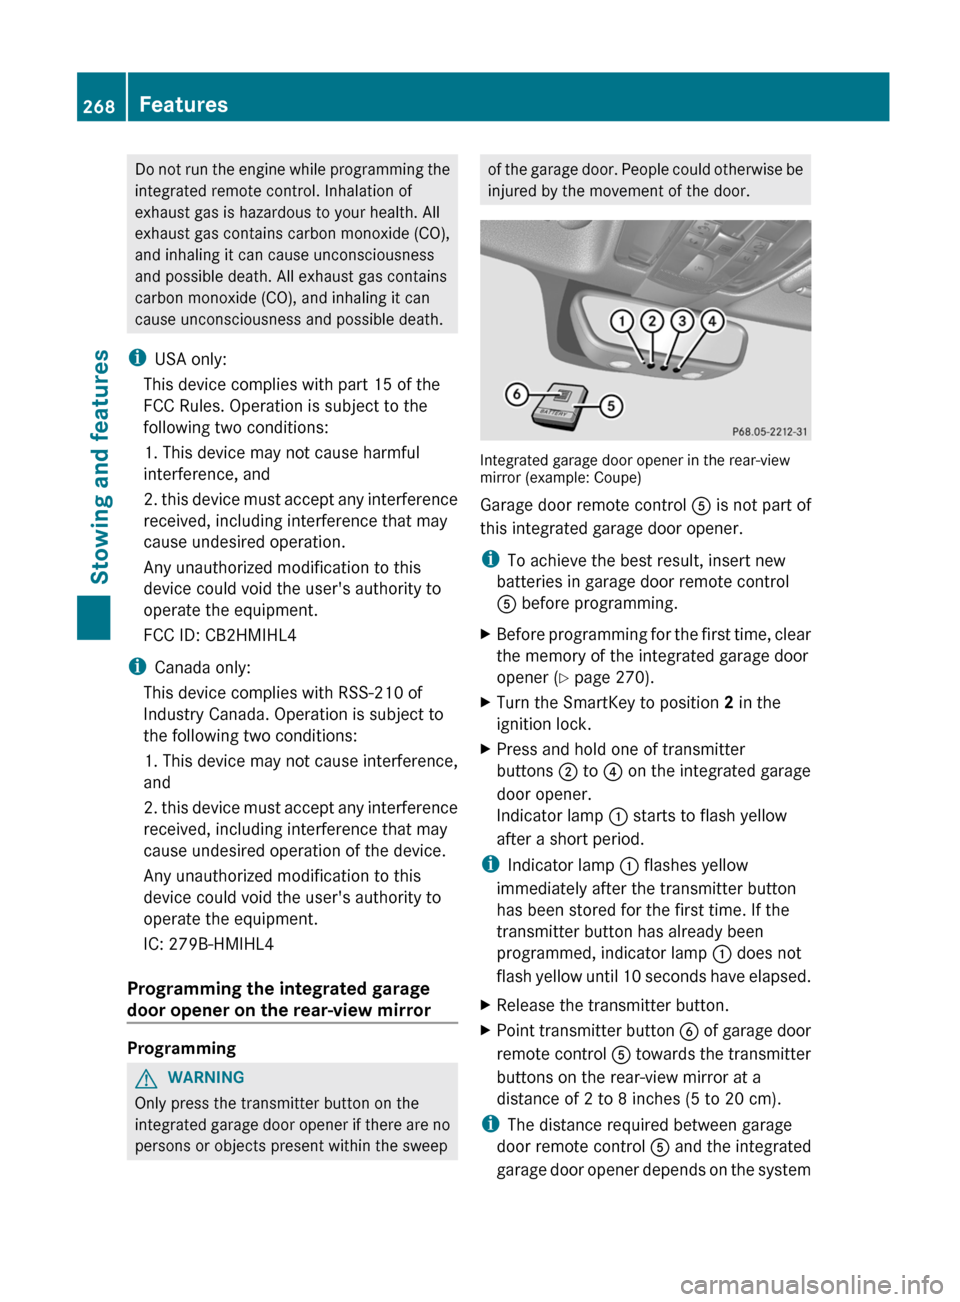
Integrated garage door opener in the rear-view
mirror (example: Coupe)
Garage door remote control A is not part of
this integrated garage door opener.
i To achieve the best result, insert new
batteries in garage door remote control
A before programming.
XBefore programming for the first time, clear
the memory of the integrated garage door
opener ( Y page 270).XTurn the SmartKey to position 2 in the
ignition lock.XPress and hold one of transmitter
buttons ; to ? on the integrated garage
door opener.
Indicator lamp : starts to flash yellow
after a short period.
i Indicator lamp : flashes yellow
immediately after the transmitter button
has been stored for the first time. If the
transmitter button has already been
programmed, indicator lamp : does not
flash yellow until 10 seconds have elapsed.
XRelease the transmitter button.XPoint transmitter button B of garage door
remote control A towards the transmitter
buttons on the rear-view mirror at a
distance of 2 to 8 inches (5 to 20 cm).
i The distance required between garage
door remote control A and the integrated
garage door opener depends on the system
268FeaturesStowing and features
Page 278 of 352
yourself. Do not spill any engine oil on hot
engine parts.HEnvironmental note
When adding oil, take care not to spill any. If
oil enters the soil or waterways, it is harmful
to the environment.
! Use only engine oils and oil filters that
have been approved for vehicles equipped
with a service system. A list of the engine
oils and oil filters tested and approved in
accordance with the Mercedes-Benz
Specifications for Service Products can be
called up by visiting http://
www.mbusa.com (USA only). More
information about tested and approved
engine oils and oil filters is available from
any authorized Mercedes-Benz Center.
Damage to the engine or exhaust system is
caused by the following:
R using engine oils and oil filters which
have not been specifically approved for
the service system.
R replacing the engine oil or oil filter after
the replacement interval required by the
service system has elapsed
R using engine oil additives.
! Do not add too much oil. If the oil level is
above the "max" mark on the dipstick, too
much oil has been added. This can lead to
damage to the engine or the catalytic
converter. Have excess oil siphoned off.
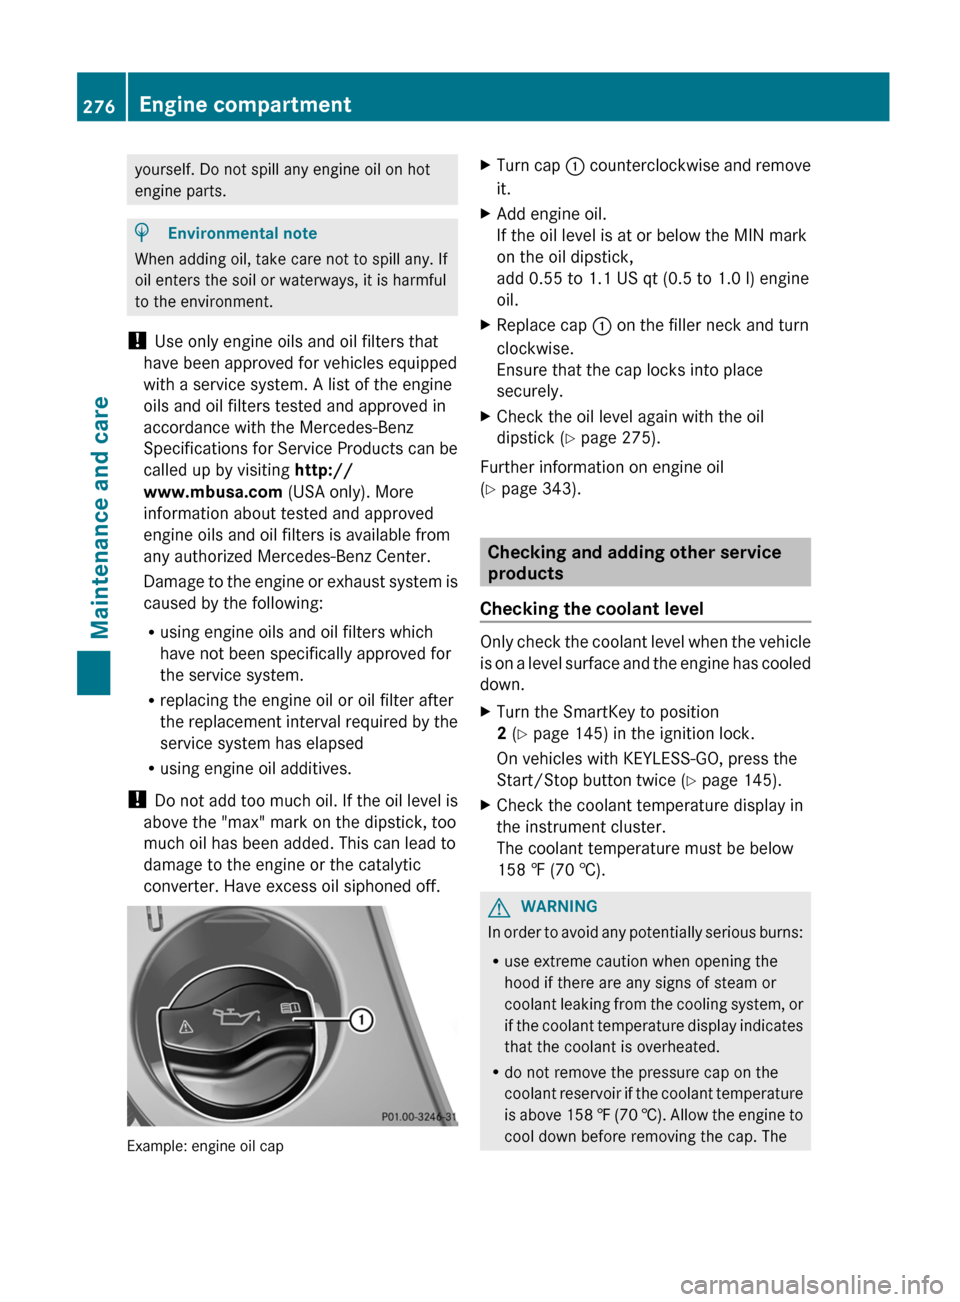
Example: engine oil cap
XTurn cap : counterclockwise and remove
it.XAdd engine oil.
If the oil level is at or below the MIN mark
on the oil dipstick,
add 0.55 to 1.1 US qt (0.5 to 1.0 l) engine
oil.XReplace cap : on the filler neck and turn
clockwise.
Ensure that the cap locks into place
securely.XCheck the oil level again with the oil
dipstick ( Y page 275).
Further information on engine oil
( Y page 343).
Checking and adding other service
products
Checking the coolant level
Only check the coolant level when the vehicle
is on a level surface and the engine has cooled
down.
XTurn the SmartKey to position
2 (Y page 145) in the ignition lock.
On vehicles with KEYLESS-GO, press the
Start/Stop button twice ( Y page 145).XCheck the coolant temperature display in
the instrument cluster.
The coolant temperature must be below
158 ‡ (70 †).GWARNING
In order to avoid any potentially serious burns:
R use extreme caution when opening the
hood if there are any signs of steam or
coolant leaking from the cooling system, or
if the coolant temperature display indicates
that the coolant is overheated.
R do not remove the pressure cap on the
coolant reservoir if the coolant temperature
is above 158 ‡ (70 †). Allow the engine to
cool down before removing the cap. The
276Engine compartmentMaintenance and care