fluid MERCEDES-BENZ E-Class COUPE 2012 C207 Owner's Manual
[x] Cancel search | Manufacturer: MERCEDES-BENZ, Model Year: 2012, Model line: E-Class COUPE, Model: MERCEDES-BENZ E-Class COUPE 2012 C207Pages: 352, PDF Size: 14.48 MB
Page 7 of 352
Audio systemsee separate operating instructions
Authorized Mercedes-Benz Center
see Qualified specialist workshop
AUTO lights
Display message ............................ 225
see Lights
Automatic headlamp mode .............. 118
Automatic transmission Automatic drive program ...............152
Changing gear ............................... 151
Display message ............................ 236
Driving tips .................................... 151
Emergency running mode ..............155
Kickdown ....................................... 151
Manual drive program ....................154
Problem (malfunction) ...................155
Program selector button ................151
Pulling away ................................... 147
Releasing the parking lock
manually ........................................ 155
Selector lever ................................ 149
Shift ranges ................................... 153
Starting the engine ........................146
Steering wheel paddle shifters ......152
Transmission position display ........150
Transmission positions ..................150
Automatic transmission
emergency mode ............................... 155
B
Back support see Lumbar support
Bag hook ............................................ 255
BAS (Brake Assist System) ................. 62
Basic settings see Settings
BAS PLUS (Brake Assist System
PLUS) .................................................... 62
Battery (SmartKey) Checking .......................................... 74
Important safety notes ....................74
Replacing ......................................... 74
Battery (vehicle)
Charging ........................................ 298
Display message ............................ 227
Important safety notes ..................296
Jump starting ................................. 299
Belt
see Seat belts
Blind Spot Assist
Activating/deactivating .................207
Notes/function .............................. 186
see Active Blind Spot Assist
Brake Assist System
see BAS (Brake Assist System)
Brake fluid
Display message ............................ 216
Notes ............................................. 344
Brake fluid level ................................ 278
Brake lamps Display message ............................ 223
Brakes
ABS .................................................. 61
BAS .................................................. 62
BAS PLUS ........................................ 62
Brake fluid (notes) .........................344
Display message ............................ 214
Driving tips .................................... 161
Important safety notes ..................161
Maintenance .................................. 162
Parking brake ................................ 159
Warning lamp ................................. 241
Breakdown
see Flat tire
see Towing away/tow-starting
Bulbs
see Changing bulbs
C
California Important notice for retail
customers and lessees ....................21
Calling up a malfunction
see Display messages
Capacities
see Technical data
Car
see Vehicle
Care
AIRCAP .......................................... 283
Carpets .......................................... 287
Car wash ........................................ 280
Index5
Page 12 of 352
Fuel gauge ....................................... 27
Important safety notes ..................342
Premium-grade unleaded gasoline . 342
Problem (malfunction) ...................158
Refueling ........................................ 155
Specifications ................................ 343
Tank content/reserve fuel .............342
Fuel filler flap, opening/closing ....... 156
Fuel level Calling up the range (on-board
computer) ...................................... 201
Fuel tank
Capacity ........................................ 342
Problem (malfunction) ...................158
Fuse allocation chart (vehicle tool
kit) ...................................................... 290
Fuses Allocation chart ............................. 303
Before changing ............................. 303
Dashboard fuse box .......................303
Fuse box in the engine
compartment ................................. 304
Fuse box in the trunk .....................304
Important safety notes ..................303
G
Garage door opener Clearing the memory .....................270
Notes ............................................. 267
Opening/closing the garage door ..270
Programming (button in the rear-
view mirror) ................................... 268
Gasoline ............................................. 156
Gear or selector lever (cleaning
guidelines) ......................................... 286
Genuine Mercedes-Benz parts ......... 338
Glove box ........................................... 252
H
Handbrake see Parking brake
Hazard warning lamps ...................... 119
Head bags ............................................ 41
Head bags ........................................ 41
Headlamp cleaning system
Notes ............................................. 346
Headlamps
Adding fluid to cleaning system .....277
Cleaning system (function) ............119
Fogging up ..................................... 121
see Automatic headlamp mode
Head level heating (AIRSCARF) ........ 108
Head restraint Lowering manually (rear) ...............105
Head restraints
Adjusting ....................................... 105
Adjusting (electrically) ...................105
Adjusting (rear) .............................. 105
see NECK-PRO head restraints
Heating
see Climate control
High-beam headlamps
Changing bulbs .............................. 124
Display message ............................ 223
Switching Adaptive Highbeam
Assist on/off ................................. 120
Switching on/off ........................... 119
Hill start assist .................................. 147
HOLD function Display message ............................ 228
Function/notes ............................. 176
Hood
Closing ........................................... 275
Display message ............................ 237
Opening ......................................... 274
Hydroplaning ..................................... 163
I
Ignition lock see Key positions
Immobilizer .......................................... 67
Indicator lamps see Warning and indicator lamps
Indicators
see Turn signals
Instrument cluster
Overview .......................................... 27
Settings ......................................... 208
Warning and indicator lamps ...........28
Instrument cluster lighting ................ 27
Instrument lighting see Instrument cluster lighting
10Index
Page 17 of 352
S
Safety Children in the vehicle .....................55
Child restraint systems ....................55
Occupant Classification System
(OCS) ............................................... 43
Overview of occupant safety
systems ........................................... 36
Safety systems
see Driving safety systems
Seat belts
Adjusting the driver's and front-
passenger seat belt .........................53
Automatic comfort-fit feature ..........55
Belt force limiters ............................ 54
Cleaning ......................................... 286
Correct usage .................................. 51
Emergency Tensioning Devices ........ 54
Fastening ......................................... 52
Important safety guidelines .............50
Releasing ......................................... 53
Safety guidelines ............................. 37
Special seat belt retractor ...............57
Switching belt adjustment on/off
(on-board computer) ......................211
Warning lamp ................................. 240
Warning lamp (function) ................... 53
Seats
Adjusting (electrically) ...................104
Adjusting the 4-way lumbar
support .......................................... 107
Adjusting the head restraint ..........105
Cleaning the cover .........................286
Correct driver's seat position ........102
Folding the backrests forward/
back ............................................... 106
Important safety notes ..................103
Multicontour seat .......................... 107
Seat backrest display message .....237
Seat heating problem ....................108
Seat ventilation problem ................108
Storing settings (memory
function) ........................................ 113
Switching AIRSCARF on/off ..........108
Switching seat heating on/off .......107
Switching seat ventilation on/off ..108
Sensors (cleaning instructions) ....... 284Service
see ASSYST PLUS service interval
display
Service interval display
Displaying service messages .........279
Hiding service messages ...............279
Notes ............................................. 279
Service messages ..........................278
Service menu (on-board computer) . 208
Service products Brake fluid ..................................... 344
Capacities ...................................... 342
Coolant (engine) ............................ 345
Engine oil ....................................... 343
Fuel ................................................ 342
Important safety notes ..................340
Refrigerant (air-conditioning
system) .......................................... 344
Washer fluid ................................... 346
Settings
Factory (on-board computer) .........212
On-board computer .......................208
Setting the air distribution ............... 136
Setting the airflow ............................ 137
Side impact air bag ............................. 41
Side marker lamp (display
message) ............................................ 224
Side windows Convenience closing feature ............85
Convenience opening feature ..........84
Important safety information ...........83
Opening/closing .............................. 83
Opening/closing all (Cabriolet) ........84
Problem (malfunction) .....................86
Resetting ......................................... 86
Sliding sunroof
see Panorama roof with power
tilt/sliding panel
SmartKey
Changing the battery .......................74
Changing the programming .............73
Checking the battery .......................74
Convenience closing feature ............85
Convenience opening feature ..........84
Display message ............................ 238
Door central locking/unlocking .......70
Important safety notes ....................70
Loss ................................................. 76Index15
Page 21 of 352
Towing away .................................. 301
Transporting .................................. 302
Unlocking (in an emergency) ...........79
Unlocking (SmartKey) ......................71
Vehicle data ................................... 346
Vehicle battery
see Battery (vehicle)
Vehicle data ....................................... 346
see Technical data
Vehicle dimensions ........................... 346
Vehicle emergency locking ................ 79
Vehicle identification number see VIN
Vehicle identification plate .............. 339
Vehicle tool kit .................................. 290
VIN ...................................................... 339
W
Warning and indicator lamps ABS ................................................ 242
Brakes ........................................... 241
Check Engine ................................. 245
Coolant .......................................... 246
Cruise control ................................ 164
Distance warning ........................... 248
DISTRONIC PLUS ........................... 248
ESP ®
.............................................. 242
ESP ®
OFF ....................................... 243
Fuel tank ........................................ 245
LIM (DISTRONIC PLUS) ..................168
Overview .......................................... 28
PASSENGER AIRBAG OFF
indicator lamp .................................. 43
Reserve fuel ................................... 245
Seat belt ........................................ 240
SRS ................................................ 244
Tire pressure monitor ....................249
Warranty ............................................ 339
Washer fluid Display message ............................ 238
see Windshield washer system
Wheel bolt tightening torque ........... 295
Wheel chock ...................................... 292
Wheels Changing a wheel .......................... 291
Checking ........................................ 309
Cleaning ......................................... 281
Important safety notes ..................308
Interchanging/changing ................332
Mounting a wheel .......................... 294
Removing a wheel ..........................294
Storing ........................................... 333
Tightening torque ........................... 295
Wheel size/tire size .......................333
Wind deflector
see AIRCAP
Wind deflector (cleaning
instructions) ...................................... 283
Window curtain air bag Display message ............................ 218
Operation ......................................... 43
Windows
Cleaning ......................................... 284
see Side windows
Wind screen (cleaning
instructions) ...................................... 283
Windshield Defrosting ...................................... 137
Windshield washer system .............. 277
Notes ............................................. 346
Windshield wipers
Problem (malfunction) ...................127
Replacing the wiper blades ............126
Switching on/off ........................... 125
Winter driving
Important safety notes ..................310
Slippery road surfaces ...................163
Snow chains .................................. 311
Winter tires
M+S tires ....................................... 310
Wiper blades
Cleaning ......................................... 284
Important safety notes ..................126
Wooden trim (cleaning
instructions) ...................................... 286Index19
Page 121 of 352
restart it, the previous rear fog lamp
settings are restored.
Headlamp cleaning system
The headlamps are cleaned automatically if
the "Wipe with washer fluid" function is
operated ten times while the lights are on and
the engine is running ( Y page 125).
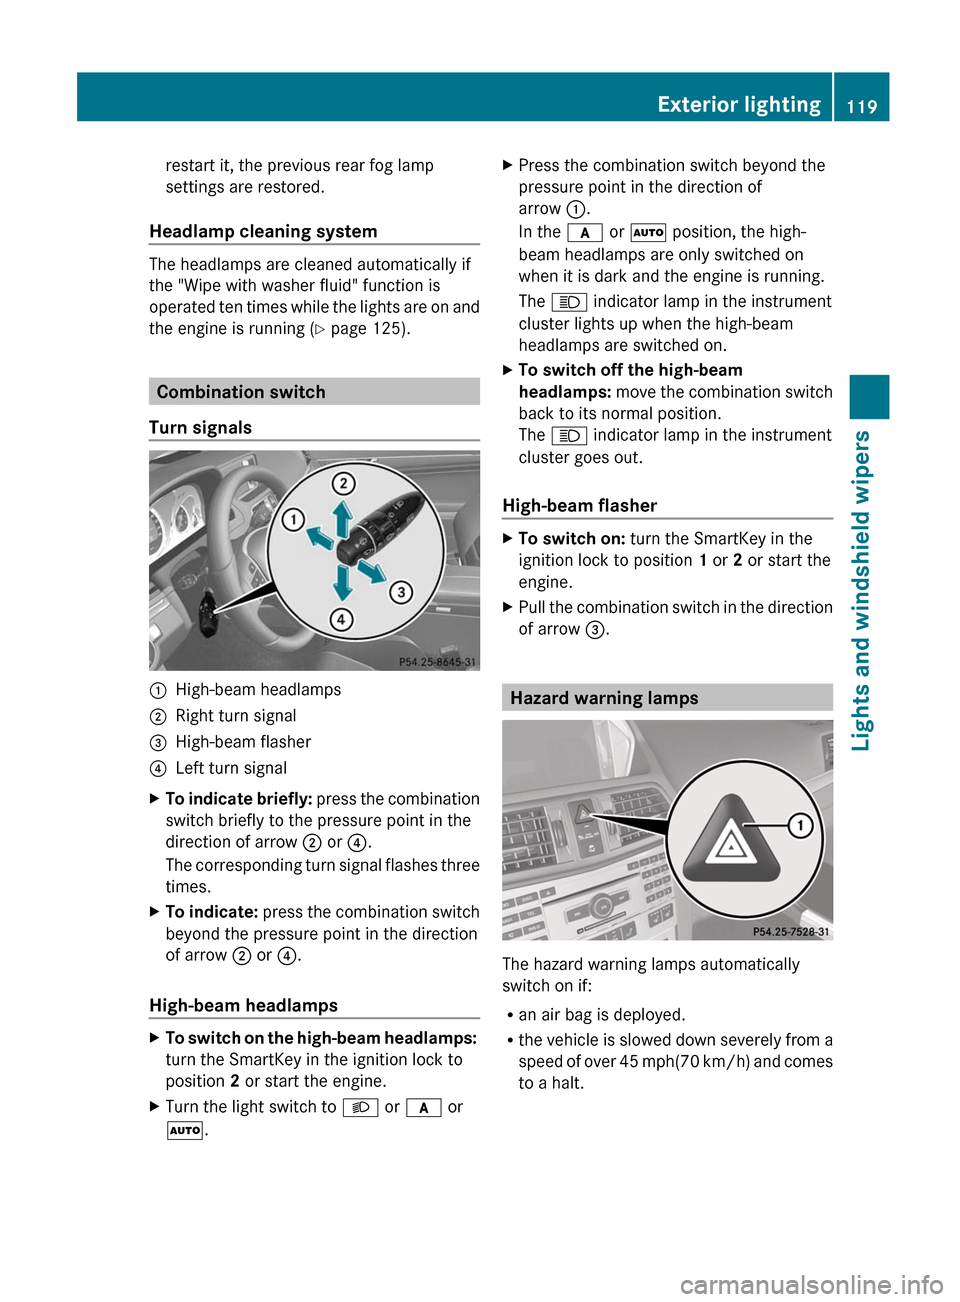
Combination switch
Turn signals
:High-beam headlamps;Right turn signal=High-beam flasher?Left turn signalXTo indicate briefly: press the combination
switch briefly to the pressure point in the
direction of arrow ; or ?.
The corresponding turn signal flashes three
times.XTo indicate: press the combination switch
beyond the pressure point in the direction
of arrow ; or ?.
High-beam headlamps
XTo switch on the high-beam headlamps:
turn the SmartKey in the ignition lock to
position 2 or start the engine.XTurn the light switch to L or c or
à .XPress the combination switch beyond the
pressure point in the direction of
arrow :.
In the c or à position, the high-
beam headlamps are only switched on
when it is dark and the engine is running.
The K indicator lamp in the instrument
cluster lights up when the high-beam
headlamps are switched on.XTo switch off the high-beam
headlamps: move the combination switch
back to its normal position.
The K indicator lamp in the instrument
cluster goes out.
High-beam flasher
XTo switch on: turn the SmartKey in the
ignition lock to position 1 or 2 or start the
engine.XPull the combination switch in the direction
of arrow =.
Hazard warning lamps
The hazard warning lamps automatically
switch on if:
R an air bag is deployed.
R the vehicle is slowed down severely from a
speed of over 45 mph (70 km/h) and comes
to a halt.
Exterior lighting119Lights and windshield wipersZ
Page 127 of 352
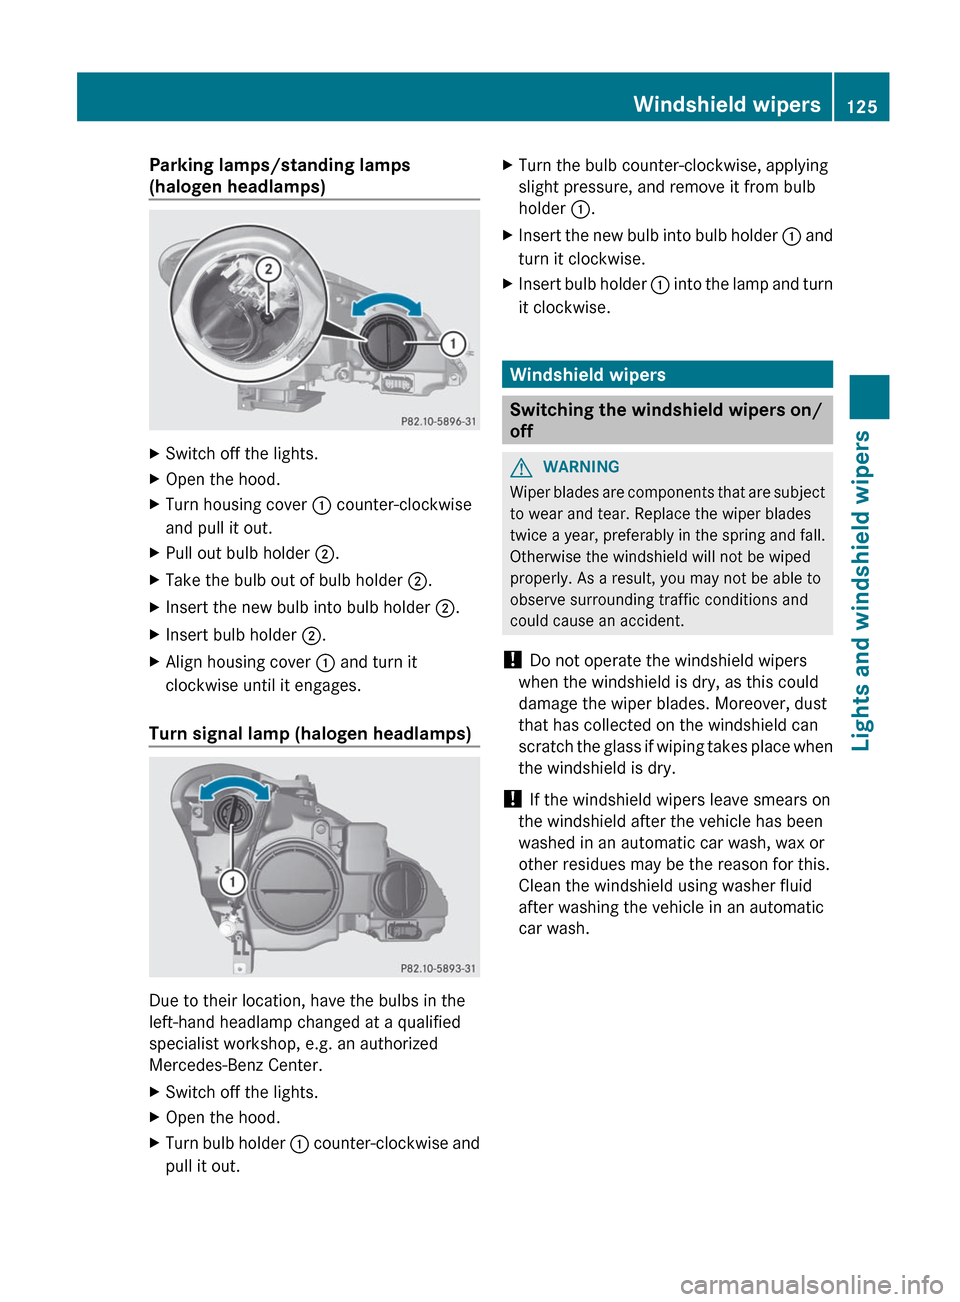
Parking lamps/standing lamps
(halogen headlamps)XSwitch off the lights.XOpen the hood.XTurn housing cover : counter-clockwise
and pull it out.XPull out bulb holder ;.XTake the bulb out of bulb holder ;.XInsert the new bulb into bulb holder ;.XInsert bulb holder ;.XAlign housing cover : and turn it
clockwise until it engages.
Turn signal lamp (halogen headlamps)
Due to their location, have the bulbs in the
left-hand headlamp changed at a qualified
specialist workshop, e.g. an authorized
Mercedes-Benz Center.
XSwitch off the lights.XOpen the hood.XTurn bulb holder : counter-clockwise and
pull it out.XTurn the bulb counter-clockwise, applying
slight pressure, and remove it from bulb
holder :.XInsert the new bulb into bulb holder : and
turn it clockwise.XInsert bulb holder : into the lamp and turn
it clockwise.
Windshield wipers
Switching the windshield wipers on/
off
GWARNING
Wiper blades are components that are subject
to wear and tear. Replace the wiper blades
twice a year, preferably in the spring and fall.
Otherwise the windshield will not be wiped
properly. As a result, you may not be able to
observe surrounding traffic conditions and
could cause an accident.
! Do not operate the windshield wipers
when the windshield is dry, as this could
damage the wiper blades. Moreover, dust
that has collected on the windshield can
scratch the glass if wiping takes place when
the windshield is dry.
! If the windshield wipers leave smears on
the windshield after the vehicle has been
washed in an automatic car wash, wax or
other residues may be the reason for this.
Clean the windshield using washer fluid
after washing the vehicle in an automatic
car wash.
Windshield wipers125Lights and windshield wipersZ
Page 128 of 352
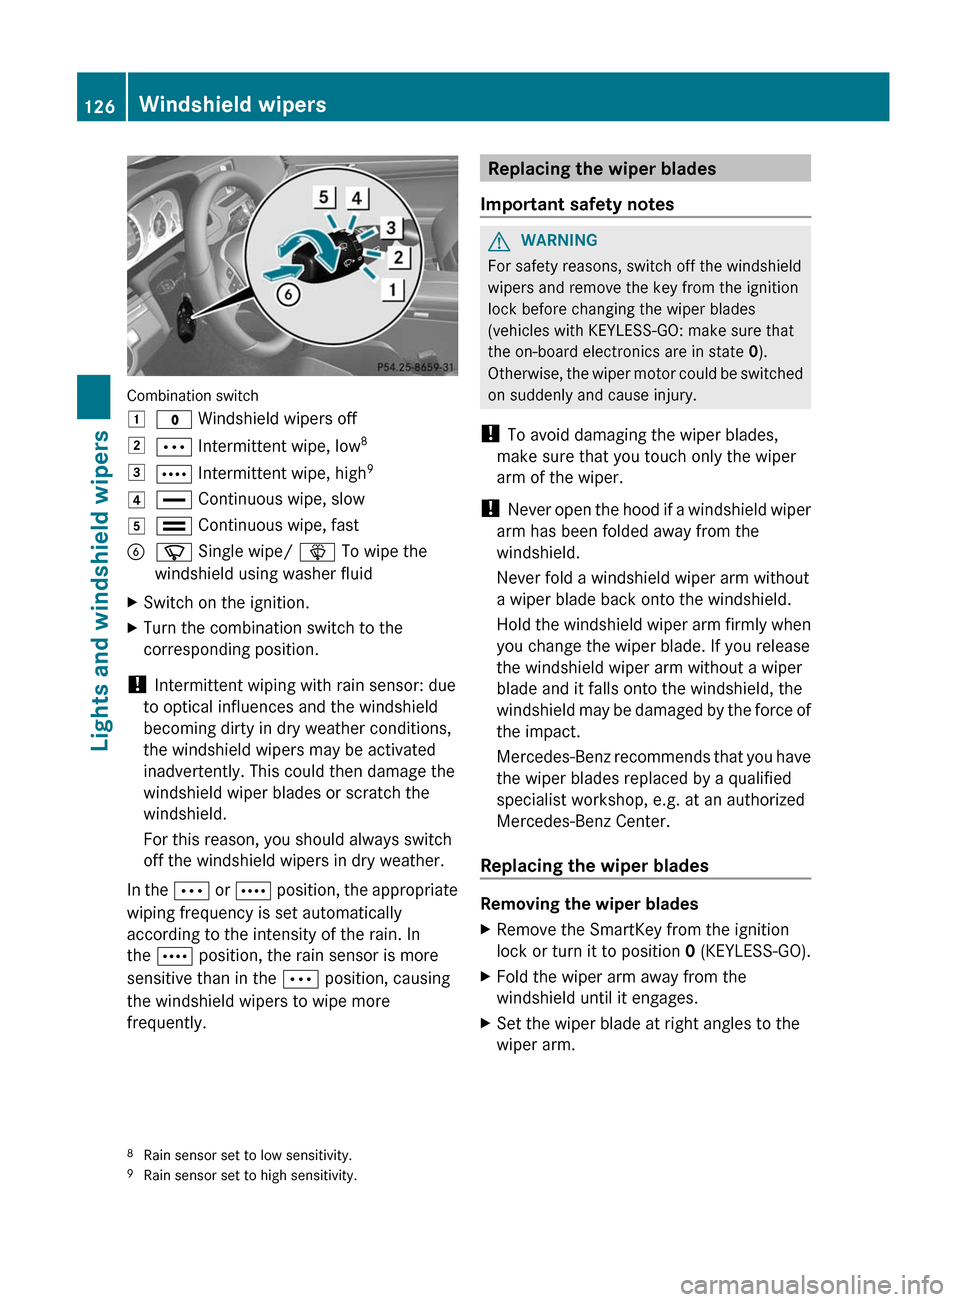
Combination switch
1$ Windshield wipers off2Ä Intermittent wipe, low 83Å
Intermittent wipe, high 94°
Continuous wipe, slow5¯ Continuous wipe, fastBí Single wipe/ î To wipe the
windshield using washer fluidXSwitch on the ignition.XTurn the combination switch to the
corresponding position.
! Intermittent wiping with rain sensor: due
to optical influences and the windshield
becoming dirty in dry weather conditions,
the windshield wipers may be activated
inadvertently. This could then damage the
windshield wiper blades or scratch the
windshield.
For this reason, you should always switch
off the windshield wipers in dry weather.
In the Ä or Å position, the appropriate
wiping frequency is set automatically
according to the intensity of the rain. In
the Å position, the rain sensor is more
sensitive than in the Ä position, causing
the windshield wipers to wipe more
frequently.
Replacing the wiper blades
Important safety notesGWARNING
For safety reasons, switch off the windshield
wipers and remove the key from the ignition
lock before changing the wiper blades
(vehicles with KEYLESS-GO: make sure that
the on-board electronics are in state 0).
Otherwise, the wiper motor could be switched
on suddenly and cause injury.
! To avoid damaging the wiper blades,
make sure that you touch only the wiper
arm of the wiper.
! Never open the hood if a windshield wiper
arm has been folded away from the
windshield.
Never fold a windshield wiper arm without
a wiper blade back onto the windshield.
Hold the windshield wiper arm firmly when
you change the wiper blade. If you release
the windshield wiper arm without a wiper
blade and it falls onto the windshield, the
windshield may be damaged by the force of
the impact.
Mercedes-Benz recommends that you have
the wiper blades replaced by a qualified
specialist workshop, e.g. at an authorized
Mercedes-Benz Center.
Replacing the wiper blades
Removing the wiper blades
XRemove the SmartKey from the ignition
lock or turn it to position 0 (KEYLESS-GO).XFold the wiper arm away from the
windshield until it engages.XSet the wiper blade at right angles to the
wiper arm.8 Rain sensor set to low sensitivity.
9 Rain sensor set to high sensitivity.126Windshield wipersLights and windshield wipers
Page 129 of 352
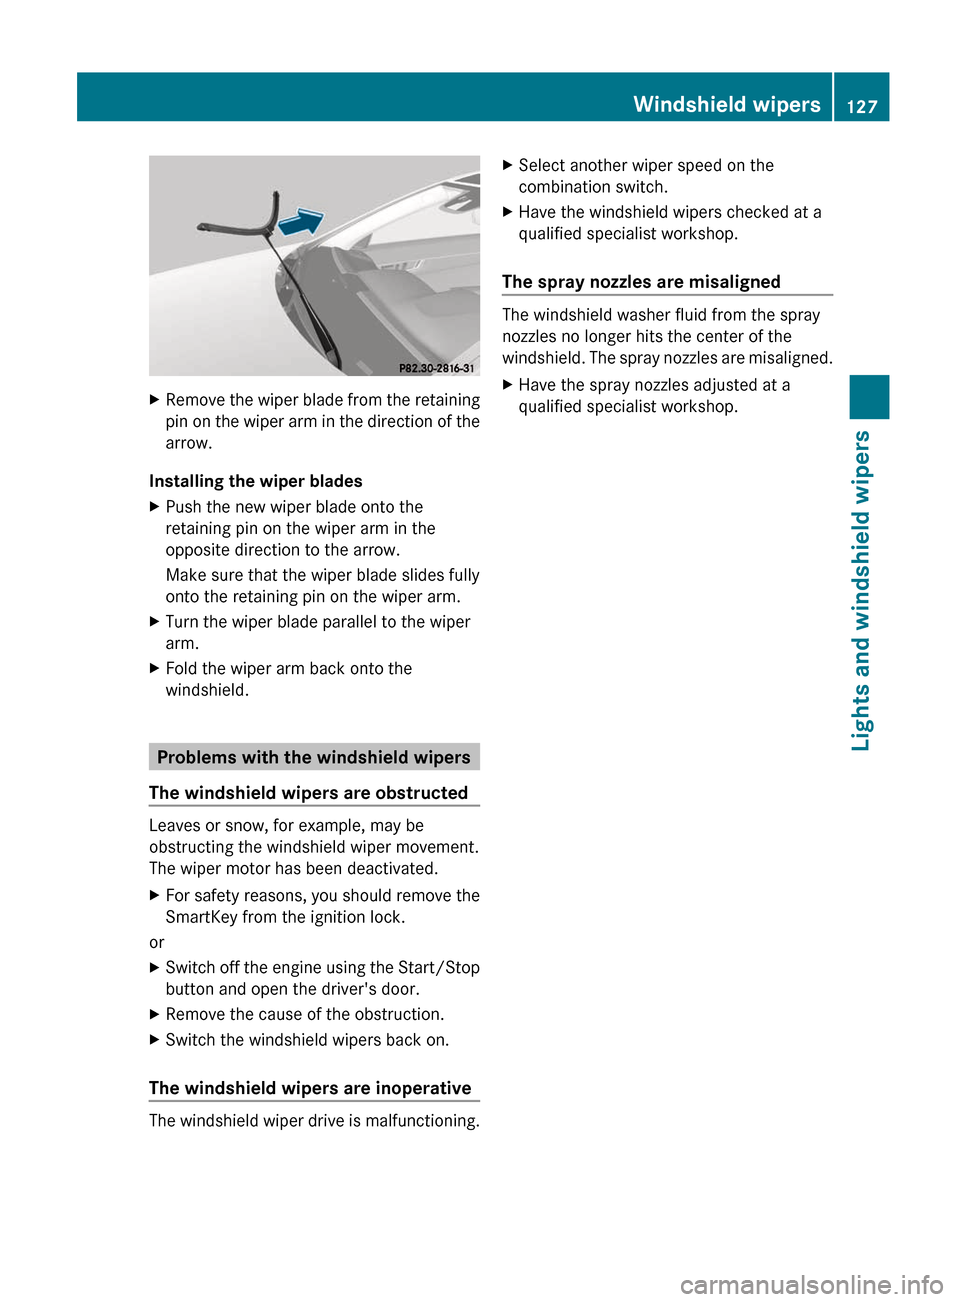
XRemove the wiper blade from the retaining
pin on the wiper arm in the direction of the
arrow.
Installing the wiper blades
XPush the new wiper blade onto the
retaining pin on the wiper arm in the
opposite direction to the arrow.
Make sure that the wiper blade slides fully
onto the retaining pin on the wiper arm.XTurn the wiper blade parallel to the wiper
arm.XFold the wiper arm back onto the
windshield.
Problems with the windshield wipers
The windshield wipers are obstructed
Leaves or snow, for example, may be
obstructing the windshield wiper movement.
The wiper motor has been deactivated.
XFor safety reasons, you should remove the
SmartKey from the ignition lock.
or
XSwitch off the engine using the Start/Stop
button and open the driver's door.XRemove the cause of the obstruction.XSwitch the windshield wipers back on.
The windshield wipers are inoperative
The windshield wiper drive is malfunctioning.
XSelect another wiper speed on the
combination switch.XHave the windshield wipers checked at a
qualified specialist workshop.
The spray nozzles are misaligned
The windshield washer fluid from the spray
nozzles no longer hits the center of the
windshield. The spray nozzles are misaligned.
XHave the spray nozzles adjusted at a
qualified specialist workshop.Windshield wipers127Lights and windshield wipersZ
Page 164 of 352
Wet roadsGWARNING
After driving in heavy rain for some time
without applying the brakes or through water
deep enough to wet brake components, the
first braking action may be somewhat
reduced. You have to depress the brake pedal
more firmly. Maintain a safe distance from
vehicles in front.
After driving on a wet road or having the
vehicle washed, brake firmly while paying
attention to the traffic conditions. This will
warm up the brake discs, thereby drying them
more quickly and protecting them against
corrosion.
Limited braking performance on salt-
treated roads
GWARNING
The layer of salt on the brake discs and the
brake pads/linings may cause a delay in the
braking effect, resulting in a significantly
longer braking distance, which could lead to
an accident.
To avoid this danger, you should:
R occasionally brake carefully, without
putting other road users at risk, when you
are driving on salted roads. This helps to
remove any salt that may have started to
build up on the brake discs and the brake
pads/linings.
R maintain a greater distance to the vehicle
ahead and drive with particular care.
R carefully apply the brakes at the end of a
trip and immediately after commencing a
new trip, so that salt residues are removed
from the brake discs.
Servicing the brakes
! If the red brake warning lamp lights up in
the instrument cluster and you hear a
warning tone while the engine is running,
the brake fluid level may be too low.
Observe additional warning messages in
the multifunction display.
The brake fluid level may be too low due to
brake pad wear or leaking brake lines.
Have the brake system checked
immediately. This work should be carried
out at an authorized Mercedes-Benz
Center.
All checks and maintenance work on the
brake system must be carried out at a
qualified specialist workshop. This work
should be carried out at an authorized
Mercedes-Benz Center.
Have the brake pads replaced and the brake
fluid renewed at a qualified specialist
workshop, e.g. an authorized Mercedes-Benz
Center.GWARNING
If brake pads or brake fluid other than those
recommended are used, the braking
properties of the vehicle can be degraded to
an extent that safe braking is substantially
impaired. This could result in an accident.
! As the ESP ®
system operates
automatically, the engine and the ignition
system must be switched off (SmartKey in
position 0 or 1 in the ignition lock or Start/
Stop button in position 0 or 1) when:
R testing the parking brake on a brake
dynamometer.
R you intend to have the vehicle towed with
one of the axles raised.
Braking maneuvers triggered automatically
by ESP ®
may seriously damage the brake
system.
If your brake system is subject only to
moderate loads, you should test the
functionality of your brakes at regular
intervals by pressing firmly on the brake pedal
at high speeds. This improves the grip of the
brake pads.
162Driving tipsDriving and parking
Page 198 of 352
Useful information
i This Operator's Manual describes all
models and all standard and optional
equipment of your vehicle available at the
time of publication of the Operator's
Manual. Country-specific differences are
possible. Please note that your vehicle may
not be equipped with all features
described. This also applies to safety-
related systems and functions.
i Please read the information on qualified
specialist workshops ( Y page 23).
Important safety notes
You will find an illustration of the instrument
cluster in the "At a glance" section
( Y page 27).
GWARNING
A driver's attention to the road and traffic
conditions must always be his/her primary
focus when driving.
For your safety and the safety of others,
selecting features through the multifunction
steering wheel should only be done by the
driver when traffic and road conditions permit
it to be done safely.
Bear in mind that at a speed of just 30 mph
(approximately 50 km/h ), your vehicle is
covering a distance of 44 feet (approximately
14 m) every second.
GWARNING
No messages will be displayed if either the
instrument cluster or the multifunction
display is inoperative.
As a result, you will not be able to see
information about your driving conditions,
such as
R speed
R outside temperature
R warning/indicator lamps
Rmalfunction/warning messages
R failure of any systems
Driving characteristics may be impaired.
If you must continue to drive, do so with added
caution. Contact an authorized Mercedes-
Benz Center as soon as possible.GWARNING
Malfunction and warning messages are only
indicated for certain systems and are
intentionally not very detailed. The
malfunction and warning messages are
simply a reminder with respect to the
operation of certain systems. They do not
replace the owner's and/or driver's
responsibility to maintain the vehicle's
operating safety. Have all required
maintenance and safety checks performed on
the vehicle. Bring the vehicle to an authorized
Mercedes-Benz Center to address the
malfunction and warning messages.
Displays and operation
Coolant temperature display
GWARNING
Driving when your engine is overheated can
cause some fluids which may have leaked into
the engine compartment to catch fire. You
could be seriously burned.
Steam from an overheated engine can cause
serious burns which can occur just by opening
the engine hood. Stay away from the engine
if you see or hear steam coming from it.
Stop the vehicle in a safe location away from
other traffic. Turn off the engine, get out of the
vehicle and do not stand near the vehicle until
the engine has cooled down.
The coolant temperature gauge is in the
instrument cluster on the right-hand side.
Under normal operating conditions and with
the specified coolant level, the coolant
temperature may rise to 248 ‡ (120 †).
196Displays and operationOn-board computer and displays