transmission MERCEDES-BENZ E-Class COUPE 2012 C207 Owner's Manual
[x] Cancel search | Manufacturer: MERCEDES-BENZ, Model Year: 2012, Model line: E-Class COUPE, Model: MERCEDES-BENZ E-Class COUPE 2012 C207Pages: 352, PDF Size: 14.48 MB
Page 7 of 352
Audio systemsee separate operating instructions
Authorized Mercedes-Benz Center
see Qualified specialist workshop
AUTO lights
Display message ............................ 225
see Lights
Automatic headlamp mode .............. 118
Automatic transmission Automatic drive program ...............152
Changing gear ............................... 151
Display message ............................ 236
Driving tips .................................... 151
Emergency running mode ..............155
Kickdown ....................................... 151
Manual drive program ....................154
Problem (malfunction) ...................155
Program selector button ................151
Pulling away ................................... 147
Releasing the parking lock
manually ........................................ 155
Selector lever ................................ 149
Shift ranges ................................... 153
Starting the engine ........................146
Steering wheel paddle shifters ......152
Transmission position display ........150
Transmission positions ..................150
Automatic transmission
emergency mode ............................... 155
B
Back support see Lumbar support
Bag hook ............................................ 255
BAS (Brake Assist System) ................. 62
Basic settings see Settings
BAS PLUS (Brake Assist System
PLUS) .................................................... 62
Battery (SmartKey) Checking .......................................... 74
Important safety notes ....................74
Replacing ......................................... 74
Battery (vehicle)
Charging ........................................ 298
Display message ............................ 227
Important safety notes ..................296
Jump starting ................................. 299
Belt
see Seat belts
Blind Spot Assist
Activating/deactivating .................207
Notes/function .............................. 186
see Active Blind Spot Assist
Brake Assist System
see BAS (Brake Assist System)
Brake fluid
Display message ............................ 216
Notes ............................................. 344
Brake fluid level ................................ 278
Brake lamps Display message ............................ 223
Brakes
ABS .................................................. 61
BAS .................................................. 62
BAS PLUS ........................................ 62
Brake fluid (notes) .........................344
Display message ............................ 214
Driving tips .................................... 161
Important safety notes ..................161
Maintenance .................................. 162
Parking brake ................................ 159
Warning lamp ................................. 241
Breakdown
see Flat tire
see Towing away/tow-starting
Bulbs
see Changing bulbs
C
California Important notice for retail
customers and lessees ....................21
Calling up a malfunction
see Display messages
Capacities
see Technical data
Car
see Vehicle
Care
AIRCAP .......................................... 283
Carpets .......................................... 287
Car wash ........................................ 280
Index5
Page 10 of 352
Display message ............................ 237
Emergency locking ........................... 79
Emergency unlocking .......................79
Important safety notes ....................77
Opening (from inside) ......................78
Draft stop ............................................. 93
Drinking and driving ......................... 160
Drinks holder see Cup holder
Drive program
Automatic ...................................... 152
Display ........................................... 150
Manual ........................................... 154
Driver's door
see Doors
Driver's seat
see Seats
Driving abroad
Mercedes-Benz Service .................279
Symmetrical low beam ..................116
Driving on flooded roads .................. 163
Driving safety systems ABS (Anti-lock Braking System) .......61
ADAPTIVE BRAKE ............................. 65
BAS (Brake Assist System) ..............62
BAS PLUS (Brake Assist System
PLUS) ............................................... 62
Electronic brake force distribution ...64
ESP ®
(Electronic Stability
Program) .......................................... 63
ETS (Electronic Traction System) .....63
Important safety information ...........61
Overview .......................................... 60
PRE-SAFE ®
Brake ............................. 65
Driving systems
Active Blind Spot Assist .................189
Active Driving Assistance
package ......................................... 189
Active Lane Keeping Assist ............192
ATTENTION ASSIST ........................185
Blind Spot Assist ............................ 186
Cruise control ................................ 164
Display message ............................ 228
DISTRONIC PLUS ........................... 166
Dynamic handling package with
sports mode .................................. 175
HOLD function ............................... 176Lane Keeping Assist ......................188
Lane Tracking package ..................186
Parking Guidance ........................... 181
PARKTRONIC ................................. 178
Rear view camera .......................... 184
Driving tips
Automatic transmission .................151
Brakes ........................................... 161
Break-in period .............................. 144
DISTRONIC PLUS ........................... 174
Downhill gradient ........................... 161
Drinking and driving .......................160
Driving abroad ............................... 116
Driving in winter ............................. 163
Driving on flooded roads ................163
Driving on wet roads ......................163
Exhaust check ............................... 161
Fuel ................................................ 160
General .......................................... 160
Hydroplaning ................................. 163
Icy road surfaces ........................... 163
Limited braking efficiency on
salted roads ................................... 162
Pedals ............................................ 160
Snow chains .................................. 311
Symmetrical low beam ..................116
Wet road surface ........................... 162
DVD audio (on-board computer) ...... 204
DVD-Video (on-board computer) ...... 204
Dynamic handling package with
sports mode ....................................... 175
E
EASY-ENTRY feature Activating/deactivating .................211
Function/notes ............................. 109
EASY-EXIT feature
Crash-responsive ........................... 110
Function/notes ............................. 109
Switching on/off ........................... 211
EBD (electronic brake force
distribution) Display message ............................ 215
Function/notes ................................ 64
Electrical fuses
see Fuses
8Index
Page 16 of 352
PRE-SAFE®
Brake (vehicles with
DISTRONIC PLUS) Display message ............................ 217
Function/notes ................................ 65
Switching on/off ........................... 207
Warning lamp ................................. 248
Preventive occupant safety
system
see PRE-SAFE ®
(Preventive
occupant safety system)
Product information ............................ 20
Program selector button .................. 151
Pulling away Automatic transmission .................147
Q
Qualified specialist workshop ........... 23
R
Radar sensor system Activating/deactivating .................210
Display message ............................ 229
Radio
Selecting a station .........................203
see separate operating instructions
Reading lamp ..................................... 122
Rear compartment Setting the air vents ......................141
Setting the temperature ................136
Rear fog lamp
Display message ............................ 223
Switching on/off ........................... 118
Rear seat
Display message ............................ 237
Rear view camera
Cleaning instructions .....................285
Function/notes ............................. 184
Rear-view mirror
Anti-glare (manual) ........................110
Dipping (automatic) .......................112
Rear window blind ............................ 259
Rear window defroster Problem (malfunction) ...................139
Rear window heating
Switching on/off ........................... 138
Refueling
Fuel gauge ....................................... 27
Important safety notes ..................155
Refueling process ..........................156
see Fuel
Releasing the parking lock
manually (automatic
transmission) ..................................... 155
Remote control Garage door opener .......................267
Reporting
Malfunctions relevant to safety ........ 23
Reserve (fuel tank)
see Fuel
Reserve fuel
Display message ............................ 228
Warning lamp ................................. 245
see Fuel
Residual heat (climate control) ........ 139
Restraint system see SRS (Supplemental Restraint
System)
Reverse gear
Engaging (automatic
transmission) ................................. 149
Reversing lamps (display
message) ............................................ 224
Roadside Assistance (breakdown) .... 21
Roll bar Display message ............................ 218
Operation ......................................... 48
Roller blind
see Roller sunblind
Roller sunblind
Panorama roof with power tilt/
sliding panel ..................................... 98
Rear window .................................. 259
Roof
see Soft top
Roof lining and carpets (cleaning
guidelines) ......................................... 287
Roof load (maximum) ........................ 346
Route see Route guidance (navigation)
Route guidance (navigation) ............ 20214Index
Page 20 of 352
Structure and characteristics
(definition) ..................................... 329
Temperature .................................. 325
TIN (Tire Identification Number)
(definition) ..................................... 331
Tire bead (definition) ......................331
Tire pressure (definition) ................331
Tire pressures (recommended) ......329
Tire size (data) ............................... 333
Tire size designation, load-bearing
capacity, speed rating .................... 326
Tire tread ....................................... 309
Tire tread (definition) .....................331
Total load limit (definition) .............332
Traction ......................................... 324
Traction (definition) .......................332
Tread wear ..................................... 324
Uniform Tire Quality Grading
Standards ...................................... 324
Uniform Tire Quality Grading
Standards (definition) ....................329
Unladen weight (definition) ............330
Wear indicator (definition) .............332
Wheel rim (definition) ....................330
see Flat tire
Top Tether ............................................ 58
Towing Important safety guidelines ...........301
Installing the towing eye ................301
Removing the towing eye ...............302
With the rear axle raised ................302
Towing away
With both axles on the ground .......302
Tow-starting
Emergency engine starting ............303
Important safety notes ..................301
Transmission
see Automatic transmission
Transporting the vehicle .................. 302
Trim pieces (cleaning instructions) . 286
Trip computer (on-board
computer) .......................................... 201
Trip meter see Trip odometer
Trip odometer
Calling up ....................................... 201
Resetting (on-board computer) ......202Trunk
Emergency release ..........................82
Important safety guidelines .............80
Locking separately ...........................82
Opening (automatically from
inside) .............................................. 81
Opening (automatically from
outside) ............................................ 81
Trunk lid
Display message ............................ 236
Opening/closing .............................. 80
Trunk partition
Display message ............................ 237
General notes .................................. 93
Opening/closing .............................. 93
Turn signals
Changing bulbs (front) ...................125
Display message ............................ 222
Switching on/off ........................... 119
Type identification plate
see Vehicle identification plate
U
Unlocking Emergency unlocking .......................79
From inside the vehicle (central
unlocking button) ............................. 78
V
Vanity mirror (in sun visor) .............. 258
Vehicle Correct use ...................................... 23
Data acquisition ............................... 24
Display message ............................ 236
Equipment ....................................... 20
Individual settings ..........................208
Limited Warranty ............................. 24
Loading .......................................... 319
Locking (in an emergency) ...............79
Locking (SmartKey) .......................... 71
Lowering ........................................ 295
Maintenance .................................... 21
Parking for a long period ................ 159
Pulling away ................................... 147
Raising ........................................... 292
Reporting problems .........................23
18Index
Page 69 of 352
transmission position P is selected or if you
drive faster than 22 mph(35 km/h).
For PRE-SAFE ®
Brake to assist you when
driving, the radar sensor system must be
switched on ( Y page 210) and operational.
Following damage to the front end of the
vehicle, have the configuration and operation
of the radar sensors checked at a qualified
specialist workshop. This also applies to
collisions at low speeds where there is no
visible damage to the front of the vehicle.
Theft deterrent locking systems
Immobilizer
The immobilizer prevents your vehicle from
being started without the correct SmartKey.
When leaving the vehicle, always take the
SmartKey with you and lock the vehicle. The
engine can be started by anyone with a valid
SmartKey that is left inside the vehicle.
XTo activate with the SmartKey: remove
the SmartKey from the ignition lock.XTo activate with KEYLESS-GO: switch the
ignition off and open the driver's door.XTo deactivate: switch on the ignition.
i
The immobilizer is always deactivated
when you start the engine.
In the event that the engine cannot be
started when the starter battery is fully
charged, the immobilizer may be faulty.
Contact an authorized Mercedes-Benz
Center or call 1-800-FOR-MERCedes (in
USA) or 1-800-387-0100 (in Canada).
ATA (Anti-Theft Alarm system)
A visual and audible alarm is triggered if the
alarm system is armed and you open:
R a door
R the vehicle with the mechanical key
R the trunk lid
R the hood
The alarm is not switched off, even if you
close the open door that has triggered it, for
example.
i If the alarm stays on for more than 30
seconds, the emergency call system
mbrace (USA only) or TELE AID (Canada
only) initiates a call to the Customer
Assistance Center automatically. The
emergency call system initiates the call
provided that:
R you have subscribed to the mbrace/
TELE AID service.
R the mbrace/TELE AID service has been
activated properly.
R the required mobile phone, power supply
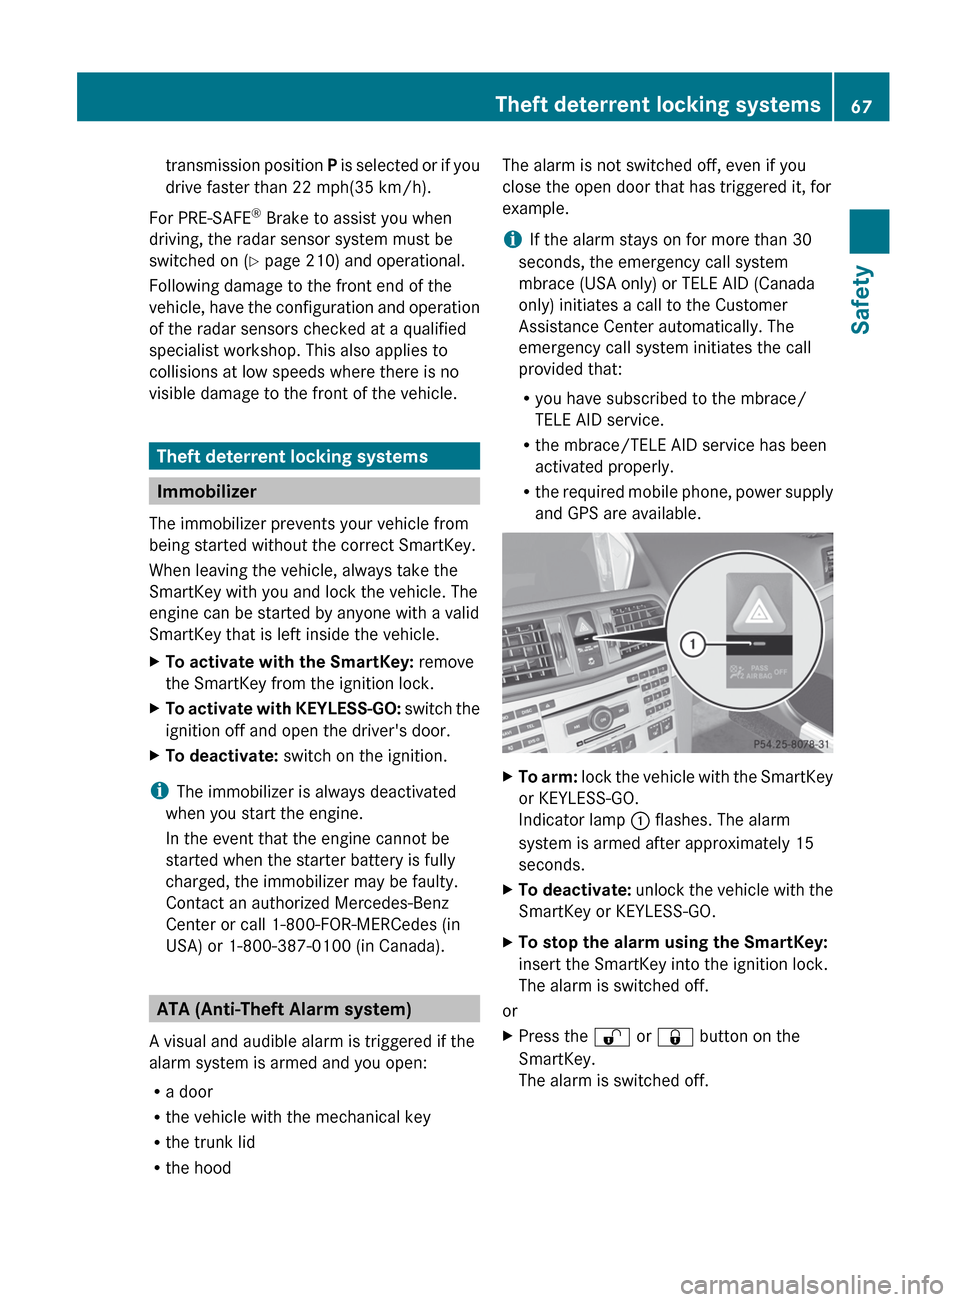
and GPS are available.XTo arm: lock the vehicle with the SmartKey
or KEYLESS-GO.
Indicator lamp : flashes. The alarm
system is armed after approximately 15
seconds.XTo deactivate: unlock the vehicle with the
SmartKey or KEYLESS-GO.XTo stop the alarm using the SmartKey:
insert the SmartKey into the ignition lock.
The alarm is switched off.
or
XPress the % or & button on the
SmartKey.
The alarm is switched off.Theft deterrent locking systems67SafetyZ
Page 74 of 352
1. This device may not cause harmful
interference, and
2. this device must accept any interference
received, including interference that may
cause undesired operation.
Any unauthorized modification to this
device could void the user’s authority to
operate the equipment.
The Product label with FCC ID and IC
certification number can be found in the
battery case of the SmartKey.
Important notes on the use of KEYLESS-
GO
R The KEYLESS-GO key can be used like a
conventional key.
R You can combine KEYLESS-GO functions
with those of a conventional key, e.g.
unlock with KEYLESS-GO and lock with the
& button.
R Always carry your KEYLESS-GO key on your
person.
R Do not keep the KEYLESS-GO key together
with:
- electronic devices, e.g. a mobile phone
or another key
- metallic objects, e.g. coins or metal foil.
This can affect the functionality of
KEYLESS-GO.
R When locking and unlocking using
KEYLESS-GO, the distance between the
SmartKey and the corresponding door
handle must not exceed 3 ft (1 m).
R If the vehicle is parked for more than
72 hours, the KEYLESS-GO function is
deactivated. Pull the outer door handle and
switch on the ignition to reactivate the
KEYLESS-GO function.
R If the KEYLESS-GO key is removed from the
vehicle, it is possible that the system may
not recognize the SmartKey. The vehicle
can then not be locked or started using
KEYLESS-GO.
R If the KEYLESS-GO key has been removed
from the vehicle, e.g. if a passenger leaves
the vehicle with a KEYLESS-GO key:
- if the start/stop button is pressed or if
an attempt is made to lock the vehicle
with the locking button on the outer door
handle, the Key Not Detected message
appears in the multifunction display
- when the engine is running, the red Key
Not Detected message appears in the
multifunction display as you pull away.
Find the KEYLESS-GO key and change its
position in the vehicle. Carry the
KEYLESS-GO key in your shirt pocket, for
example.
R If you have started the engine with the
Start/Stop button, you can switch it off
again by:
- pressing the Start/Stop button again
- inserting the KEYLESS-GO key into the
ignition lock if the vehicle is stationary
and the automatic transmission is in park
position P.
R You could unlock the vehicle by mistake if
the distance between the KEYLESS-GO key
and the vehicle is less than 3 ft (1 m) and:
- an exterior door handle is hit by a water
jet
or
- you clean an exterior door handle.
R Bear in mind that the engine can be started
by any of the vehicle occupants if there is
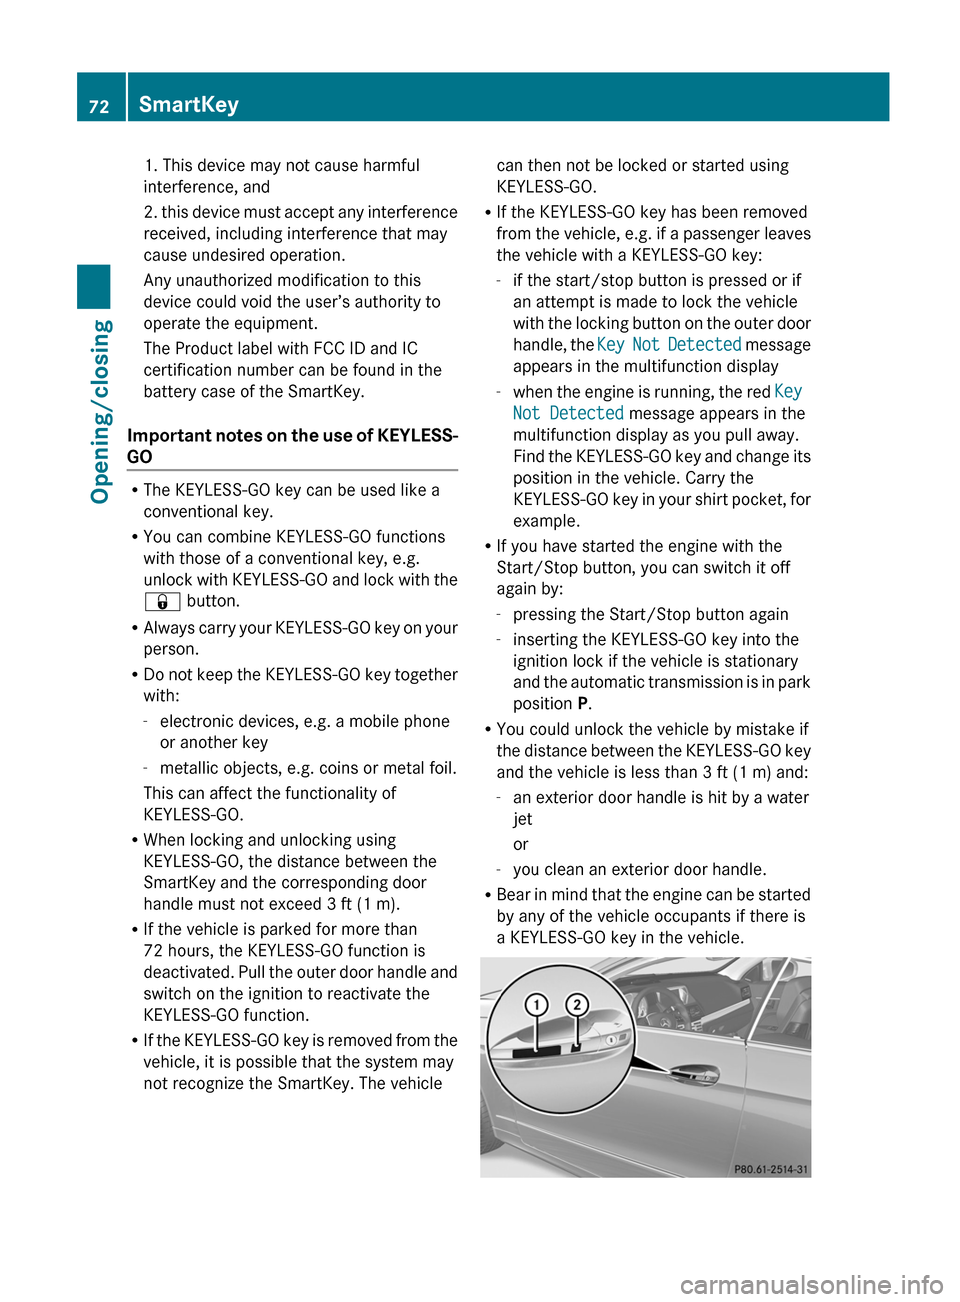
a KEYLESS-GO key in the vehicle.72SmartKeyOpening/closing
Page 114 of 352
Rthe exterior mirrors fold in automatically as
soon as you lock the vehicle from the
outside.
R the exterior mirrors fold out again
automatically as soon as you unlock the
vehicle and then open the driver's or front-
passenger door.
i The mirrors do not fold out if they have
been folded in manually.
Exterior mirror out of position
If an exterior mirror has been pushed out of
position, proceed as follows:
XVehicles without electrically folding
exterior mirrors: move the exterior mirror
into the correct position manually.XVehicles with electronically folding
mirrors 4
: press the mirror-folding button
( Y page 111) repeatedly until you hear the
mirror engage in position.
The mirror housing is engaged again and
you can adjust the exterior mirrors as usual
( Y page 110).
Automatic anti-glare mirrors
GWARNING
If incident light from headlamps is prevented
from striking the sensor in the rear-view
mirror, for instance, by luggage piled too high
in the vehicle, the mirror's automatic anti-
glare function will not operate.
Incident light could then blind you. This may
distract you from the traffic conditions and,
as a result, you may cause an accident.
The rear-view mirror and the exterior mirror
on the driver's side automatically go into anti-
glare mode if the ignition is switched on and
incident light from headlamps strikes the
sensor in the rear-view mirror.
The mirrors do not go into anti-glare mode if
reverse gear is engaged.
Parking position for the exterior
mirror on the front-passenger side
Setting and storing the parking position
You can position the front-passenger side
exterior mirror in such a way that you can see
the rear wheel on that side as soon as you
engage reverse gear. You can store this
position.
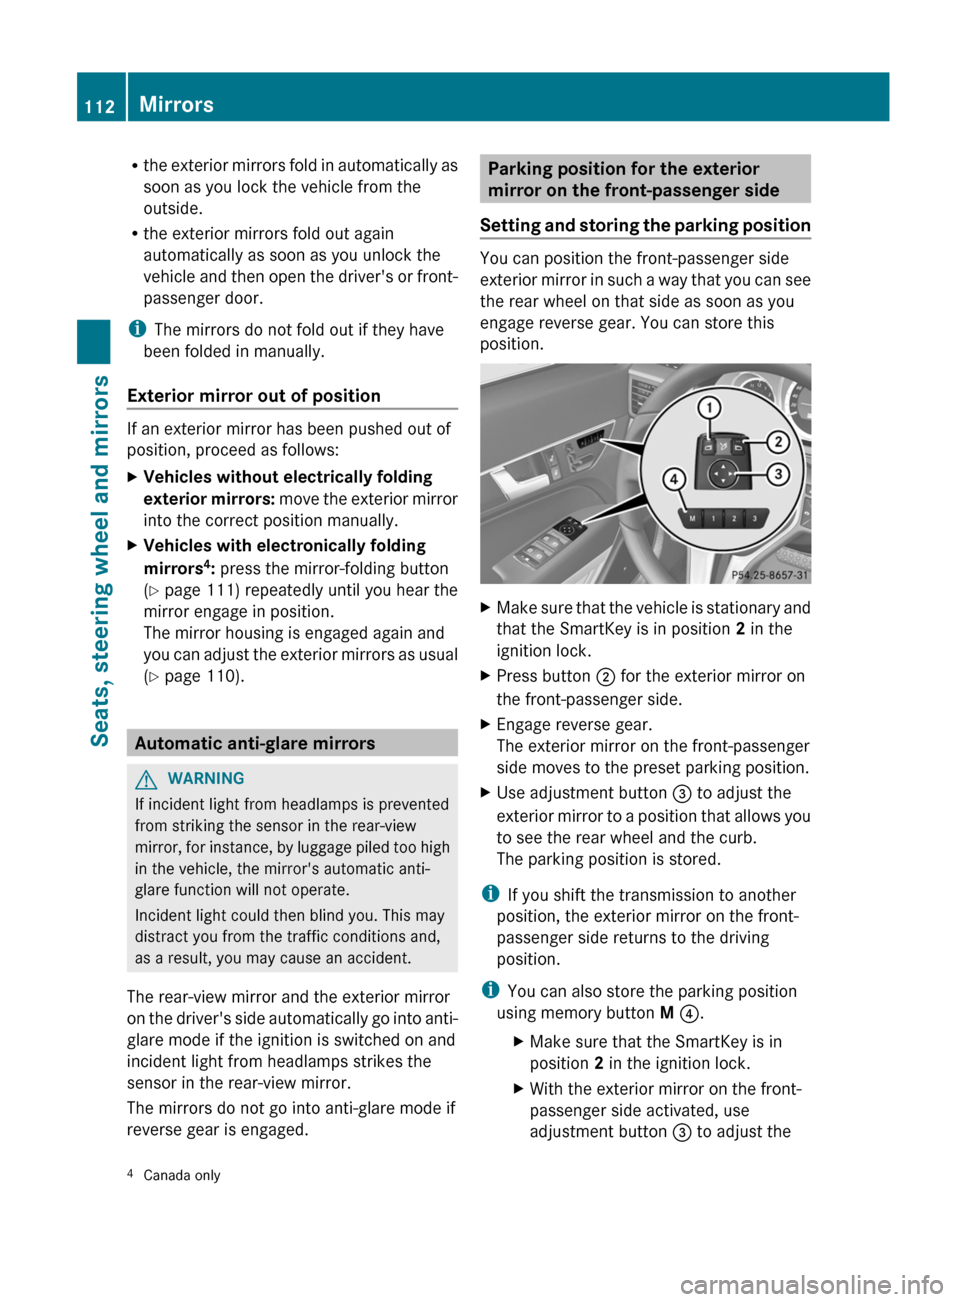
XMake sure that the vehicle is stationary and
that the SmartKey is in position 2 in the
ignition lock.XPress button ; for the exterior mirror on
the front-passenger side.XEngage reverse gear.
The exterior mirror on the front-passenger
side moves to the preset parking position.XUse adjustment button = to adjust the
exterior mirror to a position that allows you
to see the rear wheel and the curb.
The parking position is stored.
i If you shift the transmission to another
position, the exterior mirror on the front-
passenger side returns to the driving
position.
i You can also store the parking position
using memory button M ? .
XMake sure that the SmartKey is in
position 2 in the ignition lock.XWith the exterior mirror on the front-
passenger side activated, use
adjustment button = to adjust the4
Canada only112MirrorsSeats, steering wheel and mirrors
Page 145 of 352
Useful information ............................144
Breaking-in notes .............................. 144
Driving ............................................... 144
Automatic transmission ...................149
Refueling ............................................ 155
Parking ............................................... 158
Driving tips ........................................ 160
Driving systems ................................ 164143Driving and parking
Page 146 of 352
Useful information
i This Operator's Manual describes all
models and all standard and optional
equipment of your vehicle available at the
time of publication of the Operator's
Manual. Country-specific differences are
possible. Please note that your vehicle may
not be equipped with all features
described. This also applies to safety-
related systems and functions.
i Please read the information on qualified
specialist workshops ( Y page 23).
Breaking-in notes
The first 1000 miles (1500 km)
The more you look after the engine when it is
new, the more satisfied you will be with its
performance in the future.
R Drive at varying vehicle speeds and engine
speeds for the first 1000 miles (1500 km)
for this reason.
R Avoid overstraining the vehicle during this
period, e.g. driving at full throttle.
R Change gear in good time, at the latest
when the tachometer needle is 2
/ 3 of the
way to the red area in the tachometer
display.
R If possible, do not depress the accelerator
pedal past the point of resistance
(kickdown).
R Only select shift ranges 3, 2 or 1 when
driving slowly, e.g. in mountainous terrain.
After 1000 miles (1500 km), you can increase
the engine speed gradually and bring the
vehicle up to full speed.
i You should also observe these notes on
running in if the engine or parts of the drive
train on your vehicle have been replaced.
i Always observe the respective speed
restrictions.
Driving
Important safety notes
GWARNING
Make sure absolutely no objects are
obstructing the pedals' range of movement.
Keep the driver's footwell clear of all
obstacles. If there are any floormats or
carpets in the footwell, make sure the pedals
still have sufficient clearance.
During sudden driving or braking maneuvers
the objects could get caught between the
pedals. You could then no longer brake or
accelerate. This could lead to accidents and
injury.
GWARNING
On slippery road surfaces, never downshift in
order to obtain braking action. This could
result in drive wheel slip and reduced vehicle
control. Your vehicle's ABS will not prevent
this type of loss of control.
GWARNING
It is dangerous to shift the automatic
transmission out of parking position P or
neutral position N if the engine speed is
higher than idle speed. If your foot is not firmly
on the brake pedal, the vehicle could
accelerate quickly forward or in reverse. You
could lose control of the vehicle and hit
someone or something. Only shift into gear
when the engine is idling normally and when
your right foot is firmly on the brake pedal.
! Warm up the engine quickly. Do not use
the engine's full performance until it has
reached operating temperature.
Only shift the automatic transmission to
the desired drive position when the vehicle
is stationary.
Where possible, avoid spinning the drive
wheels when pulling away on slippery
roads. You could otherwise damage the
drive train.
144DrivingDriving and parking
Page 147 of 352
SmartKey positions
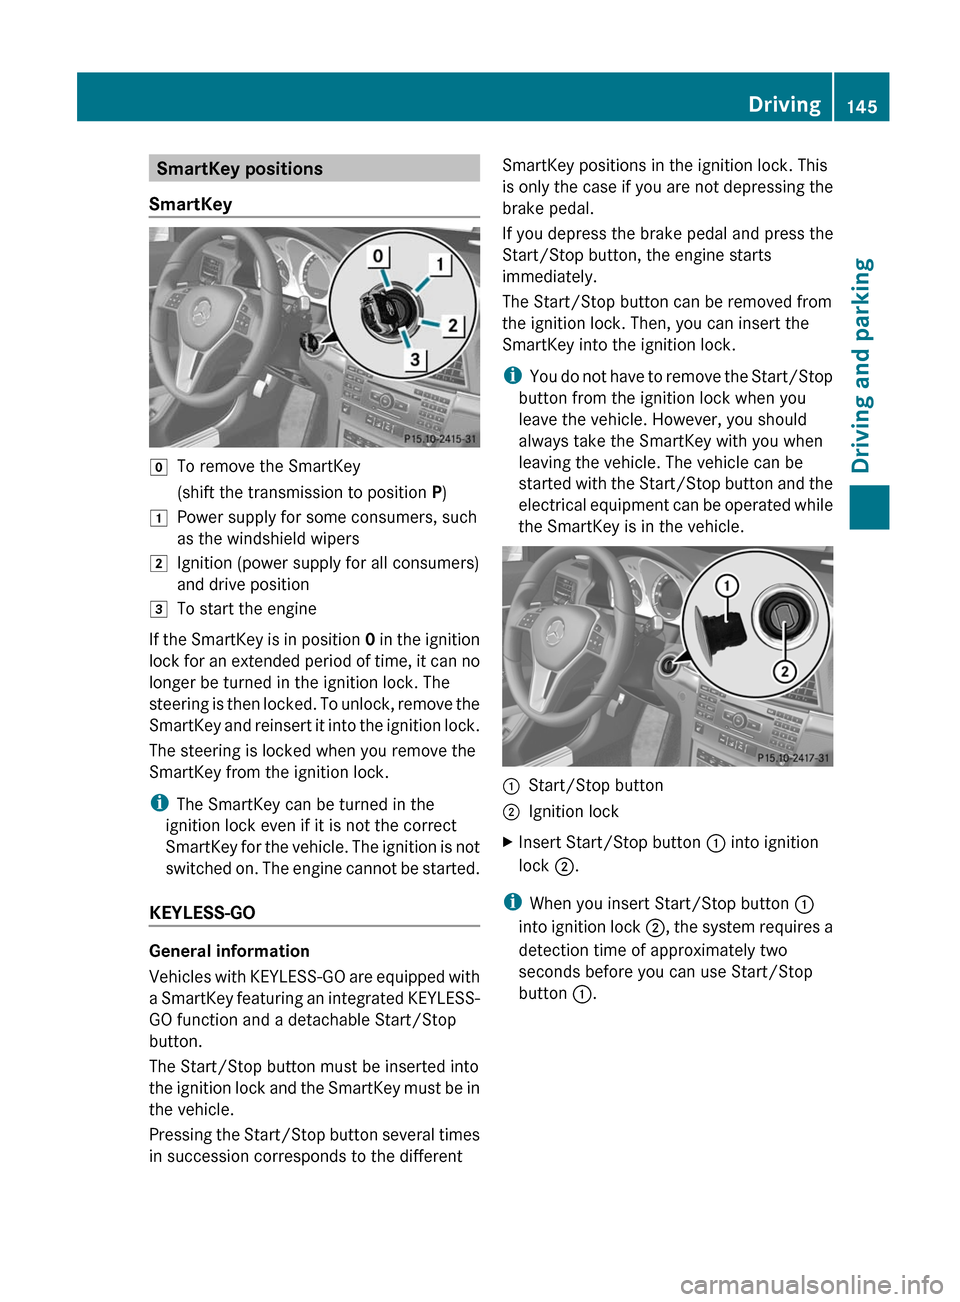
SmartKeygTo remove the SmartKey(shift the transmission to position P)1Power supply for some consumers, such
as the windshield wipers2Ignition (power supply for all consumers)
and drive position3To start the engine
If the SmartKey is in position 0 in the ignition
lock for an extended period of time, it can no
longer be turned in the ignition lock. The
steering is then locked. To unlock, remove the
SmartKey and reinsert it into the ignition lock.
The steering is locked when you remove the
SmartKey from the ignition lock.
i The SmartKey can be turned in the
ignition lock even if it is not the correct
SmartKey for the vehicle. The ignition is not
switched on. The engine cannot be started.
KEYLESS-GO
General information
Vehicles with KEYLESS-GO are equipped with
a SmartKey featuring an integrated KEYLESS-
GO function and a detachable Start/Stop
button.
The Start/Stop button must be inserted into
the ignition lock and the SmartKey must be in
the vehicle.
Pressing the Start/Stop button several times
in succession corresponds to the different
SmartKey positions in the ignition lock. This
is only the case if you are not depressing the
brake pedal.
If you depress the brake pedal and press the
Start/Stop button, the engine starts
immediately.
The Start/Stop button can be removed from
the ignition lock. Then, you can insert the
SmartKey into the ignition lock.
i You do not have to remove the Start/Stop
button from the ignition lock when you
leave the vehicle. However, you should
always take the SmartKey with you when
leaving the vehicle. The vehicle can be
started with the Start/Stop button and the
electrical equipment can be operated while
the SmartKey is in the vehicle.:Start/Stop button;Ignition lockXInsert Start/Stop button : into ignition
lock ;.
i
When you insert Start/Stop button :
into ignition lock ;, the system requires a
detection time of approximately two
seconds before you can use Start/Stop
button :.
Driving145Driving and parkingZ