Display and operation MERCEDES-BENZ E-CLASS COUPE 2012 Owners Manual
[x] Cancel search | Manufacturer: MERCEDES-BENZ, Model Year: 2012, Model line: E-CLASS COUPE, Model: MERCEDES-BENZ E-CLASS COUPE 2012Pages: 389, PDF Size: 9.32 MB
Page 14 of 389
Fuel
Additives ........................................ 373
Consumptio ninformation ..............374
Consumption statistics ..................233
Displaying the current consump-
tion ................................................ 234
Displaying the range ......................234
Fuel gauge ............................... 30, 229
Grade (petrol) ................................ 372
Important safety notes ..................372
Problem (malfunction) ...................176
Quality (diesel )............................... 373
Refuelling ...................................... .173
Tank content/reserve fuel .............372
Fuel filler flap
Opening/closing ............................ 174
Fuel filte r(white display message) .262
Fuel level Calling up the range (on-board
computer) ...................................... 234
Gauge ...................................... 30, 229
Fuel reserve
see Fuel
Fuel tank
Capacity ........................................ 372
Problem (malfunction) ...................176
Fuse allocation chart (vehicle tool
kit) ...................................................... 323
Fuses Allocation chart ............................. 336
Before changing ............................. 336
Dashboard fuse box .......................336
Fuse box in the boot ......................337
Fuse box in the engine compart-
ment .............................................. 337
Important safety notes ..................336 G
Garage door opener Clearing the memory .....................299
Frequencies ................................... 299
Important safety notes ..................297
Opening/closing the garage door ..299
Programming (button in the rear-
view mirror) ................................... 297
Genuine Mercedes-Benz parts .........368
Glove compartment ..........................287 H
Handbrake see Parking brake
Hazard warning lamps ......................127
Headbag Display message ............................ 255
Operation ........................................ .46
Headlamp
Cleaning system (function) ............128
Cleaning system (notes) ................377
Headlamps
Misting up ...................................... 131
Topping up the cleaning system ....310
see Automatic headlamp mode
Head level heating (AIRSCARF) ........115
Head restraint Lowering manually (rear) ...............111
Head restraints
Adjusting ....................................... 111
Adjusting (electrically). ..................111
Adjusting (manually). .....................111
Adjusting (rear) .............................. 111
see NECK-PR Ohead restraints
Heating
see Climate control
High-pressure cleaners ....................313
Hill start assist .................................. 162
HOLD function Display message ............................ 263
Function/notes ............................. 198 I
Ignition lock see Key positions
Immobiliser .......................................... 71
Indicator and warning lamps Coolant .......................................... 281
DISTRONI CPLUS ........................... 283
Engine diagnostics .........................280
Indicator lamps
Display message ............................ 256
see Warning and indicator lamps
Insectp rotection on the radiator ....308
Inspection see ASSYST PLUS Index
11
Page 17 of 389
N
Navigation Menu (on-board computer) ............235
Neck-level heating
see AIRSCARF
NECK-PRO head restraints
Operation ........................................ .47
Resetting after being triggered ........48
Notes on running in anew vehicle ..158 O
Occupant safety Childre ninthe vehicle ..................... 53
Important safety notes ....................40
Odometer
see Total distance recorder
see Trip meter
Oil
see Engine oil
On-board computer
Assistance menu ........................... 239
Audi omenu ................................... 236
Convenience submenu ..................247
Displaying a service message ........311
Display messages ..........................249
DISTRONI CPLUS ........................... 195
Factory setting submenu ...............248
Heating submenu ........................... 246
Important safety notes ..................228
Instrument cluster submenu ..........242
Ligh tsubmenu ............................... 243
Menu overview .............................. 233
Message memory .......................... 249
Navigation menu ............................ 235
Operating the TV ............................ 237
Operating vide oDVD ..................... 237
Operation ....................................... 231
Service menu ................................. 241
Settings menu ............................... 242
Standard displa y............................ 233
Telephone menu ............................ 238
Trip menu ...................................... 233
Vehicle submenu ........................... 245
Operating system
see On-board computer
Outside temperature display ...........231Overhead control panel
......................36
Override feature Rea rside windows ........................... 64 P
Pain tcode .......................................... 371
Paintwork (cleaning instructions) ...313
Panic alarm .......................................... 40
Panorama sliding sunroof Important safety information .........103
Opening/closing ............................ 104
Opening/closing the roller sun-
blind ............................................... 105
Problem (malfunction) ...................106
Rain closing feature .......................104
Resetting ....................................... 105
Park Assist
Parking Guidance ........................... 203
Parking ............................................... 177
Important safety notes ..................177
Parking brake ................................ 178
Position of exterior mirror, front-
passenger side ............................... 119
Reversing camera ..........................206
see PARKTRONIC
Parking aid
see Exterior mirrors
see PARKTRONIC
Parking brake
Display message ............................ 252
Notes/function .............................. 178
Warning lamp ................................. 280
Parking Guidance
Display message ............................ 265
Important safety notes ..................203
Trailer towing ................................. 206
Parking lamps
Changing bulbs .............................. 134
Display message ............................ 258
Switching on/off ........................... 126
Parking lamps (changing bulbs) ......134
PARKTRONIC Deactivating/activating .................202
Driving system ............................... 200
Function/notes ............................. 200
Important safety notes ..................200
Problem (fault) ............................... 20314
Index
Page 19 of 389
Reversing camera
Cleaning instructions .....................317
Function/notes ............................. 206
Switching on/off ........................... 207
Reversing lamp (display message) ..258
Roll bar Display message ............................ 254
Operation ........................................ .47
Rolle rsunblind
Panorama sliding sunroo f.............. 104
Rea rwindow .................................. 293
Roof
Overview .......................................... 92
see Soft top
Roof lining and carpets (cleaning
instructions) ...................................... 319
Roof load (maximum) ........................378 S
Safety Childre ninthe vehicle ..................... 53
Child restraint systems ....................53
Safety system
see Driving safety system
Seat
Seat backres tdisplay message .....271
Seat belt
Adjusting the driver's and front-
passenger sea tbelt ......................... 51
Automatic comfort-fit feature ..........53
Belt force limiter .............................. 52
Belt tensioner .................................. 52
Cleaning ......................................... 319
Display message ............................ 254
Fastening ......................................... 50
Important safety guidelines .............49
Rea rseat belt status indicator .........52
Releasing ......................................... 51
Switching belt adjustment on/off
(on-board computer) ......................247
Warning lamp ................................. 276
Warning lamp (function) ................... 52
Seats
Adjusting (electrically). ..................110
Adjusting (manually and electri-
cally) .............................................. 110Adjusting the 4-way lumba
rsup-
por t................................................ 113
Adjusting the head restraint ..........111
Cleaning the cover .........................318
Correct driver's sea tposition ........108
Folding the backrests forward/
back ............................................... 112
Important safety notes ..................109
Overview ........................................ 109
Seat heating problem ....................114
Seat ventilation problem ................115
Storing settings (memory func-
tion) ............................................... 120
Switching AIRSCARF on/off ..........115
Switching sea theating on/off .......113
Switching the sea tventilation on/
off .................................................. 114
Selector lever
Cleaning ......................................... 318
Sensors (cleaning instructions) .......317
Service see ASSYST PLUS
Service Centre
see Qualified specialist workshop
Service menu (on-board computer) .241
Service products Brake fluid ..................................... 376
Coolant (engine) ............................ 376
Engine oil ....................................... 375
Fuel ................................................ 372
Important safety notes ..................371
Washer fluid .................................. .377
Settings
Factory (on-board computer) .........248
On-board computer .......................242
Setting the air distribution ...............145
Setting the airflow ............................146
Short journeys (diesel particle fil-
ter) ...................................................... 180
Sidebag ................................................ 45
Side lamps Switching on/off ........................... 125
Side windows
Convenience closing ........................90
Convenience opening ......................90
Important safety notes ....................87
Opening/closing .............................. 88
Opening/closing all (Cabriolet) ........88 16
Index
Page 28 of 389
save and edit data required for the operation
of the respective device.
Further information on operation (e.g. on
deleting data) can be found in the separate
operating instructions. Copyright information
FreeType
Portions of this software are copyright ©
2005
The FreeType Project (www.freetype.org). All
rights reserved. ©
1996-2000 by David
Turner, Robert Wilhelm, and Werner Lemberg. Gnu compiler
Copyright ©
1982, 1986 Regents of the Uni-
versity of California. All rights reserved.
The Berkeley software License Agreement
specifies the terms and conditions for redis-
tribution. Redistribution and use in source
and binary forms, with or without modifica-
tion, are permitted provided that the following
conditions are met:
1. Redistribution of source code must retain the above copyright notice, this list of
conditions and the following disclaimer.
2. Redistribution in binary for mmust repro-
duce the above copyright notice, this list
of conditions and the following disclaimer
in the documentation and/o rothe rmate-
rials provided with the distribution.
3. All advertising materials mentioning fea- tures or use of this software must display
the following acknowledgement: This
product includes software developed by
the University of California, Berkeley and
its contributors.
4. Neither the name of the University no rthe
names of its contributors may be used to
endorse or promote products derived
from this software without specific prior
written permission. THIS SOFTWARE IS PROVIDED BY THE
REGENTS AND CONTRIBUTORS "AS IS" AND
ANY EXPRESS OR IMPLIED WARRANTIES,
INCLUDING, BUT NOT LIMITED TO, THE
IMPLIED WARRANTIES OF MERCHANTABIL-
ITY AND FITNESS FOR A PARTICULAR PUR-
POSE ARE DISCLAIMED. IN NO EVENT SHALL
THE REGENTS OR CONTRIBUTORS BE LIABLE
FOR ANY DIRECT, INDIRECT, INCIDENTAL,
SPECIAL, EXEMPLARY, OR CONSEQUENTIAL
DAMAGES (INCLUDING, BUT NOT LIMITED
TO, PROCUREMENT OF SUBSTITUTE GOODS
OR SERVICES; LOSS OF USE, DATA, OR
PROFITS; OR BUSINESS INTERRUPTION)
HOWEVERC
AUSED AND ON ANY THEORY OF
LIABILITY, WHETHER IN CONTRACT, STRICT
LIABILITY, OR TORT (INCLUDING NEGLI-
GENCE OR OTHERWISE) ARISING IN ANY
WAY OUT OF THE USE OF THIS SOFTWARE,
EVEN IF ADVISED OF THE POSSIBILITY OF
SUCH DAMAGE. Introduction
25 Z
Page 96 of 389
R
no objects are on the soft-top compart-
ment cover
R the fabric is not dirty, wet or frozen.
You could otherwise damage the sof ttop,
boot and other parts of the vehicle.
i Make sure that the soft top is dry and
clean before closing it. Otherwise, water or
dirt could enter the vehicle interior or boot.
You can open or close the soft top:
R when the vehicle is stationary or
R when driving up to a speed of 40 km/h
If there is a strong head wind, it may not be
possible to close the soft top fully. In this
case, reduce speed or stop in order to close
the soft top fully.
For safety reasons, Mercedes-Benz recom-
mends that you only open or close the soft
top when the vehicle is stationary. Opening and closing with the soft-top
switch
Important safety notes G
WARNING
Make sure nobody can be trapped or injured
by moving parts, such as the soft-top linkage
or soft-top compartment cover, when opening
or closing the soft top.
Release the soft-top switch in the event of
danger. The soft-top mechanism stops imme-
diately. G
WARNING
If the vehicle speed exceeds 40km/h, the soft
top stops the opening or closing movement
and remains in that position. This could impair
your rear view. At high speeds the soft top
may be damaged.
Reduce your speed to below 40km/h or stop
the vehicle in accordanc ewith the traffic con-
ditions. Press the soft-top switch again in
order to open or close the soft top fully. Opening and closing X
Make sure that the boot separator is closed
(Y page 99).
X Close the boot lid.
X Turn the key to position 2in the ignition
lock.
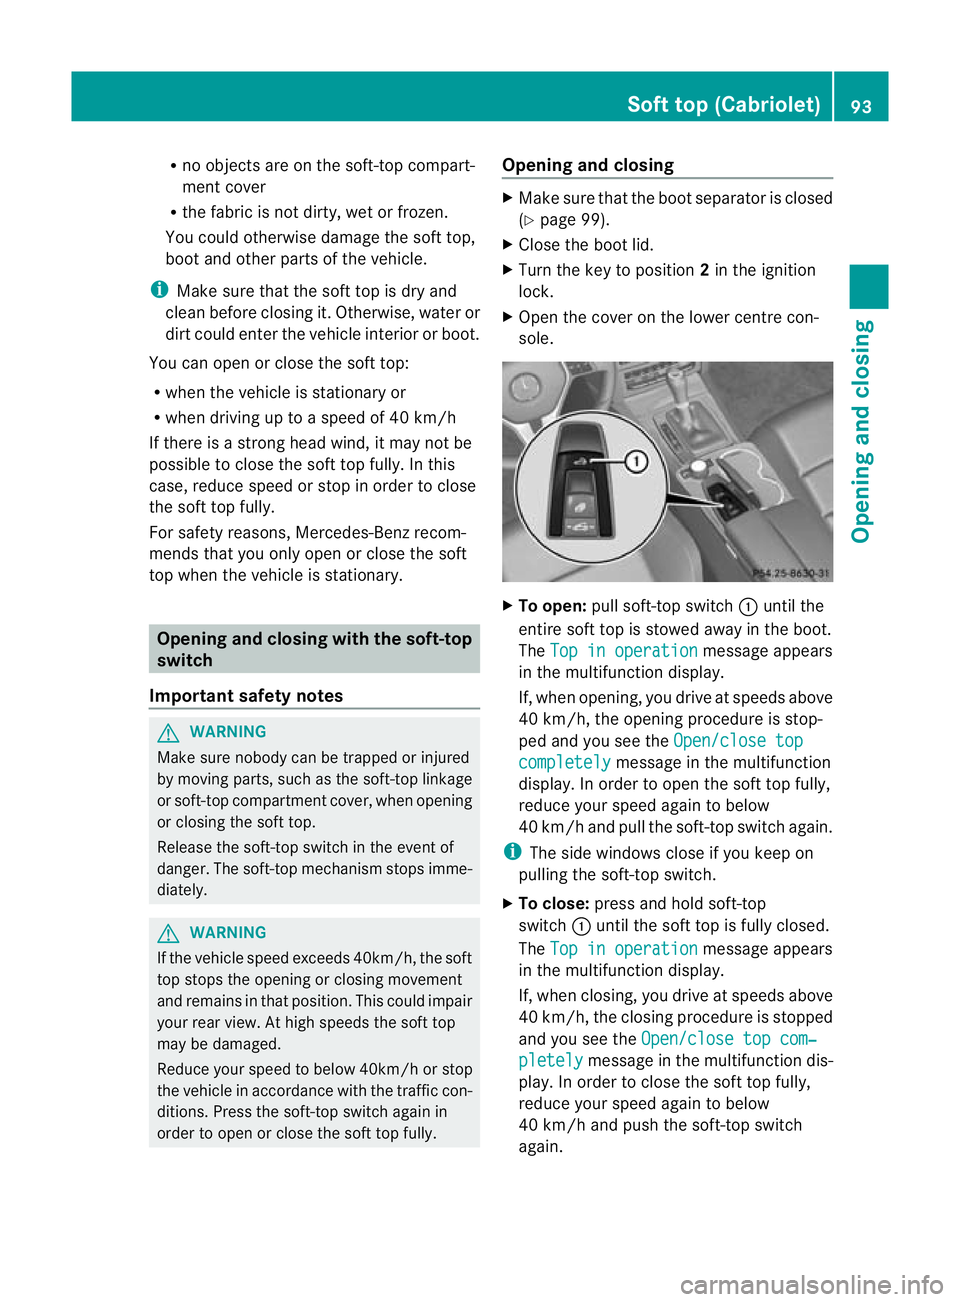
X Open the cover on the lower centre con-
sole. X
To open: pull soft-top switch :until the
entire soft top is stowed away in the boot.
The Top in operation message appears
in the multifunction display.
If, when opening, you drive at speeds above
40 km/h, the opening procedure is stop-
ped and you see the Open/close top completely message in the multifunction
display. In order to open the soft top fully,
reduce your speed again to below
40 km/h and pull the soft-top switch again.
i The side windows close if you keep on
pulling the soft-top switch.
X To close: press and hold soft-top
switch :until the soft top is fully closed.
The Top in operation message appears
in the multifunction display.
If, when closing, you drive at speeds above
40 km/h, the closing procedure is stopped
and you see the Open/close top com‐ pletely message in the multifunction dis-
play. In order to close the soft top fully,
reduce your speed again to below
40 km/h and push the soft-top switch
again. Soft top (Cabriolet)
93Opening and closing Z
Page 97 of 389
i
The side windows close if you keep on
pressing the soft-top switch. Opening and closing with the key
Important safety notes G
WARNING
Make sure nobody can be trapped or injured
by moving parts such as the soft-top linkage
or soft-top compartment cover when opening
or closing the soft top.
If there is a risk of entrapment, immediately
release the %or& button on the key.
The soft-top mechanism stops immediately.
Opening and closing The key must be close to the driver's door
handle.
X Point the tip of the key at the driver's door
handle.
X To open: press and hold the %button
on the key until the soft top is fully opened.
The Top in operation message appears
in the multifunction display .The seat ven-
tilation is switched on. The rear side win-
dows open.
X To close: press and hold the &button
on the key until the soft top is fully closed.
The Top in operation message appears
in the multifunction display. The soft top
and the side windows close. Closing the soft top manually
Important safety notes G
WARNING
Remove wristwatches and any jewellery such
as rings or bracelets. You could otherwise get
caught, injured and damage the vehicle.
Always grip the soft top at the indicated grip-
ping points when closing the soft top man-
ually. You could otherwise be injured. If the soft top cannot be closed automatically,
check the following points:
R
Is the boot separator engaged
(Y page 99)?
R Are the head restraints on the rear bench
seats extended?
R Is the boot lid closed?
R Is the on-board voltage sufficient?
Start the engine if necessary.
If automatic operation still does not work, the
soft top can be closed manually.
To carry out this work, you will need the assis-
tance of another person.
i Closing the soft top manually is a com-
plex, technically demanding process which
requires a great deal of force. Only close
the soft top manually in extreme emergen-
cies. Preferably, contact a qualified spe-
cialist workshop.
Closing the soft top X
Apply the parking brake.
X Open the side windows.
X Lower the head restraints automatically or
manually, see the Digital Owner's Manual,
keyword "Head restraint".
X Remove the key from the ignition lock.
X Open the boot.
X Take the two straps out of the vehicle tool
kit (Y page 323).
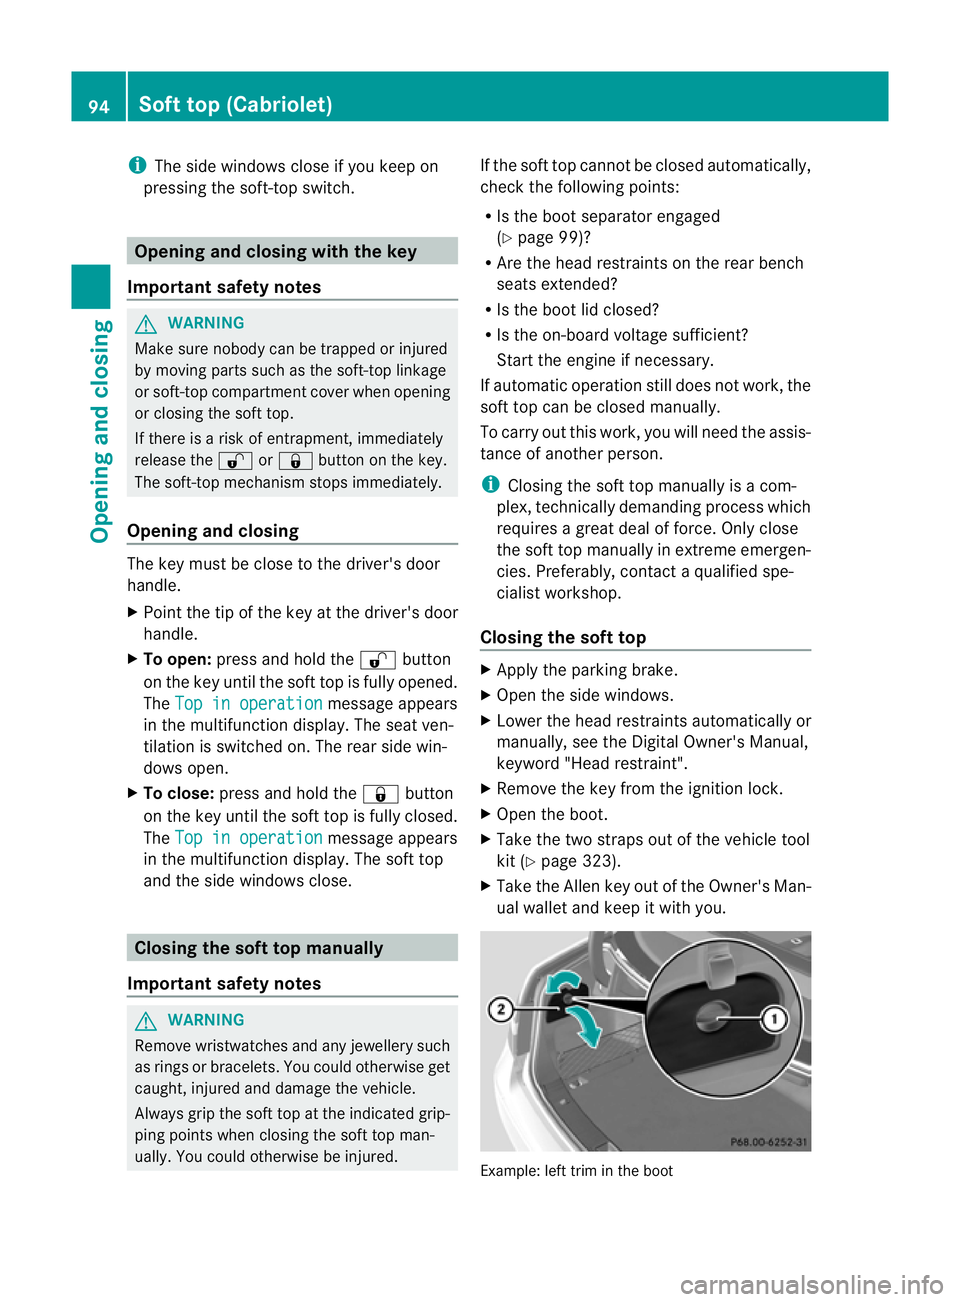
X Take the Allen key out of the Owner's Man-
ual wallet and keep it with you. Example: left trim in the boot94
Soft top (Cabriolet)Opening and closing
Page 101 of 389
G
WARNING
You could trap yourh ands.
Do not push the soft-top compartment cover
forwards in front of the soft-top support with
your hands. X
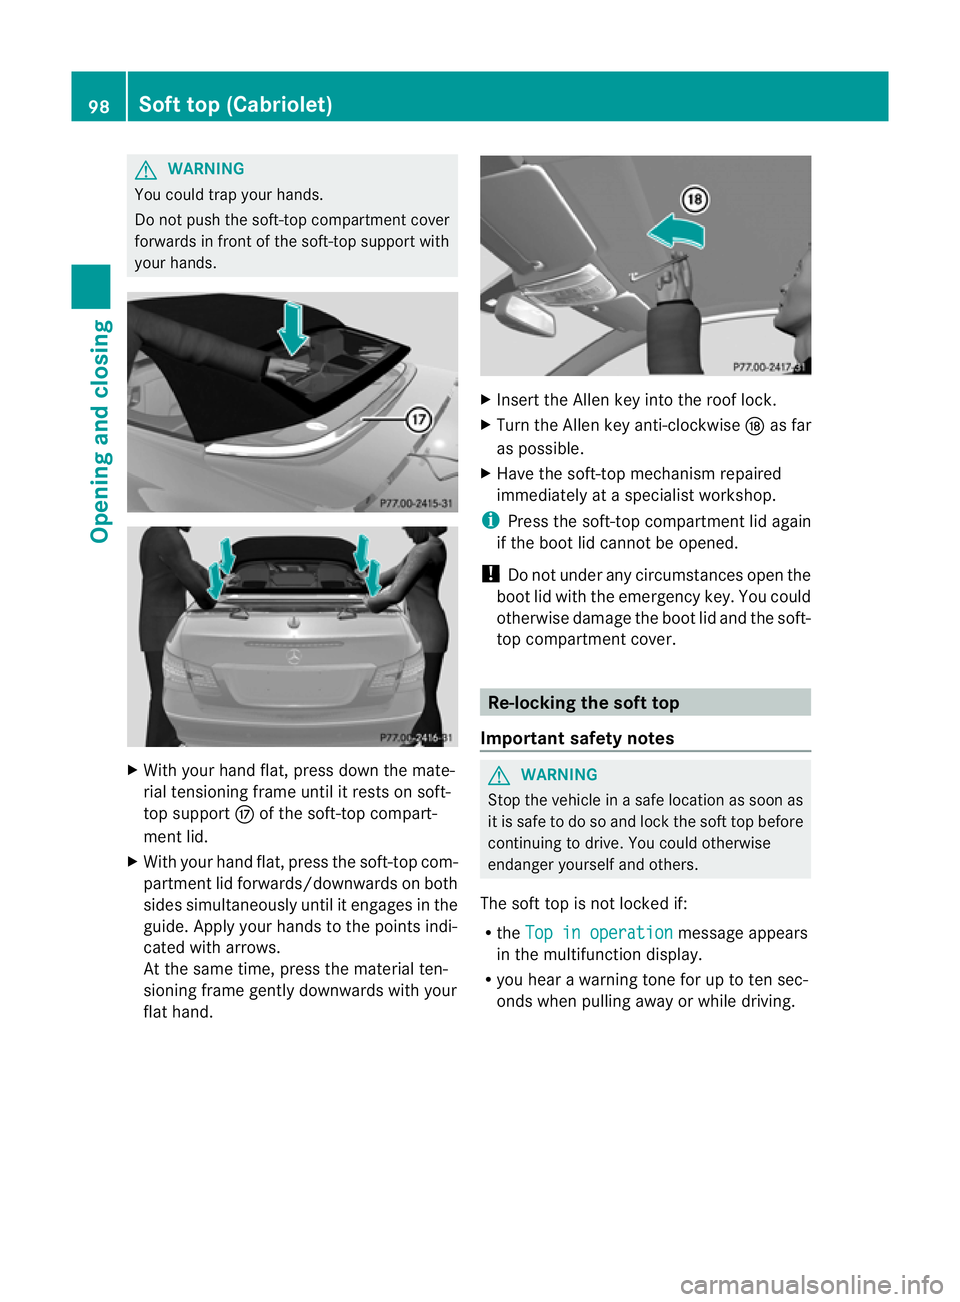
With your hand flat, pres sdown the mate-
rial tensioning frame until it rests on soft-
top support Mof the soft-top compart-
ment lid.
X With your hand flat, press the soft-top com-
partmen tlid forwards/downwards on both
sides simultaneously until it engages in the
guide. Apply your hands to the points indi-
cated with arrows.
At the same time, press the material ten-
sioning frame gently downwards with your
flat hand. X
Insert the Allen key into the roof lock.
X Turn the Allen key anti-clockwise Nas far
as possible.
X Have the soft-top mechanis mrepaired
immediately at a specialist workshop.
i Press the soft-top compartment lid again
if the boot lid cannot be opened.
! Do not under any circumstances open the
boot lid with the emergency key. You could
otherwise damage the boot lid and the soft-
top compartment cover. Re-locking the soft top
Important safety notes G
WARNING
Stop the vehicle in a safe location as soon as
it is safe to do so and lock the soft top before
continuing to drive. You could otherwise
endanger yourself and others.
The soft top is not locked if:
R the Top in operation message appears
in the multifunction display.
R you hear a warning tone for up to ten sec-
onds when pulling away or while driving. 98
Soft top (Cabriolet)Opening and closing
Page 150 of 389
Demisting the windows
Windows misted up on th einside X
Activate the ¿cooling with air dehu-
midification function.
X Activate automatic mode Ã.
X If the windows continue to mist up, activate
the demisting function (Y page 146).
i You should only select this setting until
the windscreen is clear again.
Windows misted up on the outside X
THERMATIC automatic climat econtrol:
press switch Fup or down ( Ypage 141)
until the PorO symbol appears in
the display.
X THERMOTRONIC automatic climate
control: press button Iup or down
(Y page 142) until the PorO symbol
appears in the display.
i You should only selec tthis setting until
the windscreen is clear again. Rear window heating
Switching on/off G
WARNING
Clear all windows of ice or snow before setting
off. Otherwise, impaired visibility could
endanger you and others.
The rear window heating has ahigh current
draw. You should therefore switch it off as
soon as the window is clear .Itotherwise
switches off automatically after several
minutes.
If the battery voltage is too low, the rea rwin-
dow heating may switch off. X
Turn the key to position 2in the ignition
lock.
X Press the ¤button.
The indicator lamp above the ¤button
lights up or goes out.
Problems with the rea rwindow heating The rear window heating has switched off
prematurely or cannot be activated.
X
Switch off any consumers that are not
required, e.g. reading lamps or interior
lighting.
When the battery is sufficiently charged,
the rear window heating is activated again
automatically. Activating/deactivating air-recircula-
tion mode
G
WARNING
Only switch over to air-recirculatio nmode
briefly at low outside temperatures. Other-
wise, the windows could mist up, thus impair-
ing visibility and endangering yourself and
others. This may prevent you from observing
the traffic conditions, thereby causing an
accident.
You can deactivate the flow of fresh air if
unpleasant odours are entering the vehicle
from outside. The air already inside the vehi-
cle will then be recirculated.
The operation of air-recirculation mode is the
same for all control panels.
X Turn the key to position 2in the ignition
lock.
X To activate: press thegbutton.
The indicator lamp above the gbutton
lights up.
i In the event of high pollution levels 1
or at
high outside temperatures, air-recircula-
tion mode is automatically activated. When
air-recirculation mode is activated auto-
1 THERMOTRONIC automatic climate control only. Operating the climate control system
147Climate control Z
Page 166 of 389
Automatic engine switch-off
Method of operation
The ECO start/stop function is operational
and the
¤symbol is displayed in green in
the multifunction display, if:
R the indicator lamp in th eECO butto nis lit
green.
R the vehicle is stationary.
R the outside temperature is within the com-
fort range.
R the engine is at normal operating temper-
ature.
R the set temperature for the vehicle interior
has been reached.
R the battery is sufficiently charged.
R the system detects that the windscreen is
not misted up when the air-conditioning
system is switched on.
R the bonnet is closed.
R the driver's door is closed and the driver's
seat belt is fastened.
If not all conditions for automatic engine
switch-off are fulfilled, the ¤symbol is
shown in yellow.
i All vehicle systems remain active during
automatic engine switch-off.
i The engine can be switched off automat-
ically a maximum of four times (first stop
and three subsequent stops) in succession.
The ¤ symbol is shown in yellow in the
multifunction display after the engine has
been started automatically for the fourth
time. When the ¤symbol is shown in
green in the multifunction display, auto-
matic engine switch-off is againp ossible.
i During automatic engine switch-off, the
climate control system only operates at a
reduced capacity. If you require full climate
control capacity, the ECO start/stop func-
tion can be deactivated by pressing the
ECO button (Y page 164). Vehicles with manual transmission
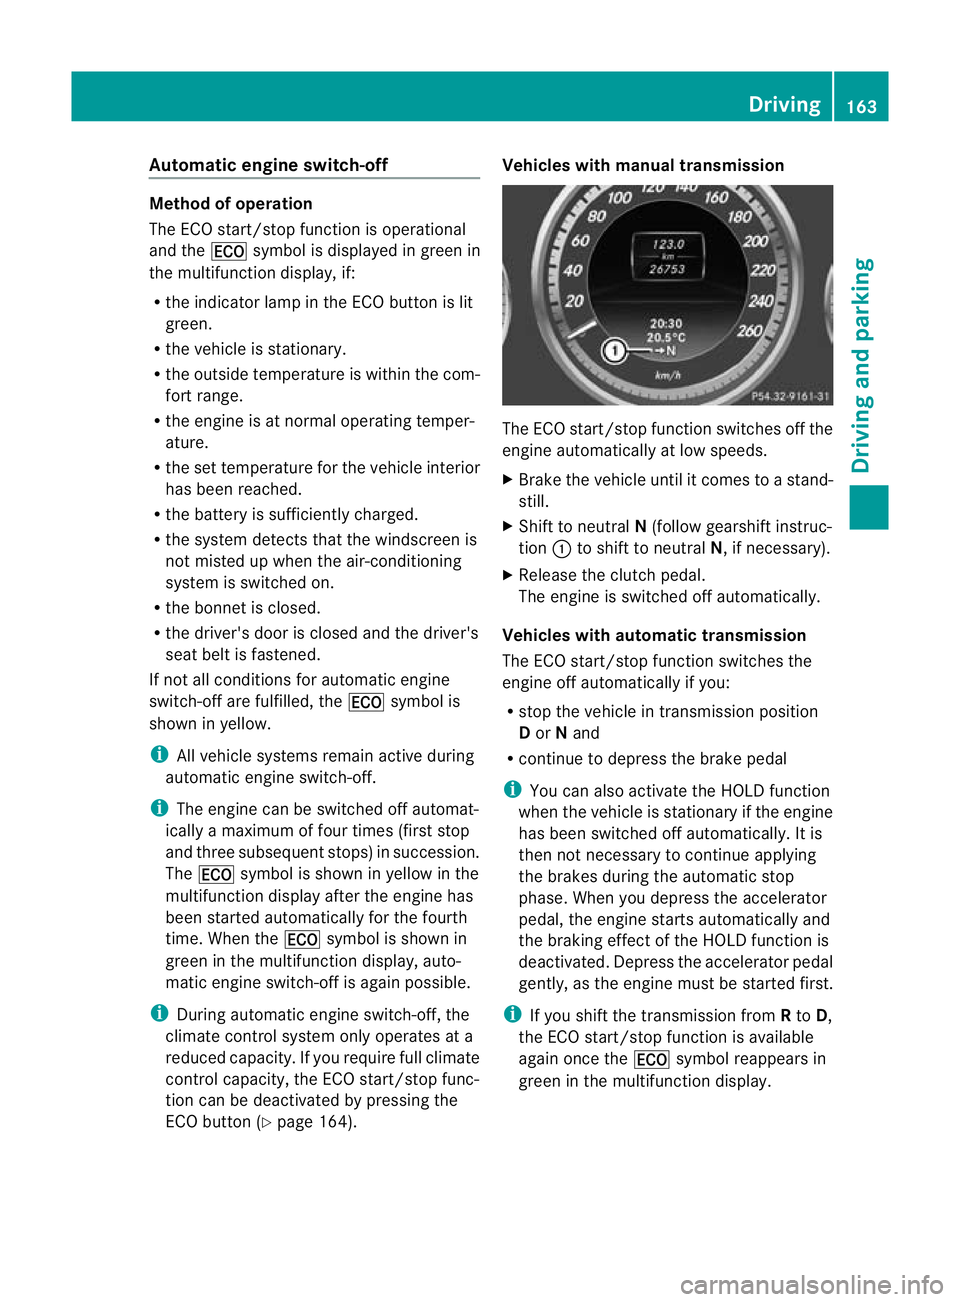
The ECO start/stop function switches off the
engine automatically at low speeds.
X
Brake the vehicle until it comes to a stand-
still.
X Shift to neutral N(follow gearshift instruc-
tion :to shift to neutral N, if necessary).
X Release the clutch pedal.
The engine is switched off automatically.
Vehicles with automatic transmission
The ECO start/stop function switches the
engine off automatically if you:
R stop the vehicle in transmission position
D or Nand
R continue to depress the brake pedal
i You can also activate the HOLD function
when the vehicle is stationary if the engine
has been switched off automatically. It is
then not necessary to continue applying
the brakes during the automatic stop
phase. When you depress the accelerator
pedal, the engine starts automatically and
the braking effect of the HOLD function is
deactivated. Depress the accelerator pedal
gently, as the engine must be started first.
i If you shift the transmission from Rto D,
the ECO start/stop function is available
again once the ¤symbol reappears in
green in the multifunction display. Driving
163Driving and parking Z
Page 204 of 389
:
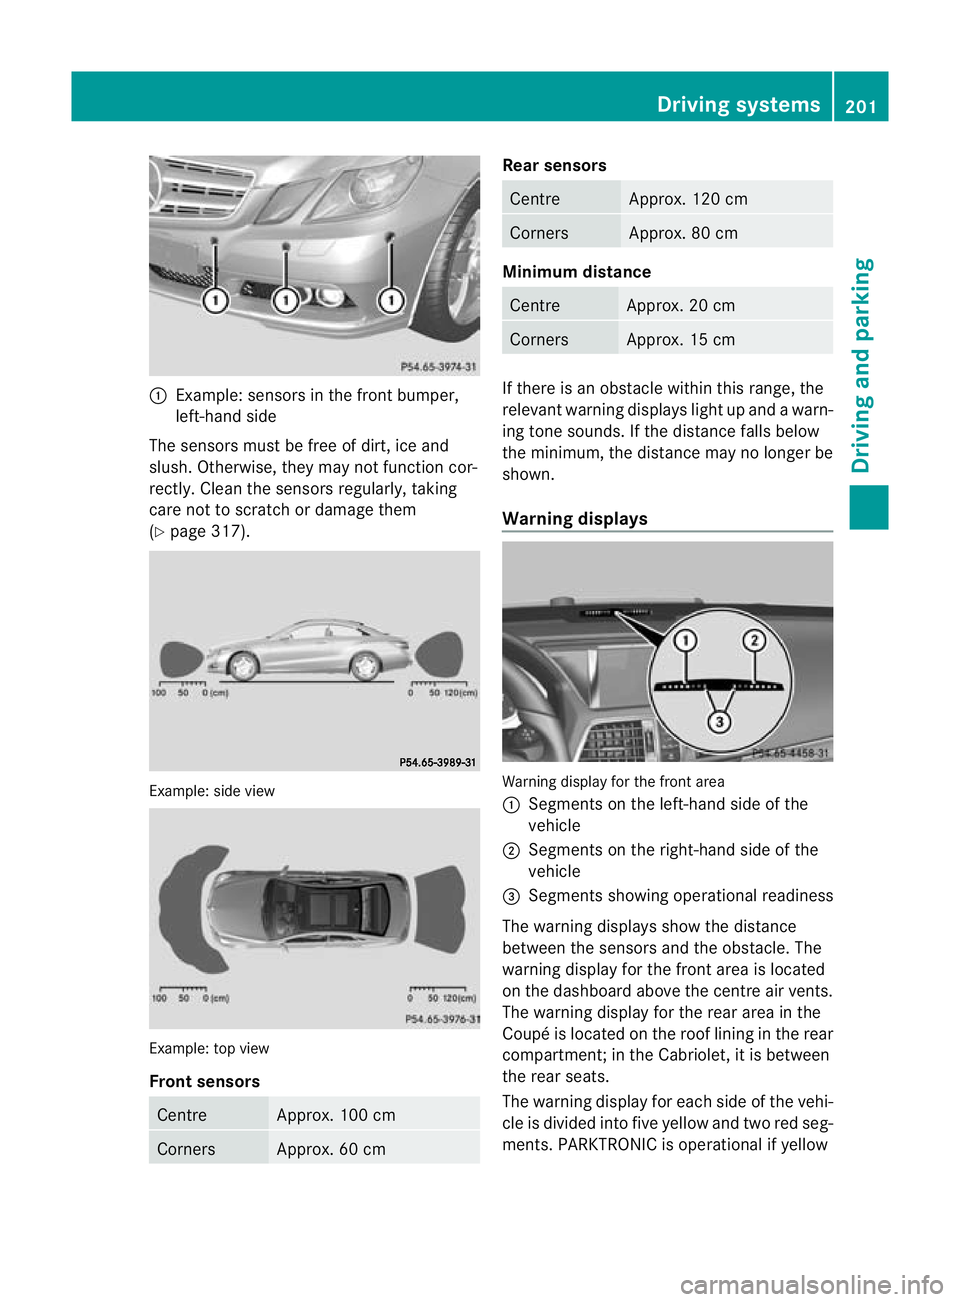
Example: sensors in the front bumper,
left-hand side
The sensors must be free of dirt, ice and
slush. Otherwise, they may not functio ncor-
rectly. Clean the sensors regularly, taking
care not to scratch or damage them
(Y page 317). Example: side view
Example: top view
Front sensors
Centre Approx. 100 cm
Corners Approx. 60 cm Rear sensors
Centre Approx. 120 cm
Corners Approx. 80 cm
Minimum distance
Centre Approx. 20 cm
Corners Approx. 15 cm
If there is an obstacle within this range, the
relevant warning displays light up and a warn-
ing tone sounds. If the distance falls below
the minimum, the distance may no longer be
shown.
Warning displays
Warning display for the front area
:
Segments on the left-hand side of the
vehicle
; Segments on the right-hand side of the
vehicle
= Segments showing operational readiness
The warning displays show the distance
between the sensors and the obstacle. The
warning display for the front area is located
on the dashboard above the centre air vents.
The warning display for the rear area in the
Coupé is located on the roof lining in the rear
compartment; in the Cabriolet, it is between
the rear seats.
The warning display for each side of the vehi-
cle is divided into five yellow and two red seg-
ments. PARKTRONIC is operational if yellow Driving systems
201Driving and parking Z