clock MERCEDES-BENZ E-CLASS COUPE 2012 Owners Manual
[x] Cancel search | Manufacturer: MERCEDES-BENZ, Model Year: 2012, Model line: E-CLASS COUPE, Model: MERCEDES-BENZ E-CLASS COUPE 2012Pages: 389, PDF Size: 9.32 MB
Page 33 of 389
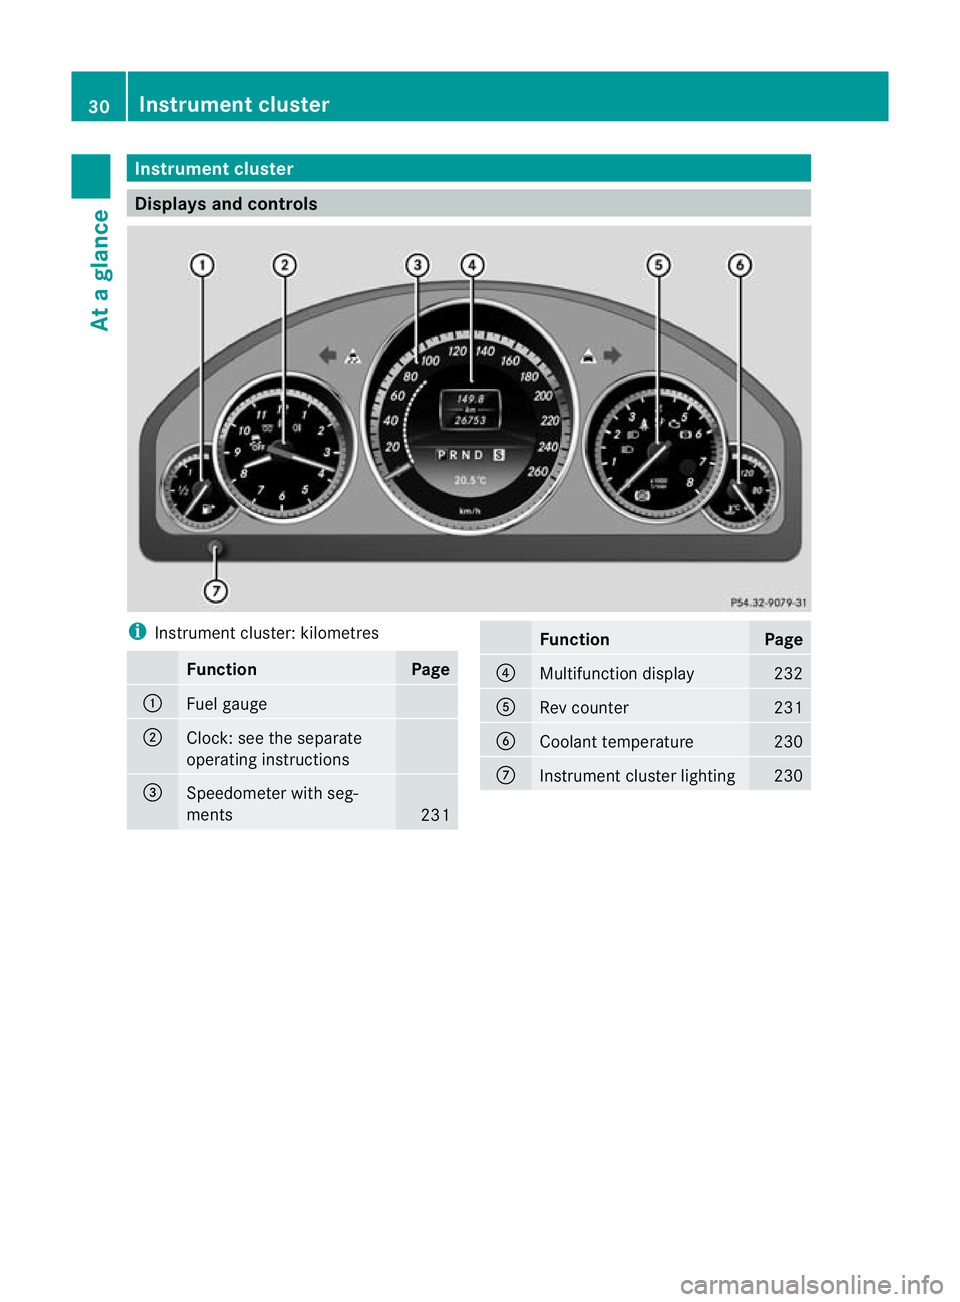
Instrumen
tcluster Displays and controls
i
Instrument cluster: kilometres Function Page
:
Fuel gauge
;
Clock
:see the separate
operating instructions =
Speedometer with seg-
ments
231 Function Page
?
Multifunction display 232
A
Rev counter 231
B
Coolant temperature 230
C
Instrument cluster lighting 23030
Instrument clusterAt a glance
Page 34 of 389
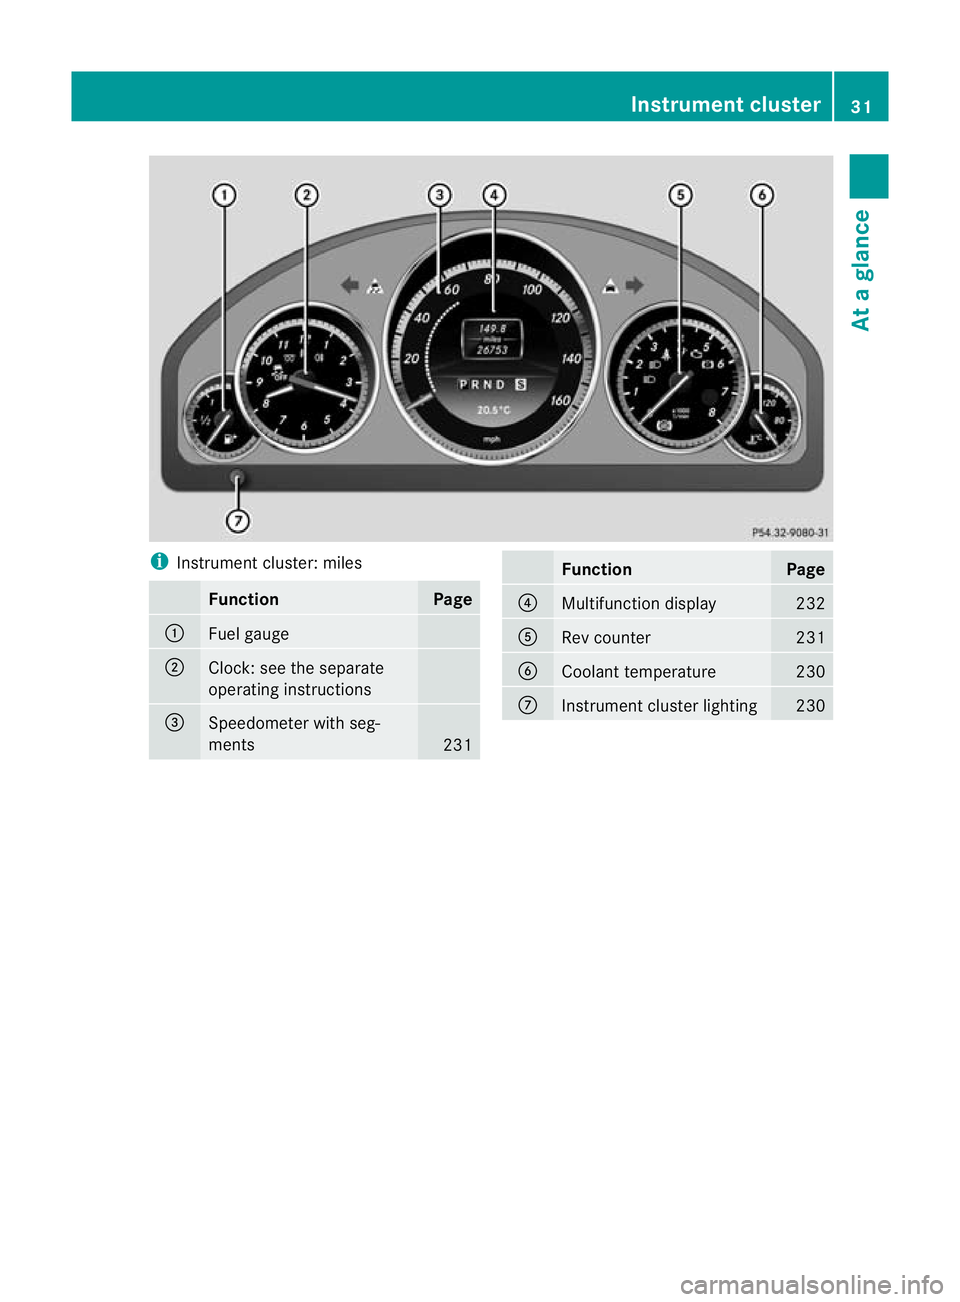
i
Instrument cluster: miles Function Page
:
Fuel gauge
;
Clock: see the separate
operating instructions
=
Speedometer with seg-
ments
231 Function Page
?
Multifunction display 232
A
Rev counter 231
B
Coolant temperature 230
C
Instrument cluster lighting 230Instrument cluster
31At a glance
Page 87 of 389
If the vehicle has been locked using the lock-
ing button for the central locking, or has been
locked automatically, and
adoor is opened
from the inside:
R the vehicle will be fully unlocked if it had
previously been fully unlocked.
R only the door which has been opened from
the inside is unlocked if only the driver's
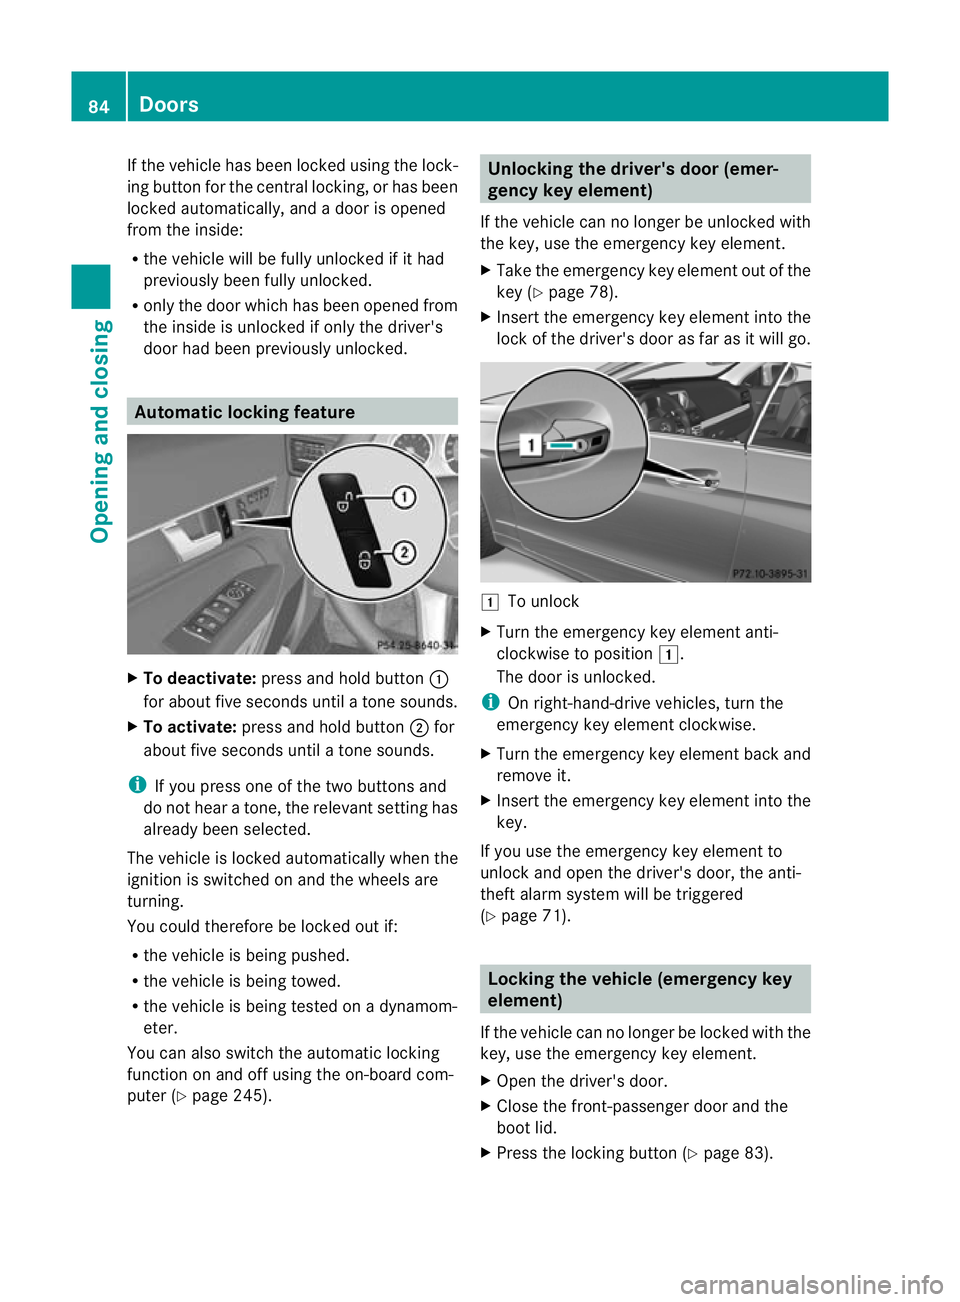
door had been previously unlocked. Automatic locking feature
X
To deactivate: press and hold button :
for about five seconds until a tone sounds.
X To activate: press and hold button ;for
about five seconds until a tone sounds.
i If you press one of the two buttons and
do not hear a tone, the relevant setting has
already been selected.
The vehicle is locked automatically when the
ignition is switched on and the wheels are
turning.
You could therefore be locked out if:
R the vehicle is being pushed.
R the vehicle is being towed.
R the vehicle is being tested on a dynamom-
eter.
You can also switch the automatic locking
function on and off using the on-board com-
puter (Y page 245). Unlocking the driver's door (emer-
gency key element)
If the vehicle can no longer be unlocked with
the key, use the emergency key element.
X Take the emergency key element out of the
key (Y page 78).
X Insert the emergency key element into the
lock of the driver's door as far as it will go. 1
To unlock
X Turn the emergency key element anti-
clockwise to position 1.
The door is unlocked.
i On right-hand-drive vehicles, turn the
emergency key element clockwise.
X Turn the emergency key element back and
remove it.
X Insert the emergency key element into the
key.
If you use the emergenc ykey element to
unlock and open the driver's door, the anti-
thef talarm system will be triggered
(Y page 71). Locking the vehicle (emergency key
element)
If the vehicle can no longer be locked with the
key, use the emergency key element.
X Open the driver's door.
X Close the front-passenger door and the
boot lid.
X Press the locking button (Y page 83).84
DoorsOpening and closing
Page 88 of 389
X
Chec kwhether the locking knob on the
front-passenger door is still visible. Press
down the locking knob by hand, if neces-
sary (Y page 83).
X Close the driver's door.
X Take the emergency key element out of the
key (Y page 78).
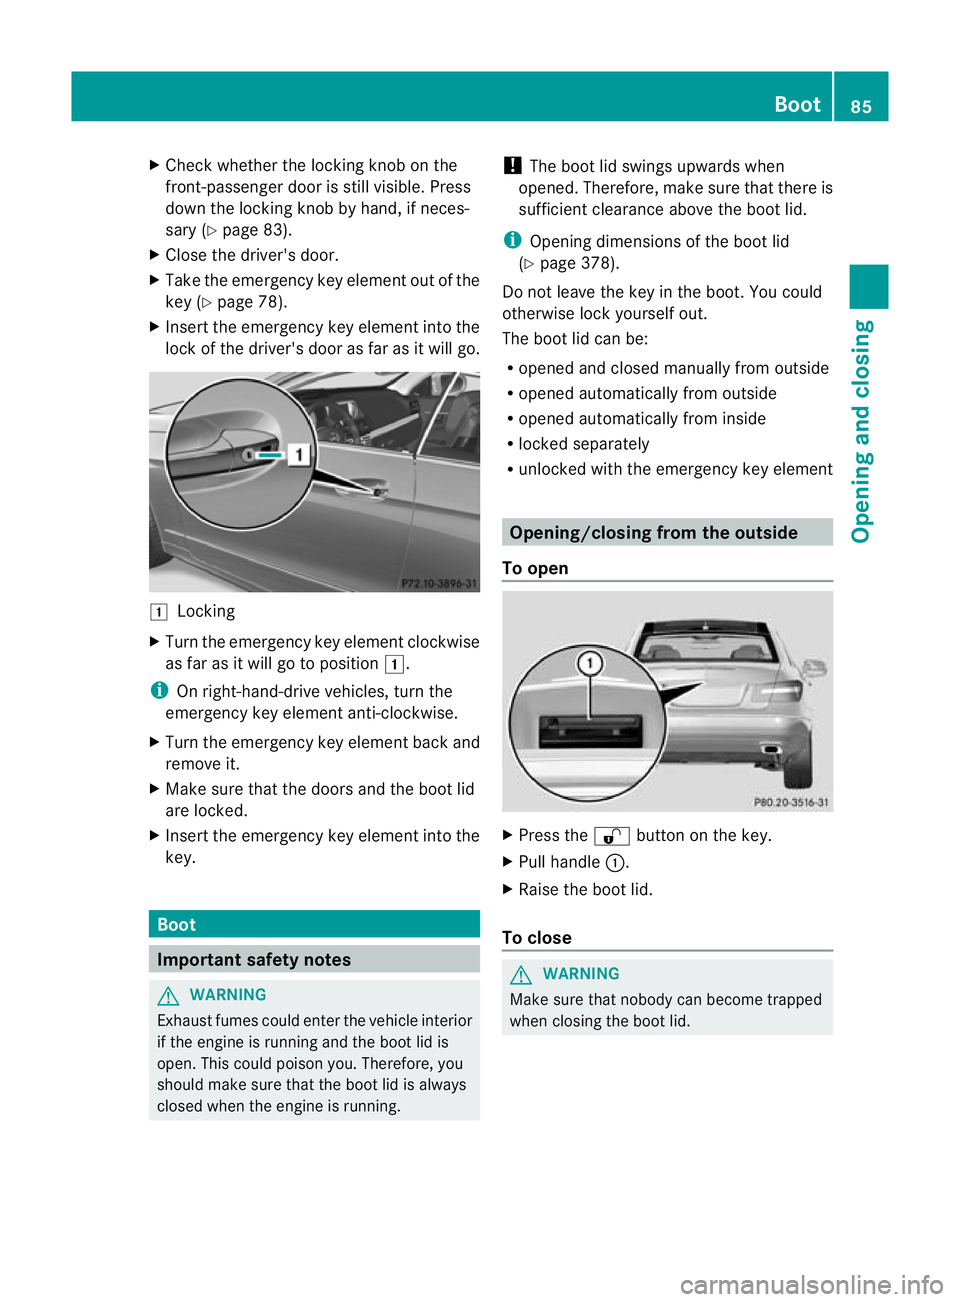
X Insert the emergency key element into the
lock of the driver's door as far as it will go. 1
Locking
X Turn the emergency key element clockwise
as far as it will go to position 1.
i On right-hand-drive vehicles, turn the
emergency key element anti-clockwise.
X Turn the emergency key element back and
remove it.
X Make sure that the doors and the boot lid
are locked.
X Insert the emergency key element into the
key. Boot
Important safety notes
G
WARNING
Exhaust fumes could enter the vehicle interior
if the engine is running and the boot lid is
open. This could poison you. Therefore, you
should make sure that the boot lid is always
closed when the engine is running. !
The boot lid swings upwards when
opened. Therefore, make sure that there is
sufficient clearance above the boot lid.
i Opening dimensions of the boot lid
(Y page 378).
Do not leave the key in the boot. You could
otherwise lock yourself out.
The boot lid can be:
R opened and closed manually from outside
R opened automatically from outside
R opened automatically from inside
R locked separately
R unlocked with the emergency key element Opening/closing from the outside
To open X
Press the %button on the key.
X Pull handle :.
X Raise the boot lid.
To close G
WARNING
Make sure that nobody can become trapped
when closing the boot lid. Boot
85Opening and closing Z
Page 90 of 389
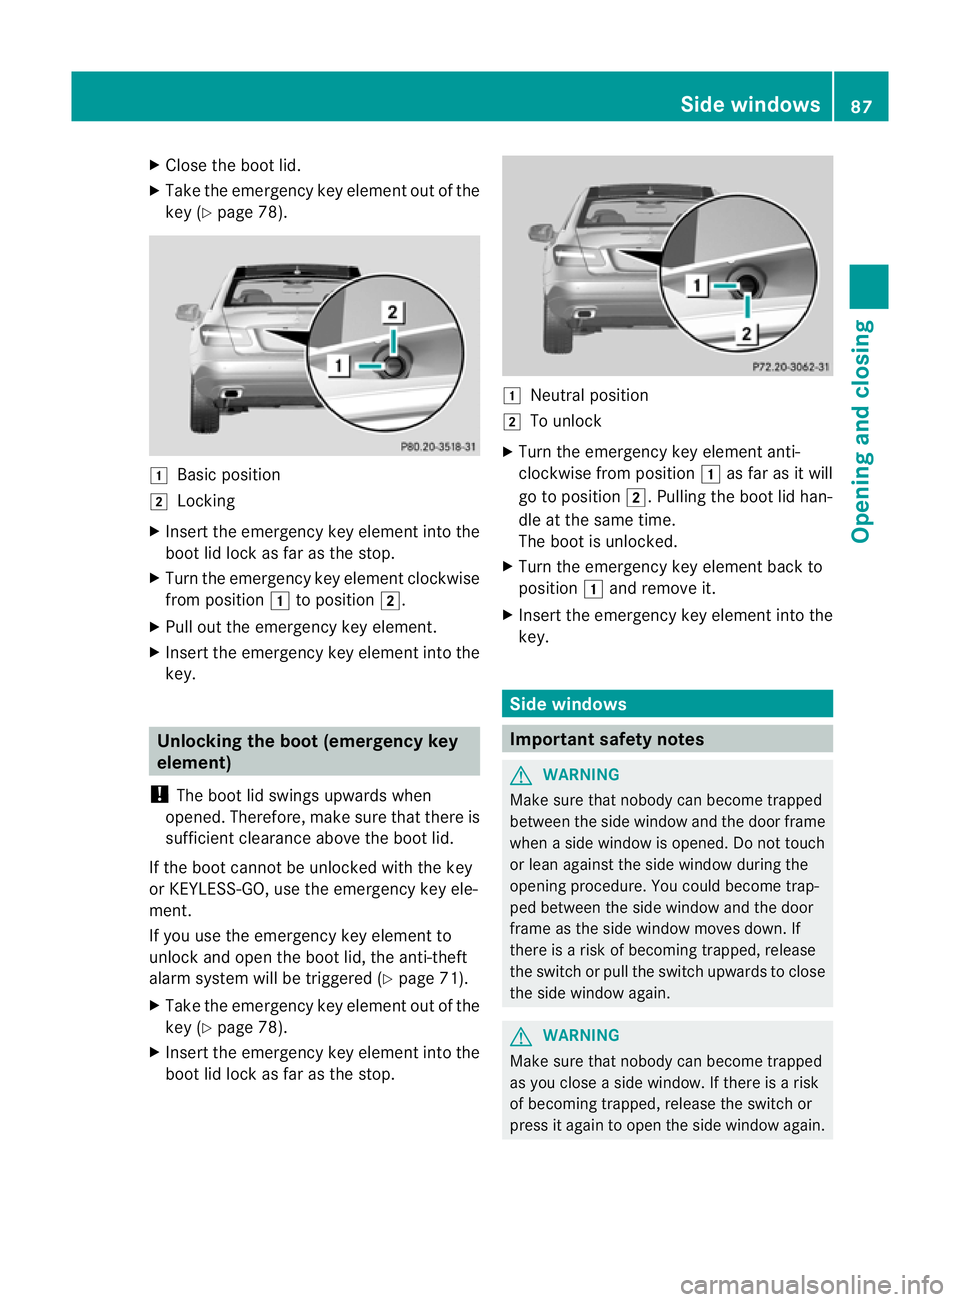
X
Close the boot lid.
X Take the emergency key elemen tout of the
key (Y page 78). 1
Basic position
2 Locking
X Inser tthe emergency key element into the
boot lid lock as far as the stop.
X Turn the emergency key element clockwise
from position 1to position 2.
X Pull out the emergency key element.
X Insert the emergency key element into the
key. Unlocking the boot (emergency key
element)
! The boot lid swings upwards when
opened. Therefore, make sure that there is
sufficient clearance above the boot lid.
If the boot cannot be unlocked with the key
or KEYLESS-GO, use the emergency key ele-
ment.
If you use the emergency key element to
unlock and open the boot lid, the anti-theft
alarm system will be triggered (Y page 71).
X Take the emergency key element out of the
key (Y page 78).
X Insert the emergency key element into the
boot lid lock as far as the stop. 1
Neutral position
2 To unlock
X Turn the emergency key element anti-
clockwise from position 1as far as it will
go to position 2.Pulling the boot lid han-
dle at the same time.
The boot is unlocked.
X Turn the emergency key element back to
position 1and remove it.
X Inser tthe emergency key element into the
key. Side windows
Important safety notes
G
WARNING
Make sure that nobody can become trapped
between the side window and the door frame
when a side window is opened. Do not touch
or lean against the side window during the
opening procedure. You could become trap-
ped between the side window and the door
frame as the side window moves down. If
there is a risk of becoming trapped, release
the switch or pull the switch upwards to close
the side window again. G
WARNING
Make sure that nobody can become trapped
as you close a side window. If there is a risk
of becoming trapped, release the switch or
press it again to open the side window again. Side windows
87Opening and closing Z
Page 98 of 389
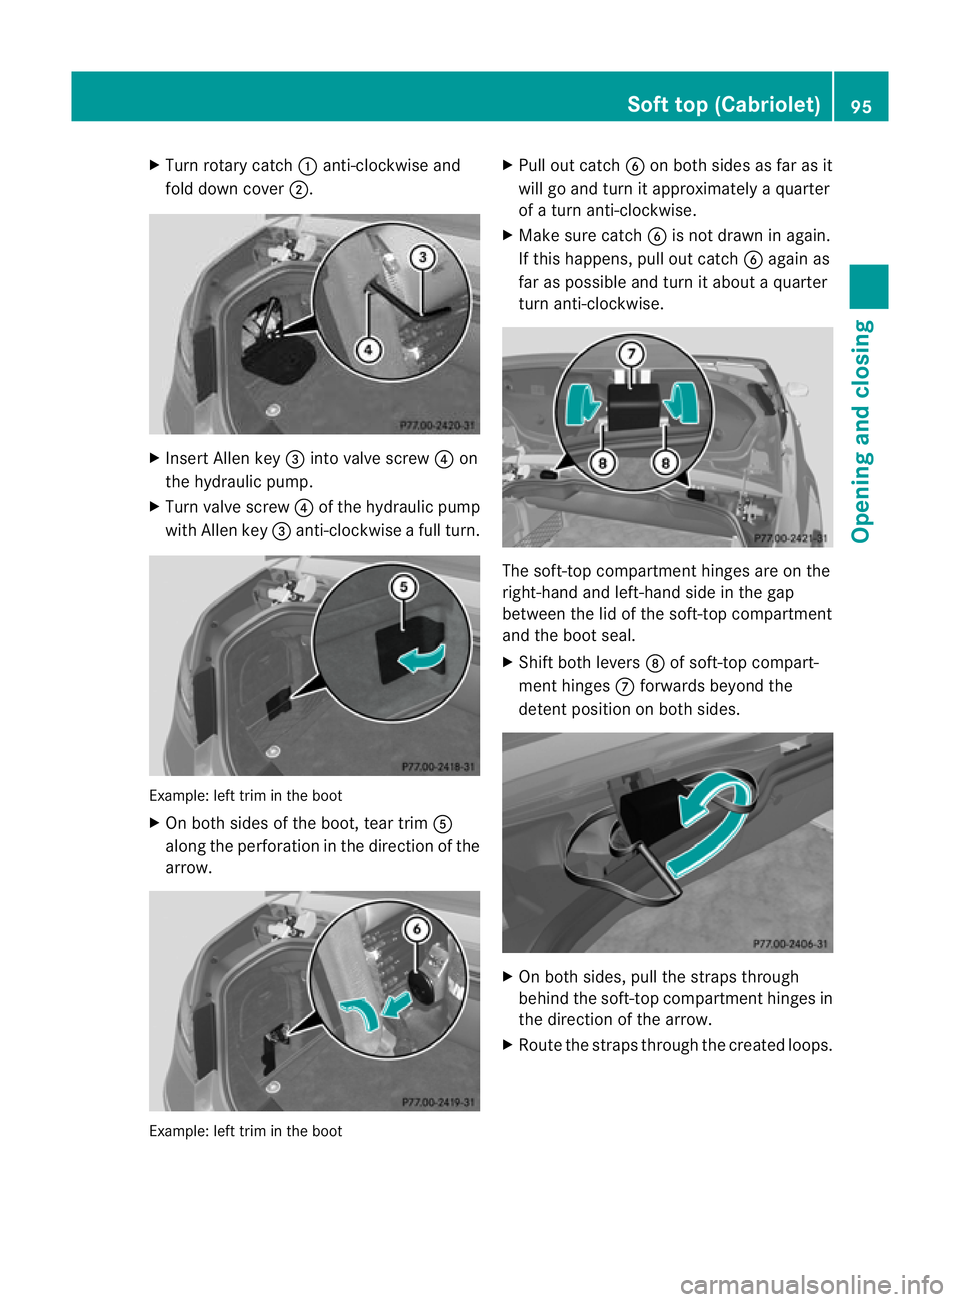
X
Turn rotary catch :anti-clockwise and
fold down cover ;. X
Insert Allen key =into valve screw ?on
the hydrauli cpump.
X Turn valve screw ?of the hydraulic pump
with Allen key =anti-clockwise a full turn. Example: left trim in the boot
X
On both sides of the boot ,tear trim A
along the perforation in the direction of the
arrow. Example: left trim in the boot X
Pull out catch Bon both sides as far as it
will go and turn it approximately a quarter
of a turn anti-clockwise.
X Make sure catch Bis not drawn in again.
If this happens, pull out catch Bagain as
far as possible and turn it about a quarter
turn anti-clockwise. The soft-top compartment hinges are on the
right-hand and left-hand side in the gap
between the lid of the soft-top compartment
and the boot seal.
X
Shift both levers Dof soft-top compart-
ment hinges Cforwards beyond the
deten tposition on both sides. X
On both sides, pull the straps through
behind the soft-top compartment hinges in
the direction of the arrow.
X Route the straps through the created loops. Soft top (Cabriolet)
95Opening and closing Z
Page 100 of 389
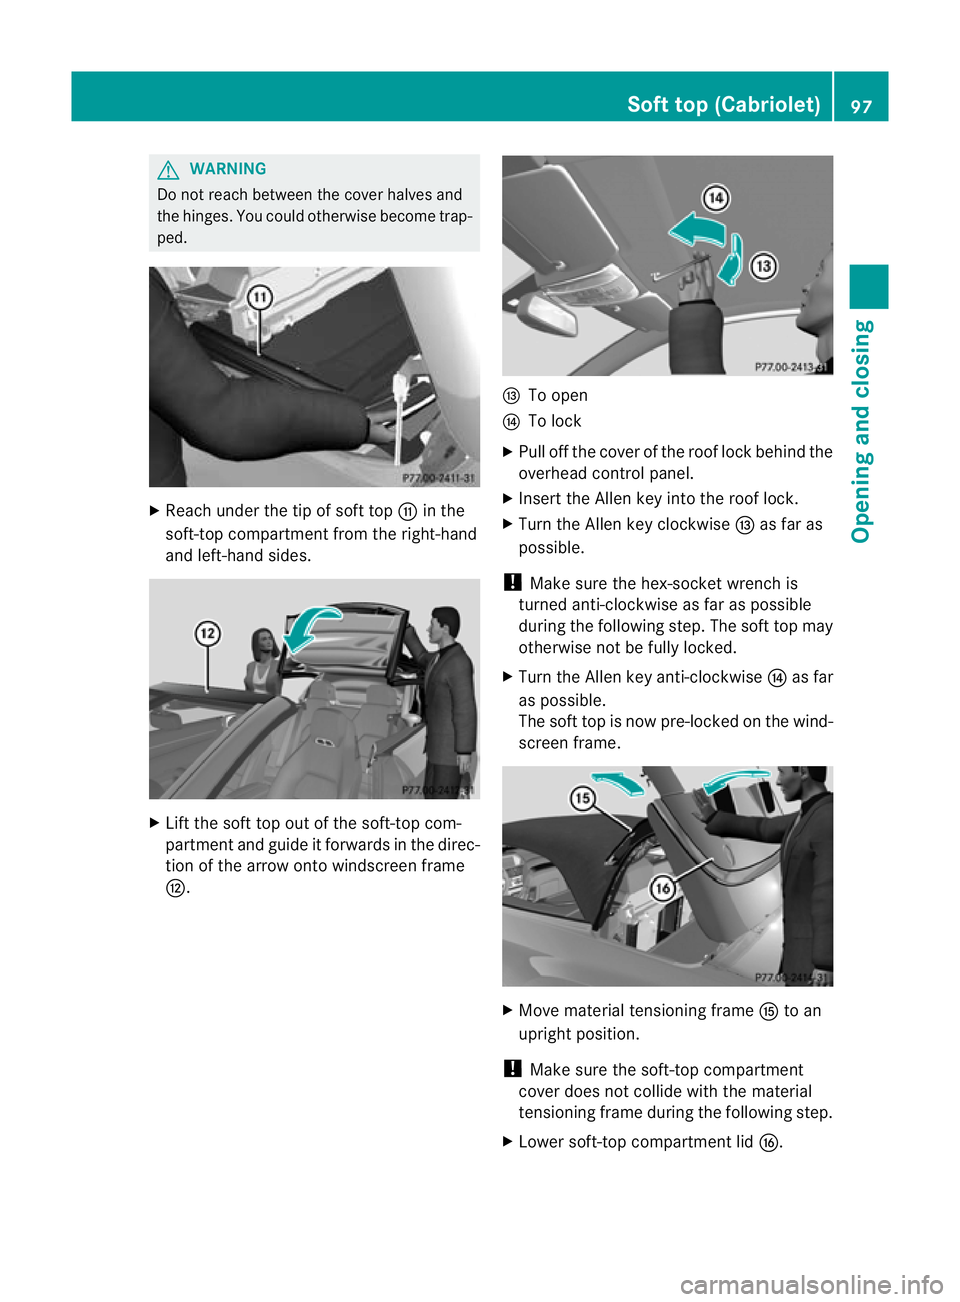
G
WARNING
Do not reach between the cover halves and
the hinges .You could otherwise become trap-
ped. X
Reach under the tip of soft top Gin the
soft-top compartment from the right-hand
and left-hand sides. X
Lift the soft top out of the soft-top com-
partment and guide it forwards in the direc-
tion of the arrow onto windscreen frame
H. I
To open
J To lock
X Pull off the cover of the roof lock behind the
overhead control panel.
X Insert the Allen key into the roof lock.
X Turn the Allen key clockwise Ias far as
possible.
! Make sure the hex-socket wrench is
turned anti-clockwise as far as possible
during the following step. The soft top may
otherwise not be fully locked.
X Turn the Allen key anti-clockwise Jas far
as possible.
The soft top is now pre-locked on the wind-
screen frame. X
Move material tensioning frame Kto an
upright position.
! Make sure the soft-top compartment
cover does not collide with the material
tensioning frame during the following step.
X Lower soft-top compartment lid L. Soft top (Cabriolet)
97Opening and closing Z
Page 101 of 389
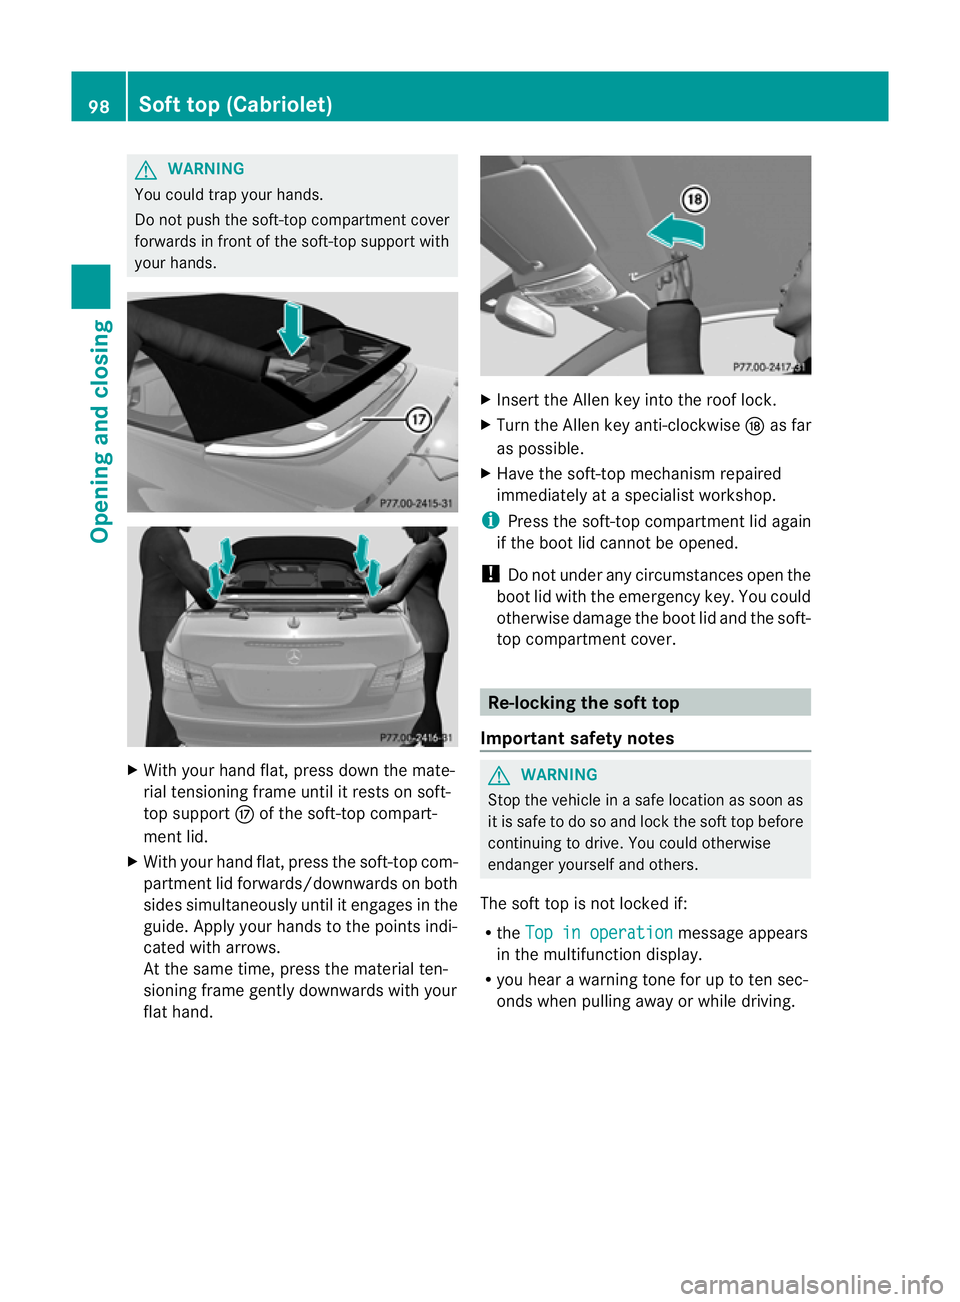
G
WARNING
You could trap yourh ands.
Do not push the soft-top compartment cover
forwards in front of the soft-top support with
your hands. X
With your hand flat, pres sdown the mate-
rial tensioning frame until it rests on soft-
top support Mof the soft-top compart-
ment lid.
X With your hand flat, press the soft-top com-
partmen tlid forwards/downwards on both
sides simultaneously until it engages in the
guide. Apply your hands to the points indi-
cated with arrows.
At the same time, press the material ten-
sioning frame gently downwards with your
flat hand. X
Insert the Allen key into the roof lock.
X Turn the Allen key anti-clockwise Nas far
as possible.
X Have the soft-top mechanis mrepaired
immediately at a specialist workshop.
i Press the soft-top compartment lid again
if the boot lid cannot be opened.
! Do not under any circumstances open the
boot lid with the emergency key. You could
otherwise damage the boot lid and the soft-
top compartment cover. Re-locking the soft top
Important safety notes G
WARNING
Stop the vehicle in a safe location as soon as
it is safe to do so and lock the soft top before
continuing to drive. You could otherwise
endanger yourself and others.
The soft top is not locked if:
R the Top in operation message appears
in the multifunction display.
R you hear a warning tone for up to ten sec-
onds when pulling away or while driving. 98
Soft top (Cabriolet)Opening and closing
Page 104 of 389
i
AIRCAP cannot be extended or retracted
if the vehicle speed exceeds 160 km/h.
Retracting AIRCAP X
Turn the key to position 2in the ignition
lock.
X Open the cover on the lower centre con-
sole.
X Press AIRCAP button :.
The two indicator lamps on the AIRCAP but-
ton go out. Wind deflector ;retracts.
The head restraints on the rea rbench seats
and AIRCAP draught stop =move to the
lower position simultaneously.
i If there are passengers wearing seat belts
in the rear compartment, the head
restraints on the rear bench seats and the
AIRCAP draught stop remain in the upper
position.
Retracting the head restraints on the
rear bench seats from the driver's seat To improve the rear view, you can retract the
head restraints on the rear bench seats indi-
vidually (Y page 111). The wind deflector
remains in its current position. Fitting/removing the AIRCAP draught
stop
Preparation You will need a
4mmAllen key to fit/remove
the AIRCAP draught stop.
Before fitting or removing the AIRCAP draught
stop:
X Turn the key to position 2in the ignition
lock.
X Open the folding roof fully (Y page 93).
X Extend the head restraints in the rear com-
partment fully (Y page 111). Removing
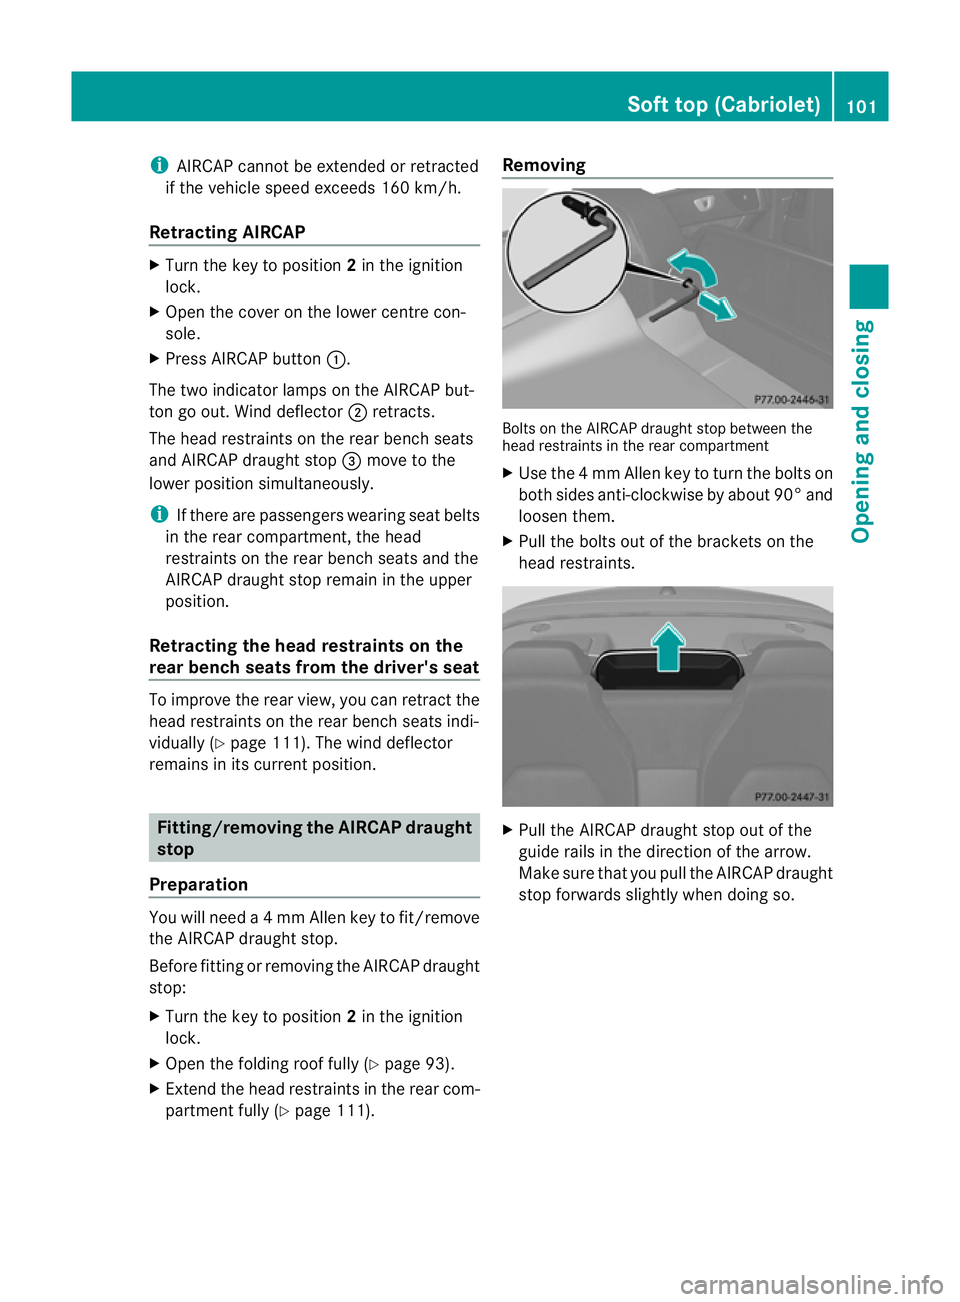
Bolts on the AIRCAP draught stop between the
head restraints in the rear compartment
X
Use the 4mmAllen key to tur nthe bolts on
both sides anti-clockwise by about 90° and
loosen them.
X Pull the bolts out of the brackets on the
head restraints. X
Pull the AIRCAP draught stop out of the
guide rails in the direction of the arrow.
Make sure that you pull the AIRCAP draught
stop forwards slightly when doing so. Soft top (Cabriolet)
101Opening and closing Z
Page 125 of 389
Useful information
i This Owner's Manual describes all mod-
els, series and optional equipment for your
vehicle that were available at the time of
going to press. National variations are pos-
sible. Note that your vehicle may not be
equipped with all of the functions descri-
bed. This is also the case for systems and
functions relevant to safety.
i Read the information on qualified special-
ist workshops: (Y page 23). Exterior lighting
Important safety notes
For reasons of safety, Mercedes-Benz recom-
mends that you drive with the lights switched
on even during the daytime. In some coun-
tries, operation of the headlamps varies due
to legal requirements and self-imposed obli-
gations. Driving abroad
General notes If your journey takes you to countries where
vehicles are driven on the opposite side of the
road to the country in which the vehicle is
registered, your headlamps must be switched
to symmetrical dipped beam as soon as pos-
sible after crossing the border. This prevents
oncoming traffic from being dazzled. Sym-
metrical lights do not illuminate as large an
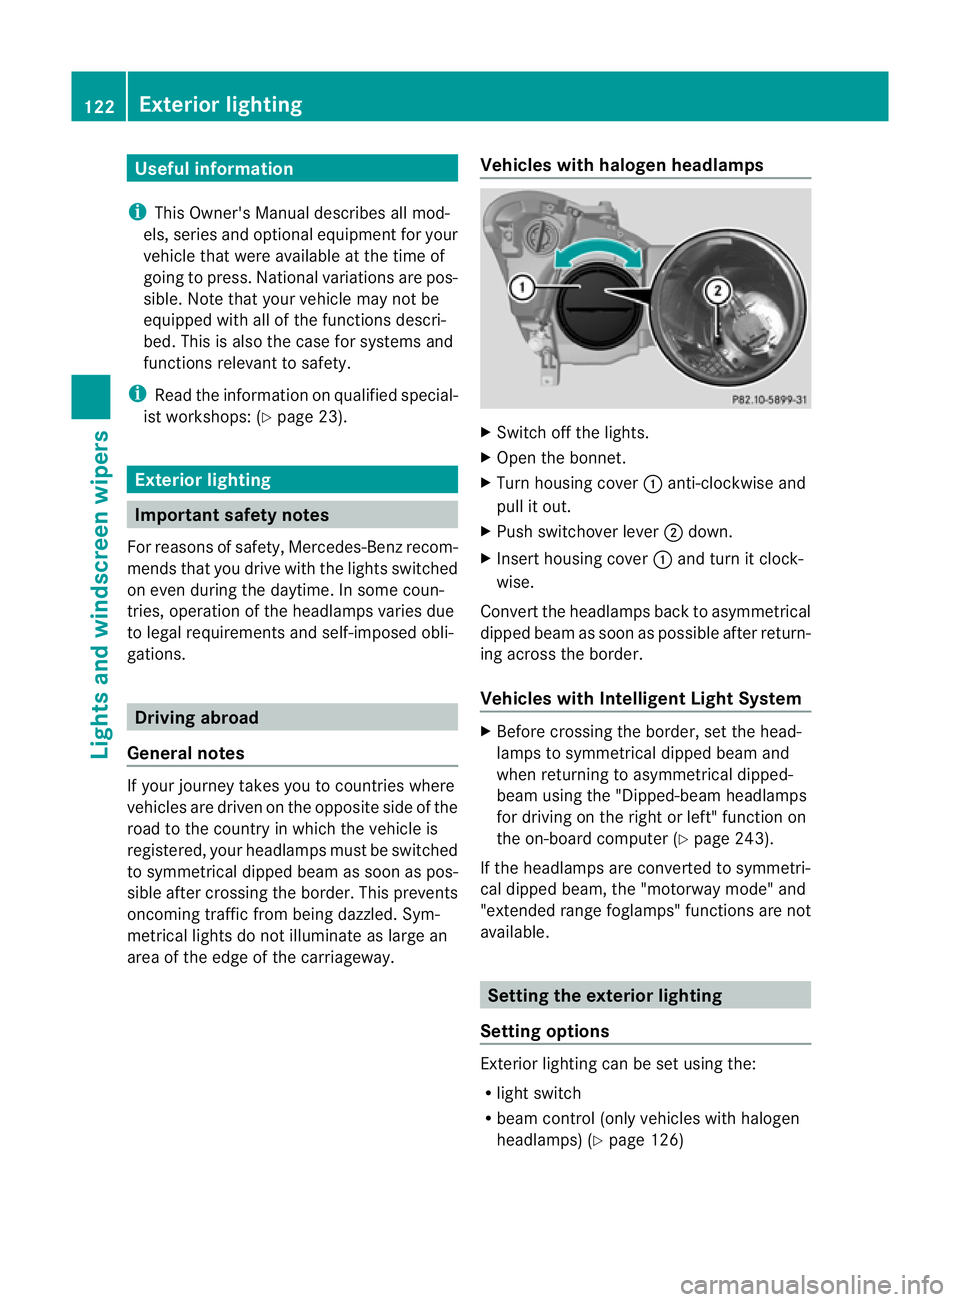
area of the edge of the carriageway. Vehicles with halogen headlamps X
Switch off the lights.
X Open the bonnet.
X Turn housing cover :anti-clockwise and
pull it out.
X Push switchover lever ;down.
X Insert housing cover :and turn it clock-
wise.
Conver tthe headlamps back to asymmetrical
dipped beam as soon as possible after return-
ing across the border.
Vehicles with Intelligent Light System X
Before crossing the border, set the head-
lamps to symmetrical dipped beam and
when returning to asymmetrical dipped-
beam using the "Dipped-beam headlamps
for driving on the right or left" function on
the on-board computer (Y page 243).
If the headlamps are converted to symmetri-
cal dipped beam, the "motorway mode" and
"extended range foglamps" functions are not
available. Setting the exterior lighting
Setting options Exterior lighting can be set using the:
R
light switch
R beam control (only vehicles with halogen
headlamps) (Y page 126)122
Exterior lightingLights and windscreen wipers