ignition MERCEDES-BENZ E-CLASS COUPE 2012 Owners Manual
[x] Cancel search | Manufacturer: MERCEDES-BENZ, Model Year: 2012, Model line: E-CLASS COUPE, Model: MERCEDES-BENZ E-CLASS COUPE 2012Pages: 389, PDF Size: 9.32 MB
Page 14 of 389
Fuel
Additives ........................................ 373
Consumptio ninformation ..............374
Consumption statistics ..................233
Displaying the current consump-
tion ................................................ 234
Displaying the range ......................234
Fuel gauge ............................... 30, 229
Grade (petrol) ................................ 372
Important safety notes ..................372
Problem (malfunction) ...................176
Quality (diesel )............................... 373
Refuelling ...................................... .173
Tank content/reserve fuel .............372
Fuel filler flap
Opening/closing ............................ 174
Fuel filte r(white display message) .262
Fuel level Calling up the range (on-board
computer) ...................................... 234
Gauge ...................................... 30, 229
Fuel reserve
see Fuel
Fuel tank
Capacity ........................................ 372
Problem (malfunction) ...................176
Fuse allocation chart (vehicle tool
kit) ...................................................... 323
Fuses Allocation chart ............................. 336
Before changing ............................. 336
Dashboard fuse box .......................336
Fuse box in the boot ......................337
Fuse box in the engine compart-
ment .............................................. 337
Important safety notes ..................336 G
Garage door opener Clearing the memory .....................299
Frequencies ................................... 299
Important safety notes ..................297
Opening/closing the garage door ..299
Programming (button in the rear-
view mirror) ................................... 297
Genuine Mercedes-Benz parts .........368
Glove compartment ..........................287 H
Handbrake see Parking brake
Hazard warning lamps ......................127
Headbag Display message ............................ 255
Operation ........................................ .46
Headlamp
Cleaning system (function) ............128
Cleaning system (notes) ................377
Headlamps
Misting up ...................................... 131
Topping up the cleaning system ....310
see Automatic headlamp mode
Head level heating (AIRSCARF) ........115
Head restraint Lowering manually (rear) ...............111
Head restraints
Adjusting ....................................... 111
Adjusting (electrically). ..................111
Adjusting (manually). .....................111
Adjusting (rear) .............................. 111
see NECK-PR Ohead restraints
Heating
see Climate control
High-pressure cleaners ....................313
Hill start assist .................................. 162
HOLD function Display message ............................ 263
Function/notes ............................. 198 I
Ignition lock see Key positions
Immobiliser .......................................... 71
Indicator and warning lamps Coolant .......................................... 281
DISTRONI CPLUS ........................... 283
Engine diagnostics .........................280
Indicator lamps
Display message ............................ 256
see Warning and indicator lamps
Insectp rotection on the radiator ....308
Inspection see ASSYST PLUS Index
11
Page 15 of 389
Instrumen
tcluster
Overview .................................. 30, 229
Settings ......................................... 242
Warning and indicator
lamps ...................................... .32, 275
Instrument cluster lighting ..............230
Intelligen tLight System
Activating/deactivatin g................. 243
Display message ............................ 258
Overview ........................................ 128
Setting the dipped-bea mhead-
lamps for driving on the right/left .243
Interior lighting ................................. 131
Automatic control system ..............131
Delayed switch-off (on-board
computer) ...................................... 245
Emergency lighting ........................132
Manual control ............................... 132
Overview ........................................ 131
Reading lamp ................................. 131
Interior motion sensor ........................72
ISOFIX child seat securing system ....57 J
Jack Storage location ............................ 323
Using ............................................. 348
Jump start (engine)
see Jump starting (engine)
Jump starting (engine) ......................331 K
Key Changing the battery .......................79
Checking the battery .......................79
Convenience closing feature ............90
Convenience opening feature ..........90
Display message ............................ 274
Door central locking/unlocking .......77
Emergency key element ................... 78
Important safety notes ....................76
Loss ................................................. 81
Modifying the programming .............78
Opening/closing soft top .................94
Positions (ignition lock) .................159Problem (malfunction)
.....................81
Starting the engine ........................160
KEYLESS-GO
Convenience closing ........................90
Display message ............................ 274
Locking ............................................ 77
Start/Stop button .......................... 159
Starting the engine ........................161
Unlocking ......................................... 77
Keyp ositions
Key ................................................ 159
KEYLESS GO .................................. 159
Kickdown
Driving tips .................................... 169
Manual drive program ....................172
Kneebag ............................................... 45 L
Lamps see Warning and indicator lamps
Lane Keeping Assist
Activating/deactivating .................241
Display message ............................ 264
Function/informatio n.................... 212
Lane package ..................................... 210
Lashing eyelets ................................. 289
Licence plate lamp (display mes-
sage) ................................................... 257
Lighting see Lights
Lights
Activating/deactivating the Intel-
ligent Ligh tSystem ........................ 243
Activating/deactivating the inte-
rior lighting delayed switch-off .......245
Active light function .......................128
Automatic headlamp mode ............123
Cornering light function .................128
Dipped-bea mheadlamps ............... 124
Driving abroad ............................... 122
Foglamps ....................................... 124
Foglamps (extended range) ...........129
Hazard warning lamps ...................127
Headlamp flasher ........................... 127
Headlamp range ............................ 126
Ligh tswitc h................................... 123
Main-beam headlamps ................... 127 12
Index
Page 31 of 389
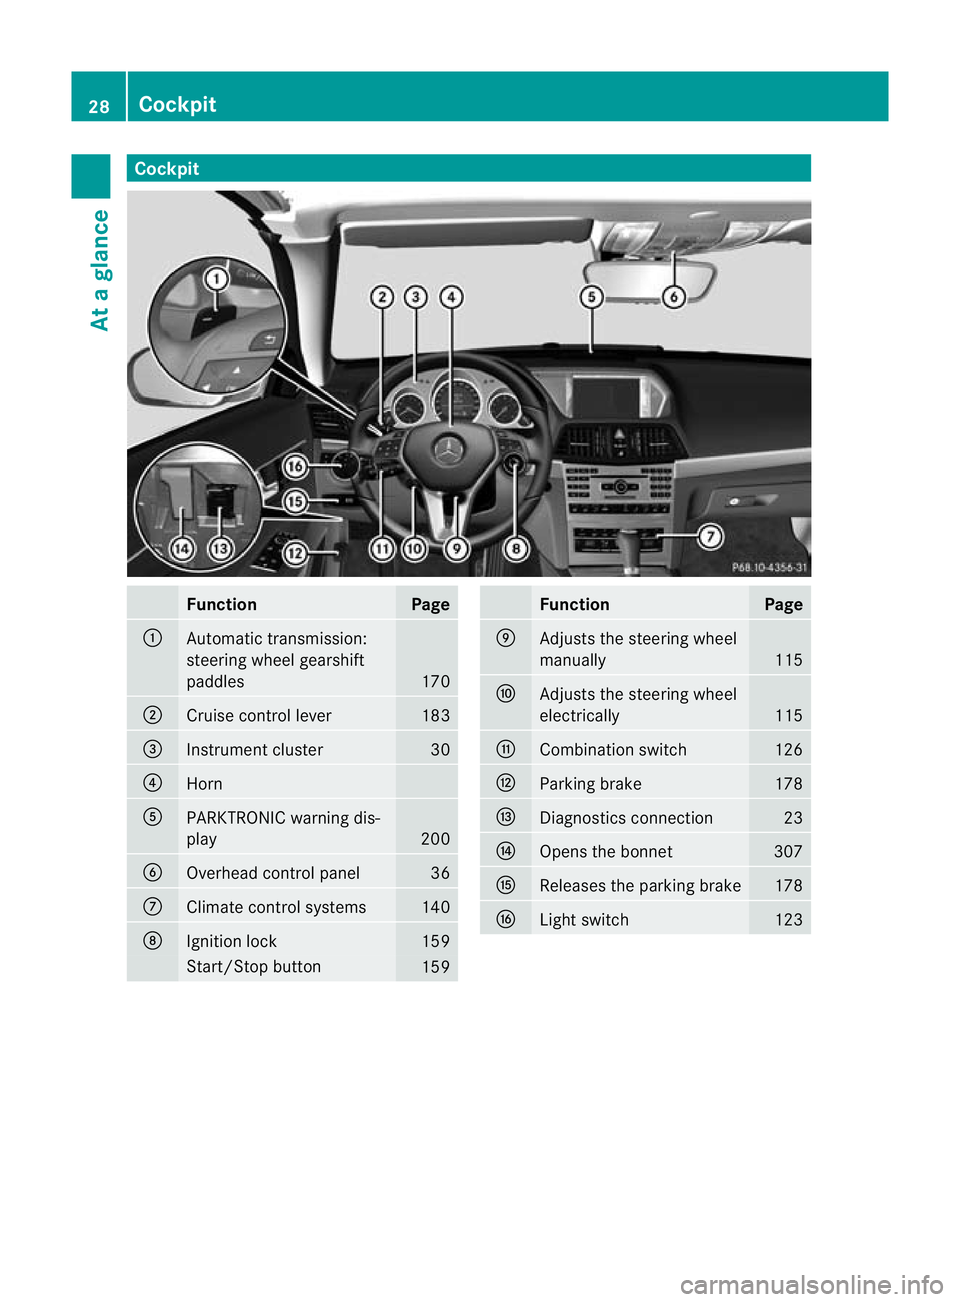
Cockpit
Function Page
:
Automatic transmission:
steering wheel gearshift
paddles
170
;
Cruise control lever 183
=
Instrument cluster 30
?
Horn
A
PARKTRONIC warning dis-
play
200
B
Overhead control panel 36
C
Climate control systems 140
D
Ignition lock 159
Start/Stop button
159 Function Page
E
Adjusts the steering wheel
manually 115
F
Adjusts the steering wheel
electrically 115
G
Combination switch 126
H
Parking brake 178
I
Diagnostics connection 23
J
Opens the bonnet 307
K
Releases the parking brake 178
L
Ligh
tswitch 12328
CockpitAt a glance
Page 32 of 389
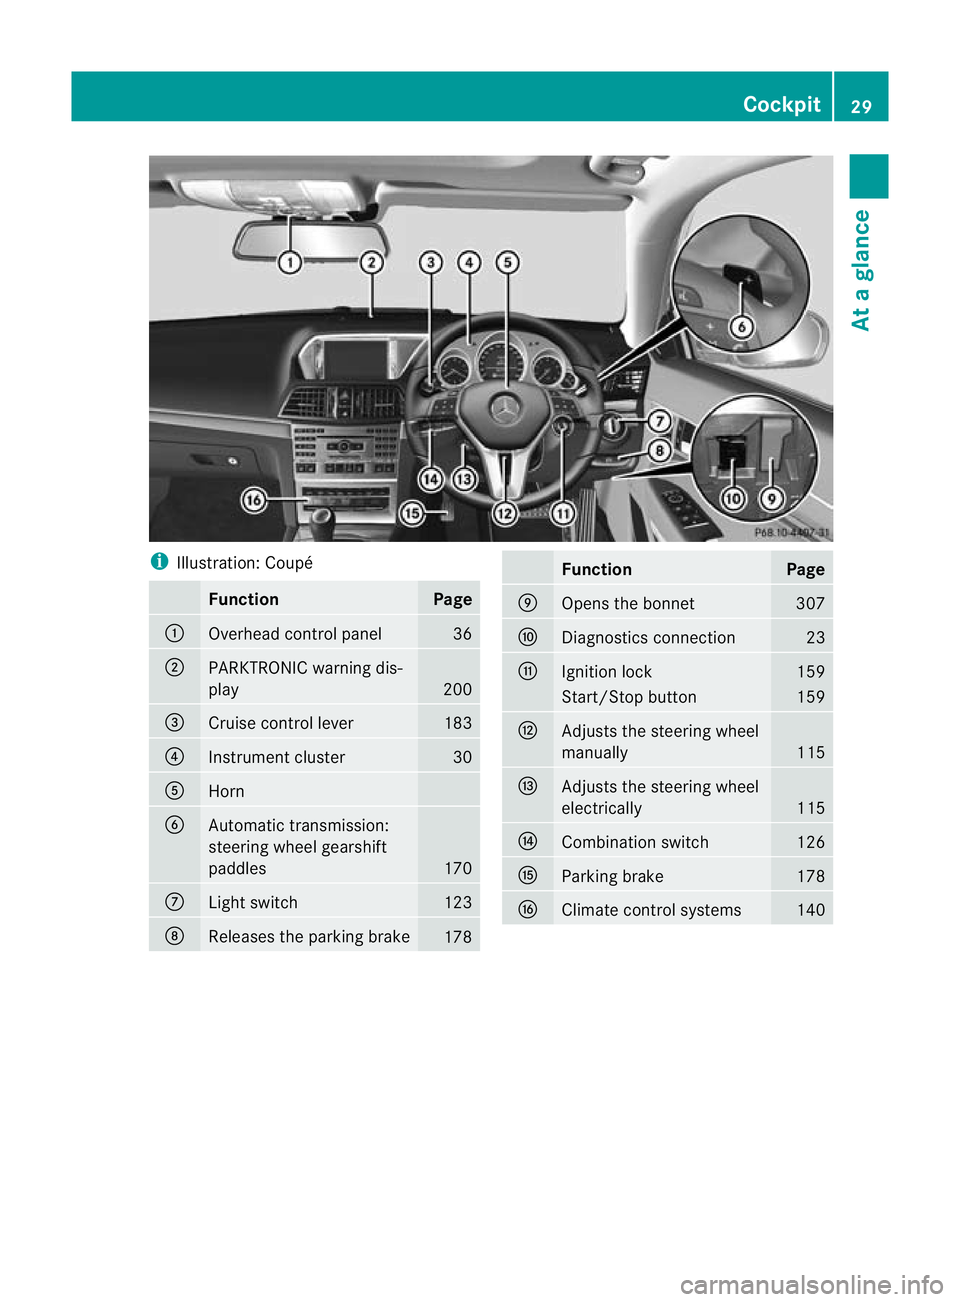
i
Illustration: Coupé Function Page
:
Overhead control panel 36
;
PARKTRONIC warning dis-
play
200
=
Cruise control lever 183
?
Instrument cluster 30
A
Horn
B
Automatic transmission:
steering wheel gearshift
paddles
170
C
Light switch 123
D
Releases the parking brake
178 Function Page
E
Opens the bonnet 307
F
Diagnostics connection 23
G
Ignition lock 159
Start/Stop button 159
H
Adjusts the steering wheel
manually
115
I
Adjusts the steering wheel
electrically
115
J
Combination switch 126
K
Parking brake 178
L
Climate control systems 140Cockpit
29At a glance
Page 43 of 389
Useful information
i This Owner's Manual describes all mod-
els, series and optional equipment for your
vehicle that were available at the time of
going to press. National variations are pos-
sible. Note that your vehicle may not be
equipped with all of the functions descri-
bed. This is also the case for systems and
functions relevant to safety.
i Read the information on qualified special-
ist workshops: (Y page 23). Panic alarm
X
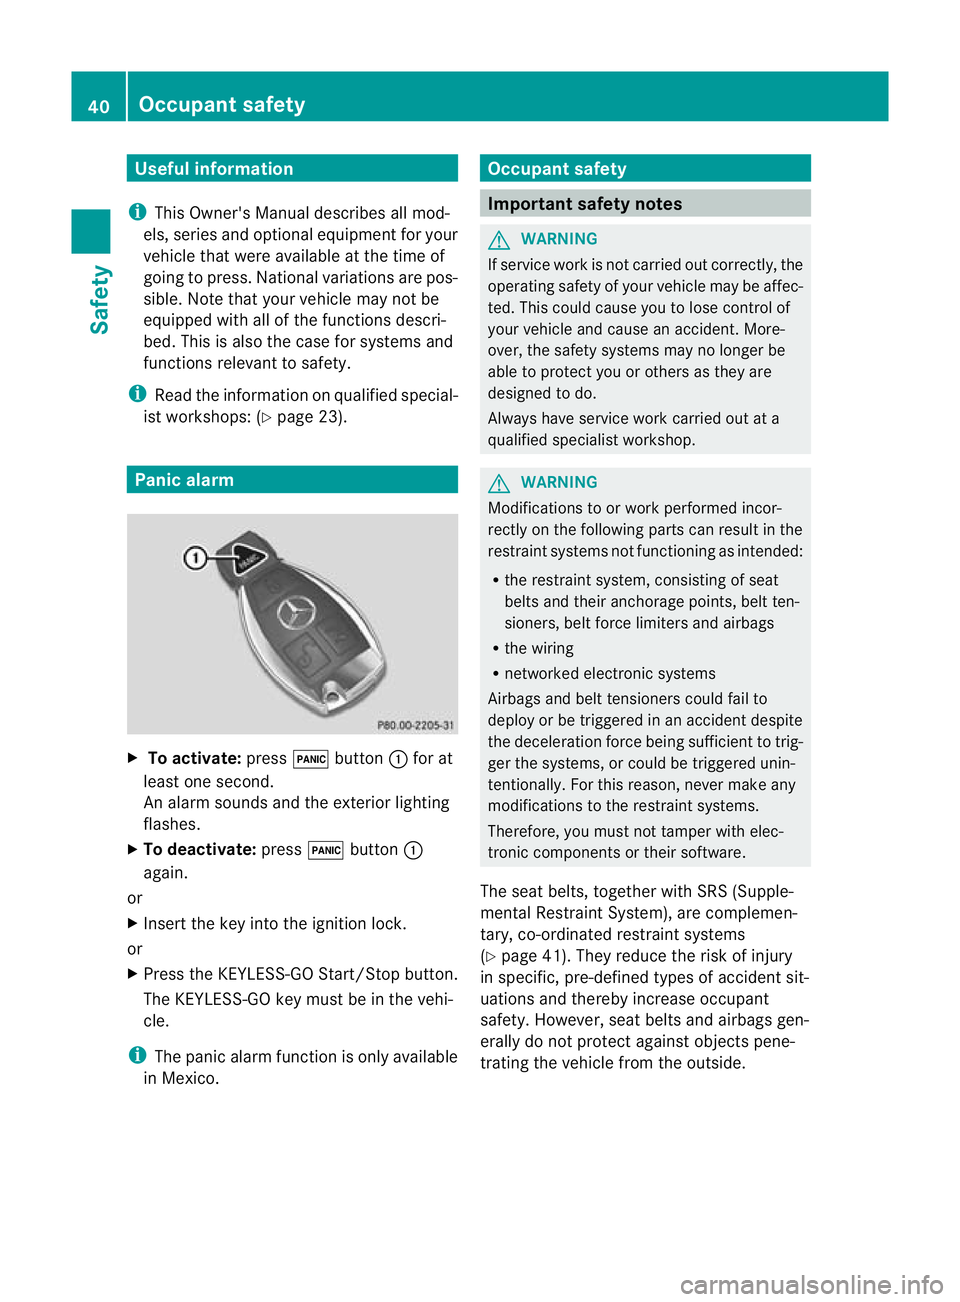
To activate: press!button :for at
least one second.
An alarm sounds and the exterior lighting
flashes.
X To deactivate: press!button :
again.
or
X Insert the key into the ignition lock.
or
X Press the KEYLESS-GO Start/Stop button.
The KEYLESS-GO key must be in the vehi-
cle.
i The panic alarm function is only available
in Mexico. Occupant safety
Important safety notes
G
WARNING
If service work is not carried out correctly, the
operating safety of your vehicle may be affec-
ted. This could cause you to lose control of
your vehicle and cause an accident. More-
over, the safety system smay no longer be
able to protect you or others as they are
designed to do.
Always have service work carried out at a
qualified specialist workshop. G
WARNING
Modifications to or work performed incor-
rectly on the following parts can result in the
restraint systems no tfunctioning as intended:
R the restraint system, consisting of seat
belts and their anchorage points, belt ten-
sioners, belt force limiters and airbags
R the wiring
R networked electronic systems
Airbags and belt tensioners could fail to
deploy or be triggered in an acciden tdespite
the deceleration force being sufficien tto trig-
ger the systems, or could be triggered unin-
tentionally. For this reason, never make any
modifications to the restraint systems.
Therefore, you must not tamper with elec-
tronic components or their software.
The seat belts, together with SRS (Supple-
mental Restraint System), are complemen-
tary, co-ordinated restraint systems
(Y page 41). They reduce the risk of injury
in specific, pre-defined types of accident sit-
uations and thereby increase occupant
safety. However, seat belts and airbags gen-
erally do not protect against objects pene-
trating the vehicle from the outside. 40
Occupant safetySafety
Page 44 of 389
To ensure that the restraint systems can
deliver their full potential protection, make
sure that:
R the seat and head restraint are adjusted
properly (Y page 108).
R the seat belt has been fastened properly
(Y page 49).
R the airbags can inflate unrestricted if
deployed (Y page 42).
R the steering wheel is adjusted properly
(Y page 115).
R the restraint systems have not been modi-
fied.
An airbag increases the protection of vehicle
occupants wearing a seat belt. However, air-
bags are only an additional restraint system
which complements, but does not replace,
the seat belt. All vehicle occupants must wear
their seat belt correctly at all times, even if
the vehicle is equipped with airbags. The air-
bags are not deployed in all types of acci-
dents .For example, if the protective capacity
of correctly fastened seat belts is not
increased by deploying the airbags, the air-
bags will not deploy.
Airbag deployment only provides increased
protection if the seat belt is worn correctly.
First, the seat belt helps to keep the vehicle
occupant in the best position in relation to the
airbag. Second, in a head-on collision, for
example, the seat belt prevents the vehicle
occupant from being propelled towards the
point of impact. SRS (Supplemental Restraint System)
Introduction SRS consists of:
R
the 6 SRS warning lamp
R airbags
R the airbag control unit with crash sensors
R belt tensioners
R belt force limiters SRS reduces the risk of occupants coming
into contact with the vehicle's interior in the
event of an accident. It can also reduce the
forces to which occupant
sare subjected dur-
ing an accident.
SRS warning lamp G
WARNING
If SRS is malfunctioning, individual systems
may be triggered unintentionally or might not
be triggered in the event of an accident with
a high rate of vehicle deceleration.
A malfunction has occurred if:
R the 6 SRS warning lamp does not light
up when the ignitio nis switched on.
R the engine is running and the 6SRS
warning lamp does not go out after a few
seconds.
R the engine is running and the 6SRS
warning lamp lights up again.
In this case, have SRS checked immediately
at a qualified specialist workshop.
SRS functions are checked regularly when
you switch on the ignition and when the
engine is running. Therefore, malfunctions
can be detected in good time.
The 6 SRS warning lamp in the instrument
cluster lights up when the ignition is switched
on. It goes out no later than a few seconds
after the engine is started.
Triggering of belt tensioners, belt force
limiters and airbags During the first stage of a collision, the airbag
control unit evaluates important physical
data relating to vehicle deceleration or accel-
eration, such as:
R
duration
R direction
R magnitude
Based on the evaluation of this data, the air-
bag control unit pre-emptively triggers the
belt tensioners in the first stage. Occupant safety
41Safety Z
Page 53 of 389
Always have damaged sea
tbelts or seat belts
that have been subjected to a load in an acci-
dent replaced at a qualified specialist work-
shop.
For safety reasons, Mercedes-Benz recom-
mends that you only use seat belts which have
been approved by Mercedes-Benz for your
vehicle.
Seat belts are the most effective means of
restraining the movement of vehicle occu-
pants in the event of an accident. This
reduces the risk of vehicle occupants coming
into contact with parts of the vehicle interior.
Fastening seat belts G
WARNING
The seat-belt extender must be retracted
when the vehicle is in motion .Only then can
the sea tbelt fit properly on the body and per-
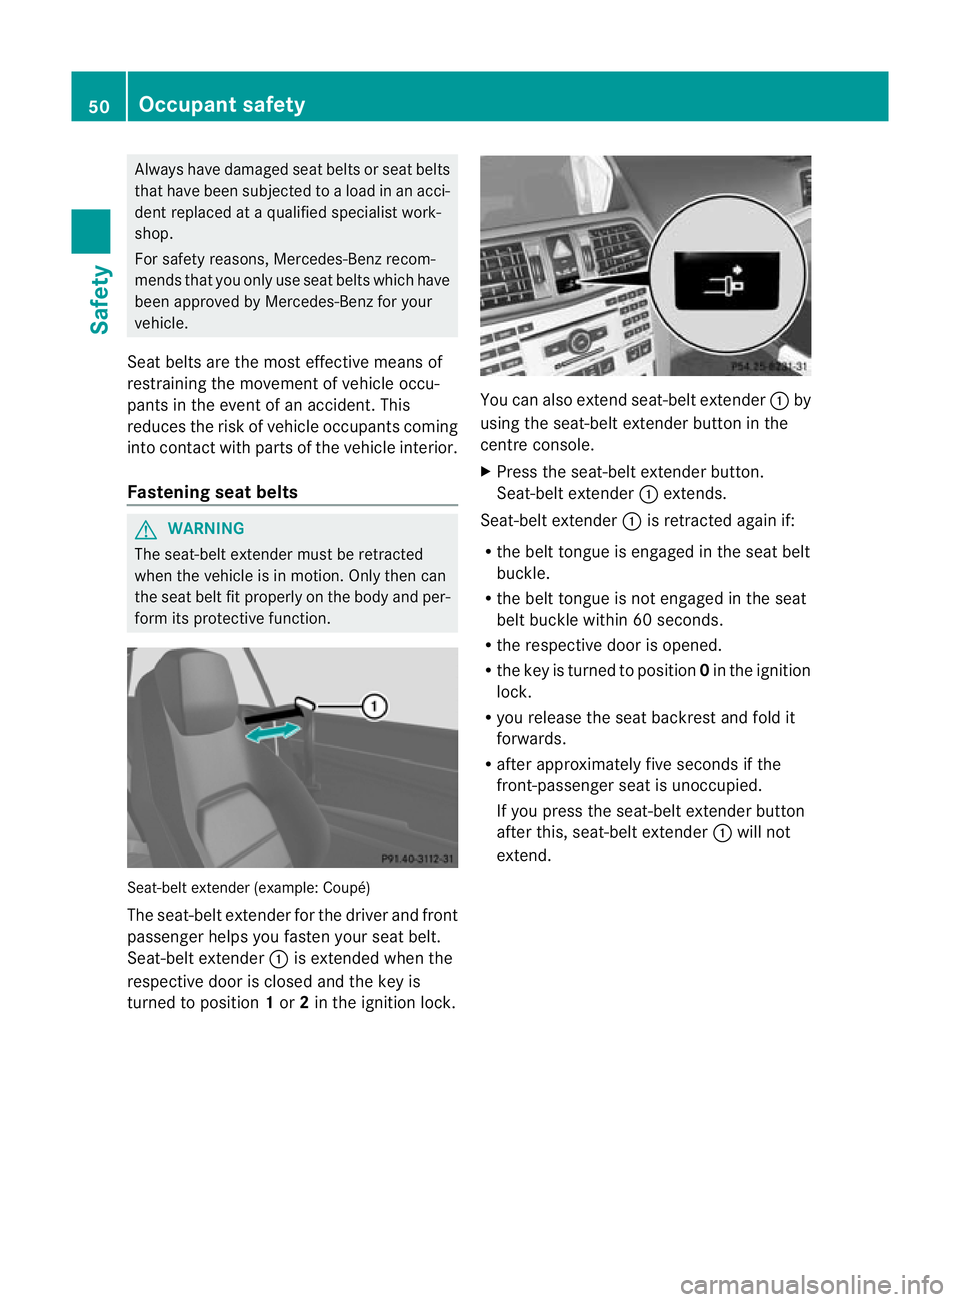
form its protective function. Seat-belt extender (example: Coupé)
The seat-belt extender for the driver and front
passenger helps you fasten your seat belt.
Seat-belt extender :is extended when the
respective door is closed and the key is
turned to position 1or 2in the ignition lock. You can also extend seat-belt extender
:by
using the seat-belt extender button in the
centre console.
X Press the seat-belt extender button.
Seat-belt extender :extends.
Seat-belt extender :is retracted again if:
R the belt tongue is engaged in the seat belt
buckle.
R the belt tongue is not engaged in the seat
belt buckle within 60 seconds.
R the respective door is opened.
R the key is turned to position 0in the ignition
lock.
R you release the seat backrest and fold it
forwards.
R after approximately five seconds if the
front-passenger seat is unoccupied.
If you press the seat-belt extender button
after this, seat-belt extender :will not
extend. 50
Occupant safetySafety
Page 54 of 389
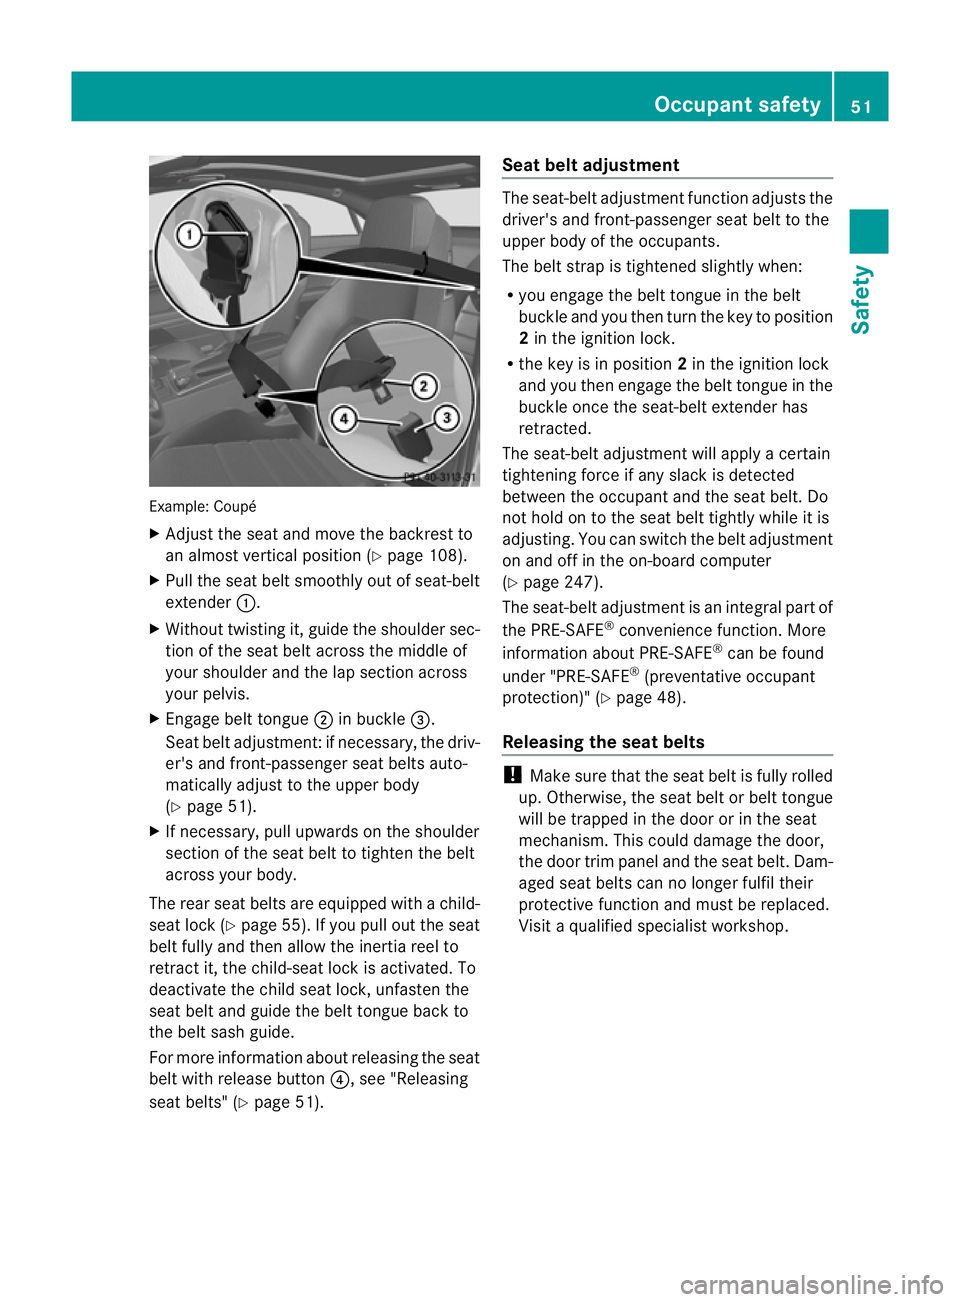
Example: Coupé
X
Adjust the seat and move the backrest to
an almos tvertical position (Y page 108).
X Pull the seat belt smoothly out of seat-belt
extender :.
X Without twisting it, guide the shoulder sec-
tion of the seat belt across the middle of
your shoulder and the lap section across
your pelvis.
X Engage belt tongue ;in buckle =.
Seat belt adjustment:ifn ecessary, the driv-
er's and front-passenger seat belts auto-
matically adjust to the upper body
(Y page 51).
X If necessary, pull upwards on the shoulder
section of the seat belt to tighten the belt
across your body.
The rear seat belts are equipped with a child-
seat lock (Y page 55). If you pull out the seat
belt fully and then allow the inertia reel to
retract it, the child-seat lock is activated. To
deactivate the child seat lock, unfasten the
seat belt and guide the belt tongue back to
the belt sash guide.
For more information about releasing the seat
belt with release button ?, see "Releasing
seat belts" (Y page 51). Seat belt adjustment The seat-belt adjustment function adjusts the
driver's and front-passenger seat belt to the
upper body of the occupants.
The belt strap is tightened slightly when:
R
you engage the belt tongue in the belt
buckle and you then turn the key to position
2in the ignition lock.
R the key is in position 2in the ignition lock
and you then engage the belt tongue in the
buckle once the seat-belt extender has
retracted.
The seat-belt adjustment will apply a certain
tightening force if any slack is detected
between the occupant and the seat belt. Do
not hold on to the seat belt tightly while it is
adjusting. You can switch the belt adjustment
on and off in the on-board computer
(Y page 247).
The seat-belt adjustment is an integral part of
the PRE-SAFE ®
convenience function. More
information about PRE-SAFE ®
can be found
under "PRE-SAFE ®
(preventative occupant
protection)" (Y page 48).
Releasing the seat belts !
Make sure that the seat belt is fully rolled
up. Otherwise, the seat belt or belt tongue
will be trapped in the door or in the seat
mechanism. This could damage the door,
the door trim panel and the seat belt. Dam-
aged seat belts can no longer fulfil their
protective function and must be replaced.
Visit a qualified specialist workshop. Occupant safety
51Safety Z
Page 56 of 389
Comply with safety regulation
swhen dispos-
ing of belt tensioners. Any Mercedes-Benz
Service Centre can provide details of these
regulations.
! If the front-passenger seat is not occu-
pied, do not engage the seat belt tongue in
the buckle on the front-passenger seat.
Otherwise, the belt tensioner could be trig-
gered in the event of an accident.
The seat belts are fitted with belt tensioners.
The belt tensioners tighten the seat belts in
an accident, pulling them close against the
body.
Belt tensioners do not correct incorrect seat
positions or incorrectly fastened seat belts.
Belt tensioners do not pull vehicle occupants
back towards the backrest.
If the seat belt is also fitted with a belt force
limiter and this is triggered, the force exerted
by the seat belt on the vehicle occupant is
reduced.
The belt force limiters for the front seats are
synchronised with the front airbags, which
take on a part of the deceleration force. This
results in the force exerted on the occupant
being distributed over a greater area.
The belt tensioners can only be activated
when:
R the ignition is switched on.
R the restraint systems are operational; see
"SRS warning lamp" (Y page 41).
R the belt tongue is engaged in the buckle on
each of the three-point seat belts in front.
R
The belt tensioners on the seats in the rear
compartmenta re triggered independently of
the lock status of the seat belts.
The beltt ensioners are triggered depending
on the type and severity of an accident:
R if, in the event of a head-on or rear-end col-
lision the vehicle decelerates or acceler- ates rapidly in a longitudinal direction dur-
ing the initial stages of the impact
R if, in the event of a side impact, on the side
opposite the impact the vehicle deceler-
ates or accelerates rapidly in a lateral direc-
tion
R Cabriolet: in certain situations if the vehicle
overturns and the system determines that
it can provide additional protection.
If the airbags are deployed, you will hear a
bang, and a small amount of powder may also
be released. Only in rare cases will the bang
affect your hearing. The powder that is
released generally does not constitute a
health hazard. The 6SRS warning lamp
lights up.
Automatic comfort-fit feature The fron
tseat belts have an automatic com-
fort-fit feature. The automatic comfort-fit fea-
ture reduces the retraction force of the seat
belts. This results in increased seat belt com-
fort. Children in the vehicle
Child restraint systems
Important safety notes G
WARNING
To reduce the risk of serious or even fatal
injury to the child in the event of a sudden
change in direction, braking or an accident:
R children less than 1.50 m tall and under
twelve years of age must always be secured
in special child restraint systems on a suit-
able vehicle seat. This is necessary
because the seat belts are not designed for
children.
R Do not drive with a child secured in a rear-
ward-facing child restraint system on the
front-passenger seat. Exception: if the vehi-
cle is equipped with automatic child seat
recognition on the front-passenger seat Children in the vehicle
53Safety
Z
Page 59 of 389
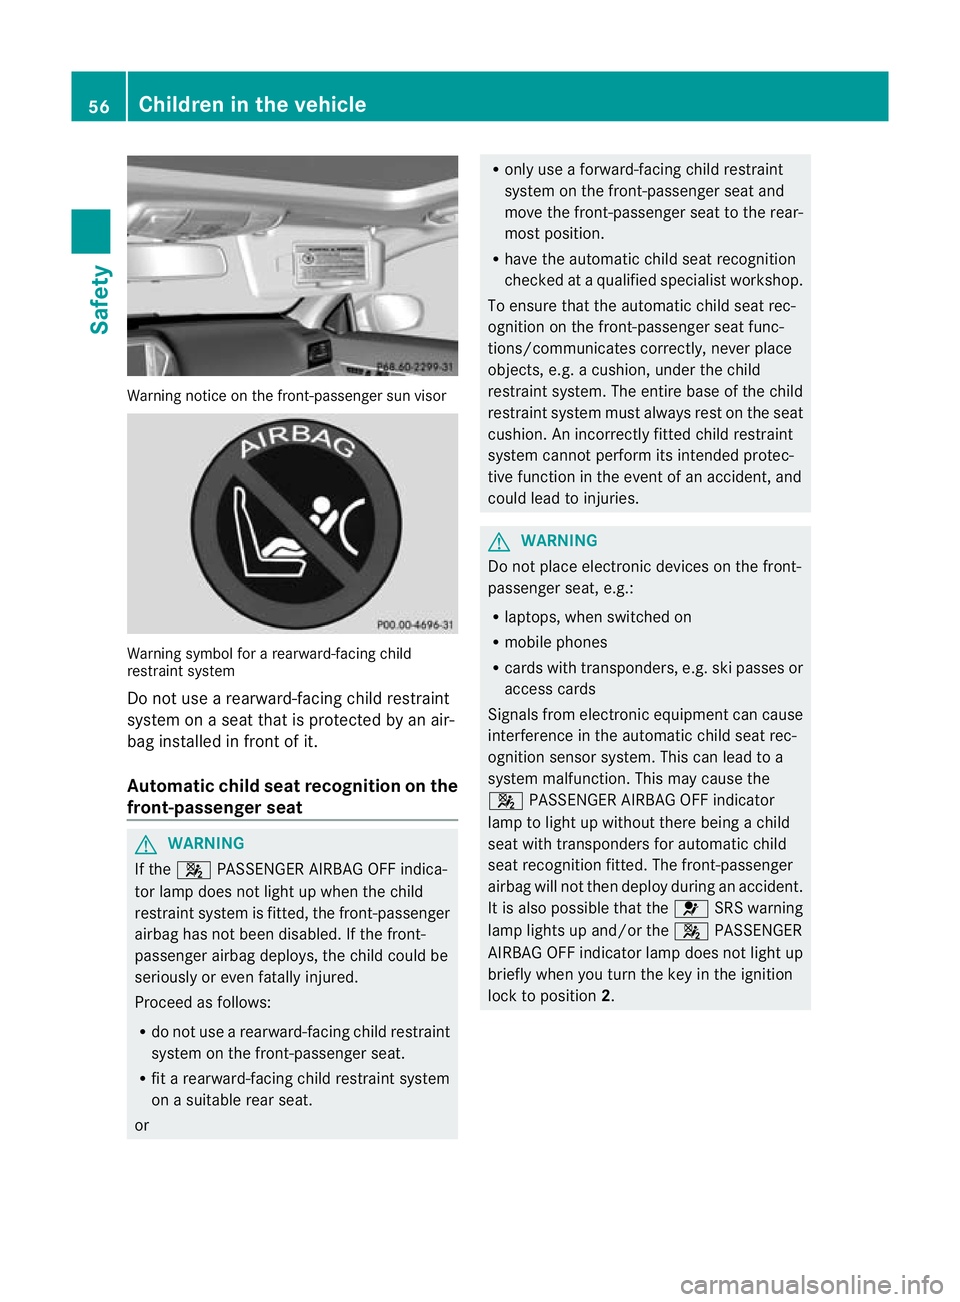
Warning notice on the front-passenger sun visor
Warning symbol for a rearward-facing child
restraint system
Do not use a rearward-facing child restraint
system on a seat that is protected by an air-
bag installed in fron tofit.
Automatic chil dseat recognition on the
front-passenger seat G
WARNING
If the 4 PASSENGER AIRBAG OFF indica-
to rlamp does no tlight up when the child
restraint system is fitted, the front-passenger
airbag has not been disabled. If the front-
passenger airbag deploys, the child could be
seriously or even fatally injured.
Proceed as follows:
R do not use a rearward-facing child restraint
system on the front-passenge rseat.
R fit a rearward-facing child restraint system
on a suitable rear seat.
or R
only use a forward-facing child restraint
system on the front-passenger seat and
move the front-passenger seat to the rear-
most position.
R have the automatic child seat recognition
checked at a qualified specialist workshop.
To ensure that the automatic child seat rec-
ognition on the front-passenger seat func-
tions/communicates correctly, never place
objects, e.g. a cushion, under the child
restraint system. The entire base of the child
restraint system must always rest on the seat
cushion. An incorrectly fitted child restraint
system cannot perform its intended protec-
tive function in the event of an accident, and
could lead to injuries. G
WARNING
Do not place electronic devices on the front-
passenger seat, e.g.:
R laptops, when switched on
R mobile phones
R cards with transponders, e.g. ski passes or
access cards
Signals from electronic equipment can cause
interference in the automatic child seat rec-
ognition sensor system. This can lead to a
system malfunction. This may cause the
4 PASSENGER AIRBAG OFF indicator
lamp to light up without there being a child
seat with transponders for automatic child
seat recognition fitted. The front-passenger
airbag will not then deploy during an accident.
It is also possible that the 6SRS warning
lamp lights up and/or the 4PASSENGER
AIRBAG OFF indicator lamp does not light up
briefly when you turn the key in the ignition
lock to position 2.56
Children in the vehicleSafety