high beam MERCEDES-BENZ E-Class COUPE 2013 C207 Owner's Manual
[x] Cancel search | Manufacturer: MERCEDES-BENZ, Model Year: 2013, Model line: E-Class COUPE, Model: MERCEDES-BENZ E-Class COUPE 2013 C207Pages: 372, PDF Size: 12.69 MB
Page 6 of 372
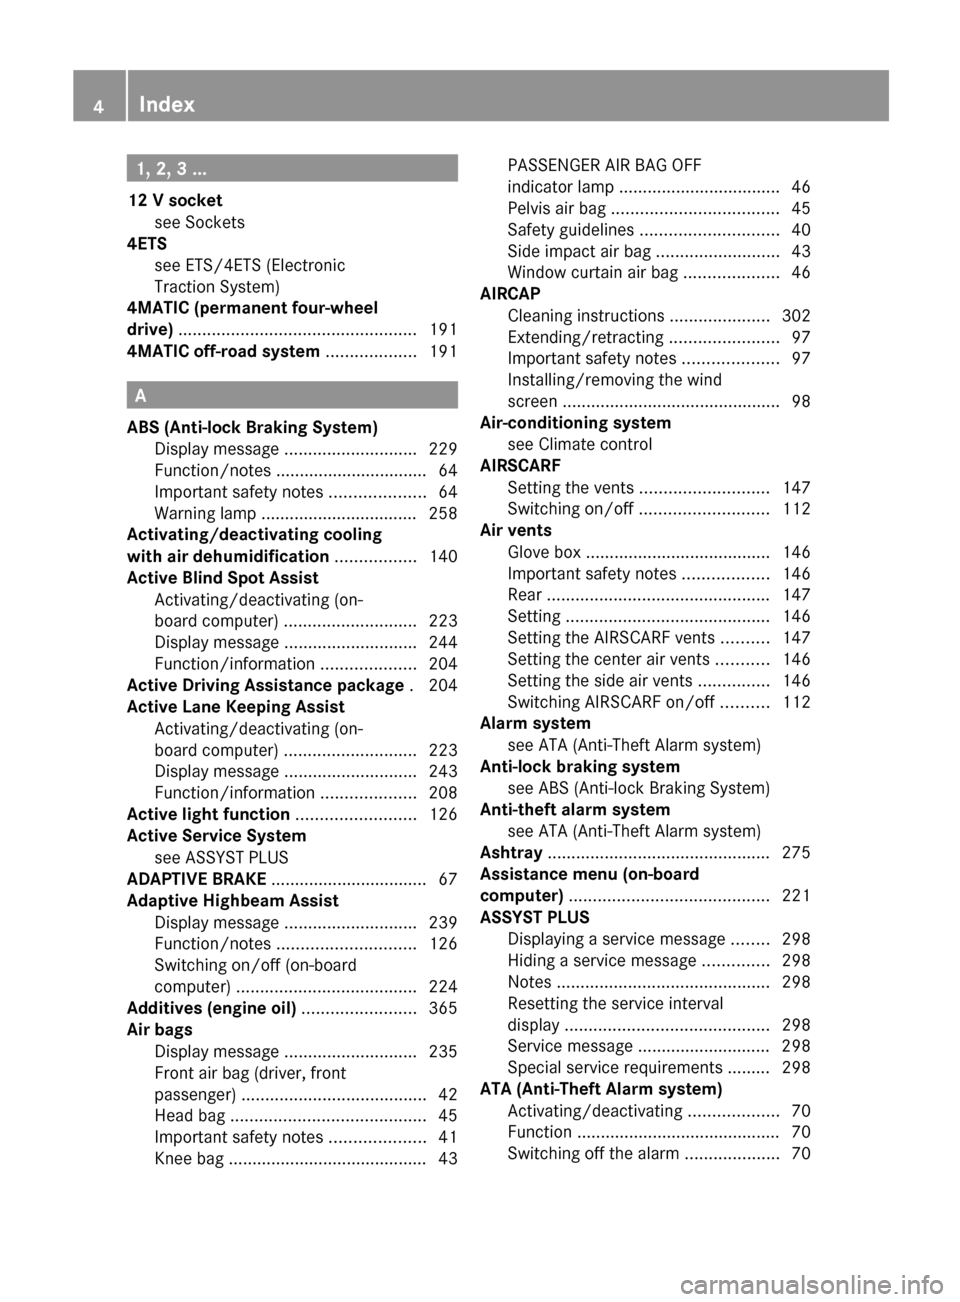
1, 2, 3 ...
12 V socket see Sockets
4ETS
see ETS/4ETS (Electronic
Traction System)
4MATIC (permanent four-wheel
drive) .................................................. 191
4MATIC off-road system ................... 191A
ABS (Anti-lock Braking System) Display message
............................ 229
Function/notes ................................ 64
Important safety notes .................... 64
Warning lamp ................................. 258
Activating/deactivating cooling
with air dehumidification ................. 140
Active Blind Spot Assist Activating/deactivating (on-
board computer) ............................ 223
Display message ............................ 244
Function/information .................... 204
Active Driving Assistance package . 204
Active Lane Keeping Assist Activating/deactivating (on-
board computer) ............................ 223
Display message ............................ 243
Function/information .................... 208
Active light function .........................126
Active Service System see ASSYST PLUS
ADAPTIVE BRAKE ................................. 67
Adaptive Highbeam Assist Display message ............................ 239
Function/notes ............................. 126
Switching on/off (on-board
computer) ...................................... 224
Additives (engine oil) ........................365
Air bags Display message ............................ 235
Front air bag (driver, front
passenger) ....................................... 42
Head bag ......................................... 45
Important safety notes .................... 41
Knee bag .......................................... 43 PASSENGER AIR BAG OFF
indicator lamp
.................................. 46
Pelvis air bag
................................... 45
Safety guidelines ............................. 40
Side impact air bag .......................... 43
Window curtain air bag ....................46
AIRCAP
Cleaning instructions ..................... 302
Extending/retracting .......................97
Important safety notes .................... 97
Installing/removing the wind
screen .............................................. 98
Air-conditioning system
see Climate control
AIRSCARF
Setting the vents ........................... 147
Switching on/off ........................... 112
Air vents
Glove box ....................................... 146
Important safety notes .................. 146
Rear ............................................... 147
Setting ........................................... 146
Setting the AIRSCARF vents ..........147
Setting the center air vents ...........146
Setting the side air vents ............... 146
Switching AIRSCARF on/off ..........112
Alarm system
see ATA (Anti-Theft Alarm system)
Anti-lock braking system
see ABS (Anti-lock Braking System)
Anti-theft alarm system
see ATA (Anti-Theft Alarm system)
Ashtray ............................................... 275
Assistance menu (on-board
computer) .......................................... 221
ASSYST PLUS Displaying a service message ........ 298
Hiding a service message .............. 298
Notes ............................................. 298
Resetting the service interval
display ........................................... 298
Service message ............................ 298
Special service requirements ......... 298
ATA (Anti-Theft Alarm system)
Activating/deactivating ................... 70
Function ........................................... 70
Switching off the alarm .................... 704
Index
Page 8 of 372
Care
AIRCAP .......................................... 302
Carpets .......................................... 306
Car wash
........................................ 299
Display ........................................... 305
Exterior lights ................................ 304
Gear or selector lever ....................305
Interior ........................................... 305
Matte finish ................................... 301
Notes ............................................. 299
Paint .............................................. 301
Plastic trim .................................... 305
Power washer ................................ 300
Rear view camera .......................... 304
Roof lining ...................................... 306
Seat belt ........................................ 306
Seat cover ..................................... 306
Sensors ......................................... 304
Soft top .......................................... 302
Steering wheel ............................... 305
Tail pipes ....................................... 305
Trim pieces .................................... 306
Washing by hand ........................... 300
Wheels ........................................... 303
Wind deflector ............................... 302
Windows ........................................ 303
Wind screen ................................... 303
Wiper blades .................................. 304
Wooden trim .................................. 306
Cargo tie down rings .........................271
Car wash (care) ................................. 299
CD player/CD changer (on-board
computer) .......................................... 219
Center console ..................................... 32
Central locking Automatic locking (on-board
computer) ...................................... 225
Locking/unlocking (SmartKey) ........ 73
Changing bulbs
High-beam headlamps ...................131
Important safety notes .................. 129
Low-beam headlamps .................... 131
Overview of bulb types ..................130
Parking lamps ................................ 131
Standing lamps (front) ...................131
Turn signals (front) ......................... 132
Child-proof locks
Important safety notes .................... 63Children
In the vehicle ................................... 58
Restraint systems ............................ 58
Special seat belt retractor ............... 61
Child seat
LATCH-type (ISOFIX) child seat
anchors ............................................ 61
Top Tether ....................................... 62
Cigarette lighter ................................ 276
Cleaning Mirror turn signal ........................... 304
Climate control
Automatic climate control (3-
zone) .............................................. 139
Controlling automatically
............... 141
Cooling with air dehumidification ..140
Defrosting the windows ................. 144
Defrosting the windshield .............. 143
Dual-zone automatic climate
control ........................................... 137
Important safety notes .................. 136
Indicator lamp ................................ 141
Information on using 3-zone
automatic climate control .............. 140
Maximum cooling .......................... 144
Notes on using automatic climate
control ........................................... 138
Overview of systems ......................136
Problems with cooling with air
dehumidification ............................ 141
Problem with the rear window
defroster ........................................ 144
Rear control panel .........................139
Setting the air distribution .............142
Setting the airflow ......................... 143
Setting the air vents ......................146
Setting the climate mode ............... 141
Setting the temperature ................ 142
Switching air-recirculation mode
on/off ............................................ 144
Switching on/off ........................... 140
Switching residual heat on/off ...... 145
Switching the rear window
defroster on/off ............................ 144
Switching the ZONE function on/
off .................................................. 1436
Index
Page 12 of 372
F
Filler cap see Fuel filler flap
First-aid kit ......................................... 308
Flat tire MOExtended tires .......................... 309
Preparing the vehicle .....................308
Floormat ............................................. 290
Fog lamps Switching on/off ........................... 122
Front fog lamps
Display message ............................ 237
Switching on/off ........................... 122
Fuel
Additives ........................................ 364
Consumption statistics ..................216
Displaying the current
consumption .................................. 217
Displaying the range ...................... 217
Driving tips .................................... 169
Flexible fuel vehicles ......................364
Fuel gauge ............................... 29, 213
Grade (gasoline) ............................ 363
Important safety notes .................. 362
Premium-grade unleaded gasoline . 363
Problem (malfunction) ...................167
Refueling ........................................ 165
Tank content/reserve fuel .............363
Fuel filler flap
Opening/closing ............................ 165
Fuel level
Calling up the range (on-board
computer) ...................................... 217
Fuel tank
Capacity ........................................ 363
Problem (malfunction) ...................167
Fuse allocation chart (vehicle tool
kit) ...................................................... 308
Fuses Allocation chart ............................. 318
Before changing ............................. 318
Dashboard fuse box ....................... 318
Fuse box in the engine
compartment ................................. 318
Fuse box in the trunk ..................... 319
Important safety notes .................. 317 G
Garage door opener Clearing the memory
.....................289
Important safety notes .................. 286
Opening/closing the garage door ..289
Programming (button in the rear-
view mirror) ................................... 287
Genuine Mercedes-Benz parts ......... 360
Glove box ........................................... 269 H
Handbrake see Parking brake
Hazard warning lamps ......................125
Head bags Display message ............................ 233
Operation ......................................... 45
Headlamps
Adding fluid to cleaning system .....297
Cleaning system (capacity) ............ 367
Cleaning system (function) ............ 125
Cleaning system (notes) ................367
Fogging up ..................................... 128
see Automatic headlamp mode
Head level heating (AIRSCARF) ........112
Head restraint Lowering manually (rear) ...............109
Head restraints
Adjusting ....................................... 109
Adjusting (electrically) ...................109
Adjusting (rear) .............................. 109
see NECK-PRO head restraints
Heating
see Climate control
High-beam headlamps
Changing bulbs .............................. 131
Display message ............................ 237
Switching Adaptive Highbeam
Assist on/off ................................. 127
Switching on/off ........................... 124
Hill start assist .................................. 153
HOLD function Display message ............................ 242
Function/notes ............................. 18910
Index
Page 13 of 372
Hood
Closing ........................................... 295
Display message ............................ 252
Opening ......................................... 294
Hydroplaning ..................................... 173I
Ignition lock see Key positions
Immobilizer .......................................... 70
Indicator lamps see Warning and indicator lamps
Instrument cluster
Overview .................................. 29, 213
Settings ......................................... 224
Warning and indicator
lamps ....................................... 30, 256
Instrument cluster lighting .............. 213
Interior lighting ................................. 128
Automatic control .......................... 128
Delayed switch-off (on-board
computer) ...................................... 225
Emergency lighting ........................ 129
Manual control ............................... 129
Overview ........................................ 128
Reading lamp ................................. 128J
Jack Storage location ............................ 308
Using ............................................. 346
Jump starting (engine) ...................... 313K
KEYLESS-GO Convenience closing feature ............ 87
Display message
............................ 254
Locking ............................................ 73
Start/Stop button .......................... 151
Starting the engine ........................ 153
Unlocking ......................................... 73
Key positions
KEYLESS-GO .................................. 151
SmartKey ....................................... 151Kickdown
Driving tips .................................... 160
Manual drive program
.................... 162
Knee bag .............................................. 43 L
Lamps see Warning and indicator lamps
Lane Keeping Assist
Activating/deactivating ................. 223
Display message ............................ 243
Function/information .................... 202
Lane Tracking package .....................200
LATCH-type (ISOFIX) child seat
anchors ................................................ 61
License plate lamp (display
message) ............................................ 237
Light function, active Display message ............................ 238
Lights
Activating/deactivating the
interior lighting delayed switch-off . 225
Active light function .......................126
Automatic headlamp mode ............ 121
Cornering light function .................126
Driving abroad ............................... 120
Fog lamps ...................................... 122
Hazard warning lamps ................... 125
High beam flasher .......................... 125
High-beam headlamps ...................124
Light switch ................................... 120
Low-beam headlamps .................... 122
Parking lamps ................................ 123
Rear fog lamp ................................ 123
Standing lamps .............................. 124
Switching Adaptive Highbeam
Assist on/off ................................. 224
Switching the daytime running
lamps on/off (on-board
computer) ...................................... 224
Switching the exterior lighting
delayed switch-off on/off (on-
board computer) ............................ 225 Index
11
Page 32 of 372
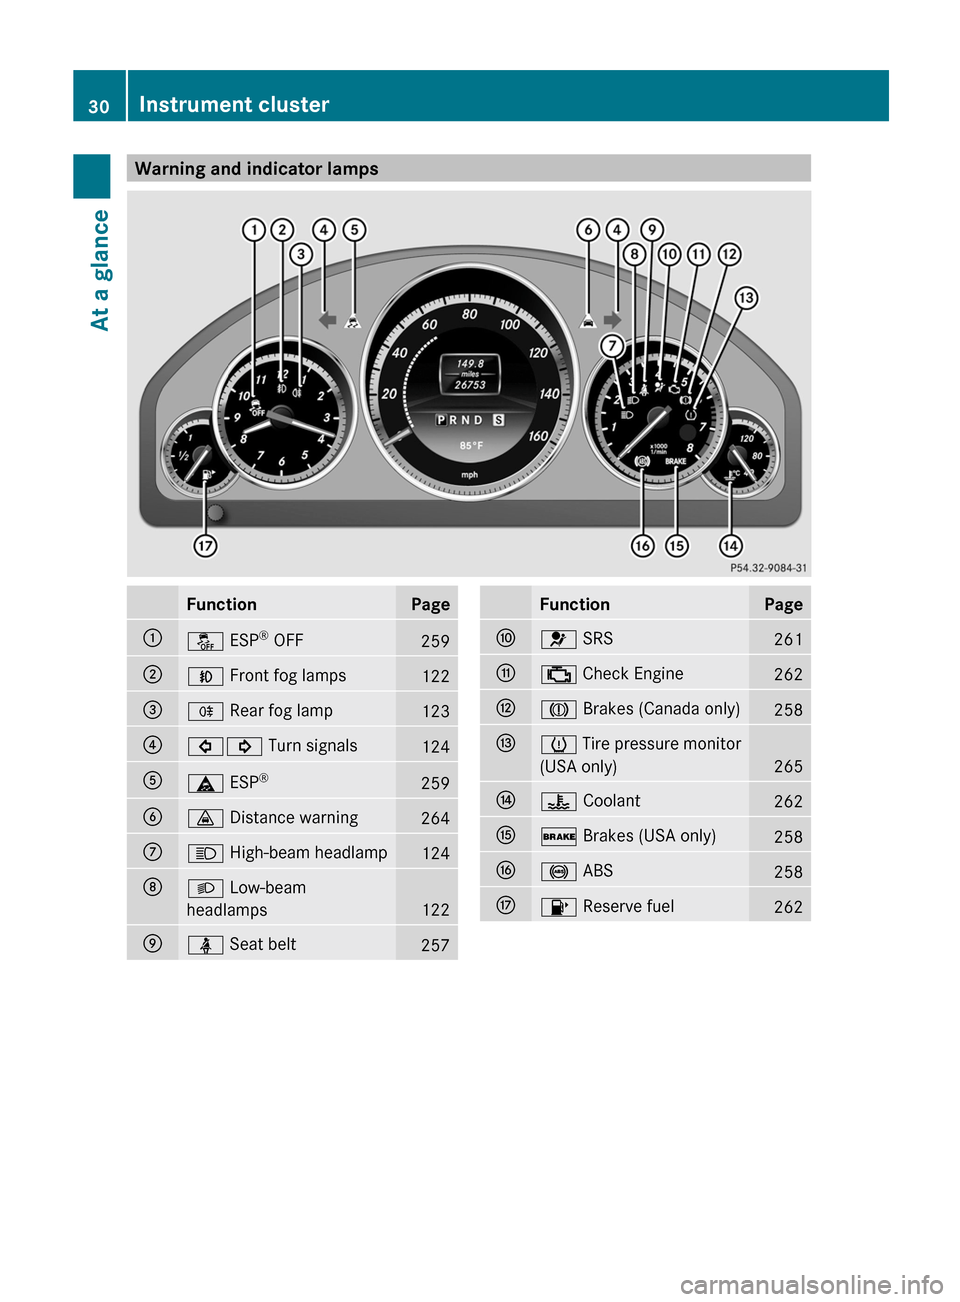
Warning and indicator lamps
Function Page
:
å ESP
®
OFF 259
;
N Front fog lamps
122
=
R Rear fog lamp
123
?
#! Turn signals
124
A
ä ESP
® 259
B
· Distance warning
264
C
K High-beam headlamp
124
D
L Low-beam
headlamps
122
E
ü Seat belt
257 Function Page
F
6 SRS
261
G
; Check Engine
262
H
J Brakes (Canada only)
258
I
h Tire pressure monitor
(USA only)
265
J
? Coolant
262
K
$ Brakes (USA only)
258
L
! ABS
258
M
8 Reserve fuel
26230
Instrument cluster
At a glance
Page 122 of 372
Useful information
i This Operator's Manual describes all
models and all standard and optional
equipment of your vehicle available at the
time of publication of the Operator's
Manual. Country-specific differences are
possible.
Please note that your vehicle may
not be equipped with all features
described. This also applies to safety-
related systems and functions.
i Read the information on qualified
specialist workshops: ( Y page 24).Exterior lighting
Important safety notes
For reasons of safety, Mercedes-Benz
recommends that you drive with the lights
switched
on even during the daytime. In some
countries, operation of the headlamps varies
due to legal requirements and self-imposed
obligations.
If you wish to drive during the daytime without
lights, switch off the daytime running lamps
function in the on-board computer
(Y page 224). Driving abroad
Symmetrical low-beam headlamps Switch the headlamps to symmetrical low
beam in countries in which traffic drives on
the
opposite side of the road from the country
where the vehicle is registered. This prevents
glare to oncoming traffic. When using
symmetrical lights, the edge of the road is not
lit as widely and as far ahead as normal.
Have the headlamps converted at a qualified
specialist workshop as close to the border as
possible before driving in these countries. Asymmetrical low-beam headlamps Have the headlamps converted back to
asymmetrical low-beam headlamps at a
qualified specialist workshop as soon as
possible after crossing the border again.
Setting the exterior lighting
Setting options Exterior lighting can be set using the:
R
light switch
R combination switch (Y page 124)
R the on-board computer (Y page 224)
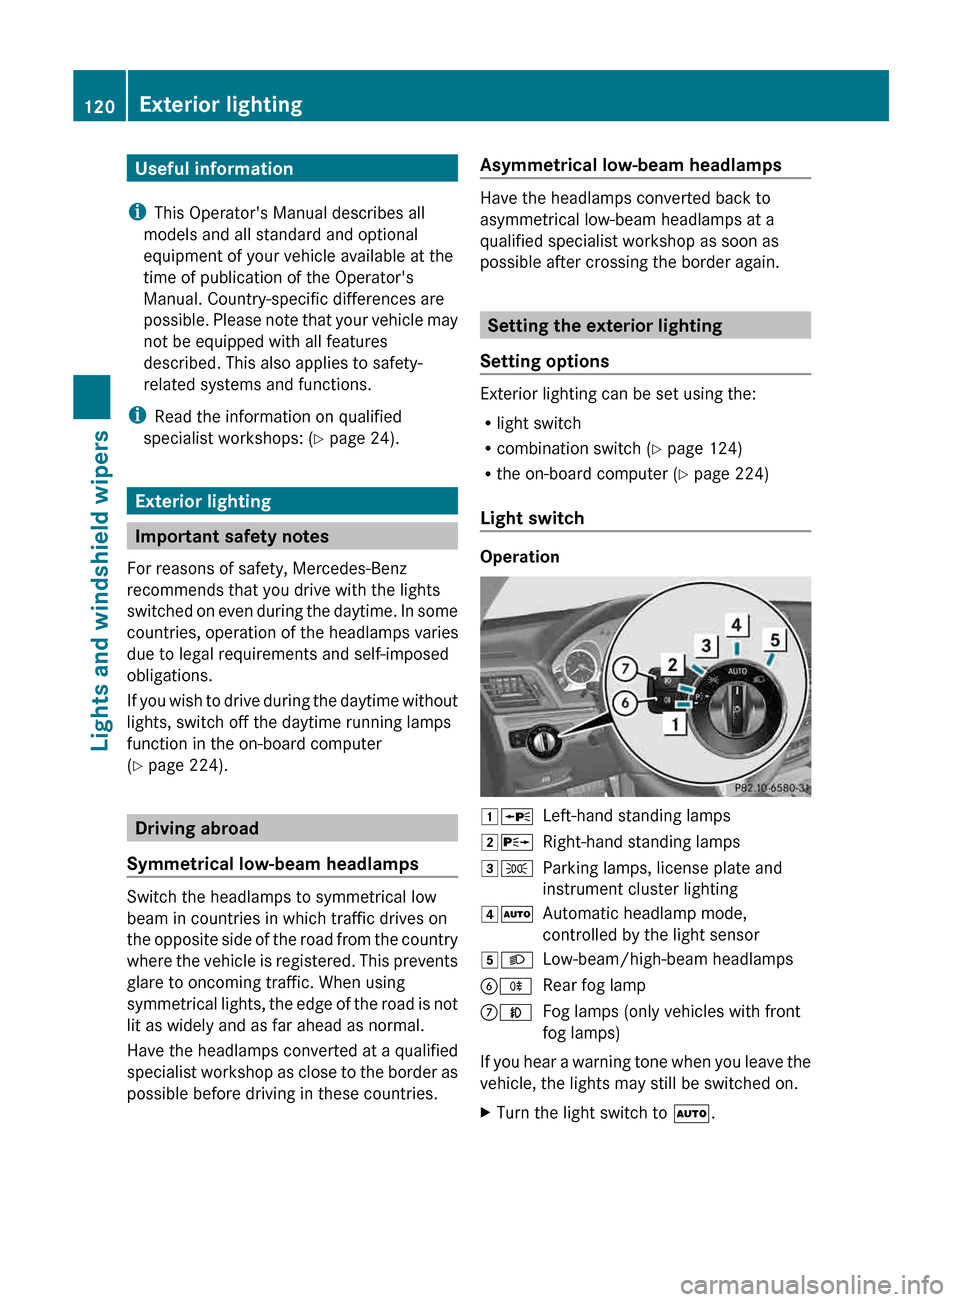
Light switch Operation
1W
Left-hand standing lamps
2X Right-hand standing lamps
3T Parking lamps, license plate and
instrument cluster lighting
4Ã Automatic headlamp mode,
controlled by the light sensor
5L Low-beam/high-beam headlamps
BR Rear fog lamp
CN Fog lamps (only vehicles with front
fog lamps)
If you hear a warning tone when you leave the
vehicle, the lights may still be switched on.
X Turn the light switch to Ã.120
Exterior lighting
Lights and windshield wipers
Page 123 of 372
The exterior lighting (except the parking/
standing lamps) switches off automatically if
you:
R
remove
the SmartKey from the ignition lock
R open the driver's door with the SmartKey
in position 0.
Automatic headlamp mode G
WARNING
If the light switch is set to Ã
and it is foggy,
snowing or there is poor visibility, the low-
beam headlamps will not come on
automatically. This could endanger you and
others. In such situations turn the light switch
to L.
The automatic headlamp feature is only an
aid. The driver is responsible for the vehicle's
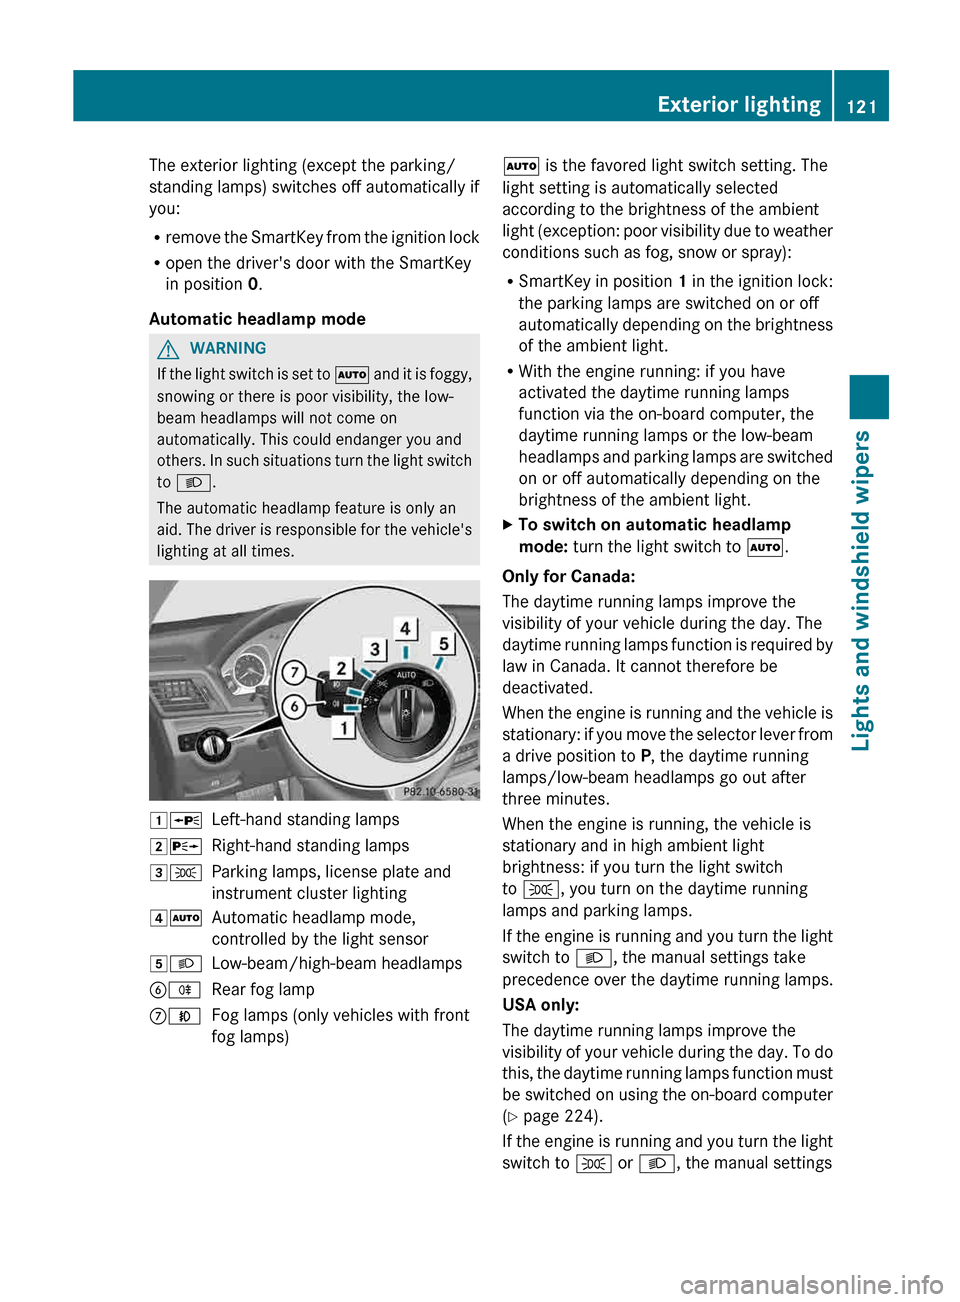
lighting at all times. 1W
Left-hand standing lamps
2X Right-hand standing lamps
3T Parking lamps, license plate and
instrument cluster lighting
4Ã Automatic headlamp mode,
controlled by the light sensor
5L Low-beam/high-beam headlamps
BR Rear fog lamp
CN Fog lamps (only vehicles with front
fog lamps) Ã is the favored light switch setting. The
light setting is automatically selected
according to the brightness of the ambient
light
(exception: poor visibility due to weather
conditions such as fog, snow or spray):
R SmartKey in position 1 in the ignition lock:
the parking lamps are switched on or off
automatically depending on the brightness
of the ambient light.
R With the engine running: if you have
activated the daytime running lamps
function via the on-board computer, the
daytime running lamps or the low-beam
headlamps and parking lamps are switched
on or off automatically depending on the
brightness of the ambient light.
X To switch on automatic headlamp
mode: turn the light switch to Ã.
Only for Canada:
The daytime running lamps improve the
visibility of your vehicle during the day. The
daytime
running lamps function is required by
law in Canada. It cannot therefore be
deactivated.
When the engine is running and the vehicle is
stationary: if you move the selector lever from
a drive position to P, the daytime running
lamps/low-beam headlamps go out after
three minutes.
When the engine is running, the vehicle is
stationary and in high ambient light
brightness: if you turn the light switch
to T, you turn on the daytime running
lamps and parking lamps.
If the engine is running and you turn the light
switch to L, the manual settings take
precedence over the daytime running lamps.
USA only:
The daytime running lamps improve the
visibility of your vehicle during the day. To do
this, the daytime running lamps function must
be switched on using the on-board computer
(Y page 224).
If the engine is running and you turn the light
switch to T or L, the manual settings Exterior lighting
121
Lights and windshield wipers Z
Page 124 of 372
take precedence over the daytime running
lamps.
i
In
the USA, the daytime running lamps are
deactivated upon delivery from the factory.
Low-beam headlamps G
WARNING
If the light switch is set to Ã
and it is foggy,
snowing or there is poor visibility, the low-
beam headlamps will not come on
automatically. This could endanger you and
others. In such situations turn the light switch
to L.
The automatic headlamp feature is only an
aid. The driver is responsible for the vehicle's
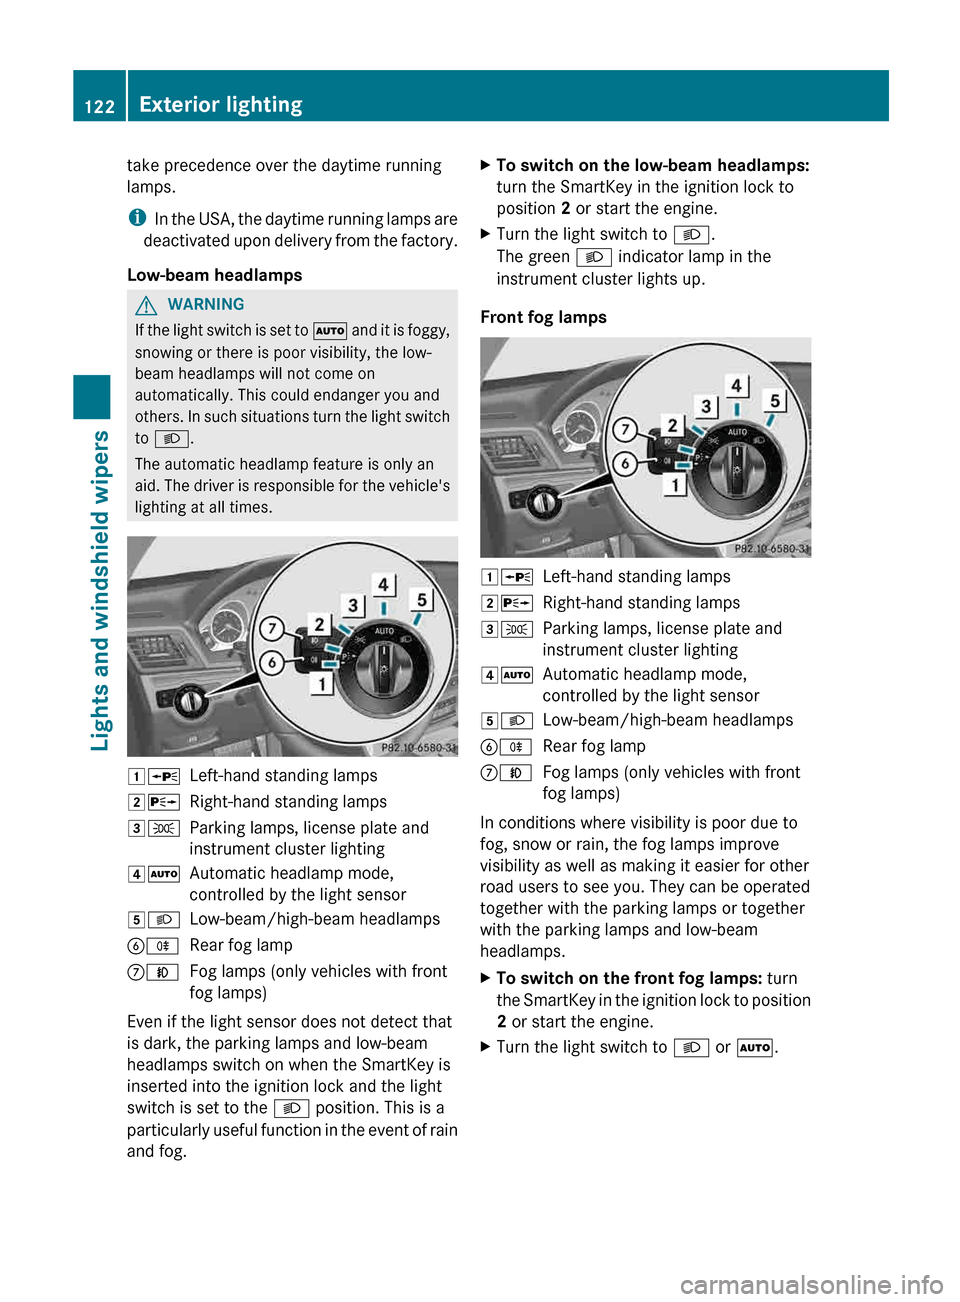
lighting at all times. 1W
Left-hand standing lamps
2X Right-hand standing lamps
3T Parking lamps, license plate and
instrument cluster lighting
4Ã Automatic headlamp mode,
controlled by the light sensor
5L Low-beam/high-beam headlamps
BR Rear fog lamp
CN Fog lamps (only vehicles with front
fog lamps)
Even if the light sensor does not detect that
is dark, the parking lamps and low-beam
headlamps switch on when the SmartKey is
inserted into the ignition lock and the light
switch is set to the L position. This is a
particularly
useful function in the event of rain
and fog. X
To switch on the low-beam headlamps:
turn the SmartKey in the ignition lock to
position 2 or start the engine.
X Turn the light switch to L.
The green L indicator lamp in the
instrument cluster lights up.
Front fog lamps 1W
Left-hand standing lamps
2X Right-hand standing lamps
3T Parking lamps, license plate and
instrument cluster lighting
4Ã Automatic headlamp mode,
controlled by the light sensor
5L Low-beam/high-beam headlamps
BR Rear fog lamp
CN Fog lamps (only vehicles with front
fog lamps)
In conditions where visibility is poor due to
fog, snow or rain, the fog lamps improve
visibility as well as making it easier for other
road users to see you. They can be operated
together with the parking lamps or together
with the parking lamps and low-beam
headlamps.
X To switch on the front fog lamps: turn
the
SmartKey in the ignition lock to position
2 or start the engine.
X Turn the light switch to L or Ã.122
Exterior lighting
Lights and windshield wipers
Page 125 of 372
X
Press the N button.
The green N indicator lamp in the
instrument cluster lights up.
X To switch off the front fog lamps: press
the N button.
The green N indicator lamp in the
instrument cluster goes out.
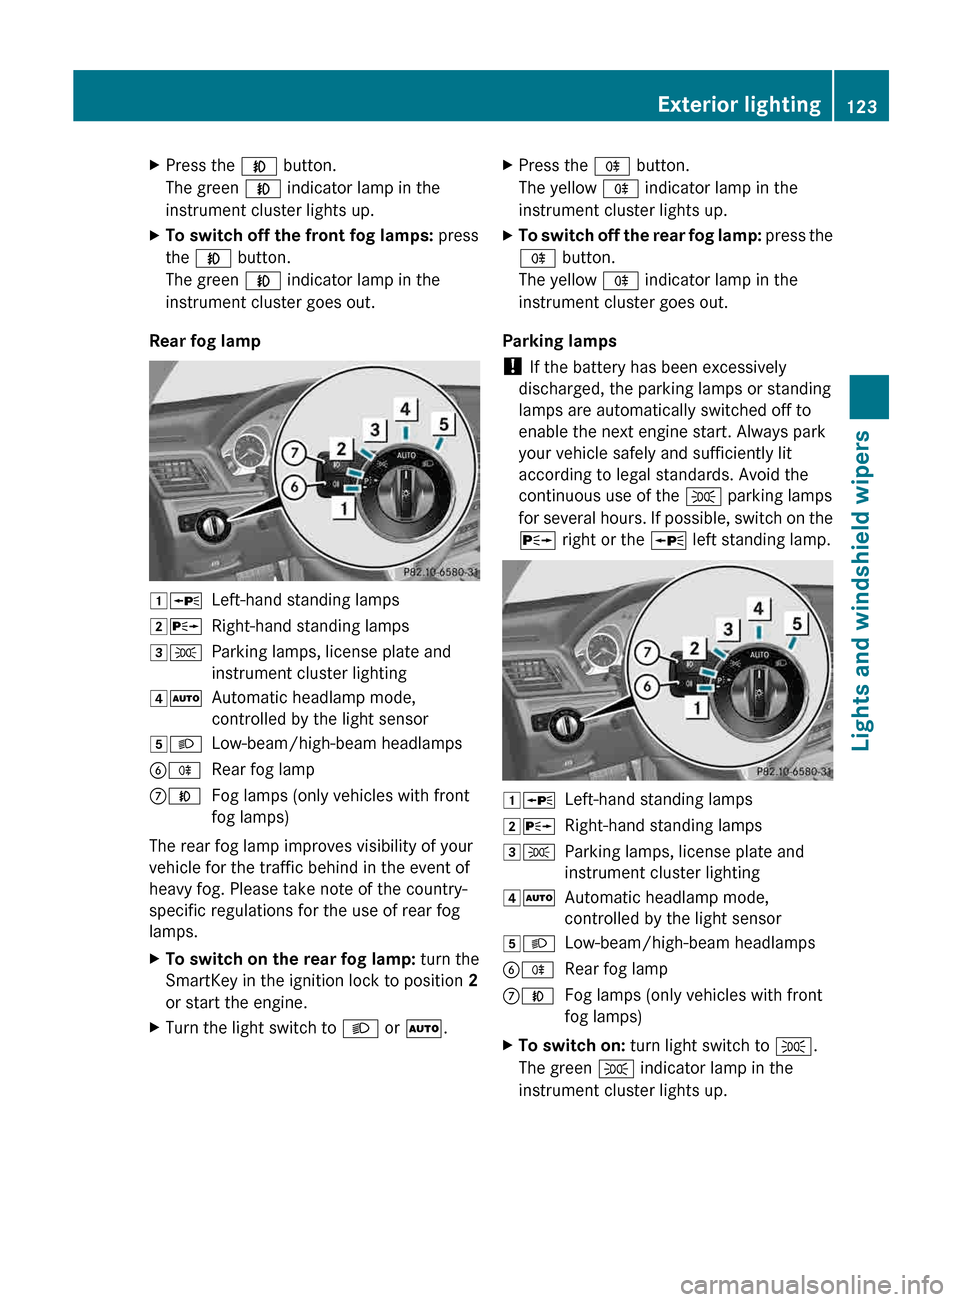
Rear fog lamp 1W
Left-hand standing lamps
2X Right-hand standing lamps
3T Parking lamps, license plate and
instrument cluster lighting
4Ã Automatic headlamp mode,
controlled by the light sensor
5L Low-beam/high-beam headlamps
BR Rear fog lamp
CN Fog lamps (only vehicles with front
fog lamps)
The rear fog lamp improves visibility of your
vehicle for the traffic behind in the event of
heavy fog. Please take note of the country-
specific regulations for the use of rear fog
lamps.
X To switch on the rear fog lamp: turn the
SmartKey in the ignition lock to position 2
or start the engine.
X Turn the light switch to L or Ã.X
Press the R button.
The yellow R indicator lamp in the
instrument cluster lights up.
X To switch off the rear fog lamp: press the
R button.
The yellow R indicator lamp in the
instrument cluster goes out.
Parking lamps
! If the battery has been excessively
discharged, the parking lamps or standing
lamps are automatically switched off to
enable the next engine start. Always park
your vehicle safely and sufficiently lit
according to legal standards. Avoid the
continuous use of the T parking lamps
for
several hours. If possible, switch on the
X right or the W left standing lamp. 1W
Left-hand standing lamps
2X Right-hand standing lamps
3T Parking lamps, license plate and
instrument cluster lighting
4Ã Automatic headlamp mode,
controlled by the light sensor
5L Low-beam/high-beam headlamps
BR Rear fog lamp
CN Fog lamps (only vehicles with front
fog lamps)
X To switch on: turn light switch to T.
The green T indicator lamp in the
instrument cluster lights up. Exterior lighting
123
Lights and windshield wipers Z
Page 126 of 372
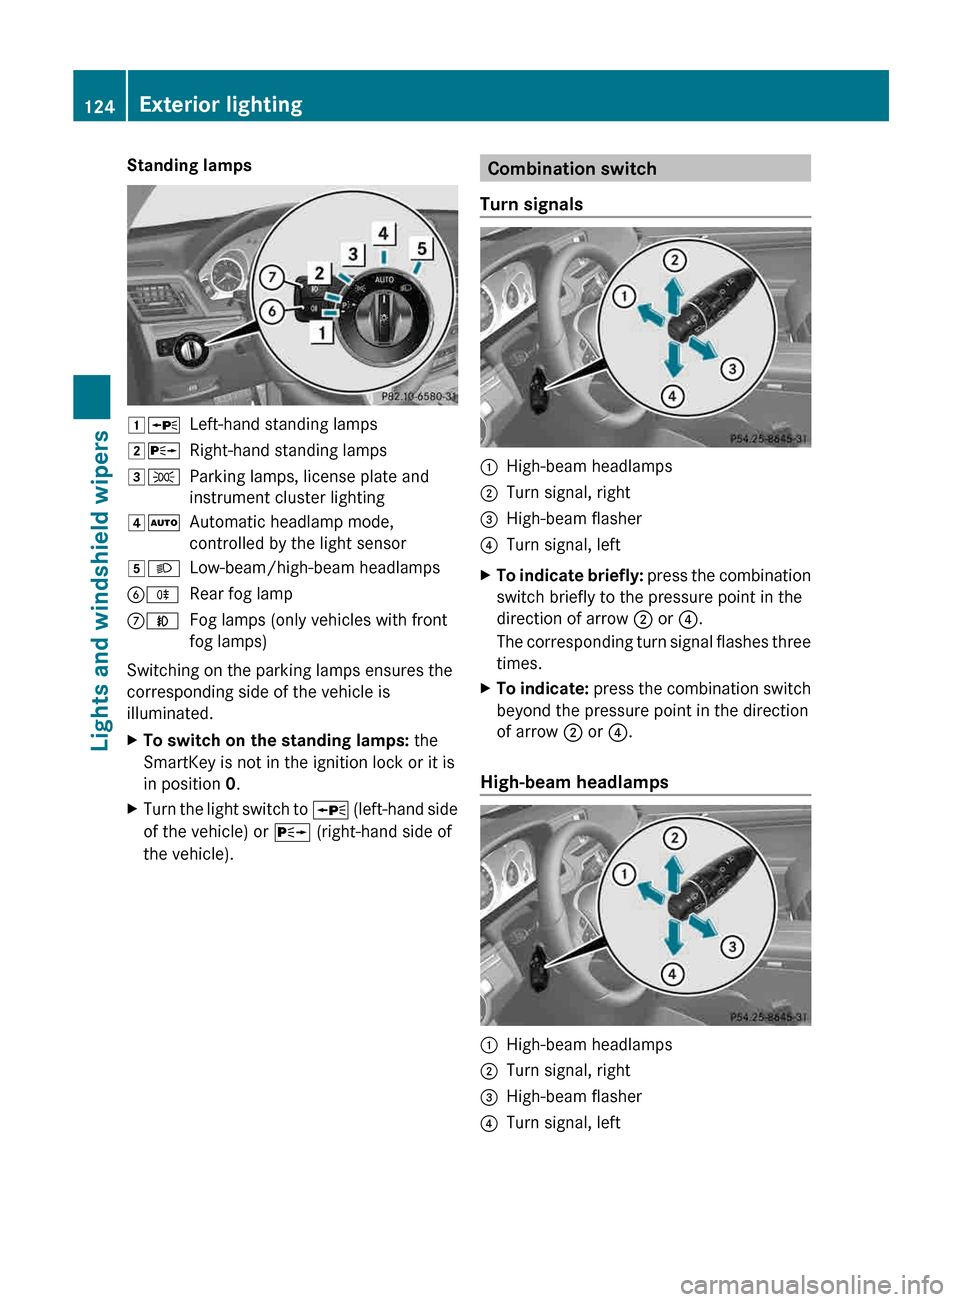
Standing lamps
1W
Left-hand standing lamps
2X Right-hand standing lamps
3T Parking lamps, license plate and
instrument cluster lighting
4Ã Automatic headlamp mode,
controlled by the light sensor
5L Low-beam/high-beam headlamps
BR Rear fog lamp
CN Fog lamps (only vehicles with front
fog lamps)
Switching on the parking lamps ensures the
corresponding side of the vehicle is
illuminated.
X To switch on the standing lamps: the
SmartKey is not in the ignition lock or it is
in position 0.
X Turn the light switch to W (left-hand side
of the vehicle) or X (right-hand side of
the vehicle). Combination switch
Turn signals :
High-beam headlamps
; Turn signal, right
= High-beam flasher
? Turn signal, left
X To indicate briefly: press
the combination
switch briefly to the pressure point in the
direction of arrow ; or ?.
The corresponding turn signal flashes three
times.
X To indicate: press
the combination switch
beyond the pressure point in the direction
of arrow ; or ?.
High-beam headlamps :
High-beam headlamps
; Turn signal, right
= High-beam flasher
? Turn signal, left124
Exterior lighting
Lights and windshield wipers