MERCEDES-BENZ E-CLASS COUPE 2015 Owners Manual
Manufacturer: MERCEDES-BENZ, Model Year: 2015, Model line: E-CLASS COUPE, Model: MERCEDES-BENZ E-CLASS COUPE 2015Pages: 345, PDF Size: 11.42 MB
Page 101 of 345
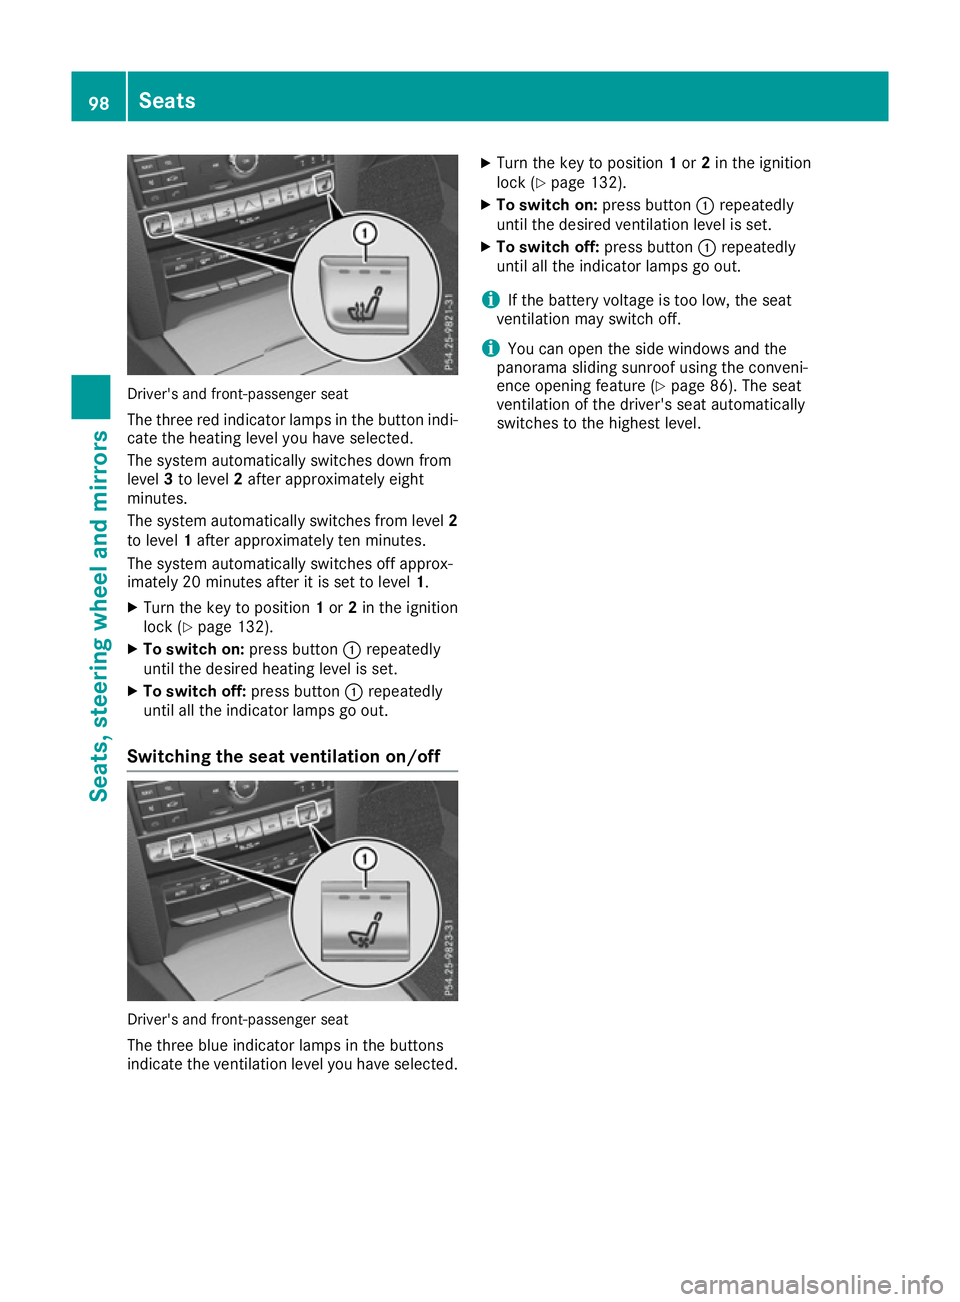
Driver's and front-passenger seat
The three red indicator lamps in the button indi-
cate the heating level you have selected.
The system automatically switches down from
level 3to level 2after approximately eight
minutes.
The system automatically switches from level 2
to level 1after approximately ten minutes.
The system automatically switches off approx-
imately 20 minutes after it is set to level 1.
X Turn the key to position 1or 2in the ignition
lock (Y page 132).
X To switch on: press button:repeatedly
until the desired heating level is set.
X To switch off: press button:repeatedly
until all the indicator lamps go out.
Switching the seat ventilation on/off Driver's and front-passenger seat
The three blue indicator lamps in the buttons
indicate the ventilation level you have selected. X
Turn the key to position 1or 2in the ignition
lock (Y page 132).
X To switch on: press button:repeatedly
until the desired ventilation level is set.
X To switch off: press button:repeatedly
until all the indicator lamps go out.
i If the battery voltage is too low, the seat
ventilation may switch off.
i You can open the side windows and the
panorama sliding sunroof using the conveni-
ence opening feature (Y page 86). The seat
ventilation of the driver's seat automatically
switches to the highest level. 98
SeatsSeats, steering
wheel and mirrors
Page 102 of 345
Problems with the seat heating or seat ventilation
Problem
Possible causes/consequences and
M
MSolutions The seat heating or seat
ventilation has switched
off prematurely or can-
not be switched on. The on-board voltage is too low because too many electrical consum-
ers are switched on.
X Switch off electrical consumers that you do not need, such as the
rear window heating or interior lighting.
Once the battery is sufficiently charged, the seat heating or seat
ventilation can be switched back on manually. Steering wheel
Important safety notes
G
WARNING
You could lose control of the vehicle while
driving if you:
R adjust the driver's seat, steering wheel or
mirrors
R fasten the seat belt
There is a risk of an accident.
Adjust the driver's seat, head restraint, steer-
ing wheel and mirrors and fasten your seat
belt before starting the engine. G
WARNING
Children could become trapped by the steer-
ing wheel if they adjust it. There is a risk of
injury.
When leaving the vehicle, always take the key with you and lock the vehicle. Never leave
children unattended in the vehicle.
The electrically adjustable steering wheel can
still be adjusted when there is no key in the igni-
tion lock. Adjusting the steering wheel man-
ually
G
WARNING
The steering wheel may move unexpectedly if you adjust it while driving. This could cause
you to lose control of the vehicle. There is a
risk of an accident. Make sure that the steering wheel is locked
before driving off. Never unlock the steering
wheel when the vehicle is in motion.
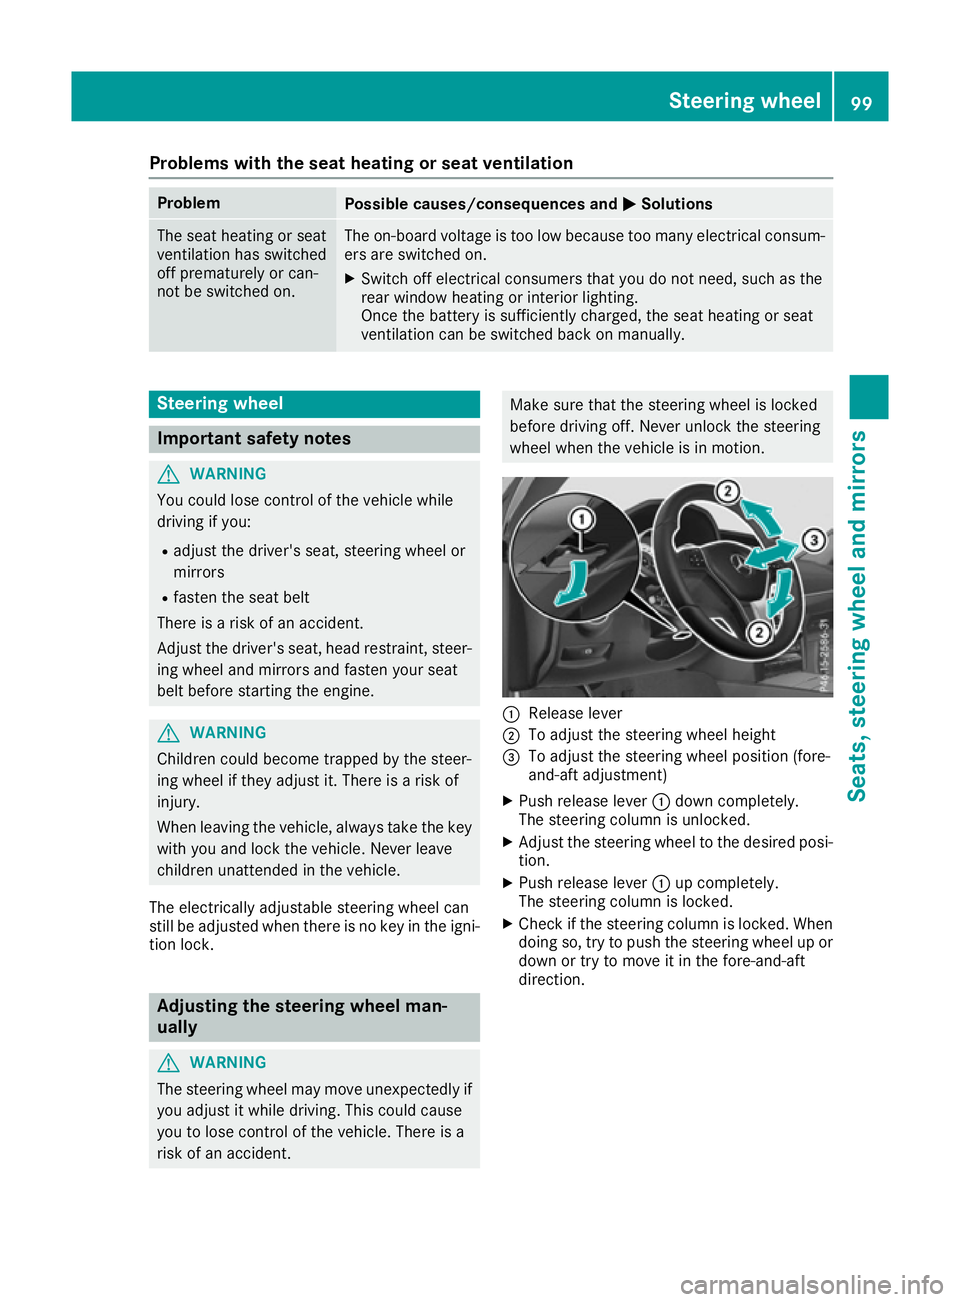
:
Release lever
; To adjust the steering wheel height
= To adjust the steering wheel position (fore-
and-aft adjustment)
X Push release lever :down completely.
The steering column is unlocked.
X Adjust the steering wheel to the desired posi-
tion.
X Push release lever :up completely.
The steering column is locked.
X Check if the steering column is locked. When
doing so, try to push the steering wheel up or
down or try to move it in the fore-and-aft
direction. Steering wheel
99Seats, steering wheel and mirrors Z
Page 103 of 345
Adjusting the steering wheel electri-
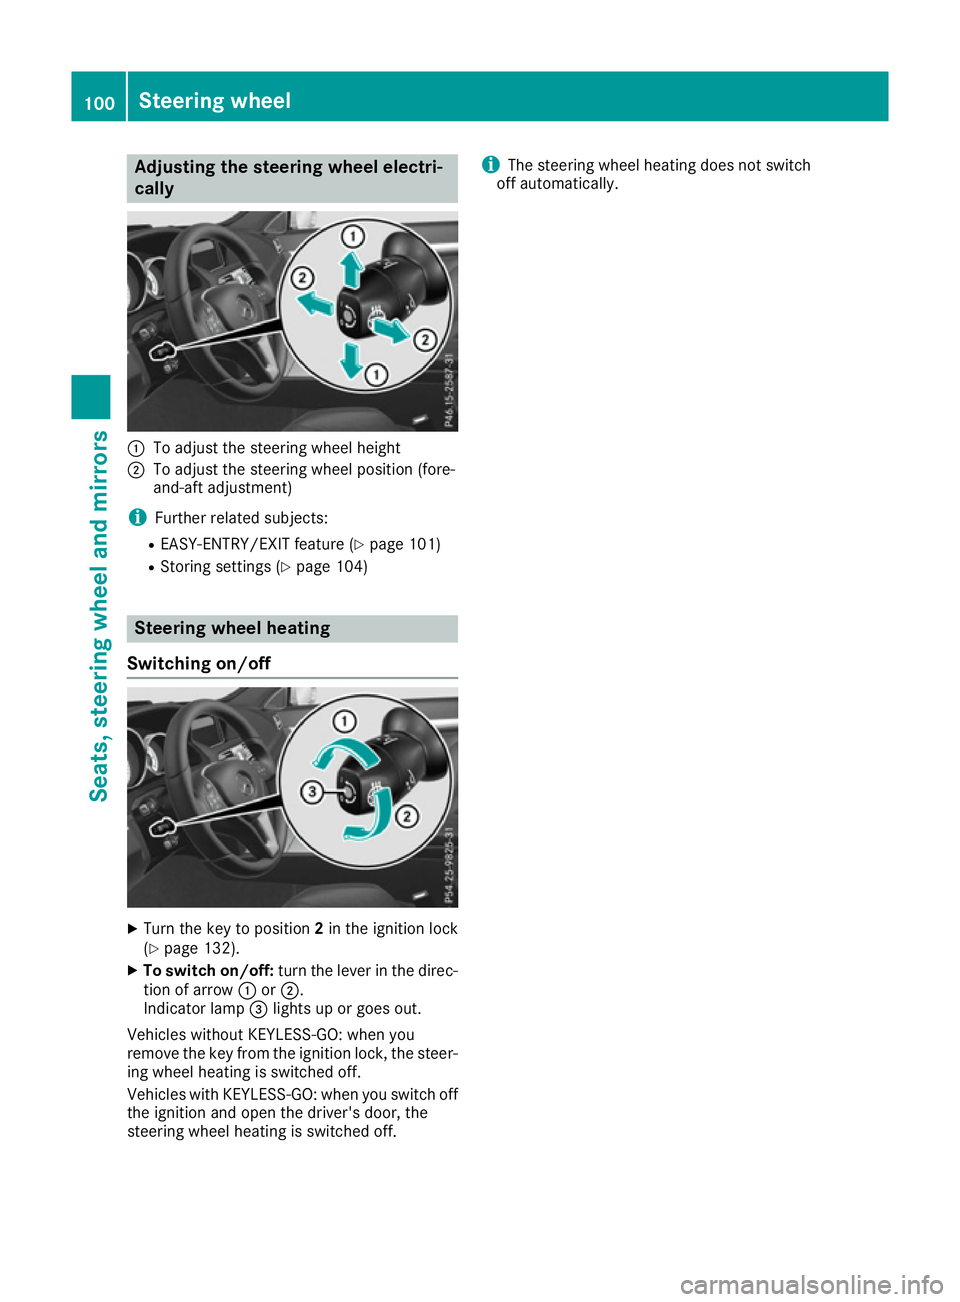
cally :
To adjust the steering wheel height
; To adjust the steering wheel position (fore-
and-aft adjustment)
i Further related subjects:
R EASY-ENTRY/EXIT feature (Y page 101)
R Storing settings (Y page 104)Steering wheel heating
Switching on/off X
Turn the key to position 2in the ignition lock
(Y page 132).
X To switch on/off: turn the lever in the direc-
tion of arrow :or;.
Indicator lamp =lights up or goes out.
Vehicles without KEYLESS-GO: when you
remove the key from the ignition lock, the steer-
ing wheel heating is switched off.
Vehicles with KEYLESS-GO: when you switch off the ignition and open the driver's door, the
steering wheel heating is switched off. i
The steering wheel heating does not switch
off automatically. 100
Steering wheelSeats
, steering wheel and mirrors
Page 104 of 345
Problems with the steering wheel heating
Problem
Possible causes/consequences and
M
MSolutions The steering wheel heat-
ing has switched itself
off prematurely or can-
not be switched on. The on-board voltage is too low because too many electrical consum-
ers are switched on.
X Switch off electrical consumers that you do not need, such as the
rear window heating or interior lighting.
Once the battery is sufficiently charged, the steering wheel heating
will switch back on automatically. EASY-ENTRY/EXIT feature
Important safety notes G
WARNING
When the EASY-ENTRY/EXIT feature adjusts
the steering wheel, you and other vehicle
occupants – particularly children – could
become trapped. There is a risk of injury.
While the EASY-ENTRY/EXIT feature is mak-
ing adjustments, make sure that no one has
any body parts in the sweep of the steering
wheel.
Move the steering wheel adjustment lever if
there is a risk of entrapment by the steering
wheel. The adjustment process is stopped.
Vehicles with a memory function: if there is a
risk of becoming trapped by the steering wheel, you can also press one of the memory function
position buttons. The adjustment process is
stopped. G
WARNING
If children activate the EASY-ENTRY/EXIT fea- ture, they can become trapped, particularly
when unattended. There is a risk of injury.
When leaving the vehicle, always take the key with you and lock the vehicle. Never leave
children unattended in the vehicle. G
WARNING
If you drive off while the EASY-ENTRY/EXIT
feature is making adjustments, you could lose
control of the vehicle. There is a risk of an
accident. Always wait until the adjustment process is
complete before driving off.
The EASY-ENTRY/EXIT feature makes getting in
and out of your vehicle easier.
You can activate and deactivate the EASY-
ENTRY/EXIT feature in the on-board computer
(Y page 220).
Position of the steering wheel when the EASY-ENTRY/EXIT feature is active The steering wheel tilts upwards if you:
R remove the key from the ignition lock
R with KEYLESS-GO: open the driver's door;
KEYLESS-GO must be in position 1
R with the key: open the driver's door; the key
must be in position 0or 1in the ignition lock
(Y page 132)
i The steering wheel only moves upwards if it
has not already reached the upper stop.
Position of the steering wheel for driv-
ing The steering wheel is moved to the previously
set position if:
R the driver's door is closed and
R with KEYLESS-GO: you press the Start/Stop
button once
or
R with the key: you insert the key into the igni-
tion lock
If you close the driver's door with the key inser-
ted in the ignition lock, the steering wheel is
automatically moved to the previously set posi- tion. Steering wheel
101Seats, steering wheel and mirrors Z
Page 105 of 345
The last position of the steering wheel is stored
when you switch off the ignition or when you
store the setting with the memory function
(Y page 104).
Crash-responsive EASY-EXIT feature If the crash-responsive EASY-EXIT feature is trig-
gered in an accident, the steering column will
move upwards when the driver's door is opened. This occurs irrespective of the position of the
key in the ignition lock. This makes it easier to
exit the vehicle and rescue the occupants.
The crash-responsive EASY-EXIT feature is only
operational if the EASY-EXIT/ENTRY feature is
activated in the on-board computer
(Y page 220). Mirrors
Rear-view mirror
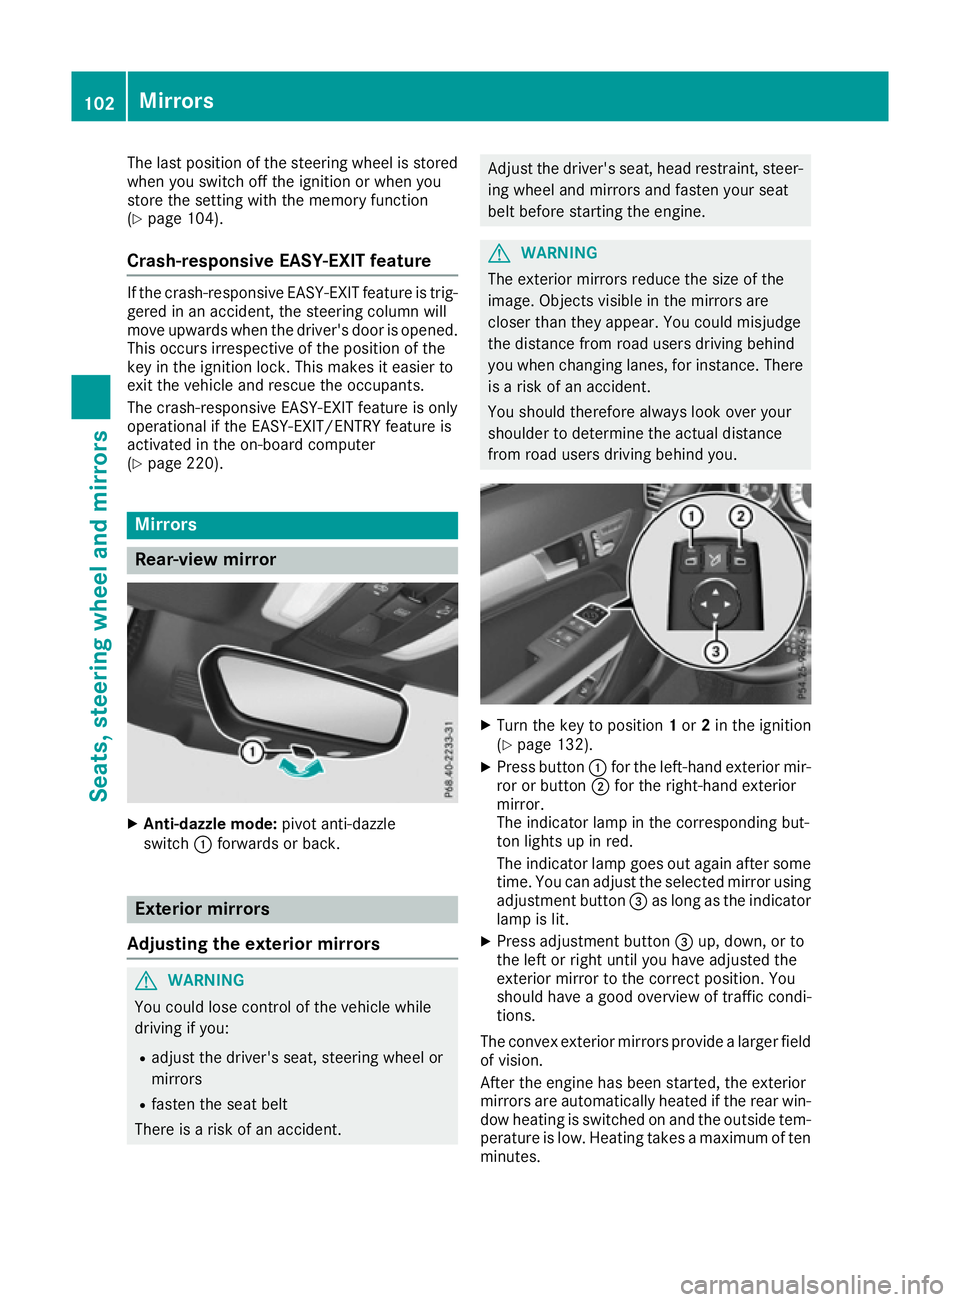
X
Anti-dazzle mode: pivot anti-dazzle
switch :forwards or back. Exterior mirrors
Adjusting the exterior mirrors G
WARNING
You could lose control of the vehicle while
driving if you:
R adjust the driver's seat, steering wheel or
mirrors
R fasten the seat belt
There is a risk of an accident. Adjust the driver's seat, head restraint, steer-
ing wheel and mirrors and fasten your seat
belt before starting the engine. G
WARNING
The exterior mirrors reduce the size of the
image. Objects visible in the mirrors are
closer than they appear. You could misjudge
the distance from road users driving behind
you when changing lanes, for instance. There is a risk of an accident.
You should therefore always look over your
shoulder to determine the actual distance
from road users driving behind you. X
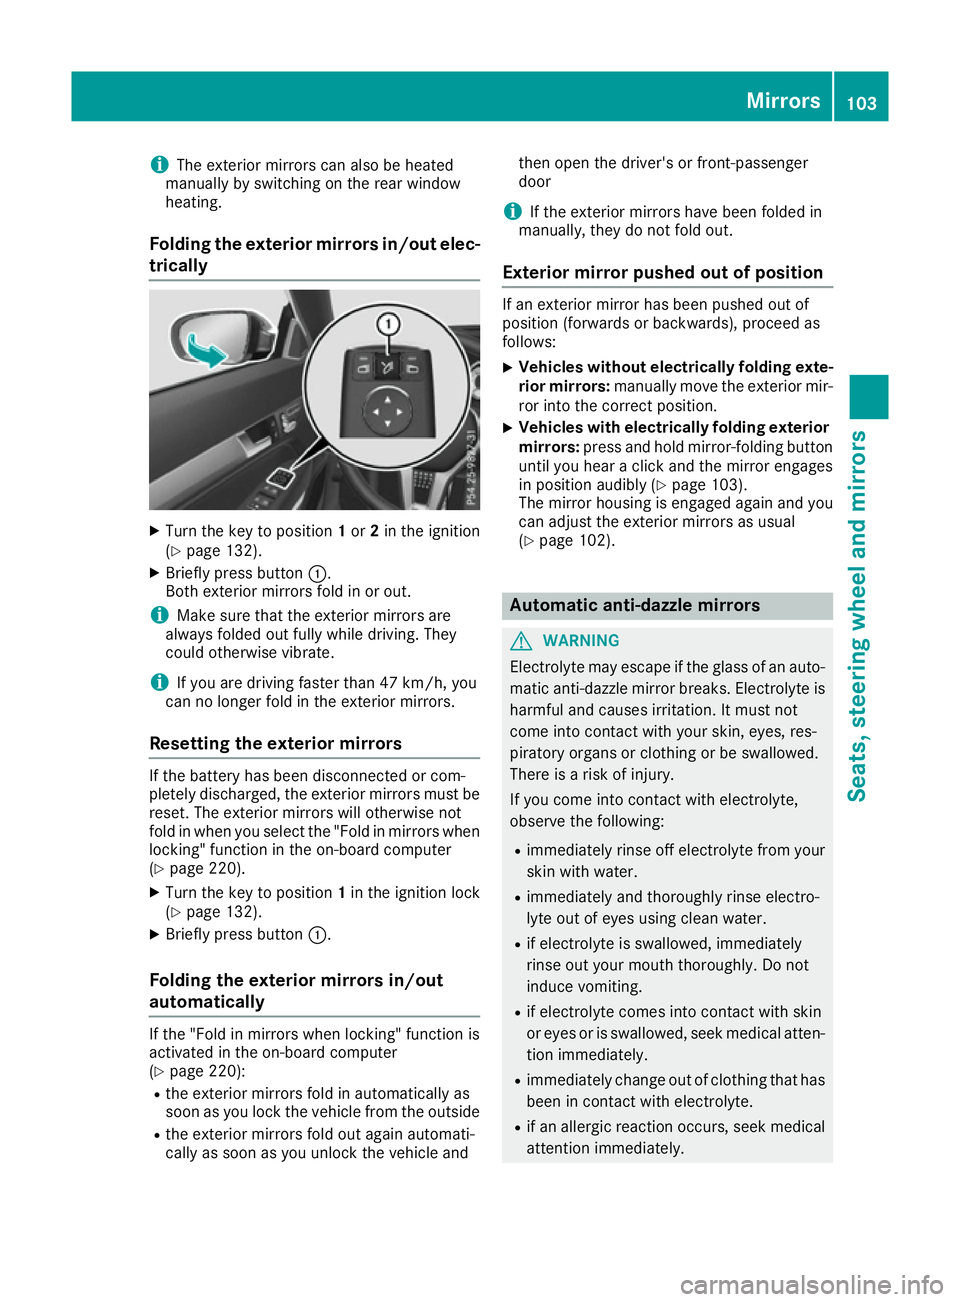
Turn the key to position 1or 2in the ignition
(Y page 132).
X Press button :for the left-hand exterior mir-
ror or button ;for the right-hand exterior
mirror.
The indicator lamp in the corresponding but-
ton lights up in red.
The indicator lamp goes out again after some
time. You can adjust the selected mirror using
adjustment button =as long as the indicator
lamp is lit.
X Press adjustment button =up, down, or to
the left or right until you have adjusted the
exterior mirror to the correct position. You
should have a good overview of traffic condi-
tions.
The convex exterior mirrors provide a larger field of vision.
After the engine has been started, the exterior
mirrors are automatically heated if the rear win-
dow heating is switched on and the outside tem- perature is low. Heating takes a maximum of tenminutes. 102
MirrorsSeats, steering wheel and mirrors
Page 106 of 345
i
The exterior mirrors can also be heated
manually by switching on the rear window
heating.
Folding the exterior mirrors in/out elec- trically X
Turn the key to position 1or 2in the ignition
(Y page 132).
X Briefly press button :.
Both exterior mirrors fold in or out.
i Make sure that the exterior mirrors are
always folded out fully while driving. They
could otherwise vibrate.
i If you are driving faster than 47 km/h,
you
can no longer fold in the exterior mirrors.
Resetting the exterior mirrors If the battery has been disconnected or com-
pletely discharged, the exterior mirrors must be
reset. The exterior mirrors will otherwise not
fold in when you select the "Fold in mirrors whenlocking" function in the on-board computer
(Y page 220).
X Turn the key to position 1in the ignition lock
(Y page 132).
X Briefly press button :.
Folding the exterior mirrors in/out
automatically If the "Fold in mirrors when locking" function is
activated in the on-board computer
(Y page 220):
R the exterior mirrors fold in automatically as
soon as you lock the vehicle from the outside
R the exterior mirrors fold out again automati-
cally as soon as you unlock the vehicle and then open the driver's or front-passenger
door
i If the exterior mirrors have been folded in
manually, they do not fold out.
Exterior mirror pushed out of position If an exterior mirror has been pushed out of
position (forwards or backwards), proceed as
follows:
X Vehicles without electrically folding exte-
rior mirrors: manually move the exterior mir-
ror into the correct position.
X Vehicles with electrically folding exterior
mirrors: press and hold mirror-folding button
until you hear a click and the mirror engages
in position audibly (Y page 103).
The mirror housing is engaged again and you
can adjust the exterior mirrors as usual
(Y page 102). Automatic anti-dazzle mirrors
G
WARNING
Electrolyte may escape if the glass of an auto- matic anti-dazzle mirror breaks. Electrolyte is
harmful and causes irritation. It must not
come into contact with your skin, eyes, res-
piratory organs or clothing or be swallowed.
There is a risk of injury.
If you come into contact with electrolyte,
observe the following:
R immediately rinse off electrolyte from your
skin with water.
R immediately and thoroughly rinse electro-
lyte out of eyes using clean water.
R if electrolyte is swallowed, immediately
rinse out your mouth thoroughly. Do not
induce vomiting.
R if electrolyte comes into contact with skin
or eyes or is swallowed, seek medical atten-
tion immediately.
R immediately change out of clothing that has
been in contact with electrolyte.
R if an allergic reaction occurs, seek medical
attention immediately. Mir
rors
103Seats, ste ering wheel and mirrors Z
Page 107 of 345
The rear-view mirror and the exterior mirror on
the driver's side automatically go into anti-daz-
zle mode if the following conditions are met
simultaneously:
R the ignition is switched on and
R incident light from headlamps strikes the sen-
sor in the rear-view mirror
The mirrors do not dip if reverse gear is engaged. Parking position of the exterior mirror
on the front-passenger side
Setting and storing the parking position You can set the front-passenger side exterior
mirror so that you can see the rear wheel on that side as soon as you engage reverse gear. You
can store this position.
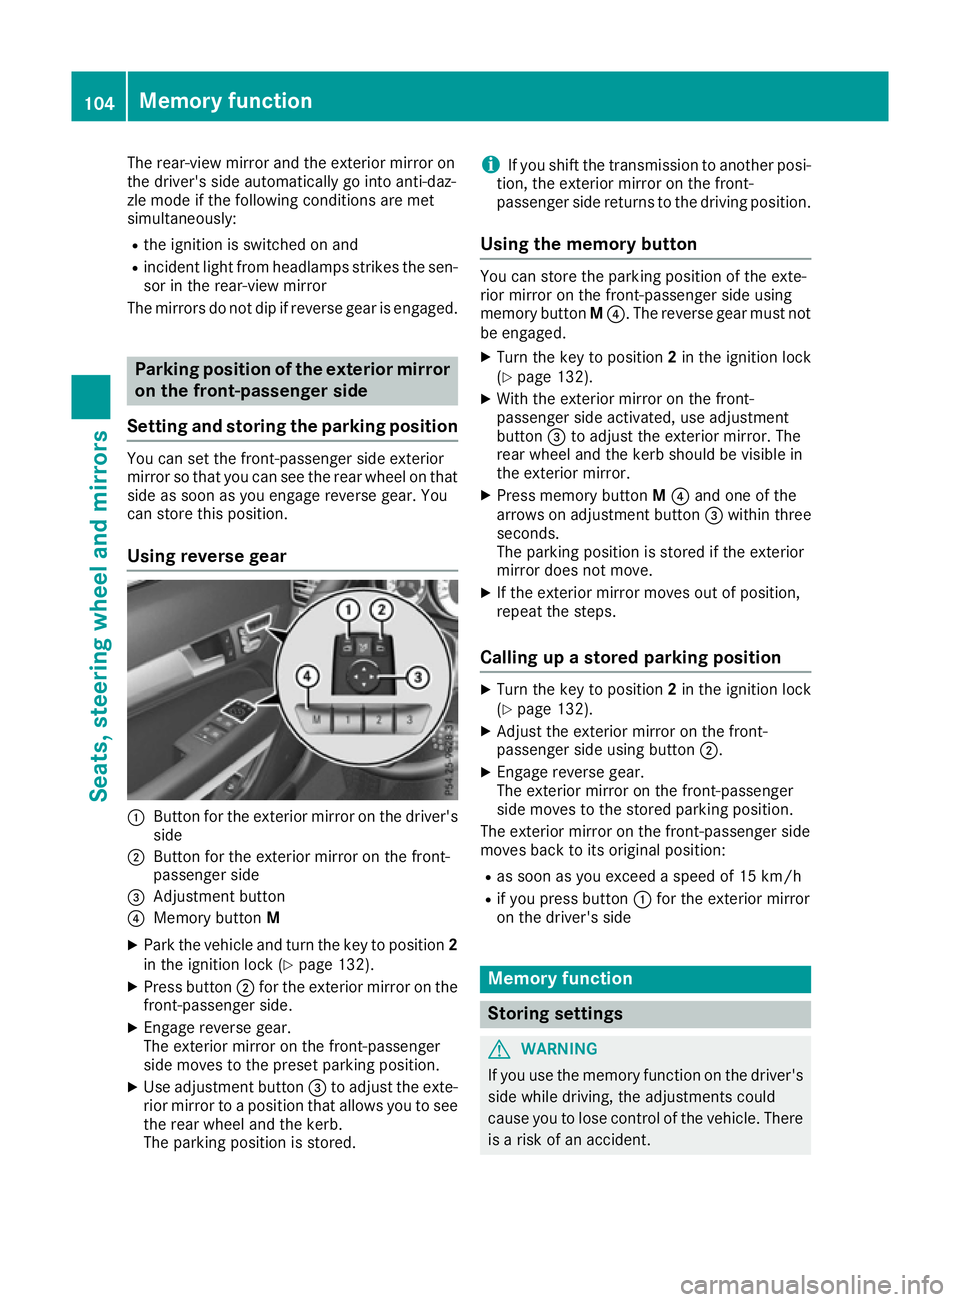
Using reverse gear :
Button for the exterior mirror on the driver's
side
; Button for the exterior mirror on the front-
passenger side
= Adjustment button
? Memory button M
X Park the vehicle and turn the key to position 2
in the ignition lock (Y page 132).
X Press button ;for the exterior mirror on the
front-passenger side.
X Engage reverse gear.
The exterior mirror on the front-passenger
side moves to the preset parking position.
X Use adjustment button =to adjust the exte-
rior mirror to a position that allows you to see
the rear wheel and the kerb.
The parking position is stored. i
If you shift the transmission to another posi-
tion, the exterior mirror on the front-
passenger side returns to the driving position.
Using the memory button You can store the parking position of the exte-
rior mirror on the front-passenger side using
memory button
M?. The reverse gear must not
be engaged.
X Turn the key to position 2in the ignition lock
(Y page 132).
X With the exterior mirror on the front-
passenger side activated, use adjustment
button =to adjust the exterior mirror. The
rear wheel and the kerb should be visible in
the exterior mirror.
X Press memory button M? and one of the
arrows on adjustment button =within three
seconds.
The parking position is stored if the exterior
mirror does not move.
X If the exterior mirror moves out of position,
repeat the steps.
Calling up a stored parking position X
Turn the key to position 2in the ignition lock
(Y page 132).
X Adjust the exterior mirror on the front-
passenger side using button ;.
X Engage reverse gear.
The exterior mirror on the front-passenger
side moves to the stored parking position.
The exterior mirror on the front-passenger side
moves back to its original position:
R as soon as you exceed a speed of 15 km/h
R if you press button :for the exterior mirror
on the driver's side Memory function
Storing settings
G
WARNING
If you use the memory function on the driver's side while driving, the adjustments could
cause you to lose control of the vehicle. There
is a risk of an accident. 104
Memory functionSeats, steering wheel and mirrors
Page 108 of 345
Only use the memory function on the driver's
side while the vehicle is stationary. G
WARNING
If children activate the memory function, they
could become trapped, especially if they are
unattended. There is a risk of injury.
When leaving the vehicle, always take the key with you and lock the vehicle. Never leave
children unattended in the vehicle. G
WARNING
When the memory function adjusts the seat or steering wheel, you and other vehicle occu-
pants – particularly children – could become
trapped. There is a risk of injury.
While the memory function is making adjust-
ments, make sure that no one has any body
parts in the sweep of the seat or steering
wheel. If somebody becomes trapped, imme-
diately release the memory function position
button. The adjustment process is stopped.
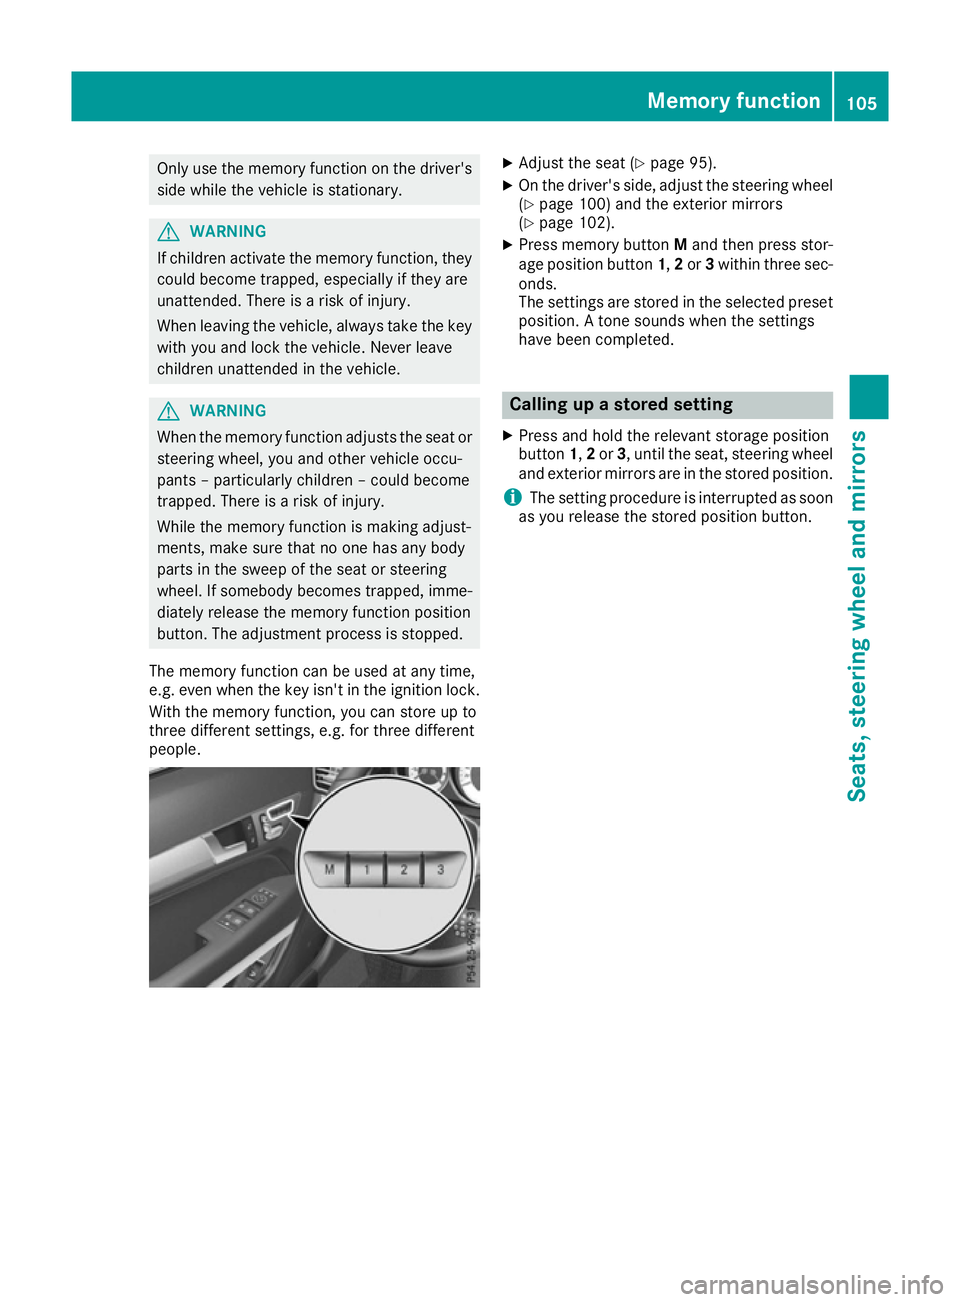
The memory function can be used at any time,
e.g. even when the key isn't in the ignition lock.
With the memory function, you can store up to
three different settings, e.g. for three different
people. X
Adjust the seat (Y page 95).
X On the driver's side, adjust the steering wheel
(Y page 100) and the exterior mirrors
(Y page 102).
X Press memory button Mand then press stor-
age position button 1,2or 3within three sec-
onds.
The settings are stored in the selected preset position. A tone sounds when the settings
have been completed. Calling up a stored setting
X Press and hold the relevant storage position
button 1,2or 3, until the seat, steering wheel
and exterior mirrors are in the stored position.
i The setting procedure is interrupted as soon
as you release the stored position button. Memory function
105Seats, steering wheel and mirrors Z
Page 109 of 345
Exterior lighting
General notes
For reasons of safety, Mercedes-Benz recom-
mends that you drive with the lights switched on even during the daytime. Therefore, your vehicle
is equipped with special daytime driving lamps.
In some countries, operation of the headlamps
varies due to legal requirements and self-
imposed obligations. Driving abroad
General notes If your journey takes you to countries where
vehicles are driven on the opposite side of the
road to the country in which the vehicle is reg-
istered, your headlamps must be switched to
symmetrical dipped beam as soon as possible
after crossing the border (exception: vehicles
with static LED headlamps). This prevents
oncoming traffic from being dazzled. Symmetri-
cal lights do not illuminate as large an area of the edge of the carriageway.
Vehicles with static LED headlamps It is not necessary to switch your headlamps to
symmetrical dipped beam when driving in coun-
tries where vehicles are driven on the opposite
side of the road to the country in which the vehi- cle is registered. Legal requirements are fulfilled
without switching the headlamps to symmetri-
cal dipped beam.
Vehicles with Intelligent Light System X
Before crossing the border, set the head-
lamps to symmetrical dipped beam and after
returning back to asymmetrical dipped beam via the "Dipped-beam headlamps for driving
on the right/left" function in the on-board
computer (Y page 217).
If the headlamps are converted to symmetrical
dipped beam, the "motorway mode" and "exten- ded range foglamps" functions are not available. Setting the exterior lighting
Setting options Exterior lighting can be set by:
R using the light switch
R using the combination switch (Y page 108)
R using the on-board computer (Y page 217)
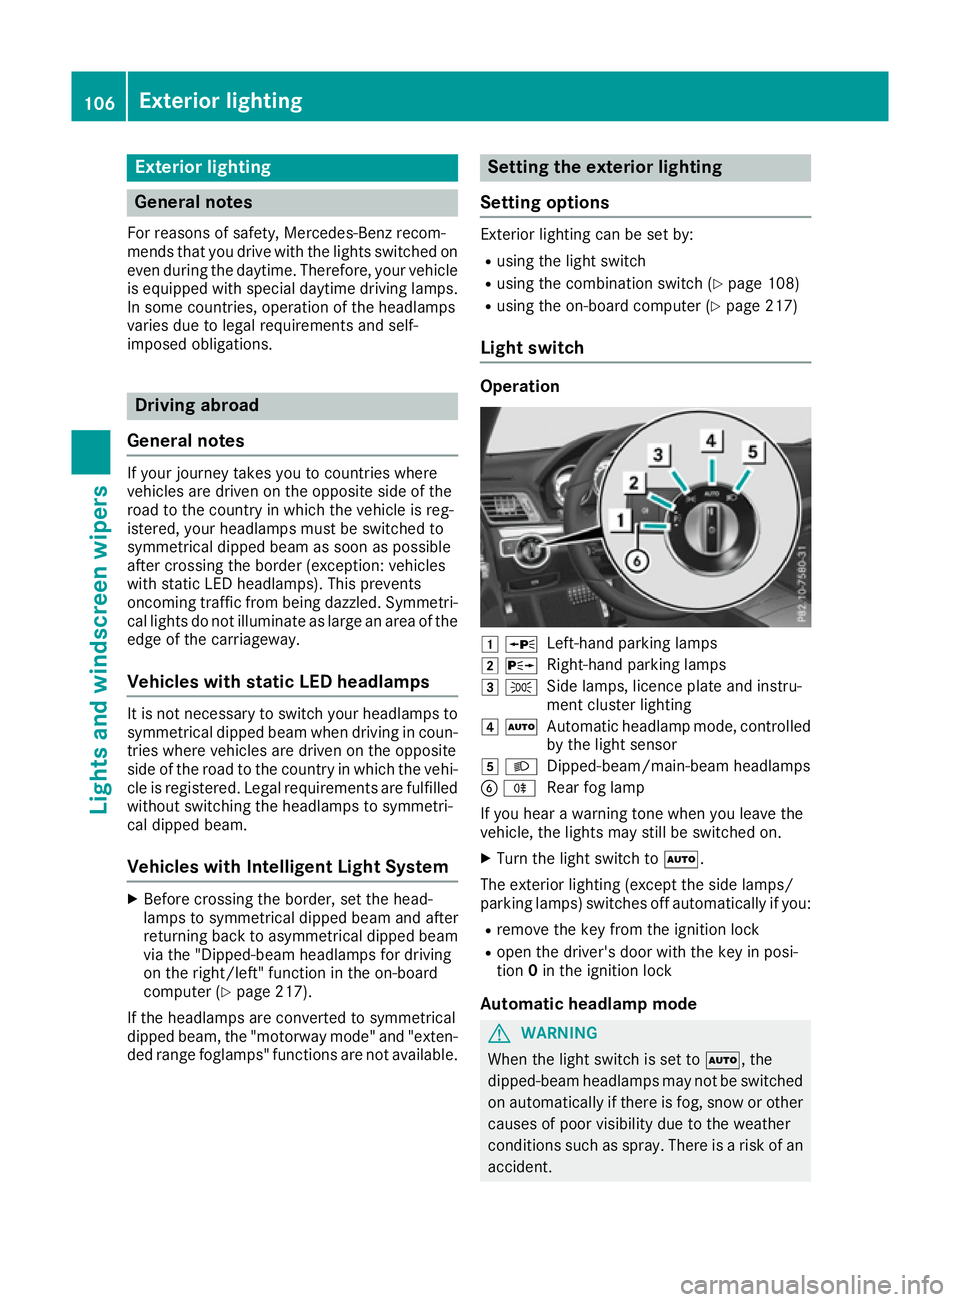
Light switch Operation
1
W
Left-hand parking lamps
2 X
Right-hand parking lamps
3 T
Side lamps, licence plate and instru-
ment cluster lighting
4 Ã
Automatic headlamp mode, controlled
by the light sensor
5 L
Dipped-beam/main-beam headlamps
B R
Rear fog lamp
If you hear a warning tone when you leave the
vehicle, the lights may still be switched on.
X Turn the light switch to Ã.
The exterior lighting (except the side lamps/
parking lamps) switches off automatically if you: R remove the key from the ignition lock
R open the driver's door with the key in posi-
tion 0in the ignition lock
Automatic headlamp mode G
WARNING
When the light switch is set to Ã, the
dipped-beam headlamps may not be switched on automatically if there is fog, snow or othercauses of poor visibility due to the weather
conditions such as spray. There is a risk of an
accident. 106
Exterior lightingLights and windscreen wipers
Page 110 of 345
In such situations, turn the light switch to
L.
The automatic headlamp feature is only an aid.
The driver is responsible for the vehicle lighting at all times.
à is the preferred light switch setting. The
light setting is automatically selected according
to the brightness of the ambient light (excep-
tion: poor visibility due to weather conditions
such as fog, snow or spray):
R Key in position 1in the ignition lock: the side
lamps are switched on or off automatically
depending on the brightness of the ambient
light.
R With the engine running: if you have switched
on the Daytime
Daytime driving drivinglights
lights function in
the on-board computer, the daytime driving
lights or the side lamps and dipped-beam
headlamps are switched on or off automati-
cally depending on the brightness of the ambi- ent light.
X To switch on automatic headlamp mode:
turn the light switch to
Ã.
The daytime driving lights improve the detecta-
bility of your vehicle during the day. Here, the
daytime driving lights function must be switched
on via the on-board computer (Y page 217).
When the side lamps and dipped-beam head-
lamps are switched on, the green T(side
lamps) and L(dipped-beam headlamps)
indicator lamps in the instrument cluster light
up.
Dipped-beam headlamps G
WARNING
When the light switch is set to Ã, the
dipped-beam headlamps may not be switched on automatically if there is fog, snow or othercauses of poor visibility due to the weather
conditions such as spray. There is a risk of an
accident.
In such situations, turn the light switch to
L.
When the ignition is switched on and the light
switch is in the Lposition, the side lamps
and dipped-beam headlamps are switched on
even if the light sensor does not sense dark
ambient light conditions. This is advantageous
when there is fog or rain. X
To switch on the dipped-beam headlamps:
turn the key in the ignition lock to position 2
or start the engine.
X Turn the light switch to L.
The green Lindicator lamp in the instru-
ment cluster lights up.
Rear fog lamp The rear foglamp improves the visibility of your
vehicle in heavy fog for the following traffic.
Please observe the country-specific laws on the
use of rear foglamps.
X To switch on the rear foglamp: turn the key
in the ignition lock to position 2or start the
engine.
X Turn the light switch to LorÃ.
X Press the Rbutton.
The yellow Rindicator lamp in the instru-
ment cluster lights up.
X To switch off the rear foglamp: press the
R button.
The yellow Rindicator lamp in the instru-
ment cluster goes out.
Side lamps ! If the battery has been discharged to a low
charge level, the side lamps or parking lamps
are automatically switched off to enable the
next engine start. Always leave your vehicle in
a safe position and adequately lit in accord-
ance with traffic regulations. Avoid using the
side lamps Tfor a period of several hours.
If possible, switch on the right Xor left
W parking lamp.
X To switch on: turn the light switch to T.
The green Tindicator lamp in the instru-
ment cluster lights up.
Parking lamps Switching on the parking lamps ensures that the
corresponding side of the vehicle is illuminated.
X To switch on the parking lamps: the key
should not be in the ignition lock or it should
be in position 0.
X Turn the light switch to W(left-hand side of
the vehicle) or X(right-hand side of the
vehicle). Exterior lighting
107Lights and windscreen wipers Z