key battery MERCEDES-BENZ E-Class COUPE 2017 C207 Owner's Manual
[x] Cancel search | Manufacturer: MERCEDES-BENZ, Model Year: 2017, Model line: E-Class COUPE, Model: MERCEDES-BENZ E-Class COUPE 2017 C207Pages: 318, PDF Size: 7.35 MB
Page 6 of 318
Assistance display (on-board com-
puter).................................................. 191
Assistance menu (on-board com-
puter) .................................................. 191
ASSYST PLUS
Displayin g a service message ........ 258
Hiding a service message .............. 258
Resetting the service interval dis-
play ................................................ 258
Se rvice message ............................ 257
Spe cial service requirements ........ .258
ATA (Anti-Theft Alarm system)
Activating/deactivating ................... 72
Function ...........................................7 2
Switching off the alarm .................... 72
ATTENTION ASSIST
Activating/deactivating ................. 192
Display message ............................ 209
Function/notes ............................. 172
Audio 20
Switching on/off ........................... 230
Audio system
see separate operating instructions
Authorized Mercedes-Benz Center
see Qualified specialist workshop
Authorized workshop
see Qualified specialist workshop
AUTO lights
Display message ............................ 206
see Lights
Automatic car wash (care) ............... 259
Automatic engine start (ECO start/
stop function) .................................... 125
Automatic engine switch-off (ECO
start/stop function) .......................... 125
Automatic headlamp mode .............. 103
Automatic transmission
Accelerator pedal position ............. 130
Automatic drive program ............... 132
C
hanging gear ............................... 130
DIRECT SELECT lever ..................... 128
Display message ............................ 215
Drive program display .................... 128
Driving tips .................................... 130
Emergency running mode .............. 135
Engaging drive position .................. 129
Engaging neutral ............................ 129 Engaging park position automati-
cally ............................................... 129
Engaging reverse gear ................... 129
Engaging the park position ............ 128
Kickdown ....................................... 131
Manual drive program .................... 132
Manual drive program (vehicles
with Sports package AMG) ............ 133
Overview ........................................ 128
Problem (malfunction) ................... 135
Program selector button ................ 131
Pulling away ................................... 124
Starting the engine ........................ 124
Steering wheel paddle shifters ...... 132
Transmission position display
(DIRECT SELECT lever) ................... 128
Transmission positions .................. 130
Automatic transmission emer-
gency mode ....................................... 135
B
Back button ....................................... 230
Bag hook ............................................ 238
BAS (Brake Assist System) ................. 63
BAS PLUS (Brake Assist System
PLUS) with Cross-Traffic Assist
Function/notes ................................ 63
BAS PLUS with Cross-Traffic Assist
(Brake Assist PLUS with Cross-
Traffic Assist)
Important safety notes .................... 63
Battery (SmartKey)
Checking .......................................... 76
Important safety notes .................... 75
Replacing ......................................... 76
Battery (vehicle)
Charging ........................................ 272
Display message ............................ 208
Important safety notes .................. 270
Jump starting ................................. 274
Belt
see Seat belts
Blind Spot Assist
Activating/deactivating (on-
board computer) ............................ 193
Display message ............................ 210
Notes/function .............................. 175
4Index
Page 18 of 318
Important safety guidelines .............42
Introduction .....................................4 1
Releasin g ......................................... 44
Switching belt adjustment on/off
(on-board computer) ...................... 196
Warning lamp ................................. 220
Warning lamp (function) ................... 45
Seats
Adjusting (electrically) ..................... 92
Adjusting the 4-way lumbar sup-
port .................................................. 94
Adjusting the head restraint ............ 93
Adjusting the multicontour seat ....... 94
Cleaning the cover ......................... 264
Correct driver's seat position ........... 91
Folding the backrests forward/
back ................................................. 93
Important safety notes .................... 91
Overview .......................................... 91
Seat backrest display message ..... 217
Seat heating .................................... 95
Seat heating problem ...................... 96
Storing settings (memory func-
tion) ............................................... 102
Switching seat heating on/off ......... 95
Switching seat ventilation on/
off .................................................... 95
Section
Trunk ............................................... 80
Securing cargo .................................. 238
Selector lever
Cleaning ......................................... 263
Sensors (cleaning instructions) ....... 262
Service menu (on-board com-
puter) .................................................. 193
Service message
see ASSYST PLUS
Service products
Brake fluid ..................................... 311
Coolant (engine) ............................ 312
Engine oil ....................................... 311
Fuel ................................................ 309
Important safety notes .................. 308
Refrigerant (air-conditioning sys-
tem) ............................................... 313
Washer fluid ................................... 312
Setting the air distribution ............... 116Setting the airflow
............................ 117
Setting the date/time format
see also Digital Operator's Man-
ual .................................................. 229
Setting the language
see also Digital Operator's Man-
ual .................................................. 229
Setting the time
see also Digital Ope rator's Ma
n-
ual .................................................. 229
Settings
Factory (on-board computer) ......... 196
On-board computer ....................... 193
Side impact air bag ............................. 47
Side marker lamp (display mes-
sage) ................................................... 206
Side windows
Cleaning ......................................... 261
Convenience closing feature ............ 84
Convenience opening feature .......... 83
Important safety information ........... 82
Opening/closing .............................. 83
Problem (malfunction) ..................... 86
Resetting ......................................... 85
Reversing feature ............................. 82
SIRIUS services
see also Digital Operator's Man-
ual .................................................. 229
Sliding sunroof
see Panorama roof with power
tilt/sliding panel
SmartKey
Changing the battery ....................... 76
Changing the programming ............. 74
Checking the battery ....................... 76
Convenience closing feature ............ 84
Convenience opening feature .......... 83
Display message ............................ 218
Door central locking/unlocking ....... 73
Important safety notes .................... 73
Loss ................................................. 77
Mechanical key ................................ 75
Overview .......................................... 73
Positions (ignition lock) ................. 122
Problem (malfunction) ..................... 77
Starting the engine ........................ 124
16Index
Page 74 of 318
Protection against theft
Immobilizer
The immobilizer prevents your vehicle from
being started without the correct SmartKey.
XTo activate with the SmartKey:remove the
SmartKey from the ignition lock.
XTo activate with KEYLESS-GO: switch the
ignition off and open the driver's door.
XTo deactivate: switch on the ignition.
When leaving the vehicle, always take the
SmartKey with you and lock the vehicle. Anyone
can start the engine if a valid SmartKey has been
left inside the vehicle.
iThe immobilizer is always deactivated when
you start the engine.
In the event that the engine cannot be started
(yet the vehicle's battery is charged), the sys-
tem is not operational. Contact an authorized
Mercedes-Benz Center or call
1-800-FOR-MERCedes (in the USA) or
1-800-387-0100 (in Canada).
ATA (anti-theft alarm system)
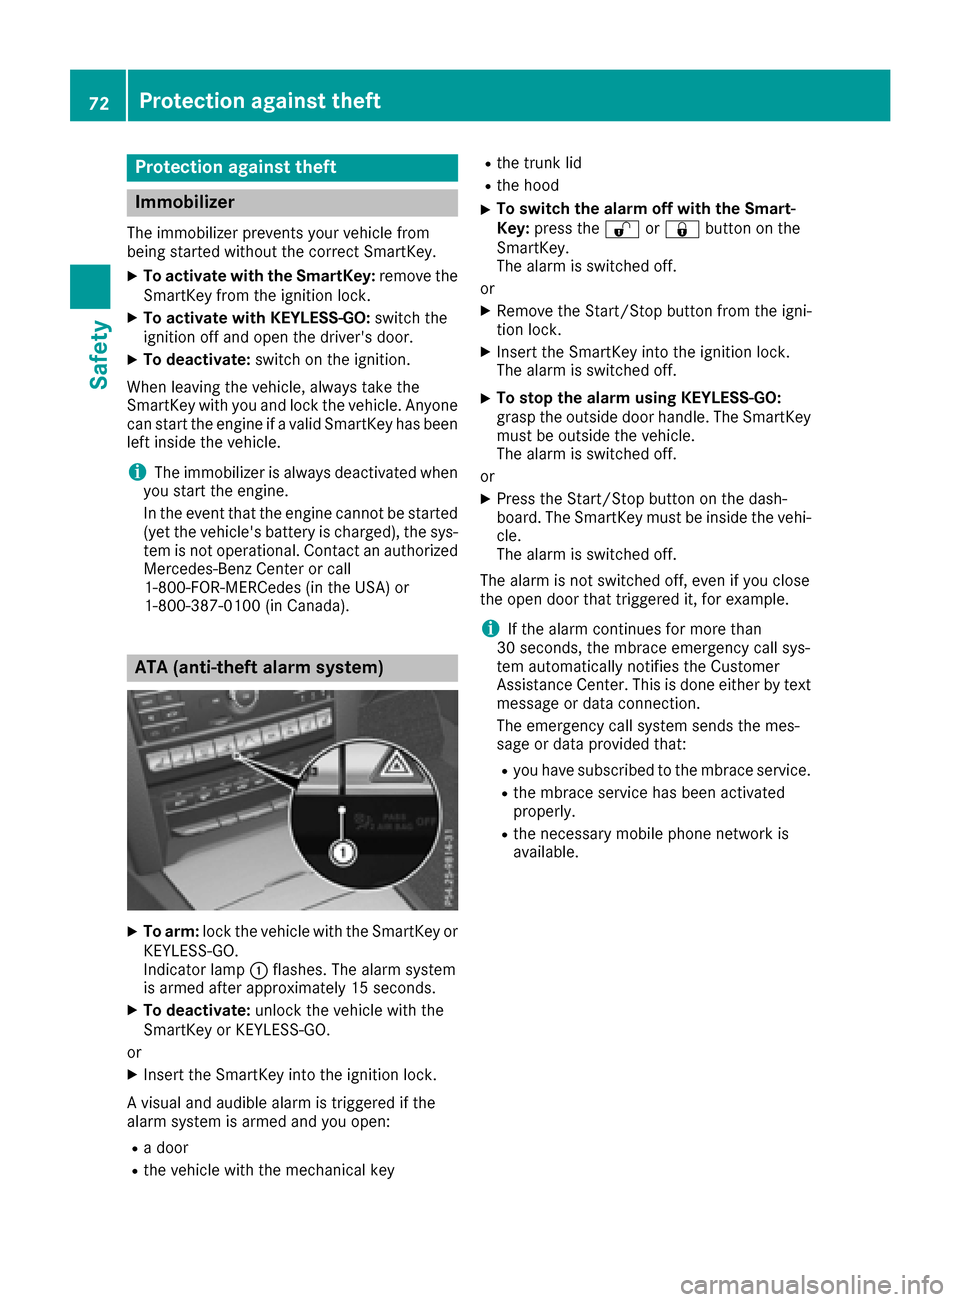
XTo arm: lock the vehicle with the SmartKey or
KEYLESS-GO.
Indicator lamp :flashes. The alarm system
is armed after approximately 15 seconds.
XTo deactivate: unlock the vehicle with the
SmartKey or KEYLESS-GO.
or
XInsert the SmartKey into the ignition lock.
A visual and audible alarm is triggered if the
alarm system is armed and you open:
Ra door
Rthe vehicle with the mechanical key
Rthe trunk lid
Rthe hood
XTo switch the alarm off with the Smart-
Key: press the %or& button on the
SmartKey.
The alarm is switched off.
or
XRemove the Start/Stop button from the igni-
tion lock.
XInsert the SmartKey into the ignition lock.
The alarm is switched off.
XTo stop the alarm using KEYLESS-GO:
grasp the outside door handle. The SmartKey
must be outside the vehicle.
The alarm is switched off.
or
XPress the Start/Stop button on the dash-
board. The SmartKey must be inside the vehi-
cle.
The alarm is switched off.
The alarm is not switched off, even if you close
the open door that triggered it, for example.
iIf the alarm continues for more than
30 seconds, the mbrace emergency call sys-
tem automatically notifies the Customer
Assistance Center. This is done either by text message or data connection.
The emergency call system sends the mes-
sage or data provided that:
Ryou have subscribed to the mbrace service.
Rthe mbrace service has been activated
properly.
Rthe necessary mobile phone network is
available.
72Protection against theft
Safety
Page 76 of 318
tions of KEYLESS-GO with those of a conven-
tional SmartKey. Unlock the vehicle by using
KEYLESS-GO, for instance, and lock it using the
&button on the SmartKey.
When locking or unlocking with KEYLESS-GO,
the distance between the SmartKey and the cor-
responding door handle must not be greater
than 3 ft (1 m).
A check which periodically establishes a radio
connection between the vehicle and the Smart-
Key determines whether a valid SmartKey is in
the vehicle. This occurs, for example:
Rwhen the external door handles are touched
Rwhen starting the engine
Rwhile the vehicle is in motion
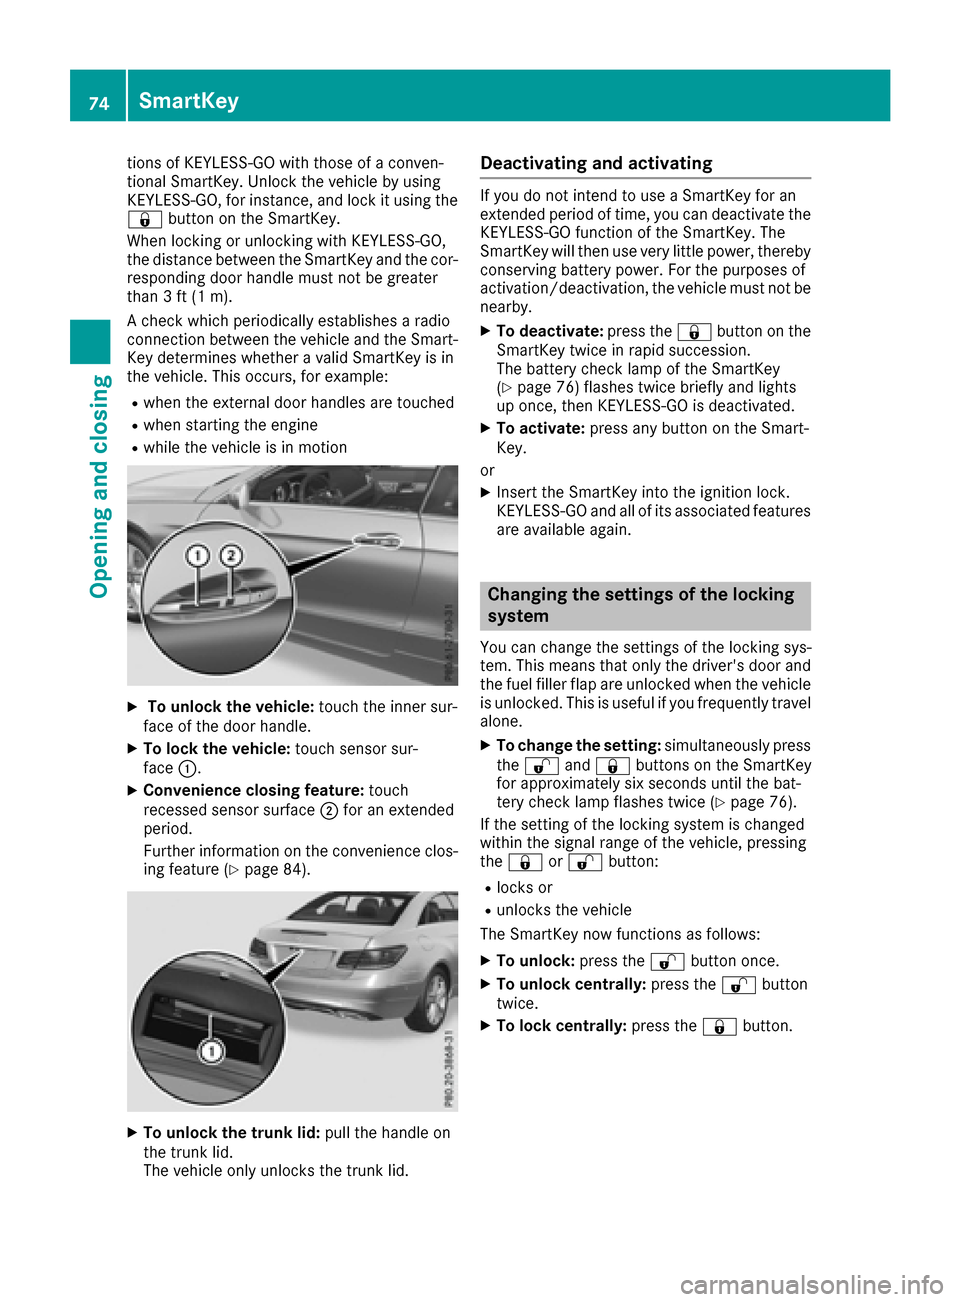
XTo unlock the vehicle: touch the inner sur-
face of the door handle.
XTo lock the vehicle: touch sensor sur-
face :.
XConvenience closing feature: touch
recessed sensor surface ;for an extended
period.
Further information on the convenience clos-
ing feature (
Ypage 84).
XTo unlock the trunk lid: pull the handle on
the trunk lid.
The vehicle only unlocks the trunk lid.
Deactivating and activating
If you do not intend to use a SmartKey for an
extended period of time, you can deactivate the
KEYLESS-GO function of the SmartKey. The
SmartKey will then use very little power, thereby
conserving battery power. For the purposes of
activation/deactivation, the vehicle must not be
nearby.
XTo deactivate: press the&button on the
SmartKey twice in rapid succession.
The battery check lamp of the SmartKey
(
Ypage 76) flashes twice briefly and lights
up once, then KEYLESS-GO is deactivated.
XTo activate: press any button on the Smart-
Key.
or
XInsert the SmartKey into the ignition lock.
KEYLESS-GO and all of its associated features
are available again.
Changing the settings of the locking
system
You can change the settings of the locking sys-
tem. This means that only the driver's door and
the fuel filler flap are unlocked when the vehicle
is unlocked. This is useful if you frequently travel
alone.
XTo change the setting: simultaneously press
the % and& buttons on the SmartKey
for approximately six seconds until the bat-
tery check lamp flashes twice (
Ypage 76).
If the setting of the locking system is changed
within the signal range of the vehicle, pressing
the & or% button:
Rlocks or
Runlocks the vehicle
The SmartKey now functions as follows:
XTo unlock: press the%button once.
XTo unlock centrally: press the%button
twice.
XTo lock centrally: press the&button.
74SmartKey
Opening and closing
Page 77 of 318
The KEYLESS-GO function is changed as fol-
lows:
XTo unlock the driver's door:touch the inner
surface of the door handle on the driver's
door.
XTo unlock centrally: touch the inner surface
of the front-passenger door handle.
XTo lock centrally: touch the outer sensor
surface on one of the door handles.
XTo restore the factory settings: press and
hold down the %and& buttons simul-
taneously for approximately six seconds until
the battery check lamp flashes twice
(
Ypage 76).
Mechanical key
General notes
If the vehicle can no longer be locked or
unlocked with the SmartKey, use the mechani-
cal key.
If you use the mechanical key to unlock and
open the driver's door or the trunk lid, the anti-
theft alarm system will be triggered. Switch off
the alarm (
Ypage 72).
If you unlock the vehicle using the mechanical
key, the fuel filler flap will not be unlocked auto-
matically.
XTo unlock the fuel filler flap: insert the
SmartKey into the ignition lock.
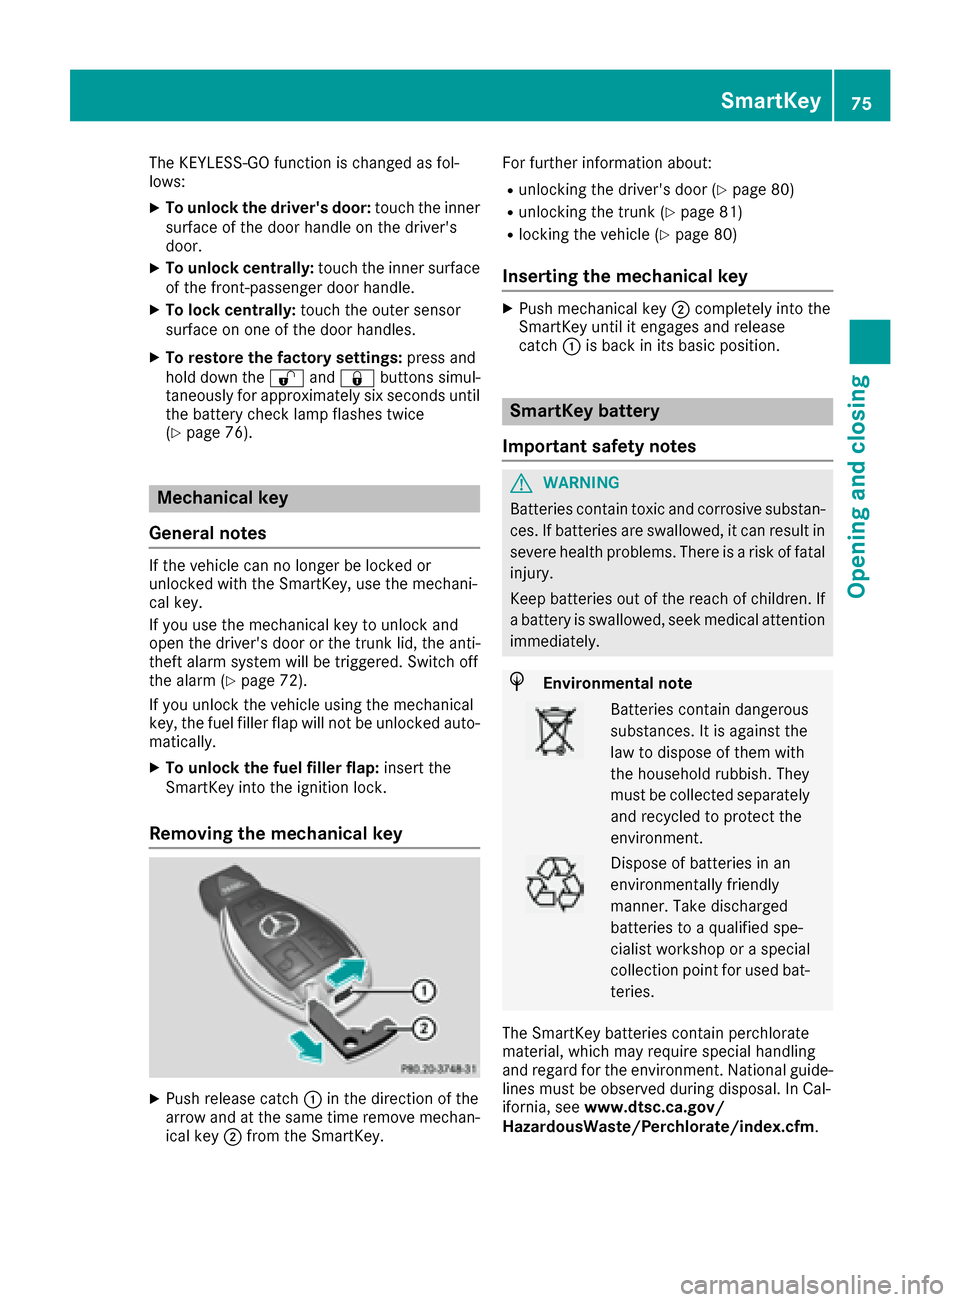
Removing the mechanical key
XPush release catch :in the direction of the
arrow and at the same time remove mechan- ical key ;from the SmartKey. For further information about:
Runlocking the driver's door (Ypage 80)
Runlocking the trunk (Ypage 81)
Rlocking the vehicle (Ypage 80)
Inserting the mechanical key
XPush mechanical key
;completely into the
SmartKey until it engages and release
catch :is back in its basic position.
SmartKey battery
Important safety notes
GWARNING
Batteries contain toxic and corrosive substan- ces. If batteries are swallowed, it can result in
severe health problems. There is a risk of fatalinjury.
Keep batteries out of the reach of children. If
a battery is swallowed, seek medical attention
immediately.
HEnvironmental note
Batteries contain dangerous
substances. It is against the
law to dispose of them with
the household rubbish. They
must be collected separately and recycled to protect the
environment.
Dispose of batteries in an
environmentally friendly
manner. Take discharged
batteries to a qualified spe-
cialist workshop or a special
collection point for used bat-
teries.
The SmartKey batteries contain perchlorate
material, which may require special handling
and regard for the environment. National guide-
lines must be observed during disposal. In Cal-
ifornia, see www.dtsc.ca.gov/
HazardousWaste/Perchlorate/index.cfm.
SmartKey75
Opening and closing
Z
Page 78 of 318
Mercedes-Benz recommends that you have the
batteries replaced at a qualified specialist work-
shop.
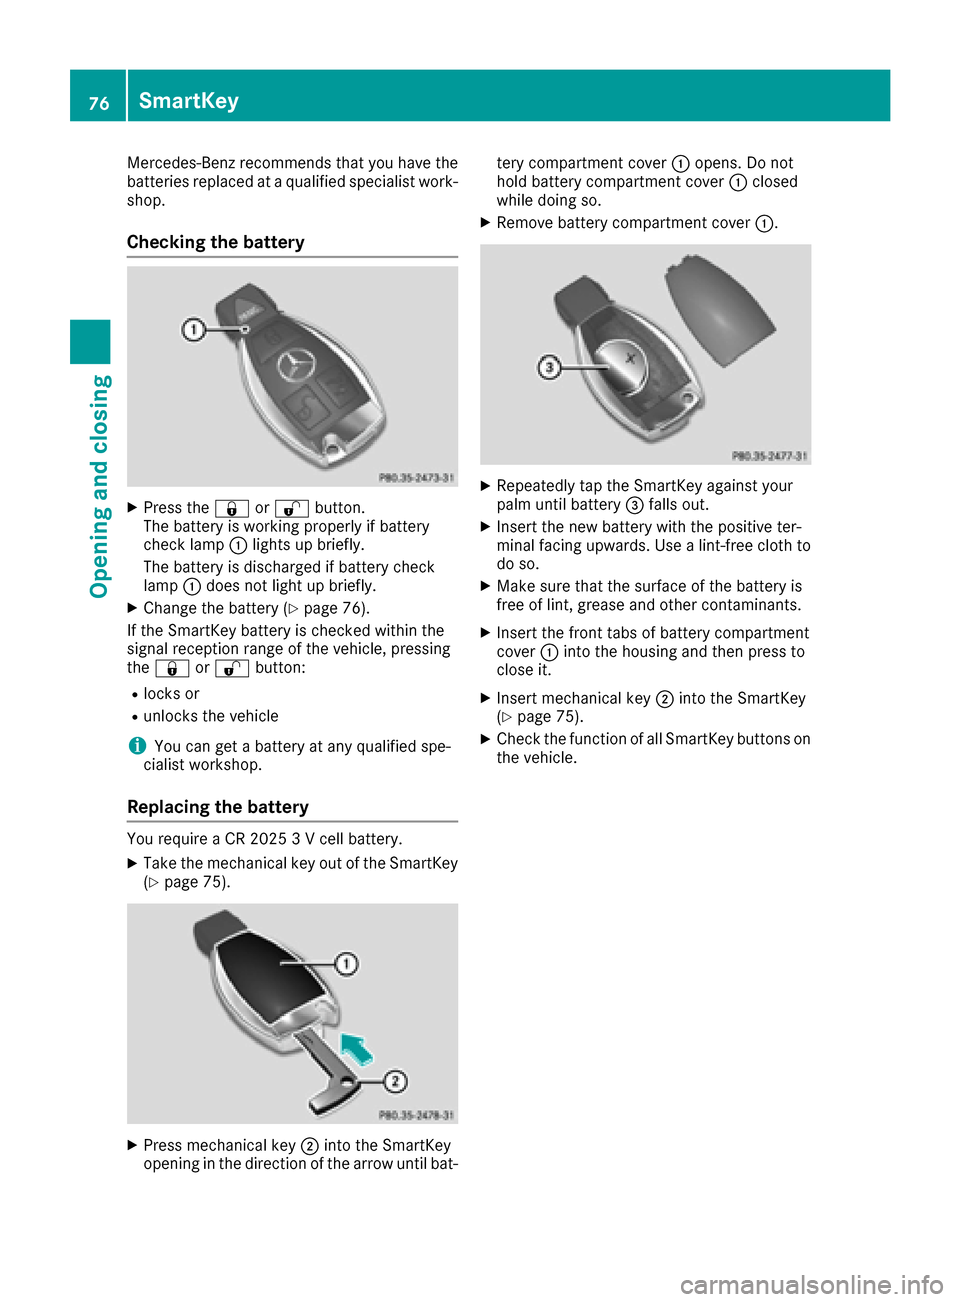
Checking the battery
XPress the&or% button.
The battery is working properly if battery
check lamp :lights up briefly.
The battery is discharged if battery check
lamp :does not light up briefly.
XChange the battery (Ypage 76).
If the SmartKey battery is checked within the
signal reception range of the vehicle, pressing
the & or% button:
Rlocks or
Runlocks the vehicle
iYou can get a battery at any qualified spe-
cialist workshop.
Replacing the battery
You require a CR 2025 3 V cell battery.
XTake the mechanical key out of the SmartKey
(Ypage 75).
XPress mechanical key ;into the SmartKey
opening in the direction of the arrow until bat- tery compartment cover
:opens. Do not
hold battery compartment cover :closed
while doing so.
XRemove battery compartment cover :.
XRepeatedly tap the SmartKey against your
palm until battery=falls out.
XInsert the new battery with the positive ter-
minal facing upwards. Use a lint-free cloth to
do so.
XMake sure that the surface of the battery is
free of lint, grease and other contaminants.
XInsert the front tabs of battery compartment
cover :into the housing and then press to
close it.
XInsert mechanical key ;into the SmartKey
(Ypage 75).
XCheck the function of all SmartKey buttons on
the vehicle.
76SmartKey
Opening and closing
Page 79 of 318
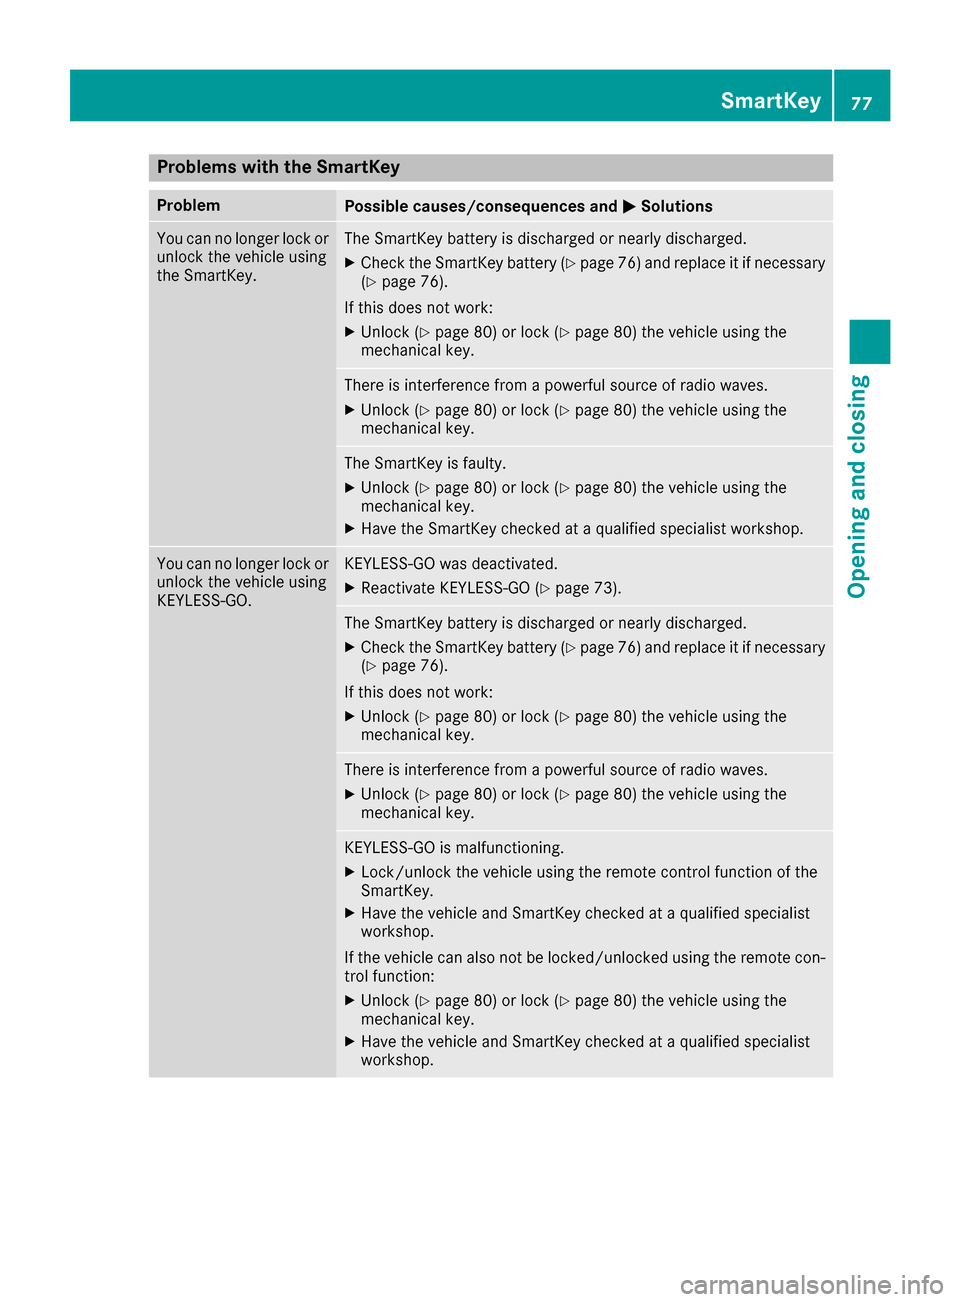
Problems with the SmartKey
ProblemPossible causes/consequences andMSolutions
You can no longer lock or
unlock the vehicle using
the SmartKey.The SmartKey battery is discharged or nearly discharged.
XCheck the SmartKey battery (Ypage 76) and replace it if necessary
(Ypage 76).
If this does not work:
XUnlock (Ypage 80) or lock (Ypage 80) the vehicle using the
mechanical key.
There is interference from a powerful source of radio waves.
XUnlock (Ypage 80) or lock (Ypage 80) the vehicle using the
mechanical key.
The SmartKey is faulty.
XUnlock (Ypage 80) or lock (Ypage 80) the vehicle using the
mechanical key.
XHave the SmartKey checked at a qualified specialist workshop.
You can no longer lock or
unlock the vehicle using
KEYLESS-GO.KEYLESS-GO was deactivated.
XReactivate KEYLESS-GO (Ypage 73).
The SmartKey battery is discharged or nearly discharged.
XCheck the SmartKey battery (Ypage 76) and replace it if necessary
(Ypage 76).
If this does not work:
XUnlock (Ypage 80) or lock (Ypage 80) the vehicle using the
mechanical key.
There is interference from a powerful source of radio waves.
XUnlock (Ypage 80) or lock (Ypage 80) the vehicle using the
mechanical key.
KEYLESS-GO is malfunctioning.
XLock/unlock the vehicle using the remote control function of the
SmartKey.
XHave the vehicle and SmartKey checked at a qualified specialist
workshop.
If the vehicle can also not be locked/unlocked using the remote con-
trol function:
XUnlock (Ypage 80) or lock (Ypage 80) the vehicle using the
mechanical key.
XHave the vehicle and SmartKey checked at a qualified specialist
workshop.
SmartKey77
Opening and closing
Z
Page 80 of 318
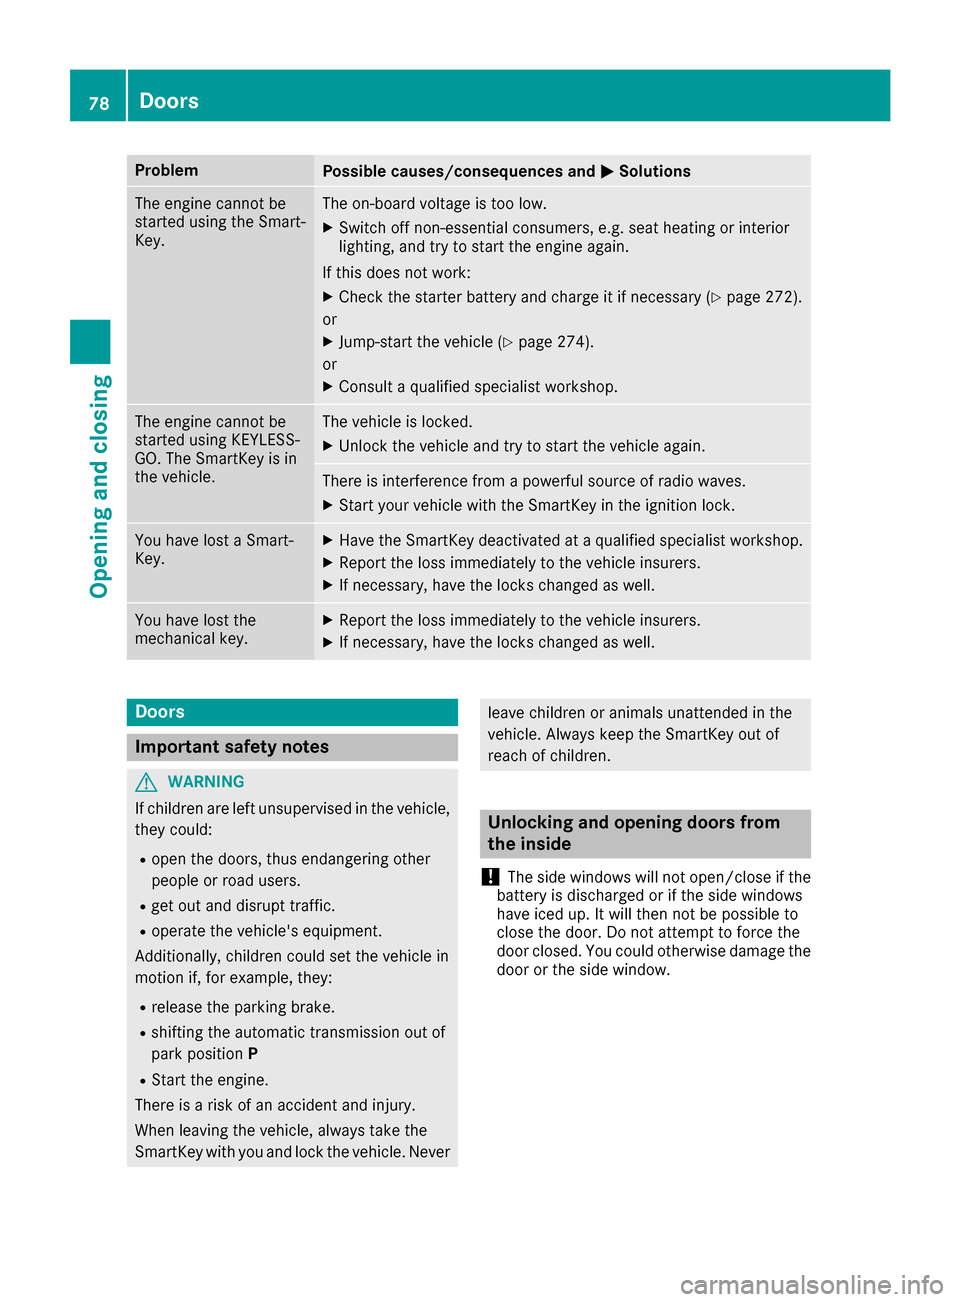
ProblemPossible causes/consequences andMSolutions
The engine cannot be
started using the Smart-
Key.The on-board voltage is too low.
XSwitch off non-essential consumers, e.g. seat heating or interior
lighting, and try to start the engine again.
If this does not work:
XCheck the starter battery and charge it if necessary (Ypage 272).
or
XJump-start the vehicle (Ypage 274).
or
XConsult a qualified specialist workshop.
The engine cannot be
started using KEYLESS-
GO. The SmartKey is in
the vehicle.The vehicle is locked.
XUnlock the vehicle and try to start the vehicle again.
There is interference from a powerful source of radio waves.
XStart your vehicle with the SmartKey in the ignition lock.
You have lost a Smart-
Key.XHave the SmartKey deactivated at a qualified specialist workshop.
XReport the loss immediately to the vehicle insurers.
XIf necessary, have the locks changed as well.
You have lost the
mechanical key.XReport the loss immediately to the vehicle insurers.
XIf necessary, have the locks changed as well.
Doors
Important safety notes
GWARNING
If children are left unsupervised in the vehicle,
they could:
Ropen the doors, thus endangering other
people or road users.
Rget out and disrupt traffic.
Roperate the vehicle's equipment.
Additionally, children could set the vehicle in
motion if, for example, they:
Rrelease the parking brake.
Rshifting the automatic transmission out of
park position P
RStart the engine.
There is a risk of an accident and injury.
When leaving the vehicle, always take the
SmartKey with you and lock the vehicle. Never
leave children or animals unattended in the
vehicle. Always keep the SmartKey out of
reach of children.
Unlocking and opening doors from
the inside
!
The side windows will not open/close if the
battery is discharged or if the side windows
have iced up. It will then not be possible to
close the door. Do not attempt to force the
door closed. You could otherwise damage the
door or the side window.
78Doors
Opening and closing
Page 84 of 318
XTurn the mechanical key from position1
counter-clockwise as far as it will go to posi-
tion 2. Simultaneously pull the trunk lid han-
dle.
The trunk is unlocked.
XTurn the mechanical key back to position 1
and remove it.
XInsert the mechanical key into the SmartKey
(Ypage 75).
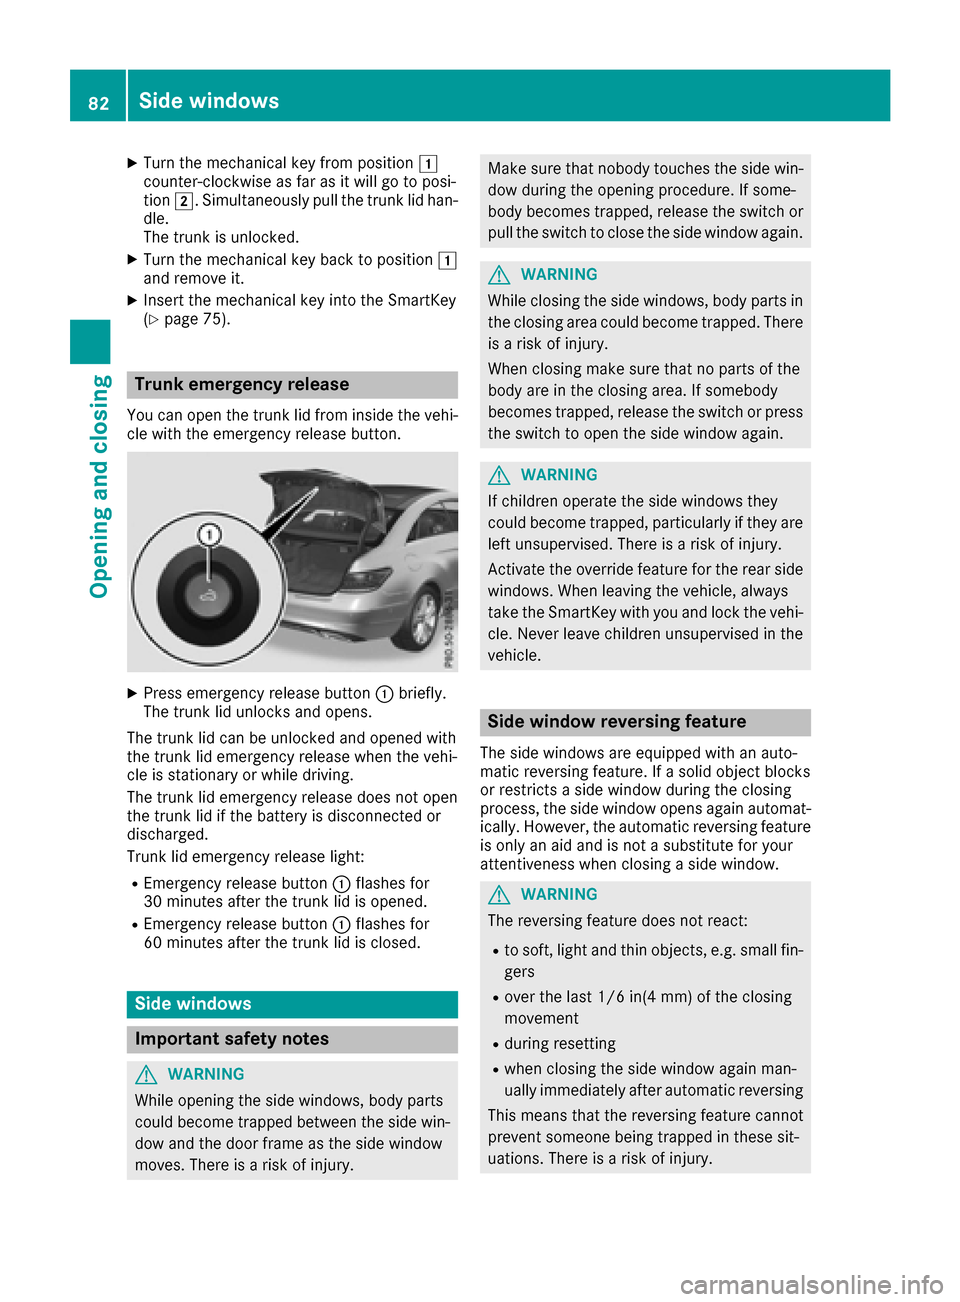
Trunk emergency release
You can open the trunk lid from inside the vehi-
cle with the emergency release button.
XPress emergency release button :briefly.
The trunk lid unlocks and opens.
The trunk lid can be unlocked and opened with
the trunk lid emergency release when the vehi-
cle is stationary or while driving.
The trunk lid emergency release does not open
the trunk lid if the battery is disconnected or
discharged.
Trunk lid emergency release light:
REmergency release button :flashes for
30 minutes after the trunk lid is opened.
REmergency release button :flashes for
60 minutes after the trunk lid is closed.
Side windows
Important safety notes
GWARNING
While opening the side windows, body parts
could become trapped between the side win-
dow and the door frame as the side window
moves. There is a risk of injury.
Make sure that nobody touches the side win- dow during the opening procedure. If some-
body becomes trapped, release the switch or
pull the switch to close the side window again.
GWARNING
While closing the side windows, body parts in
the closing area could become trapped. There is a risk of injury.
When closing make sure that no parts of the
body are in the closing area. If somebody
becomes trapped, release the switch or press
the switch to open the side window again.
GWARNING
If children operate the side windows they
could become trapped, particularly if they are left unsupervised. There is a risk of injury.
Activate the override feature for the rear side
windows. When leaving the vehicle, always
take the SmartKey with you and lock the vehi-
cle. Never leave children unsupervised in the
vehicle.
Side window reversing feature
The side windows are equipped with an auto-
matic reversing feature. If a solid object blocks
or restricts a side window during the closing
process, the side window opens again automat-
ically. However, the automatic reversing feature
is only an aid and is not a substitute for your
attentiveness when closing a side window.
GWARNING
The reversing feature does not react:
Rto soft, light and thin objects, e.g. small fin-
gers
Rover the last 1/6 in(4 mm) of the closing
movement
Rduring resetting
Rwhen closing the side window again man-
ually immediately after automatic reversing
This means that the reversing feature cannot
prevent someone being trapped in these sit-
uations. There is a risk of injury.
82Side windows
Opening and closing
Page 97 of 318
Seat heating and seat ventilation
Switching the seat heating on/off
GWARNING
Repeatedly switching on the seat heating can
cause the seat cushion and backrest pads to
become very hot. The health of persons with
limited temperature sensitivity or a limited
ability to react to excessively high tempera-
tures may be affected or they may even suffer
burn-like injuries. There is a risk of injury.
Therefore, do not switch the seat heating on
repeatedly.
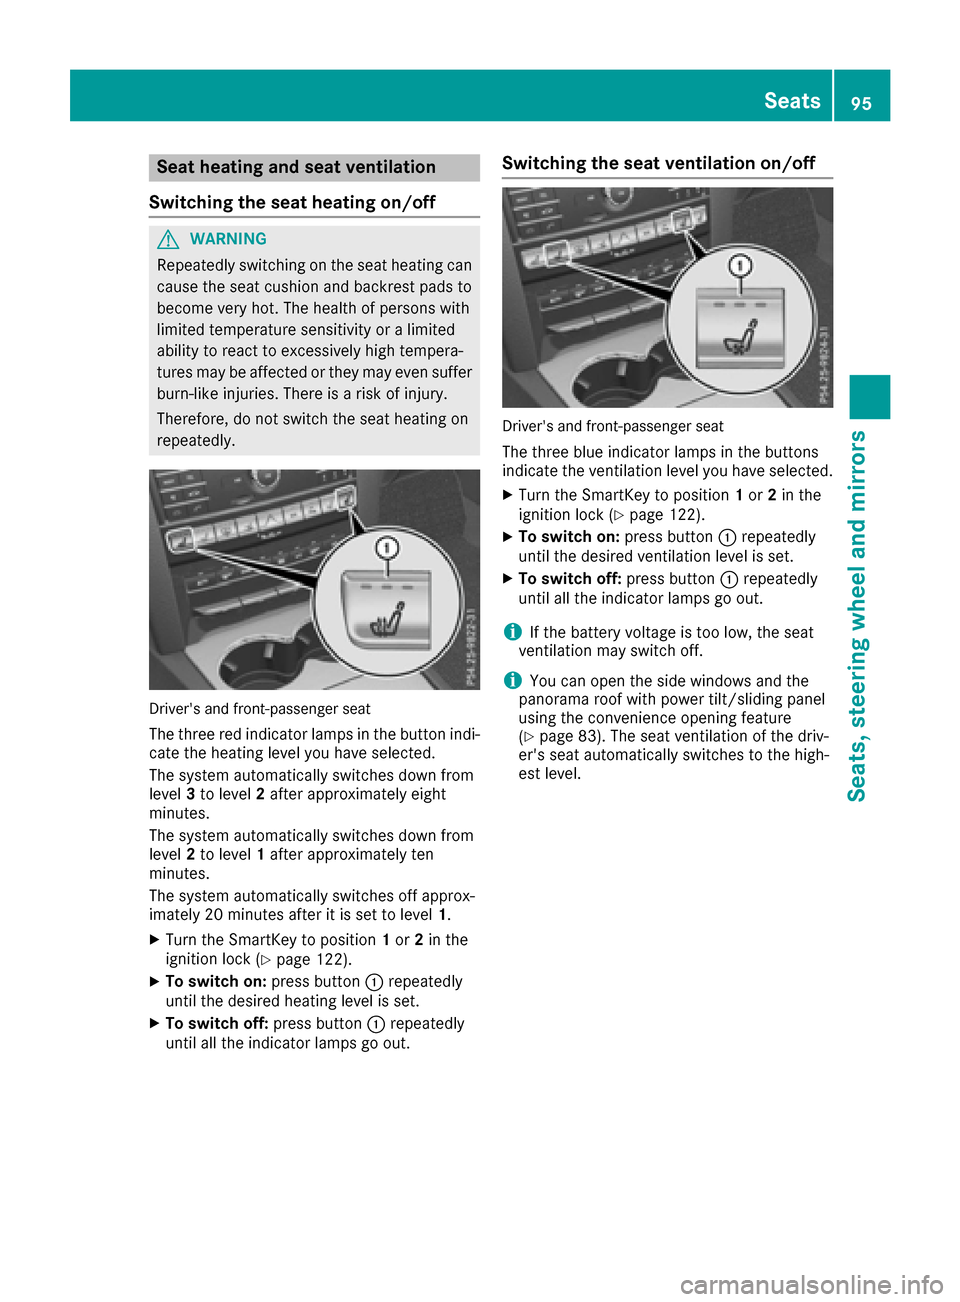
Driver's and front-passenger seat
The three red indicator lamps in the button indi-
cate the heating level you have selected.
The system automatically switches down from
level 3to level 2after approximately eight
minutes.
The system automatically switches down from
level 2to level 1after approximately ten
minutes.
The system automatically switches off approx-
imately 20 minutes after it is set to level 1.
XTurn the SmartKey to position1or 2in the
ignition lock (Ypage 122).
XTo switch on: press button:repeatedly
until the desired heating level is set.
XTo switch off: press button:repeatedly
until all the indicator lamps go out.
Switching the seat ventilation on/off
Driver's and front-passenger seat
The three blue indicator lamps in the buttons
indicate the ventilation level you have selected.
XTurn the SmartKey to position 1or 2in the
ignition lock (Ypage 122).
XTo switch on: press button:repeatedly
until the desired ventilation level is set.
XTo switch off: press button:repeatedly
until all the indicator lamps go out.
iIf the battery voltage is too low, the seat
ventilation may switch off.
iYou can open the side windows and the
panorama roof with power tilt/sliding panel
using the convenience opening feature
(
Ypage 83). The seat ventilation of the driv-
er's seat automatically switches to the high-
est level.
Seats95
Seats, steering wheel and mirrors
Z