towing MERCEDES-BENZ E-CLASS COUPE 2017 Owners Manual
[x] Cancel search | Manufacturer: MERCEDES-BENZ, Model Year: 2017, Model line: E-CLASS COUPE, Model: MERCEDES-BENZ E-CLASS COUPE 2017Pages: 541, PDF Size: 10.71 MB
Page 5 of 541
At
agl ance .................................................... 6
Cockpit ........................................................... 6
Wa rning and indicator lamps .......................... 8
Overhead control panel ................................ 12
Door control panel and seat adjustment ....... 14
Emergencies and breakdowns ...................... 16Digital Owner's Manual
.............................18
Calling up the Digital Owner's Manual ..........18 Genera
l notes............................................. 19
Pr otection of the environment ......................19
Ta ke -ba ckof end-of-life vehicles ...................19
Mercedes-Benz GenuineParts ....................... 20
Owner's Manual ............................................ 21
Operating saf ety .......................................... .21
Declaration of Conformity ............................ 22
Diagno stics connection ................................ 23
Qualified specialist workshop ....................... 24
Ve hicle registration ....................................... 24
Cor rect use of theve hicle ............................25
Implied warranty .......................................... .25
QR code forre scue card ...............................25
Ve hicle data storage .....................................25 Copyright ...................................................... 26 Occupant saf
ety......................................... 27
Re stra int sy stem ...........................................27
Seat belts ..................................................... 29
Airbags ......................................................... 34
PRE-SAFE ®
sy stem ........................................41
Children in theve hicle ..................................42
Pe ts in theve hicle ........................................57 Opening and closing
.................................. 58
Ke y .............................................................. .58
Doo rs............................................................ 62
Boot .............................................................. 67
Ro ller sunblinds ............................................ 72
Side windo ws................................................ 73
Sliding sunroof ............................................. 77
Anti-theft pr otection .....................................82 Seats and
stowing ..................................... 85
Cor rect driver's seat position ....................... 85
Seats ............................................................ 86
St eering wheel ..............................................95 Using
the memory function .......................... 98
St ow age areas .............................................. 99
Cup holde rs................................................ 106
Ashtr ayand cigar ette lighter ...................... .108
Soc kets ....................................................... 109
Wi reless charging of the mobile phone
and connection with theex terior aerial .......1 11
Fitting/removing thefloor mats .................. 11 2 Light and sight
.......................................... 11 4
Exterior lighting ........................................... 11 4
Interior lighting ........................................... 121
Wi ndsc reen wipers and windscreen
wa sher sy stem ............................................ 12 2
Mir rors ........................................................ 12 5
Operating the sun visors ............................. 127
Infrared reflective windscreen .................... 12 8 Climate control
......................................... 12 9
Overview of climate contro l systems ..........1 29
Operating the climate control sy stem ......... 13 0 2
Contents
Page 6 of 541
Driving and pa
rking ................................. 14 0
Driving ........................................................ 14 0
DY NA MIC SELECT switch ............................1 48
Manual transmission .................................. 14 9
Au tomatic transmission .............................. 15 0
Re fuelling .................................................... 154
Pa rking ...................................................... .160
Driving and driving saf ety sy stems .............1 69
Tr ailer hit ch................................................ 227
Bicycle rack ................................................ 231 In
stru ment Displ ayand on-board
comp uter.................................................. 234
Instrument display overview ...................... .234
Overview of the buttons on thesteering
wheel ..........................................................2 35
Operating the on-board computer .............. 236
Displa ysinthe multifunction display ..........2 37
Ad justing the instrument lighting ............... 238
Menus and submenus ................................ 238
Head-up Display ......................................... 24 5LINGU
ATRO NIC ......................................... 247
Operating saf ety ........................................ .247 Operation ....................................................2
47
Using LINGU ATRO NIC ef fectively ................ 24 9
Essential voice commands .......................... 24 9 Multimedia sy
stem .................................. 258
Overview and operation .............................. 258
Sy stem settings .......................................... 266
Na vigation ................................................... 274
Te lephone .................................................. .296
Online and Internet functions ..................... .319
Media ......................................................... 327
Ra dio .......................................................... 338
TV ............................................................... 341
Sound ......................................................... 349 Main
tenance and care ............................. 352
ASS YST PLUS service inter val display ........ 352
Engine compartment .................................. 353
Cleaning and care ...................................... .360 Breakdown assi
stance ............................ 367
Emergency ................................................. .367
Flat tyre ...................................................... 369 Battery (vehicle) ..........................................
375
To w starting or towing away ....................... 379
Electrical fuses ........................................... 385 Wheels and tyres
..................................... 388
Noise or unusual handling characteris‐
tics ............................................................ .388
Re gular checking of wheels and tyres ........ 388
No tes on snow chains ................................ 388
Ty re pressure .............................................. 389
Wheel change ............................................ .396
Emer gency spa rewheel .............................. 406 Te
ch nical data .......................................... 408
No tes on tech nical da ta.............................. 408
On-board electronics .................................. 408
Ve hicle identification plate, VIN and
engine number ............................................ 41 0
Operating fluids .......................................... 412
Ve hicle data ................................................ 419
Tr ailer hit ch................................................. 421 Contents
3
Page 20 of 541
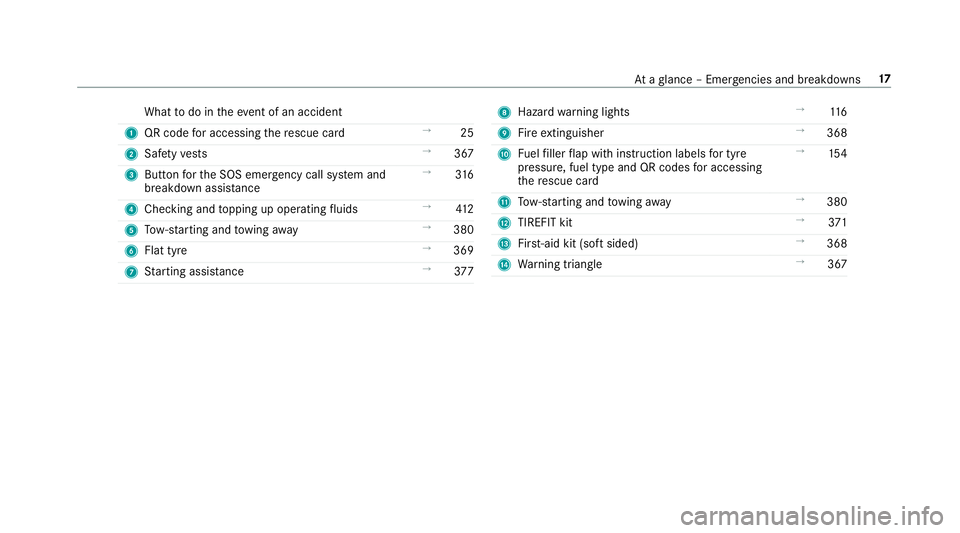
What
todo in theeve nt of an accident
1 QR code for accessing there scue card →
25
2 Safetyve sts →
367
3 Button forth e SOS emer gency call sy stem and
breakdown assis tance →
316
4 Checking and topping up operating fluids →
412
5 Tow- starting and towing away →
380
6 Flat tyre →
369
7 Starting assis tance →
377 8
Haza rdwa rning lights →
11 6
9 Fire extinguisher →
368
A Fuelfiller flap with instruction labels for tyre
pressu re, fuel type and QR codes for accessing
th ere scue card →
154
B Tow- starting and towing away →
380
C TIREFIT kit →
371
D First-aid kit (so ftsided) →
368
E Warning triangle →
367 At
aglance – Emer gencies and breakdowns 17
Page 45 of 541
Information on PRE-SAFE
®
PLUS (anticipa‐
to ry occupant pr otection plus) PRE-
SAFE®
PLUS can de tect cer tain impacts,
particular lyan imminent rear impact, and take
pre-em ptive measures toprotect theve hicle
occupants. These measures cannot necessarily
pr eve nt an imminent impact.
PRE-SAFE ®
PLUS can implement thefo llowing
measures independently of each other:
R Tightening the seat belts on the driver's seat
and front passenger seat.
R Activating there ar hazard warning lights at a
higher flashing frequenc y.
R Increasing brake pressure when theve hicle
is stationar y.This brake application is cancel‐
led automatically when theve hicle pulls
aw ay.
If an accident did not occur, the pre-em ptive
measures that we retake n are reve rsed.
PRE-SAFE ®
PLUS sy stem limitations
R No me asures are implemented:
- Ifth eve hicle is reve rsing. or
- When theve hicle is towing a trailer and
th ere is a risk of a rear impact.
R The brakes are not applied:
- Whilst driving.
or
- When entering or exiting a parking space
using Parking Pilot. Children in
theve hicle Note
s onthe safe transportation of children &
WARNING Risk of accident and inju ry
due tochildren left unat tended in the
ve hicle
If yo u lea vechildren unat tended in theve hi‐
cle, they may be able toset theve hicle in
motion, forex ample by:
R Releasing the parking brake. R
Shifting the automatic transmission out
of park position jor shifting the manual
transmission into neutral.
R Starting the engine.
In addition, they may operate vehicle equip‐
ment. #
Never lea vechildren and animals unat‐
te nded in theve hicle. #
When leaving theve hicle, alw aysta ke
th eke y with you and lock theve hicle.
This also applies tomobile phones if the
"Digital Car Key in the smartphone"
function is activated via the Mercedes
connect me web app. &
WARNING This poses an increased risk
of death due toheat strokeorexposure
to cold in theve hicle
If persons – particularly children – experi‐
ence prolonged exposure toextremely high
or low temp eratures, this poses a risk of
injury or evenfa ta l injur y. 42
Occupant saf ety
Page 88 of 541
Cor
rect driver's seat position &
WARNING Risk of inju rythro ugh adjust‐
ing vehicle settings while theve hicle is in
motion
Yo u could lose cont rol of theve hicle in the
fo llowing situations:
R ifyo u adjust the driver's seat, the head
re stra ints, thesteering wheel or the mir‐
ro r while theve hicle is in motion
R ifyo ufast enyour seat belt while theve hi‐
cle is in motion #
Before starting the engine: adjust the
driver's seat, the head restra ints, the
st eering wheel or the mir ror and fasten
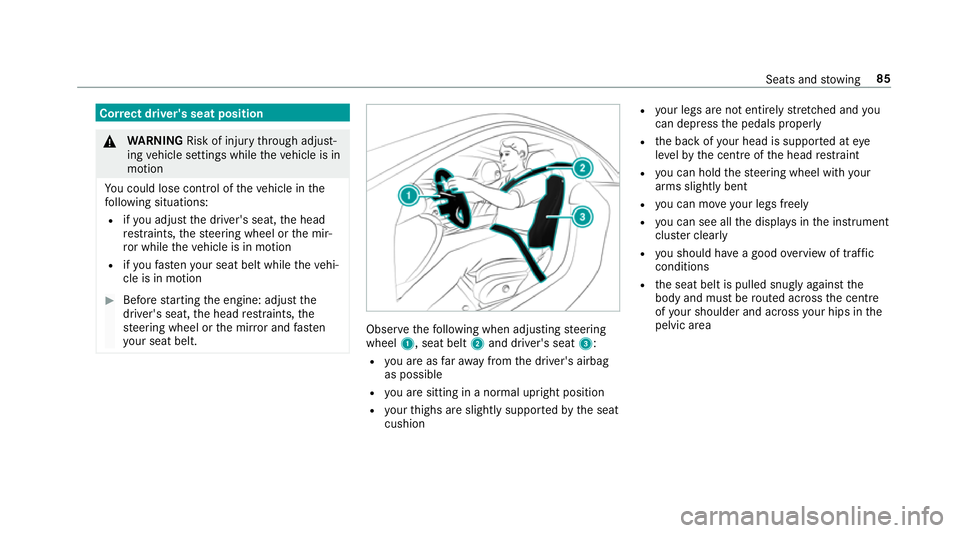
yo ur seat belt. Obser
vethefo llowing when adjusting steering
wheel 1, seat belt 2and driver's seat 3:
R you are as faraw ay from the driver's airbag
as possible
R you are sitting in a no rmal upright position
R your thighs are slight lysuppor tedby the seat
cushion R
your legs are not entirely stre tched and you
can dep ress the pedals properly
R the back of your head is suppo rted at eye
le ve lby the cent reofthe head restra int
R you can hold thesteering wheel with your
arms slightly bent
R you can mo veyour legs freely
R you can see all the displa ysinthe instrument
clus ter clea rly
R you should ha vea good overview of traf fic
conditions
R the seat belt is pulled snugly against the
body and must be routed across the cent re
of your shoulder and across your hips in the
pelvic area Seats and
stowing 85
Page 89 of 541
Seats
Ad
justing the front seat mechanically and
electrically &
WARNING Risk of becoming trapped if
th e seats are adjus tedby children
Children could become trapped if they adjust
th e seats, particularly when unattended. #
When leaving theve hicle, alw aysta ke
th eke y with you and lock theve hicle.
This also applies tomobile phones if the
"Digital Car Key in the smartphone"
function is activated via the Mercedes
connect me web App. #
Never lea vechildren unat tended in the
ve hicle. The seats can be adjus
ted when the ignition is
switched off. &
WARNING Risk of becoming trapped
when adjusting the seats
When you adjust a seat, you or other vehicle
occupants could become trapped, e.g. on the
seat guide rail. #
Make sure when adjusting a seat that
no one has any body parts in the sweep
of the seat. Obser
vethe saf ety no tes on "Airbags" and "Chil‐
dren in theve hicle". &
WARNING Risk of accident due tothe
driver's seat not being engaged
If th e driver's seat is not engaged, it could
mo veunexpectedly while theve hicle is in
motion.
This could cause youto lose control of the
ve hicle. #
Alw ays make sure that the driver's seat
is engaged before starting theve hicle. &
WARNING Risk of becoming trapped if
th e seat height is adjus ted carelessly
If yo u adjust the seat height carelessly, you
or other vehicle occupants could be trapped
and thereby injured.
Children in particular could acciden tally
press the electrical seat adjustment buttons
and become trapped. #
While moving the seats, make sure that
hands or other body parts do not get
under the le ver assembly of the seat
adjustment sy stem. &
WARNING Risk of inju rydue tohead
re stra ints which are not fitted or are
adjus ted incor rectly
If head restra ints are not fitted or are adjus‐
te d incor rectl y,they cannot pr ovide pr otec‐
tion as intended.
There is an increased risk of injury in the
head and neck area, e.g. in theeve nt of an
accident or when braking. 86
Seats and stowing
Page 90 of 541
#
Alw ays drive with the head restra ints
fi tted. #
Before driving off, ma kesure forev ery
ve hicle occupant that the cent reofthe
head restra int supports the back of the
head at about eye le vel. Do not inter
change the head restra ints of the
front and rear seats. Otherwise, you cannot
adjust the height and angle of the head
re stra ints cor rectl y.
Ad just the head restra int fore -and-aft position so
th at it is as close as possible tothe back of your
head. &
WARNING Risk of inju ryor death due to
incor rect seat position
The seat belt does not of ferth e intended
le ve l of pr otection if you ha venot mo vedthe
seat backrest toan almost vertical position.
When braking or in theeve nt of an accident,
yo u could slide underneath the seat belt and
sus tain abdominal or neck injuries, forex am‐
ple. #
Adjust the seat proper lybefore begin‐
ning your journe y. #
Alw ays ensure that the seat backrest is
in an almost vertical position and that
th e shoulder section of your seat belt is
ro uted across the cent reofyour shoul‐
der. *
NO
TEDama getothe seats when moving
th e seats back The seats may be damaged
byobjects when
moving the seats bac k. #
When moving the seats bac k,make
sure that there are no objects in the
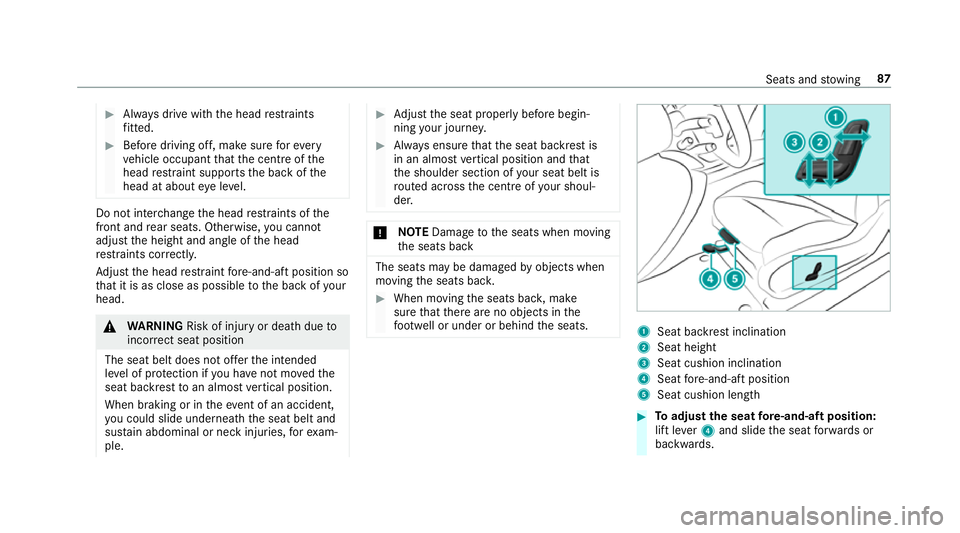
fo ot we ll or under or behind the seats. 1
Seat backrest inclination
2 Seat height
3 Seat cushion inclination
4 Seat fore -and-aft position
5 Seat cushion length #
Toadjust the seat fore -and-aft position:
lift le ver4 and slide the seat forw ards or
backwards. Seats and
stowing 87
Page 91 of 541

#
Make sure that the seat is engaged. #
Toadjust the seat cushion length: lift lever
5 and slide the front section of the seat
cushion forw ards or bac k. Ad
justing the front seat electrically 1
Head restra int height
2 Seat backrest inclination 3
Seat height
4 Seat cushion length
5 Seat cushion inclination
6 Seat fore -and-aft adjustment #
Save the settings with the memory function
(→ page 98). Ad
justing the front passen ger seat from the
driver's seat electrically Re
quirement:
R The po wer supp lyis switched on
This function is only available on vehicles with an
electrically adjus table front passenger seat. Yo
u can call up thefo llowing functions forthe
front passenger sea t:
R Seat adjustment
R Seat hea ter
R Seat ventilation
R Memory function 88
Seats and stowing
Page 92 of 541

#
Toselect the front passenger seat: press
button 1.
When the indicator lamp lights up, the front
passenger seat is selected. #
Adjust the front passenger seat using the
buttons in the door control panel on the driv‐
er's side. Ad
justing the 4-w aylumbar support 1
Toraise
2 Tosof ten
3 Tolower
4 Toharden #
Using buttons 1to4 , adjust the conto ur
of the backrest individually tosuit your bac k. Head
restra ints Ad
justing the head restra ints on the front
seats &
WARNING Risk of inju rythro ugh adjust‐
ing vehicle settings while theve hicle is in
motion
Yo u could lose cont rol of theve hicle in the
fo llowing situations:
R ifyo u adjust the driver's seat, the head
re stra ints, thesteering wheel or the mir‐
ro r while theve hicle is in motion
R ifyo ufast enyour seat belt while theve hi‐
cle is in motion #
Before starting the engine: adjust the
driver's seat, the head restra ints, the
st eering wheel or the mir ror and fasten
yo ur seat belt. Seats and
stowing 89
Page 93 of 541

&
WARNING Risk of inju rydue tohead
re stra ints which are not fitted or are
adjus ted incor rectly
If head restra ints are not fitted or are adjus‐
te d incor rectl y,they cannot pr ovide pr otec‐
tion as intended.
There is an increased risk of injury in the
head and neck area, e.g. in theeve nt of an
accident or when braking. #
Alw ays drive with the head restra ints
fi tted. #
Before driving off, ma kesure forev ery
ve hicle occupant that the cent reofthe
head restra int supports the back of the
head at about eye le vel. Do not inter
change the head restra ints of the
front and rear seats. Otherwise, you cannot
adjust the height and angle of the head
re stra ints cor rectl y.
Ad just the head restra int fore -and-aft position so
th at it is as close as possible tothe back of your
head. #
Toraise: pullthe head restra int up. #
Tolowe r:press release knob 1and push
th e head restra int down. #
Tomo veforw ards: pullthe head restra int
fo rw ards. #
Tomo vebackwards: pressrelease knob 1
and push the head restra int backwards. 90
Seats and stowing