display MERCEDES-BENZ E-CLASS COUPE 2020 Owners Manual
[x] Cancel search | Manufacturer: MERCEDES-BENZ, Model Year: 2020, Model line: E-CLASS COUPE, Model: MERCEDES-BENZ E-CLASS COUPE 2020Pages: 473, PDF Size: 8.5 MB
Page 289 of 473
R
Direction of tr avel
R Vehicle identification number
R Vehicle drive type
R Number of people de term ined tobe in the
ve hicle
R Whe ther Mercedes me connect is available
or not
R Whe ther the emer gency call was initiated
manually or automatically
R Time of the accident
R Language setting on the multimedia sy stem
Fo r accident clarification purposes, thefo llowing
measures can be take n up toan hour af terthe
emer gency call has been initia ted:
R The cur rent vehicle position can be de ter‐
mined.
R Avo ice connection totheve hicle occupants
can be es tablished.
% ForRu ssia: various functions, e.g. receiving
traf fic information, cannot be per form ed for
up totwo hou rsafte r sending an emer gency
call. Fu
nction of the emer gency call sy stem self-
diagnosis (Russia) Yo
ur car verifies the operability of the emer‐
ge ncy call sy stem each time the ignition is ON.
In case of sy stem failure, you will be informed
with text messa geon the instrument clus ter and
with red indicator SOS NOT READY onthe dis‐
pla y.
Please, make sure, that during 30 seconds af ter
switching ignition ON there d indicator SOS
NOT READY inthe upper right corner of display
is switched OFF, this means the emer gency call
sy stem passed diagnostics successfully. St
arting/ending ERA-GLONASS test mode
(Russia) Re
quirements:
R The star ter battery is suf ficiently charge d.
R The ignition is switched on.
R The vehicle has been stationary for at least
one minute. #
Tostart thete st mode: press and hold the
~ button on the multifunction steering
wheel for at least five seconds.
The test mode is star ted and automatically
ends af terth e language test has been per‐
fo rm ed. #
Toend thete st mode manuall y:switch off
th e ignition.
The test mode is ended. 286
MBUX multimedia sy stem
Page 298 of 473
ASS
YST PLUS se rvice inter val display Fu
nction of the ASS YST PLUS se rvice inter val
displ ay The ASS
YST PLUS service inter val display on the
instrument display pr ovides information on the
re maining time or dis tance be fore the next
service due date.
Yo u can hide this service display using the back
button on the left-hand side of thesteering
wheel.
Depending on how theve hicle is used, the
ASS YST PLUS service inter val display may
shor tenth e service inter val, e.g. in thefo llowing
cases:
R mainly short-dis tance driving
R when the engine is of ten le ftidling for long
periods
R intheeve nt of frequent cold start phases
R vehicles with a diesel particulate filter: in
th eev ent of frequently inter rupted rege nera‐
tion of the diesel particulate filter Mercedes-Benz
recommends avoiding such
operating conditions.
Yo u can obtain information concerning the serv‐
icing of your vehicle from a qualified specialist
wo rkshop, e.g. a Mercedes-Benz Service Centre. Displaying
the service due da te On-board computer:
4 Service 5
ASSYST PLUS
The next service due date is displa yed. #
Toexitth e displa y:press the back button
on the left-hand side of thesteering wheel.
Bear in mind thefo llowing related topic:
R Operating the on-board computer
(/ page 246). Infor
mation on regular maintenance work *
NO
TEPremature wearthro ugh failure to
obser veservice due dates Service
workwhich is not car ried out at the
ri ght time or incomple tely can lead to
inc reased wear and damage totheve hicle. #
Alw ays obser vethe prescribed service
inter vals. #
Alw ays ha vethe prescribed service
wo rkcar ried out at a qualified specialist
wo rkshop. Special service
requ irements The prescribed service inter
val is based on nor‐
mal operation of theve hicle. Maintenance work
will need tobe per form ed more of ten if theve hi‐
cle is operated under arduous conditions or
increased loads.
The ASS YST PLUS service inter val display is only
an aid. The driver of theve hicle bears responsi‐
bility as rega rdsto whe ther maintenance work
needs tobe per form ed more of tenth an speci‐ Main
tenance and care 295
Page 299 of 473
fi
ed based on the actual operating conditions
and/or loads.
Examples of arduous operating conditions:
R regular city driving with frequent intermedi‐
ate stops
R mainly short-dis tance driving
R frequent operation in mountainous terrain or
on poor road sur faces
R when the engine is of ten le ftidling for long
periods
R operation in particula rly dusty conditions
and/or if air-recirculation mode is frequently
used
In these or similar operating conditions, ha vethe
interior air filter, engine air cleaner, engine oil
and oil filter etc. changed more frequent ly. The
ty re s must be checked more frequently if the
ve hicle is operated under increased loads. Fur‐
th er information can be obtained at a qualified
specialist workshop. Battery disconnection periods
The ASS
YST PLUS se rvice inter val display
can only calculate the service due da tewhen
th e bat tery is connected. #
Notedown the service due date displa yed on
th e instrument display before disconnecting
th e battery (/ page 295). Engine compartment
Ac
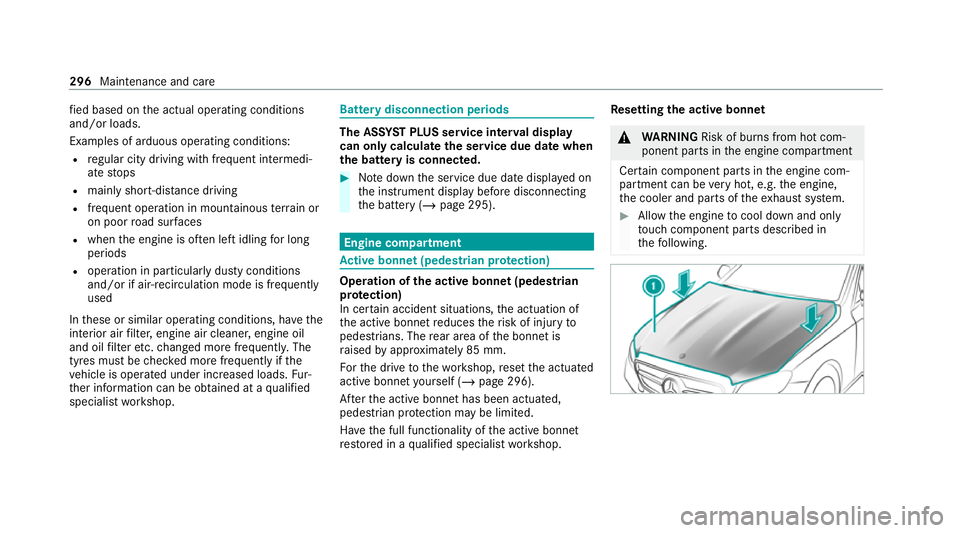
tive bonn et(pedestrian pr otection) Operation of
the active bonnet (pedestrian
pr otection)
In cer tain accident situations, the actuation of
th e active bonn etreduces therisk of injury to
pedestrians. The rear area of the bonn etis
ra ised byappr oximately 85 mm.
Fo rth e drive tothewo rkshop, reset the actuated
active bonn etyourself (/ page 296).
Af terth e active bonn ethas been actuated,
pedestrian pr otection may be limited.
Ha ve the full functionality of the active bonn et
re stored in a qualified specialist workshop. Re
setting the active bonnet &
WARNING Risk of bu rns from hot com‐
ponent parts in the engine compartment
Cer tain component parts in the engine com‐
partment can be very hot, e.g. the engine,
th e cooler and parts of theex haust sy stem. #
Allow the engine tocool down and only
to uch co mponent parts described in
th efo llowing. 296
Maintenance and care
Page 302 of 473
#
Ifth e bonn etcan still be lif ted slightl y,open
th e bonn etagain and close it with a little
more forc e until it engages cor rectly. Engine oil
Che
cking the engine oil le vel using the on-
board compu ter
Re quirements:
R the engine has been warmed up.
R theve hicle is par ked on a le vel sur face.
R The engine is running at idle speed.
The engine oil le vel is de term ined during driving.
De term ining the engine oil le vel can take up to
30 minutes with a normal driving style and even
longer with an active driving style.
On-board computer: 4 Service 5
Engine oil level
Yo u will see one of thefo llowing messages on
th e multifunction display:
R Engine oil level Measuring now : measure‐
ment of the oil le vel is not yet possible. #
Repeat there qu est af ter a maximum of
30 minutes' driving.
R Engine oil level OK andthe bar display for
indicating the oil le vel on the multifunction
display is green and is between "min" and
"max": the oil le vel is cor rect.
R Engine oil level Add 1,0 l andthe bar display
fo r indicating the oil le vel on the multifunc‐
tion display is orange and is below "min": #
Add 1 l of engine oil.
R Reduce engine oil level andthe bar display
fo r indicating the oil le vel on the multifunc‐
tion display is orange and is abo ve"max": #
Drain off any excess engine oil that has been
added. Todo so, consult a qualified specialist
wo rkshop.
R For engine oil level turn on ignition #
Switch on the ignition tocheck the engine oil
le ve l.
R Engine oil level System inoperative : The oil
le ve l sensor is defective or not connec ted. #
Consult a qualified specialist workshop.
R Engine oil level System currently unavail. #
Close the bonn et.
To pping up engine oil &
WARNING Risk of bu rns from hot com‐
ponent parts in the engine compartment
Cer tain component parts in the engine com‐
partment can be very hot, e.g. the engine,
th e cooler and parts of theex haust sy stem. #
Allow the engine tocool down and only
to uch co mponent parts described in
th efo llowing. &
WARNING Risk offire and injury from
engine oil
If engine oil comes into con tact wi thhot
component parts in the engine compart‐
ment, it may ignite. #
Make sure that no engine oil is spilled
next tothefiller opening. Maintenance and care
299
Page 303 of 473
#
Allow the engine tocool off and thor‐
oughly clean the engine oil from compo‐
nent parts before starting theve hicle. *
NO
TEEngine dama gecaused byan
incor rect oil filter, incor rect oil or addi‐
tives #
Do not use engine oils or oil filters
which do not cor respond tothe specifi‐
cations explicitly prescribed forthe
service inter vals. #
Follow the instructions on the service
inter val display forch anging the engine
oil and obser vethe prescribed change
inter vals. #
Do not use additives. *
NO
TEDama gecaused bytopping up too
much engine oil To
o much engine oil can damage the engine
or the catalytic con verter. #
Have excess engine oil remo ved at a
qu alified specialist workshop. %
Depending on driving style, theve hicle con‐
sumes up to0.8 lof oil per 1000 km. The oil
consum ption may be higher than this when
th eve hicle is new or if you frequently drive
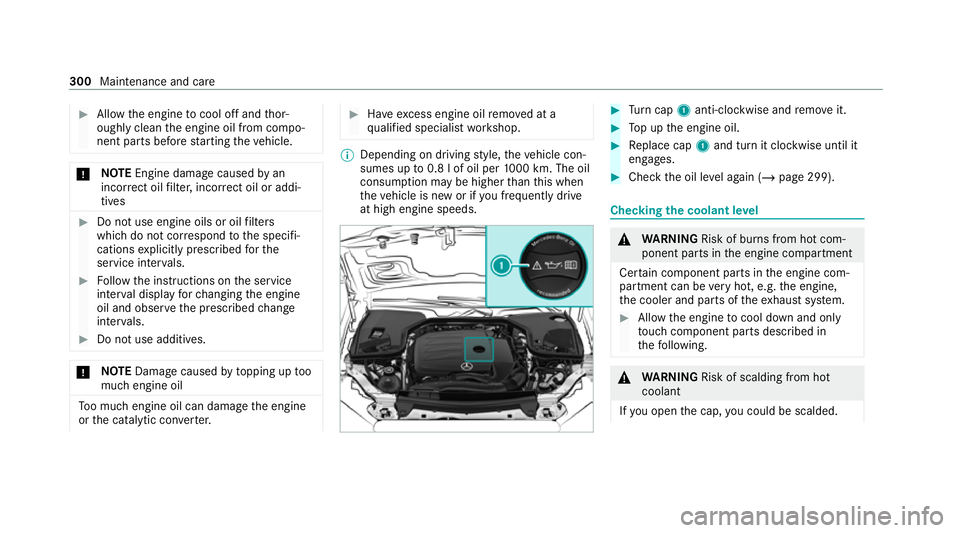
at high engine speeds. #
Turn cap 1anti-clockwise and remo veit. #
Top up the engine oil. #
Replace cap 1and turn it clockwise until it
engages. #
Check the oil le vel again (/ page 299). Checking
the coolant le vel &
WARNING Risk of bu rns from hot com‐
ponent parts in the engine compartment
Cer tain component parts in the engine com‐
partment can be very hot, e.g. the engine,
th e cooler and parts of theex haust sy stem. #
Allow the engine tocool down and only
to uch co mponent parts described in
th efo llowing. &
WARNING Risk of scalding from hot
coolant
If yo u open the cap, you could be scalded. 300
Maintenance and care
Page 304 of 473
#
Let the mo tor cool down before opening
th e cap. #
When opening the cap, wear pr otective
gl ove s and saf etygl asses. #
Open the cap slowly torelease pres‐
sure. #
Park theve hicle on a le vel sur face. #
Check the coolant temp erature display in the
instrument clus ter.
The coolant temp erature must be below
70°C. #
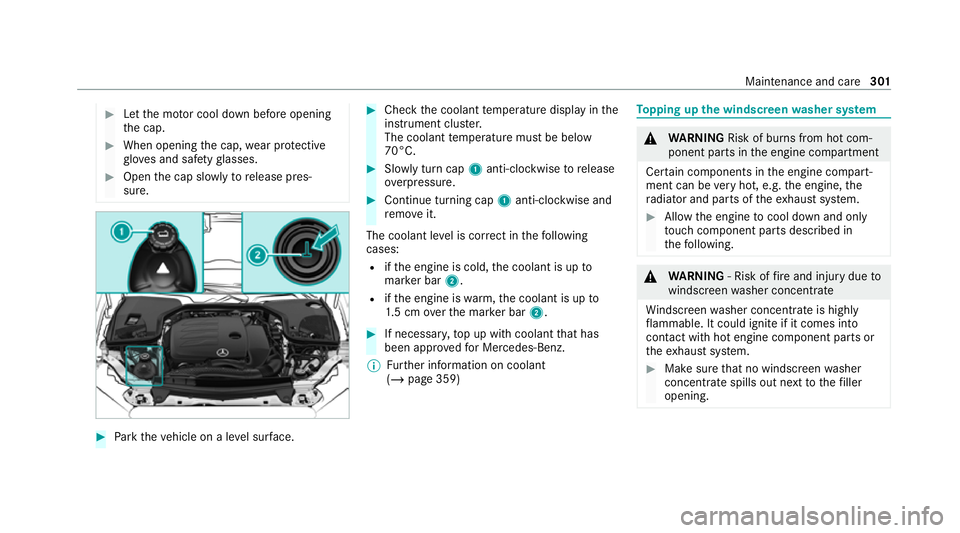
Slowly turn cap 1anti-clockwise torelease
ove rpressure. #
Continue turning cap 1anti-clockwise and
re mo veit.
The coolant le vel is cor rect in thefo llowing
cases:
R ifth e engine is cold, the coolant is up to
mar ker bar 2.
R ifth e engine is warm,th e coolant is up to
1. 5 cm overth e mar ker bar 2. #
If necessar y,top up with coolant that has
been appr ovedfo r Mercedes-Benz.
% Further information on coolant
(/ page 359) To
pping up the windsc reen washer sy stem &
WARNING Risk of bu rns from hot com‐
ponent parts in the engine compartment
Cer tain components in the engine compart‐
ment can be very hot, e.g. the engine, the
ra diator and parts of theex haust sy stem. #
Allow the engine tocool down and only
to uch co mponent parts described in
th efo llowing. &
WARNING ‑ Risk of fire and injury due to
windscreen washer concentrate
Wi ndsc reen washer concentrate is highly
fl ammable. It could ignite if it comes into
con tact wi thhot engine component parts or
th eex haust sy stem. #
Make sure that no windsc reen washer
concentrate spills out next tothefiller
opening. Maintenance and care
301
Page 310 of 473
Note
s on care of the interior &
WARNING Risk of inju ryfrom pla stic
parts breaking off af terth e use of sol‐
ve nt-based care products
Ca reand cleaning products con taining sol‐
ve nts can cause su rfaces in the cockpit to
become porous. When the airbags are
deplo yed, plastic parts may break away. #
Do not use any care or cleaning prod‐
ucts containing sol vents toclean the
cockpit. &
WARNING Risk of inju ryor death from
bleached seat belts
Bleaching or dyeing seat belts can se verely
we aken them.
This can, forex ample, cause seat belts to
te ar or fail in an accident. #
Never blea chor dye seat belts. To
avo id damage totheve hicle, obser vethe
no tes on cleaning and care. Seat belts
R Clean with luk ewarmand soapy water.
R Do not use chemical cleaning agents.
R Do not dry seat belts byheating them toover
80°C or exposing them todirect sunlight.
Display
R Switch off the display and let it cool down.
R Clean the sur face carefully wi tha mic rofibre
clo thand a suitable display care product
(TF T-LC D).
R Do not use any other agents.
Plastic trim R Clean with a damp microfibre clo th.
R For heavy soiling: use a cleaner recommen‐
ded for Mercedes-Benz.
R Do not attach sticke rs,fi lms or similar mate‐
ri als.
R Do not allow cosmetics, insect repellent or
sun cream tocome in contact wi th the plas‐
tic trim.
Re alwo od and trim elements
R Clean with a mic rofibre clo th. R
Blackpiano-lac quer look: clean with a damp
clo thand soapy water.
R For heavy soiling: use a cleaner recommen‐
ded for Mercedes-Benz.
R Do not use sol vent-based cleaning agents,
polishes or waxes.
Ro of lining
R Clean with a brush or dry shampoo.
Carpet
R Use a carpet and textile cleaning agent rec‐
ommended for Mercedes-Benz.
St eering wheel made of genuine leather or
DINAMICA
* NO
TEDama gecaused bywrong cleaners #
Do not use solvent-based cleaning
agents such as tarre mo ver or wheel
cleaner; neither should you use pol‐
ishes or waxes. Otherwise you may
damage thefinish. R
Clean wi tha damp clo thand 1% soapy water
solution and then wipe with a dry clo th. Maintenance and care
307
Page 337 of 473
The load conditions "partially laden" and "fully
laden" are defined in
theta ble for dif fere nt num‐
be rs of passengers and amounts of luggage. The
actual number of seats may dif fer from this. Ty
re pressure moni toring sy stem Fu
nction of the ty repressure moni toring sys‐
tem
The sy stem checks the tyre pressure and the
tyre temp erature of the tyres fitted totheve hicle
by means of a tyre pressu resensor.
The tyre pressure and the tyre temp erature
appear in the multifunction display
(/ page 334).
If th ere is a subs tantial pressure loss or if the
tyre temp erature is excessive, you will be
wa rned in thefo llowing ways:
R via display messa ges (/ page 409)
R viatheh warning lamp in the instrument
clus ter
The tyre pressure monitoring sy stem is only an
aid. It is the driver's responsibility toset the tyre pressure
tothere commended cold tyre pressure
suitable forth e operating situation.
In most cases, the tyre pressure monitoring sys‐
te m will auto maticallyupdate the new refere nce
va lues af teryo u ha vechanged the tyre pressure.
Yo u can, ho wever,also update there fere nce val‐
ues byrestarting the tyre pressure monitoring
sy stem manually (/ page 431).
Sy stem limits
The sy stem may be impaired or may not function
particular lyin thefo llowing situations:
R the tyre pressure has been set incor rectly
R there is a sudden pressure loss caused, for
ex ample, byafo re ign object penetrating the
tyre
R there is a malfunction caused byano ther
ra dio signal source
Checking the ty repressure with the tyre
pressure moni toring sy stem
Requ irements:
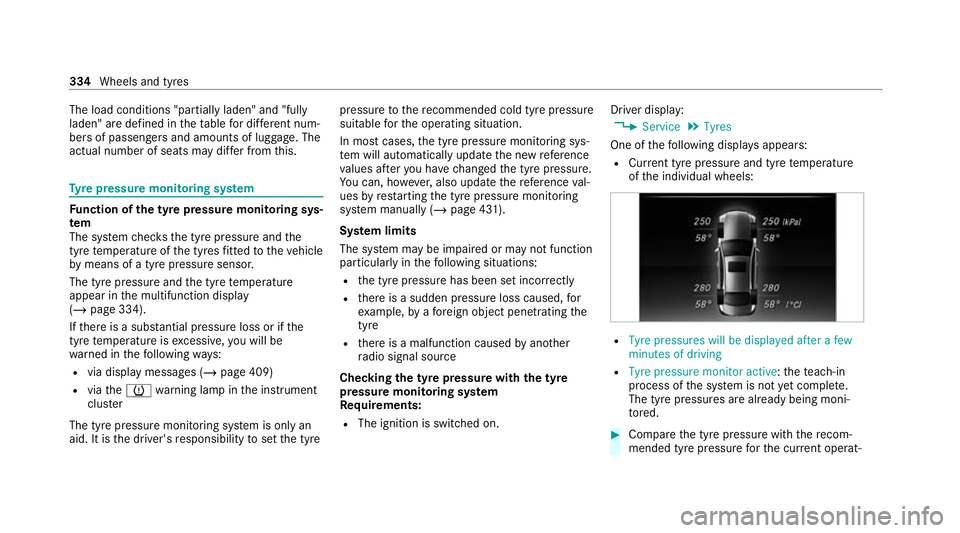
R The ignition is switched on. Driver display:
4 Service 5
Tyres
One of thefo llowing displa ysappears:
R Cur rent tyre pressure and tyre temp erature
of the individual wheels: R
Tyre pressures will be displayed after a few
minutes of driving
R Tyre pressure monitor active: thete ach-in
process of the sy stem is not yet compl ete.
The tyre pressures are already being moni‐
to re d. #
Compare the tyre pressure with there com‐
mended tyre pressure forth e cur rent operat‐ 334
Wheels and tyres
Page 338 of 473
ing condition (/
page 333). Observethe
no tes on tyre temp erature (/ page 332).
% The values displa yed in the driver display
may deviate from those of the tyre pressure
ga uge as they referto sea le vel.At high ele‐
va tions, the tyre pressure values indicated
by a pressure gauge are higher than those
shown bythe driver displa y.In this case, do
not reduce the tyre pressure.
Re starting the ty repressure moni toring sys‐
tem
Re quirements:
R The recommended tyre pressure is cor rectly
set forth ere spective operating status on all
of the wheels (/ page 332).
Re start the tyre pressure monitoring sy stem in
th efo llowing situations:
R The tyre pressure has changed.
R The wheels or tyres ha vebeen changed or
newly fitted. Driver display:
4 Service 5
Tyres #
Swipe down wards on Touch Control on the
left-hand side of thesteering wheel.
The Use current pressures as new reference
values? message is shown in the multifunc‐
tion displa y. #
Torestart, press Touch Control on the left-
hand side of thesteering wheel.
The Tyre press. monitor restarted message is
shown in the multifunction displa y.
Cur rent wa rning messages are dele ted and
th eye llow h warning lamp goes out.
Af teryo u ha vebeen driving for a few
minutes, the sy stem checks whe ther the cur‐
re nt tyre pressures are wi thin the specified
ra nge. The cur rent tyre pressures are then
accep ted as refere nce values and monitored.
Be sure toalso pay attention tothefo llowing
re lated topic:
R Notes on tyre pressure (/ page 332) Ty
re pressure loss warning sy stem Fu
nction of the ty repressure loss warning
sy stem
The tyre pressure loss warning sy stem warnsthe
driver bymeans of display messa ges when there
is a se vere tyre pressu reloss.
Sy stem limits
The sy stem may be impaired or may not function
particular lyin thefo llowing situations:
R incor rectly set tyre pressure
R sudden pressure loss caused, forex ample,
by afo re ign object penetrating the tyre
R steady pressure loss in se veral tyres
The sy stem has a restricted or del ayed function
particularly in thefo llowing situations:
R poor ground cond itions, e.g. snow or gr avel
R driving with snow chains
R when adopting a very sporty driving style
with high cornering speeds or sudden accel‐
eration
R driving with a very heavy or lar getrailer Wheels and tyres
335
Page 339 of 473
R
driving with a high load
The tyre pressure loss warning sy stem is only an
aid. It is the driver's responsibility toset the tyre
pressure tothere commended cold tyre pressure
suitable forth e operating situation and tocheck
it.
Be sure toalso obse rveth efo llowing fur ther
re lated subjects:
R Notes on tyre pressure (/ page 332)
R Display messages about the tyres
(/ page 409)
Rest arting the ty repressure loss warning
sy stem
Requ irements:
R The recommended tyre pressure is cor rectly
set forth ere spective operating status on all
wheels.
Re start the tyre pressure loss warning sy stem in
th efo llowing situations:
R The tyre pressure has changed.
R The wheels or tyres ha vebeen changed or
newly fitted. On-boa
rdcompu ter:
4 Service 5
Tyres #
Swipe down wards on Touch Control on the
left-hand side of thesteering wheel.
The Run Flat Indicator active Restart mes‐
sage is shown in the multifunction displa y. #
Tobegin restart, press Touch Control on the
left-hand side of thesteering wheel.
The Tyre pressure now OK? message is
shown in the multifunction displa y. #
Select Yes. #
Toconfirm restart, press Touch Control on
th e left-hand side of thesteering wheel.
The Run Flat Indicator restarted message is
shown in the multifunction displa y.
Af teryo u ha vedriven for a few minutes, the
tyre pressu reloss warning sy stem monitors
th e set tyre pressures of all the tyres.
Be sure toalso pay attention tothefo llowing
re lated topic:
R Notes on tyre pressure (/ page 332) Wheel
change Note
s on selecting, fitting and replacing
tyres *
NO
TEMercedes-AMG vehicles #
Obser vethe no tes in the Supplement.
Yo u could otherwise failto recognise
dangers. &
WARNING Risk of accident due toincor‐
re ct dimensions of wheels and tyres
If wheels and tyres of the wrong size are
used, the wheel brakes or wheel suspension
components may become damaged. #
Alw aysre place wheels and tyres with
th ose that fulfil the specifications of the
original part.
When replacing wheels, make sure tofit the
cor rect:
R Designation
R Type 336
Wheels and tyres