display MERCEDES-BENZ E-CLASS COUPE 2020 User Guide
[x] Cancel search | Manufacturer: MERCEDES-BENZ, Model Year: 2020, Model line: E-CLASS COUPE, Model: MERCEDES-BENZ E-CLASS COUPE 2020Pages: 473, PDF Size: 8.5 MB
Page 50 of 473

Fu
nction of thePA SSENGER AIR BAG indica‐
to r lamps Ve
hicles without automatic front passenger air‐
bag shutoff ha vea special sticke r af fixe dto the
side of the cockpit on the front passenger side
(/ page 65). Self-test of automatic front passenger airbag
shutoff
When
the ignition is switched on, a self-test is
per form ed during which the two PASSENGER
AIR BAG ON and OFF indicator lamps light up
simul taneously.
The status of the front passenger airbag is dis‐
pla yed via thePA SSENGER AIR BAG indicator
lamps af terth e self-tes t:
R ON is lit: the front passenger airbag may
deploy during an accident.
The indicator lamp goes out af ter appro x‐
ima tely 60 seconds.
R ON and OFF are not lit: the front passenger
airbag may deploy during an accident.
R OFF is lit: the front passenger airbag is disa‐
bled. It will then not be deplo yed in theev ent
of an accident.
If th ePA SSENGER AIR BAG ON indicator lamp is
off, on lythePA SSENGER AIR BAG OFF indicator
lamp sho wsthest atus of the front passenger
airbag. The PASSENGER AIR BAG OFF indicator
lamp may be lit continuously or be off. If
th ePA SSENGER AIR BAG OFF indicator lamp
and the6 restra int sy stem warning lamp
light up simultaneousl y,the front passenger seat
may not be used. Also in this case, do not fit a
ch ild restra int sy stem tothe front passenger
seat. Ha vethe automatic front passenger airbag
shutoff checked and repaired immediately at a
qu alified specialist workshop.
St atus display
If th e front passenger seat is occupied, ensure,
bo th before and during the journe y,that thest a‐
tus of the front passenger airbag is cor rect for
th e cur rent situation.
Af terfitting a rear wa rd-facing child restra int
sy stem tothe front passenger seat:
PA SSENGER AIR BAG OFF must be lit continu‐
ousl y. Occupant saf
ety47
Page 63 of 473
on
the multifunction display on the instrument
clus ter.
If th e cent reseat backrest is not engaged and
loc ked in place, there d lock verification indica‐
to r will be visible. &
WARNING Risk of inju ryor death if the
permissible gross mass of thech ild and
ch ild restra int sy stem is exceeded.
To o much load may be placed on the ISOFIX
or i‑Size child restra int sy stems and thech ild
may not be restra ined cor rectly in theeve nt
of an accident, forex ample. #
Ifth ech ild and thech ild restra int sys‐
te m toget her weigh more than 33 kg,
use on lyan ISOFIX or i‑Size child
re stra int sy stem that secures thech ild
using theve hicle seat belt. #
Also secure thech ild restra int sy stem
with theTo pTe ther belt, if available. Alw
ays comply with the information about the
mass of thech ild restra int sy stem:
R inthe manufacturer's ins tallation and operat‐
ing instructions forth ech ild restra int sy stem
used
R on a label on thech ild restra int sy stem, if
present
Re gular lych eck that the permissible gross mass
of thech ild and child restra int sy stem is still
complied with.
When fitting a child restra int sy stem, obser ve
th efo llowing:
O Alw
ays obser vethe cor rect use of the seats
and consider their suitability for attaching a
ch ild restra int sy stem.
ISOFIX child seat securing sy stem
(/ page 58)
or
i‑Size child seat securing sy stem
(/ page 59) O
Alw
ays comply with the manufacturer's
ins tallation and operating instructions for
th ech ild restra int sy stem used.
O Make sure
that thech ild's feet do not touch
th e front seat. If necessar y,mo vethe front
seat slightly forw ards.
®When fitting an ISOFIX child restra int sys‐
te m, also obser vethefo llowing:
O When using a Group 0/0+ baby car seat
and a Group 1 rear wa rd-facing child
re stra int sy stem on a rear seat: adjust
th e front seat so that the seat does not
to uch thech ild restra int sy stem.
O When using a Group 1
forw ard-facing
ch ild restra int sy stem: the backrest of the
ch ild restra int sy stem must lie as flat as
possible against the backrest of theve hicle
seat.
O Yo
u can ha vethe head restra ints of there ar
seats remo ved and ins talled byaqu alified
specialist workshop. This may be necessary
fo rth e use of cer tain child restra int sys‐
te ms. 60
Occupant saf ety
Page 65 of 473
#
Alw ays lock rear seat backrests af ter
fi tting TopTe ther belts. #
Pay attention tothe lock verification
indicator. If
th e left and right seat backrests are not
engaged and loc ked in place, this will be shown
on the multifunction display on the instrument
clus ter.
If th e cent reseat backrest is not engaged and
loc ked in place, there d lock verification indica‐
to r will be visible.
¯ Ifth ech ild restra int sy stem is equipped
with a TopTe ther belt:
The risk of injury can be reduced byaTo p
Te ther. The TopTe ther belt enables an
additional connection between thech ild
re stra int sy stem attached with ISOFIX or
i‑Size and theve hicle. #
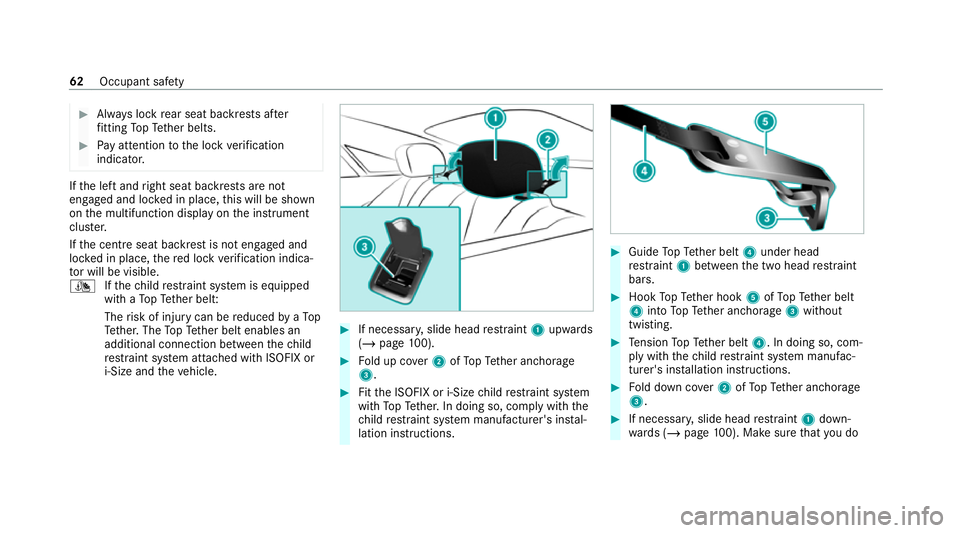
If necessar y,slide head restra int 1 upwards
(/ page 100). #
Fold up co ver2 ofTopTe ther anchorage
3. #
Fitthe ISOFIX or i‑Size child restra int sy stem
with TopTe ther. In doing so, comply with the
ch ild restra int sy stem manufacturer's ins tal‐
lation instructions. #
Guide TopTe ther belt 4under head
re stra int 1 between the two head restra int
bars. #
Hook TopTe ther hook 5ofTopTe ther belt
4 into TopTe ther anchorage 3without
twisting. #
Tension TopTe ther belt 4. In doing so, com‐
ply with thech ild restra int sy stem manufac‐
turer's ins tallation instructions. #
Fold down co ver2 ofTopTe ther anchorage
3. #
If necessar y,slide head restra int 1 down‐
wa rds (/ page100). Ma kesure that you do 62
Occupant saf ety
Page 67 of 473
We
ight category III: 22 to36 kg
Fr ont passenger airbag enabled 1
UF, L
Fr ont passenger airbag disabled 1, 2
U, L
1 Ad just the seat cushion inclination so that the front
edge of the seat cushion is in the highest position and
th ere ar edge of the seat cushion is in the lo west posi‐
tion.
2 The vehicle is equipped with automatic front
passenger airbag shutoff. The PASSENGER AIR BAG
OFF indicator lamp must be lit.
X Not suitable forch ildren in this we ight categor y.
U Suitable forch ild restra int sy stems of the "Univer‐
sal" category in this we ight categor y. L Suitable
for semi-universal child restra int sy stems
according totheta ble in "Recommended child
re stra int sy stems", or if theve hicle and the seat are
lis ted in thech ild restrai nt sy stem manufacturer's
ve hicle model list.
UF Suitable forfo rw ard-facing child restra int sy stems
of the "Universal" category in this we ight categor y. Securing
thech ild restra int sy stem with the
seat belt on there ar seat &
WARNING Risk of accident if there ar
ben chseat, rear seat and seat backrest
are not engaged
The rear ben chseat, rear seat and seat back‐
re st may fold forw ards, even while theve hi‐
cle is in motion.
R As a result, theve hicle occupant will be
pressed into the seat belt with increased
fo rc e. The seat belt will not be able to
pr otect as intended and could cause
additional injur y. R
Objects or loads in the boot or load com‐
partment cann otbe restra ined bythe
seat backrest. #
Make sure that there ar ben chseat, the
re ar seat and the seat backrest are
engaged before everytrip. If
th e left and right seat backrests are not
engaged and loc ked in place, this will be shown
on the multifunction display on the instrument
clus ter.
If th e cent reseat backrest is not engaged and
loc ked in place, there d lock verification indica‐
to r will be visible.
When fitting a belt-secured child restra int
sy stem, obser vethefo llowing:
O Alw
ays obser vethech ild restra int sy stem
manufacturer's ins tallation and operating
instructions.
O Fo
r a child restra int sy stem in the "Univer‐
sal" or "Semi-Universal" categor y,make
sure that the sy stem has been appr oved for
th eve hicle seat. 64
Occupant saf ety
Page 105 of 473
Selecting
the massage prog ramme for the
front seats Multimedia sy
stem:
4 © 5
Comfort 5
Massage #
Start the program forth e desired seat ;.#
Toset the massage intensit y:switch High
intensity on or off . Re
setting seat settings Multimedia sy
stem:
4 © 5
Comfort 5
Seat comfort #
Select ßforth e desired seat. #
Confirm the prom pt. Fo
lding the front seat backrest forw ards/
back (vehicles with memo ryfunction) If
yo ufo ld the seat backrest forw ards, the seat
will mo veforw ards with the EASY -ENTRY func‐
tion. This allo wspassengers toget into and out
of there ar passenger compartment com fortabl y. #
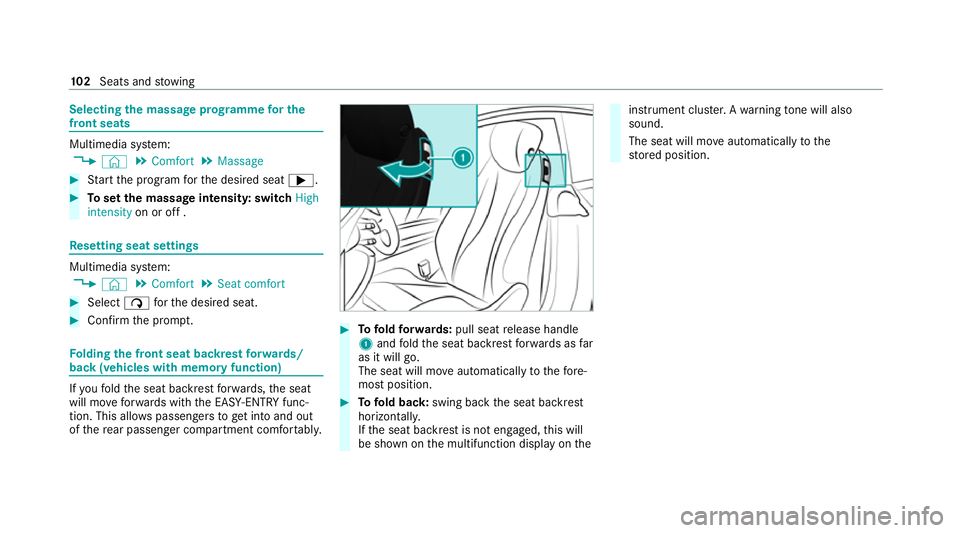
Tofold forw ards: pull seat release handle
1 and fold the seat backrest forw ards as far
as it will go.
The seat will mo veautomatically tothefo re‐
most position. #
Tofold back: swing back the seat backrest
horizon tally.
If th e seat backrest is not engaged, this will
be shown on the multifunction display on the instrument clus
ter.A wa rning tone will also
sound.
The seat will mo veautomatically tothe
st ored position. 102
Seats and stowing
Page 106 of 473
Fo
lding the front seat backrest forw ards/
backwards (vehicles with out memory func‐
tion) Fo
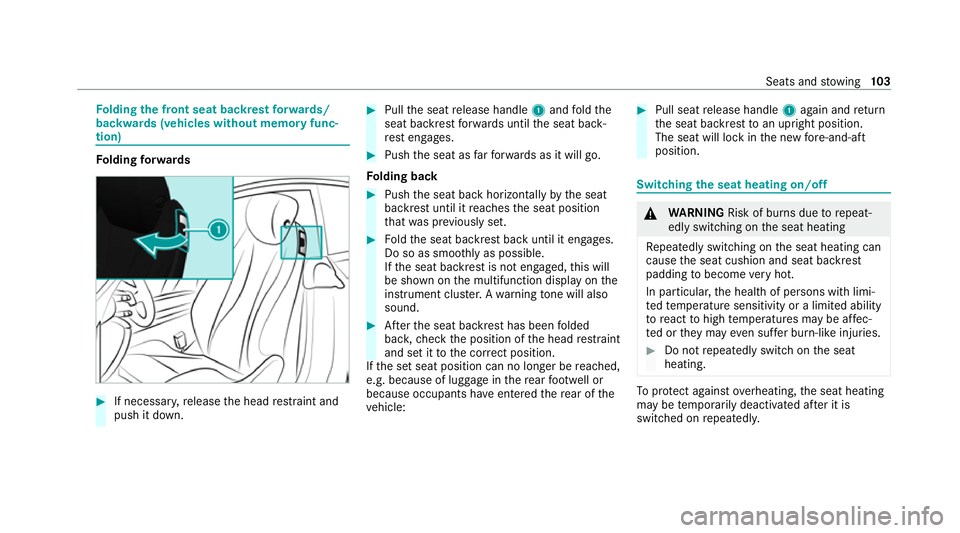
lding forw ards #
If necessa ry,re lease the head restra int and
push it down. #
Pull the seat release handle 1and fold the
seat backrest forw ards until the seat back‐
re st engages. #
Push the seat as farfo rw ards as it will go.
Fo lding back #
Push the seat back horizon tally by the seat
backrest until it reaches the seat position
th at wa s pr eviously set. #
Foldthe seat backrest back until it engages.
Do so as smoo thly as possible.
If th e seat backrest is not engaged, this will
be shown on the multifunction display on the
instrument clus ter.A wa rning tone will also
sound. #
Afterth e seat backrest has been folded
bac k,check the position of the head restra int
and set it tothe cor rect position.
If th e set seat position can no longer be reached,
e.g. because of luggage in there ar foot we ll or
because occupants ha veentered there ar of the
ve hicle: #
Pull seat release handle 1again and return
th e seat backrest toan upright position.
The seat will lock in the new fore -and-aft
position. Switching the seat heating on/o
ff &
WARNING Risk of bu rns due torepeat‐
edly switching on the seat heating
Re peatedly switching on the seat heating can
cause the seat cushion and seat backrest
padding tobecome very hot.
In particular, the health of persons with limi‐
te dte mp erature sensitivity or a limited ability
to react tohigh temp eratures may be af fec‐
te d or they may even suf fer burn-like injuries. #
Do not repeatedly switch on the seat
heating. To
protect against overheating, the seat heating
may be temp orarily deactivated af ter it is
switched on repeatedly. Seats and
stowing 103
Page 113 of 473
&
WARNING Risk of entrapment when set‐
ting the seat with the memory function
When the memory function adjusts the seat,
yo u and other vehicle occupants – particu‐
lar lych ildren – could become trapped. #
During the adjustment process of the
memory function, make sure that no
one has any body parts in the sweep of
th e seat. #
If someone becomes trapped, press a
preset position button or seat adjust‐
ment switch immediately. &
WARNING Risk of entrapment if the
memory function is activated bychildren
Children could become trapped if they acti‐
va te the memory function, particularly when
unattended. #
Never lea vechildren unat tended in the
ve hicle. #
When leaving theve hicle, alw aysta ke
th eke y with you and lock theve hicle. This also applies
tothe Digital Vehicle Key.
Yo u can use the memory function when the igni‐
tion is switched off.
Seat adjustments for up tothre e people can be
st ored and called up using the memory function.
Yo u can sa vesettings forth efo llowing sy stems:
R Seat, backrest and head restra int
R Steering wheel
R Outside mir rors
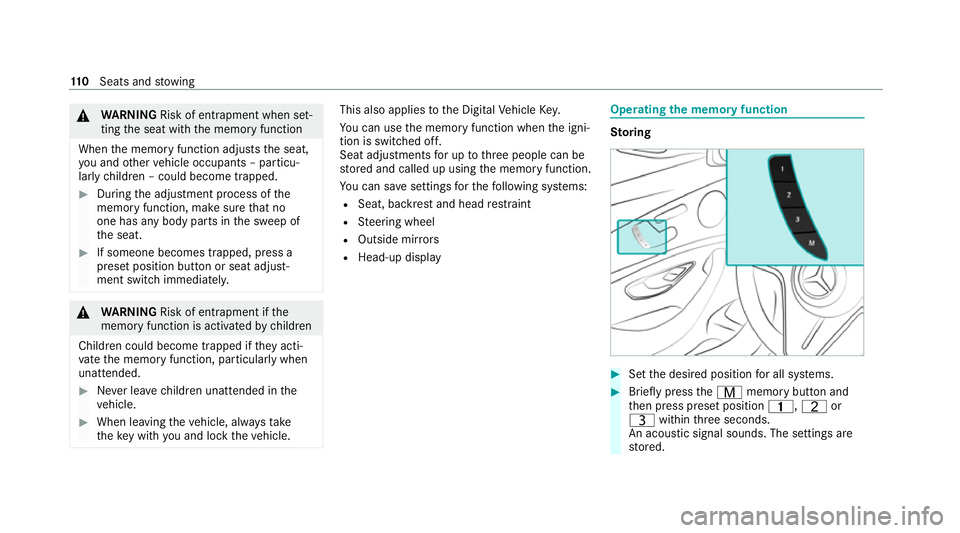
R Head-up display Operating
the memory function St
oring #
Set the desired position for all sy stems. #
Brief lypress theV memory button and
th en press preset position 4,Tor
U within thre e seconds.
An acoustic signal sounds. The settings are
st ored. 11 0
Seats and stowing
Page 118 of 473
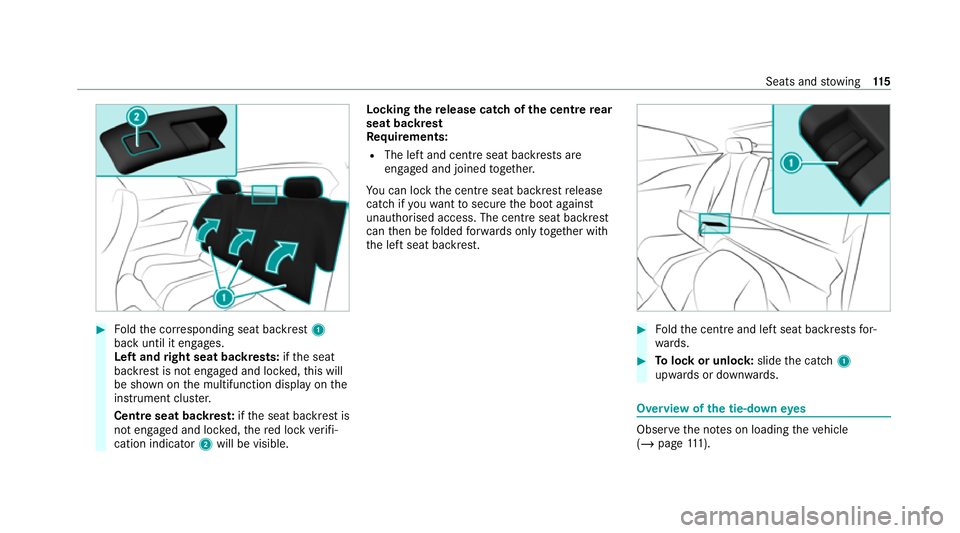
#
Foldthe cor responding seat backrest 1
back until it engages.
Left and right seat backrests: ifth e seat
backrest is not engaged and loc ked, this will
be shown on the multifunction display on the
instrument clus ter.
Centre seat backres t:ifth e seat backrest is
not engaged and loc ked, there d lock verifi‐
cation indicator 2will be visible. Lo
cking there lease catch of the centre rear
seat backrest
Re quirements:
R The left and centre seat backrests are
engaged and joined toge ther.
Yo u can lock the cent reseat backrest release
cat chifyo uwa nttosecure the boot against
unauthorised access. The cent reseat backrest
can then be folded forw ards on lytoge ther with
th e left seat backrest. #
Foldthe cent reand left seat backrests for‐
wa rds. #
Tolock or unlock: slidethe catch 1
upwards or down wards. Overview of
the tie-down eyes Obser
vethe no tes on loading theve hicle
(/ page 111). Seats and
stowing 11 5
Page 124 of 473
R
When charging, the mat should be used if
possible. Wire
lessly charging a mobile phone Requ
irements:
R The mobile phone is suitable for wireless
ch arging (Qi-compatible mobile phone).
A list of Qi-compatible mobile phones can be
fo und at: https://www.mercedes-benz-
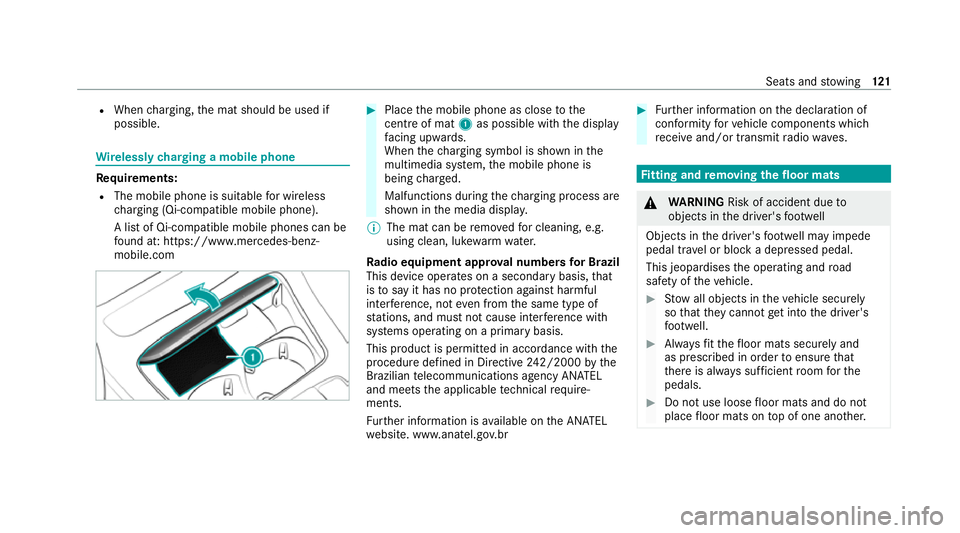
mobile.com #
Place the mobile phone as close tothe
centre of mat 1as possible wi th the display
fa cing up wards.
When thech arging symbol is shown in the
multimedia sy stem, the mobile phone is
being charge d.
Malfunctions during thech arging process are
shown in the media displa y.
% The mat can be remo vedfo r cleaning, e.g.
using clean, luk ewarmwate r.
Ra dio equipment appr oval numbers for Brazil
This device operates on a secondary basis, that
is to say it has no pr otection against harmful
inter fere nce, not even from the same type of
st ations, and must not cause inter fere nce wi th
sy stems operating on a primary basis.
This product is permitted in accordance with the
procedure defined in Directive 242/2000 bythe
Brazilian telecommunications agency AN ATEL
and meets the applicable tech nical requ ire‐
ments.
Fu rther information is available on the AN ATEL
we bsite. www.anatel.go v.br #
Further information on the declaration of
confo rmity forve hicle components which
re cei veand/or transmit radio wav es. Fi
tting and removing the floormats &
WARNING Risk of accident due to
objects in the driver's foot we ll
Objects in the driver's foot we ll may impede
pedal tr avel or block a depressed pedal.
This jeopardises the operating and road
saf ety of theve hicle. #
Stow all objects in theve hicle securely
so that they cannot getinto the driver's
fo ot we ll. #
Alw aysfit th efloor mats securely and
as prescribed in order toensure that
th ere is alw ays suf ficient room forthe
pedals. #
Do not use loose floor mats and do not
place floor mats on top of one ano ther. Seats and
stowing 121
Page 134 of 473
R
If highly reflective signs are de tected, ULTRA
RANGE Highbeam will be switched off au to‐
matical ly.
The sy stem's optical sensor is located behind
th e windscreen near theove rhead control panel.
Switching Adaptive Highbeam Assist Plus
on/off #
Toswitch on: turnthe light switch to
th eà position. #
Switch on the high beam using the combina‐
tion switch.
When the high beam is switched on automat‐
ically in the dar k,the_ indicator lamp on
th e multifunction display will light up. #
Toswitch off: switch offthe high beam
using the combination switch. Setting
the low beam (vehicles with MULTI‐
BEAM LED headlamps only) Multimedia sy
stem:
4 © 5
Settings 5
Lights
5 Dipped-beams #
Select Right-side traffic, Left-side trafficor
Automatic. Setting
theex terior lighting switch-off delay
time Re
quirements:
R The light switch is in theà position.
Multimedia sy stem:
4 © 5
Settings 5
Lights
5 Ext. light. del. sw. off #
Set the switch-off delay time.
When theve hicle engine is switched off, the
ex terior lighting will be activated forth e set
time. Switching
the sur round lighting on/off Multimedia sy
stem:
4 © 5
Settings 5
Lights
5 Surround lighting
When Surround lighting is active,theex terior
lighting lights up for 40 seconds af terth eve hicle
is unloc ked. When youstart theve hicle, the sur‐
ro und lighting is deactivated and the automatic
driving lights are activated. #
Activate or deacti vate the function. Light and sight
131