bulb MERCEDES-BENZ E-CLASS ESTATE 2008 User Guide
[x] Cancel search | Manufacturer: MERCEDES-BENZ, Model Year: 2008, Model line: E-CLASS ESTATE, Model: MERCEDES-BENZ E-CLASS ESTATE 2008Pages: 401, PDF Size: 6.89 MB
Page 316 of 401

Changing the bulbs
313
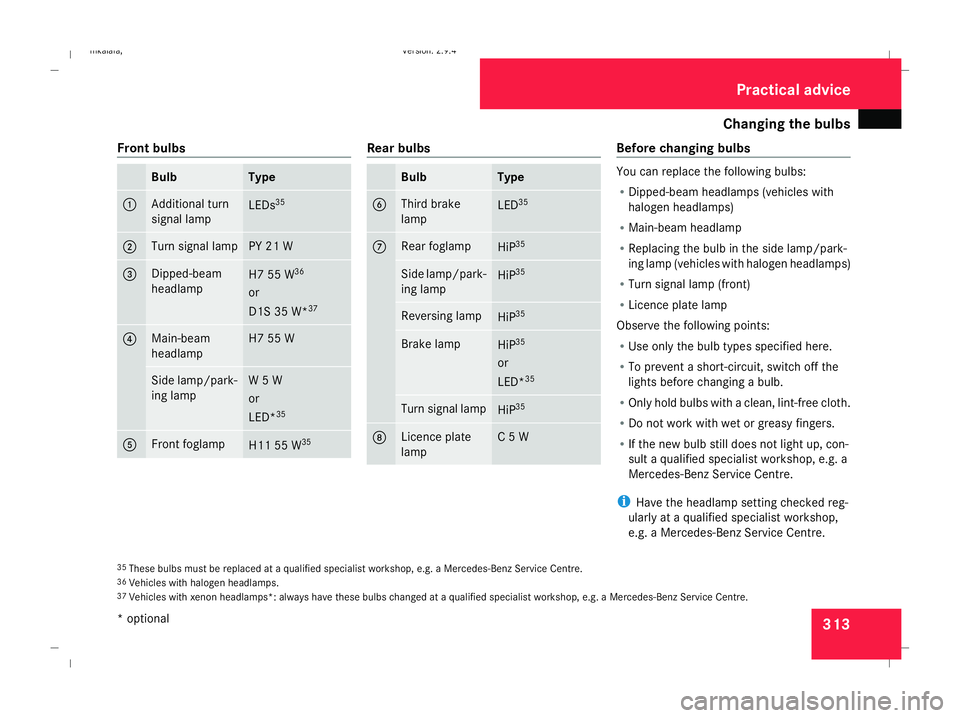
Front bulbs Bulb Type
1 Additional turn
signal lamp
LEDs
35 2 Turn signal lamp PY 21 W
3 Dipped-beam
headlamp
H7 55 W
36
or
D1S 35 W* 37 4 Main-beam
headlamp H7 55 W
Side lamp/park-
ing lamp W 5 W
or
LED*
35 5 Front foglamp
H11 55 W
35 Rear bulbs
Bulb Type
6 Third brake
lamp
LED
35 7 Rear foglamp
HiP
35 Side lamp/park-
ing lamp
HiP
35 Reversing lamp
HiP
35 Brake lamp
HiP
35
or
LED* 35 Turn signal lamp
HiP
35 8 Licence plate
lamp C 5 W Before changing bulbs
You can replace the following bulbs:
R
Dipped-beam headlamps (vehicles with
halogen headlamps)
R Main-beam headlamp
R Replacing the bulb in the side lamp/park-
ing lamp (vehicles with halogen headlamps)
R Turn signal lamp (front)
R Licence plate lamp
Observe the following points:
R Use only the bulb types specified here.
R To prevent a short-circuit, switch off the
lights before changing a bulb.
R Only hold bulbs with a clean, lint-free cloth.
R Do not work with wet or greasy fingers.
R If the new bulb still does not light up, con-
sult a qualified specialist workshop, e.g. a
Mercedes-Benz Service Centre.
i Have the headlamp setting checked reg-
ularly at a qualified specialist workshop,
e.g. a Mercedes-Benz Service Centre.
35 These bulbs must be replaced at a qualified specialist workshop, e.g. a Mercedes-Benz Service Centre.
36 Vehicles with halogen headlamps.
37 Vehicles with xenon headlamps*: always have these bulbs changed at a qualified specialist workshop, e.g. a Mercedes-Benz Service Centre. Practical advice
* optional
211_AKB; 2; 5, en-GB
mkalafa,
Version: 2.9.4
2008-02-29T16:57:07+01:00 - Seite 313 ZDateiname: 6515_3416_02_buchblock.pdf; preflight
Page 317 of 401

Changing the bulbs
314 Changing the front bulbs
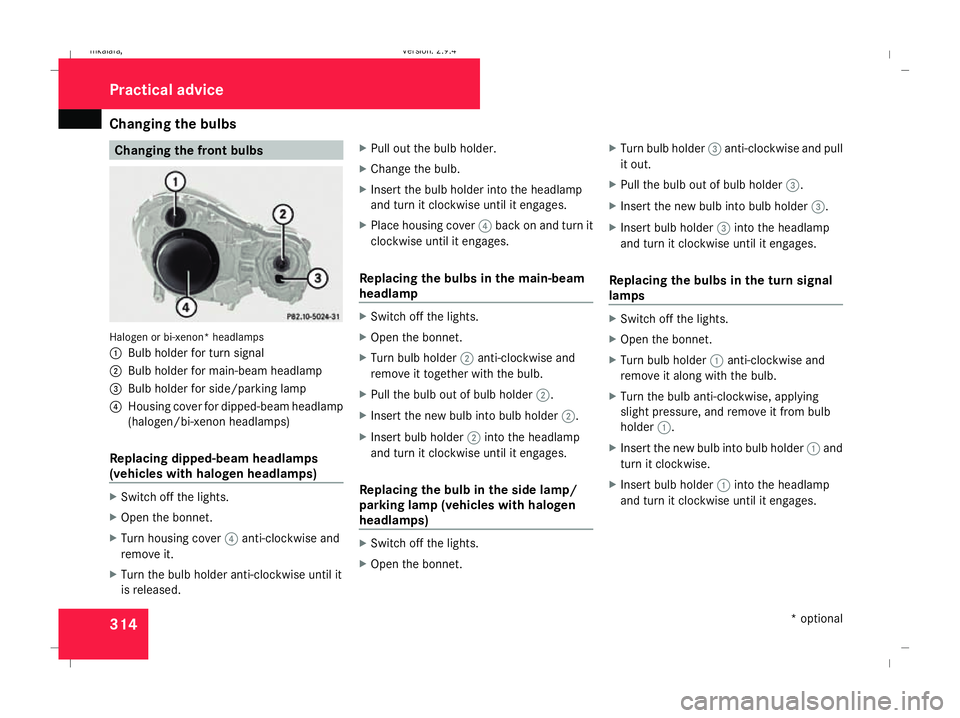
Halogen or bi-xenon* headlamps
1
Bulb holder for turn signal
2 Bulb holder for main-beam headlamp
3 Bulb holder for side/parking lamp
4 Housing cover for dipped-beam headlamp
(halogen/bi-xenon headlamps)
Replacing dipped-beam headlamps
(vehicles with halogen headlamps) X
Switch off the lights.
X Open the bonnet.
X Turn housing cover 4anti-clockwise and
remove it.
X Turn the bulb holder anti-clockwise until it
is released. X
Pull out the bulb holder.
X Change the bulb.
X Insert the bulb holder into the headlamp
and turn it clockwise until it engages.
X Place housing cover 4back on and turn it
clockwise until it engages.
Replacing the bulbs in the main-beam
headlamp X
Switch off the lights.
X Open the bonnet.
X Turn bulb holder 2anti-clockwise and
remove it together with the bulb.
X Pull the bulb out of bulb holder 2.
X Insert the new bulb into bulb holder 2.
X Insert bulb holder 2into the headlamp
and turn it clockwise until it engages.
Replacing the bulb in the side lamp/
parking lamp (vehicles with halogen
headlamps) X
Switch off the lights.
X Open the bonnet. X
Turn bulb holder 3anti-clockwise and pull
it out.
X Pull the bulb out of bulb holder 3.
X Insert the new bulb into bulb holder 3.
X Insert bulb holder 3into the headlamp
and turn it clockwise until it engages.
Replacing the bulbs in the turn signal
lamps X
Switch off the lights.
X Open the bonnet.
X Turn bulb holder 1anti-clockwise and
remove it along with the bulb.
X Turn the bulb anti-clockwise, applying
slight pressure, and remove it from bulb
holder 1.
X Insert the new bulb into bulb holder 1and
turn it clockwise.
X Insert bulb holder 1into the headlamp
and turn it clockwise until it engages. Practical advice
* optional
211_AKB; 2; 5, en-GB
mkalafa,
Version: 2.9.4 2008-02-29T16:57:07+01:00 - Seite 314Dateiname: 6515_3416_02_buchblock.pdf; preflight
Page 318 of 401

Replacing the wiper blades
315Changing the rear bulbs
Changing the bulbs in the licence plate
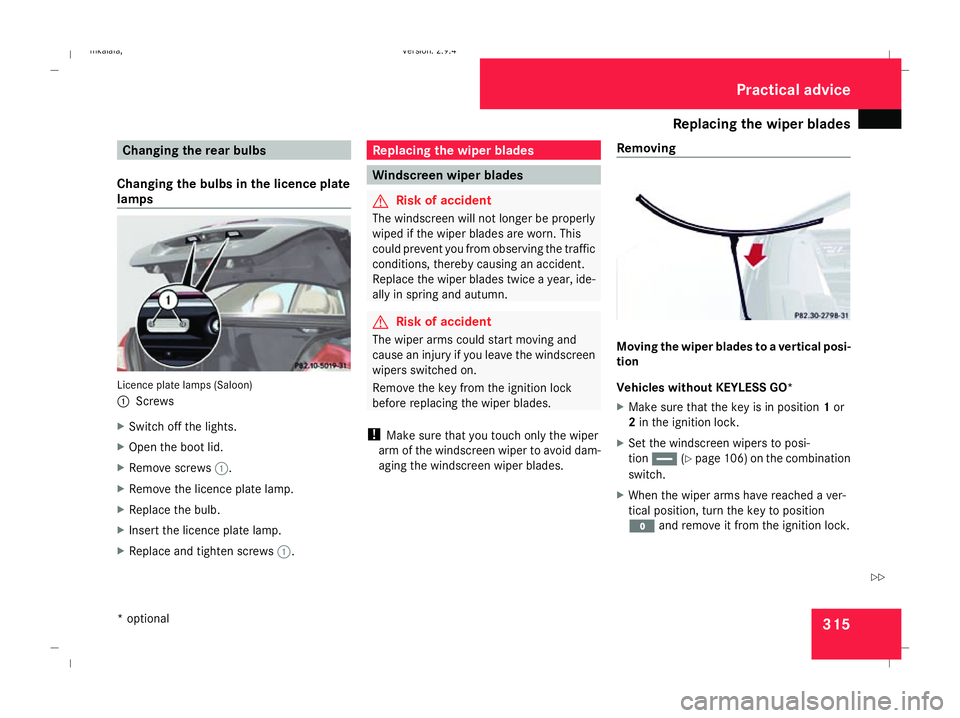
lamps Licence plate lamps (Saloon)
1
Screws
X Switch off the lights.
X Open the boot lid.
X Remove screws 1.
X Remove the licence plate lamp.
X Replace the bulb.
X Insert the licence plate lamp.
X Replace and tighten screws 1. Replacing the wiper blades
Windscreen wiper blades
G
Risk of accident
The windscreen will not longer be properly
wiped if the wiper blades are worn. This
could prevent you from observing the traffic
conditions, thereby causing an accident.
Replace the wiper blades twice a year, ide-
ally in spring and autumn. G
Risk of accident
The wiper arms could start moving and
cause an injury if you leave the windscreen
wipers switched on.
Remove the key from the ignition lock
before replacing the wiper blades.
! Make sure that you touch only the wiper
arm of the windscreen wiper to avoid dam-
aging the windscreen wiper blades. Removing Moving the wiper blades to a vertical posi-
tion
Vehicles without KEYLESS GO*
X
Make sure that the key is in position 1or
2 in the ignition lock.
X Set the windscreen wipers to posi-
tion u (Ypage 106) on the combination
switch.
X When the wiper arms have reached a ver-
tical position, turn the key to position
M and remove it from the ignition lock. Practical advice
* optional
211_AKB; 2; 5, en-GB
mkalafa ,V ersion: 2.9.4
2008-02-29T16:57:07+01:00 - Seite 315 ZDateiname: 6515_3416_02_buchblock.pdf; preflight