child lock MERCEDES-BENZ E-CLASS ESTATE 2008 Owner's Manual
[x] Cancel search | Manufacturer: MERCEDES-BENZ, Model Year: 2008, Model line: E-CLASS ESTATE, Model: MERCEDES-BENZ E-CLASS ESTATE 2008Pages: 401, PDF Size: 6.89 MB
Page 70 of 401
Opening and closing
67
X
To change the setting: press thek
and j buttons simultaneously for
approximately six seconds until the battery
check lamp flashes twice.
The key now functions as follows:
X To unlock the driver's door: press the
k button once.
X To unlock centrally: press thekbut-
ton twice.
X To lock centrally: press thejbutton.
Restoring the factory settings X
Press the kandj buttons simulta-
neously for approximately six seconds until
the battery check lamp flashes twice. KEYLESS GO key*
The optional equipment supplied with your
vehicle includes two KEYLESS GO keys. KEY-
LESS GO allows you to lock/unlock and start
the vehicle simply by carrying the KEYLESS
GO key with you. When you touch the surface
of the sensors on the vehicle's door handles,
KEYLESS GO establishes a radio connection
between the vehicle and the key.
When you touch the inner surface of the door
handle or press the button on the tailgate
handle (Estate), your vehicle unlocks cen-
trally if the factory settings have not been
changed:
R the doors
R the boot lid/tailgate
R the fuel filler flap
When starting the engine and whilst driving,
KEYLESS GO also checks whether a valid
KEYLESS GO key is in the vehicle by periodi-
cally establishing radio contact. G
Risk of accident
If children are left unsupervised in the vehi-
cle, they could open a door from the inside,
even if it has been locked. Or they could
start the vehicle if a valid KEYLESS GO key is in the vehicle and they press the KEY-
LESS GO button on the gear selector lever.
They could endanger themselves and oth-
ers. Never leave children unsupervised in
the vehicle. Switch off the engine and take
the KEYLESS GO key with you, even if you
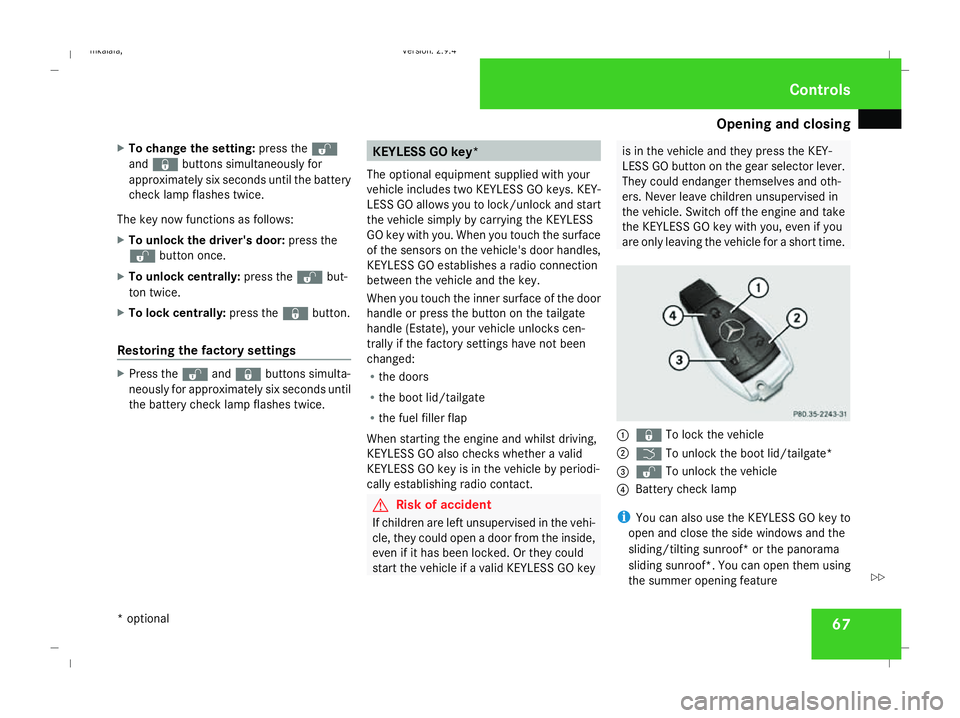
are only leaving the vehicle for a short time. 1
j To lock the vehicle
2 i To unlock the boot lid/tailgate*
3 k To unlock the vehicle
4 Battery check lamp
i You can also use the KEYLESS GO key to
open and close the side windows and the
sliding/tilting sunroof* or the panorama
sliding sunroof *.You can open them using
the summer opening feature Controls
* optional
211_AKB; 2; 5, en-GB
mkalafa,
Version: 2.9.4
2008-02-29T16:57:07+01:00 - Seite 67 ZDateiname: 6515_3416_02_buchblock.pdf; preflight
Page 73 of 401
Opening and closing
70
X
Pull door handle 2.
If the door is locked, locking knob 1pops
up. The door is unlocked and can be
opened. Automatic locking feature
The vehicle will lock automatically once you
have pulled away.
You can switch off the automatic locking
function via the on-board computer
(Y page 137).
i The vehicle is locked automatically when
the ignition is switched on and the wheels
begin to turn. There is therefore a risk of
being locked out when the vehicle is being
pushed or tested on a dynamometer. Locking/unlocking the vehicle from
the inside
You can centrally lock or unlock the vehicle
from the inside. This feature may be useful if,
for example, you wish to unlock the
passenger door from the inside or lock the
vehicle before you pull away. G
Risk of accident
Do not leave children unsupervised in the
vehicle. They could open a door from the
inside – even if it is locked – and thereby
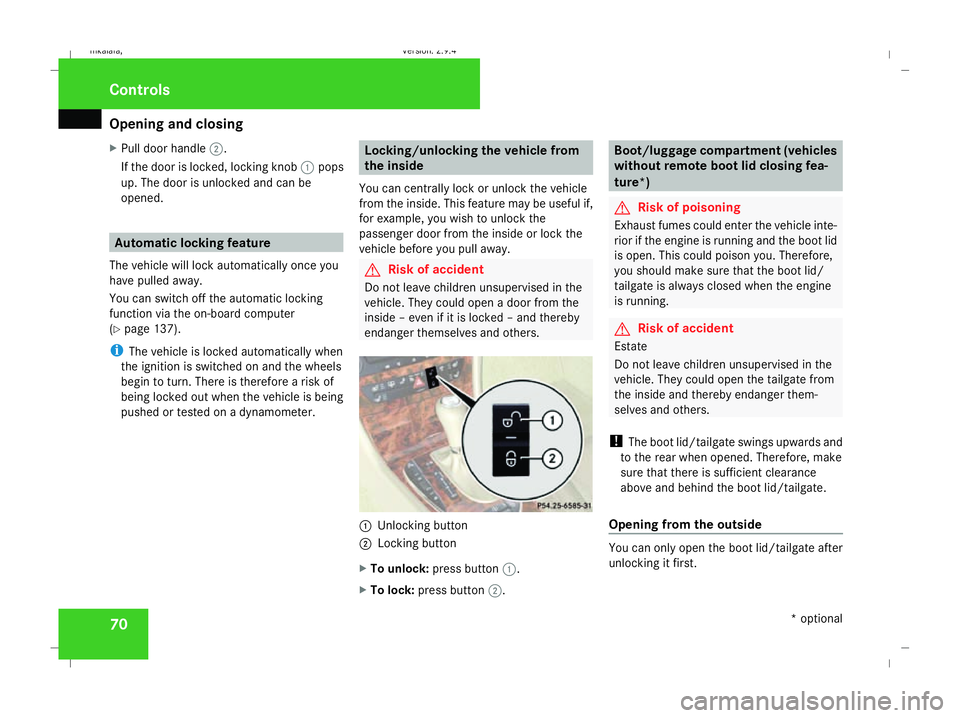
endanger themselves and others. 1
Unlocking button
2 Locking button
X To unlock: press button 1.
X To lock: press button 2. Boot/luggage compartment (vehicles
without remote boot lid closing fea-
ture*)
G
Risk of poisoning
Exhaust fumes could enter the vehicle inte-
rior if the engine is running and the boot lid
is open. This could poison you. Therefore,
you should make sure that the boot lid/
tailgate is always closed when the engine
is running. G
Risk of accident
Estate
Do not leave children unsupervised in the
vehicle. They could open the tailgate from
the inside and thereby endanger them-
selves and others.
! The boot lid/tailgate swings upwards and
to the rear when opened. Therefore, make
sure that there is sufficient clearance
above and behind the boot lid/tailgate.
Opening from the outside You can only open the boot lid/tailgate after
unlocking it first.Controls
* optional
211_AKB; 2; 5, en-GB
mkalafa,
Version: 2.9.4 2008-02-29T16:57:07+01:00 - Seite 70Dateiname: 6515_3416_02_buchblock.pdf; preflight
Page 75 of 401
Opening and closing
72
X
Pull the boot lid/tailgate down using
recess 1.
X Lock the vehicle if necessary using
the j button on the key or with KEY-
LESS GO*.
Opening from the inside (Saloon) You can simultaneously unlock and open the
boot from the driver's seat when the vehicle
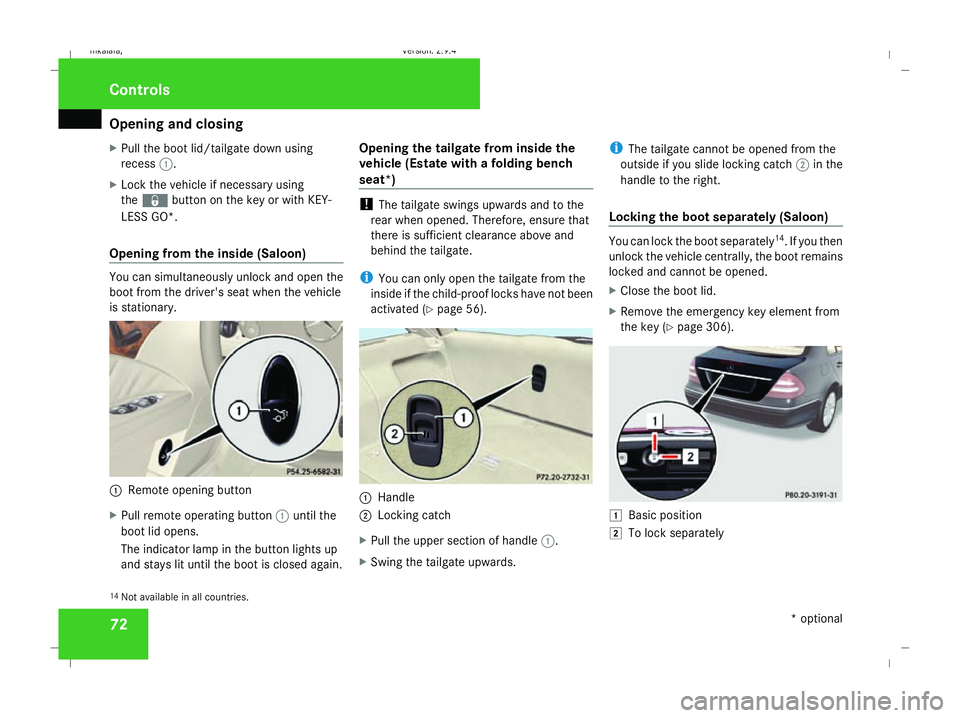
is stationary. 1
Remote opening button
X Pull remote operating button 1until the
boot lid opens.
The indicator lamp in the button lights up
and stays lit until the boot is closed again. Opening the tailgate from inside the
vehicle (Estate with a folding bench
seat*) !
The tailgate swings upwards and to the
rear when opened. Therefore, ensure that
there is sufficient clearance above and
behind the tailgate.
i You can only open the tailgate from the
inside if the child-proof locks have not been
activated (Y page 56). 1
Handle
2 Locking catch
X Pull the upper section of handle 1.
X Swing the tailgate upwards. i
The tailgate cannot be opened from the
outside if you slide locking catch 2in the
handle to the right.
Locking the boot separately (Saloon) You can lock the boot separately
14
. If you then
unlock the vehicle centrally, the boot remains
locked and cannot be opened.
X Close the boot lid.
X Remove the emergency key element from
the key (Y page 306). $
Basic position
% To lock separately
14 Not available in all countries. Controls
* optional
211_AKB; 2; 5, en-GB
mkalafa,
Version: 2.9.4 2008-02-29T16:57:07+01:00 - Seite 72Dateiname: 6515_3416_02_buchblock.pdf; preflight
Page 76 of 401
Opening and closing
73
X
Insert the emergency key element fully into
the boot lock.
X Turn the emergency key element clockwise
to position %.
X Remove the emergency key element. Boot/luggage compartment (vehicles
with remote boot lid closing feature*)
The remote boot lid closing feature* opens
and closes the boot lid/tailgate automati-
cally. You can stop the automatic opening and
closing procedure at any time:
R Saloon: by pulling or pressing the remote
operating button at the driver's seat
Estate: by pulling the remote operating but-
ton at the driver's seat again
R by pressing the ibutton on the key
R by pulling the handle on the boot lid/tail-
gate
R by pressing the closing button in the boot
lid/tailgate
On Estate vehicles, you will hear a warning
tone as the tailgate is opening or closing. G
Risk of poisoning
Exhaust fumes could enter the vehicle inte-
rior if the engine is running and the boot lid
is open. This could poison you. Therefore,
you should make sure that the boot lid/
tailgate is always closed when the engine
is running. G
Risk of accident
Estate
Do not leave children unsupervised in the
vehicle. They could open the tailgate from
the inside and thereby endanger them-
selves and others.
! The boot lid/tailgate swings upwards and
to the rear when opened. Therefore, make
sure that there is sufficient clearance
above and behind the boot lid/tailgate.
Opening from the outside You can only open the boot lid/tailgate after
unlocking it first.
X
To unlock centrally: press thekbut-
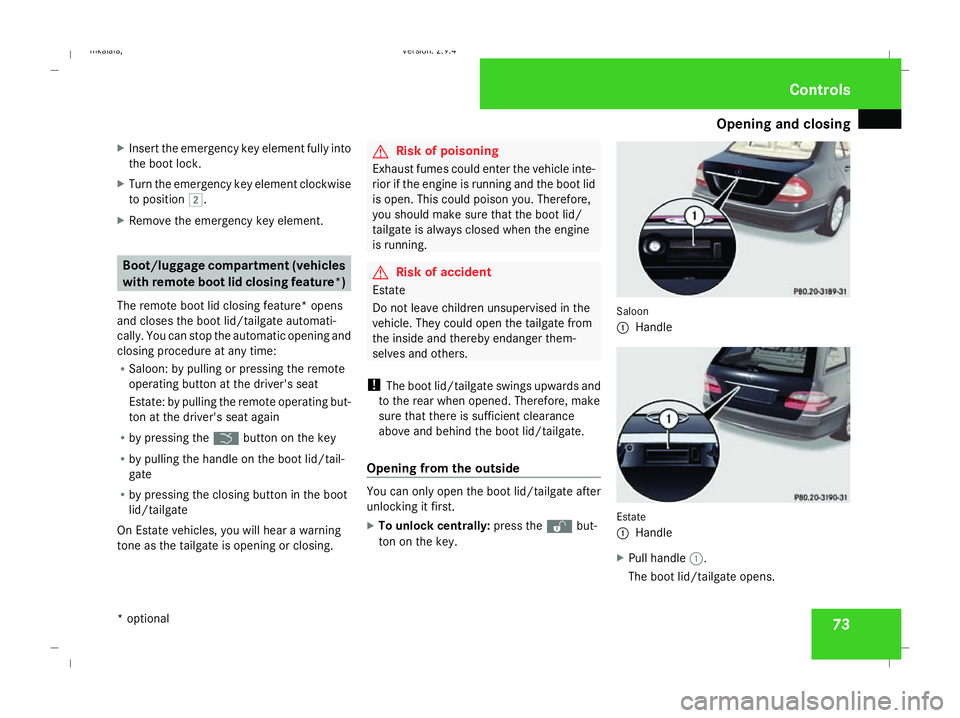
ton on the key. Saloon
1
Handle Estate
1
Handle
X Pull handle 1.
The boot lid/tailgate opens. Controls
* optional
211_AKB; 2; 5, en-GB
mkalafa,
Version: 2.9.4 2008-02-29T16:57:07+01:00 - Seite 73 ZDateiname: 6515_3416_02_buchblock.pdf; preflight
Page 80 of 401
Seats
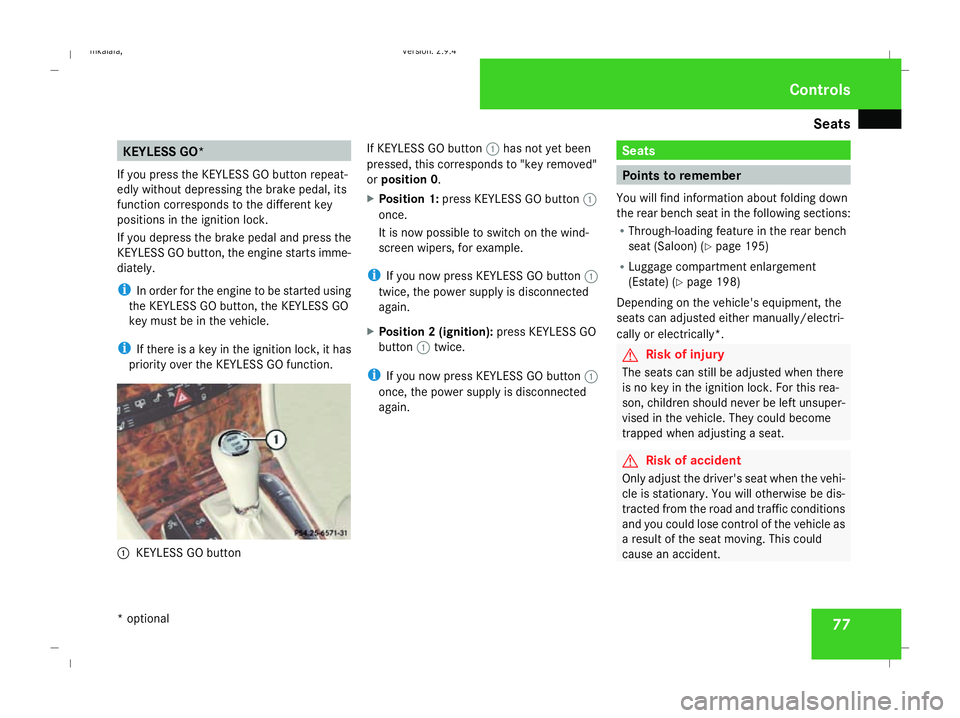
77KEYLESS GO*
If you press the KEYLESS GO button repeat-
edly without depressing the brake pedal, its
function corresponds to the different key
positions in the ignition lock.
If you depress the brake pedal and press the
KEYLESS GO button, the engine starts imme-
diately.
i In order for the engine to be started using
the KEYLESS GO button, the KEYLESS GO
key must be in the vehicle.
i If there is a key in the ignition lock, it has
priority over the KEYLESS GO function. 1
KEYLESS GO button If KEYLESS GO button
1has not yet been
pressed, this corresponds to "key removed"
or position 0.
X Position 1: press KEYLESS GO button 1
once.
It is now possible to switch on the wind-
screen wipers, for example.
i If you now press KEYLESS GO button 1
twice, the power supply is disconnected
again.
X Position 2 (ignition): press KEYLESS GO
button 1twice.
i If you now press KEYLESS GO button 1
once, the power supply is disconnected
again. Seats
Points to remember
You will find information about folding down
the rear bench seat in the following sections:
R Through-loading feature in the rear bench
seat (Saloon) (Y page 195)
R Luggage compartment enlargement
(Estate) (Y page 198)
Depending on the vehicle's equipment, the
seats can adjusted either manually/electri-
cally or electrically*. G
Risk of injury
The seats can still be adjusted when there
is no key in the ignition lock. For this rea-
son, children should never be left unsuper-
vised in the vehicle. They could become
trapped when adjusting a seat. G
Risk of accident
Only adjust the driver's seat when the vehi-
cle is stationary. You will otherwise be dis-
tracted from the road and traffic conditions
and you could lose control of the vehicle as
a result of the seat moving. This could
cause an accident. Controls
* optional
211_AKB; 2; 5, en-GB
mkalafa, Version: 2.9.4 2008-02-29T16:57:07+01:00 - Seite 77 ZDateiname: 6515_3416_02_buchblock.pdf; preflight
Page 81 of 401
Seats
78 G
Risk of injury
Make sure that nobody can become trap-
ped when you adjust the seat.
Observe the notes concerning the airbag
system.
Secure children as recommended; see
"Children in the vehicle" section.
! When you move the seats, make sure that
there are no objects in the footwell or
behind the seats. Otherwise, you could
damage the seats and the objects.
i The head restraints in the front seats are
fitted with the NECK-PRO system
(Y page 47). For this reason, it is not pos-
sible to remove the head restraints from
the front seats.
For design reasons, some rear-compart-
ment head restraints cannot be removed
(Y page 83).
Please contact a Mercedes-Benz Service
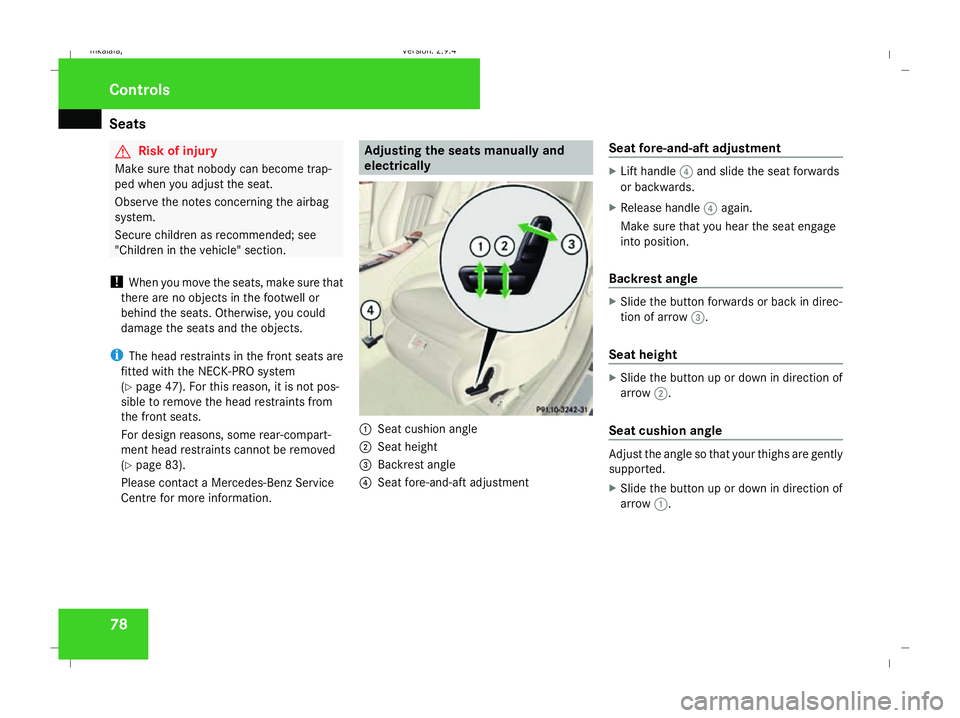
Centre for more information. Adjusting the seats manually and
electrically 1
Seat cushion angle
2 Seat height
3 Backrest angle
4 Seat fore-and-aft adjustment Seat fore-and-aft adjustment X
Lift handle 4and slide the seat forwards
or backwards.
X Release handle 4again.
Make sure that you hear the seat engage
into position.
Backrest angle X
Slide the button forwards or back in direc-
tion of arrow 3.
Seat height X
Slide the button up or down in direction of
arrow 2.
Seat cushion angle Adjust the angle so that your thighs are gently
supported.
X Slide the button up or down in direction of
arrow 1. Controls
211_AKB; 2; 5, en-GB
mkalafa,
Version: 2.9.4 2008-02-29T16:57:07+01:00 - Seite 78Dateiname: 6515_3416_02_buchblock.pdf; preflight
Page 89 of 401
Seats
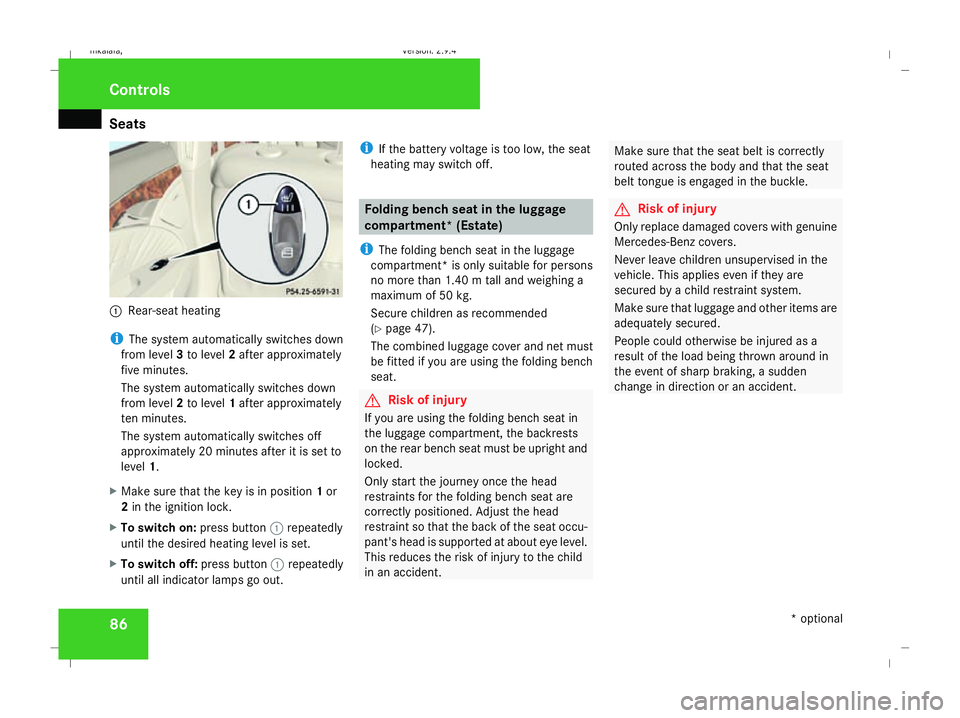
861
Rear-seat heating
i The system automatically switches down
from level 3to level 2after approximately
five minutes.
The system automatically switches down
from level 2to level 1after approximately
ten minutes.
The system automatically switches off
approximately 20 minutes after it is set to
level 1.
X Make sure that the key is in position 1or
2 in the ignition lock.
X To switch on: press button1repeatedly
until the desired heating level is set.
X To switch off: press button1repeatedly
until all indicator lamps go out. i
If the battery voltage is too low, the seat
heating may switch off. Folding bench seat in the luggage
compartment* (Estate)
i The folding bench seat in the luggage
compartment* is only suitable for persons
no more than 1.40 m tall and weighing a
maximum of 50 kg.
Secure children as recommended
(Y page 47).
The combined luggage cover and net must
be fitted if you are using the folding bench
seat. G
Risk of injury
If you are using the folding bench seat in
the luggage compartment, the backrests
on the rear bench seat must be upright and
locked.
Only start the journey once the head
restraints for the folding bench seat are
correctly positioned. Adjust the head
restraint so that the back of the seat occu-
pant's head is supported at about eye level.
This reduces the risk of injury to the child
in an accident. Make sure that the seat belt is correctly
routed across the body and that the seat
belt tongue is engaged in the buckle. G
Risk of injury
Only replace damaged covers with genuine
Mercedes-Benz covers.
Never leave children unsupervised in the
vehicle. This applies even if they are
secured by a child restraint system.
Make sure that luggage and other items are
adequately secured.
People could otherwise be injured as a
result of the load being thrown around in
the event of sharp braking, a sudden
change in direction or an accident. Controls
* optional
211_AKB; 2; 5, en-GB
mkalafa,
Version: 2.9.4 2008-02-29T16:57:07+01:00 - Seite 86Dateiname: 6515_3416_02_buchblock.pdf; preflight
Page 92 of 401
Steering wheel
89Steering wheel
Points to remember
Depending on the vehicle equipment, you can
adjust the steering wheel either manually or
electrically*. G
Risk of injury
The electrically adjustable steering
wheel* can be adjusted when the key is
removed from the ignition lock. Therefore,
do not leave children unsupervised in the
vehicle as they could become trapped as
the steering wheel is adjusted. G
Risk of accident
Only adjust the steering wheel when the
vehicle is stationary and do not pull away
until the steering wheel adjustment mech-
anism is locked in position. You might oth-
erwise drive without the steering wheel
adjustment mechanism being locked in
position. As a result you could be distracted
from road and traffic conditions by an unex-
pected movement of the steering wheel
and thereby cause an accident.
The steerability of the vehicle is however
not affected. When you adjust the steering wheel, make
sure that:
R
the steering wheel can be reached with
your arms slightly bent
R you can move your legs freely
R you can see all the displays in the instru-
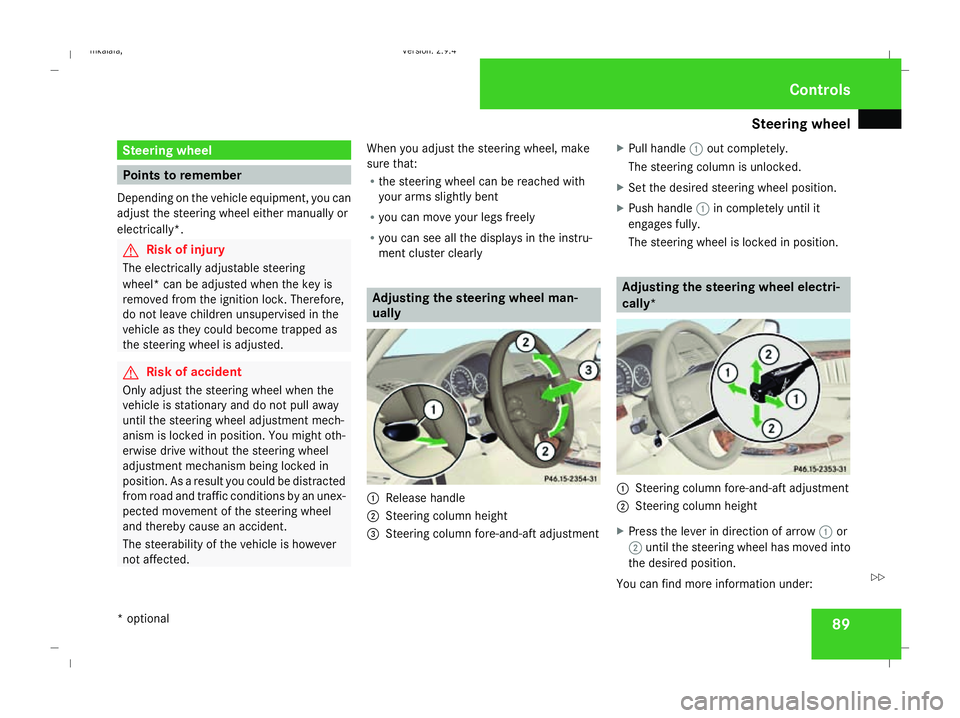
ment cluster clearly Adjusting the steering wheel man-
ually
1
Release handle
2 Steering column height
3 Steering column fore-and-aft adjustment X
Pull handle 1out completely.
The steering column is unlocked.
X Set the desired steering wheel position.
X Push handle 1in completely until it
engages fully.
The steering wheel is locked in position. Adjusting the steering wheel electri-
cally*
1
Steering column fore-and-aft adjustment
2 Steering column height
X Press the lever in direction of arrow 1or
2 until the steering wheel has moved into
the desired position.
You can find more information under: Controls
* optional
211_AKB; 2; 5, en-GB
mkalafa,
Version: 2.9.4 2008-02-29T16:57:07+01:00 - Seite 89 ZDateiname: 6515_3416_02_buchblock.pdf; preflight
Page 93 of 401
Steering wheel
90
R
Easy-entry/exit feature (Y page 90)
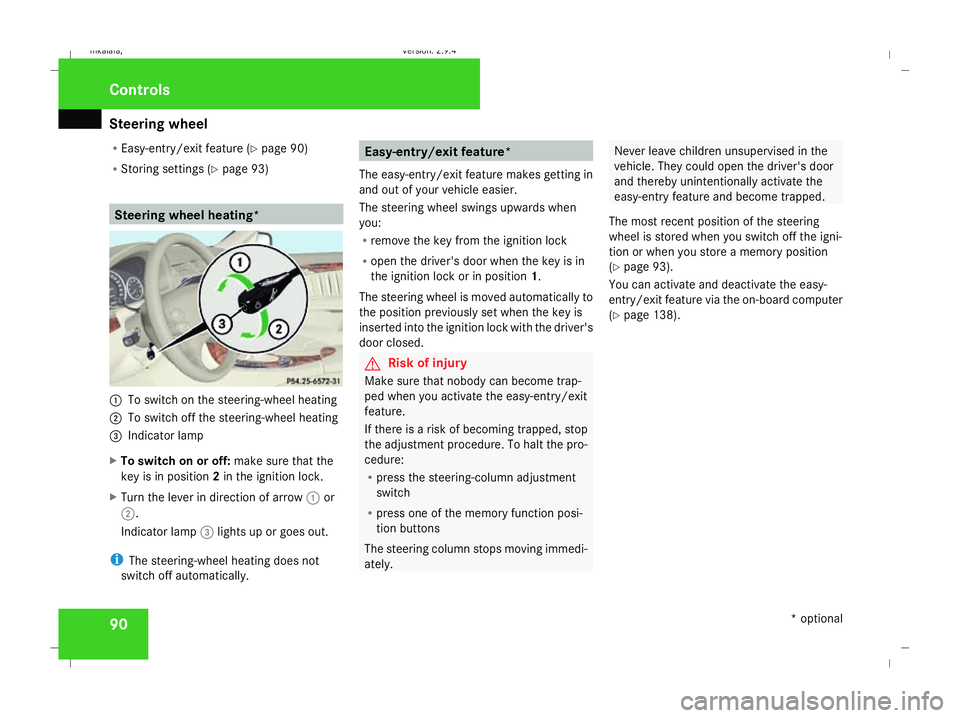
R Storing settings (Y page 93) Steering wheel heating*
1
To switch on the steering-wheel heating
2 To switch off the steering-wheel heating
3 Indicator lamp
X To switch on or off: make sure that the
key is in position 2in the ignition lock.
X Turn the lever in direction of arrow 1or
2.
Indicator lamp 3lights up or goes out.
i The steering-wheel heating does not
switch off automatically. Easy-entry/exit feature*
The easy-entry/exit feature makes getting in
and out of your vehicle easier.
The steering wheel swings upwards when
you:
R remove the key from the ignition lock
R open the driver's door when the key is in
the ignition lock or in position 1.
The steering wheel is moved automatically to
the position previously set when the key is
inserted into the ignition lock with the driver's
door closed. G
Risk of injury
Make sure that nobody can become trap-
ped when you activate the easy-entry/exit
feature.
If there is a risk of becoming trapped, stop
the adjustment procedure. To halt the pro-
cedure:
R press the steering-column adjustment
switch
R press one of the memory function posi-
tion buttons
The steering column stops moving immedi-
ately. Never leave children unsupervised in the
vehicle. They could open the driver's door
and thereby unintentionally activate the
easy-entry feature and become trapped.
The most recent position of the steering
wheel is stored when you switch off the igni-
tion or when you store a memory position
(Y page 93).
You can activate and deactivate the easy-
entry/exit feature via the on-board computer
(Y page 138). Controls
* optional
211_AKB; 2; 5, en-GB
mkalafa,
Version: 2.9.4 2008-02-29T16:57:07+01:00 - Seite 90Dateiname: 6515_3416_02_buchblock.pdf; preflight
Page 96 of 401
Memory functions*
93
X
Make sure that parking position for the
exterior mirror on the front-passenger side
is stored with the memory function
(Y page 94).
X Make sure that the key is in position 2in
the ignition lock.
X Make sure that button 2for the exterior
mirror on the front-passenger side is
pressed in.
X Engage reverse gear.
The exterior mirror on the front-passenger
side moves to the stored parking position.
The exterior mirror on the front-passenger
side moves back to its original position:
R as soon as you exceed a speed of
10 km/h
R about ten seconds after you have disen-
gaged reverse gear
R if you press button 1for the exterior mir-
ror on the driver's side Memory functions*
Storing settings
You can store up to three different settings
using the memory button.
The following settings are stored as a single
memory preset:
R Position of the seat, backrest and head
restraint
R Dynamic driving seat*: activated/deacti-
vated
R Driver's side: steering-wheel position
R Driver's side: position of the exterior mir-
rors on the driver's and front-passenger
sides G
Risk of injury
The memory function can be used when the
key has been removed. For this reason,
children should never be left unsupervised
in the vehicle. They could otherwise
become trapped when moving the seat or
the steering wheel. G
Risk of accident
Only use the memory function on the
driver’s side when the vehicle is stationary.
You could otherwise be distracted from the traffic conditions by the steering wheel and
seat moving of their own accord, and cause
an accident.
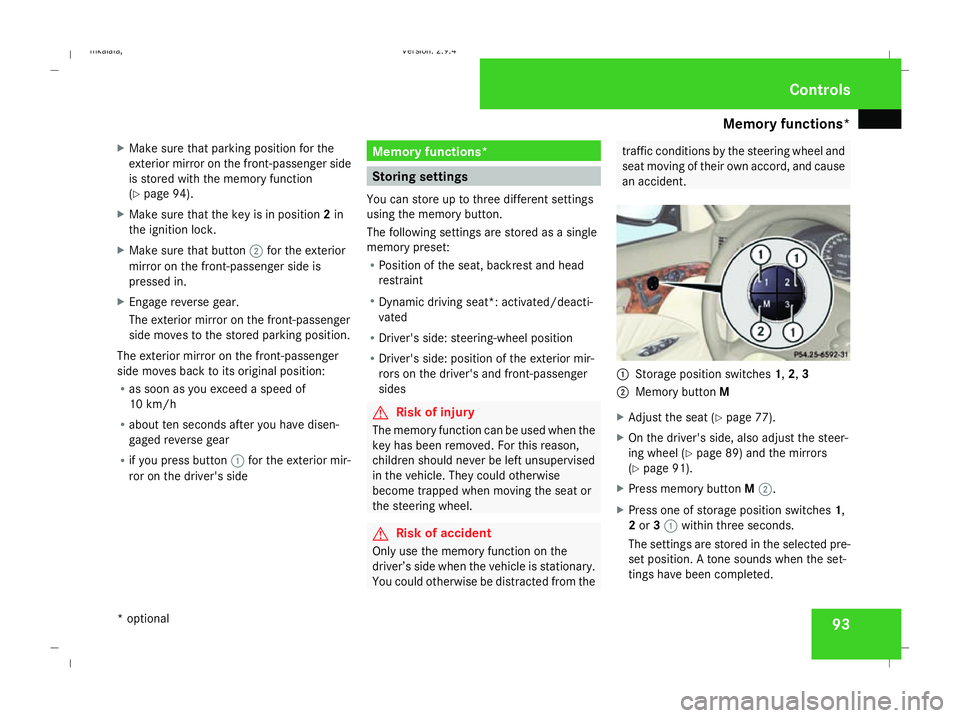
1
Storage position switches 1,2,3
2 Memory button M
X Adjust the seat ( Ypage 77).
X On the driver's side, also adjust the steer-
ing wheel (Y page 89) and the mirrors
(Y page 91).
X Press memory button M2.
X Press one of storage position switches 1,
2 or 31 within three seconds.
The settings are stored in the selected pre-
set position. A tone sounds when the set-
tings have been completed. Controls
* optional
211_AKB; 2; 5, en-GB
mkalafa
, Version: 2.9.4 2008-02-29T16:57:07+01:00 - Seite 93 ZDateiname: 6515_3416_02_buchblock.pdf; preflight