tailgate MERCEDES-BENZ E-CLASS ESTATE 2009 User Guide
[x] Cancel search | Manufacturer: MERCEDES-BENZ, Model Year: 2009, Model line: E-CLASS ESTATE, Model: MERCEDES-BENZ E-CLASS ESTATE 2009Pages: 373, PDF Size: 12.37 MB
Page 199 of 373

Folding the rear seat backrest back
X
If necessary, move the driver's or front-
passenger seat forward.
! Make sure that the seat belt does not
become trapped when folding the rear seat
backrest back. Otherwise, it could be dam-
aged.
X Swing rear seat backrest :back until it
engages. G
Risk of injury
Make sure that the rear seat backrest is cor-
rectly engaged in position. Otherwise, vehicle
occupants could be injured by objects being
thrown around if you:
R brake sharply
R change direction suddenly
R are involved in an accident
If the rear seat backrest is not engaged, it will
appear in the multi-function display in the
instrument cluster.
i You should always engage the rear seat
backrests if you do not need the through-
loading feature. This will prevent access to
the boot from the vehicle interior.
X Adjust the head restraints if necessary.
X If necessary, move the driver's or front-
passenger seat back. EASY-PACK through-loading feature
in the rear bench seat (Estate)
The left-hand and right-hand rear seat backr-
ests can be folded down separately to
increase the luggage compartment capacity.
The combined luggage cover and net can
remain installed. G
Risk of injury
Do not carry heavy or hard objects inside the
vehicle or in the luggage compartment unless
they are secured.
Otherwise, you and other vehicle occupants
could be injured by objects being thrown
around the vehicle in the event of sharp brak-
ing, a sudden change in direction or an acci-
dent.
When using the enlarged luggage compart-
ment, always clip in the safety net. G
Risk of poisoning
Always drive with the tailgate closed. Exhaust
fumes could otherwise enter the vehicle inte-
rior.
Folding the rear seat backrest forwards !
Before you fold down the rear seat back-
rest, remove the side head restraints for
the integrated child seat*, see the "Side
head restraints for integrated child seat*"
section. Otherwise, the side head
restraints could be damaged.
! When folding the rear seat backrest for-
wards, ensure that there are no items lying
on the seat cushions. These items could
otherwise be damaged or could themselves
damage the rear seats.
i When you fold one or both parts of the
rear seat backrest forwards, the respective
head restraints will lower if necessary and,
on vehicles with a Memory function*, the
respective front seat moves forwards
slightly, when necessary, in order to avoid
contact. 196
Loading and stowingCont
rols
* optional
212_AKB; 2; 4, en-GB
mkalafa
,V ersion: 2.11.8.1
2009-05-05T14:17:16+02:00 - Seite 196
Dateiname: 6515346702_buchblock.pdf; erzeugt am 07. May 2009 14:16:40; WK
Page 201 of 373

Otherwise, vehicle occupants could be
injured by objects being thrown around if you:
R brake sharply
R change direction suddenly
R are involved in an accident
Please observe the loading guidelines.
Observe the following points or guidelines
when securing loads:
R secure the load using the lashing eyelets.
R do not use elastic straps or nets to secure
a load, as these are only intended as an
anti-slip protection for light loads.
R do not route lashing materials across sharp
edges or corners.
R pad sharp edges for protection.
There are six lashing eyelets in the boot/lug-
gage compartment. Saloon
:
Lashing eyelets Estate
:
Lashing eyelets EASY-PACK luggage compartment
cover and safety net (Estate)
G
Risk of accident and injury
The luggage compartment cover is not a
restraint system. Secure the load under the
luggage compartment cover by suitable
means. Make sure that the luggage compart-
ment cover is engaged securely. If luggage is
not sufficiently secured, it can be thrown over
the backrest into the passenger compart-
ment, for instance during heavy braking, sud-
den changes of direction or in the event of an
accident. You could cause an accident or
cause injury to yourself and others.
! When loading the vehicle, make sure that
you do not stack the load in the luggage
compartment higher than the lower edge of
the side windows. Do not place heavy
objects on top of the luggage compartment
cover.
The luggage compartment cover and the
safety net are attached to anchorages on the
right and left in the luggage compartment as
a combined luggage cover and net.
When the tailgate is opened, the luggage
compartment cover is automatically raised to
make loading easier. It is automatically low-
ered again when the tailgate is closed.
When the luggage compartment cover is clip-
ped in, there should be no objects obstructing
the downwards movement of the cover in the
luggage compartment when the tailgate is
closed. The luggage compartment cover will
otherwise be raised again. 198
Loading and stowingControls
212_AKB; 2; 4, en-GB
mkalafa,
Version: 2.11.8.1 2009-05-05T14:17:16+02:00 - Seite 198
Dateiname: 6515346702_buchblock.pdf; erzeugt am 07. May 2009 14:16:42; WK
Page 204 of 373

items sufficiently. This could result in injury to
yourself or others.
! The bag hook can bear a maximum load
of 3 kg. Do not use it to secure a load.
Saloon X
Pull down bag hook ;by tab :.
Estate There is a bag hook on both the right and the
left of the luggage compartment.
X
To open: press bag hook :(arrow).
Bag hook :slides out.
X To close: press bag hook :until it
engages. Coat hooks on the tailgate
G
Risk of injury
The tailgate may close if too great a load is
placed on the coat hooks.
This could cause you or others to be trapped
and injured.
If you use the coat hooks, only hang light
clothing on them. Make sure that nobody can
become trapped. :
Coat hooks EASY-PACK boot box* (Saloon)
G
Risk of injury
Only load the EASY-PACK convenience box to
the maximum permissible load of 10 kg. To
prevent overloading, the floor of the box
moves down onto the boot floor mat when
loaded with more than approx. 5 kg.
Do not transport sharp-edged and fragile
objects in the box.
Otherwise, e.g. in the event of a rapid change
of direction or heavy braking, the objects
could be thrown out of the EASY-PACK con-
venience box and injure you and others.
! When the EASY-PACK convenience box is
pulled out, no objects may be placed on the
frame of the box or pushed onto the frame
from above. Otherwise, the box could be
damaged. Loading and stowing
201Controls
* optional
212_AKB; 2; 4, en-GB
mkalafa,
Version: 2.11.8.1 2009-05-05T14:17:16+02:00 - Seite 201 Z
Dateiname: 6515346702_buchblock.pdf; erzeugt am 07. May 2009 14:16:45; WK
Page 208 of 373

X
To open: open the tailgate.
X Holding the ribbing, press handle :down-
wards ;.
Handle :folds upwards. X
Pull EASY-PACK folding luggage-compart-
ment floor =in the direction of the arrow
by handle :until it reaches the desired
position and engages in side ?.
X To close: disengage the EASY-PACK fold-
ing luggage-compartment floor and pull it
back.
X Press the EASY-PACK folding luggage-com-
partment floor down ;until it engages.
Removing/installing the EASY-PACK
folding luggage-compartment floor X
Remove the combined luggage cover and
net ( Ypage 199). 120˚ position
X
To remove: move EASY-PACK folding lug-
gage-compartment floor :into the 120˚
position and lift it upwards.
X To install: push EASY-PACK folding lug-
gage-compartment floor :to the stop,
move it into the 120˚ position and make
sure it engages audibly.
X Pull EASY-PACK folding luggage-compart-
ment floor :forwards. EASY-PACK rear sill protector (Estate)
The EASY-PACK loading sill protector is
attached to the underside of the EASY-PACK
folding luggage-compartment floor by means
of magnets. It is designed to prevent clothing
becoming stained and the paintwork being
scratched when loading.
X Open the EASY-PACK folding luggage-com-
partment floor ( Ypage 204). Loading and stowing
205Controls
212_AKB; 2; 4, en-GB
mkalafa, Version: 2.11.8.1 2009-05-05T14:17:16+02:00 - Seite 205 Z
Dateiname: 6515346702_buchblock.pdf; erzeugt am 07. May 2009 14:16:48; WK
Page 209 of 373

X
Use tab ;to detach EASY-PACK loading
sill protector :from the magnets and
place it over the loading sill.
X Close the EASY-PACK folding luggage-com-
partment floor.
! Before closing the tailgate, refasten the
EASY-PACK loading sill protector on the
underside of the EASY-PACK folding lug-
gage-compartment floor.
The EASY-PACK loading sill protector could
otherwise be damaged. Roof rack*
G
Risk of accident and injury
An incorrectly secured roof rack, ski rack or
load could become detached from the vehi-
cle. These objects may be thrown around and
can injure you or others, or cause an accident.
Follow the roof rack/ski rack manufacturer's
installation instructions and special instruc-
tions for use.
The roof load raises the vehicle's centre of
gravity, thereby affecting vehicle handling.
You must always observe the maximum roof
load of 100 kg. Always adapt your driving style
to the prevailing road, traffic and weather
conditions and drive with particular care if the
roof is laden.
! Mercedes-Benz recommends that you
only use roof rack systems which have
been tested and approved for Mercedes-
Benz vehicles. This helps to prevent dam-
age to the vehicle.
Position the load on the roof rack in such a
way that the vehicle will not sustain dam-
age even when it is in motion.
Ensure that, depending on the vehicle's
equipment, you can raise the sliding/tilting
sunroof* or panorama sliding sunroof* fully
and open the boot lid/tailgate completely. Saloon
Vehicles with a steel roof or sliding/tilting sunroof
(illustration)*
Vehicles with a panorama sliding sunroof*
! To avoid damaging or scratching the cov-
ers, do not use metallic or hard objects to
open them.
X Open covers :carefully in the direction of
the arrow.
X Fold covers :upwards.
X Only secure the roof carrier to the anchor-
age points under covers :.
Observe the manufacturer's installation
instructions.
Estate X
Secure the roof carrier to roof rails.
Observe the manufacturer's installation
instructions. 206
Loading and stowingControls
* optional
212_AKB; 2; 4, en-GB
mkalafa,
Version: 2.11.8.1 2009-05-05T14:17:16+02:00 - Seite 206
Dateiname: 6515346702_buchblock.pdf; erzeugt am 07. May 2009 14:16:48; WK
Page 253 of 373
(e.g. if the engine is started or if a door or the
boot lid/tailgate is opened or closed) and you
could be seriously injured.
i When using the jack, you should also
observe the safety notes in the "Flat tyre"
section (Y page 316).
Vehicles with a TIREFIT kit X
Saloon: open the boot floor (Y page 204).
X Estate: open the EASY-PACK folding lug-
gage compartment floor (Y page 204).:
TIREFIT kit
; Folding wheel chock
= Electric air pump
? Towing eye
A Jack
B Centring pin
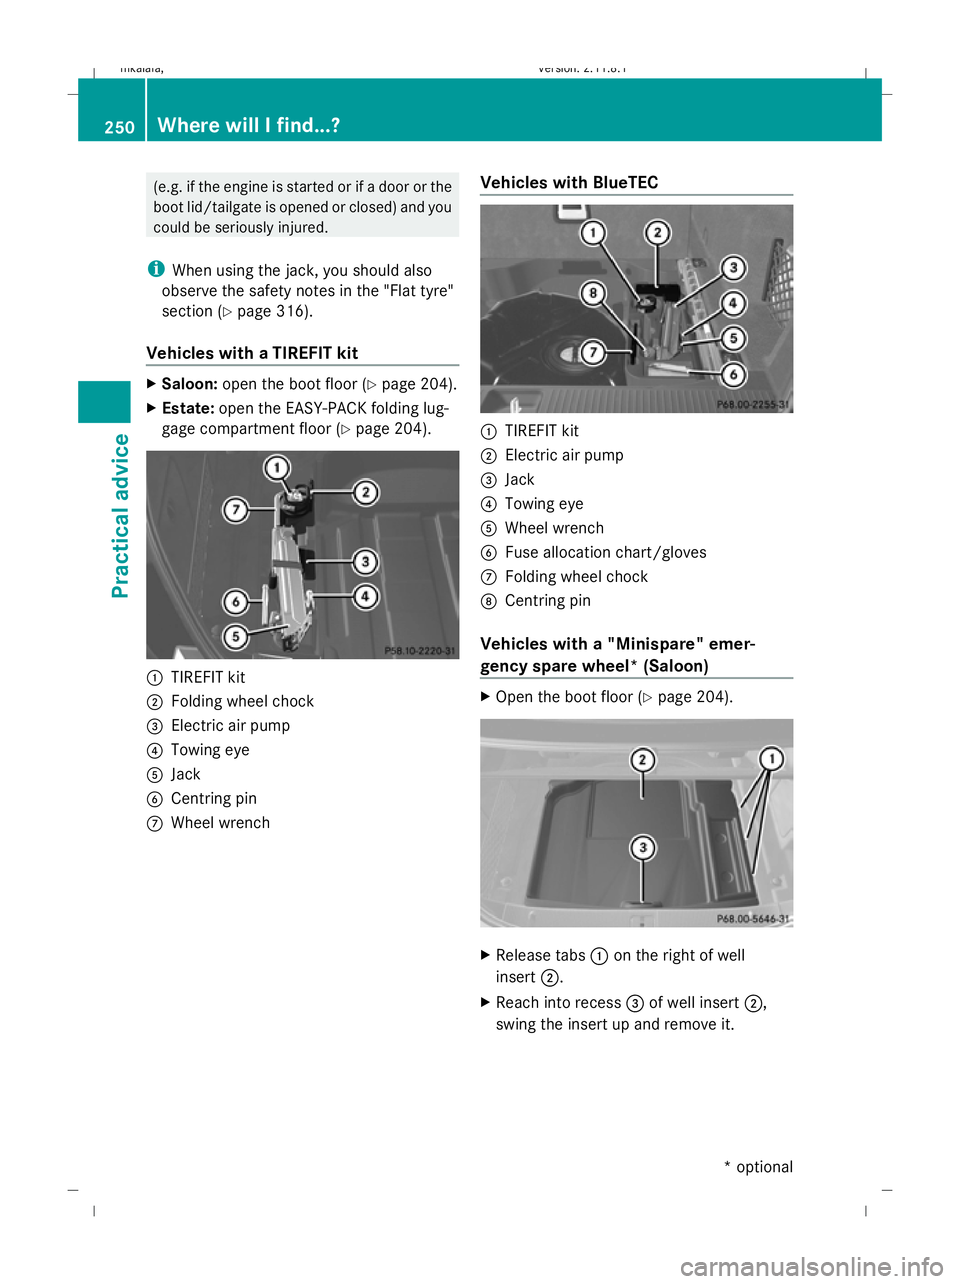
C Wheel wrench Vehicles with BlueTEC :
TIREFIT kit
; Electric air pump
= Jack
? Towing eye
A Wheel wrench
B Fuse allocation chart/gloves
C Folding wheel chock
D Centring pin
Vehicles with a "Minispare" emer-
gency spare wheel* (Saloon) X
Open the boot floor (Y page 204). X
Release tabs :on the right of well
insert ;.
X Reach into recess =of well insert ;,
swing the insert up and remove it. 250
Where will I find...?Practical advice
* optional
212_AKB; 2; 4, en-GB
mkalafa,
Version: 2.11.8.1
2009-05-05T14:17:16+02:00 - Seite 250
Dateiname: 6515346702_buchblock.pdf; erzeugt am 07. May 2009 14:17:06; WK
Page 266 of 373

Symbol messages
G
Risk of accident and injury
The operating safety of the vehicle can be compromised if maintenance work is carried out
incorrectly. This could cause you to lose control of the vehicle and cause an accident. The safety
systems may also not be able to protect you or others as they are designed to do.
Always have maintenance work carried out at a qualified specialist workshop. The qualified spe-
cialist workshop must have the necessary specialist knowledge and tools to carry out the work
required. Mercedes-Benz recommends that you use a Mercedes-Benz Service Centre for this
purpose. In particular, work relevant to safety or on safety-related systems must be carried out
at a qualified specialist workshop. Display messages
Possible causes/consequences and
X
X Solutions 7 If the symbol appears in the multi-function display, a seat belt
tongue has been clipped into a rear seat belt buckle.
Further information on the status indicator for the rear seat
belts (Y
page 91) a G
Risk of injury
If the symbol appears in the multi-function display, a seat belt
tongue has not been clipped into a rear seat belt buckle.
X If necessary, ask occupants in the rear to fasten their seat
belts.
Further information on the status indicator for the rear seat
belts (Y page 91) N Saloon: the boot lid is open.
X
Close the boot lid. A Estate: the tailgate is open.
X
Close the tailgate. M
or
? G
Risk of accident
The bonnet is open. A warning tone also sounds.
X Stop immediately, paying attention to road and traffic con-
ditions.
X Close the bonnet.
If the active bonnet (pedestrian protection) is triggered:
X Reset the bonnet (Y page 302).
X Close the bonnet. ; At least one door is open. A warning tone also sounds.
X
Close the doors. Display messages
263Practical advice
212_AKB; 2; 4, en-GB
mkalafa, Version: 2.11.8.1 2009-05-05T14:17:16+02:00 - Seite 263 Z
Dateiname: 6515346702_buchblock.pdf; erzeugt am 07. May 2009 14:17:09; WK
Page 292 of 373
 has been trig-
gered. Your vehicle has been involved in a frontal collision.
X
Reset the t")
Problem
Possible causes/consequences and
X
X Solutions The active bonnet func-
tion (pedestrian protec-
tion) has been trig-
gered. Your vehicle has been involved in a frontal collision.
X
Reset the triggered active bonnet (pedestrian protection)
(Y page 302). The NECK-PRO head
restraints on the driv-
er's and the front-pas-
senger's seats have
been triggered. Your vehicle has been involved in a rear-end collision.
X
Reset the NECK-PRO head restraints (Y page 303).Fuel and fuel tank
Problem
Possible causes/consequences and
X
X Solutions Fuel is leaking from the
vehicle.
G
Risk of explosion or fire
The fuel line or the fuel tank is defective.
X Turn the key to position 0(Y page 75) in the ignition lock imme-
diately and remove it.
X Do not restart the engine under any circumstances.
X Consult a qualified specialist workshop. The fuel filler flap can-
not be opened. The fuel filler flap is not released.
Or:
The key batteries are discharged.
X
Unlock the vehicle using the emergency key element
(Y page 299).
X Open the boot/tailgate (Y page 72).
X Manually unlock the tailgate using the emergency release
(Y page 301). The fuel filler flap is released, but the opening mechanism is jam-
med.
X
Release the fuel filler flap by hand (Y page 301).
X Consult a qualified specialist workshop. Troubleshooting
289Practical advice
212_AKB; 2; 4, en-GB
mkalafa, Version: 2.11.8.1 2009-05-05T14:17:16+02:00 - Seite 289 Z
Dateiname: 6515346702_buchblock.pdf; erzeugt am 07. May 2009 14:17:13; WK
Page 302 of 373

Locking/unlocking in an emergency
Emergency key element
If the vehicle can no longer be locked or
unlocked with the key, use the emergency
key element.
If you use the emergency key element to
unlock and open the driver's door or the boot
lid, the anti-theft alarm system* will be trig-
gered (Y page 65).
There are several ways to turn off the alarm:
X Press the %or& button on the key.
or
X Insert the key into the ignition lock.
or
X Press the start/stop button *in the ignition
lock. The key must be in the vehicle.
or
X Lock or unlock the vehicle using KEYLESS
GO*. The key must be outside the vehicle.
If you unlock the vehicle using the emergency
key element, the fuel filler flap will not be
unlocked automatically.
X To unlock the fuel filler flap: insert the
key in the ignition lock.
Removing the emergency key element X
Push release catch :in the direction of
the arrow and at the same time remove
emergency key element ;from the key. Unlocking the vehicle
If the vehicle can no longer be unlocked cen-
trally with the key or KEYLESS GO*:
X Remove the emergency key element from
the key (Y page 299). X
Insert the emergency key element into the
lock of the driver's door as far as it will go.
X Turn the emergency key element anti-
clockwise to position 1.
The door is unlocked.
i On right-hand-drive vehicles, turn the
emergency key element clockwise.
X Turn the emergency key element back and
remove it. Locking the vehicle
If the vehicle can no longer be unlocked cen-
trally with the key or KEYLESS GO*:
X Open the driver's door.
X Close the front-passenger door and the
boot lid.
Close the front-passenger door and the
boot lid/tailgate.
X Press the locking button (Y page 71).
X Check whether the locking knobs on the
doors are still visible. Press the locking
knobs down manually, if necessary.
X Close the driver's door.
X Remove the emergency key element from
the key (Y page 299). Locking/unlocking in an emergency
299Practical advice
* optional
212_AKB; 2; 4, en-GB
mkalafa,
Version: 2.11.8.1 2009-05-05T14:17:16+02:00 - Seite 299 Z
Dateiname: 6515346702_buchblock.pdf; erzeugt am 07. May 2009 14:17:15; WK
Page 303 of 373

X
Insert the emergency key element into the
lock of the driver's door as far as it will go.
X Turn the emergency key element clockwise
as far as it will go to position 1.
i On right-hand-drive vehicles, turn the
emergency key element anti-clockwise.
X Turn the emergency key element back and
remove it.
X Check whether the doors and the boot lid/
tailgate are locked. Opening the boot (Saloon)
! The boot lid swings upwards when
opened. Therefore, make sure that there is
sufficient clearance above the boot lid.
If the boot can no longer be unlocked with the
key or KEYLESS GO*:
X Remove the emergency key element from
the key (Y page 299). X
Insert the emergency key element fully into
the tailgate lock.
X Turn the emergency key element anti-
clockwise as far as it will go to position
1.
The boot is unlocked.
X Turn the emergency key element back and
remove it. Opening the tailgate (Estate)
If the tailgate can no longer be opened from
the outside, use the emergency release on
the inside of the tailgate.
On vehicles with a folding bench seat*, you
can use the handle to open the tailgate from
the inside (Y page 73).
X Remove the emergency key element from
the key (Y page 299). !
When opening, the tailgate swings up and
out. Therefore, make sure that there is suf-
ficient clearance above and behind the tail-
gate.
X Insert emergency key element ;into
opening in trim :.
X Turn emergency key element ;90° clock-
wise.
X Push emergency key element ;in the
direction of the arrow and open the tail-
gate. 300
Locking/unlocking in an emergencyPractical advice
* optional
212_AKB; 2; 4, en-GB
mkalafa
,V ersion: 2.11.8.1
2009-05-05T14:17:16+02:00 - Seite 300
Dateiname: 6515346702_buchblock.pdf; erzeugt am 07. May 2009 14:17:15; WK