tow MERCEDES-BENZ E-CLASS ESTATE 2009 Manual Online
[x] Cancel search | Manufacturer: MERCEDES-BENZ, Model Year: 2009, Model line: E-CLASS ESTATE, Model: MERCEDES-BENZ E-CLASS ESTATE 2009Pages: 373, PDF Size: 12.37 MB
Page 253 of 373
(e.g. if the engine is started or if a door or the
boot lid/tailgate is opened or closed) and you
could be seriously injured.
i When using the jack, you should also
observe the safety notes in the "Flat tyre"
section (Y page 316).
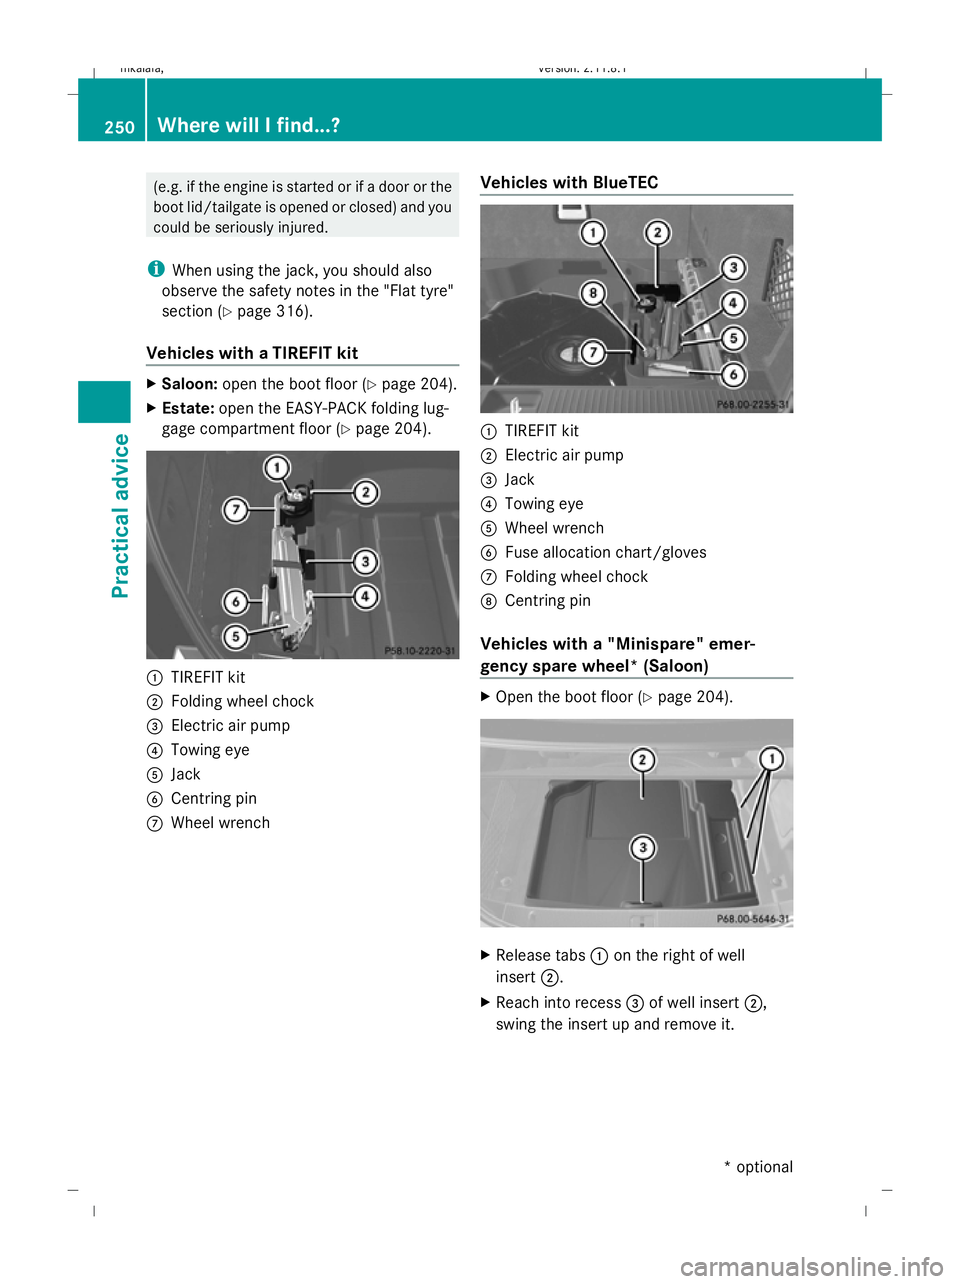
Vehicles with a TIREFIT kit X
Saloon: open the boot floor (Y page 204).
X Estate: open the EASY-PACK folding lug-
gage compartment floor (Y page 204).:
TIREFIT kit
; Folding wheel chock
= Electric air pump
? Towing eye
A Jack
B Centring pin
C Wheel wrench Vehicles with BlueTEC :
TIREFIT kit
; Electric air pump
= Jack
? Towing eye
A Wheel wrench
B Fuse allocation chart/gloves
C Folding wheel chock
D Centring pin
Vehicles with a "Minispare" emer-
gency spare wheel* (Saloon) X
Open the boot floor (Y page 204). X
Release tabs :on the right of well
insert ;.
X Reach into recess =of well insert ;,
swing the insert up and remove it. 250
Where will I find...?Practical advice
* optional
212_AKB; 2; 4, en-GB
mkalafa,
Version: 2.11.8.1
2009-05-05T14:17:16+02:00 - Seite 250
Dateiname: 6515346702_buchblock.pdf; erzeugt am 07. May 2009 14:17:06; WK
Page 254 of 373

X
Estate without a folding bench seat*:
open the EASY-PACK folding luggage com-
partment floor ( Ypage 204).
X Estate with a foldi")
Vehicles with a "Minispare" emer-
gency spare wheel* (Estate)
X
Estate without a folding bench seat*:
open the EASY-PACK folding luggage com-
partment floor ( Ypage 204).
X Estate with a folding bench seat *:
remove the seat cushions of the folding
bench seat (Y page 83). Estate without a folding bench seat
X
Estate without a folding bench seat*:
remove stowage space :.
X Estate with folding bench seat*: open
the luggage compartment floor.
Remove the "Minispare" emergency
spare wheel* (Saloon and Estate with-
out folding bench seat*) X
Remove vehicle tool kit tray :.
X Turn stowage well ;anti-clockwise and
remove it.
X Take out "Minispare" emergency spare
wheel =. Remove the "Minispare" emergency
spare wheel* (Estate with folding
bench seat*)
X
Remove vehicle tool kit tray :by
recess ;.
X Take out "Minispare" emergency spare
wheel =. Display messages
Notes
G
Risk of accident
The on-board computer only records and
shows malfunctions and warnings from cer-
tain systems. Therefore, make sure that your
vehicle is safe to use. You could otherwise
cause an accident by driving an unsafe vehi-
cle.
Certain display messages are accompanied
by a warning tone or a continuous tone.
The multi-function display shows high-priority
display messages in red.
Please respond in accordance with the dis-
play messages and follow the additional
notes in this Owner's Manual. G
Risk of accident
If the instrument cluster or the multi-function
display fails, then no display messages can be
shown.
You will not then be able to see information
about the vehicle status, such as speed and Display messages
251Practical advice
* optional
212_AKB; 2; 4, en-GB
mkalafa,
Version: 2.11.8.1 2009-05-05T14:17:16+02:00 - Seite 251 Z
Dateiname: 6515346702_buchblock.pdf; erzeugt am 07. May 2009 14:17:07; WK
Page 265 of 373

Display messages
Possible causes/consequences and
X
X Solutions Blind
Spot
Assist currently
unavaila‐
ble See
Owner's
Manual
Blind Spot Assist* is temporarily inoperative if:
R
you have established the electrical connection between a
trailer and your vehicle.
R the sensors in the bumpers are dirty.
R its function is impaired due to heavy rain or snow.
R the radar sensor system is outside the operating tempera-
ture range.
R the radar sensor system has switched off automatically, for
example in the vicinity of a radio telescope facility.
X When towing a trailer, confirm the display message with
a.
When driving without a trailer:
Blind Spot Assist* is operational again and the display mes-
sage disappears when:
R the dirt (e.g. slush) drops away while you are driving.
R the system detects that the sensors are fully available
again.
R the radar sensor system is back within the operating tem-
perature range.
If the display message continues to be shown:
X Clean the bumpers (Y page 243).
X Restart the engine. Cruise
control
and SPEED‐
TRONIC inopera‐
tive Cruise control and Speedtronic are malfunctioning. A warning
tone also sounds.
X
Visit a qualified specialist workshop. Cruise
control - - - km/h A condition for activating cruise control has not been fulfilled.
You have tried to store a speed below 30 km/h, for example.
X
Activate ESP ®
(Y page 61)
X If conditions permit, drive faster than 30 km/h and store
the speed (Y page 138). 262
Display
messagesPractical advice
* optional
212_AKB; 2; 4, en-GB
mkalafa
,V ersion: 2.11.8.1
2009-05-05T14:17:16+02:00 - Seite 262
Dateiname: 6515346702_buchblock.pdf; erzeugt am 07. May 2009 14:17:09; WK
Page 268 of 373

Display messages
Possible causes/consequences and
X
X Solutions j Check
trailer
hitch lock
G
Risk of accident
The trailer tow hitch* is not correctly engaged. A warning tone
also sounds.
X Pull over and stop the vehicle safely, paying attention to
road and traffic conditions.
X Engage the ball coupling in the end position (Y page 234).À Attention
Assist:
Time for
a break? Based on specific criteria, ATTENTION ASSIST has deter-
mined that your concentration has waned. A warning tone
also sounds.
X
If necessary, take a break.
During long journeys, take regular breaks in good time so you
get enough rest. À Attention
Assist
inopera‐
tive ATTENTION ASSIST is inoperative.
X
Visit a qualified specialist workshop. # The battery is not being charged. A warning tone also sounds.
Possible causes are:
R
a faulty alternator
R a torn poly-V-belt
R a malfunction in the electronics
X Pull over and stop the vehicle safely, paying attention to
road and traffic conditions and leave the engine running.
X Open the bonnet.
X Check whether the poly-V-belt is torn.
If the poly-V-belt is torn:
! Do not continue driving. The engine could otherwise over-
heat.
X Switch off the engine.
X Consult a qualified specialist workshop.
If the poly-V-belt is OK:
X Visit a qualified specialist workshop. # Check
brake wear The brake pads/linings have reached their wear limit.
X
Visit a qualified specialist workshop. Display
messages
265Practical advice
* optional
212_AKB; 2; 4, en-GB
mkalafa
,V ersion: 2.11.8.1
2009-05-05T14:17:16+02:00 - Seite 265 Z
Dateiname: 6515346702_buchblock.pdf; erzeugt am 07. May 2009 14:17:09; WK
Page 289 of 373

Problem
Possible causes/consequences and
X XSolutions h
The yellow tyre
pressure moni-
tor* warning
lamp is on. G
Risk of accident
The tyre pressure monitor* has detected a sudden or significant
pressure loss in at least one of the tyres.
X Stop the vehicle without making any sudden steering or braking
manoeuvres. Pay attention to traffic conditions as you do so.
X Observe the additional messages in the multi-function display
(Y page 251). 7
The red seat belt
warning lamp
lights up for six
seconds after
the engine is
started 43
. The seat belt warning lamp reminds the driver and front passenger
to fasten their seat belts.
X
Fasten your seat belt (Y page 89).7
After the engine
starts, a warning
tone sounds for
up to six sec-
onds43
. G
Risk of injury
The driver's seat belt is not fastened.
X Fasten your seat belt (Y page 89).
The warning tone ceases. 7
The red seat belt
warning lamp
lights up after
the engine
starts, as soon
as the driver's
door or the
front-passenger
door is closed. G
Risk of injury
The driver or front passenger has not fastened their seat belt.
X Fasten your seat belt (Y page 89).
The warning lamp goes out. G
Risk of injury
There are objects on the front-passenger seat.
X Remove the objects from the front-passenger seat and stow
them safely.
The warning lamp goes out. 43
Only for certain countries. 286
TroubleshootingPractical advice
* optional
212_AKB; 2; 4, en-GB
mkalafa,
Version: 2.11.8.1 2009-05-05T14:17:16+02:00 - Seite 286
Dateiname: 6515346702_buchblock.pdf; erzeugt am 07. May 2009 14:17:12; WK
Page 290 of 373

Problem
Possible causes/consequences and
X
X Solutions 7
The red seat belt
warning lamp
flashes and an
intermittent
audible warning
sounds. G
Risk of injury
The driver or front passenger has not fastened their seat belt. At
the same time, you are driving faster than 25 km/ho r have briefly
driven faster than 25 km/h.
X Fasten your seat belt (Y page 89).
The warning lamp goes out and the intermittent audible warning
ceases. G
Risk of injury
There are objects on the front-passenger seat. At the same time,
you are driving faster than 25 km/h or have briefly driven faster
than 25 km/h.
X Remove the objects from the front-passenger seat and stow
them safely.
The warning lamp goes out and the intermittent audible warning
ceases. 8
The yellow
reserve fuel
warning lamp
lights up while
the engine is
running. The fuel level has fallen below the reserve range. The operation of
the auxiliary heating* can no longer be guaranteed.
X
Refuel at the nearest filling station. Warning tones
Problem
Possible causes/consequences and
X
X Solutions The anti-theft warning
alarm* is triggered. You have opened the vehicle with the anti-theft alarm system still
activated*.
X Switch off the alarm (Y page 65). You hear a warning
tone. A message appears in the multi-function display.
X
See the explanations for the display message (Y page 251). You are driving with the parking brake applied.
X
Release the parking brake. The lights are still switched on when you leave the vehicle.
X
Turn the light switch to c. Troubleshooting
287Practical advice
* optional
212_AKB; 2; 4, en-GB
mkalafa,
Version: 2.11.8.1 2009-05-05T14:17:16+02:00 - Seite 287 Z
Dateiname: 6515346702_buchblock.pdf; erzeugt am 07. May 2009 14:17:12; WK
Page 304 of 373

Emergency fuel filler flap release
G
Risk of injury
The edges on the inside of the vehicle body
can be sharp. You could injure yourself when
using the fuel filler flap emergency release.
Avoid contact with the edges on the inside of
the vehicle body.
The emergency release is located in the
boot/luggage compartment behind the side
trim on the right-hand side, when viewed in
the direction of travel.
Saloon X
Slide down the luggage net.
X Open the side trim. X
Detach the emergency release from
retainer :.
X Pull the emergency release in the direction
of arrow ;.
The fuel filler flap is unlocked.
X Open the fuel filler flap.
Estate X
Open the side trim.
X Fold down the trim. X
Pull the emergency release in the direction
of arrow :.
The fuel filler flap is unlocked.
X Open the fuel filler flap. Releasing the parking lock manually
i The following description does not apply
to vehicles with DIRECT SELECT levers and
AMG vehicles.
In the event of an electrical fault, it is possible
to release the selector lever lock manually to
move it out of position P, e.g. if you wish to
tow the vehicle away. X
Depress the parking brake firmly.
X Prise out selector lever gaiter :with a flat,
blunt object, (e. g. a screwdriver wrapped Locking/unlocking in an emergency
301Practical advice
212_AKB; 2; 4, en-GB
mkalafa, Version: 2.11.8.1 2009-05-05T14:17:16+02:00 - Seite 301 Z
Dateiname: 6515346702_buchblock.pdf; erzeugt am 07. May 2009 14:17:16; WK
Page 313 of 373

X
Vehicles without KEYLESS GO*: remove
the key from the ignition lock.
X Vehicles with KEYLESS GO*: open the
driver's door.
The on-board electronics have status 0,
which is the same as the key having been
removed.
X Get out of the vehicle.
X Close the driver’s door.
X Place the warning triangle (Y page 248) at
a suitable distance. Observe legal require-
ments. Using the TIREFIT kit
You can use the TIREFIT kit to seal small
punctures, particularly those in the tyre tread.
You can use TIREFIT at outside temperatures
down to -20 †. G
Risk of accident
In the following cases your safety is especially
endangered, as tyre sealant is insufficient if:
R there are cuts or punctures in the tyre
greater than 4 mm.
R the wheel rim is damaged.
R you have driven at very low tyre pressures
or on a flat tyre.
Do not drive any further. Consult a qualified
specialist workshop which has the necessary
specialist knowledge and tools to carry out
the work required.
Mercedes-Benz recommends that you use a
Mercedes-Benz Service Centre for this pur-
pose. In particular, work relevant to safety or
on safety-related systems must be carried out
at a qualified specialist workshop.
X Do not remove any foreign objects which
have penetrated the tyre, e.g. screws or
nails.
X Remove the TIREFIT kit, the accompanying
"max. 80 km/h" sticker and the electric air
pump from the stowage well underneath the boot/luggage compartment floor
(Y
page 249). X
Affix part :of the sticker within the driv-
er's field of vision.
X Affix part ;of the sticker near the valve
on the wheel with the defective tyre. G
Risk of injury
TIREFIT must not come into contact with your
skin, eyes or clothing.
R If TIREFIT comes into contact with your
eyes or skin, immediately rinse thoroughly
with clean water.
R Change out of clothing which has come into
contact with TIREFIT immediately.
R If an allergic reaction occurs, consult a doc-
tor immediately.
Keep TIREFIT away from children.
R If TIREFIT is swallowed, immediately rinse
your mouth out thoroughly and drink plenty
of water.
R Do not induce vomiting. Consult a doctor
immediately.
R Do not inhale TIREFIT fumes.
i If TIREFIT leaks out, allow it to dry. It can
then be removed like a layer of film.
If you get TIREFIT on your clothing, have it
cleaned as soon as possible with perchloro-
ethylene. 310
Flat tyrePractical advice
* optional
212_AKB; 2; 4, en-GB
mkalafa
,V ersion: 2.11.8.1
2009-05-05T14:17:16+02:00 - Seite 310
Dateiname: 6515346702_buchblock.pdf; erzeugt am 07. May 2009 14:17:20; WK
Page 315 of 373

If a pressure of 1.8 bar is not reached
after five minutes:
X Switch off and disconnect the electric air
pump and drive the vehicle forwards or
backwards approximately 10 m.
This distributes the TIREFIT more evenly.
X Pump up the tyre again. G
Risk of accident
If a pressure of 1.8 bar is not achieved after
five minutes, the tyre is too badly damaged.
Do not drive any further. Consult a qualified
specialist workshop which has the necessary
specialist knowledge and tools to carry out
the work required. Mercedes-Benz recom-
mends that you use a Mercedes-Benz Service
Centre for this purpose. In particular, work
relevant to safety or on safety-related sys-
tems must be carried out at a qualified spe-
cialist workshop.
When a tyre pressure of at least 1.8 bar
is reached:
X Press on/off switch ?on the electric air
pump to 0.
The electric air pump is switched off.
X Remove the TIREFIT kit from the wheel.
! After use, excess TIREFIT may run out of
the filler hose. This may cause stains.
Therefore, place the filler hose in the plastic
which contained the TIREFIT kit.
X Stow away the TIREFIT kit, the electric air
pump and the warning triangle.
X Pull away immediately.
X Stop after driving for approximately ten
minutes and check the tyre pressure with
the electric air pump. G
Risk of accident
If the tyre pressure is now lower than 1.3 bar,
the tyre is too badly damaged. Do not drive
any further. Consult a qualified specialist
workshop which has the necessary specialist
knowledge and tools to carry out the work required. Mercedes-Benz recommends that
you use a Mercedes-Benz Service Centre for
this purpose. In particular, work relevant to
safety or on safety-related systems must be
carried out at a qualified specialist workshop.
X If the tyre pressure is still at least 1.3 bar,
correct it (see fuel filler flap for values).
To increase the tyre pressure: switch on
the electric air pump.
To reduce the tyre pressure: open pres-
sure release screw Fon pressure
gauge G.
X Drive to the nearest workshop and have the
tyre changed there.
X Have the TIREFIT kit replaced as soon as
possible at a qualified specialist workshop,
e.g. at a Mercedes-Benz Service Centre. G
Risk of accident
Do not exceed the maximum speed of
80 km/h.
The "max. 80 km/h" label must be affixed in
the driver's field of vision.
The vehicle's handling characteristics may be
affected. H
Environmental note
Have the used TIREFIT kit disposed of profes-
sionally, e.g. at a Mercedes-Benz Service
Centre.
X Have the TIREFIT kit replaced every four
years at a qualified specialist workshop,
e.g. a Mercedes-Benz Service Centre. 312
Flat tyrePractical advice
212_AKB; 2; 4, en-GB
mkalafa
,V ersion: 2.11.8.1
2009-05-05T14:17:16+02:00 - Seite 312
Dateiname: 6515346702_buchblock.pdf; erzeugt am 07. May 2009 14:17:21; WK
Page 317 of 373

When a tyre pressure of at least 1.8 bar
is reached:
X Press on/off switch =on the electric air
pump to 0.
The electric air pump is switched off.
X Remove the TIREFIT kit from the wheel.
! After use, excess TIREFIT may run out of
the filler hose. This may cause stains.
Therefore, place the filler hose in the plastic
which contained the TIREFIT kit.
X Stow away the TIREFIT kit, the electric air
pump and the warning triangle.
X Pull away immediately.
X Stop after driving for approximately ten
minutes and check the tyre pressure with
the electric air pump. G
Risk of accident
If the tyre pressure is now lower than 1.3 bar,
the tyre is too badly damaged. Do not drive
any further. Consult a qualified specialist
workshop which has the necessary specialist
knowledge and tools to carry out the work
required. Mercedes-Benz recommends that
you use a Mercedes-Benz Service Centre for
this purpose. In particular, work relevant to
safety or on safety-related systems must be
carried out at a qualified specialist workshop. X
If the tyre pressure is still at least 1.3 bar,
correct it (see fuel filler flap for values).
To increase the tyre pressure: switch on
the electric air pump. To reduce the tyre pressure:
press pres-
sure release button Enext to pressure
gauge F.
X Drive to the nearest workshop and have the
tyre changed there.
X Have the TIREFIT kit replaced as soon as
possible at a qualified specialist workshop,
e.g. at a Mercedes-Benz Service Centre. G
Risk of accident
Do not exceed the maximum speed of
80 km/h.
The "max. 80 km/h" label must be affixed in
the driver's field of vision.
The vehicle's handling characteristics may be
affected. H
Environmental note
Have the used TIREFIT kit disposed of profes-
sionally, e.g. at a Mercedes-Benz Service
Centre.
X Have the TIREFIT kit replaced every four
years at a qualified specialist workshop,
e.g. a Mercedes-Benz Service Centre. Changing a wheel and fitting the
spare wheel*
G
Risk of accident
The wheel dimensions and tyre size of the
"Minispare" emergency spare wheel* may dif-
fer from those of the damaged wheel.
Your vehicle's handling characteristics will
change when a "Minispare" emergency spare
wheel* is fitted. Adapt your style of driving
accordingly.
The "Minispare" emergency spare wheel*
may only be used for a short time. Do not
exceed the maximum speed of 80 km/h and
do not deactivate ESP ®
.
Never drive the vehicle with more than one
"Minispare" emergency spare wheel* fitted. 314
Flat tyrePractical advice
* optional
212_AKB; 2; 4, en-GB
mkalafa,
Version: 2.11.8.1 2009-05-05T14:17:16+02:00 - Seite 314
Dateiname: 6515346702_buchblock.pdf; erzeugt am 07. May 2009 14:17:22; WK