fuel pressure MERCEDES-BENZ E-CLASS ESTATE 2011 Owners Manual
[x] Cancel search | Manufacturer: MERCEDES-BENZ, Model Year: 2011, Model line: E-CLASS ESTATE, Model: MERCEDES-BENZ E-CLASS ESTATE 2011Pages: 409, PDF Size: 10.47 MB
Page 15 of 409
Fuel fille
rflap
Emergency release ........................174
Opening/closing ............................ 173
Fuel filte r(white display message) .265
Fuel level Calling up the range (on-board
computer) ...................................... 235
Gauge .............................................. 30
Fuel reserve
see Fuel
Fuel tank
Capacity ........................................ 384
Problem (malfunction) ...................175
Fuse allocation chart (vehicle tool
kit) ...................................................... 337
Fuses Allocation chart ............................. 359
Before changing ............................. 359
Fuse box in the boot ......................360
Fuse box in the engine compart-
ment .............................................. 359
Fuse box in the luggage compart-
ment .............................................. 360
Important safety notes ..................359 G
Garage door opener Clearing the memory .....................317
Frequencies ................................... 318
Notes ............................................. 315
Opening/closing the garage door ..316
Programming (button in the rear-
view mirror) ................................... 315
Gear indicator (on-board com-
puter) ................................................. .249
Gear or selector lever (cleaning
instructions) ...................................... 332
Gearshift program SETUP (on-board computer) ..........250
Genuine Mercedes-Benz parts .........380
Glove compartment ..........................291H
Handbrake see Parking brake
Hazard warning lamps ......................125Headlamp
Cleaning system (function) ............124
Headlamp cleaning system
Notes ............................................. 391
Headlamps
Misting up ...................................... 128
Topping up the cleaning system ....324
see Automatic headlamp mode
Head restraints
Adjusting ....................................... 107
Adjusting (electrically). ..................107
Adjusting (manually). .....................107
Adjusting (rear) .............................. 108
Fitting/removing (rear) ..................109
Luxury ............................................ 107
see NECK-PR Ohead restraints
Heating
see Climate control
High-pressure cleaners ....................328
Hill start assist .................................. 158
HOLD function Display message ............................ 267
Function/notes ............................. 194
Hook ................................................... 299 I
ICS padded play table .........................62
Ignition lock see Key positions
Immobiliser .......................................... 77
Indicator and warning lamps Coolant .......................................... 285
DISTRONI CPLUS ........................... 287
Engine diagnostics .........................285
Fuel tank ........................................ 285
SPORT handling mode ...................284
Indicator lamps
Display message ............................ 260
see Warning and indicator lamps
Indicators
see Turn signals
Infrared lamps (changing bulbs) ......132
Insectp rotection on the radiator ....322
Instrument cluster Overview .......................................... 30
Settings ......................................... 243
Warning and indicator lamps ...........32 12
Index
Page 24 of 409
Tyre pressure monitor
Function/note s............................. 368
Restarting ...................................... 369
Warning lamp ................................. 287
Tyres
Checking ........................................ 363
Direction of rotatio n...................... 371
Display message ............................ 272
Grip ................................................ 180
Important safety notes ..................362
Replacing ....................................... 370
Service life ..................................... 363
Storing ........................................... 371
Tyr esize (data) .............................. 371
Tyr etread ...................................... 363
see Flat tyre U
Unladen weight ................................. 392
Unlocking Emergency unlocking .......................90
From inside the vehicle (central
unlocking button) ............................. 89 V
Vanity mirror (in sun visor) ..............309
Variable SPEEDTRONIC see SPEEDTRONIC
Vehicle
Correct use ...................................... 25
Data acquisition ............................... 26
Display message ............................ 275
Electronics ..................................... 381
Emergency unlocking .......................90
Equipment ....................................... 23
Implied warranty .............................. 26
Individua lsettings .......................... 243
Leaving parked up .........................177
Locking (in an emergency) ...............90
Locking (key )................................... 82
Lowering ........................................ 348
Pulling away ................................... 157
Raising ........................................... 345
Registration ..................................... 25
Towing away .................................. 355
Tow-starting ................................... 355
Transporting .................................. 358Unlocking (in an emergency)
...........90
Unlocking (key )................................ 82
Vehicle data ................................... 392
Vehicle battery
see Battery (vehicle)
Vehicle data ....................................... 392
Vehicle dimensions ...........................392
Vehicle emergency locking ................90
Vehicle identification number see VIN
Vehicle identification plate ..............382
Vehicle level AIRMATIC ...................................... 197
AMG RIDE CONTROL sports sus-
pension .......................................... 199
Vehicle level (display message) .......266
Vehicle tool kit .................................. 337
Vehicle weights ................................. 392
Vents see Air vents
Video (DVD) ........................................ 238
Video DVD (on-board computer) ......238
VIN ...................................................... 382 W
Warning and indicator lamps ABS ................................................ 282
Brakes ........................................... 281
Distance warning signa l................. 287
ESP ®
.............................................. 283
ESP ®
OFF ....................................... 283
LIM (cruise control) ........................ 181
LIM (DISTRONIC PLUS) ..................186
LIM (variable SPEEDTRONIC) .........183
Overview .......................................... 32
PASSENGER AIRBAG OFF ................56
Reserve fuel ................................... 285
Seat bel t........................................ 280
SRS ................................................ 284
Tyr ep ressure monitor ...................287
Warning triangle ................................ 336
Washer fluid Display message ............................ 278
Wheel bol ttightening torque ...........348
Wheel chock ...................................... 344 Index
21
Page 26 of 409
Protection of the environment
Notes
H
Environmental note
Daimler's declared policy is one of compre-
hensive environmental protection.
Our objectives are to use the natural resour-
ces which form the basis of our existence on
this planet sparingly and in a manner which
takes the requirements of both nature and
humanity into consideration.
You too can help to protect the environment
by operating your vehicle in an environmen-
tally-responsible manner.
Fuel consumption and the rate of engine,
transmission, brake and tyre wear depend on
the following factors:
R operating conditions of your vehicle
R your personal driving style
You can influence both factors. Therefore,
please bear the following in mind:
Operating conditions:
R avoid short trips, as these increase fuel
consumption.
R observe the correct tyre pressure.
R do not carry any unnecessary weight in the
vehicle.
R monitor the vehicle's fuel consumption.
R remove the roof rack once you no longer
need it.
R a regularly serviced vehicle will contribute
to environmental protection. You should
therefore adhere to the service intervals.
R all maintenance work should be carried out
at a qualified specialist workshop.
Personal driving style:
R do not depress the accelerator pedal when
starting the engine.
R do not warm up the engine when the vehicle
is stationary.
R drive carefully and maintain a safe distance
from the vehicle in front.
R avoid frequent, sudden acceleration. R
change gear in good time and use each gear
only up to Ôof its maximum engine speed.
R switch off the engine in stationary traffic. Returning an end-of-life vehicle
Mercedes-Benz will take back your
Mercedes-Benz to dispose of it in an environ-
mentally responsible manner, in accordance
with the European Union (EU) End of Life
Vehicles Directive.
The End of Life Vehicles Directive applies to
vehicles with a gross vehicle weight of up to
3.5 t, in accordance with national regulations.
For several years, Mercedes-Benz has been
meeting all the legal requirements for a
design which allows for recycling and re-use.
There is a network of return points and dis-
assembly plants which can recycle your vehi-
cle in an environmentally-responsible man-
ner. The options for recycling vehicles and
parts are constantly being developed and
improved. This means that your Mercedes-
Benz will also continue to meet even the
increased recycling quotas in the future in
good time. You can obtain further information
from your national Mercedes-Benz homepage
or your national hotline number. Vehicle equipment
This Owner's Manual describes all models
and all standard and optional equipment of
your vehicle available at the time of publica-
tion of the Owner's Manual. Country-specific
deviations are possible. Please note that your
vehicle may not be equipped with all features
described. This is also the case for systems
and functions relevant to safety. The equip-
ment in your vehicle may therefore differ from
that shown in the descriptions and illustra-
tions.
All the systems found in your vehicle are listed
in the original purchase agreement of your
vehicle. Introduction
23 Z
Page 35 of 409
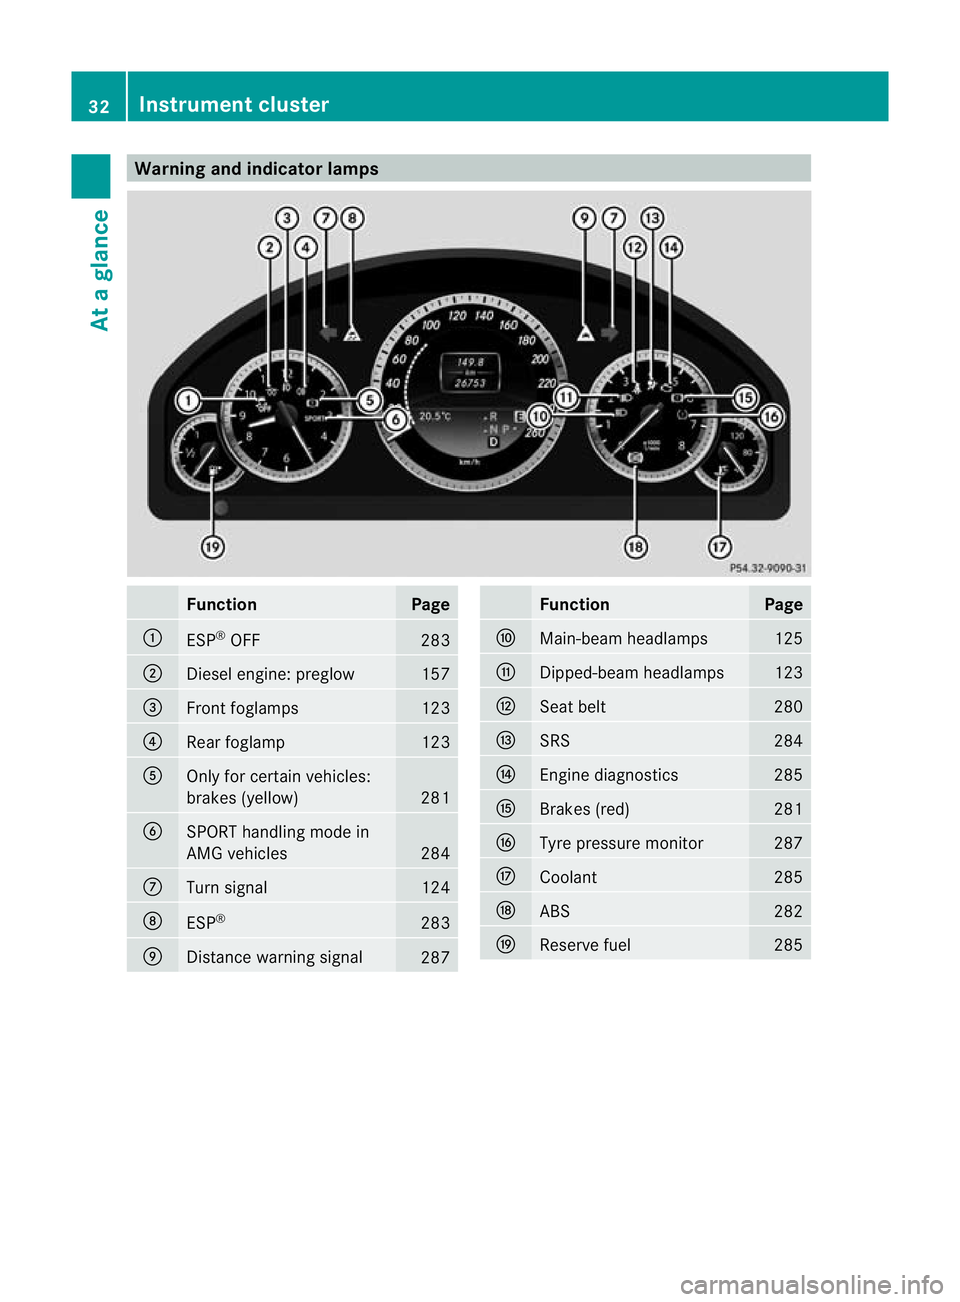
Warning and indicator lamps
Function Page
:
ESP
®
OFF 283
;
Diesel engine: preglow 157
=
Front foglamps 123
?
Rea
rfoglamp 123
A
Only for certain vehicles:
brakes (yellow)
281
B
SPORT handling mode in
AMG vehicles
284
C
Turn signal 124
D
ESP
® 283
E
Distance warning signal
287 Function Page
F
Main-beam headlamps 125
G
Dipped-beam headlamps 123
H
Seat belt 280
I
SRS 284
J
Engine diagnostics 285
K
Brakes (red) 281
L
Tyre pressure monitor 287
M
Coolant 285
N
ABS 282
O
Reserve fuel 28532
Instrument clusterAt a glance
Page 174 of 409
dles or the selector lever in manual drive pro-
gram Mif the transmission is in position D.
X Press the program selector button
(Y page 168 )repeatedly until Mappears in
the multifunction display.
X AMG vehicles: turn the drive program
selector (Y page 168)u ntilMappears in the
multifunctio ndisplay.
The indicator Mon the drive program selec-
tor lights up in red.
Upshifting X
Briefly press the selector lever to the right
towards D+.
or
X Pull the right-hand steering wheel gearshift
paddle (Y page 169).
The automatic transmission shifts up to the
next gear.
Vehicles with AMG engines
! In manual gearshift program M, the auto-
matic transmission does not shift up auto-
matically even when the engine limiting
speed for the current gear is reached.
When the engine limiting speed is reached,
the fuel supply is cut to prevent the engine
fro mo verrevving. You must make sure that
the engine speed does not reach the red
area of the rev counter. Otherwise, there is
a risk of engine damage.
X Shift up a gearift he colour in the multi-
function display in the speedometer
changes to red and the UP display message
is shown.
Downshifting X
Briefly press the selector lever to the left
towards D–.
or
X Pull the left-hand steering wheel gearshift
paddle (Y page 169).
The automatic transmission shifts down to
the next gear. i
If you desire maximum acceleration, push
the selector lever to the left or pull and hold
the left-hand steering wheel gearshift pad-
dle until the transmission shifts to the opti-
mal gear for the current speed.
Kickdown i
Vehicles with an AMG engine: it is not
possible to use kickdown in manual drive
program M.
You can also use kickdown for maximum
acceleration in manual drive program M.
X Depress the accelerator pedal beyond the
pressure point.
The transmission shifts to a lower gear
depending on the engine speed.
Switching off the manuald rive program X
Standard vehicles with aselector lever
and vehicles with aDIRECT SELECT
lever: press the program selector button
(Y page 168) until Eor Sappears in the
multifunction display.
X AMG vehicles: turn the drive program
selector (Y page 168) until C,Sor S+
appears in the multifunction display. Automatic transmission
171Driving and parking Z
Page 176 of 409
G
WARNING
Do not use petrol to refuel a diesel tank. Never
mix diesel with petrol. Doing so could damage
the fuel system and the engine. The vehicle
could also catch fire.
! Do not use petrol to refuel vehicles with a
diesel engine. Do not use diesel to refuel
vehicles with a petrol engine. Even small
amounts of the wrong fuel result in damage
to the fuel system and the engine.
! Do not switch on the ignition if you acci-
dentally refuel with the wrong fuel .Other-
wise, the fuel will ente rthe fuel lines. Notify
a qualified specialist workshop and have
the fuel tank and fuel lines drained com-
pletely.
! Overfilling the fuel tank could damage the
fuel system.
! Take care not to spill any fuel on painted
surfaces. You could otherwise damage the
paintwork.
! Use a filter when adding fuel from a fuel
can. The fuel lines and/or the diesel injec-
tion system could otherwise be blocked by
particles from the fuel can.
Further information on fuel and on fuel grades
can be found in the "Fuel" section
(Y page 384). Refuelling
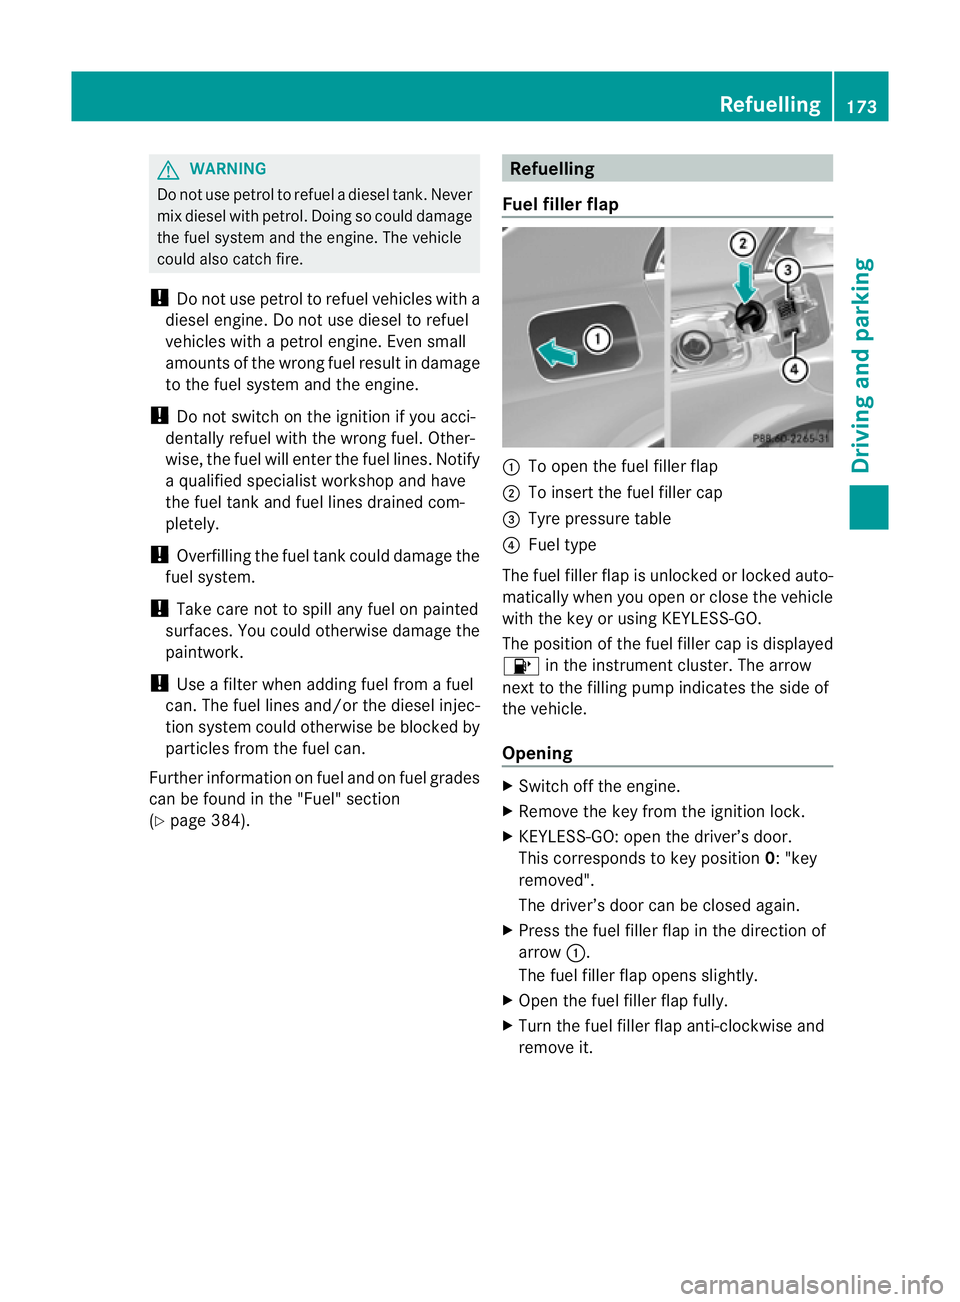
Fuel filler flap :
To open the fuel filler flap
; To insert the fuel filler cap
= Tyre pressure table
? Fuel type
The fuel filler flap is unlocked or locked auto-
matically when you open or close the vehicle
with the key or using KEYLESS-GO.
The position of the fuel filler cap is displayed
8 in the instrument cluster. The arrow
next to the filling pump indicates the side of
the vehicle.
Opening X
Switch off the engine.
X Remove the key from the ignition lock.
X KEYLESS-GO: open the driver’s door.
This corresponds to key position 0: "key
removed".
The driver’s door can be closed again.
X Press the fuel filler flap in the direction of
arrow :.
The fuel filler flap opens slightly.
X Open the fuel filler flap fully.
X Turn the fuel filler flap anti-clockwise and
remove it. Refuelling
173Driving and parking Z
Page 181 of 409
X
Disconnect the battery ( Ypage 352) or
connect it to a trickle charger.
i You can obtain information about trickle
chargers fro maqualified specialist work-
shop.
If you leave the vehicle parked up for longer
than six weeks, the vehicle may suffer dam-
age as a result of lack of use.
X Visit a qualified specialist workshop and
seek advice. Driving tips
General driving tips
Rolling with the engine switched off G
WARNING
Never switch the engine off while the vehicle
is in motion.
There is no power assistance for the steering
and the service brake when the engine is not
running.
You will require considerably more effor tto
steer and brake, and you could therefore lose
control of the vehicle and cause an accident. Driving short distances
! Vehicles with adiesel particle filter: if
the vehicle is mostly driven for short dis-
tances, it is possible that malfunctions may
occur during the automatic cleaning of the
diesel particle filter. This may lead to fuel
collecting in the engine oil and cause
engine failure. Therefore, if you frequently
drive short distances, you should take a 20
minute trip on a motorway or rural road at
least every 500km. Brakes
Important safety notes G
WARNING
Do not change down for additional engine
braking on a slippery road surface. This could
cause the drive wheels to lose their grip and
the vehicle could skid. G
WARNING
Make sure that other road users are not
endangered by your braking.
Downhill gradients On long and steep downhill gradients, espe-
cially if the vehicle is laden or towing a trailer,
you must shift to a lower gear in good time or,
on vehicles with automatic transmission,
select shift range 1,2or 3.
i This also applies if you have activated
cruise control, SPEEDTRONIC or DIS-
TRONIC PLUS.
This will use the braking effect of the engine,
so less braking will be required to maintain
the speed. This relieves the load on the brake
system and prevents the brakes from over-
heating and wearing too quickly.
Heavy and light loads G
WARNING
Never depress the brake pedal continuously
while the vehicle is in motion, e.g. never cause
the brakes to rub by applying constan tslight
pedal pressure. This causes the brake system
to overheat, increases the braking distance
and can lead to the brakes failing completely.
If the brakes have been subjected to a heavy
load, do not stop the vehicle immediately, but
drive on for a shor twhile. This allows the air-
flow to cool the brakes more quickly.
If the brakes have been used only moderately,
you should occasionally test their effective-
ness. To do this, brake more firmly from a 178
Driving tipsDriving and parking
Page 225 of 409
The vehicle/trailer combination:
R
is heavier
R is restricted in its acceleration and gradi-
ent-climbing capability
R has an increased braking distance
R is affected more by strong crosswinds
R demands more sensitive steering
R has a larger turning circle
As a result, the handling characteristics may
be impaired and you may lose control of the
vehicle. This could lead to an accident with
serious or even fatal injuries.
When towing a trailer, always adjust your
speed to the current road and weather con-
ditions. Do not exceed the maximum permis-
sible speed for your vehicle/trailer combina-
tion. G
WARNING
Never depress the brake pedal continuously
while the vehicle is in motion, e.g. never cause
the brakes to rub by applying constant slight
pedal pressure. This causes the brake system
to overheat, increases the braking distance
and can lead to the brakes failing completely. G
WARNING
On no account should you attempt to draw the
vehicle/trailer combination out by increasing
speed. G
WARNING
If you exceed the maximum noseweight when
using a carrier system on the ball coupling:
R the carrier system may be thrown around.
R the ball coupling and the carrier system
may become detached from the vehicle.
As a result, you may injure others or cause an
accident.
Do not exceed the maximum noseweight.
When driving with a loaded carrier system,
always adjust your driving style to the prevail- ing road, traffic and weather conditions and
drive particularly carefully.
You can use carrier systems, e.g. bicycle
racks or load-bearing implements, on the ball
coupling. The maximum noseweight of
75 kg applies when using carrier systems on
the ball coupling.
General notes i
When towing a trailer, set the tyre pres-
sure on the rear axle of the towing vehicle
for a maximum load; see the tyre pressure
table in the fuel filler flap (Y page 365).
You will find installation dimensions and loads
in the "Technical data" section
(Y page 395).
The maximum noseweight of the trailer draw-
bar on the ball coupling is 84 kg 21
. However,
the actual noseweight must not exceed the
value given on the trailer tow hitch or trailer
identification plates. The lowest weight
applies.
! Use a drawbar noseweight as close as
possible to the maximum permissible nose-
weight. Do not use a noseweight of less
than 50kg, otherwise the trailer may come
loose.
Note that the payload and the rear axle load
are reduced by the actual payload.
Please note that when towing a trailer, PARK-
TRONIC (Y page 200), parking guidance
(Y page 203) and Blind Spot Assist
(Y page 212) are only available with limita-
tions, or not at all.
i On vehicles without level control, the
height of the ball coupling will alter accord-
ing to the load placed on the vehicle. If nec-
essary, use a trailer with a height-adjusta-
ble drawbar.
21 Missing values for the E300 model were not available at the time of going to print. 222
Towing
atrailerDriving an d parking
Page 331 of 409
X
Rinse the vehicle with clean water and dry
thoroughly with a chamois.
X Do not let the cleaning agent dry on the
paintwork.
Whe nusing the vehicle in winter, remove all
traces of road salt deposits carefully and as
soon as possible.
High-pressure cleaning equipment G
WARNING
Do not use high-pressure cleaners with circu-
lar-jet nozzles (dirt grinders) to clean your
vehicle, in particular the tyres. You could oth-
erwise damage the tyres and cause an acci-
dent.
! Always maintain a distance of at least
30 cm between the vehicle and the high-
pressure cleaner nozzle. Information about
the correct distance is available from the
equipment manufacturer.
Move the high-pressure cleaner nozzle
around when cleaning your vehicle.
Do not aim directly at any of the following:
R tyres
R door gaps, roof gaps, joints etc.
R electrical components
R battery
R connectors
R lights
R seals
R trim elements
R ventilation slots
Damaged seals or electrical components
can lead to leaks or failures.
Cleaning the wheels !
Do not use acidic wheel cleaning products
to remove brake dust. This could damage
wheel bolts and brake components.
! Do not park up the vehicle for an extended
period straight after cleaning it, particularly
after having cleaned the wheels with wheel cleaner. Wheel cleaners could cause
increased corrosion of the brake discs and
brake pads/linings. For this reason, you
should drive for a few minutes after clean-
ing. Braking heats the brake discs and the
brake pads/linings, thus drying them. The
vehicle can then be parked up.
Cleaning the paintwork Scratches, corrosive deposits, areas affected
by corrosion and damage caused by inade-
quate care cannot always be completely
repaired. In such cases, visit a qualified spe-
cialist workshop.
X
Remove impurities immediately,w here
possible, whilst avoiding rubbing too hard.
X Soak insect remains with insect remover
and rinse off the treated areas afterwards.
X Soak bird droppings with water and rinse
off the treated areas afterwards.
X Remove coolant, brake fluid, tree resin,
oils, fuels and greases by rubbing gently
with a cloth soaked in petroleum ether or
lighter fluid.
X Use tar remover to remove tar stains.
X Use silicone remover to remove wax.
! Do not affix:
R stickers
R films
R magnetic plates or similar items
to painted surfaces. You could otherwise
damage the paintwork.
Care and treatment of matt paintwork If your vehicle has a clear matt finish, observe
the following instructions in order to avoid
damage to the paintwork due to incorrect
care.
These notes also apply to light-alloy wheels
with a clear matt finish.
!
Never polish the vehicle or the light alloy
wheels. Polishing makes the paintwork
shiny. 328
CareMaintenance and care
Page 346 of 409
Tyre pressure of at least 180 kPa
(1.8 bar/26 psi) is no treached If a pressure of 180 kP
a(1 .8 ba r,26 psi) has
not bee nachieved afte rfive minutes:
X Switch off the tyre inflation compressor.
X Unscrew the filler hose fro mthe valve of
the faulty tyre.
X Very slowly drive forwards or reverse
approximately 10 m.
X Pump up the tyre again.
After a maximum of five minutes the tyre
pressure must be at least 180 kPa (1.8 bar,
26 psi). G
WARNING
If the required tyre pressure is not reached
after the specified time, the tyre is too badly
damaged. The tyre sealant cannot repair the
tyre in this instance. Damaged tyres and a tyre
pressure that is too low can significantly
impair the vehicle's braking and driving char-
acteristics. There is a risk of accident.
Do not continue driving. Contact a qualified
specialist workshop.
Tyre pressure of 180 kPa (1.8 bar/
26 psi) is reached X
Switch off the tyre inflation compressor.
X Unscrew the filler hose from the valve of
the faulty tyre.
! After use, excess tyre sealant may run out
of the filler hose. This could cause stains.
Therefore, place the filler hose in the plastic
bag that contained the TIREFIT kit.
X Stow the tyre sealant bottle, the tyre infla-
tion compressor and the warning triangle.
X Pull away immediately. G
WARNING
At yre temporarily sealed with tyre sealant
impairs the driving characteristics and is not
suitable for higher speeds .There is a risk of
accident. You should therefore adapt your driving style
accordingly and drive carefully. Do not exceed
the specified maximum speed with a tyre that
has been repaired using tyre sealant.
The maximum speed for a tyre sealed with
tyre sealant is 80 km/h. The "max. 80 km/h"
sticker must be affixed to the instrumentc lus-
ter within the driver's field of vision.
X Stop after driving for approximately ten
minutes and chec kthe tyre pressure with
the tyre inflation compressor.
The tyre pressure must now be at least
130 kPa (1.3 bar, 19 psi). G
WARNING
If the required tyre pressure is not reached
after driving for a short period, the tyre is too
badly damaged. The tyre sealant cannot
repair the tyre in this instance. Damaged tyres
and a tyre pressure that is too low can signif-
icantly impair the vehicle's braking and driv-
ing characteristics. There is a risk of accident.
Do not continue driving. Contact a qualified
specialist workshop.
i In your vehicle, you will find a sticker with
the Mercedes-Ben zService24h telephone
number, e.g. on the B-pillar on the driver's
side.
X Correct the tyre pressure if it is still at least
130 kPa (1.3 bar, 19 psi) (for the values,
see the fuel filler flap).
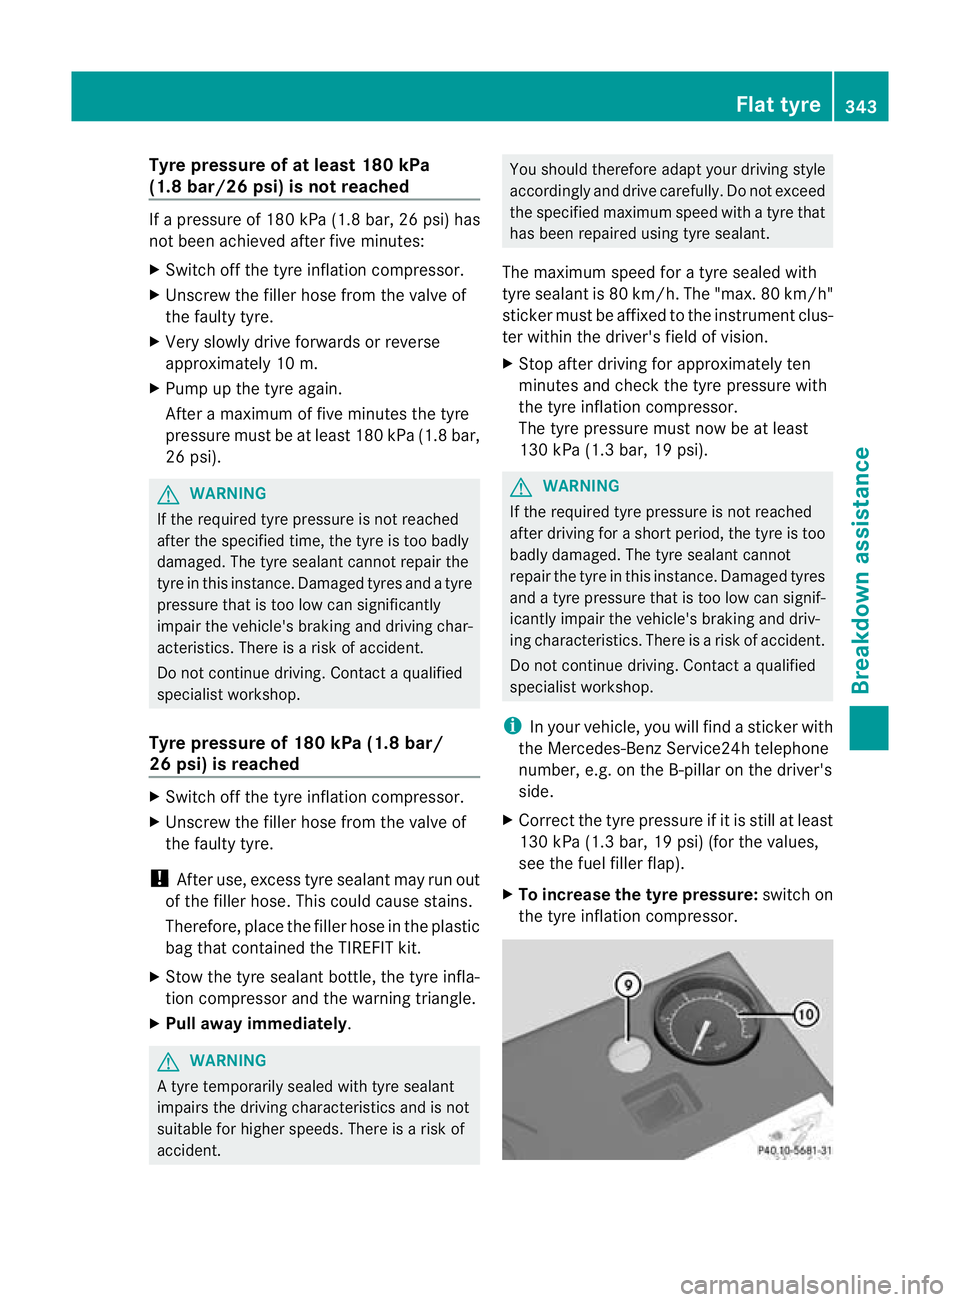
X To increase the tyre pressure: switch on
the tyre inflation compressor. Flat tyre
343Breakdown assistance Z