ignition MERCEDES-BENZ E-CLASS ESTATE 2011 Owners Manual
[x] Cancel search | Manufacturer: MERCEDES-BENZ, Model Year: 2011, Model line: E-CLASS ESTATE, Model: MERCEDES-BENZ E-CLASS ESTATE 2011Pages: 409, PDF Size: 10.47 MB
Page 15 of 409
Fuel fille
rflap
Emergency release ........................174
Opening/closing ............................ 173
Fuel filte r(white display message) .265
Fuel level Calling up the range (on-board
computer) ...................................... 235
Gauge .............................................. 30
Fuel reserve
see Fuel
Fuel tank
Capacity ........................................ 384
Problem (malfunction) ...................175
Fuse allocation chart (vehicle tool
kit) ...................................................... 337
Fuses Allocation chart ............................. 359
Before changing ............................. 359
Fuse box in the boot ......................360
Fuse box in the engine compart-
ment .............................................. 359
Fuse box in the luggage compart-
ment .............................................. 360
Important safety notes ..................359 G
Garage door opener Clearing the memory .....................317
Frequencies ................................... 318
Notes ............................................. 315
Opening/closing the garage door ..316
Programming (button in the rear-
view mirror) ................................... 315
Gear indicator (on-board com-
puter) ................................................. .249
Gear or selector lever (cleaning
instructions) ...................................... 332
Gearshift program SETUP (on-board computer) ..........250
Genuine Mercedes-Benz parts .........380
Glove compartment ..........................291H
Handbrake see Parking brake
Hazard warning lamps ......................125Headlamp
Cleaning system (function) ............124
Headlamp cleaning system
Notes ............................................. 391
Headlamps
Misting up ...................................... 128
Topping up the cleaning system ....324
see Automatic headlamp mode
Head restraints
Adjusting ....................................... 107
Adjusting (electrically). ..................107
Adjusting (manually). .....................107
Adjusting (rear) .............................. 108
Fitting/removing (rear) ..................109
Luxury ............................................ 107
see NECK-PR Ohead restraints
Heating
see Climate control
High-pressure cleaners ....................328
Hill start assist .................................. 158
HOLD function Display message ............................ 267
Function/notes ............................. 194
Hook ................................................... 299 I
ICS padded play table .........................62
Ignition lock see Key positions
Immobiliser .......................................... 77
Indicator and warning lamps Coolant .......................................... 285
DISTRONI CPLUS ........................... 287
Engine diagnostics .........................285
Fuel tank ........................................ 285
SPORT handling mode ...................284
Indicator lamps
Display message ............................ 260
see Warning and indicator lamps
Indicators
see Turn signals
Infrared lamps (changing bulbs) ......132
Insectp rotection on the radiator ....322
Instrument cluster Overview .......................................... 30
Settings ......................................... 243
Warning and indicator lamps ...........32 12
Index
Page 16 of 409
Instrumen
tcluster lighting ................30
Instrument lighting see Instrument cluster lighting
Integrated child seat
ICS padded pla ytable ...................... 62
Important safety guidelines .............60
Side hea drestraints ........................ .63
Storing, IC Spadded play table and
side head restraint s......................... 64
Intelligen tLight System
Activating/deactivatin g................. 244
Display message ............................ 262
Overview ........................................ 125
Setting the dipped-bea mhead-
lamps for driving on the right/left .245
Interior lighting ................................. 128
Automatic control system ..............129
Delayed switch-off (on-board
computer) ...................................... 246
Emergency lighting ........................129
Manual control ............................... 129
Overview ........................................ 128
Reading lamp ................................. 128
Setting the ambient lighting
brightness (on-board computer) ....245
Interior motion sensor ........................78
ISOFIX child seat securing system ....57 J
Jack Storage location ............................ 337
Using ............................................. 345
Jump start (engine)
see Jump starting (engine)
Jump starting (engine) ......................354 K
Key Changing the battery .......................85
Checking the battery .......................85
Convenience closing feature ............96
Convenience opening feature ..........96
Display message ............................ 278
Door central locking/unlocking .......82
Emergency key element ................... 84
Loss ................................................. 87Modifying the programming
.............83
Positions (ignition lock) .................155
Problem (malfunction) .....................87
Starting the engine ........................157
KEYLESS-GO
Convenience closing ........................97
Display message ............................ 278
Locking ............................................ 83
Start/Stop button .......................... 155
Starting the engine ........................157
Unlocking ......................................... 83
Keyp ositions
Key ................................................ 155
KEYLESS GO .................................. 155
Kickdown
Driving tips .................................... 168
Manual drive program ....................171
Kneebag ............................................... 46 L
Lamps see Warning and indicator lamps
Lane-change assistant
see Blind Spot Assist
Lane detection (automatic)
see Lane Keeping Assist
Lane Keeping Assist
Activating/deactivating .................242
Display message ............................ 268
Function/informatio n.................... 214
Lane package ..................................... 212
Lap time (RACETIMER) ......................250
Lashing eyelets ................................. 298
Licence plate lamp (display mes-
sage) ................................................... 261
Lighting see Lights
Lights
Activating/deactivating the Intel-
ligent Ligh tSystem ........................ 244
Activating/deactivating the inte-
rior lighting delayed switch-off .......246
Active light function .......................126
Automatic headlamp mode ............123
Cornering light function .................126
Dipped-bea mheadlamps ............... 123
Display message ............................ 259 Index
13
Page 31 of 409
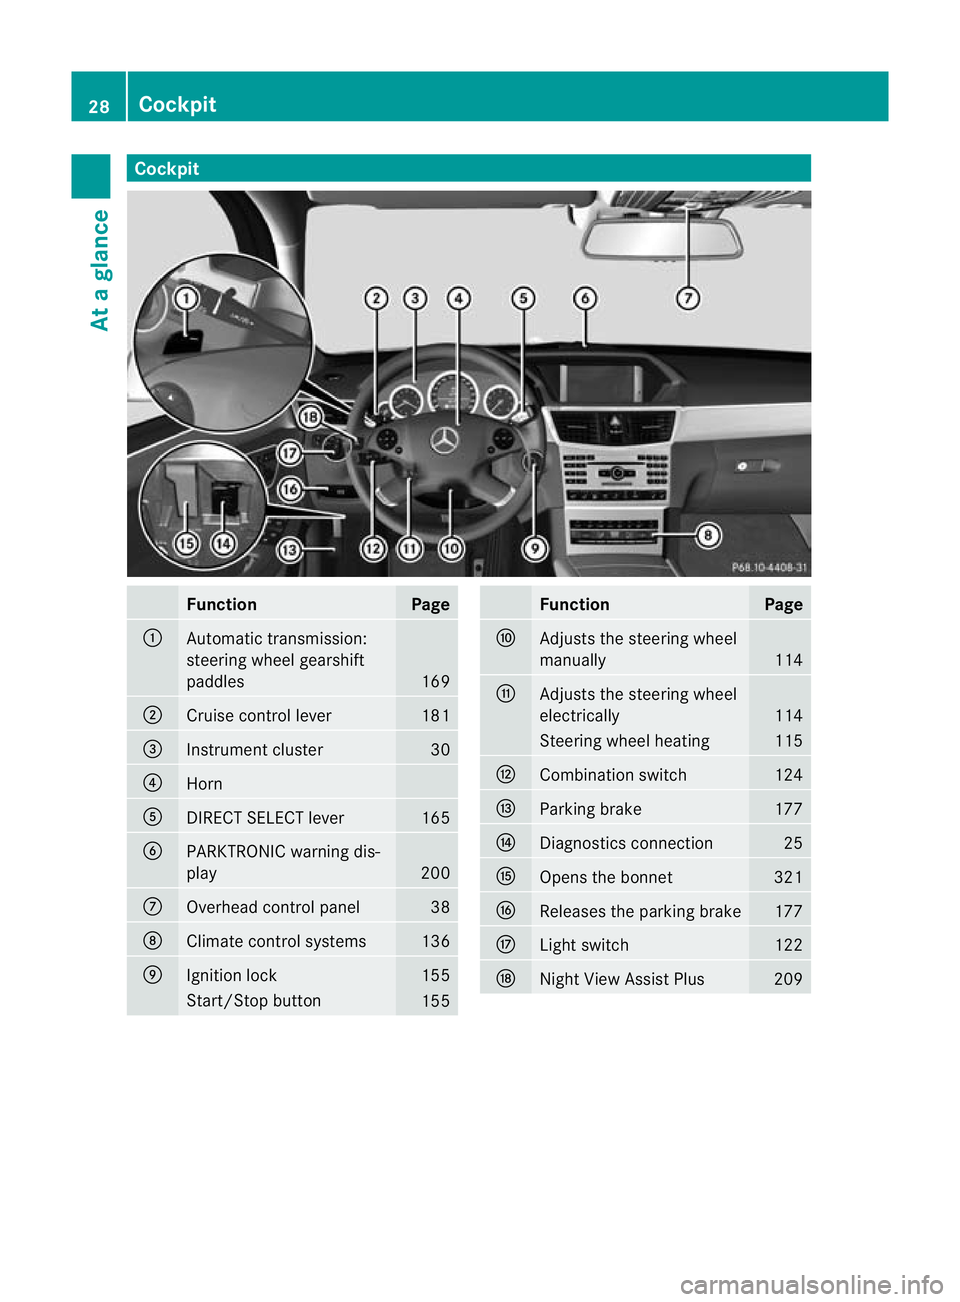
Cockpit
Function Page
:
Automatic transmission:
steering wheel gearshift
paddles
169
;
Cruise control lever 181
=
Instrument cluster 30
?
Horn
A
DIRECT SELECT lever 165
B
PARKTRONIC warning dis-
play
200
C
Overhead control panel 38
D
Climate control systems 136
E
Ignition lock 155
Start/Stop button
155 Function Page
F
Adjusts the steering wheel
manually 114
G
Adjusts the steering wheel
electrically 114
Steering wheel heating 115
H
Combination switch 124
I
Parking brake 177
J
Diagnostics connection 25
K
Opens the bonnet 321
L
Releases the parking brake 177
M
Ligh
tswitch 122
N
Night View Assist Plus 20928
CockpitAt a glance
Page 32 of 409
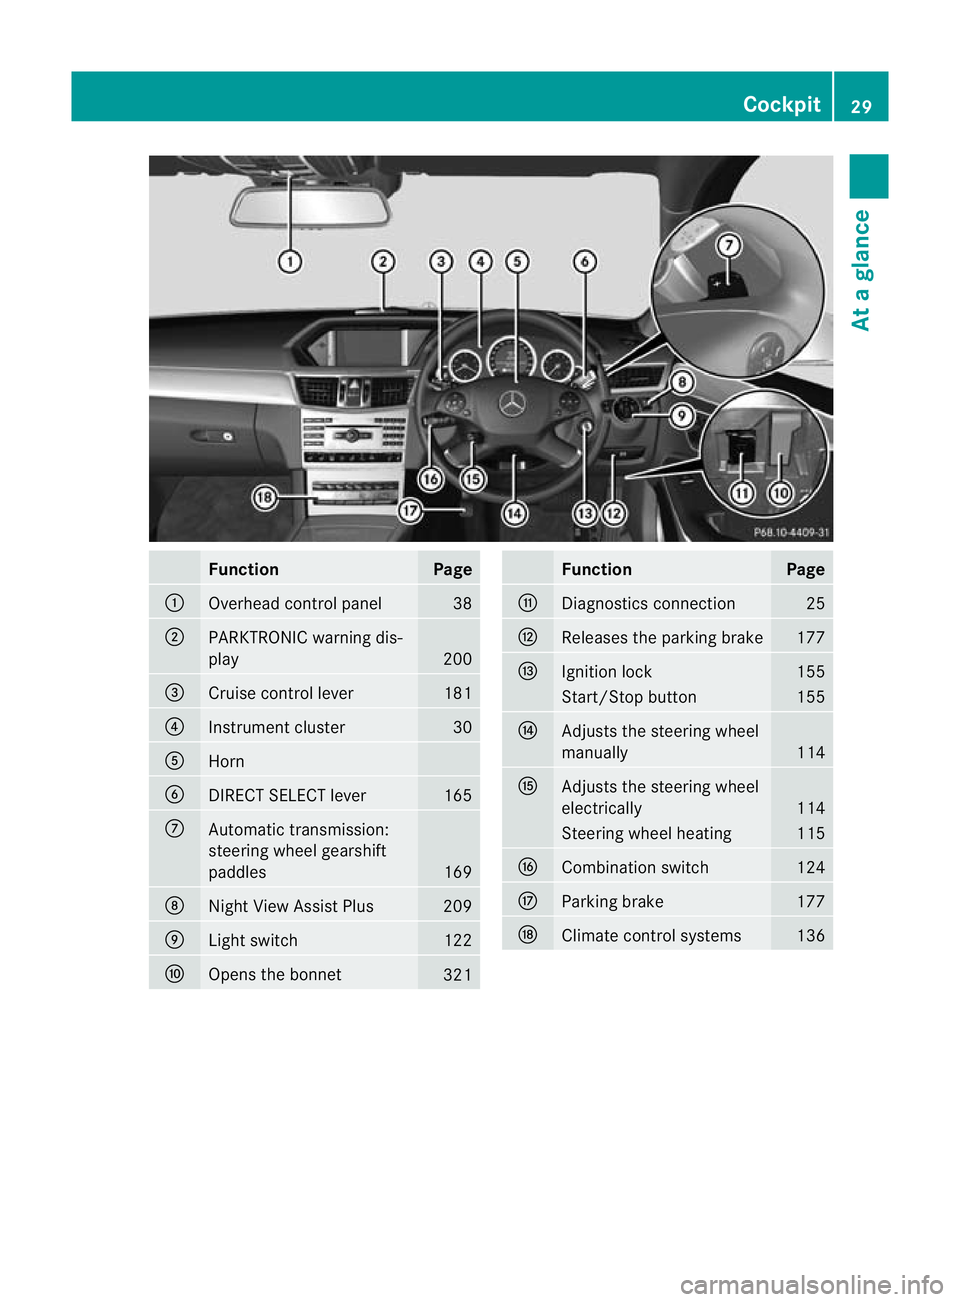
Function Page
:
Overhead control panel 38
;
PARKTRONIC warning dis-
play
200
=
Cruise control lever 181
?
Instrument cluster 30
A
Horn
B
DIRECT SELECT lever 165
C
Automatic transmission:
steering wheel gearshift
paddles
169
D
Nigh
tView Assist Plus 209
E
Light switch 122
F
Opens the bonnet
321 Function Page
G
Diagnostics connection 25
H
Releases the parking brake 177
I
Ignition lock 155
Start/Stop button 155
J
Adjusts the steering wheel
manually
114
K
Adjusts the steering wheel
electrically
114
Steering wheel heating 115
L
Combination switch 124
M
Parking brake 177
N
Climate control systems 136Cockpit
29At a glance
Page 46 of 409
tentionally. For this reason, never make any
modifications to the restraint systems.
Therefore, you must not tampe rwith elec-
tronic components or their software. SRS (Supplemental Restraint System)
Introduction SRS consists of:
R
the 6 SRS warning lamp
R airbags
R airbag control unit (with crash sensors)
R belt tensioners
R belt force limiters
SRS reduces the risk of occupants coming
into contact with the vehicle's interior in the
event of an accident. It can also reduce the
effect of the forces to which occupants are
subjected during an accident.
SRS warning lamp SRS functions are checked regularly when
you switch on the ignition and when the
engine is running. Therefore, malfunctions
can be detected in good time.
The 6 SRS warning lamp in the instrument
cluster lights up when the ignition is switched
on. It goes out no later than a few seconds
after the engine is started. G
WARNING
If SRS is malfunctioning, individual systems
may be triggered unintentionally or might not
be triggered in the event of an accident with
a high rate of vehicle deceleration.
A malfunction has occurred if:
R the 6 SRS warning lamp does not light
up when the ignition is switched on.
R the engine is running and the 6SRS
warning lamp does not go out after a few
seconds.
R the engine is running and the 6SRS
warning lamp lights up again. In this case, have SRS checked immediately
at a qualified specialist workshop.
Triggering of belt tensioners, belt force
limiters and airbags During the firs
tstage of a collision, the airbag
control uni tevaluates important physical
data relating to vehicle deceleratio noraccel-
eration, such as:
R duration
R direction
R magnitude
Based on the evaluation of this data, the air-
bag control uni tpre-emptively triggers the
beltt ensioners in the first stage.
i The fron tbelt tensioners can only be trig-
gered if the seat belt tongues on the front
seats are correctly engaged in the seat belt
buckles.
If there is an even higher rate of vehicle decel-
eration or acceleration in a longitudinal direc-
tion, the fron tairbags are also deployed.
Your vehicle has adaptive, two-stage front air-
bags. The airbag control unit evaluates vehi-
cle deceleration or acceleration in the event
of a collision. In the firs tdeployment stage,
the fron tairbag is filled with enough propel-
lant gas to reduce the risk of injuries. The
front airbag is fully deployed if a second
deploymen tthreshold is exceeded within a
few milliseconds.
The belt tensioner and airbag triggering
thresholds are variable and are adapted to the
rate of deceleration or acceleration of the
vehicle. This process is pre-emptive in nature.
The triggering process must take place in
good time at the start of the collision.
i Airbags are not deployed in all types of
accidents. Also, not all airbags are
deployed together in an accident. The dif-
ferent airbag systems work independently
of each other. Occupant safety
43Safety Z
Page 54 of 409
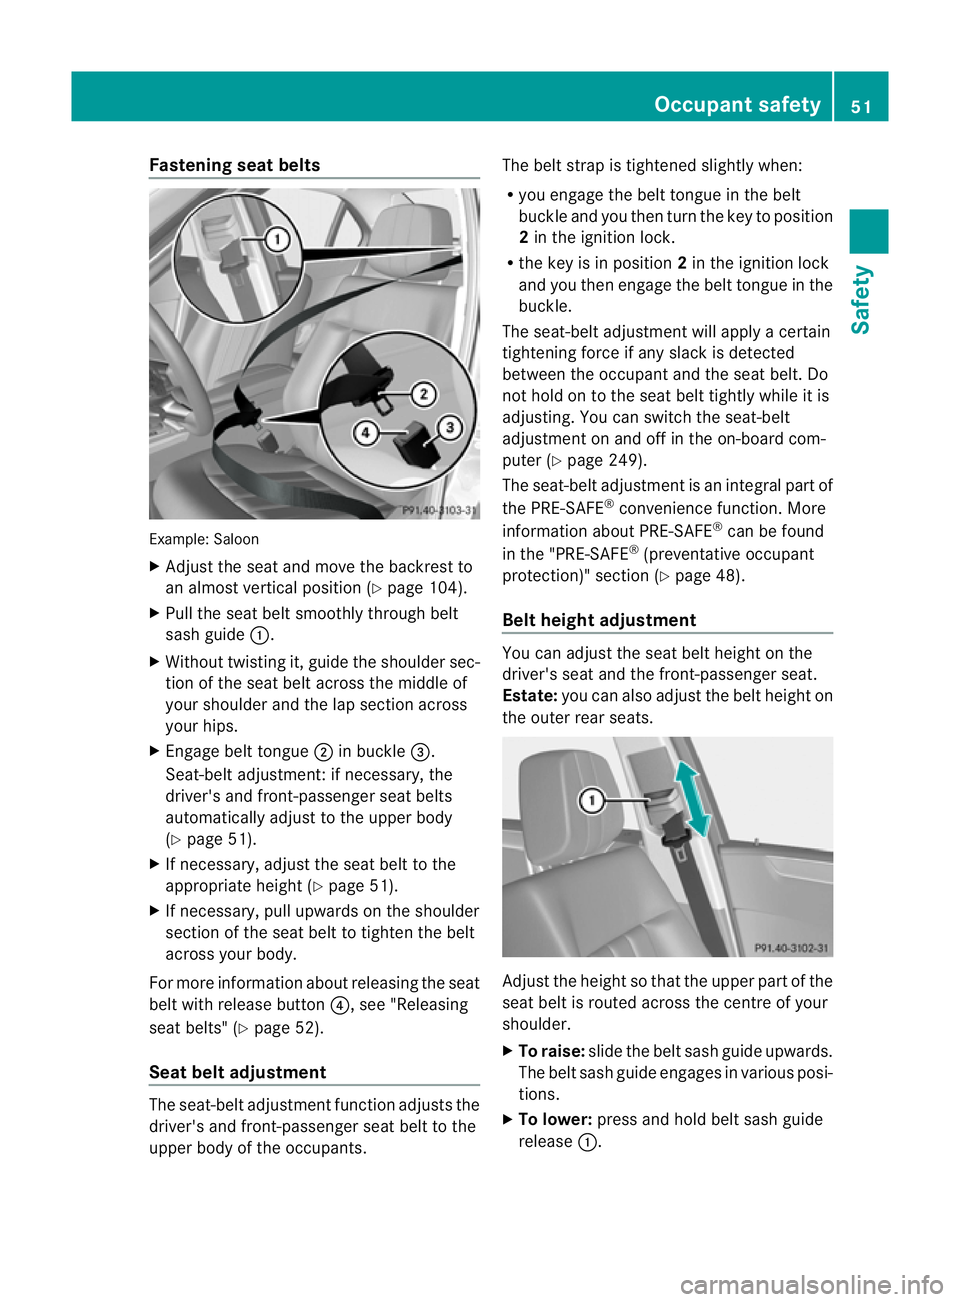
Fastening seat belts
Example: Saloon
X
Adjust the seat and move the backrest to
an almost vertical position (Y page 104).
X Pull the seat belt smoothly through belt
sash guide :.
X Without twisting it, guide the shoulder sec-
tion of the seat belt across the middle of
your shoulder and the lap section across
your hips.
X Engage belt tongue ;in buckle =.
Seat-belt adjustment: if necessary, the
driver's and front-passenger seat belts
automatically adjust to th eupper body
(Y page 51).
X If necessary, adjust the seat belt to the
appropriate height (Y page 51).
X If necessary, pull upwards on the shoulder
section of the seat belt to tighten the belt
across your body.
For more information about releasing the seat
belt with release button ?, see "Releasing
seat belts" (Y page 52).
Seat belt adjustment The seat-belt adjustment function adjusts the
driver's and front-passenger seat belt to the
upper body of the occupants. The belt strap is tightened slightly when:
R
you engage the belt tongue in the belt
buckle and you then turn the key to position
2in the ignition lock.
R the key is in position 2in the ignition lock
and you then engage the belt tongue in the
buckle.
The seat-belt adjustment will apply a certain
tightening force if any slack is detected
between the occupant and the seat belt. Do
not hold on to the seat belt tightly while it is
adjusting. You can switch the seat-belt
adjustment on and off in the on-board com-
puter (Y page 249).
The seat-belt adjustment is an integral part of
the PRE-SAFE ®
convenience function. More
information about PRE-SAFE ®
can be found
in the "PRE-SAFE ®
(preventative occupant
protection)" section (Y page 48).
Belt height adjustment You can adjust the seat belt height on the
driver's seat and the front-passenger seat.
Estate:
you can also adjust the belt height on
the outer rear seats. Adjust the height so that the upper part of the
seat belt is routed across the centre of your
shoulder.
X
To raise: slide the belt sash guide upwards.
The belt sash guide engages in various posi-
tions.
X To lower: press and hold belt sash guide
release :. Occupant safety
51Safety Z
Page 56 of 409
Bel
ttensioners, belt force limiters The fron
tseat belts and the outer seat belts
in the rear are equipped with belt tensioners.
The belt tensioners tighten the seat belts in
an accident, pulling them close against the
body.
Belt tensioners do not correct incorrect seat
positions or incorrectly fastened seat belts.
Belt tensioners do not pull vehicle occupants
back towards the backrest.
If the seat belt is also fitted with a belt force
limiter and this is triggered, the force exerted
by the seat belt on the vehicle occupan tis
reduced.
The belt force limiters on the front seats are
synchronised with the front airbags. They
take on a part of the deceleration force,
resulting in the force exerted on the occupant
being distributed over a greater area.
The beltt ensioners can only be activated
when:
R the ignition is switched on.
R the restraint systems are operational; see
"SRS warning lamp" (Y page 43).
R the belt tongue is engaged in the buckle on
each of the three-poin tseat belts in the
front.
The belt tensioners on the outside seats in the
rear compartment are triggered independ-
ently of the lock status of the seat belts.
The belt tensioners are triggered depending
on the type and severity of an accident:
R if, in the event of a head-on or rear-end col-
lision, the vehicle decelerates or acceler-
ates rapidly in a longitudinal direction dur-
ing the initial stages of the impact
R if, in the event of a side impact, on the side
opposite the impact the vehicle deceler-
ates or accelerates rapidly in a lateral direc-
tion
R if in certain situations where the vehicle
overturns and the system determines that
it can provide additional protection If the airbags are deployed, you will hear a
bang, and a small amount of powder may also
be released. Only in rare cases will the bang
affect your hearing. The powder that is
released generally does not constitute a
health hazard. The
6SRS warning lamp
lights up. G
WARNING
If the seat belt tensioners have been trig-
gered, they provide no additional protection
in the event of another accident. Therefore,
have belt tensioners which have been trig-
gered replaced at a qualified specialist work-
shop.
Comply with safety regulations when dispos-
ing of belt tensioners. Any Mercedes-Benz
Service Centre can provide details of these
regulations.
! If the front-passenger seat is not occu-
pied, do not engage the seat belt tongue in
the buckle on the front-passenger seat.
Otherwise, the belt tensioner could be trig-
gered in the event of an accident. Children in the vehicle
Child restraint systems
Important safety notes G
WARNING
To reduce the risk of serious or even fatal
injury to the child in the event of a sudden
change in direction, braking or an accident:
R children less than 1.50 m tall and under
twelve years of age must always be secured
in special child restraint systems on a suit-
able vehicle seat. This is necessary
because the seat belts are not designed for
children.
R do not secure children less than 1.5 0mtall
and under twelve years of age on the front-
passenge rseat. Exception :ifthe vehicle is
equipped with automatic child seat recog-
nition on the front-passenger seat and the Children in the vehicle
53Safety
Z
Page 59 of 409
Automatic child sea
trecognition on the
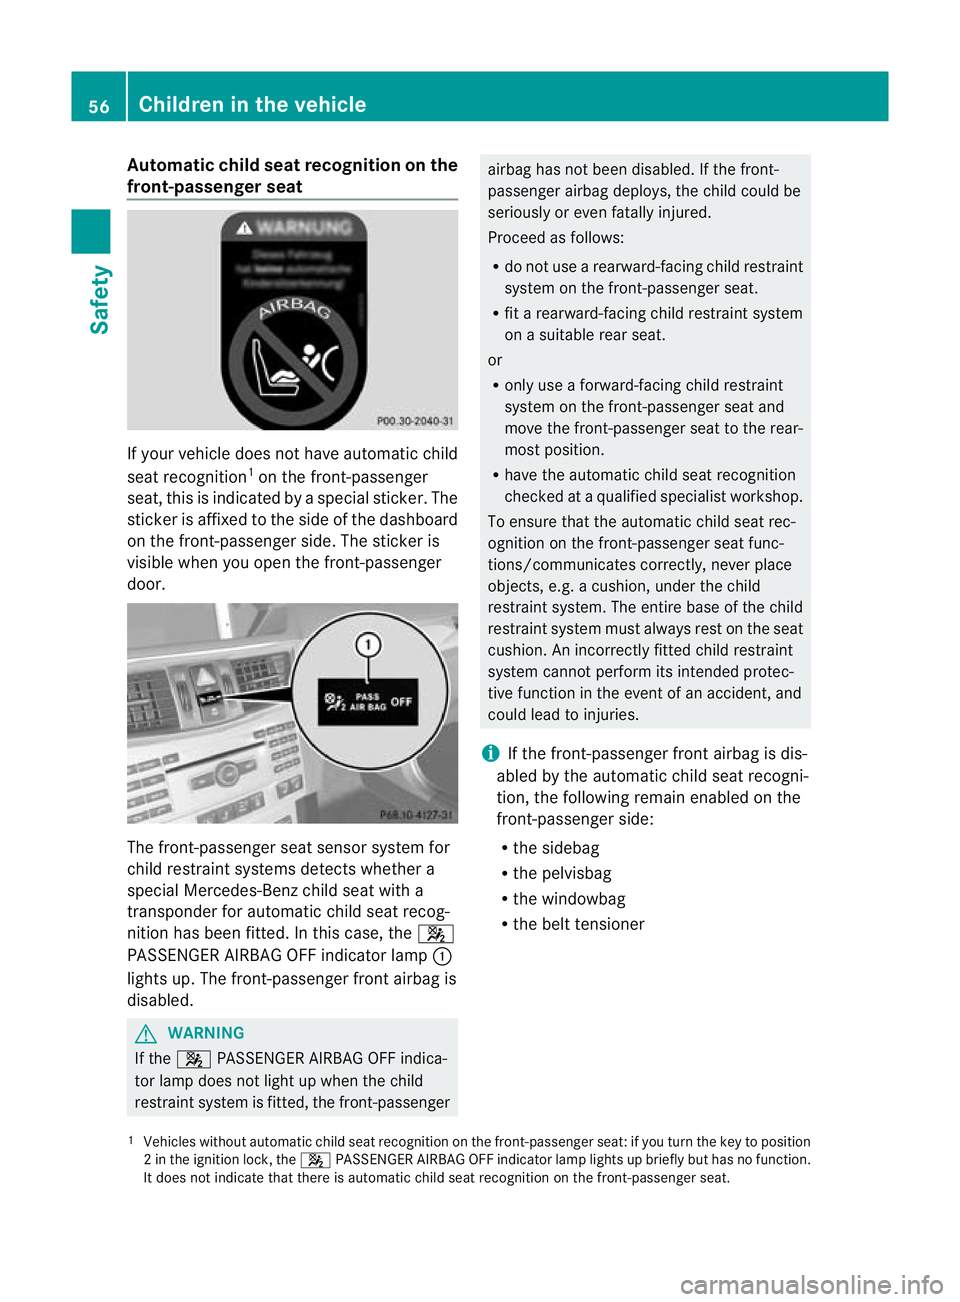
front-passenger seat If your vehicle does no
thave automatic child
seat recognition 1
on the front-passenger
seat, this is indicated by a special sticker. The
sticker is affixed to the side of the dashboard
on the front-passenger side. The sticker is
visible when you open the front-passenger
door. The front-passenger seat sensor system for
child restraint systems detects whether a
special Mercedes-Ben
zchild seat with a
transponder for automatic child seat recog-
nition has been fitted. In this case, the 4
PASSENGER AIRBAG OFF indicator lamp :
lights up. The front-passenger front airbag is
disabled. G
WARNING
If the 4 PASSENGER AIRBAG OFF indica-
tor lamp does not light up when the child
restraint system is fitted, the front-passenger airbag has not been disabled. If the front-
passenger airbag deploys, the child could be
seriously or even fatally injured.
Proceed as follows:
R do not use a rearward-facing child restraint
system on the front-passenger seat.
R fit a rearward-facing child restraint system
on a suitable rear seat.
or
R only use a forward-facing child restraint
system on the front-passenger seat and
move the front-passenger seat to the rear-
most position.
R have the automatic child seat recognition
checked at a qualified specialist workshop.
To ensure that the automatic child seat rec-
ognition on the front-passenger seat func-
tions/communicates correctly, never place
objects, e.g. a cushion, under the child
restraint system. The entire base of the child
restraint system must always rest on the seat
cushion. An incorrectly fitted child restraint
system cannot perform its intended protec-
tive function in the event of an accident, and
could lead to injuries.
i If the front-passenger front airbag is dis-
abled by the automatic child seat recogni-
tion, the following remain enabled on the
front-passenger side:
R the sidebag
R the pelvisbag
R the windowbag
R the belt tensioner
1 Vehicles without automatic child seat recognition on the front-passenger seat: if you turn the key to position
2int he ignition lock, the 4PASSENGER AIRBAG OFF indicator lamp lights up briefly but has no function.
It does not indicate that there is automatic child seat recognition on the front-passenger seat. 56
Children in the vehicleSafety
Page 60 of 409
G
WARNING
Do not place electronic devices on the front-
passenger seat, e.g.:
R laptops, when switched on
R mobile phones
R cards with transponders, e.g. ski passes or
access cards
Signals from electronic equipment can cause
interference in the automatic child seat rec-
ognitio nsensor system. This can lead to a
system malfunction. This may cause the
4 PASSENGER AIRBAG OFF indicator
lamp to light up without there being a child
seat with transponders for automatic child
seat recognition fitted. The front-passenger
airbag will not then deploy during an accident.
It is also possible that the 6SRS warning
lamp lights up and/or the 4PASSENGER
AIRBAG OFF indicator lamp does not light up
briefly when you turn the key in the ignition
lock to position 2.
ISOFIX child seat securing system for
the rear seats ISOFIX is a standardised securing system for
specially designed child restraint systems on
the rear seats. Securing rings for two ISOFIX
child restraint systems are fitted on the left
and right of the rear seats. G
WARNING
Ac hild restraint system secured by the ISOFIX
child seat securing system does not provide
sufficient protection for children weighing
more than 22 kg. For this reason, do not
secure children weighing more than 22 kg in
a child restraint system secured by the ISOFIX
child seat securing system. If the child weighs
more than 22 kg, secure the child restraint
system using a three-point seat belt. G
WARNING
The child restraint system cannot perform its
protective function if it is not correctly fitted
to a suitable vehicle seat. The child cannot be restrained in the event of an accident, heavy
braking or sudden changes of direction. The
child could be seriously or even fatally injured.
For this reason, when fitting a child restraint
system, observe the manufacturer's installa-
tion instructions and the correct use of the
child restraint system.
For reasons of safety, only use child restraint
systems with the ISOFIX child seat securing
system on the rear seats.
We recommend that you use the ISOFIX child
restraint systems that have been recommen-
ded for Mercedes-Benz.
An incorrectly fitted child restraint system
could come loose and seriously or even fatally
injure the child or other vehicle occupants.
When fitting the child restraint system, always
make sure that it is engaged correctly in the
securing rings on both sides.
G
WARNING
Please note that if child restraint systems, or
their retaining systems, are damaged or sub-
jected to a load in an accident, they may not
be able to provide their protective function.
This could result in serious or even fatal inju-
ries to the secured child in the event of an
accident, heavy braking or a sudden change
in direction.
For this reason, have child restraint systems
and their anchorages which have been dam-
aged or subjected to a load in an accident
checked immediately at a qualified specialist
workshop.
! When fitting the child restraint system,
make sure that the seat belt for the centre
seat does not get trapped. Otherwise, the
seat belt could be damaged. Children in the vehicle
57Safety Z
Page 63 of 409
Problems with child seat recognition
Problem Possible causes/consequences and
M Solutions
The
4 PASSENGER
AIRBAG OFF indicator
lamp on the centre con-
sole is lit. As
pecial Mercedes-Benz child seat with a transponder for auto-
matic child seat recognition has been fitted to the front-passenger
seat. The front-passenger airbag has therefore been disabled as
desired. G
Risk of injury
There is no child seat fitted to the front-passenger seat. Automatic
child seat recognition is malfunctioning.
It is also possible that the 6SRS warning lamp lights up and/
or the 4PASSENGER AIRBAG OFF indicator lamp does not light
up briefly when you switch the ignition on.
X Remove electronic equipment from the front-passenger seat,
e.g.
R
laptop
R mobile phone
R cards with transponders, such as ski passes or access cards
If the 4 PASSENGER AIRBAG OFF indicator lamp is still lit:
X Visit a qualified specialist workshop. Integrated child seat
Important safety notes
G
WARNING
To reduce the risk of serious or even fatal
injury to the child in the event of a sudden
change in direction, braking or an accident:
R you must follow the manufacturer's instal-
lation instructions for the child seat when
fitting the integrated child seat (ICS) pad-
ded play table and side head restraint and
when fastening the seat belt.
R do not modify the integrated child seat, the
ICS padded play table or the side head
restraint. Do not use protective covers.
R make sure that the ICS padded play table
and the side head restraints do not become trapped or damaged. This could happen
when you
-
close the doors
- adjust the seat
- store the ICS padded play table and the
side head restraints
- transport heavy objects
R replace the integrated child seat, the pad-
ded play table and the side head restraints
if these were damaged or subjected to
heavy loads during an accident.
R note: children who weigh less than
12.5 kg require a different child restraint
system. Information about other child
restraint systems is available from any
Mercedes-Benz Service Centre.
R the vehicle's rear seat backrest must be
locked in position. 60
Children in the vehicleSafety