low beam MERCEDES-BENZ E-CLASS ESTATE 2011 Owners Manual
[x] Cancel search | Manufacturer: MERCEDES-BENZ, Model Year: 2011, Model line: E-CLASS ESTATE, Model: MERCEDES-BENZ E-CLASS ESTATE 2011Pages: 409, PDF Size: 10.47 MB
Page 10 of 409
Sensors
......................................... 330
Steering wheel ............................... 332
Tai lpipes ....................................... 330
Trim pieces .................................... 332
Washing by hand ........................... 327
Wheels ........................................... 328
Windows ........................................ 329
Wiper blades .................................. 329
Wooden trim .................................. 332
Car key
see Key
Car wash (care) ................................. 327
CD player/CD changer(on-board
computer) .......................................... 238
Cell phone see Mobile phone
Central locking
Automatic locking (on-board com-
puter) ............................................. 246
Locking/unlocking (key ).................. 82
Centre console
Lowe rsection .................................. 35
Lowe rsection (AMG vehicles) ..........37
Uppe rsection .................................. 34
Changing bulbs
Dipped-bea mheadlamps ............... 131
Important safety notes ..................129
Infrared lamp ................................. 132
Main-beam headlamps ................... 131
Overview of bul btypes .................. 130
Parking lamps (front) .....................131
Standing lamps .............................. 131
Turn signals (front) ......................... 132
Child-proof locks
Important safety notes ....................68
Rea rdoors ....................................... 68
Children
Fastening seat belts ......................... 61
In the vehicle ................................... 53
Restraint systems ............................ 53
Child seat
Automatic recognition .....................56
Display message ............................ 258
Integrated ........................................ 60
Integrated, ICS padded pla ytable ....62
Integrated, side head restraints .......63
Integrated ,storing ........................... 64
ISOFIX .............................................. 57 On the front-passenger sea
t............ 55
Problem (malfunction) .....................60
Recommendations ...........................67
Suitable positions ............................ 65
Cigarette lighter ................................ 311
Cleaning Mirro rturn signal ........................... 330
Trailer tow hitch ............................. 330
Climate control
Auxiliary heating/ventilation .......... 145
Controlling automatically ...............140
Convenience opening/closing
(air-recirculatio nmode) ................. 144
Cooling with aird ehumidification..139
Demisting the windows .................. 143
Demisting the windscreen .............142
Important safety notes ..................136
Indicator lamp ................................ 140
Notes on using THERMATIC auto-
matic climate control .....................137
Notes on using THERMOTRONIC
automatic climate control ..............139
Overview of systems ......................136
Problems with cooling with air
dehumidification ............................ 140
Problem with the rear window
heating .......................................... 143
Rea rcontrol panel ......................... 138
Setting the aird istribution.............141
Setting the airflow .........................142
Setting the airv ents...................... 149
Setting the climate mode .............. .140
Setting the temperature ................141
Switching air-recirculation mode
on/off ............................................ 144
Switching on/off ........................... 139
Switching residual hea ton/off ......145
Switching the rear window heat-
ing on/off ...................................... 143
Switching the ZONE function on/
off .................................................. 142
THERMATIC automatic climate
control (2-zone) ............................. 137
THERMOTRONIC (3-zone) auto-
matic climate control .....................138
Clock( on-board computer) ...............244
Coat hooks ......................................... 301 Index
7
Page 35 of 409
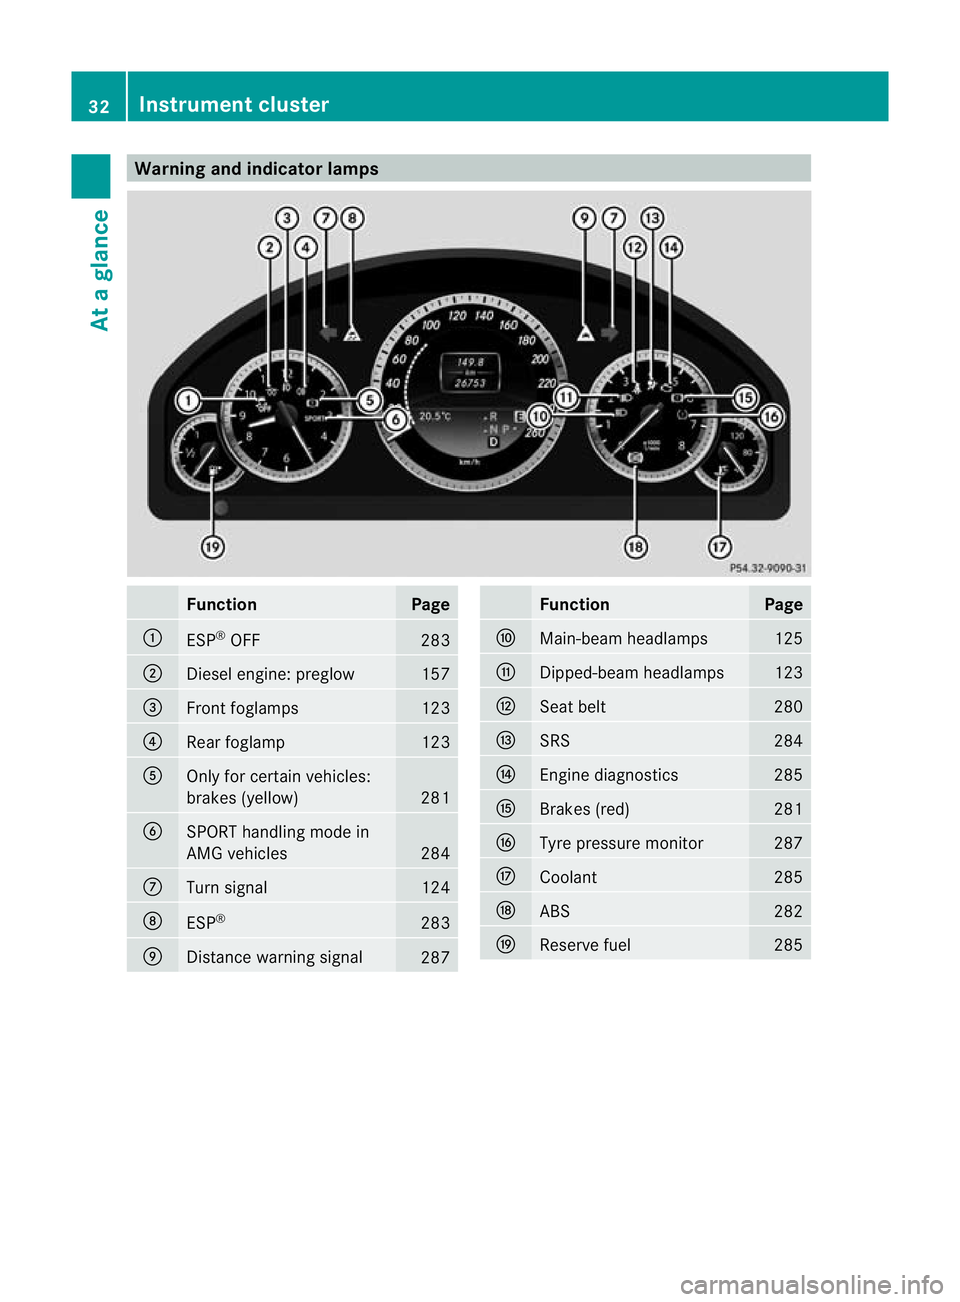
Warning and indicator lamps
Function Page
:
ESP
®
OFF 283
;
Diesel engine: preglow 157
=
Front foglamps 123
?
Rea
rfoglamp 123
A
Only for certain vehicles:
brakes (yellow)
281
B
SPORT handling mode in
AMG vehicles
284
C
Turn signal 124
D
ESP
® 283
E
Distance warning signal
287 Function Page
F
Main-beam headlamps 125
G
Dipped-beam headlamps 123
H
Seat belt 280
I
SRS 284
J
Engine diagnostics 285
K
Brakes (red) 281
L
Tyre pressure monitor 287
M
Coolant 285
N
ABS 282
O
Reserve fuel 28532
Instrument clusterAt a glance
Page 127 of 409
X
Press the Rbutton.
The yellow Rindicator lamp in the
instrument cluster lights up.
X To switch off the rear foglamp: press the
R button.
The yellow Rindicator lamp in the
instrument cluster goes out.
Vehicles with frontf oglamps: when the light
switch is in the Tposition, the rear fog-
lamp can only be switched on if the foglamps
(without dipped-beam headlamps) are
switched on.
i If you switch the engine off (key in posi-
tion 1in the ignition lock) and then restart
it, the previous rear foglamp settings are
restored.
Adjusting the headlam prange (halogen
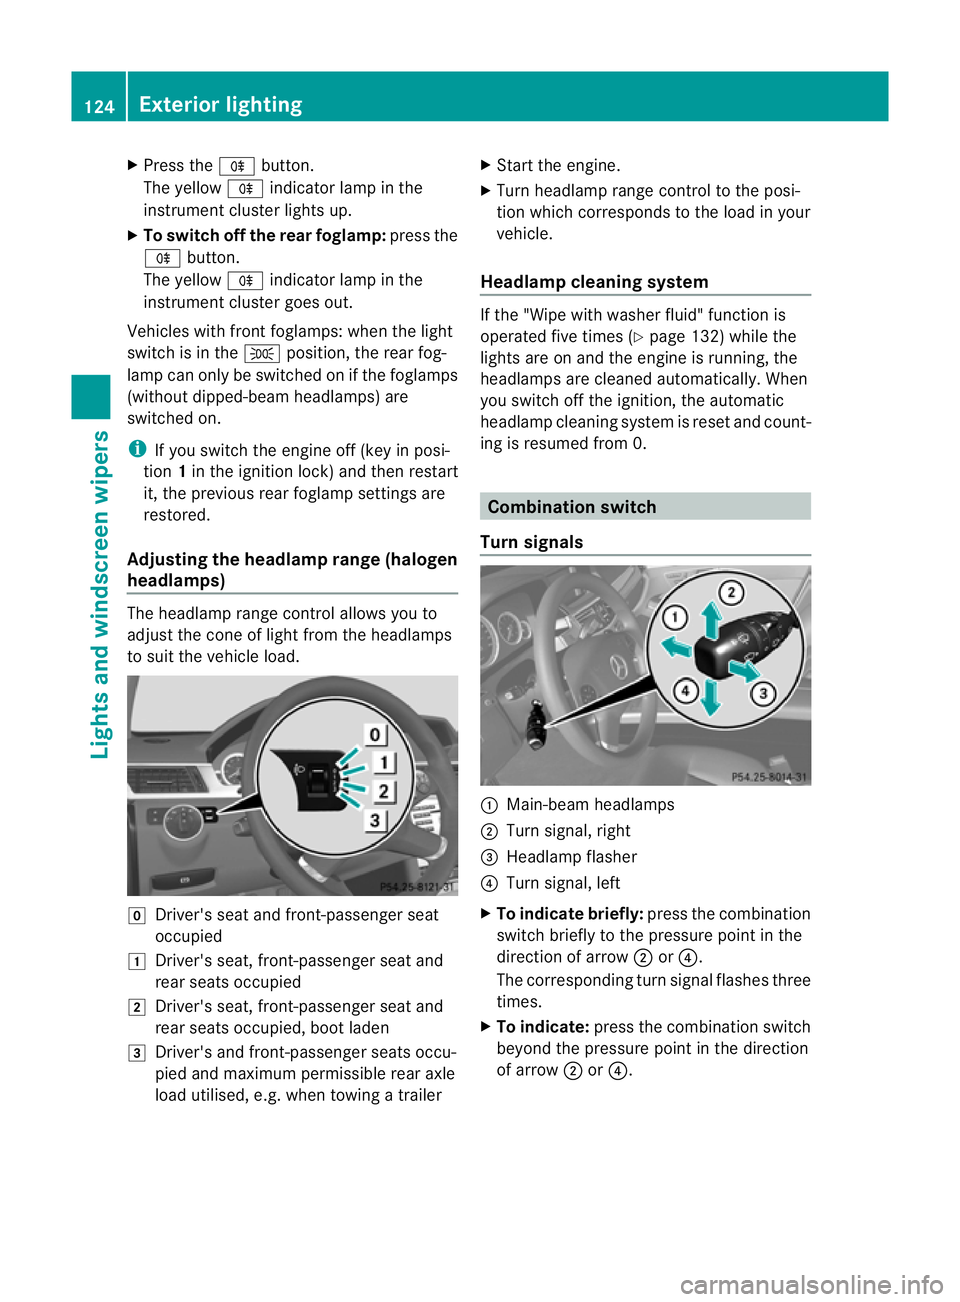
headlamps) The headlamp range control allows you to
adjust the cone of light from the headlamps
to sui tthe vehicle load. g
Driver's seat and front-passenger seat
occupied
1 Driver's seat, front-passenger seat and
rear seats occupied
2 Driver's seat, front-passenger seat and
rear seats occupied, boot laden
3 Driver's and front-passenger seats occu-
pied and maximum permissible rear axle
load utilised, e.g. when towing a trailer X
Start the engine.
X Turn headlamp range control to the posi-
tion which corresponds to the load in your
vehicle.
Headlampc leaning system If the "Wipe with washer fluid" function is
operated five times (Y
page 132) while the
lights are on and the engine is running, the
headlamps are cleaned automatically. When
you switch off the ignition, the automatic
headlamp cleaning syste mis reset and count-
ing is resumed from 0. Combination switch
Turn signals :
Main-beam headlamps
; Turn signal, right
= Headlamp flasher
? Turn signal, left
X To indicate briefly: press the combination
switch briefly to the pressure point in the
direction of arrow ;or?.
The corresponding turn signal flashes three
times.
X To indicate: press the combination switch
beyond the pressure point in the direction
of arrow ;or?. 124
Exterior lightingLights and windscreen wipers
Page 129 of 409
Active ligh
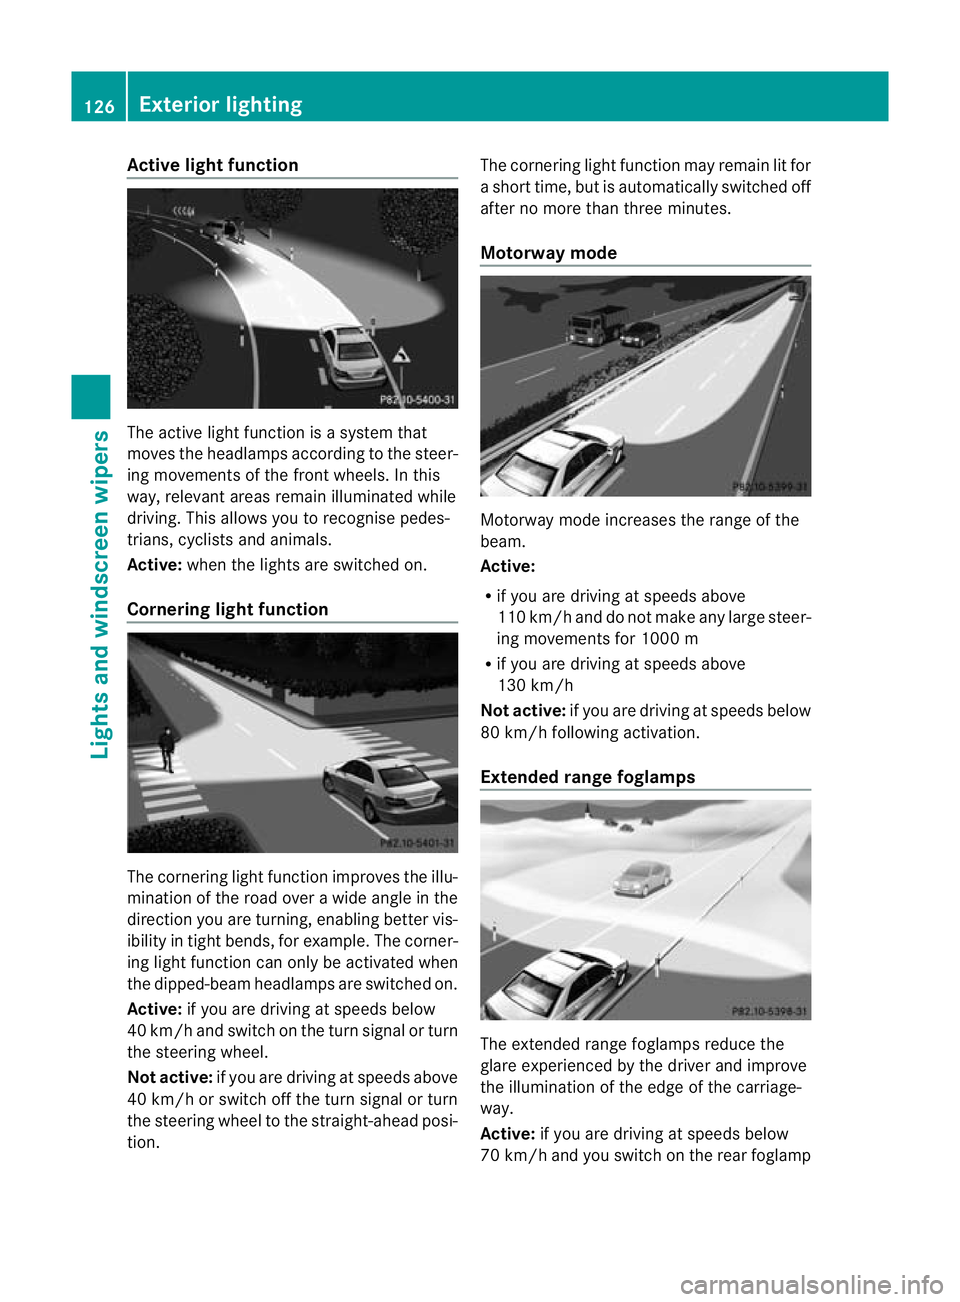
tfunction The active light function is a system that
moves the headlamps according to the steer-
ing movements of the front wheels. In this
way, relevant areas remai nilluminated while
driving. This allows you to recognise pedes-
trians, cyclists and animals.
Active: when the lights are switched on.
Cornering light function The cornering light function improves the illu-
mination of the road over a wide angle in the
direction you are turning, enabling better vis-
ibility in tigh
tbends, for example. The corner-
ing light function can only be activated when
the dipped-beam headlamps are switched on.
Active: if you are driving at speeds below
40 km/ha nd switch on the tur nsignal or turn
the steering wheel.
Not active: if you are driving at speeds above
40 km/h or switch off the turn signal or turn
the steering wheel to the straight-ahead posi-
tion. The cornering light function may remain lit for
a shor ttime, but is automatically switched off
after no more than three minutes.
Motorway mode Motorway mode increases the range of the
beam.
Active:
R
if you are driving at speeds above
110 km/h and do not make any large steer-
ing movements for 1000 m
R if you are driving at speeds above
130 km/h
Not active: if you are driving at speeds below
80 km/h following activation.
Extended range foglamps The extended range foglamps reduce the
glare experienced by the drive
rand improve
the illuminatio nofthe edge of the carriage-
way.
Active: if you are driving at speeds below
70 km/h and you switch on the rear foglamp 126
Exterior lightingLights and windscreen wipers
Page 130 of 409
Not active:
if you are driving at speeds above
100 km/h or if you switch off the rea rfoglamp
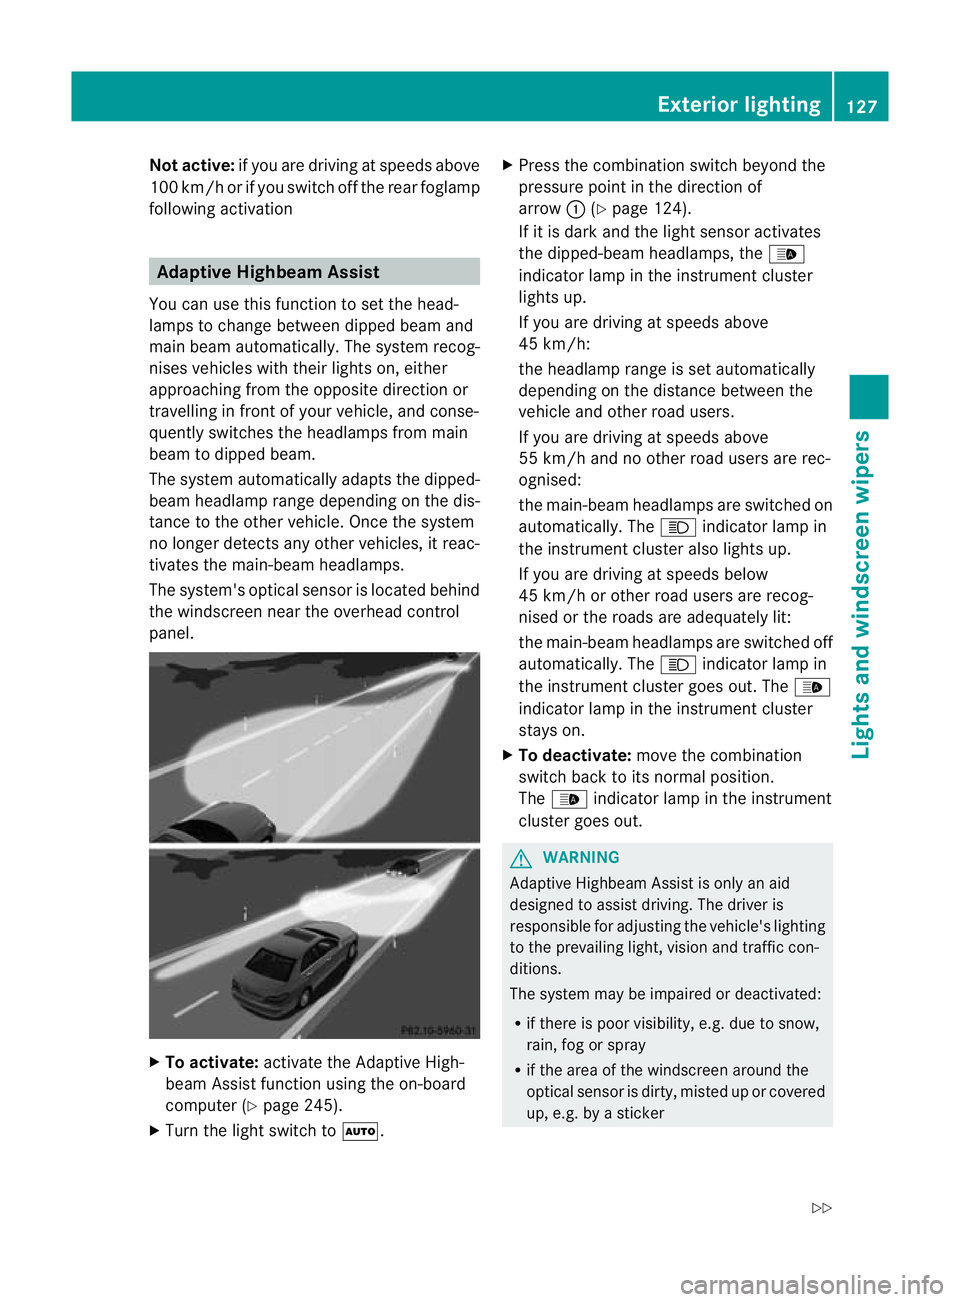
following activation Adaptive Highbeam Assist
You can use this function to set the head-
lamps to change between dipped beam and
main beam automatically. The system recog-
nises vehicles with their lights on, either
approaching from the opposite direction or
travelling in front of your vehicle, and conse-
quently switches the headlamps from main
beam to dipped beam.
The system automatically adapts the dipped-
beam headlamp range depending on the dis-
tance to the other vehicle. Once the system
no longer detects any other vehicles, it reac-
tivates the main-beam headlamps.
The system's optical sensor is located behind
the windscreen near the overhead control
panel. X
To activate: activate the Adaptive High-
beam Assist function using the on-board
computer (Y page 245).
X Turn the light switch to Ã.X
Press the combination switch beyond the
pressure point in the direction of
arrow :(Ypage 124).
If it is dark and the light sensor activates
the dipped-beam headlamps, the _
indicator lamp in the instrument cluster
lights up.
If you are driving at speeds above
45 km/h:
the headlamp range is set automatically
depending on the distance between the
vehicle and other road users.
If you are driving at speeds above
55 km/h and no other road users are rec-
ognised:
the main-beam headlamps are switched on
automatically. The Kindicator lamp in
the instrument cluster also lights up.
If you are driving at speeds below
45 km/h or other road users are recog-
nised or the roads are adequately lit:
the main-beam headlamps are switched off
automatically. The Kindicator lamp in
the instrument cluster goes out. The _
indicator lamp in the instrument cluster
stays on.
X To deactivate: move the combination
switch back to its normal position.
The _ indicator lamp in the instrument
cluster goes out. G
WARNING
Adaptive Highbeam Assist is only an aid
designed to assist driving. The driver is
responsible for adjusting the vehicle's lighting
to the prevailing light, vision and traffic con-
ditions.
The system may be impaired or deactivated:
R if there is poor visibility, e.g. due to snow,
rain, fog or spray
R if the area of the windscreen around the
optical sensor is dirty, misted up or covered
up, e.g. by a sticker Exterior lighting
127Lights and windscreen wipers
Z
Page 131 of 409
The system may not recognise the following
road users:
R road users that have no lighting, e.g. pedes-
trians
R road users that have poor lighting, e.g.
cyclists
R road users whose lighting is not clearly visi-
ble, e.g. road users behind a crash barrier
R on rare occasions :road users that have
lights that may be recognised too late or not
at all
The automatic main-beam headlamps will not
be deactivated, or they may be activated
despite road users travelling in front of or
approaching the vehicle.
Thus, you could cause an accident and injure
yourself and others. Always observe traffic
conditions and, if necessary, dip the lights
manually. Headlamps misted up on the inside
The headlamps may mist up on the inside if
there is high atmospheric humidity.
X Drive with the headlamps switched on.
The level of moisture diminishes, depend-
ing on the length of the journey and the
weather conditions (humidity and temper-
ature).
If the level of moisture does not diminish:
X Have the headlamps checked at a qualified
specialist workshop. Interior lighting
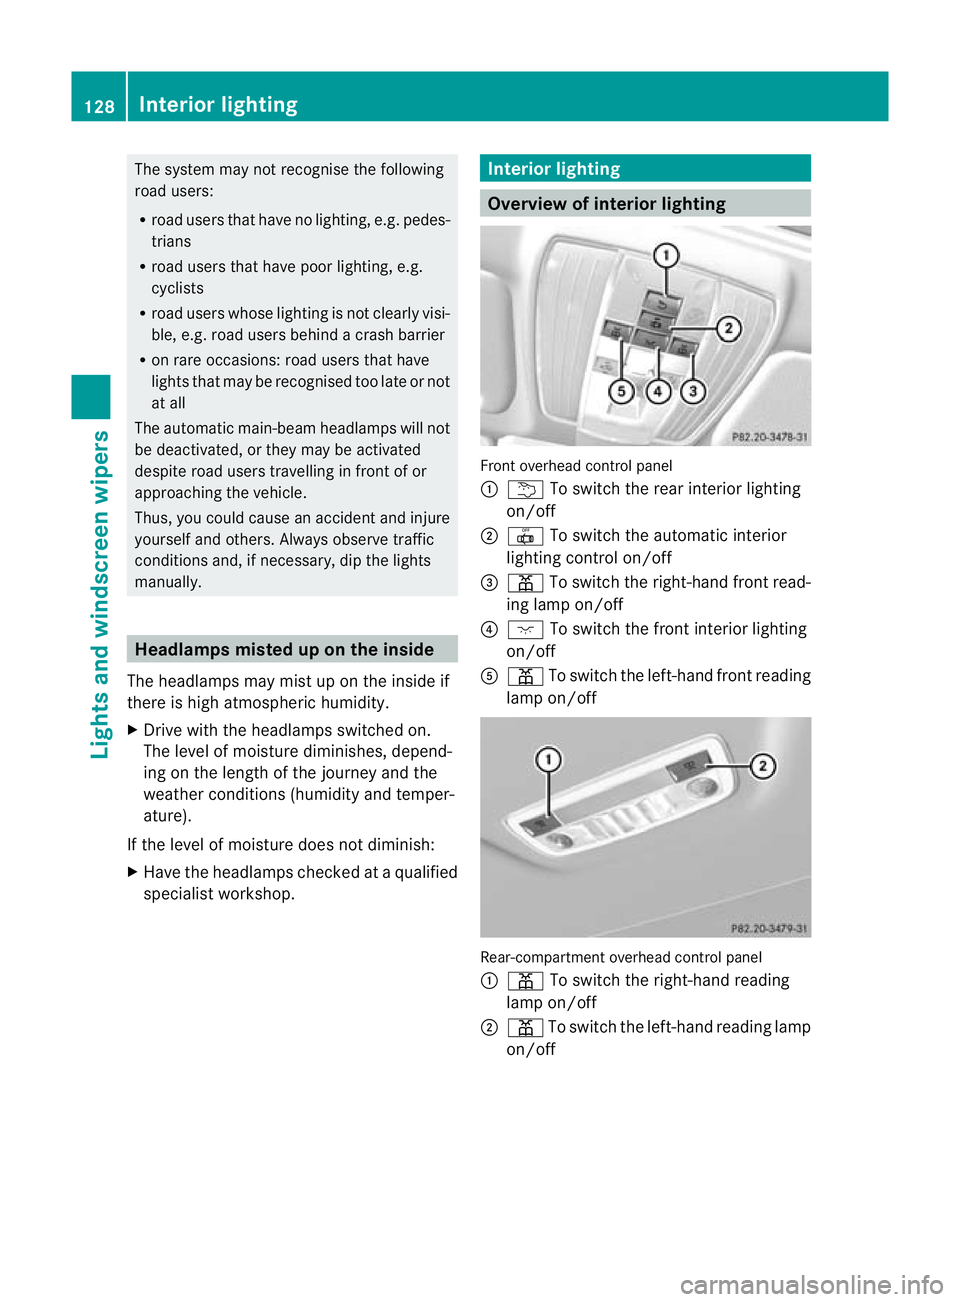
Overview of interior lighting
Front overhead control panel
:
u To switch the rear interior lighting
on/off
; | To switch the automatic interior
lighting control on/off
= p To switch the right-hand front read-
ing lamp on/off
? c To switch the front interior lighting
on/off
A p To switch the left-hand front reading
lamp on/off Rear-compartment overhead control panel
:
p To switch the right-hand reading
lamp on/off
; p To switch the left-hand reading lamp
on/off 128
Interior lightingLights and windscreen wipers
Page 133 of 409
free cloth or only touch the base of the bulb
whe
nfitting.
Only use bulbs of the correc ttype.
If the new bulb still does no tlight up, consult
a qualified specialist workshop.
Bulbs and lamps are an importan taspect of
vehicle safety. You must therefore make sure
that these function correctly at all times.
Have the headlamp setting checked regularly. G
WARNING
Bulbs and lamps can be very hot. You should
therefore allow them to cool down before you
change them. Otherwise, you could be burned
if you touch them.
Keep bulbs out of the reach of children. Oth-
erwise, they could damage the bulbs, for
example, and injure themselves.
Never use a bulb which has been dropped.
Such a bulb may break or even explode and
injure you.
Halogen bulbs are pressurised and can
explode when you change them, particularly
if they are very hot. You should therefore wear
eye protection and gloves when you are
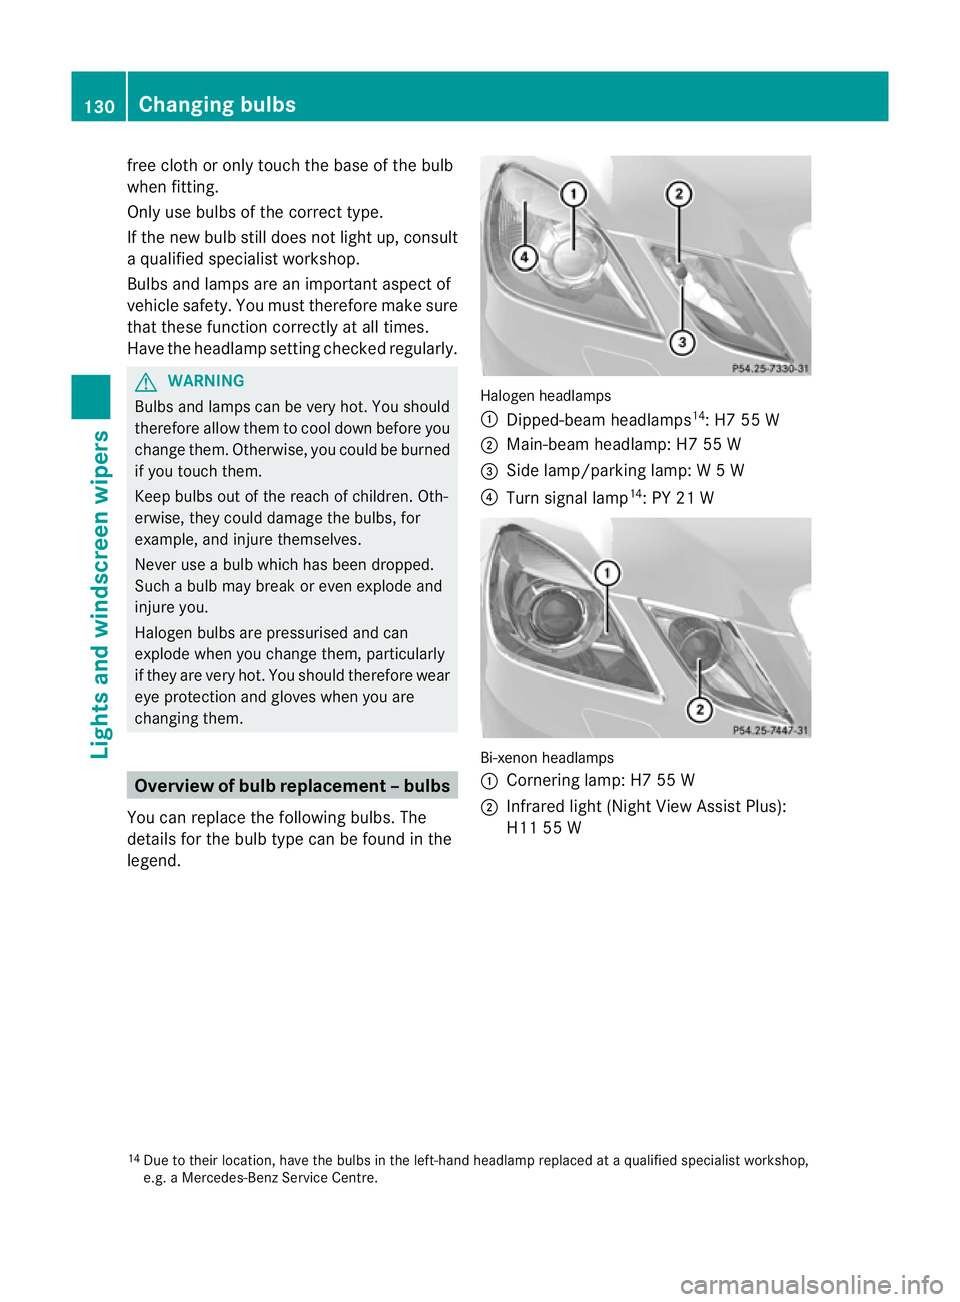
changing them. Overview of bulb replacement
–bulbs
You can replace the following bulbs. The
details for the bulb type can be found in the
legend. Halogen headlamps
:
Dipped-bea mheadlamps 14
: H7 55 W
; Main-beam headlamp: H7 55 W
= Side lamp/parking lamp: W5W
? Turn signal lamp 14
: PY 21 W Bi-xenon headlamps
:
Cornering lamp: H7 55 W
; Infrared light (Night View Assist Plus):
H11 55 W
14 Due to their location, have the bulbs in the left-hand headlamp replaced at a qualified specialist workshop,
e.g. a Mercedes-Benz Service Centre. 130
Changing bulbsLights and windscreen wipers
Page 236 of 409
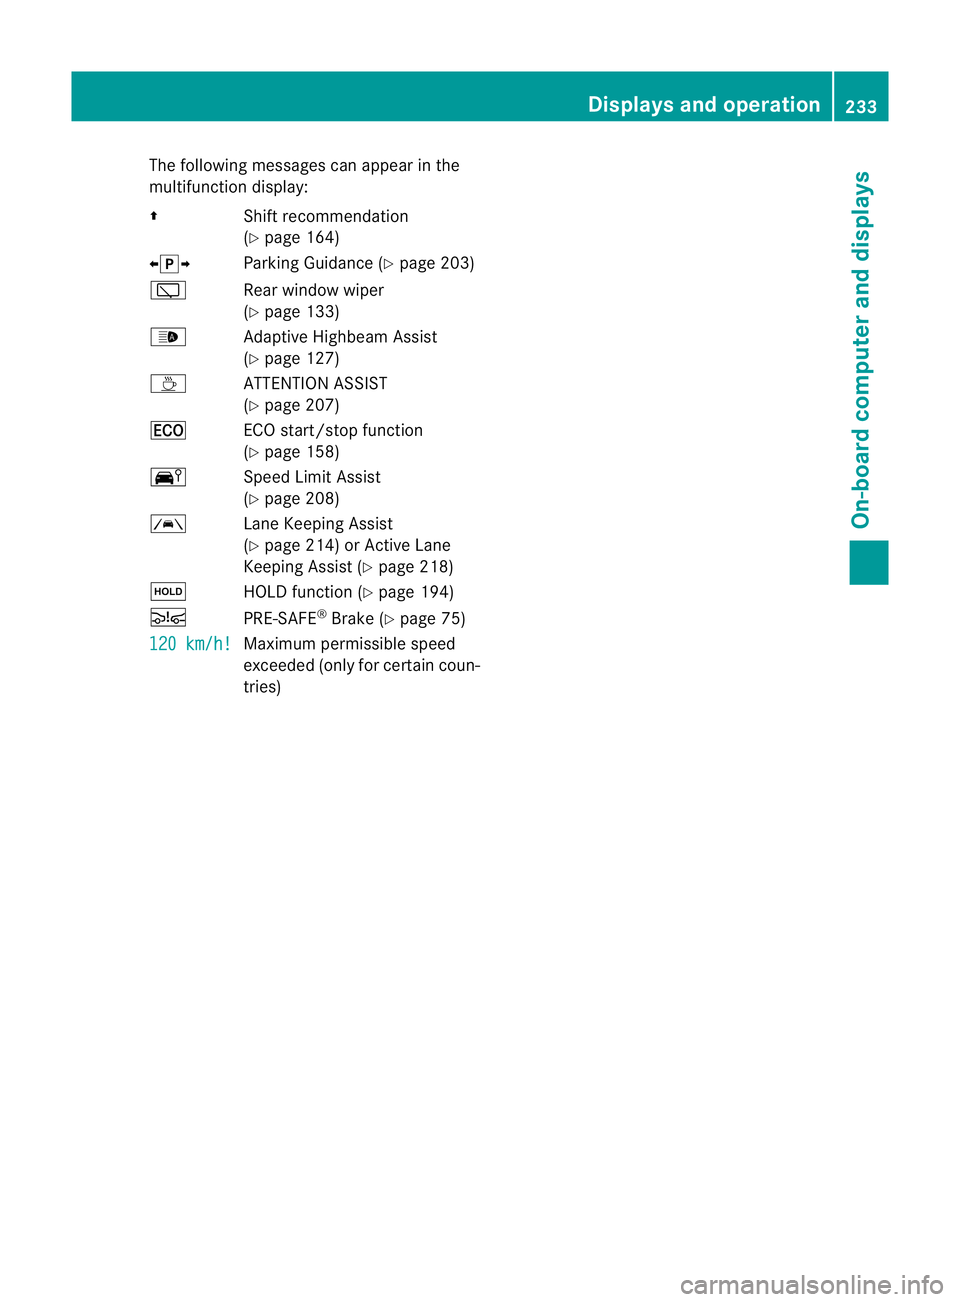
The following messages can appear in the
multifunction display:
Z Shift recommendation
(Ypage 164)
XjY Parking Guidance (Y page 203)
è Rear window wiper
(Ypage 133)
_ Adaptive Highbeam Assist
(Ypage 127)
À ATTENTION ASSIST
(Ypage 207)
¤ ECO start/stop function
(Ypage 158)
Ä Speed Limit Assist
(Ypage 208)
à Lane Keeping Assist
(Ypage 214) or Active Lane
Keeping Assist (Y page 218)
ë HOLD function (Y page 194)
Ä PRE-SAFE®
Brake (Y page 75)
120 km/h! Maximum permissible speed
exceeded (only for certain coun-
tries) Displays and operation
233On-board computer and displays Z
Page 247 of 409
![MERCEDES-BENZ E-CLASS ESTATE 2011 Owners Manual X
Press the abutton to confirm.
X Press :or9 to select the Perma‐ nent display function.
You will see the selected setting: outsidetemperature or
Dig. speedom [mph] .
X Press the abutton to save the MERCEDES-BENZ E-CLASS ESTATE 2011 Owners Manual X
Press the abutton to confirm.
X Press :or9 to select the Perma‐ nent display function.
You will see the selected setting: outsidetemperature or
Dig. speedom [mph] .
X Press the abutton to save the](/img/4/55509/w960_55509-246.png)
X
Press the abutton to confirm.
X Press :or9 to select the Perma‐ nent display function.
You will see the selected setting: outsidetemperature or
Dig. speedom [mph] .
X Press the abutton to save the setting.
Time/date This submenu is only available on vehicles
with Audio 20.
In the
Time/date submenu, you can set the
time and date.
Your vehicle may have the following audio
equipment:
A: Audio 20
B: Audio 50 APS
C: COMAND APS
X Refer to the separate operating instruc-
tions to find out which audio system is fit-
ted in your vehicle.
Depending on the audio system, the time and
date are received from GPS satellites and
cannot be set using the on-board computer
(see the following table). A B C
Setting using the on-board com-
puter X
Automatic GPS satellite recep-
tion X X
Setting the time zone once; see
the separate operating instruc-
tions X X
X
Press the =or; button on the steer-
ing wheel to select the Settings menu.
X Press the :or9 button to select the
Time/Date submenu.
X Press the abutton to confirm.
X Press the :or9 button to select
Time: or
Date: .
The curren ttime or date set is displayed. X
Press ato change the setting.
X Press the =or; button to selec tthe
display you want to change: hour, minute,
day, month, year.
X Press the :or9 button to set the
selected display.
X Press the abutton to store the entry.
Lights Switching the daytime driving lights on/
off
If you have activated the
Day lights function
and the light switch is in the Ãposition,
the daytime driving lights are automatically
switched on when the engine is running.
Depending on light conditions, the side lamps
and the dipped-beamh eadlamps will addi-
tionally light up.
X Switch off the engine.
X Press the =or; button on the steer-
ing wheel to select the Settings menu.
X Press the :or9 button to select the
Light submenu.
X Press the abutton to confirm.
X Press the :or9 button to select the
Day lights function.
If the Day lights have been switched on,
the cone of light and the Wsymbol in
the multifunction display are shown in red.
X Press the abutton to save the setting.
Switching the Intelligent Light System
on/off
If you activate the Intell. Light Sys. function, you activate the following functions:
R motorway mode
R active light function
R cornering light function
R extended range foglamps 244
Menus and submenusOn-board computer and displays
Page 248 of 409
X
Press the =or; button on the steer-
ing wheel to select the Settings menu.
X Press the :or9 button to select the
Light submenu.
X Press the abutton to confirm.
X Press the :or9 button to select the
Intell. Light Sys. function.
If the Intell. Light System function has
been switched on, the cone of light and the
L symbol in the multifunction display
are shown in red.
X Press the abutton to save the setting.
If you set the dipped-beam headlamps for
driving on the right/left (Y page 245), the
multifunction display shows the Systeminoperative display message under the
image of the vehicle for the Intell. Light
System function in the
Light submenu.
Setting the dipped-beam headlamps for
driving on the left/right
This function is only available on vehicles with
the Intelligent Light System.
You can use this function to switch between
symmetrical beam and asymmetrical dipped
beam (Y page 122).
If you set the dipped-beam headlamps for
driving on the right/left, then motorway
mode and the extended range foglamps are
not available.
X Press the =or; button on the steer-
ing wheel to select the Settings menu.
X Press the :or9 button to select the
Light submenu.
X Press the abutton to confirm.
X Press :or9 to select the Dipped beams Setting for function.
You will see the selected setting: Right-side traffic or
Left-side traffic .
X Press the abutton to save the setting.
When you change the setting, conversion
does not take place until the next time the
vehicle is stationary. You can also have the dipped-beam head-
lamps set for driving on the right or left at a
qualified specialist workshop.
Switching Adaptive Highbeam Assist on/
off
X
Press the =or; button on the steer-
ing wheel to select the Settings menu.
X Press the :or9 button to select the
Light submenu.
X Press the abutton to confirm.
X Press the :or9 button to select the
Adapt. main beam function.
If the Adapt. main beam function has
been activated, the cone of light and the
_ symbol in the multifunction display
are shown in red.
X Press the abutton to save the setting.
Setting the brightness of the ambient
lighting
X Press the =or; button on the steer-
ing wheel to select the Settings menu.
X Press the :or9 button to select the
Light submenu.
X Press the abutton to confirm.
X Press the :or9 button to select
Amb. light +/- .
X Press the abutton to confirm.
X Press the :or9 button to adjust the
brightness to any level from Off to
Level 5 (bright).
X Press the aor% button to save the
setting.
Activating/deactivating the surround
lighting and exterior lighting delayed
switch-off
If you have activated the Surround light‐ ing function and the light switch is set to
Ã, the following functions are activated
when it is dark:
R Surround lighting: the exterior lighting
remains lit for 40 secondsafter unlocking Menus and submenus
245On-board computer and displays Z