key MERCEDES-BENZ E-CLASS ESTATE 2015 Owners Manual
[x] Cancel search | Manufacturer: MERCEDES-BENZ, Model Year: 2015, Model line: E-CLASS ESTATE, Model: MERCEDES-BENZ E-CLASS ESTATE 2015Pages: 497, PDF Size: 16.23 MB
Page 414 of 497
N,y
ou must provide power to the vehicle's
electrical system in the same way as when
jump-startin g(Ypage 405).
Have the vehicle transported on atransporter
or trailer. Tow-starting (emergency engine
starting)
! Vehicles with automatic transmission
must not be tow-started. The transmission
may otherwise be damaged.
i You can find information on "Jump-start-
ing" under (Y page 405).
Before tow-starting, the following conditions
must be fulfilled:
R the battery is connected
R the engin ehas cooled down
R the exhaust system has cooled down
When tow-starting, it is important that you
observ ethe safet ynotes (Y page 407) and the
legal requirementsine ach respective coun-
try.
X Switch on the hazard warnin glamps
(Y page 145).
X Fit the towin geye (Y page 409).
X Secure the rigid towin gbar or the towing
rope.
X Depress the brake pedal and keep it
depressed.
X Turn the key to position 2in the ignition
lock.
X Depress the clutc hpedal fully, engage sec-
ond gear and continue to keep the clutch
pedal fully depressed.
X Release the brake pedal.
X Tow-start the vehicle.
X Release the clutc hpedal slowly, do not
depress the accelerator pedal while doing
so.
X When the engin ehas been started, imme-
diately depress the clutc hpedal fully and
shift to neutral. X
Pull over at asuitable place and sto pthe
vehicle safely, paying attention to road and
traffic conditions.
X Depress the parkin gbrake.
X Remove the rigid towin gbar or towin grope.
X Remove the towin geye (Y page 409).
X Switch off the hazard warnin glamps. Electrical fuses
Important safet
ynotes G
WARNING
If you manipulate, bridge or replace afaulty
fuse with afuse of ahigher amperage, the
electric cables could be overloaded. This may result in afire. There is arisk of an accident
and injury.
Always replace faulty fuses with specified new fuses of the correct amperage.
! Only use fuses that have been approved
for Mercedes-Benz vehicles and which
have the correct fuse ratin gfor the system
concerned. Otherwise, components or sys-
tem scould be damaged.
The fuses in your vehicle serv etodisconnect
faulty circuits. If afuse blows, all the compo-
nents on the circuit and their function swill
fail.
Blown fuses must be replaced with fuses of
the same rating, which you can recognise by
the colour and fuse rating. The fuse ratings
are listed in the fuse allocation chart.
If the newly inserted fuse also blows, have the
cause traced and rectified at aqualified spe-
cialist workshop, e.g. aMercedes-Benz Ser-
vice Centre. Befor
ereplacing afuse
Pay attention to the important safet ynotes
(Y page 411). Electrical fuses
411Breakdown assistance Z
Page 415 of 497
X
Safeguard the vehicl eagains trolling away
(Y page 205).
X Switch off the engine.
X Switch off al lelectrical consumers.
X Remove the key from the ignition lock.
or, on vehicles with KEYLESS‑GO,
X Ope nthe driver' sdoor.
The on-board electronics now have status
0.T hisist he same as the key having been
removed.
The driver' sdoorc an be closed again.
All indicator lamps in the instrument cluster
mus tbeo ff.
The fuses are locate dinvarious fus eboxes:
R fus ebox in the engine compartment on the
left-hand sid eofthe vehicle, when viewed
in the direction of travel
R fus ebox in the boot/luggage compartment
on the right-hand sid eofthe vehicle, when
viewe dinthe direction of travel
The fus ealloc ation chart is locate dinthe
vehicl etool kit in the stowag ecompartment
under the boot/luggage compartment floor
(Y page 395). Fus
eboxin the engine compartment
Pa ya ttention to the important safety notes
(Y page 411). G
WARNING
Whe nthe bonne tiso pen, and the windscreen
wipers are set in motion, yo ucan be injured by
the wipe rlinkage. There is ariskofi njury.
Alway sswitch off the windscreen wipers and
the ignition before opening the bonnet.
! Make sure tha
tnomoisture can enter the
fus eb ox when the cove risopen.
! Whe
nclosing the cover, make sure tha tit
is lying correctly on the fus ebox. Moisture
seeping in or dirt could otherwise impair
the operation of the fuses. X
Make sure tha tthe windscreen wipers are
switche doff.
X Ope nthe bonnet.
X Remove any existing moisture from the
fus eb ox using adry cloth.
X To open: take lines ;outoft he guides.
X Mov elines ; to one side. Route the lines
behind connection =to do this.
X Ope nretaining clamps :.
X Remove the fus ebox cove rforwards.
X To close: check whethe rthe sea lislying
correctly in the cover.
X Insert the cove ratthe rea rofthe fus ebox
into the retainer.
X Fol dd ownc ove rand close clamps :.
X Secure lines ;in the guides.
X Close the bonnet. Fus
eboxin the boot
Pa ya ttention to the important safety notes
(Y page 411).
! Make sure tha
tnomoisture can enter the
fus eb ox when the cove risopen.
! Whe
nclosing the cover, make sure tha tit
is lying correctly on the fus ebox. Moisture
seeping in or dirt could otherwise impair
the operation of the fuses. 412
Electrical fusesBreakdown assistance
Page 425 of 497
Important safety notes
The tyr
epressur ewarning system does not
warn you of an incorrectl yset tyr epressure.
Observ ethe note sont herecommended tyre
pressur e(Ypage 420).
The tyr epressur eloss warning does not
replace th eneedtor egularly chec kthe tyre
pressures. An eve nloss of pressur eonsev-
eral tyres at th esame time canno tbedetec-
te dbyt hetyrep ressur eloss warning system.
The tyr epressur emonitor is no table to warn
you of asudde nloss of pressure, e.g. if the
tyr eisp enetrated by aforeign object. In the
event of asudde nloss of pressure, brin gthe
vehicl etoah alt by braking carefully. Avoid
abrup tsteering manoeuvres.
The function of th etyrep ressur eloss warning
system is limited or delayed if:
R snow chains are fitte dtoyour vehicle's
tyres.
R road condition sare wintry.
R you are driving on san dorgravel.
R you adopt averys port ydriving style (cor-
nerin gath igh speeds or driving wit hhigh
rates of acceleration).
R you are towin gaveryh eav yorl argetrailer.
R you are driving wit haheavyload (in the
vehicl eoront heroof).
Restarting th etyrep ressure loss warn-
ing system Restart th
etyrep ressur eloss warning system
if you have:
R changed th etyrep ressure
R changed th ewheels or tyres
R fitte dnew wheels or tyres
X Befor erestarting ,makes ure that th etyre
pressures are set properly on all four tyres
for th erespective operating conditions.
The recommended tyr epressures can be
foun dint hetyrep ressur etable on th efuel
filler flap.
The tyr epressur eloss warning system can
only giv ereliable warning sifyou have set th
ec orrect tyrep ressure. If an incorrect
tyr ep ressur eisset,the se incorrec tvalues
will be monitored.
X Observ ethe note sint hesection on tyre
pressures (Y page 420).
X Mak esure that th ekeyis in position 2in the
ignition loc k(Ypage 179).
X Press the =or; buttononthesteer-
ing whee ltos elect the Serv.
Serv. menu.
X Press the 9or: buttononthesteer-
ing whee ltos elect the Tyrep ressure
Tyr ep ressure
menu.
X Press the abutton.
The Run Fla tIndicator active
Run Fla tIndicator active
Restart Restart with
withOK
OKmessage appear sinthe
multifunction display.
If you wish to confirm th erestart:
X Press the abutton.
The Tyrep ress. now OK?
Tyr ep ress. now OK? message
appear sinthemultifunction display.
X Press the 9or: buttontos elect
Yes
Yes .
X Press the abutton.
The Run Fla tIndicator restarted
Run Fla tIndicator restarted
message appear sinthemultifunction dis-
play.
Afte rateach-in period, th etyrep ressure
loss warning system will monitor th eset
tyr ep ressures of all four tyres.
If you wish to cance lthe restart:
X Press the %button.
or
X When the Tyre
Tyre press. press. now
now OK?
OK?message
appears, press the 9or: buttonto
select Cancel
Cancel .
X Press the abutton.
The tyr epressur evalue sstoredatt helast
restar twill continue to be monitored. 422
Tyre pressureWheels and ty
res
Page 427 of 497
phones, two-way radios) that may be being
operated in or near the vehicle.
Checking the tyr epressure electroni-
cally X
Make sure that the key is in position 2
(Y page 179) in the ignition lock.
X Press the =or; button on the steer-
ing wheel to select the Service
Servicemenu.
X Press the 9or: button to select
Tyre pressure
Tyre pressure.
X Press the abutton.
The curren ttyre pressure for each wheel
will be displayed in the multifunction dis-
play.
If the vehicle has been parked for over
20 minutes, the Tyre Tyrepressures
pressures will
willbe
be
displayed after afew minute sof
displayed after afew minute sof
driving
driving message appears.
After ateach-in period, the tyre pressure
monitor automatically detects new wheels or new sensors. As long as aclear allocation of
the tyre pressure values to the individual
wheels is not possible, the Tyre pressure Tyre pressure
monito ractive
monito ractive display message is shown
instead of the tyre pressure display. The tyre
pressures are already being monitored.
If an emergency spare wheel is fitted, for a
few minutes the system may continue to
show the tyre pressure of the wheel that has
been removed. If this occurs, not ethat the
value displayed for the position where the
spare wheel is fitted is not the same as the
curren ttyre pressure of the emergency spare
wheel.
Warning messages of the tyr epressure
monitor If the tyre pressure monitor detects
apres-
sure loss in one or more tyres, awarning mes-
sage is shown in the multifunction display and
the yellow tyre pressure monitor warning
lamp comes on.
R If the Please correc ttyre pressure
Please correc ttyre pressure
message appears in the multifunction dis- play, the tyre pressure in at least one tyre is
too low and must be corrected at the next
opportunity.
R If the Check tyre(s) Check tyre(s) message appears in
the multifunction display, the tyre pressure in one or more tyres has dropped signifi-
cantly and the tyres must be checked.
R If the Warnin gtyre defect
Warnin gtyre defect message
appears in the multifunction display, the
tyre pressure in one or more tyres has drop-
ped suddenly and the tyres must be
checked.
Observ ethe instructions and safety notes in
the display messages in the "Tyres" section
(Y page 322).
If the wheel position sonthe vehicle are inter-
changed, the tyre pressures may be displayed for the wrong position sfor as hort time. After
af ew minutes of driving, this is rectified and
the tyre pressures are displayed for the cor-
rect positions.
Restarting the tyr epressure monitor When you restart the tyre pressure monitor,
all existing warning messages are deleted and
the warning lamps go out. The monitor uses
the currently set tyre pressures as the refer-
enc evalues for monitoring. In most cases, the
tyre pressure monitor will automatically
detec tthe new referenc evalues after you
have changed the tyre pressure. However,
you can also define referenc evalues man-
ually as described here. The tyre pressure
monitor then monitors the new tyre pressure values.
X Use the table on the inside of the fuel filler
flap to ensure that the tyre pressure is set
correctly in all four tyres for the current
operatin gconditions.
Also observe the notes in the section on
tyre pressures (Y page 420).
X Make sure that the key is in position 2in the
ignition lock.
X Press the =or; button on the steer-
ing wheel to select the Service Servicemenu. 424
Tyrep
ressureWheels and tyres
Page 430 of 497
X
Remove th ekeyfrom th eignition lock.
or, on vehicles wit hKEYLESS‑GO:
X Ope nthe driver's door.
The on-boar delectronics no whaves tatus
0 .T his is th esam east hekeyh avin gbeen
removed.
X Remove th eStart/Sto pbutto nfromt he
ignition loc k(Ypage 179).
X If included in th evehicl eequipment,
remove th etyre-chang etoolkitfrom the
vehicl e(Ypage 395).
X Safeguar dthe vehicl eagainst rollin gaway.
i Apart from som
ecountry-specific var-
iants ,vehicles are no tequipped wit htyre-
changin gtools. Some tools for changin ga
whee lare specific to th evehicle. Fo rmore
information on whic htools are require dto
perfor mawheelcha ng eony our vehicle,
consult aqualified specialist workshop.
Necessary tyre-changin gtools may
include, for example:
R Jack
R Wheel chock
R Wheel wrench
Securing th evehicle against rolling
away If your vehicl
eisequipped wit hawheelchock,
it can be found in th etyre-chang etoolkit
( Y page 395).
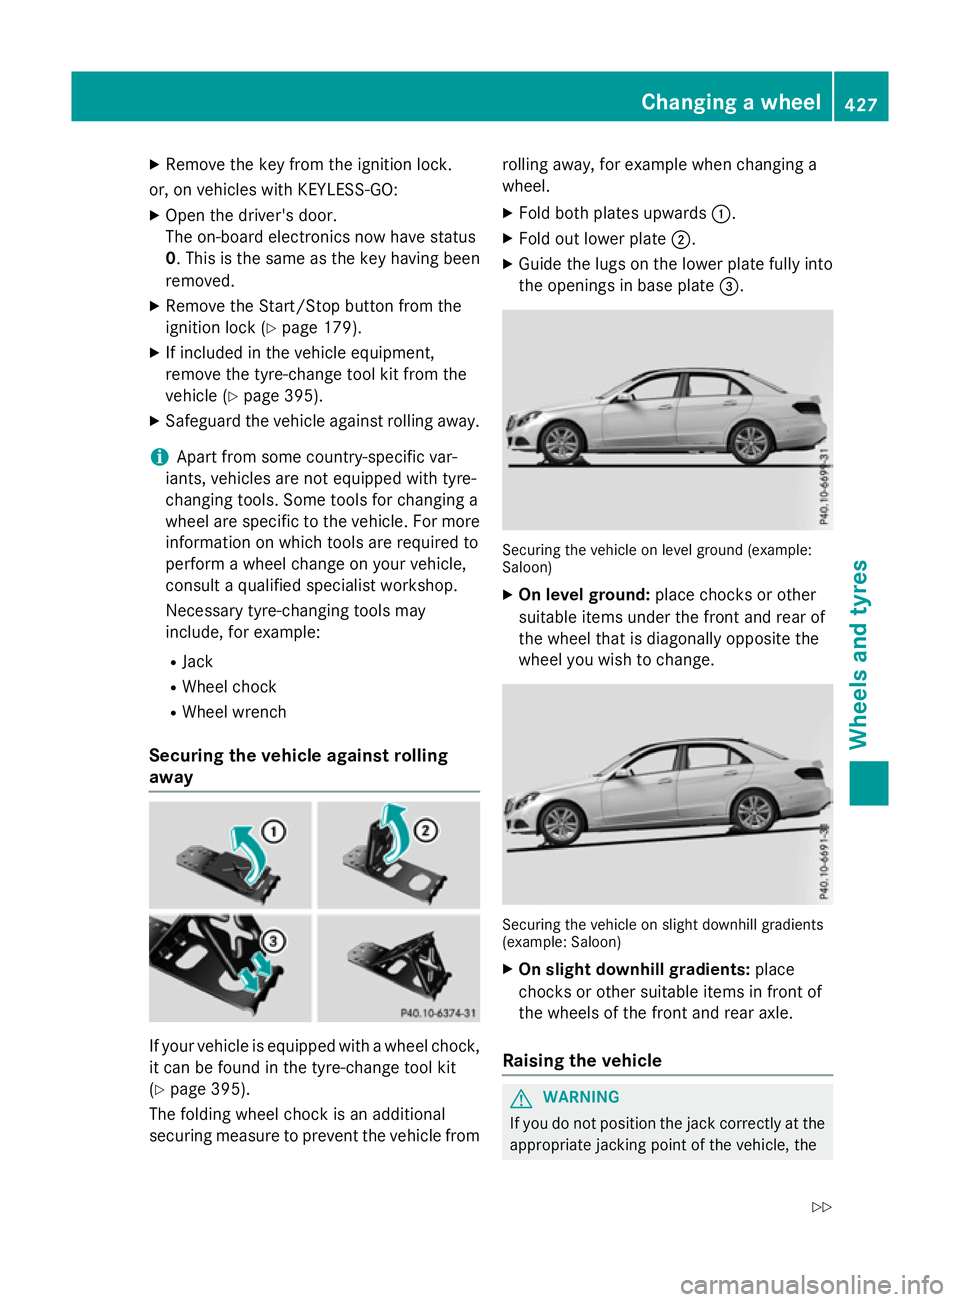
The foldin gwhee lchock is an additional
securin gmeasure to preven tthe vehicl efrom rollin
gaway, for exampl ewhen changin ga
wheel.
X Fold bot hplates upwards :.
X Fold out lower plate ;.
X Guide th elugs on th elower plat efully into
th eo penings in base plate =. Securin
gthe vehicl eonlevel ground (example:
Saloon)
X On level ground: placechock soro ther
suitable items under th efront and rear of
th ew hee ltha tisd iagonally opposit ethe
whee lyou wish to change. Securin
gthe vehicl eons light downhill gradients
(example: Saloon)
X On sligh tdownhil lgradie nts:place
chocks or other suitable items in fron tof
th ew heels of th efront and rear axle.
Raisin gthe vehicle G
WARNING
If you do no tposition th ejackc orrectly at the
appropriat ejacking poin tofthevehicle, the Changing
awheel
427Wheels and tyres
Z
Page 470 of 497
X
Remove th eprotective film from th evehicle
tool ki tand put it ove rthe collapsible emer-
gency spar ewheel.
X Stow th ecollapsible emergenc yspare
whee lintheemergenc yspar ew hee lwell
under th eboot/luggag ecom partment. Inflating th
ecollapsible emergency
spar ewheel
! Inflat
ethe collapsible emergenc yspare
whee lusin gthe tyreinflation compressor
before lowerin gthe vehicle. The whee lrim
could otherwise be damaged.
! Do no
toperate th etyrei nflation com-
presso rfor longer than eigh tminute sata
time without abreak. It may otherwise
overheat.
The tyr einflation compressor can be oper-
ate dagain once it has cooled down. X
Moun tthe collapsible emergenc yspare
whee lasd escribed (Y page 426).
The collapsible emergenc yspar ew heel
mus tbem ountedbefore it is inflated.
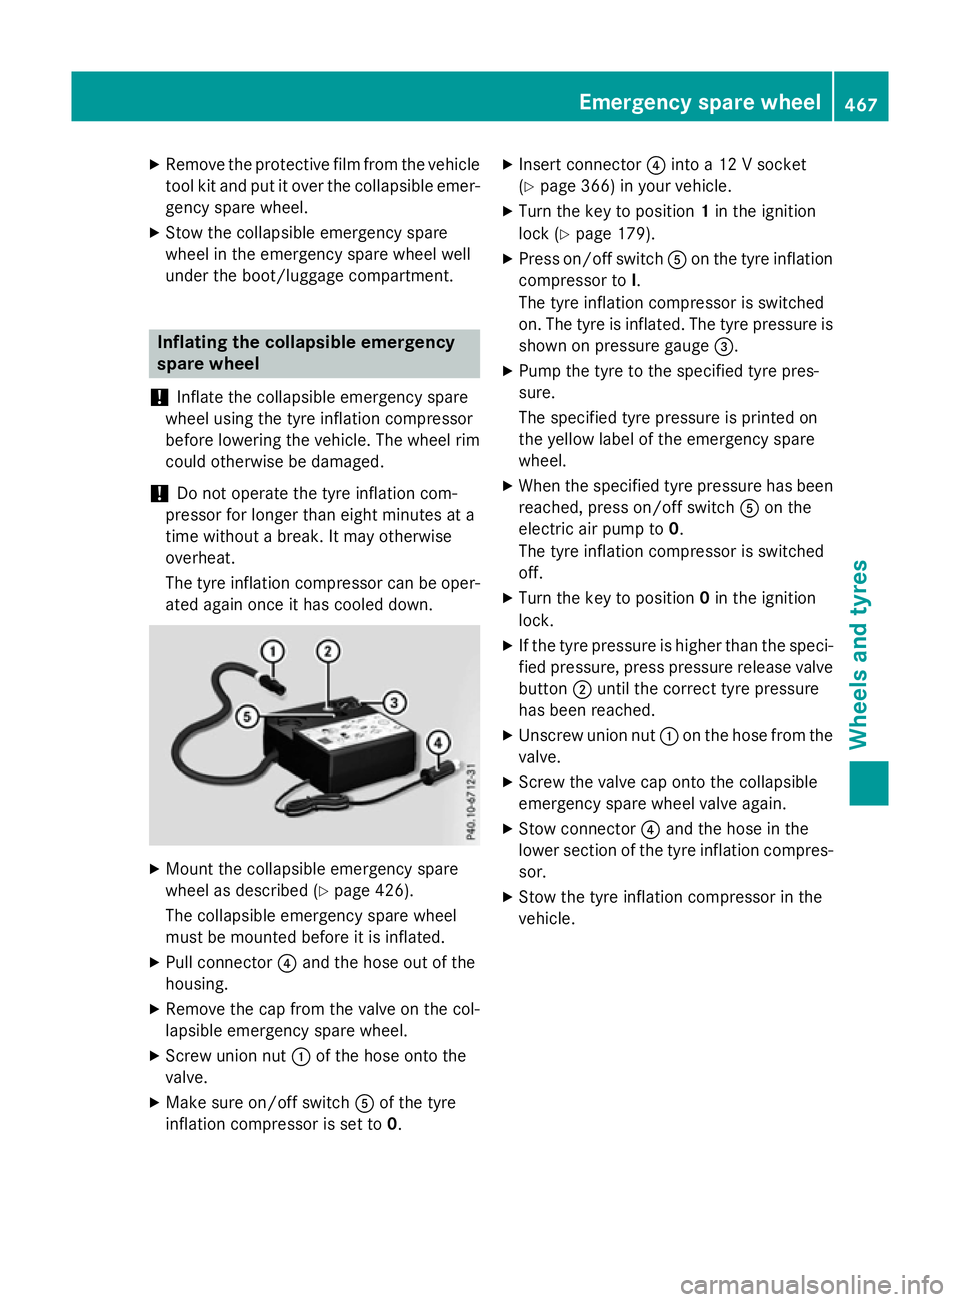
X Pull connector ?and th ehoseo ut of the
housing.
X Remove th ecap from th evalveont hecol-
lapsible emergenc yspar ew heel.
X Screw union nut :of th ehoseo ntot he
valve.
X Mak esureo n/of fswitch Aof th etyre
inflation compressor is set to 0.X
Inser tconnector ?into a12Vs ocket
(Y page 366) in your vehicle.
X Turn th ekeyto position 1in th eignition
loc k(Ypage 179).
X Press on/off switch Aon th etyrei nflation
compressor to I.
The tyr einflation compressor is switched
on .The tyr eisinflated. The tyr epressur eis
shown on pressur egauge =.
X Pump th etyretot hespecified tyr epres-
sure.
The specified tyr epressur eisprinted on
th ey ellow label of th eemergenc yspare
wheel.
X Whe nthe specified tyr epressur ehas been
reached, press on/off switch Aon the
electric air pump to 0.
The tyr einflation compressor is switched
off.
X Turn th ekeyto position 0in th eignition
lock.
X If th etyrep ressur eishigher than th especi-
fie dp ressure, press pressur erelease valve
button ;until th ecorrect tyrep ressure
has been reached.
X Unscrew union nut :on th ehosef romt he
valve.
X Screw th evalvec ap onto th ecollapsible
emergenc yspar ew hee lvalv ea gain.
X Stow connector ?and th ehoseint he
lower section of th etyrei nflation compres-
sor.
X Stow th etyrei nflation compressor in the
vehicle. Emergency spar
ewheel
467Wheels and tyres Z