seats MERCEDES-BENZ E-CLASS ESTATE 2015 User Guide
[x] Cancel search | Manufacturer: MERCEDES-BENZ, Model Year: 2015, Model line: E-CLASS ESTATE, Model: MERCEDES-BENZ E-CLASS ESTATE 2015Pages: 497, PDF Size: 16.23 MB
Page 58 of 497
NECK-PRO head restraints/NECK-
PRO luxury head restraints
Important safety notes G
WARNING
Th ef unctio noft he head restraint ma ybe
impaired if you:
R attach objects such as coa thangers to the
head restraints ,for example
R useu nsuitable head restraint covers
If yo udos o,the head restraints cannot fulfil
their intende dprotective functio ninthe event
of an accident. In addition, objects attached
to the head restraints could endanger other
vehicl eoccupants. This pose sanincreased
risk of injury.
Do not attach any objects to the head
restraints and onl yusesuitabl eheadr estraint
covers.
Consult aMercedes-Benz Service Centre
regarding the availability of suitabl eseator
head restraint covers.
Operation NECK-PR
Oheadr estraints/NECK-PR Oluxury
head restraints offer additional protection
against head and neck injuries .Inthe event of
ar ea rcollision of acertai nseverity ,the NECK-
PR Oh eadr estraints/NECK-PR Oluxuryh ead
restraints on the driver's and front-passenger
seats ar emoved forwards and upwards .This
provide sbetter head support.
If the NECK-PR Oheadr estraints/NECK-PRO
luxur yheadr estraints have been triggere din
an accident, reset the NECK-PR Ohead
restraints/NECK-PR Oluxuryh eadr estraints
on the driver's seat and the front-passenger
seat (Y page 55). Otherwise, the additional
protection will not be availabl einthe event of
anothe rrear-en dcollision. Yo ucan se ethata
NECK-PR Oheadr estraint/NECK-PR Oluxury
head restraint ha sbeent riggere difitist ilted
forward and can no longe rbeadjusted. Mercedes-Benz recommend
sthaty ou have
the functionality of the NECK-PR Ohead
restraints/NECK-PR Oluxuryh eadr estraints
checked at aqualified specialis tworkshop
after arear-en dcollision.
Resetting atriggered NECK-PRO head
restraint/NECK-PRO luxury head
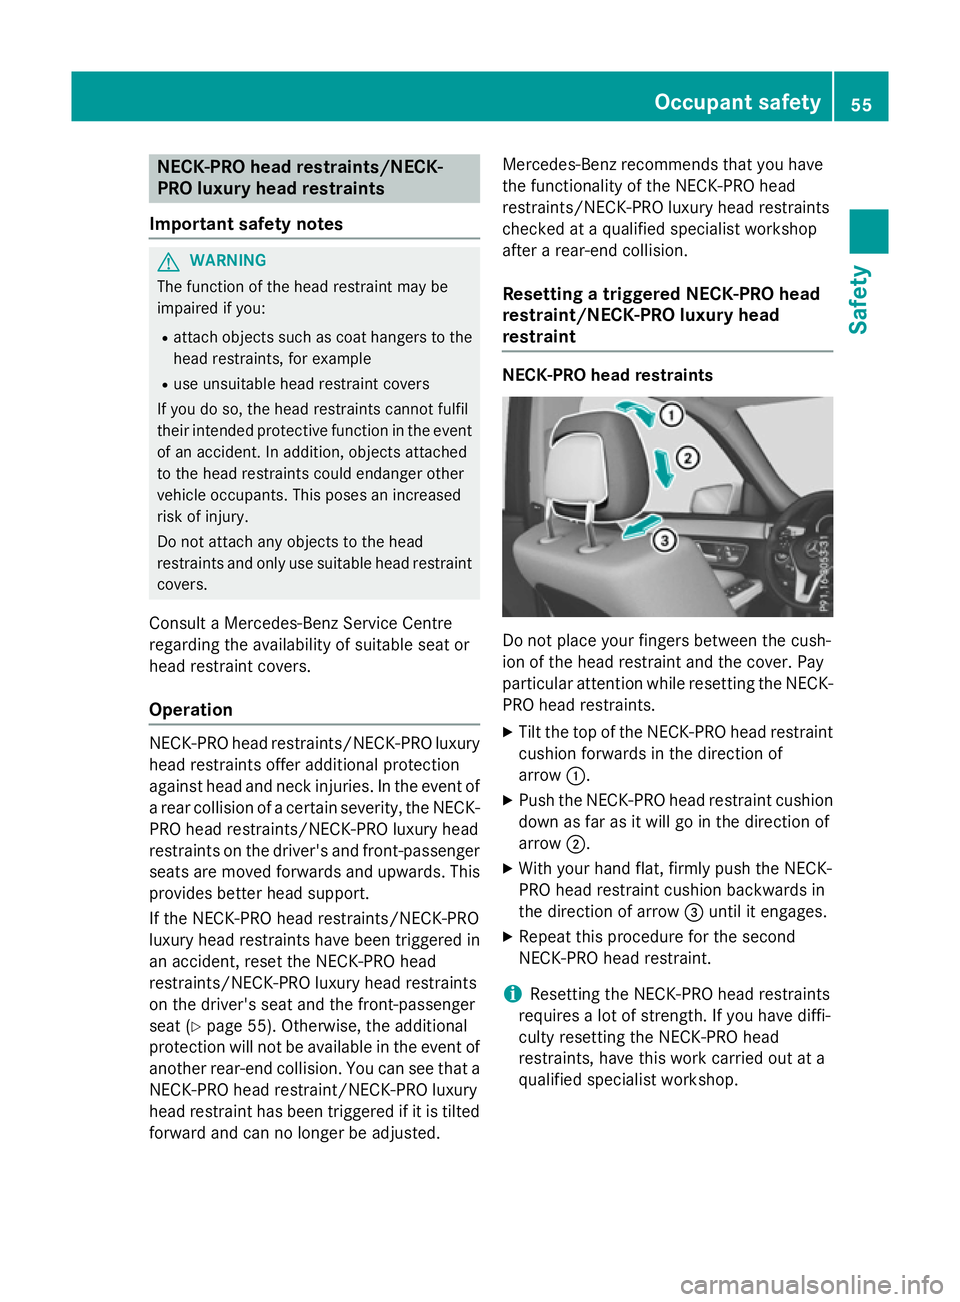
restraint NECK-PRO head restraints
Do not place your fingers between the cush-
io
noft he head restraint and the cover. Pay
particula rattentio nwhile resetting the NECK-
PR Oh eadr estraints.
X Tilt the top of the NECK-PR Oheadr estraint
cushion forwards in the directio nof
arrow :.
X Push the NECK-PR Oheadr estraint cushion
down as fa rasitwillgoint he directio nof
arrow ;.
X With your hand flat, firml ypusht he NECK-
PR Oh eadr estraint cushion backwards in
the directio nofarrow =unti lite ngages.
X Repeat thi sprocedur efor the second
NECK-PR Oheadr estraint.
i Resetting the NECK-PR
Oheadr estraints
requires alot of strength .Ifyouhave diffi-
culty resetting the NECK-PR Ohead
restraints ,havet hisw orkc arried ou tata
qualifie dspecialis tworkshop. Occupant safety
55Safety Z
Page 59 of 497
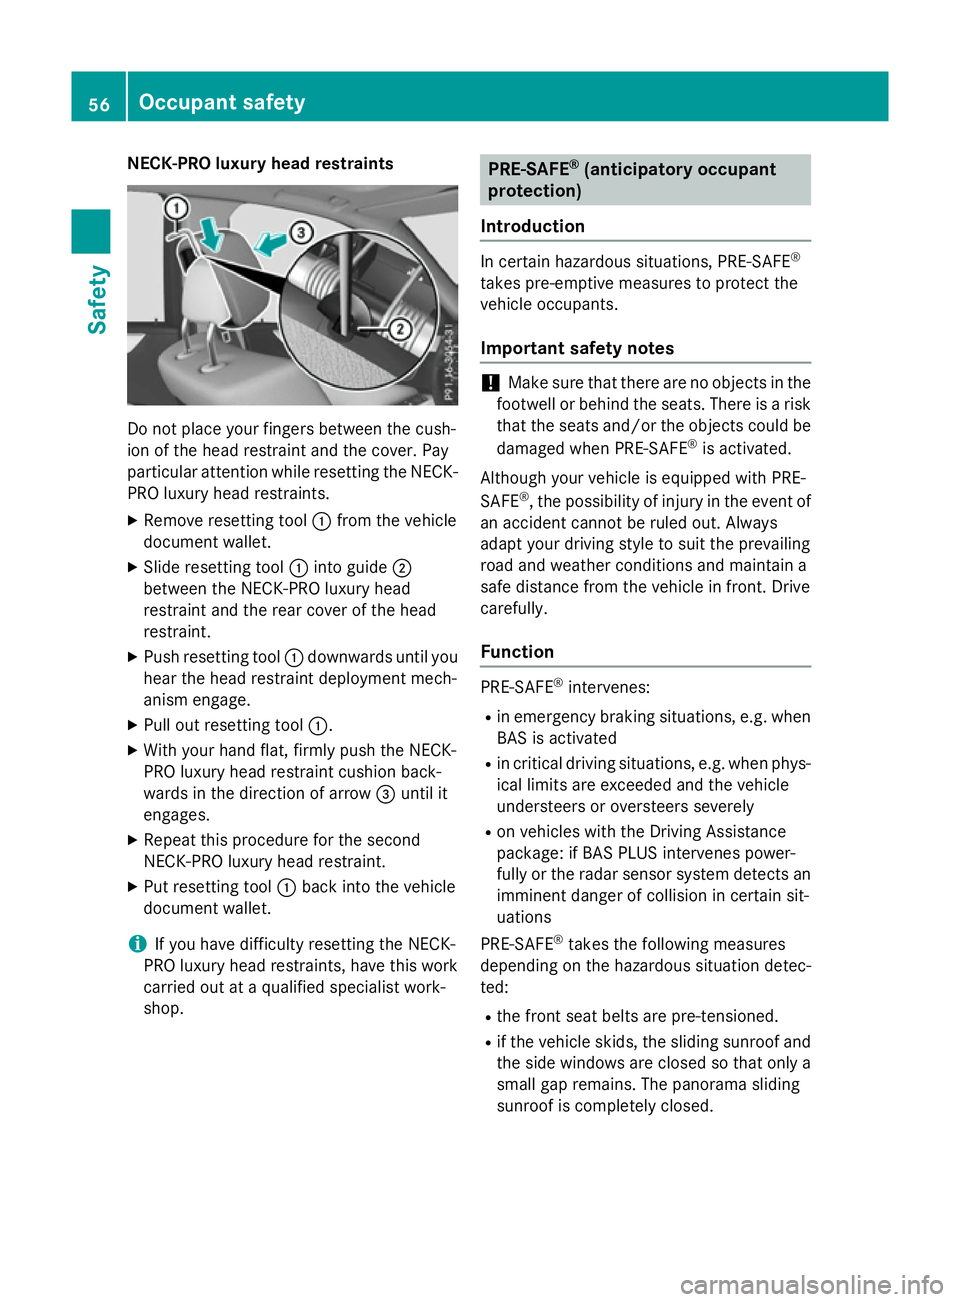
NECK-PRO luxury head restraints
Do not place your fingers between the cush-
io noft he head restraint and the cover. Pay
particular attentio nwhile resetting the NECK-
PR Ol uxuryh eadr estraints.
X Remov eresetting tool :fromt he vehicle
document wallet.
X Slide resetting tool :into guide ;
between the NECK-PR Oluxuryh ead
restraint and the rea rcove roft he head
restraint.
X Push resetting tool :downwards unti lyou
hear the head restraint deployment mech-
anism engage.
X Pull ou tresetting tool :.
X With your hand flat, firml ypusht he NECK-
PR Ol uxuryh eadr estraint cushion back-
wards in the direction of arrow =unti lit
engages.
X Repeat thi sprocedur efor the second
NECK-PR Oluxuryh eadr estraint.
X Pu tresetting tool :back into the vehicle
document wallet.
i If yo
uhaved ifficulty resetting the NECK-
PR Ol uxuryh eadr estraints ,havet hisw ork
carried ou tataqualified specialis twork-
shop. PRE-SAFE
®
(anticipatory occupant
protection)
Introduction In certain hazardous situations, PRE-SAFE
®
take spre-emptive measures to protect the
vehicl eoccupants.
Important safety notes !
Make sure tha
tthere ar enoobjects in the
footwell or behind the seats .The re is arisk
tha tthe seats and/or the objects could be
damage dwhenP RE-SAFE ®
is activated.
Although your vehicl eisequippe dwithP RE-
SAFE ®
,t he possibility of injury in the event of
an accident cannot be rule dout.A lways
adap tyou rd rivin gstyle to suit the prevailing
roa dand weather conditions and maintain a
safe distance fro mthe vehicl einfront. Drive
carefully.
Function PRE-SAFE
®
intervenes:
R in emergency braking situations, e.g .when
BAS is activated
R in critica ldrivin gsituations, e.g .whenp hys-
ica llimit sareexceeded and the vehicle
understeers or oversteers severely
R on vehicles with the Driving Assistance
package: if BAS PLU Sintervenes power-
full yort he rada rsen sor syste mdetects an
imminent dange rofcollision in certain sit-
uations
PRE-SAFE ®
take sthe following measures
depending on the hazardous situatio ndetec-
ted:
R the front seat belts ar epre-tensioned.
R if the vehicl eskids ,the sliding sunroo fand
the side windows ar eclose dsot hato nlya
small ga premains. Th epanorama sliding
sunroo fiscompletel yclosed. 56
Occupant safetySafety
Page 60 of 497
R
vehicles with the memory function: the
front-passenge rseat is adjusted if it is in an
unfavourable position.
R vehicles with amulticontour seat or active
multicontour seat: the air pressure in the
side bolsters of the backrest is increased.
If the hazardous situation passes without
resulting in an accident, PRE-SAFE ®
slackens
the beltp re-tensioning. On vehicles with mul-
ticontour seats/active multicontour seats,
the air pressure in the side bolsters is reduced
again. All settings made by PRE-SAFE ®
can
then be reversed.
If the seat beltp re-tensioning is not reduced:
X Move the seat backrest or seat back
slightly when the vehicl eisstationary.
Seat beltp re-tensioning is reduced and the
locking mechanism is released.
The seat-belt adjustment is an integral part of
the PRE-SAFE ®
convenience function. Infor-
mation about the convenience function can
be found under "Bel tadjustment"
(Y page4 9). PRE-SAFE
®
PLUS( anticipatory occu-
pant protectio nPLUS)
Introduction PRE-SAFE
®
PLUS is only available in vehicles
with the Driving Assistance package.
Using the rada rsensor system, PRE-SAFE ®
PLUS is abletod etect thatahead-on or rear-
end collision is imminent. In certain hazard-
ous situations, PRE-SAFE ®
PLUS takes pre-
emptive measures to protect the vehicle
occupants.
Important safety notes The intervention of PRE-SAFE
®
PLUS cannot
prevent an imminent collision.
The drive risnot warned before the interven-
tion of PRE-SAFE ®
PLUS. PRE-SAFE
®
PLUS does not intervene:
R if the vehicl eisreversing
R when the vehicl eistowing atrailer and
there is arisk of arear-end collision
PRE-SAFE ®
PLUS does not perform braking
actions while the vehicl eisinmotion or when
Parking Guidance is active.
Function PRE-SAFE
®
PLUS intervenes in certain situa-
tions if the rada rsensor system detects an
imminent head-on or rear-end collision.
PRE-SAFE ®
PLUS takes the following meas-
ures depending on the hazardous situation
detected:
R If the rada rsensor system detects that a
head-on collision is imminent, the seat
belts are pre-tensioned.
R If the rada rsensor system detects that a
rear-end collision is imminent:
- the rear hazard warning lamp sare acti-
vated and flas hatahigher frequency.
- the brake pressure is increase difthe
drive rappliest he brakes when the vehi-
cle is stationary.
- the seat belts are pre-tensioned.
The PRE-SAFE ®
PLUS braking application is
cancelled:
R if the accelerator peda lisdepressed when
ag earise ngaged
R if the risk of acollision passes or is no lon-
ger detected
R if DISTRONIC PLUS indicates an intention
to pulla way
If the hazardous situation passes without
resulting in an accident, the original settings
are restored. Occupant safety
57Safety Z
Page 61 of 497
Automati
cmeasures after an acci-
dent
Immediately after an accident, th efollowing
measures are implemented, depending on
th et ypea nd severity of th eimpact:
R theh azard warning lamp sare activated
R thee mergenc ylighting is activated
R thev ehicl edoor sare unlocked
R thef ront side windows are lowered
R vehicles wit hamemory function :the elec-
trically adjustable steering whee lisraised
R thee ngineiss witched off and th efuel sup-
ply is cut off
R vehicles wit hthe Mercedes-Benz emer-
gency call system: automatic emergency
call
R vehicles wit hthe hybrid driv esystem: the
hybrid system and th ehigh-voltage electri-
cal system are deactivated Children in th
evehicle Important safety notes
Acciden tstatistics sho wthatc hildren
secured in th erear seat sare safer than chil-
dre nsecured in th efront seats. Fo rthisr ea-
son ,Mercedes-Benz strongly advises that you
instal lachild restrain tsystem on arear seat.
Children are generally bette rprotected there.
If ac hild younger than twelve years old and
under 1.50 minh eight is travellin ginthe
vehicle:
R always secure th echild in achild restraint
system suitable for Mercedes-Benz vehi-
cles. The child restrain tsystem mus tbe
appropriat etotheage, weigh tand siz eof
th ec hild
R be sur etoobservethe instruction sand
safet ynotes in this section in addition to
th ec hild restrain tsystem manufacturer's
installation instructions
Do no tfitar earward-facing child restraint
system on th ecentre rear seat. G
WARNING
If you leav echildren unattended in th evehi-
cle ,the ym ay be able to set th evehicl ein
motion if, for example, they:
R release th eparking brake
R shif tthe automatic transmission out of park
position Por shif tmanual transmission into
neutral
R start th eengine
In addition ,the ym ay operate vehicl eequip-
men tand become trapped .There is ariskof
an acciden tand injury.
When leaving th evehicle, always tak ethe key
wit hyou and loc kthe vehicle. Never leave
children unattended in th evehicle. G
WARNING
If person s(particularly children )are exposed
to heat or cold for aprolonged period, there is
ar iskofs erious or eve nfatal injuries. Never
leav eperson s(particularly children )unatten-
ded in th evehicle. G
WARNING
If th echild restrain tsystem is placed in direct
sunlight, th epartsc ould become ver yhot.
Children could be suffer burn sbytouching
these parts, in particular on th emetallic parts
of th echild restrain tsystem. There is ariskof
injury.
If you and your child leav ethe vehicle, always
mak esuret hatthe child restrain tsystem is
no tind irectsunlight. Cove ritwithab lanket,
for example. If th echild restrain tsystem has
been exposed to direc tsunlight, leav eitto
cool down before securin gthe child in it.
Never leav echildren unattended in th evehi-
cle.
Always ensur etha tall vehicl eoccupant shave
their seat belt sfastene dcorrectly and are sit-
ting properly. Particular attention mus tbe
paid to children.
Observ ethe safet ynotes on th eseat belt
(Y page 46) and th enotes on how to use the
seat belt properly (Y page 47).58
Childre
ninthevehicleSafety
Page 63 of 497
accident. This pose
sanincreased risk of
injury or even fatal injury.
If th echild weigh smoret han2 2kg,only use
ISOFIX child restraint systems with whic hthe
child is also secured with th evehicle seat belt.
Als osecure th echild restraint system with the
Top Tether belt ,ifavailable.
When fittin gachild restraint system, be sure
to observ ethe manufacturer' sinstallation
and operatin ginstruction sand th einstruc-
tions for correc tuse of th echild restraint sys-
te m( Ypage 70).
Before ever ytrip, mak esure that th eISOFIX
child restraint system is engaged correctly in bot hISOFI Xsecurin grings.
! When fittin
gthe child restraint system,
mak esure that th eseat belt for th ecentre
seat does no tget trapped. Otherwise, the
seat belt coul dbedamaged. When installing th
eISOFI Xchild restraint sys-
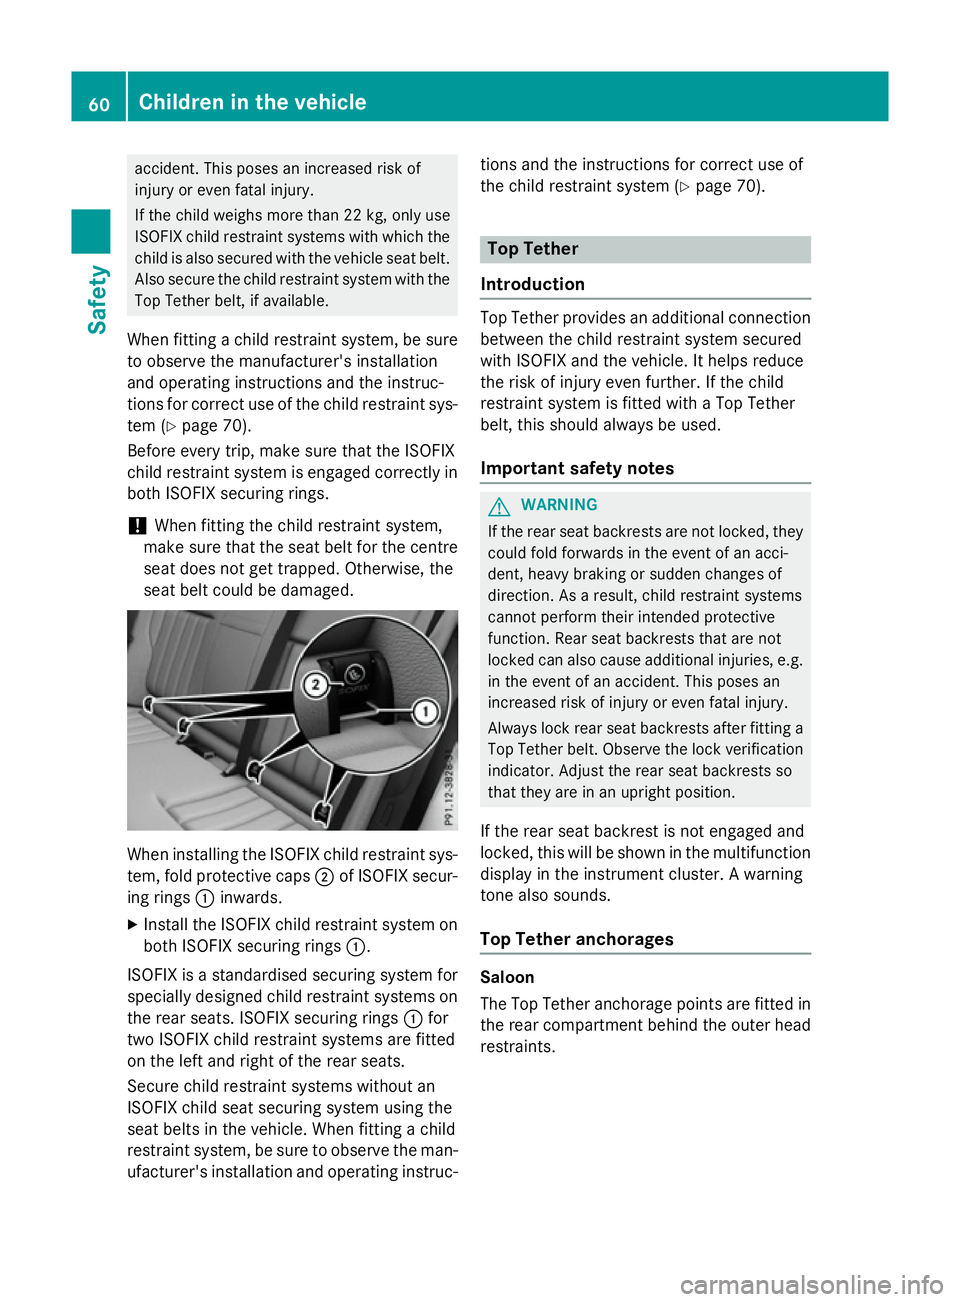
tem, fold protective caps ;of ISOFIX secur-
ing rings :inwards.
X Install th eISOFI Xchild restraint system on
bot hISOFI Xsecurin grings :.
ISOFIX is astandardised securin gsystem for
specially designed child restraint systems on
th er ear seats. ISOFIX securin grings :for
two ISOFIX child restraint systems are fitted
on th eleft and righ toftherear seats.
Secure child restraint systems without an
ISOFIX child seat securin gsystem usin gthe
seat belt sinthevehicle .When fittin gachild
restraint system, be sure to observ ethe man-
ufacturer' sinstallation and operatin ginstruc- tions and th
einstruction sfor correc tuse of
th ec hild restraint system (Y page 70). Top Tether
Introduction Top Tether provides an additional connection
between th echild restraint system secured
with ISOFIX and th evehicle .Ithelps reduce
th er isk of injury even further. If th echild
restraint system is fitte dwithaTop Tether
belt ,thiss houl dalways be used.
Important safety notes G
WARNING
If th erear seat backrests are no tlocked, they
coul dfold forwards in th eeven tofana cci-
dent, heav ybraking or sudden changes of
direction .Asaresult, child restraint systems
canno tperform their intended protective
function .Rear seat backrests that are not
locke dcan also caus eadditional injuries ,e.g.
in th eeven tofana ccident. This pose san
increased risk of injury or even fatal injury.
Always loc krear seat backrests after fittin ga
Top Tether belt .Observ ethe lockverification
indicator. Adjust th erear seat backrests so
that they are in an upright position.
If th erear seat backres tisnotengaged and
locked, this will be show ninthemultifunction
display in th einstrumen tcluster. Awarning
tone also sounds.
Top Tether anchorages Saloon
The Top Tether anchorage points are fitte
din
th er ear compartmen tbehin dthe outer head
restraints. 60
Children in th
evehicleSafety
Page 64 of 497
X
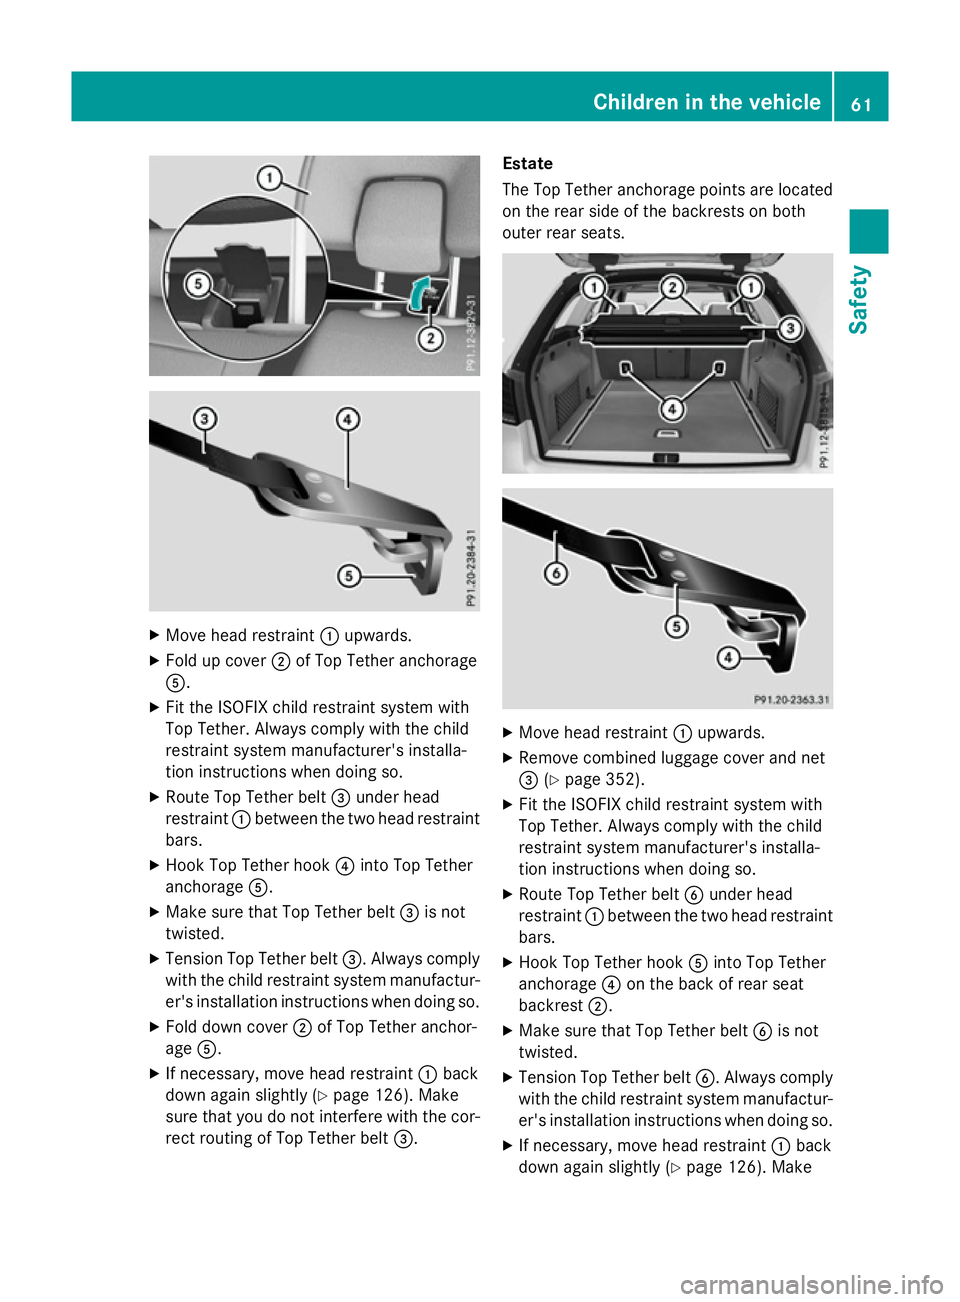
Move head restraint :upwards.
X Fold up cover ;of Top Tether anchorage
A.
X Fit the ISOFIXc hild restraint system with
Top Tether. Always comply with the child
restraint system manufacturer's installa-
tion instructions when doing so.
X Route Top Tether belt =under head
restraint :between the two head restraint
bars.
X Hook Top Tether hook ?into Top Tether
anchorage A.
X Make sure that Top Tether belt =is not
twisted.
X Tension Top Tether belt =.Always comply
with the child restraint system manufactur- er's installation instructions when doing so.
X Fold down cover ;of Top Tether anchor-
age A.
X If necessary, move head restraint :back
down again slightly (Y page 126). Make
sure that you do not interfere with the cor-
rect routing of Top Tether belt =.Estate
The Top Tether anchorage points are located
on the rear side of the backrests on both
outer rear seats. X
Move head restraint :upwards.
X Remove combined luggage cover and net
= (Ypage 352).
X Fit the ISOFIXc hild restraint system with
Top Tether. Always comply with the child
restraint system manufacturer's installa-
tion instructions when doing so.
X Route Top Tether belt Bunder head
restraint :between the two head restraint
bars.
X Hook Top Tether hook Ainto Top Tether
anchorage ?on the back of rear seat
backrest ;.
X Make sure that Top Tether belt Bis not
twisted.
X Tension Top Tether belt B.Always comply
with the child restraint system manufactur- er's installation instructions when doing so.
X If necessary, move head restraint :back
down again slightly (Y page 126). Make Children in the vehicle
61Safety Z
Page 65 of 497
sure that you do not interfere with the cor-
rect routing of Top Tether belt B.
X Install combined luggage cover and net =
(Y page 352). Integrated child seat (ICS)
Important safety notes G
WARNING
If the integrated child seat or the ICS padded play table is modified, damaged or subjected
to aload in an accident, it cannot perform its
intended protective function. Achild there-
fore cannot be restrained in the event of an
accident, heavy braking or asudden change of
direction. This poses an increased risk of
injury or even fatal injury.
Immediately replace an integrated child seat
or ICS padded play table that has been modi- fied, damaged or subjected to aheavy load as
the result of an accident. Only use the ICS
padded play table with its original cover or
with acover that has been approved by the
manufacturer, and do not used aprotective
cover. G
WARNING
If the ICS padded play table is exposed to
direct sunlight or heat, parts could heat up.
Children could suffer burns on these parts,
particularly on metallic parts. There is arisk of
injury.
If you and your child leave the vehicle, cover
the ICS padded play table so that it is not
exposed to direct sunlight and heat. If the ICS padded play table has been exposed to direct sunlight, allow it to cool before securing a
child to it. Never leave children unattended in
the vehicle.
Observe the notes on the ICS paddedp lay
table (Y page 63).
The integrated child seats are integrated into the seat cushions of the outer rear seats. In
conjunction with the componentsl isted in thefollowing table, they comply with the legal
requirements of ECE-R44.04.
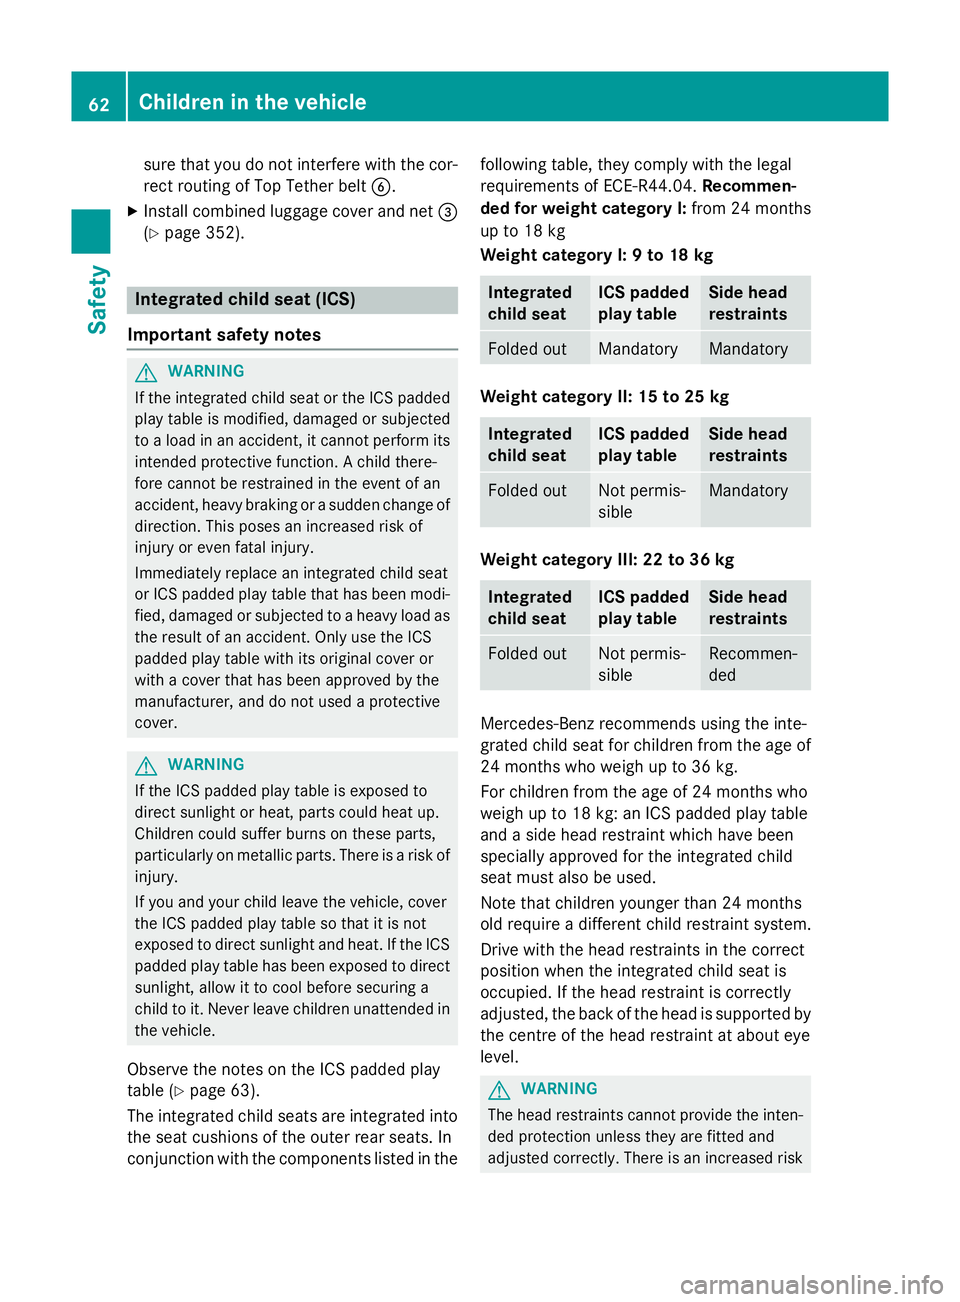
Recommen-
ded for weight category I: from 24 months
up to 18 kg
Weight category I: 9to18kg Integrated
child seat ICS padded
play table Side head
restraints
Folded out Mandatory Mandatory
Weight category II: 15 to 25 kg
Integrated
child seat ICS padded
play table Side head
restraints
Folded out Not permis-
sible Mandatory
Weight category III:2
2to36kg Integrated
child seat ICS padded
play table Side head
restraints
Folded out Not permis-
sible Recommen-
ded
Mercedes-Benz recommends using the inte-
grated child seat for children from the age of
24 months who weigh up to 36 kg.
For children from the age of 24 months who
weigh up to 18 kg: an ICS paddedp lay table
and aside head restraint which have been
speciallya pproved for the integrated child
seat must also be used.
Note that children younger than 24 months
old require adifferent child restraint system.
Drive with the head restraints in the correct
position when the integrated child seat is
occupied. If the head restraint is correctly
adjusted, the back of the head is supported by the centre of the head restraint at aboute ye
level. G
WARNING
The head restraints cannot provide the inten-
ded protection unless they are fitted and
adjusted correctly. There is an increased risk 62
Children in the vehicleSafety
Page 67 of 497
G
WARNING
If the ICS padded playt able has been incor-
rectly fitted to the integrated child seat, it
cannot perform its intended protective func-
tion. Achild therefore cannot be restrained in
the event of an accident, heavy braking or a
sudden change of direction. In addition, the
ICS padded playt able couldbecome loose
and be thrown around, endangering vehicle
occupants. This pose sanincreased risk of
injury or even fatal injury.
Fit the ICS padded playt able as described.
After fitting the ICS padded playt able,make
sure that it is secure dcorrectly. For safety
reasons, only use the ICS padded playt able
that has been tested and approved for your
vehicle.
The ICS padded playt able is only suitable for
use with the folded-out integrated child seat.
On the rear seats with an integrated child
seat, only use the ICS padded playt able that
is recommende dfor Mercedes-Benz vehicles.
Only use the ICS padded playt able with its
original cover. Withou tthe original cover, the
officia lapproval is invalidated.
Use the ICS padded playt able in accordance
with the instructions in the table in the "Inte-
grated child seat( ICS)"section (Y page62).
Note that children under two years old and
children who weigh less than 12.5 kg require ad ifferent and suitable child restraint system.
Information about other child restraint sys-
tems is available at any Mercedes-Benz Ser-
vice Centre.
You must not use the integrated child seat
with ICS padded playt able asadirect attach-
ment to ababyc ar seatf or which abody
weight of up to 10 kg is permissible. Note that
children younger than 24 months old require
ad ifferent child restraint system
(Y page7 4).
If you are not using the ICS padded playt able,
stow it in an appropriate place, e.g. in the
boot/luggage compartment. You willf ind fur-
ther information on stowing objects, luggage and loads securely under "Loading guide-
lines".
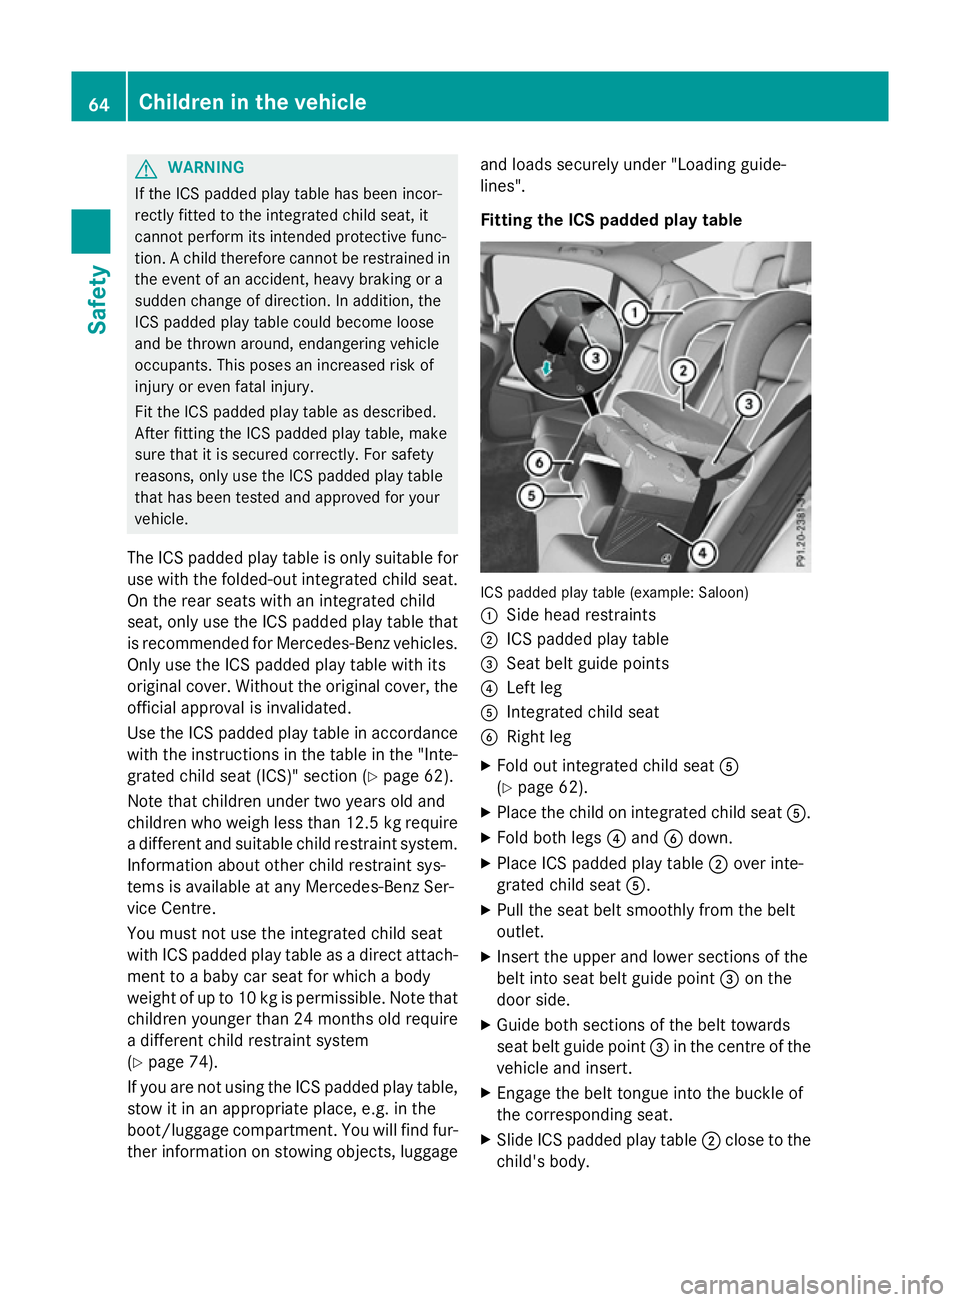
Fittin gthe ICSp added play table ICS padded pla
ytable (example: Saloon)
: Side headr estraints
; ICS padded playt able
= Seat beltg uide points
? Left leg
A Integrated child seat
B Right leg
X Fold out integrated child seat A
(Y page6 2).
X Place the child on integrated child seat A.
X Fold both legs ?and Bdown.
X Place ICS padded playt able;over inte-
grated child seat A.
X Pullt he seat belts moothly from the belt
outlet.
X Insert the upper and lower sections of the
belti nto seat beltg uide point=on the
door side.
X Guide both sections of the beltt owards
seat beltg uide point =in the centre of the
vehicl eand insert.
X Engage the beltt ongue into the buckle of
the corresponding seat.
X Slide ICS padded playt able;close to the
child's body. 64
Children in the vehicleSafety
Page 70 of 497
PASSENGERA
IR BAG OFF indicator lamp :
shows you whether the front-passenger front airbag is disabled.
X Turn the key to position 1or 2in the ignition
lock or, on vehicles with KEYLESS-GO,
press the Start/Stop button once or twice. The system carries out aself-diagnosis.
The PASSENGERA IR BAG OFF indicator lamp
must light up for approximately six seconds.
If, after the system self-test, the
PASSENGER AIR BAG OFF indicator lamp:
R lights up ,the front-passenger fronta irbag
is disabled. It will then not be deployed in
the event of an accident.
R is not lit,t he sensor system did not detect
ac hild restraint system with transponder
for automatic child seat recognition. If, in
the case of an accident ,all deployment cri-
teria are met, the front-passenger fronta ir-
bag is deployed. G
WARNING
Electronic devices on the front-passenger
seat can affect the function of the automatic
child seat recognition, for example:
R laptop
R mobile phone
R transponder cards such as ski passes or
access passes
The front-passenger fronta irbag could deploy
unintentionally or not function as intended
during an accident .This poses an increased
risk of injury or even fatal injury.
Do not place any of the devices mentioned
above or similar devices on the front-
passenger seat. Be aware of the status of the front-passenger fronta irbag both before and
during the journey. Child restraint system on the front-
passenger seat
General notes Accident statistics show that children
secured in the rear seats are safer than chil-
dren secured in the front-passenger seat. For
this reason, Mercedes-Benz strongly advises
that you install achild restraint system on a
rear seat.
Vehicles with automatic child seat recogni-
tion on the front-passenger seat: if it is abso- lutely necessary to fit achild restraint system
to the front-passenger seat, alway sobserve
the information on "Automatic child seat rec-
ognition on the front-passenger seat"
(Y page 65).
You can thus avoid the risks that could arise
as aresult of:
R ac hild restraint system that is not detected
by the automatic child seat recognition
sensor system
R the unintentional disabling of the front-
passenger fronta irbag
R the unsuitable positionin gofthe child
restraint system, e.g. too close to the dash-
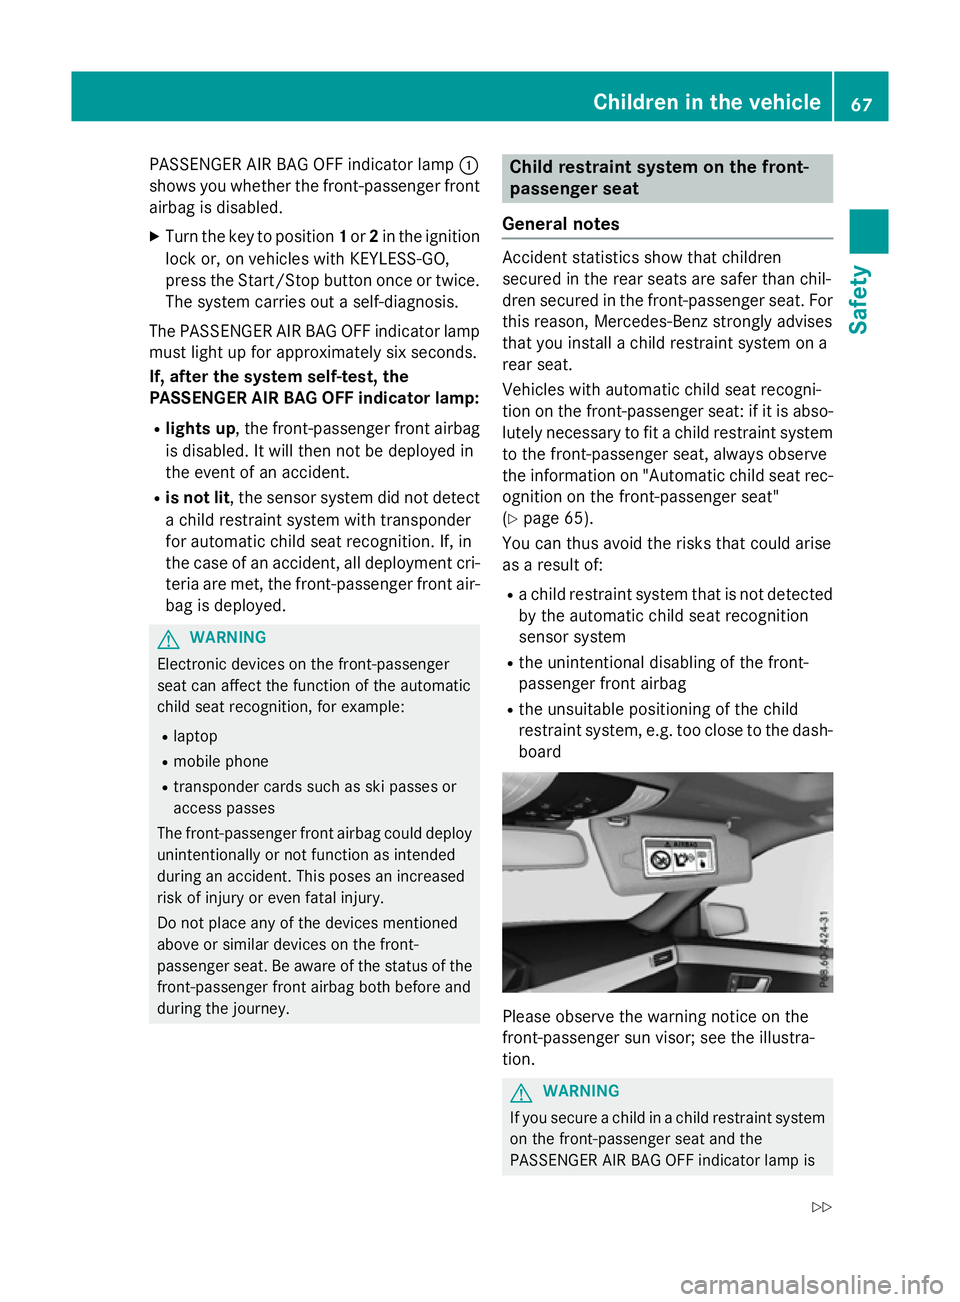
board Please observe the warning notice on the
front-passenger sun visor; see the illustra-
tion.
G
WARNING
If you secure achild in achild restraint system
on the front-passenger seat and the
PASSENGER AIR BAG OFF indicator lamp is Children in the vehicle
67Safety
Z
Page 74 of 497
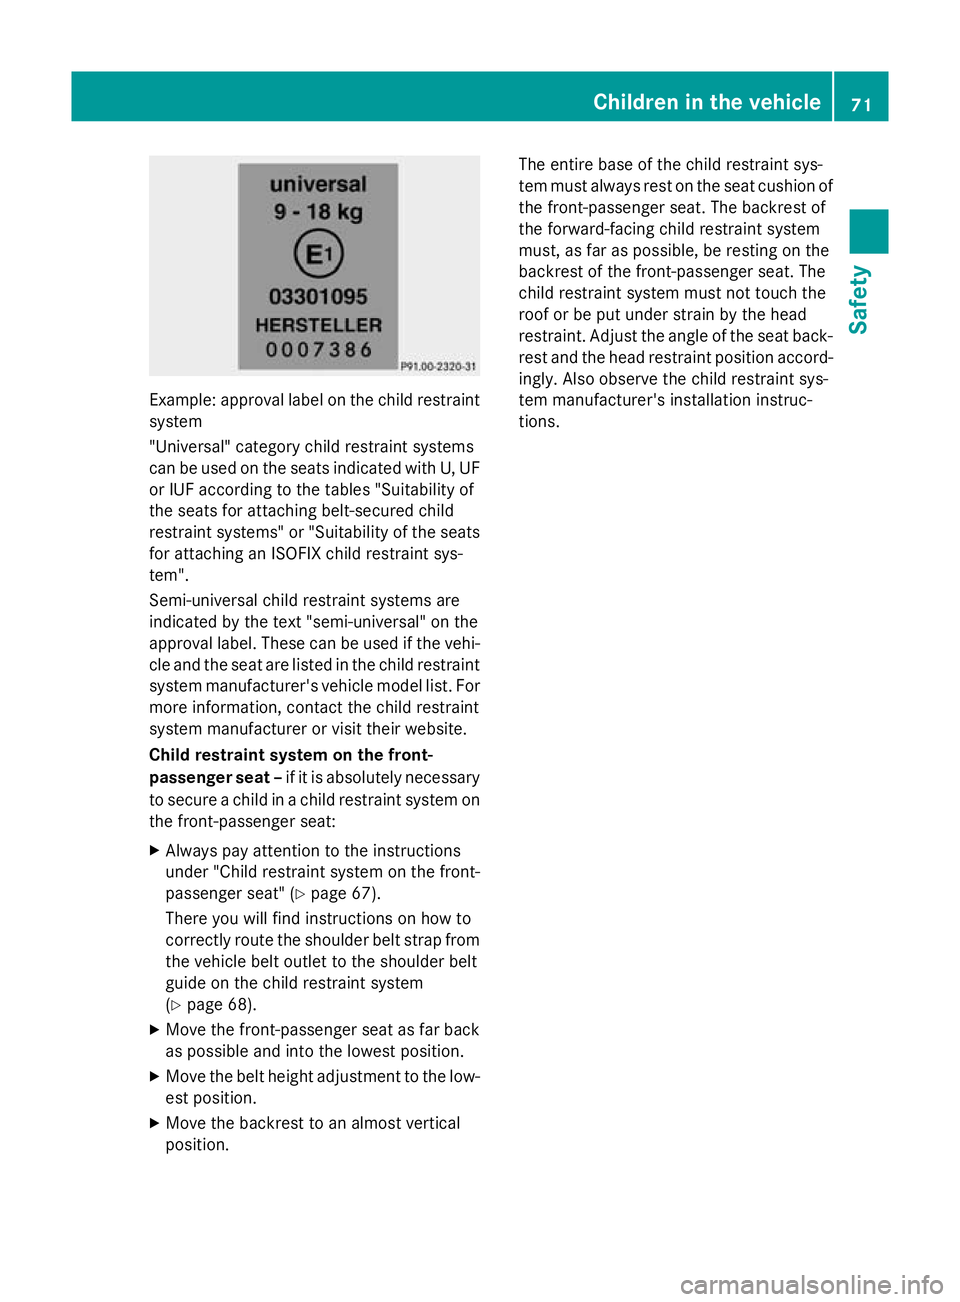
Example: approva
llabel on the child restraint
system
"Universal "category child restraint systems
can be used on the seats indicated with U, UF
or IUF according to the table s"Suitability of
the seats for attaching belt-secured child
restraint systems" or "Suitability of the seats
for attaching an ISOFIX child restraint sys-
tem".
Semi-universal child restraint systems are
indicated by the text "semi-universal" on the
approva llabel .These can be used if the vehi-
cle and the seat ar eliste dint he child restraint
syste mmanufacturer's vehicl emodel list. For
mor einformation, contact the child restraint
syste mmanufacturer or visi ttheir website.
Chil drestrain tsystem on the front-
passenge rsea t–if it is absolutely necessary
to secur eachild in achild restraint syste mon
the front-passenge rseat:
X Alway spayattentio ntothe instructions
under "Child restraint syste monthe front-
passenge rseat" (Y page 67).
There yo uwillf indi nstructions on ho wto
correctl yroute the shoulde rbelts tra pfrom
the vehicl ebelto utlettot he shoulde rbelt
guid eont he child restraint system
(Y page 68).
X Move the front-passenge rseatasf arback
as possibl eand into the lowest position.
X Move the belt height adjustment to the low-
es tp osit ion.
X Move the backrest to an almos tvertical
position. Th
ee ntire base of the child restraint sys-
tem must always res tonthe seat cushion of
the front-passenge rseat. Th ebackrest of
the forward-facing child restraint system
must, as fa raspossible, be resting on the
backrest of the front-passenge rseat. The
child restraint syste mmustn ot touch the
roo forbep utunder strain by the head
restraint. Adjust the angle of the seat back- res tand the head restraint positio naccord-
ingly .Alsoo bser ve the child restraint sys-
tem manufacturer's installatio ninstruc-
tions. Children in the vehicle
71Safety Z