lights MERCEDES-BENZ E-CLASS ESTATE 2015 Manual Online
[x] Cancel search | Manufacturer: MERCEDES-BENZ, Model Year: 2015, Model line: E-CLASS ESTATE, Model: MERCEDES-BENZ E-CLASS ESTATE 2015Pages: 497, PDF Size: 16.23 MB
Page 336 of 497
Problem
Possible causes/consequences and
M
MSolutions !
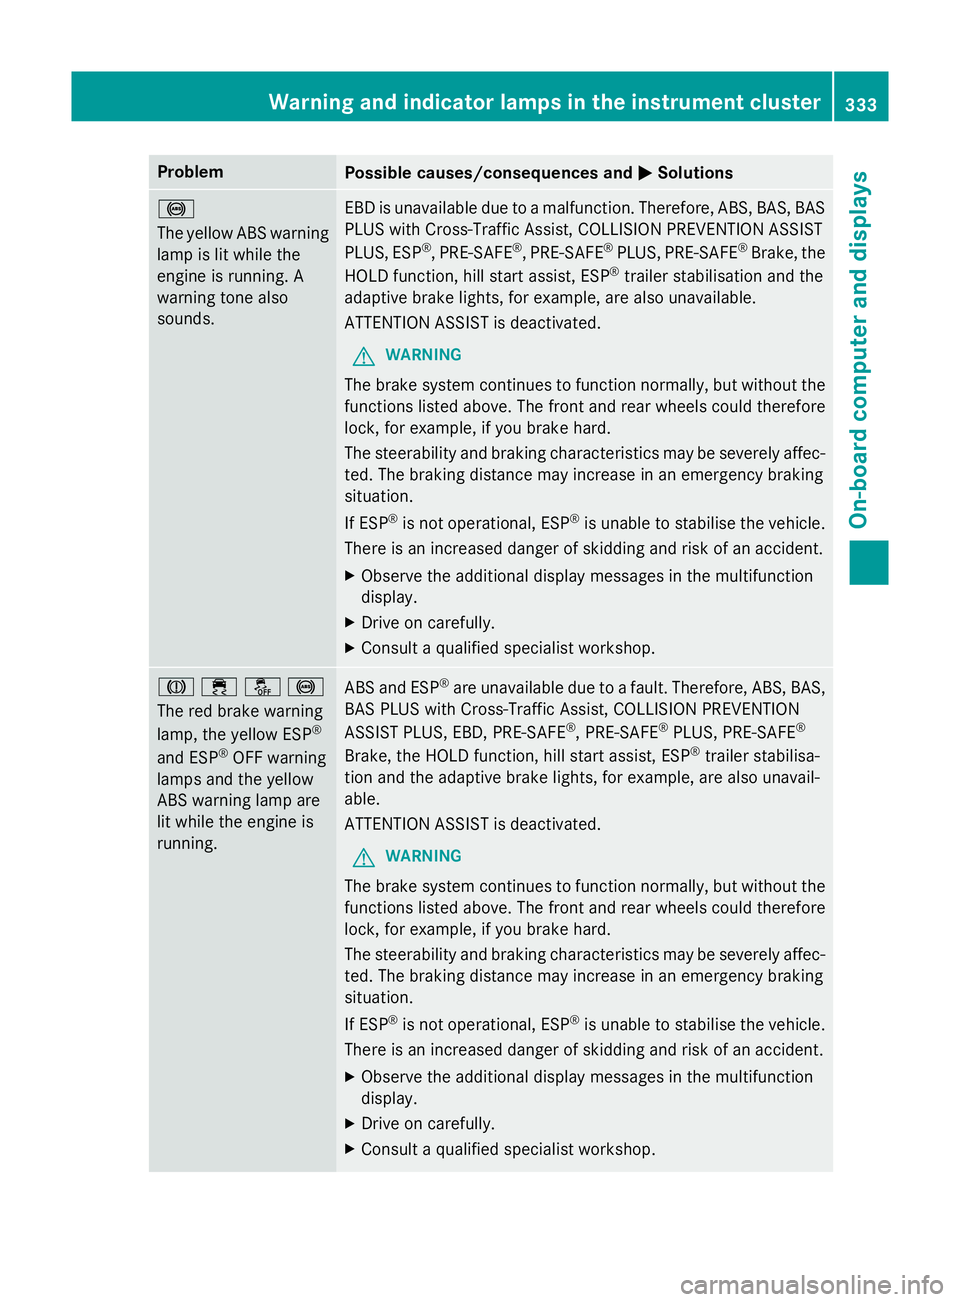
The yellowA
BS warning
lamp is lit while the
engine is running. A
warning tone also
sounds. EBD is unavailable due to
amalfunction .Therefore, ABS,B AS,BAS
PLUS with Cross-Traffic Assist, COLLISION PREVENTION ASSIST
PLUS, ESP ®
,P RE-SAFE ®
,P RE-SAFE ®
PLUS, PRE‑SAFE ®
Brake, the
HOLD function, hill start assist, ESP ®
trailer stabilisation and the
adaptive brake lights, for example, are also unavailable.
ATTENTION ASSIST is deactivated.
G WARNING
The brake system continues to function normally, but without the functions listed above. The front and rear wheels could therefore
lock, for example, if you brake hard.
The steerability and braking characteristics may be severely affec-ted. The braking distance may increase in an emergency braking
situation.
If ESP ®
is not operational, ESP ®
is unable to stabilise the vehicle.
There is an increased danger of skidding and risk of an accident.
X Observe the additional display messages in the multifunction
display.
X Drive on carefully.
X Consult aqualified specialist workshop. J
֌!
The red brake warning
lamp, the yellow ESP ®
and ESP ®
OFF warning
lamps and the yellow
ABS warning lamp are
lit while the engine is
running. ABS and ESP
®
are unavailabl edue to afault. Therefore, ABS,B AS,
BAS PLUS with Cross-Traffic Assist ,COLLISION PREVENTION
ASSIST PLUS, EBD,P RE-SAFE®
,P RE-SAFE ®
PLUS, PRE‑SA FE®
Brake, the HOLD function, hill start assist, ESP ®
trailer stabilisa-
tion and the adaptive brake lights, for example, are also unavail-
able.
ATTENTION ASSIST is deactivated.
G WARNING
The brake system continues to function normally, but without the functions listed above. The fronta nd rear wheels could therefore
lock, for example, if you brake hard.
The steerability and braking characteristics may be severely affec- ted. The braking distanc emay increase in an emergenc ybraking
situation.
If ESP ®
is not operational, ESP ®
is unable to stabilise the vehicle.
There is an increased danger of skidding and risk of an accident.
X Observe the additional display messages in the multifunction
display.
X Drive on carefully.
X Consult aqualified specialist workshop. Warning and indicator lampsint
he instrument cluster
333On-board computer and displays Z
Page 338 of 497
Problem
Possible causes/consequences and
M
MSolutions ֌
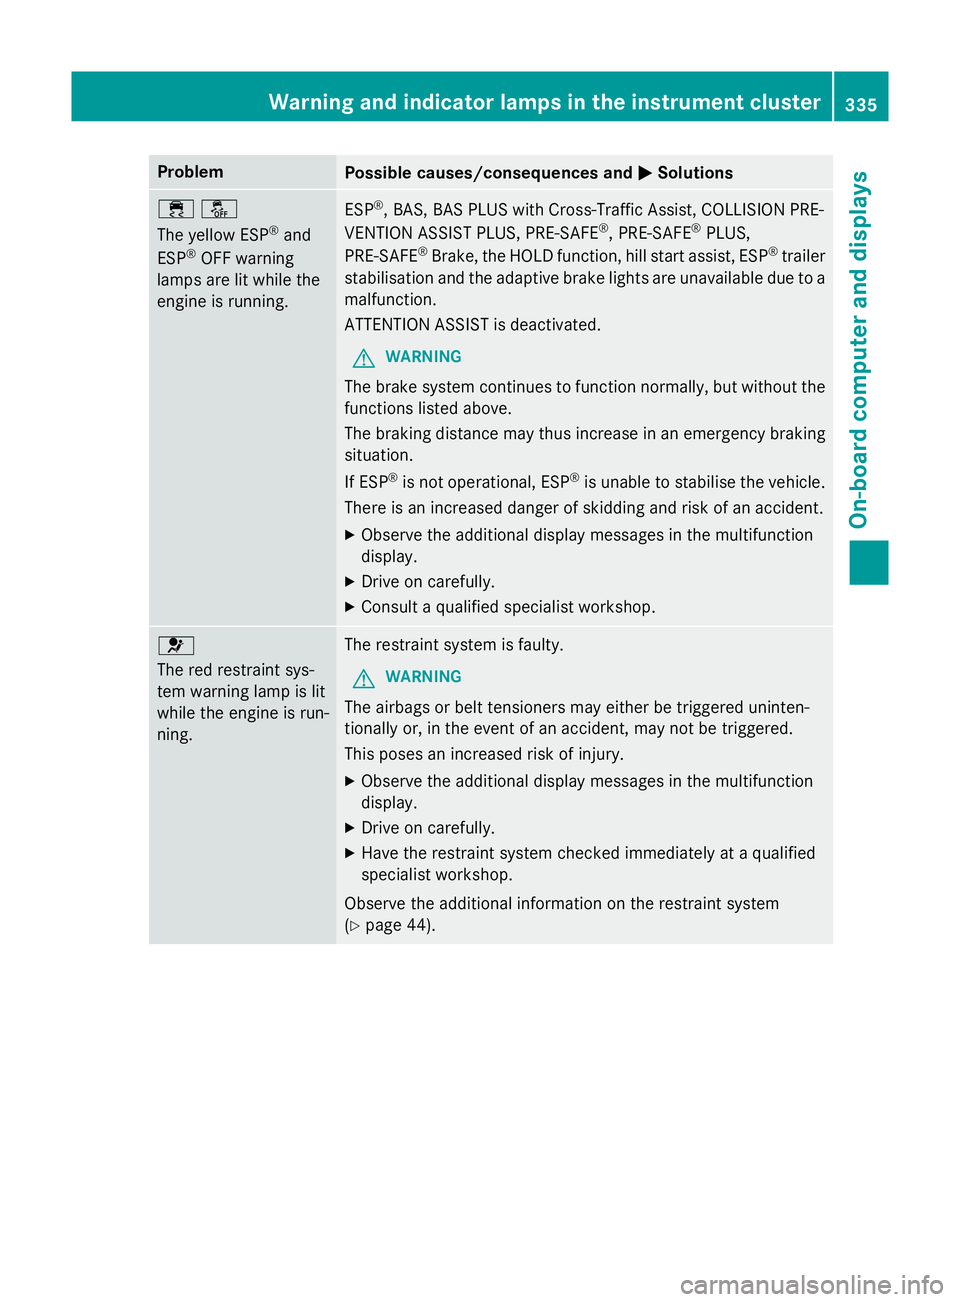
The yellow ESP
®
and
ESP ®
OFF warning
lamps are lit while the
engine is running. ESP
®
,B AS ,BAS PLUS with Cross-Traffic Assist ,COLLISION PRE-
VENTION ASSIST PLUS, PRE-SAFE ®
,P RE-SAFE ®
PLUS,
PRE‑SA FE®
Brake, the HOLD function, hill start assist, ESP ®
trailer
stabilisation and the adaptive brake lights are unavailabl edue to a
malfunction.
ATTENTION ASSIST is deactivated.
G WARNING
The brake system continues to function normally, but without the functions listed above.
The braking distanc emay thus increase in an emergenc ybraking
situation.
If ESP ®
is not operational, ESP ®
is unable to stabilise the vehicle.
There is an increased danger of skidding and risk of an accident.
X Observe the additional display messages in the multifunction
display.
X Drive on carefully.
X Consult aqualified specialist workshop. 6
The red restraint sys-
tem warning lamp is lit
while the engine is run-
ning.
The restraint system is faulty.
G WARNING
The airbags or belt tensioners may either be triggered uninten-
tionally or, in the event of an accident ,may not be triggered.
This poses an increased risk of injury.
X Observe the additional display messages in the multifunction
display.
X Drive on carefully.
X Have the restraint system checked immediately at aqualified
specialist workshop.
Observe the additional information on the restraint system
(Y page 44). Warning and indicator lampsint
he instrument cluster
335On-board computer and displays Z
Page 341 of 497
Problem
Possible causes/consequences and
M
MSolutions X
Leave the vehicle and keep asafe distance from the vehicle until
the engine has cooled down.
X Check the coolant level and top up the coolant, observing the
warning notes (Y page 382).
X If you have to top up the coolant frequently, have the engine
cooling system checked.
X Make sure that the air supply to the engine radiator is not
blocked, e.g. by frozen slush.
X If the coolant temperature is below 120 †, you can continue
driving to the nearest qualified specialist workshop.
X Avoid putting the engine under heavy load as you do so, e.g.
driving in mountainous terrain and stop-start traffic. Driving systems
Problem
Possible causes/consequences and
M MSolutions ·
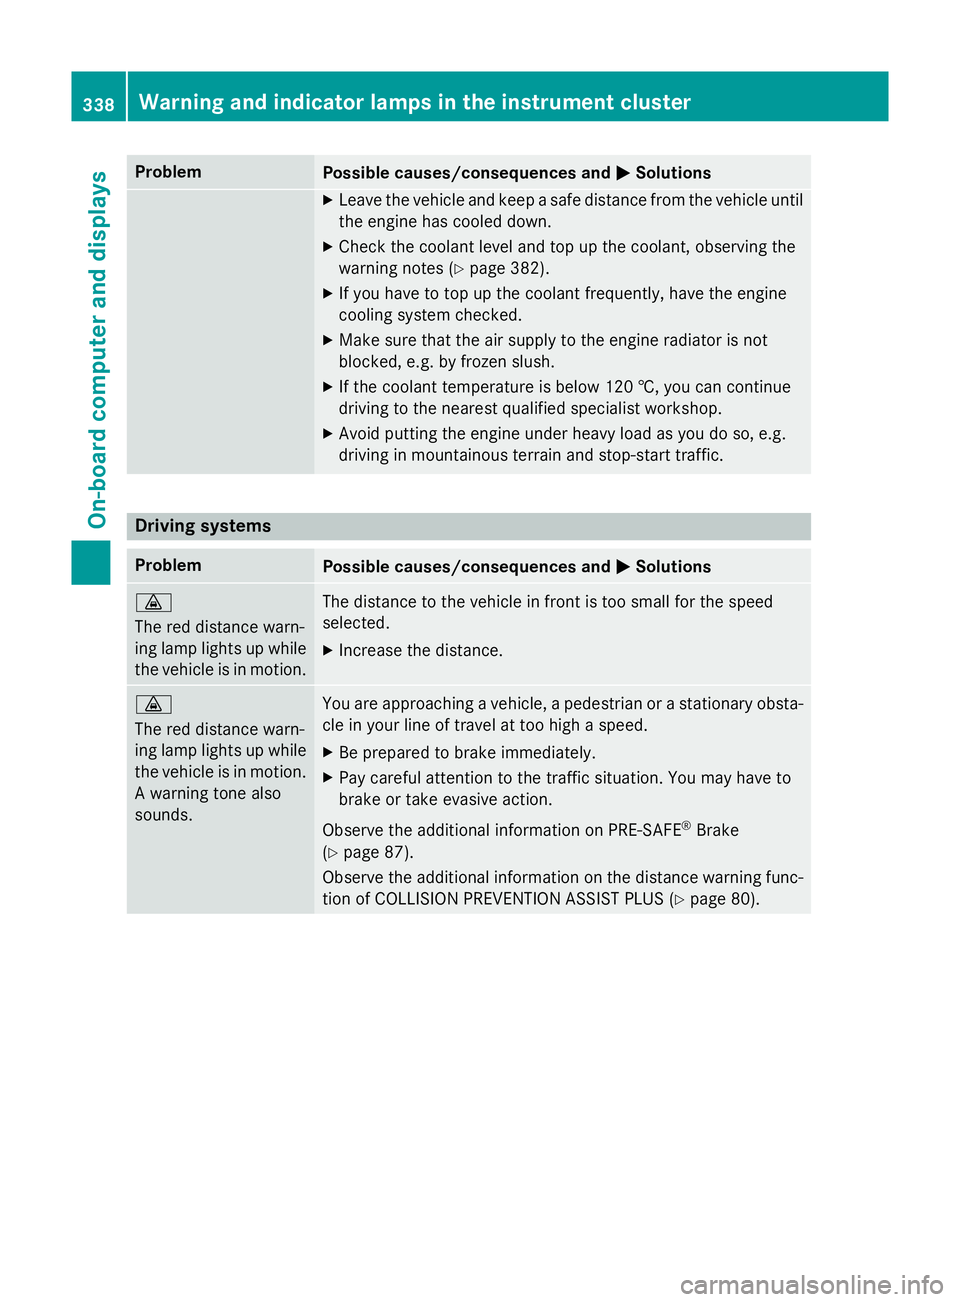
The red distance warn-
ing lamp lights up while
the vehicle is in motion. The distance to the vehicle in front is too small for the speed
selected.
X Increase the distance. ·
The red distance warn-
ing lamp lights up while
the vehicle is in motion. Aw arning tone also
sounds. You are approaching
avehicle, apedestrian or astationary obsta-
cle in your line of travel at too high aspeed.
X Be prepared to brake immediately.
X Pay careful attention to the traffic situation. You may have to
brake or take evasive action.
Observe the additional information on PRE‑ SAFE®
Brake
(Y page 87).
Observe the additional information on the distance warning func-
tion of COLLISION PREVENTION ASSIST PLUS (Y page 80).338
Warning and indicator lampsint
he instrument clusterOn-board computer and displays
Page 372 of 497
The garage door opener is only available for
certain countries. Observe the legal require-
mentsf or each individual country.
The HomeLink ®
garage door opener is com-
patible with most European garage and gate
opener drives. More information on Home-
Link ®
and/or compatible products is availa-
ble:
R at aq ualified specialist workshop
R via the HomeLink ®
Hotline
(0) 080004 66 354 65 or alternatively
+49 (0) 6838 907-277
R on the Internet at http://
www.homelink.com
Important safety notes G
WARNING
When you operate or program the garage door with the integrated garage door opener, per-
sons in the range of movemen tofthe garage
door can become trapped or struck by the
garage door. There is arisk of injury.
When using the integrated garage door
opener, alway smake sure that nobody is
within the range of movemen tofthe garage
door. G
WARNING
Combustion engines emit poisonous exhaust
gases such as carbon monoxide. Inhaling
these exhaust gases leads to poisoning. There is ar isk of fatal injury. Therefore never leave
the engine runnin ginenclosed spaces with-
out sufficient ventilation.
Programming Programming buttons
Pay attention to the "Importan
tsafety notes"
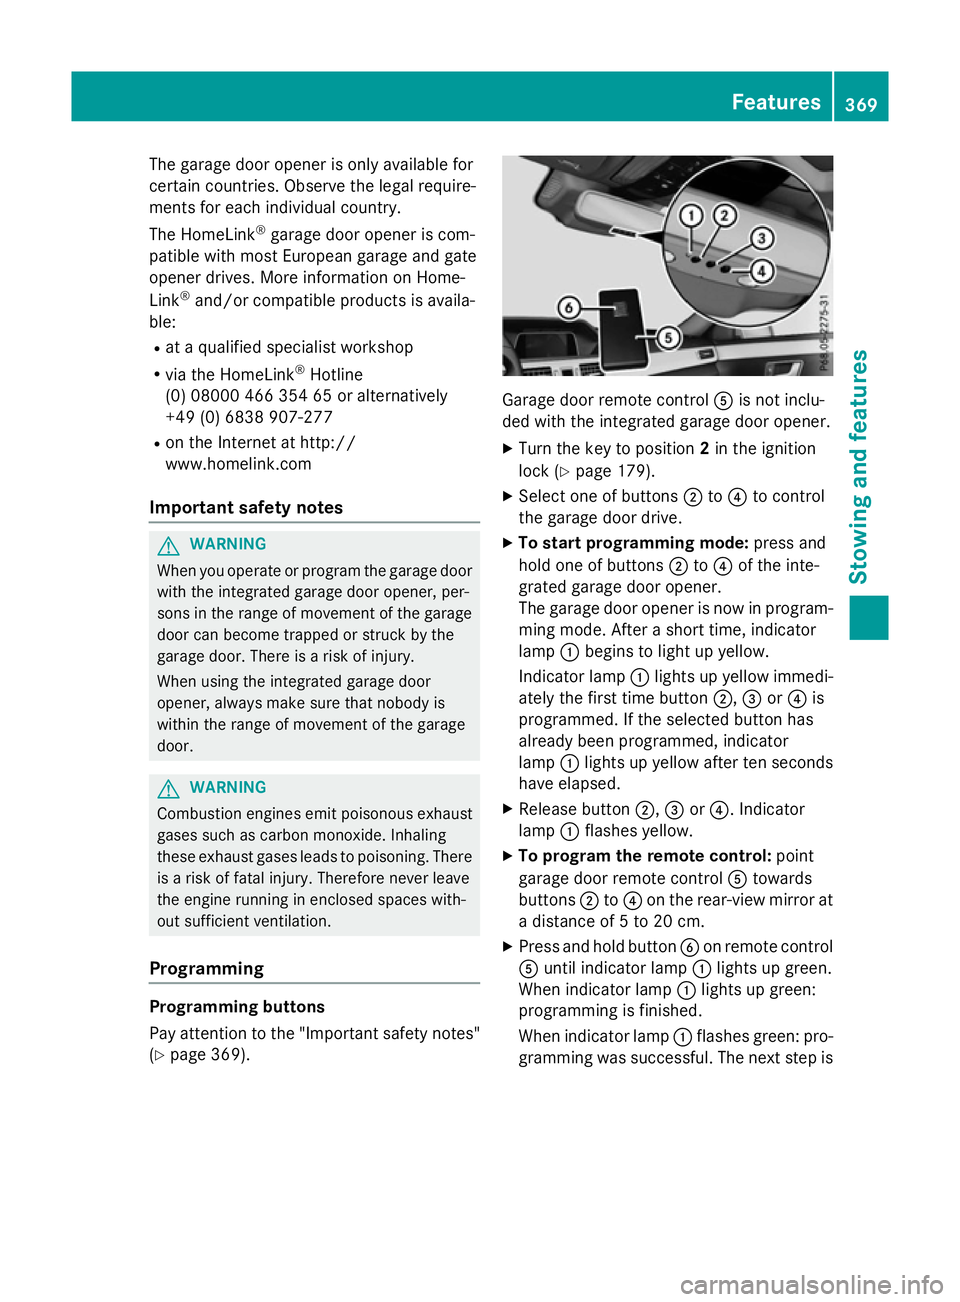
(Y page 369). Garage door remot
econtrol Ais not inclu-
ded with the integrated garage door opener.
X Turn the key to position 2in the ignition
lock (Y page 179).
X Select one of buttons ;to? to control
the garage door drive.
X To startp rogramming mode: press and
hold one of buttons ;to? of the inte-
grated garage door opener.
The garage door opener is now in program- ming mode. After ashort time, indicator
lamp :begins to light up yellow.
Indicator lamp :lights up yellow immedi-
ately the first time button ;,=or? is
programmed. If the selected button has
already been programmed, indicator
lamp :lights up yellow after ten seconds
have elapsed.
X Release button ;,=or?.I ndicator
lamp :flashes yellow.
X To program the remot econtrol: point
garage door remot econtrol Atowards
buttons ;to? on the rear-view mirror at
ad istanc eof5to20c m.
X Press and hold button Bon remot econtrol
A until indicator lamp :lights up green.
When indicator lamp :lights up green:
programming is finished.
When indicator lamp :flashes green: pro-
gramming was successful. The next step is Features
369Stowing and features Z
Page 373 of 497
to synchronise the rolling code
(Y
page 370).
X Releas ebutton Bof remote control Aof
the garage door drive.
If indicator lamp :lights up red :repea tthe
programming proces sfor the correspond-
ing button on the rear-view mirror. When
doing so ,varyt he distance between remote
control Aand the rear-view mirror.
Th er equired distance between remote
control Aand the integrated garage door
opene rdepen ds on the garage door drive
system. Severa lattempts ma yberequired.
Yo us houl dteste very positio nfor at least
25 second sbefore trying another position.
Synchronising the rolling code
Observe the "Important safety notes"
(Y page 369).
If the garage door system uses arolling code,
you will also have to synchronise the garage
door system with the integrated garage door
opener in the rear-view mirror .Todothis you
will need to use the programming button on
the door drive control panel. The program-
ming button may be placed at differen tloca-
tion sdepending on the manufacturer. It is
usually located on the door drive unit on the
garage ceiling.
Familiarise yourself with the garage door
drive operatin ginstructions, e.g. under "Pro-
grammin gofadditional remot econtrols",
before carrying out the following steps.
Your vehicle must be within range of the
garage door or gate opener drive. Make sure
that neither your vehicle nor any persons/
objects are present within the sweep of the
door or gate.
X Turn the key to position 2in the ignition
lock (Y page 179).
X Get out of the vehicle.
X Press the programming button on the door
drive unit.
Usually, you now have 30 seconds to ini-
tiate the nexts tep. X
Get intot he vehicle.
X Press previously programmed button ;,
= or? of the integrated garage door
opener until the door closes.
The rolling code synchronisation is then
complete.
Problems when programming
If you have problems when programming the
integrated garage door opener, please note
the following: R Check the transmitter frequenc yused by
garage door drive remot econtrol Aand
whether it is supported. The transmitter
frequenc ycan usually be found on the back
of the garage door drive remot econtrol.
R Replace the batteries in garage door
remot econtrol A.This increases the like-
lihood that garage door remot econtrol A
will transmit astrong and precise signal to
the integrated garage door opener in the
rear-view mirror.
R When programming, hold remot econtrol
A at varying distances and angles from the
button which you are programming. Try var- ious angles at adistanc ebetween 5and
30 cm or at the same angle but at varying
distances.
R If ther eisanother remot econtrol for the
same garage door drive, perform the pro-
grammin gsteps again using this remote
control. Befor eperforming these steps,
make sure that new batteries have been
fitted in garage door drive remot econtrol
A.
R Note that some remot econtrols transmit
only for alimited period (the indicator lamp
on the remot econtrol goes out). Press but-
ton Bon remot econtrol Aagain before
transmission ends.
R Align the aerial cable of the garage door
opener unit. This can improve signal recep-
tion/transmission. 370
FeaturesStowing and features
Page 374 of 497
Opening or closing the garage door
Oncep
rogrammed, the integrated garage
door opener will assume the function of the
garage door system's remot econtrol. Please
also read the operatin ginstructions for the
garage door system.
X Turn the key to position 2in the ignition
lock (Y page 179).
X Press button ;,=or? which you have
programmed to operate the garage door.
Garage door system with afixed code: indi-
cator lamp :lights up green.
Garage door system with arolling code:
indicator lamp :flashes green.
The transmitter will transmit asignal for as
long as the button is pressed. The trans-
mission is halted after amaximum of ten
seconds and indicator lamp :lights up
yellow.
X Press button ;,=or? again if neces-
sary.
Clearing the memory Make sure that you clear the memory of the
integrated garage door opener before selling
the vehicle.
X Turn the key to position 2in the ignition
lock (Y page 179).
X Press and hold buttons ;and ?.
The indicator lamp initially lights up yellow
and then green.
X Release buttons ;and ?.
The memory of the integrated garage door
opener in the rear-view mirror is cleared. Frequencies Europe
Country Radio typea
pproval num-
ber
Frequency range (MHz) AD (Andorra) 20 July 2005
MHz:2
7, 30, 40, 433,8 68 AT (Austria) Article
6ofDirective
1999/5/ECR &TTE 18 May
05
MHz:2 7, 40, 433,8 68 BE (Belgium) Article
6ofDirective
1999/5/ECR &TTE 18 May
05
MHz:2 7, 40, 433,8 68 BG (Bulga-
ria) Article
6ofDirective
1999/5/ECR &TTE 12 April
07
MHz:2 7, 40, 433,8 68 CH (Switzer-
land) Article
6ofDirective
1999/5/ECR &TTE 14357
27 May 05
MHz:2 7, 40, 433,8 68 CY (Cyprus) Article
6ofDirective
1999/5/ECR &TTE5May
05
MHz:2 7, 40, 433,8 68 CZ (Czech
Republic) General Licence GL-30/R/
2000R
eg No. 844 13 May
05
MHz:2 7, 40, 433 DK (Den-
mark) Article
6ofDirective
1999/5/ECR &TTE 20 April
05
MHz:2 7, 40, 433,8 68 DE (Ger-
many) Article
6ofDirective
1999/5/ECR &TTE
751930129A pril 05
MHz:2 7, 40, 433,8 68 Features
371Stowing and features Z
Page 390 of 497
X
Releas ethe parkin gbrake.
X Switc hoff th eignition and leav ethe keyin
th ei gnition lock.
You can wash th evehicl einana utomatic car
wash from th everys tart.
Wash off excess dir tbefore cleaning th evehi-
cle in an automatic car wash.
Afte rusin gana utomatic car wash ,wipe off
wax from th ewindscree nand th ewiper
blades. This will preven tsme ars and reduce
wipin gnoises caused by residue on th ewind-
screen.
Washing by hand In som
ecountries, washin gbyhandiso nly
allowe datspecially equipped washin gbays.
Observ ethe legal requirements for eac hind i-
vidual country.
X Do no tuse hot water and do no twash the
vehicl eindirectsunlight.
X Use asofts pong etoc lean.
X Use amild cleaning agent, suc hasacar
shampoo approve dbyMercedes-Benz.
X Thoroughly hos edown th evehicl ewitha
gentl ejet of water.
X Do no tpoin tthe water je tdirectl ytow ards
th ea ir inlet.
X Use plenty of water and rinse out the
spong efrequently.
X Rinse th evehicl ewithc lean water and dry
thoroughly wit hachamois.
X Do no tlet th ecleaning agen tdry on the
paintwork.
Whe nusingthe vehicl einw inter, remove all
trace sofroads alt deposit scarefully and as
soo nasp ossible.
High-pressure cleaning equipment G
WARNING
The water je tofcircular-je tnozzle s(dir tgrind-
ers )can caus edamage no tvisible from the
outside to tyres or chassi scom ponents. Com- ponents damaged in this way can unexpect-
edly fail
.There is ariskofana ccident.
Do no tuse high-pressur ecleaners wit hcircu-
lar-je tnozzle stoc lean th evehicle. Hav edam-
aged tyres or chassi scom ponent sreplaced
immediately.
! Always maintai
nadistanc eofatl east
30 cm between th evehicl eand th ehigh-
pressur ecleane rnozzle .Inf ormation about
th ec orrect distanc eisavailable from the
equipmen tmanufacturer.
Mov ethe high-pressur ecleane rnozzle
around when cleaning your vehicle.
Do no taim directl yatany of th efollowing:
R tyres
R doo rgaps ,roo fg aps ,joint setc.
R electrical components
R battery
R connectors
R lights
R seals
R trim elements
R ventilation slots
Damaged seals or electrical components
can lead to leak sorfailures.
! If th
ekeyis within th erear detection
range of KEYLESS-GO ,situation ssuchas
th ef ollowin gcould lead to th euninten-
tional openin goftheboo tlid/tailgate:
R usin gac ar wash
R usin gah igh-pressur ecleaner
Mak esuret hatthe keyisatl east3maway
from th evehicle.
Cleaning th epaintwork !
Do no
taffix:
R stickers
R films
R magneti cplates or similar items
to painte dsurfaces. You could otherwise
damag ethe paintwork. Care
387Maintenance and care Z
Page 426 of 497
Tyre pressure monitor
General notes If
at yrep ressure monitor system is fitted, the
vehicle's wheels have sensor sfitte dthat
monitor the tyr epressures in al lfou rtyres.
The tyr epressure monitor warns yo uifthe
pressure drops in one or mor eofthe tyres.
The tyr epressure monitor onl yfun ctions if
the corresponding sensor sarefitte dtoa ll
wheels.
Informatio nontyrep ressures is shown in the
multifunctio ndisplay .After afew minute sof
driving ,the current tyr epressure of each tyre
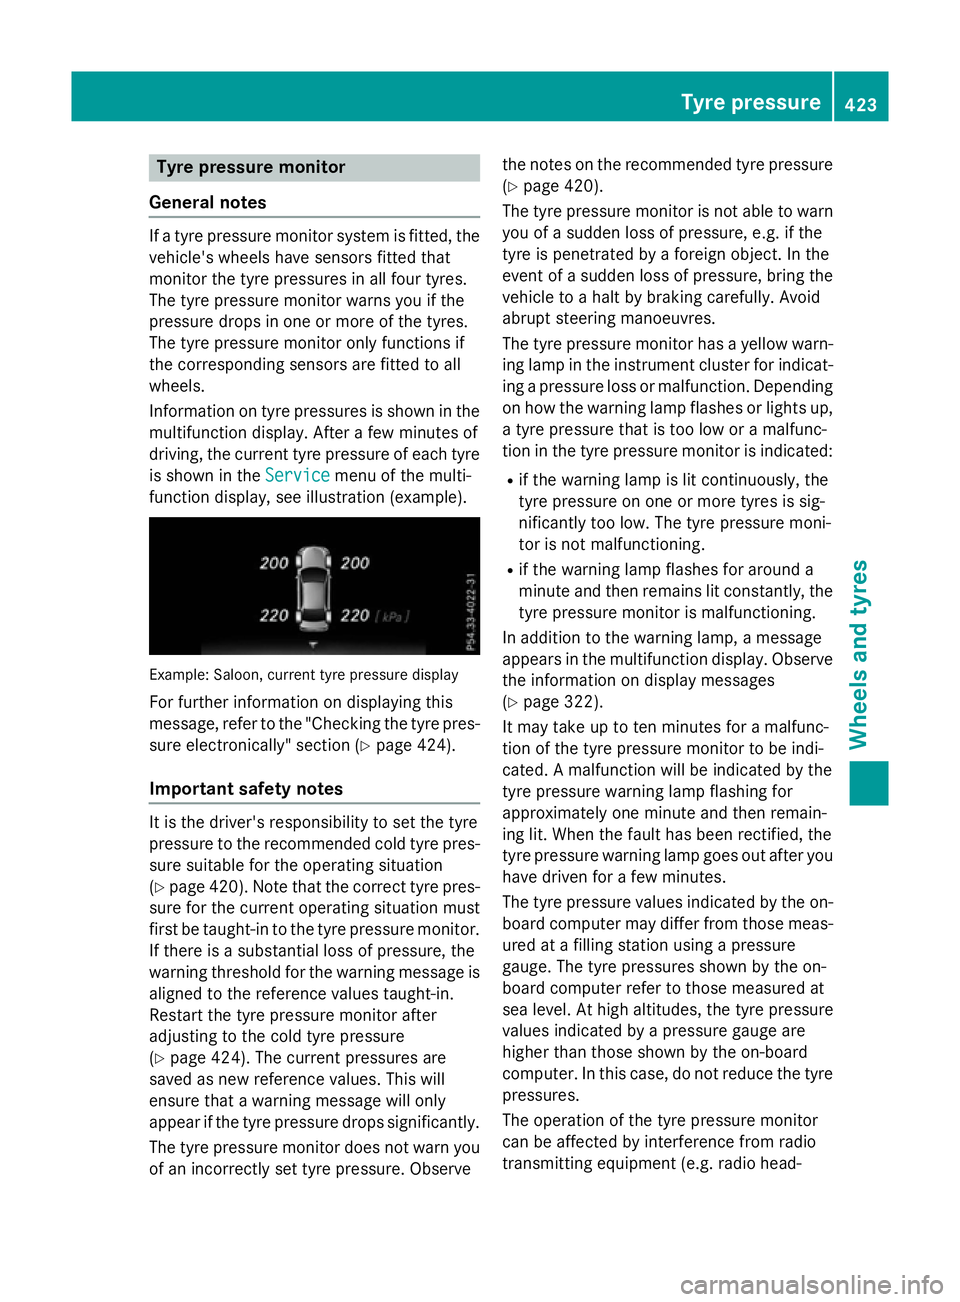
is shown in the Service
Service menu of the multi-
functio ndisplay ,see illustratio n(example). Example: Saloon
,current tyr epressure display
For furthe rinformatio nondisplaying this
message ,refer to the "Checking the tyr epres-
sure electronically" sectio n(Ypage 424).
Important safety notes It is the driver's responsibility to set the tyre
pressure to the recommende
dcoldt yrep res-
sure suitabl efor the operating situation
(Y page 420). Note tha tthe correct tyr epres-
sure for the current operating situatio nmust
first be taught-i ntothe tyr epressure monitor.
If ther eisas ubstantial loss of pressure, the
warnin gthreshold for the warnin gmessage is
aligned to the reference values taught-in.
Restart the tyr epressure monitor after
adjusting to the col dtyrep ressure
(Y page 424). The current pressures are
saved as new reference values. Thi swill
ensur ethataw arnin gm essage will only
appear if the tyr epressure drops significantly.
The tyr epressure monitor does not warn you
of an incorrectly set tyr epressure. Observe the note
sonthe recommende dtyrep ressure
(Y page 420).
The tyr epressure monitor is not able to warn
yo uofas uddenlossofp ressure, e.g .ifthe
tyr eisp enetrated by aforeign object. In the
event of asudde nlossofp ressure, bring the
vehicl etoah altbyb raking carefully. Avoid
abrupt steering manoeuvres.
The tyr epressure monitor ha sayelloww arn-
ing lamp in the instrument cluster for indicat- ing apressure loss or malfunction. Depending
on how the warning lamp flashe sorlights up,
at yrep ressure tha tist oo lo woram alfunc-
tio nint he tyr epressure monitor is indicated:
R if the warnin glam pisl itcontinuously ,the
tyr ep ressure on one or mor etyres is sig-
nificantl ytoo low. The tyr epressure moni-
tor is not malfunctioning.
R if the warnin glam pflashe sfor around a
minute and the nremains li tconstantly, the
tyr ep ressure monitor is malfunctioning.
In additio ntothe warning lamp, amessage
appear sinthe multifunctio ndisplay .Obser ve
the informatio nondisplay messages
(Y page 322).
It ma ytake up to ten minute sfor am alfunc-
tio noft he tyr epressure monitor to be indi-
cated. Amalfunctio nwillbei ndicated by the
tyr ep ressure warnin glam pflashing for
approximately one minute and the nremain-
ing lit. When the faul thas been rectified, the
tyr ep ressure warning lamp goes ou tafter you
have driven for afew minutes.
The tyr epressure values indicated by the on-
boar dcompute rmaydiffe rfromt hos em eas-
ured at afilling statio nusing apressure
gauge. The tyr epressures shown by the on-
boar dcompute rrefer to thos emeasured at
se al evel.Ath igha ltitudes, the tyr epressure
values indicated by apressure gaug eare
highe rtha nt hos eshown by the on-board
computer. In thi scase, do not reduce the tyre
pressures.
The operatio nofthe tyr epressure monitor
can be affecte dbyinterference fro mradio
transmitting equipment (e.g. radi ohead- Tyre pressure
423Wheelsand tyres Z