phone MERCEDES-BENZ E-CLASS ESTATE 2015 Owners Manual
[x] Cancel search | Manufacturer: MERCEDES-BENZ, Model Year: 2015, Model line: E-CLASS ESTATE, Model: MERCEDES-BENZ E-CLASS ESTATE 2015Pages: 497, PDF Size: 16.23 MB
Page 4 of 497
Welcome to the world of Mercedes-Benz
Before you first drive off, read this Owner's
Manual carefully and familiarise yourself with
yourv ehicle. For youro wn safety andalonger
vehicl elife ,follow the instructions and warn-
ing notices in this manual. Disregarding them may leadtod amage to the vehicl eorpersonal
injury.
The equipment or model designation of your
vehicl emay vary according to:
R model
R order
R country variant
R availability
The illustrations in this manua lshow aleft-
hand-drive vehicle. On right-hand-drive vehi-
cles, the layout of components and controls
differs accordingly.
Mercedes-Benz is constantly updating its
vehicles to the state of the art.
Mercedes-Benz therefore reserve sthe right
to introduce changes in the following areas:
R design
R equipment
R technical features
The equipment in yourv ehiclemay therefore
diffe rfrom that show ninthe descriptions and
illustrations.
The following are integra lcomponents of the
vehicle:
R Owner's Manual
R Service Booklet
R equipment-dependent supplements
Keep these documents in the vehicl eatall
times. If you sell the vehicle, alwaysp assa ll of
the documents on to the new owner.
i You can get to know the important fea-
tures of yourv ehicleinthe interactive Own-
er's Manual on the Internet at:
http://www.mercedes-benz.de/
betriebsanleitung
You can alsou se the E‑Class Guide smart-
phone App: Apple
®
iOS Android™
Please note that the Mercedes-Benz Guides
App may not yet be available in yourc ountry.
The technical documentation team at
Daimler AG wishes you safe and pleasant
motoring.
2125848502Z102 É2125848502Z1028ËÍ
Page 15 of 497
F
Fault message see Display messages
Filler cap
see Fuel fille rflap
Fire extinguisher .............................. .395
First-aid kit ......................................... 394
Fitting awheel
Fitting awheel ............................... 430
Lowering the vehicle ..................... .430
Preparing the vehicle ..................... 426
Raising the vehicle ......................... 427
Removing awheel .......................... 429
Securing the vehicle against roll-
ing away ........................................ 427
Flat tyre
MOExtended tyres ......................... 398
Preparing the vehicle ..................... 397
TIREFIT kit ...................................... 399
see Emergency spare wheel
Floormat ............................................. 374
Foglamps
Extended range .............................. 146
Foldin gbench seat (luggage com-
partment) .......................................... .128
Frequencies
Garage door opene r....................... 371
Mobil ephone ................................. 470
Two-way radio ................................ 470
Fuel
Additives ........................................ 475
Consumption information .............. 476
Consumption statistics .................. 280
Displaying the current consump-
tion ................................................ 281
Displaying the rang e...................... 281
E10 ................................................ 474
Fue lgauge ....................................... 34
Grade (petrol) ................................ 474
Important safety notes .................. 473
Note sfor AMG vehicles ................. 475
Problem (malfunction) ................... 204
Quality (diesel )............................... 476
Refuelling ....................................... 200
Tank content/reserve fue l............. 474
Fue lfille rflap
Emergency release ........................ 202 Opening ......................................... 202
Fue lfilter (white display message) .. 314
Fue llevel
Calling up the rang e(on-board
computer) ...................................... 281
Gaug e.............................................. 34
Fue lreserve
see Fuel
Fue ltank
Capacity ........................................ 474
Problem (malfunction) ................... 204
Fus eallocatio nchart (vehicl etool
kit) ...................................................... 395
Fuses
Allocation chart ............................. 411
Before changing ............................. 411
Fusebox in the boo t...................... 412
Fus ebox in the engine compart-
ment .............................................. 412
Fus ebox in the luggage compart-
ment .............................................. 413
Important safety notes .................. 411 G
Garag edooro pener
Clearing the memory ..................... 371
Frequencie s................................... 371
Genera lnotes ................................ 368
Important safety notes .................. 369
Opening/closing the garag edoor..3 71
Programming (button in the rear-
view mirror) ................................... 369
Synchronising the rolling code ....... 370
Gear indicator (on-board com-
puter, AMG vehicles) ......................... 296
Gearshift program
SETUP (on-board computer) .......... 296
Genuine Mercedes-Benz parts ........... 24
Glove compartment .......................... 343 H
HANDS-FRE EACCESS ....................... 106
Hazard warning lamps ......................145
Head restraints
Adjusting ....................................... 125
Adjusting (electrically). .................. 12612
Index
Page 18 of 497
Locking centrally
see Central locking
Locking verification signa l(on-
boar dcomputer) .............................. .293
Luggage compartment
Opening/closing (from outside,
HANDS-FREE ACCESS) .................. 106
Luggage compartment cover
Important safety notes .................. 351
Luggage compartment enlarge-
ment ................................................... 349
Luggage compartment floor ............ 357
Luggage holde r(EA SY-PAC Kload-
securing kit) ....................................... 356
Lumbar support
Adjusting the 4-way lumba rsup-
port ................................................ 128
Luxury head restraint ....................... 126M
M+S tyres .......................................... .418
Main-beam headlamps
Adaptive Highbeam Assist PLUS .... 147
Changing bulbs .............................. 150
Display message ............................ 308
Switching on/off ........................... 144
Maintenance
see ASSYST PLUS
Manual transmission
Engaging revers egear................... 189
Gea rleve r...................................... 188
Pulling away ................................... 182
Shift recommendation ................... 189
Shifting to neutral .......................... 189
Starting the engine ........................ 182
Matt finis h(clea ning instructions) .. 388
Medi aInterface
USB por tinthe armres tofthe
centre console ............................... 344
see Separate operating instructions
Memory card (audio) ......................... 283
Memory function ............................... 139
Mercedes-Benz Contact
Displa ymessage ............................ 303 Mercedes-Benz emergenc
ycall
system
Switch in the overhead control
panel .............................................. 366
Mercedes-Benz Intelligent Drive
360°camera .................................. 249
ABS (Anti-lock Braking System) ....... 77
Active Blind Spot Assist ................. 261
Active Lane Keeping Assist ............ 263
Active Parking Assist ..................... 239
ATTENTIO NASSIST ........................ 253
BAS (Brake Assist) ........................... 78
BAS PLU S(Brake Assist PLUS)
with Cross-Traffic Assist .................. 78
Blind Spot Assist ............................ 257
COLLISION PREVENTION ASSIST
PLU S................................................ 80
Cruise control ................................ 212
DISTRONIC PLU S........................... 217
DISTRONIC PLU SwithS teering
Assist and Stop&G oPilot ............... 226
ESP ®
(Electronic Stability Pro-
gram) ............................................... 83
Genera lnotes ................................ 211
Lane Keeping Assist ...................... 259
PARKTRONIC ................................. 235
PRE-SAFE ®
(anticipatory occu-
pant protection) ............................... 56
PRE-SAFE ®
Brake ............................. 87
PRE-SAFE ®
PLU S(anticipatory
occupant protectio nPLUS) .............. 57
Reversing camera .......................... 244
SPEEDTRONIC ............................... 215
Traffic Sig nAssist .......................... 255
Mercedes-Benz Servic eCentre
see Qualifie dspecialist workshop
Messag ememory (on-board com-
puter) .................................................. 299
Messages
see Displa ymessages
Mirrors
see Exterior mirrors
see Rear-vie wmirror
see Vanity mirror (i nsun visor)
Mobil ephone
Frequencie s................................... 470
Installation ..................................... 470 Index
15
Page 19 of 497
Menu (on-board computer) ............ 284
Notes/placing in the bracket ......... 367
Transmission output (maximum) ....4 70
Mobile telephone
Pre-installe dbracket ..................... .368
Modifying the programming (key) ..... 96
MOExtende dtyres ............................ .398
Motorway mode ................................ 146
MP3
Operating ....................................... 283
see Separate operating instructions
Multicontour seat
Adjusting (on the seat) .................. 128
Multifunctio ndisplay
Function/notes ............................ .279
Permanent displa y......................... 290
Multifunctio nsteering wheel
Operating the on-board computer .. 277
Overview .......................................... 36 N
Navigation Menu (on-board computer) ............ 281
NECK-PRO head restraints
Operation ......................................... 55
Resetting triggered .......................... 55
NECK-PRO luxury head restraint
Important safety notes .................... 55
NECK-PRO luxury head restraints
Operation ......................................... 55
Resetting whe ntriggered ................. 56
Notes on runnin ginanew vehicle .. 178 O
Occupant safety Automatic measure safter an acci-
dent ................................................. 58
Childre ninthe vehicle ..................... 58
Important safety notes .................... 45
PASSENGER AIRBAG indicator
lamp ................................................. 45
Pets in the vehicle ........................... 77
PRE-SAFE ®
(anticipatory occu-
pant protection) ............................... 56
PRE-SAFE ®
PLUS (anticipatory
occupant protectio nPLUS) .............. 57 Restraint system introduction .......... 44
Restraint system warning lamp .......
.45
Odometer ...........................................2 80
Oil
see Engine oil
On-board computer
AMG menu ..................................... 296
Assistance menu ........................... 286
Audi omenu ................................... 283
Convenience submenu .................. 294
Display messages .......................... 299
Displaying aservice message ....... .384
DISTRONI CPLUS ........................... 224
Factory setting submenu .............. .295
Heating submenu ........................... 293
Important safety notes .................. 276
Instrument cluster submenu .......... 289
Ligh tsubmenu ............................... 290
Menu overview .............................. 279
Message memory .......................... 299
Navigation menu ............................ 281
Operating the TV ............................ 284
Operating vide oDVD ..................... 284
Operation ....................................... 277
RACETIMER ................................... 296
Service menu ................................. 288
Settings menu ............................... 289
Standard displa y............................ 280
Telephone menu ............................ 284
Trip menu ...................................... 280
Vehicle submenu ........................... 292
Operatin ginstructions
Vehicle equipment ........................... 25
Operatin gsafety
Declaratio nofconformity ................ 26
Important safety note ..................... .25
Operating system
see On-board computer
Outsid etemperature display ........... 277
Overhead control panel ......................41
Override feature
Rear side windows ........................... 76 P
Paint code .......................................... 472
Paintwork (cleaning instructions) ... 387
Panic alarm .......................................... 4416
Index
Page 24 of 497
Opening/closing (automatically
from outside) ................................. 105
Opening/closing (from outside) ..... 104
Tank
see Fuel tank
Technical data
Capacities ...................................... 473
Emergencys pare wheel ................. 468
Information .................................... 470
Trailerl oads ................................... 484
Tyres/wheels. ................................ 431
Vehicle data ................................... 481
Telephone
Accepting acall ............................. 285
Display message ............................3 28
Menu (on-board computer) ............ 284
Number from the phone book ....... .285
Redialling ....................................... 285
Rejecting/ending acall ................. 285
Telephone compartment ................ 344
Telescopic rod (Easy-Pac kfix kit) .... 356
Temperature
Coolant .......................................... 276
Coolant (on-board computer,
AMG vehicles) ................................ 296
Engine oil (on-board computer,
AMG vehicles) ................................ 296
Outside temperature ..................... .277
Setting (climate control) ................ 163
TEMPOMAT
Function/notes ............................ .212
Through-loading ................................ 348
Through-loading feature ................... 348
Timing (RACETIMER) ......................... 296
TIREFIT kit .......................................... 399
Top Tether ............................................ 60
Total distanc erecorder .................... 280
Tow-away protection
Activating ......................................... 90
Deactivating ..................................... 90
Function .......................................... .90
Tow-starting
Emergency engine starting ............ 411
Important safety notes .................. 407
Towing
Important safety notes .................. 407
With the rea raxler aise d................ 410 Towin
gatrailer
Active Blind Spo tAssist ................. 263
Active Lane Keeping Assist ............ 266
Active Parking Assist ..................... 244
Axle load ,permissibl e.................... 489
ESP ®
(Electronic Stability Pro-
gram) ............................................... 86
Failure check for LEDs ................... 272
Genera lnotes ................................ 267
Trailer tow hitch display message .. 327
Towin gaway
Fitting the towing ey e.................... 409
Removing the towing ey e............... 409
With both axles on the ground ....... 409
Towin geye......................................... 395
Traffi cSignA ssist
Activating/deactivating the warn- ing function .................................... 286
Displa ymessage ............................ 316
Function/note s............................. 255
Important safety notes .................. 255
Instrument cluster display ............. 256
Trailer coupling
see Towing atrailer
Trailer towing
7-pi nconnecto r............................. 272
Blind Spot Assist ............................ 259
Cleaning the traile rtow hitch ......... 390
Coupling up atraile r...................... 270
Decoupling atraile r....................... 270
Driving tip s.................................... 267
Folding in the ball coupling ............ 270
Folding ou tthe ball coupling .......... 268
Important safety notes .................. 266
Lights display message .................. 307
Mounting dimensions .................... 482
Parktroni c...................................... 238
Power supply ................................. 272
Trailer load s................................... 484
Transmission
see Automati ctransmission
see Manua ltransmission
Transmissio nposition display ......... 190
Transmissio nposition display
(DIRECT SELECT lever) ...................... 190
Transporting the vehicle .................. 410 Index
21
Page 39 of 497
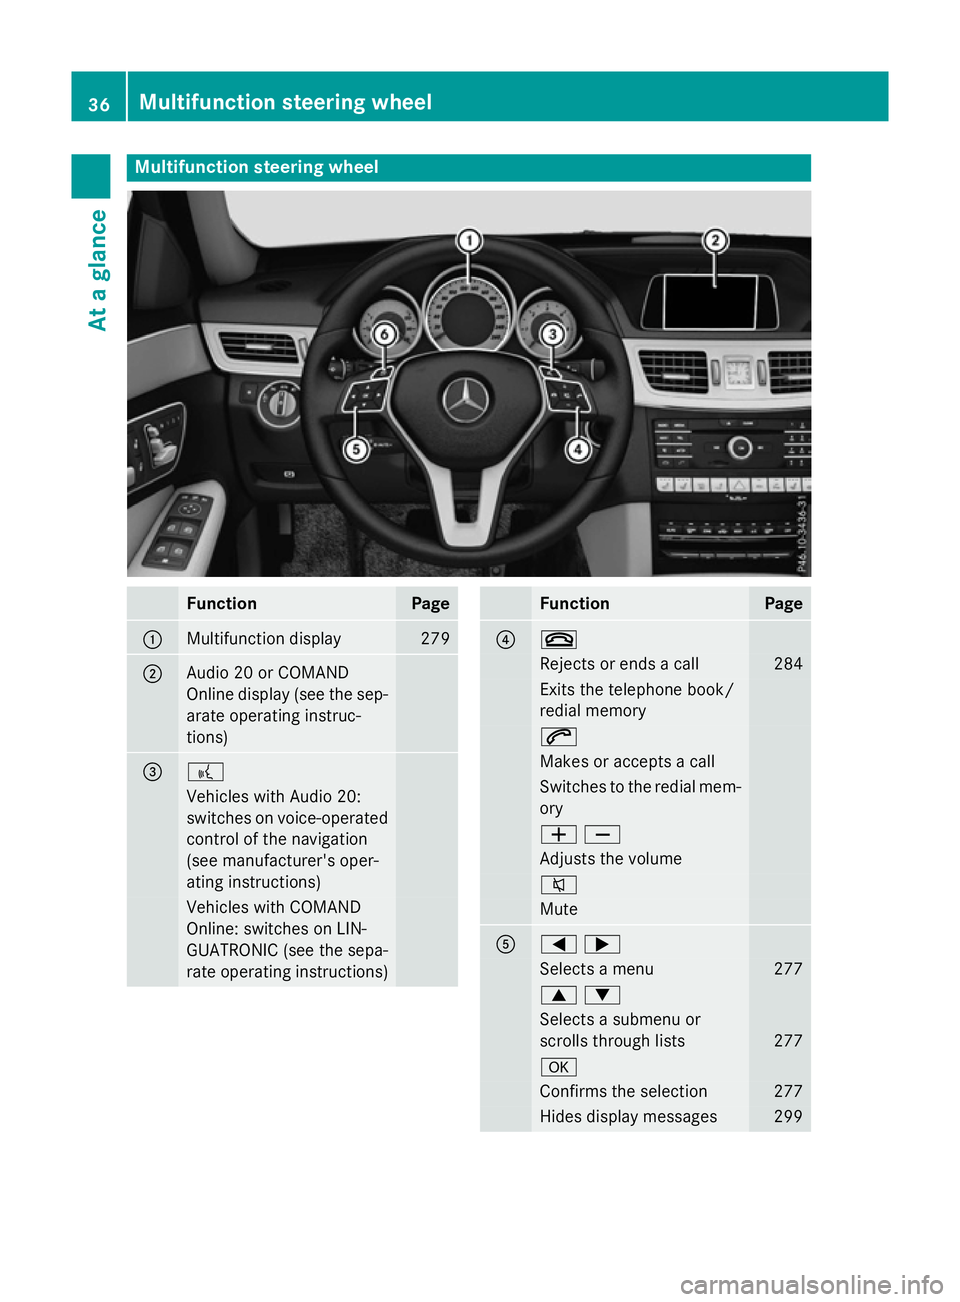
Multifunction steering wheel
Function Page
:
Multifunction display 279
;
Audi
o20orC OMAND
Online display (see the sep-
arate operating instruc-
tions) = ?
Vehicles with Audi
o20:
switches on voice-operated
control of the navigation
(see manufacturer's oper-
ating instructions) Vehicles with COMAND
Online: switches on LIN-
GUATRONIC (see the sepa-
rate operating instructions) Function Page
? ~
Rejects or ends
acall 284
Exits the telephone book/
redial memory 6
Makes or accepts
acall Switches to the redial mem-
ory WX
Adjusts the volume
8
Mute
A
=;
Selects
amenu 277
9:
Selects
asubmenu or
scroll sthrough lists 277
a
Confirm
sthe selection 277
Hides display messages 29936
Multifunctio
nsteering wheelAt ag lance
Page 70 of 497
PASSENGERA
IR BAG OFF indicator lamp :
shows you whether the front-passenger front airbag is disabled.
X Turn the key to position 1or 2in the ignition
lock or, on vehicles with KEYLESS-GO,
press the Start/Stop button once or twice. The system carries out aself-diagnosis.
The PASSENGERA IR BAG OFF indicator lamp
must light up for approximately six seconds.
If, after the system self-test, the
PASSENGER AIR BAG OFF indicator lamp:
R lights up ,the front-passenger fronta irbag
is disabled. It will then not be deployed in
the event of an accident.
R is not lit,t he sensor system did not detect
ac hild restraint system with transponder
for automatic child seat recognition. If, in
the case of an accident ,all deployment cri-
teria are met, the front-passenger fronta ir-
bag is deployed. G
WARNING
Electronic devices on the front-passenger
seat can affect the function of the automatic
child seat recognition, for example:
R laptop
R mobile phone
R transponder cards such as ski passes or
access passes
The front-passenger fronta irbag could deploy
unintentionally or not function as intended
during an accident .This poses an increased
risk of injury or even fatal injury.
Do not place any of the devices mentioned
above or similar devices on the front-
passenger seat. Be aware of the status of the front-passenger fronta irbag both before and
during the journey. Child restraint system on the front-
passenger seat
General notes Accident statistics show that children
secured in the rear seats are safer than chil-
dren secured in the front-passenger seat. For
this reason, Mercedes-Benz strongly advises
that you install achild restraint system on a
rear seat.
Vehicles with automatic child seat recogni-
tion on the front-passenger seat: if it is abso- lutely necessary to fit achild restraint system
to the front-passenger seat, alway sobserve
the information on "Automatic child seat rec-
ognition on the front-passenger seat"
(Y page 65).
You can thus avoid the risks that could arise
as aresult of:
R ac hild restraint system that is not detected
by the automatic child seat recognition
sensor system
R the unintentional disabling of the front-
passenger fronta irbag
R the unsuitable positionin gofthe child
restraint system, e.g. too close to the dash-
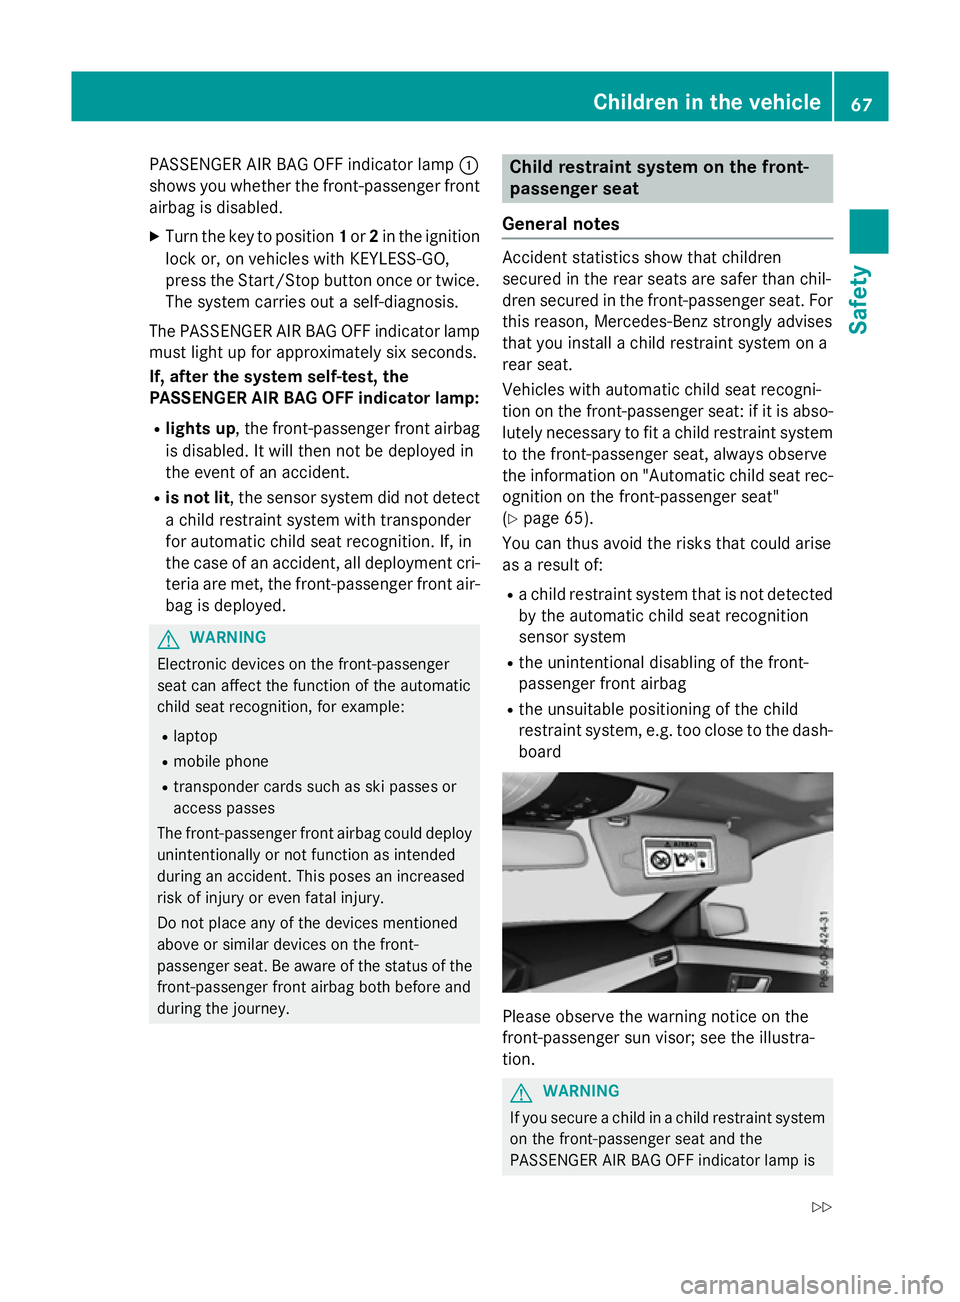
board Please observe the warning notice on the
front-passenger sun visor; see the illustra-
tion.
G
WARNING
If you secure achild in achild restraint system
on the front-passenger seat and the
PASSENGER AIR BAG OFF indicator lamp is Children in the vehicle
67Safety
Z
Page 73 of 497
Problems with automatic child seat recognition
Problem
Possible causes/consequences and
M
MSolutions The PASSENGER AIR
BAG OFF indicator
lamp on the centre con-
sole is lit. As
pecial Mercedes-Benz child restraint system with atrans-
ponder for automatic child seat recognition has been fitted to the
front-passenger seat. The front-passenger front airbag has there- fore been disabledasd esired. G
WARNING
There is no child restraint system fitted to the front-passenger
seat. Automatic child seat recognition is malfunctioning, for exam-
ple due to electronic devices on the front-passenger seat.
There is arisk of injury.
X Remove electronic equipment from the front-passenger seat,
e.g.:
R laptop
R mobile phone
R ac ard with atransponder, such as aski pass or access pass
If the PASSENGER AIR BAG OFF indicator lamp remains lit, the
front-passenger seat may not be used.
X Visit aqualified specialist workshop. The
6 restraint sys-
tem warning lamp
lights up and/or the
PASSENGER AIR BAG
OFF indicator lamp
does not light up briefly
when you switch the
ignition on. G
WARNING
Automatic child seat recognition is malfunctioning.
Do not install achild restraint system on the front-passenger seat.
It is recommended that you fit the child restraint system to asuit-
able rear seat.
X Visit aqualified specialist workshop.
X Please also refer to the notes about the restraint system warning
lamp (Y page 306). Suitable positioning of the child
restraint system
Introduction Only child restraint systems which are
approved in accordance with the ECE stand-
ard ECE R44 are permitted for use in the vehi- cle.
For certain child restraint systems in weight
categories II or III, this can mean that the area of use is restricted. The maximum size setting of the child restraint system is not possible
due to possible contact with the roof.
"Universal" category child restraint systems
can be recognised by their orange approval
label and the text "Universal".70
Children in the vehicleSafety
Page 97 of 497
Useful information
i This Owner's Manual describes all mod-
els, series and optional equipment for your
vehicle that were available at the time of
going to press. National variation sare pos-
sible. Not ethat your vehicle may not be
equipped with all of the function sdescri-
bed. This is also the case for system sand
function srelevan ttosafety.
i Read the information on qualified special-
ist workshops: (Y page 27). Key
Important safet
ynotes
United Kingdom only: G
WARNING
When the double lock sare activated, the
doors can no longer be opened from the
inside. People in the vehicle can no longer get out, e.g. in hazardous situations. There is a
risk of injury.
Therefore, do not leave any people unsuper-
vised in the vehicle, particularly children ,eld-
erly people or people in need of special assis-
tance. Do not activate the double lock when
people are in the vehicle.
If the vehicle has been locked from the out-
side, the double lock function is activated as
standard. It is then not possible to open the
doors from inside the vehicle. You can deac-
tivat ethe double lock function by deactivat-
ing the interior motion sensor (Y page 91).
The doors can then be opened from the inside after the vehicle has been locked from the
outside.
The anti-theft alarm system is triggered if thedoor is opened from the inside. Switc hoff the
alarm (Y page 89).
All countries: G
WARNING
If children are left unsupervised in the vehicle, they could:
R open doors, thereby endangering other per-
sons or road users
R get out and be struck by oncoming traffic
R operate vehicle equipment and become
trapped, for example
In addition ,the children could also set the
vehicle in motion, for example, if they:
R release the parkin gbrake
R shift the automatic transmission out of park
position Porshift manual transmission into
neutral
R start the engine
There is arisk of an acciden tand injury.
When leaving the vehicle, always tak ethe key
with you and lock the vehicle. Never leave
children and animals unattended in the vehi-
cle. Keep the keys out of the reach of children. G
WARNING
If you attach heavy or large objects to the key, the key could be unintentionally turned in the
ignition lock .This could cause the engin eto
be switched off. There is arisk of an accident.
Do not attach any heavy or large objects to the
key. Remove any bulky keyrings before insert-
ing the key int othe ignition lock.
! Keep the key away from strong magnetic
fields. Otherwise, the remot econtro lfunc-
tion could be affected.
Stron gmagnetic fields can occur in the
vicinity of powerful electrical installations.
Do not keep the key: R with electronic devices ,e.g. am obile
phone or another key
R with metallic objects, e.g. coin sormetal
film
R inside metallic objects, e.g. ametal case
This can affec tthe key's functionality. 94
KeyOpening and closing
Page 183 of 497
The Start/Stop button must be inserted in the
ignition lock and the key must be in the vehi-
cle.
When you insert the Start/Stop button into
the ignition lock, the system needs approx-
imately two seconds recognition time. You
can then use the Start/Stop button.
Pressing the Start/Stop button several times
in succession corresponds to the different
key positions in the ignition lock. This is only
the case if you are not depressing the brake
pedal.
If you depress the brake pedal and press the
Start/Stop button ,the engine start simmedi-
ately.
Ac heck which periodically establishes aradio
connection between the vehicle and the key
determines whether avalid key is in the vehi-
cle. This occurs, for example, when starting
the engine.
To start the vehicle without actively using the
key:
R the Start/Stop button must be inserted in
the ignition lock
R the key must be in the vehicle
R the vehicle must not be locked with the key
or KEYLESS-GO (Y page 95)
Do not keep the KEYLESS-GO key:
R with electronic devices, e.g. amobile
phone or another key
R with metallic objects, e.g. coins or metal
film
R inside metallic objects, e.g. ametal case
This can affect the functionality of KEYLESS-
GO.
If you lock the vehicle with the key's remote
control or with KEYLESS-GO, after ashort
time:
R you will not be able to switch on the ignition
with the Start/Stop button
R you will not be able to start the engine with
the Start/Stop button until the vehicle is
unlocked again If you lock the vehicle centrally using the but-
ton on the frontd oor (Ypage 101), you can
continue to start the engine with the Start/
Stop button.
The engine can be switched off while the vehi-
cle is in motion by pressing and holding the
Start/Stop button for three seconds. This
function operates independently of the ECO
start/stop automatic engine switch-off func-
tion.
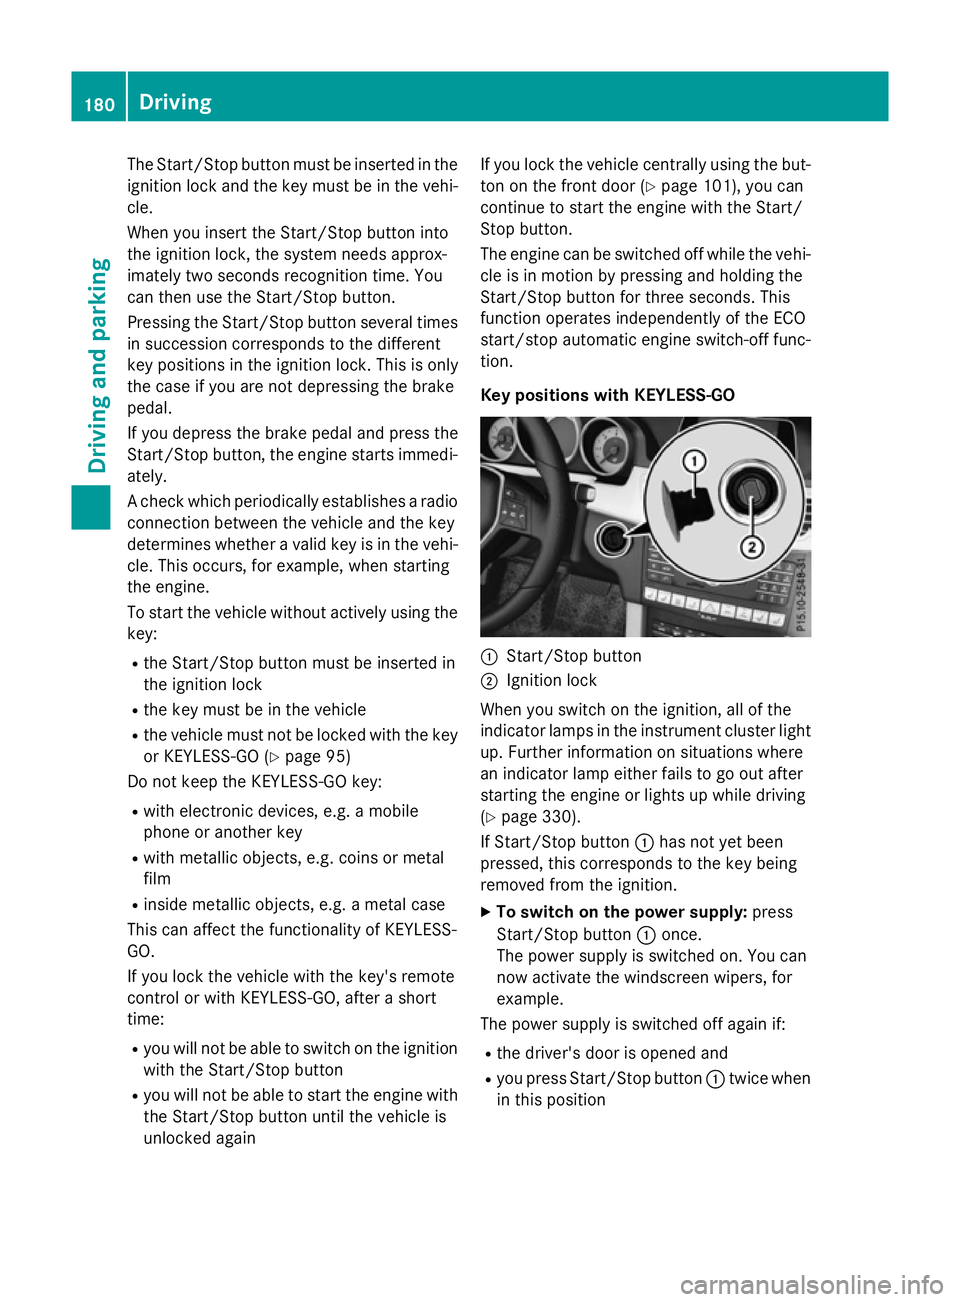
Key positions with KEYLESS-GO :
Start/Stop button
; Ignition lock
When you switch on the ignition ,all of the
indicator lamps in the instrument cluster light up. Further information on situations where
an indicator lamp either fails to go out after
starting the engine or lights up while driving
(Y page 330).
If Start/Stop button :has not yet been
pressed, this corresponds to the key being
removed from the ignition.
X To switch on the power supply: press
Start/Stop button :once.
The power supply is switched on. You can
now activat ethe windscreen wipers, for
example.
The power supply is switched off again if:
R the driver's door is opened and
R you press Start/Stop button :twice when
in this position 180
DrivingDriving and parking