towing capacity MERCEDES-BENZ E-CLASS ESTATE 2015 Owners Manual
[x] Cancel search | Manufacturer: MERCEDES-BENZ, Model Year: 2015, Model line: E-CLASS ESTATE, Model: MERCEDES-BENZ E-CLASS ESTATE 2015Pages: 497, PDF Size: 16.23 MB
Page 7 of 497
1, 2,
3...
4ETS (Electronic Traction System) see ETS/4ETS (Electronic Trac-
tion System)
4MATIC (permanent all-wheel
drive)
Function/notes .............................2 35
12 Vsocket
see Sockets
360 °camera
Cleaning ......................................... 390
Function/notes ............................ .249 A
ABS (Anti-lock Braking System) Display message ............................ 300
Function/notes ................................ 77
Warning lamp ................................. 332
Accident
Automatic measure safter an acci-
dent ................................................. 58
Activating/deactivating air-recir-
culation mode ................................... .166
Activating/deactivating cooling
with air dehumidification ................. 160
Active Blin dSpot Assist
Activating/deactivating (on-
board computer) ............................ 288
Display message ............................ 317
Function/notes ............................ .261
Towing atrailer .............................. 263
Active Driving Assistanc epackage .. 261
Active Lane Keepin gAssist
Activating/deactivating (on-
board computer) ............................ 288
Display message ............................ 317
Function/notes ............................ .263
Towing atrailer .............................. 266
Active light function ......................... 145
Active multicontour seat
Adjusting (on the seat) .................. 128
Active Parking Assist
Detecting parking spaces .............. 240
Display message ............................ 318
Exiting aparking space .................. 243
Function/notes ............................ .239 Important safety notes .................. 239
Parking .......................................... 241
Towing atrailer .............................. 244
ADAPTIVE BRAKE ................................. 86
Adaptive Brake Assist
Function/notes ................................ 82
Adaptive brake lights .......................... 83
Adaptive Dampin gSyste m(ADS)..... 232
Adaptive Highbeam Assist Plus
Display message ............................ 310
Function/notes ............................ .147
Switching on/off ........................... 148
AdBlue ®
Display message ............................ 314
Filling capacity ............................... 478
Important safety notes .................. 477
Service indicator ............................ 385
AdBlue ®
service indicator ................ 385
Additional speedometer ................... 289
Additives (engine oil) ........................ 479
Airc onditioning
General notes ................................ 156
Airf ilter(wh ite display message) .... 314
Airp ressure
see Tyr epressure
Airv ents
Glove compartment ....................... 174
Important safety notes .................. 173
Rea r............................................... 174
Setting .......................................... .173
Setting the centre airv ents ........... 174
Setting the sid eairvents .............. .174
Air-conditionin gsystem
see Climate control
Airbag
Introduction ..................................... 50
PASSENGER AIR BAG OFF indica-
tor lamp .......................................... .45
Airbags
Fron tairbag (driver ,front
passenger )....................................... 51
Important safety guidelines .............50
Kneebag ........................................... 51
Pelvi sairbag .................................... 52
Sideba g............................................ 52
Triggering .........................................53
Windowbag ...................................... 52 4
Index
Page 14 of 497
Electronic Stability Program
see ESP ®
(Electronic Stabilit yProgram)
Emergency
Automatic measures after an acci-
den t................................................. 58
Emergency key
Unlockin gthe driver' sdoor ............ 102
Emergency key element
Function/notes ................................ 96
Insertin g......................................... .97
Lockin gvehicle .............................. 103
Removing ........................................ .97
Emergency release
Driver's door .................................. 102
Fuel filler flap ................................ .202
Emergency spare wheel
General notes ................................ 465
Important safety notes .................. 465
Inflating the collapsibl espare
wheel ............................................. 467
Removing ....................................... 465
Storage location ............................ 465
Stowing .......................................... 466
Technical data ............................... 468
Emergency unlocking
Tailgate .......................................... 110
Vehicle .......................................... .102
Engine
Display message ............................ 311
ECO start/stop function ................ 183
Engine numbe r............................... 473
Jump-starting ................................. 405
Running irregularl y......................... 187
Starting problems .......................... 187
Starting the engine with the key .... 182
Starting with KEYLESS GO ............. 182
Stopping ........................................ 206
Tow-starting (vehicle )..................... 411
Warning lamp (engine diagnos-
tics) ............................................... 336
Engine electronics
Note s............................................. 470
Problem (fault) ............................... 187
Engine oil
Additives ........................................ 479
Checking the oi llev el ..................... 380
Checking the oi llev el using the
dipstick .......................................... 381 Displa
ymessage ............................ 313
Filling capacity ............................... 478
Note sabout oilg rade s................... 478
Note sono illevel/consumption .... 380
Temperature (on-board computer, AMG vehicles) ................................ 296
Topping up ..................................... 381
Viscosity ........................................ 479
Environmental protection
Returning an end-of-life vehicl e....... 24
ESP ®
(Electroni cStability Pro-
gram)
Activating/deactivating (except
AMG vehicles) .................................. 84
Activating/deactivating (on-
board computer, except AMG
vehicles) ........................................ 287
AMG menu (on-board computer) ... 296
Characteristics ................................. 84
Deactivating/activating (button
in AMG vehicles) .............................. 85
Displa ymessage ............................ 300
ETS/4ETS ........................................ 83
Function/note s................................ 83
Genera lnotes .................................. 83
Important safety guideline s............. 83
Trailer stabilisation .......................... 86
Warning lamp ................................. 333
ETS/4ETS (Electroni cTraction Sys-
tem) ...................................................... 83
Exhaus tpipe (cleaning instruc-
tions) .................................................. 390
Exterior lighting
Setting soptions ............................. 142
see Lights
Exterior mirrors
Adjusting ....................................... 136
Anti-dazzle mod e(automatic) ........ 137
Folding in when locking (on-board computer) ...................................... 295
Folding in/out (automatically )....... 137
Folding in/out (electrically) ........... 137
Ou tofp osition (troubleshooting )... 137
Parking position ............................. 138
Resetting ....................................... 137
Storing settings (memory func-
tion) ............................................... 139 Index
11
Page 351 of 497
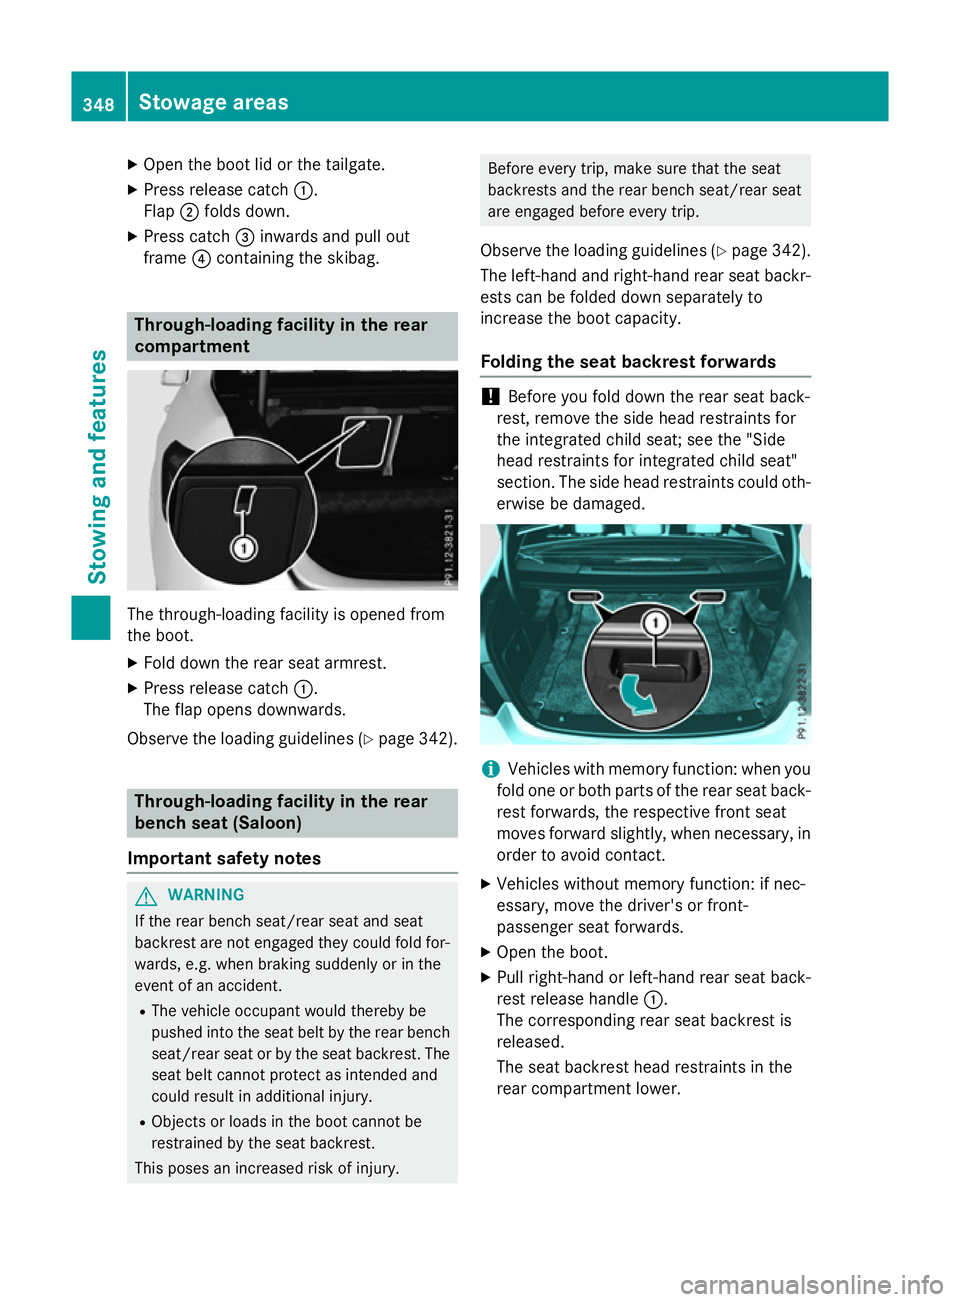
X
Open the boot lid or the tailgate.
X Press release catch :.
Flap ;folds down.
X Press catch =inwards and pull out
frame ?containing the skibag. Through-loading facility in the rear
compartment The through-loading facility is opened from
the boot.
X Fold down the rear seat armrest.
X Press release catch :.
The flap opens downwards.
Observe the loading guidelines (Y page 342).Through-loading facility in the rear
benchs eat (Saloon)
Important safety notes G
WARNING
If the rear bench seat/rear seat and seat
backrest are not engaged they could fold for- wards, e.g. when braking suddenly or in the
event of an accident.
R The vehicle occupant wouldt hereby be
pushed into the seat belt by the rear bench
seat/rear seat or by the seat backrest. The
seat belt cannot protect as intended and
could result in additional injury.
R Objects or loads in the boot cannot be
restrained by the seat backrest.
This poses an increased risk of injury. Before every trip, make sure that the seat
backrests and the rear bench seat/rear seat
are engaged before every trip.
Observe the loading guidelines (Y page 342).
The left-hand and right-hand rear seat backr- ests can be folded down separately to
increase the boot capacity.
Folding the seat backrest forwards !
Before you fold down the rear seat back-
rest, remove the side head restraints for
the integrated child seat; see the "Side
head restraints for integrated child seat"
section. The side head restraints could oth-
erwise be damaged. i
Vehicles with memory function: when you
fold one or both parts of the rear seat back- rest forwards, the respective front seat
moves forward slightly, when necessary, inorder to avoid contact.
X Vehicles without memory function: if nec-
essary, move the driver's or front-
passenger seat forwards.
X Open the boot.
X Pull right-hand or left-hand rear seat back-
rest release handle :.
The corresponding rear seat backrest is
released.
The seat backrest head restraints in the
rear compartment lower. 348
Stowage areasStowinga
nd features
Page 353 of 497
The left-hand and right-hand rear seat backr-
ests can be folded forwards separately to
increase the luggage compartment capacity.
The combined luggage cover and net can
remain installed.
i When you fold one or both parts of the
rear seat backrest sforwards, the headr-
ests are also lowered if necessary. In the
case of vehicles with memory function, the respective fronts eat is moved forwards
slightly to avoid contact with the seat
behind it.
X Vehicles without memory function: if nec-
essary, move the driver's or front-
passenger seat forwards.
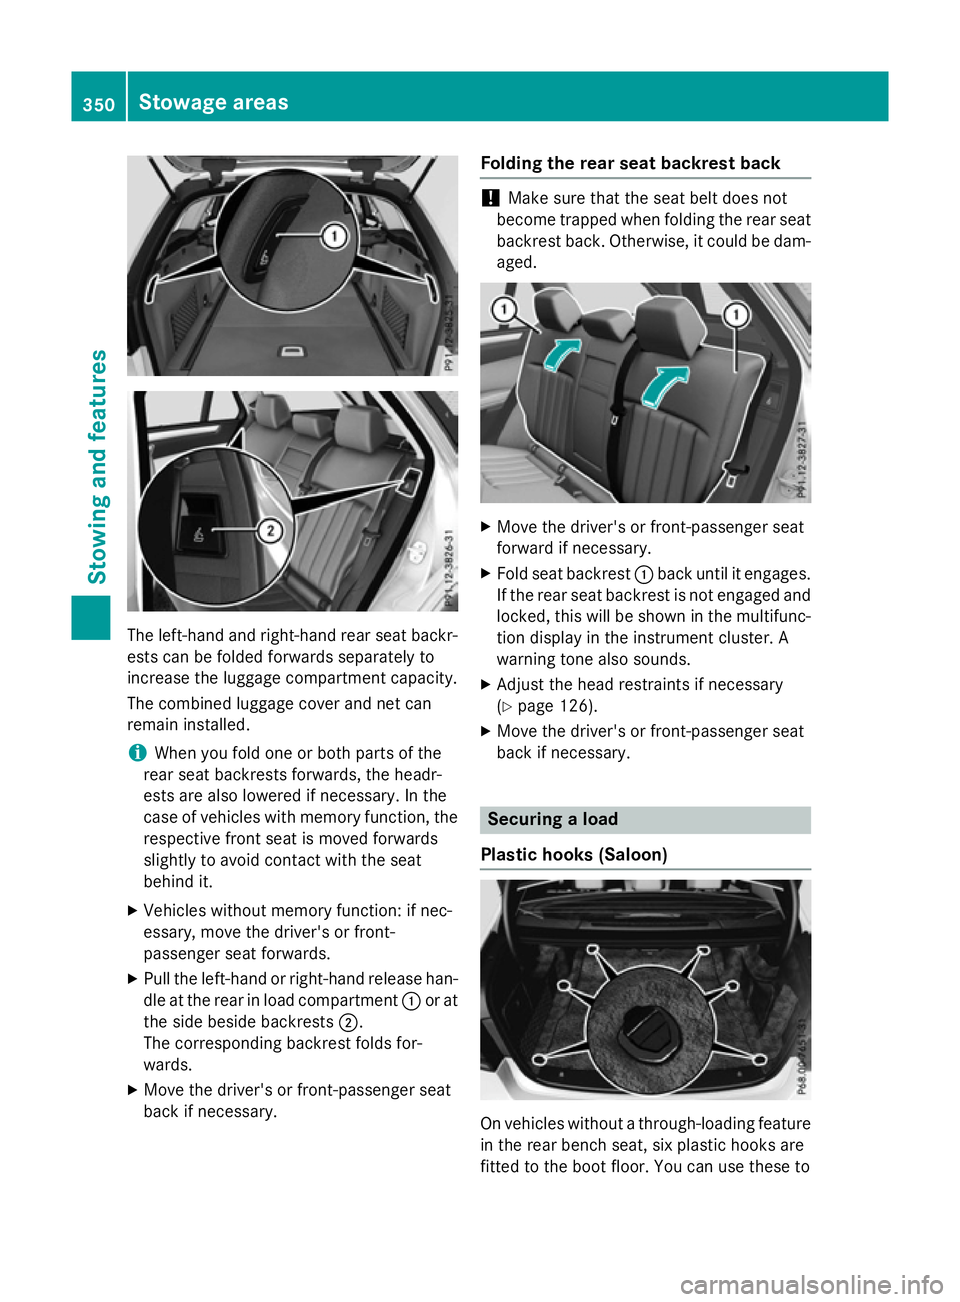
X Pull the left-hand or right-hand release han-
dle at the rear in load compartment :or at
the side beside backrests ;.
The corresponding backrest folds for-
wards.
X Move the driver's or front-passenger seat
back if necessary. Folding the rear seat backrest back !
Make sure that the seat belt does not
become trapped when folding the rear seat backrest back. Otherwise, it could be dam- aged. X
Move the driver's or front-passenger seat
forward if necessary.
X Fold seat backrest :back until it engages.
If the rear seat backrest is not engaged and locked, this will be shown in the multifunc-
tion display in the instrument cluster. A
warning tonea lso sounds.
X Adjust the head restraints if necessary
(Y page 126).
X Move the driver's or front-passenger seat
back if necessary. Securing
aload
Plastic hooks (Saloon) On vehicles without
athrough-loading feature
in the rear bench seat, six plastic hooks are
fitted to the boot floor. You can use these to 350
Stowage areasStowing and features
Page 366 of 497
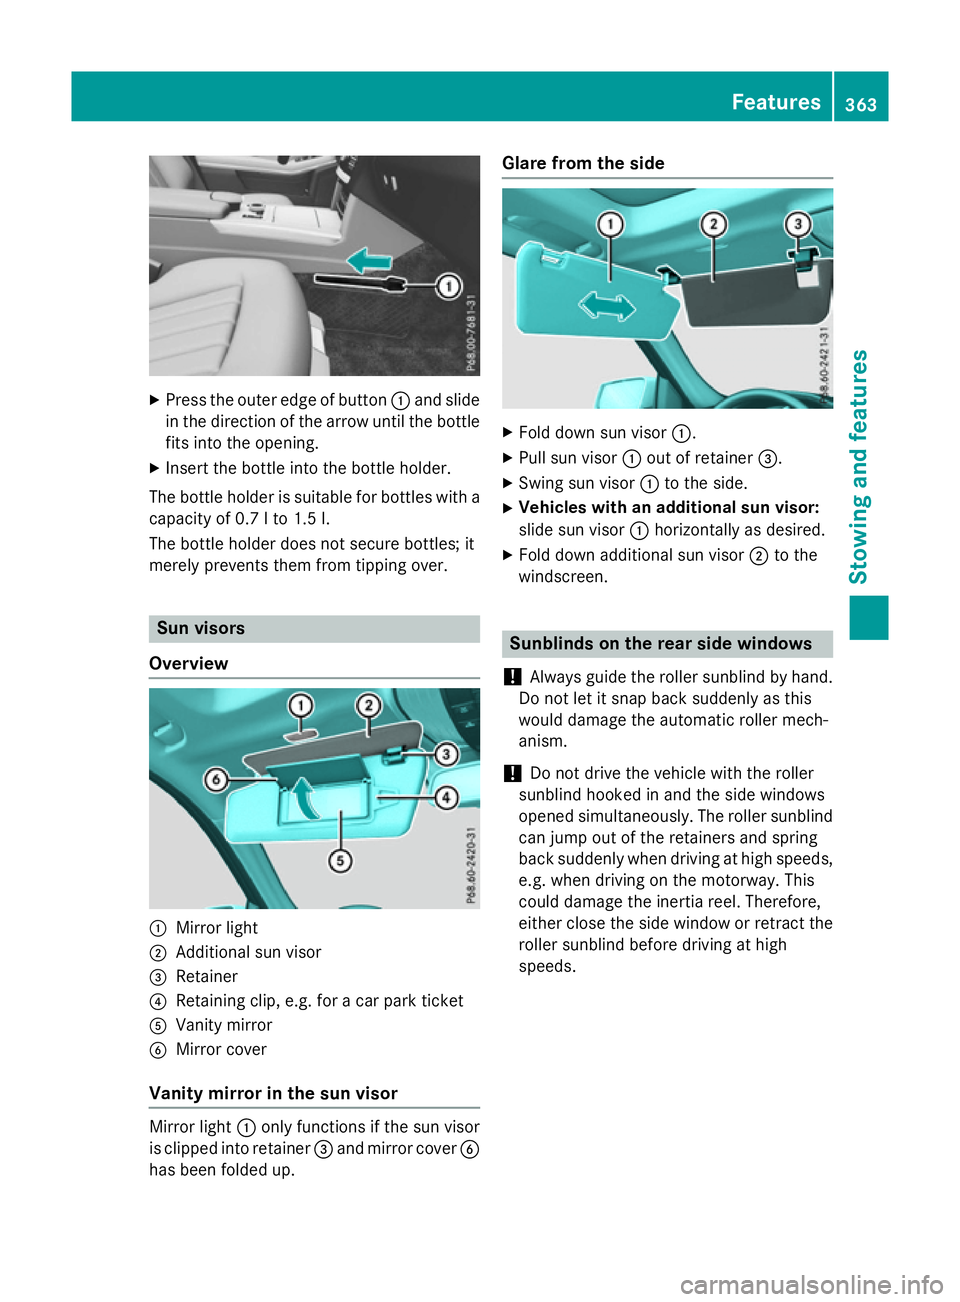
X
Press the outer edge of button :and slide
in the direction of the arrow until the bottle
fits into the opening.
X Inser tthe bottle into the bottle holder.
The bottle holder is suitable for bottles with a
capacity of 0.7 lto1 .5l.
The bottle holder does not secure bottles; it
merely prevent sthem from tipping over. Sun visors
Overview :
Mirror light
; Additional sun visor
= Retainer
? Retaining clip, e.g. for acar park ticket
A Vanity mirror
B Mirror cover
Vanit ymirror in the sun visor Mirror light
:only functions if the sun visor
is clipped into retainer =and mirror cover B
has been folded up. Glare from the side
X
Fold down sun visor :.
X Pull sun visor :out of retainer =.
X Swing sun visor :to the side.
X Vehicles with an additional sun visor:
slide sun visor :horizontally as desired.
X Fold down additional sun visor ;to the
windscreen. Sunblinds on the rear side windows
! Always guide the roller sunblind by hand.
Do not let it snap back suddenly as this
would damage the automatic roller mech-
anism.
! Do not drive the vehicle with the roller
sunblind hooked in and the side windows
opened simultaneously. The roller sunblind can jump out of the retainers and spring
back suddenly when driving at high speeds,
e.g. when driving on the motorway. This
could damage the inertia reel. Therefore,
either close the side window or retrac tthe
roller sunblind before driving at high
speeds. Features
363Stowing and features Z