wheel bolts MERCEDES-BENZ E-CLASS ESTATE 2015 Owners Manual
[x] Cancel search | Manufacturer: MERCEDES-BENZ, Model Year: 2015, Model line: E-CLASS ESTATE, Model: MERCEDES-BENZ E-CLASS ESTATE 2015Pages: 497, PDF Size: 16.23 MB
Page 391 of 497

Scratches, corrosiv
edeposits, areas affected
by corrosio nand damag ecaused by inade-
quate care canno talway sbec ompletely
repaired .Insuchc ases, visit aquali fied spe-
cialist workshop.
X Remove impuritie simmediately, where
possible ,whilst avoiding rubbing too hard.
X Soa kinsect remains with insect remover
and rins eoff the treated areas afterwards.
X Soa kbirdd ropping swithw ater and rinse
off the treated areas afterwards.
X Remove coolant, brake fluid ,tree resin,
oils, fuels and greases by rubbing gently
with acloth soaked in petroleu metheror
lighte rfluid.
X Use tar remover to remove tar stains.
X Use silicone remover to remove wax.
Care and treatment of matt paintwork !
Neve
rpolish the vehicl eorthe light alloy
wheels. Polishing make sthe paintwork
shiny.
! The following may cause the paint to
become shiny and thu sreduce the matt
effect:
R Vigorous rubbing with unsuitable mate-
rials.
R Frequent us eofcar washes.
R Washing the vehicl eindirect sunlight.
! Neve
ruse paint cleaner, buffing or pol-
ishing products, or gloss preserver, e.g.
wax. These products are onl ysuitabl efor
high-gloss surfaces. Their us eonvehicles
with matt finish lead stoconsiderable sur-
face damag e(shiny ,spotted areas).
Alway shavep aintwork repairs carrie dout
at aq uali fied specialist workshop.
! Do not us
ewashp rograms with ahot wax
treatment under any circumstances.
Observe thes enotes if your vehicl ehas a
clear matt finish. Thi swillh elpy ou to avoid
damag etothe paintwork du etoincorrect
treatment. These notes also appl
ytolight-alloy wheels
with aclear matt finish.
i The vehicl
eshoul dpreferabl ybewashed
by hand using asoft sponge, car shampoo
and plenty of water.
i Use onl
yinsect remover and car shampoo
from the rang eofrecommended and
approved Mercedes-Benz care products. Cleanin
gvehicle parts
Cleanin gthe wheels G
WARNING
The water jet of circular-jet nozzle s(dirt grind-
ers )can cause damag enot visible from the
outsid etotyresorc hassi scomponents .Com-
ponents damaged in this wa ycan unexpect-
edly fail. There is ariskofana ccident.
Do not us ehigh-pressure cleaners with circu-
lar-jet nozzle stoclean the vehicle. Hav edam-
aged tyre sorchassiscomponents replaced
immediately.
! Do not us
eacidi cwheel cleaning products
to remove brake dust. Thi scould damage
wheel bolts and brake components.
! Do not park up the vehicl
efor an extended
perio dstraight afte rcleaning it, particularly
afte rhaving cleane dthe wheel swithw heel
cleaner. Wheel cleaners could cause
increased corrosio nofthe brake discs and
brake pads/linings. For this reason, you
shoul ddrive for afew minutes afte rclean-
ing .Braking heats the brake discs and the
brake pads/linings, thu sdrying them. The
vehicl ecan then be parked up.
Cleanin gthe windows G
WARNING
If the windscreen wipers are set in motion
when cleaning the windscreen or wiper
blades, yo ucould become trapped. There is a
danger of injury. 388
CareMaintenanc
eand care
Page 431 of 497

jack could tip ove
rwitht he vehicl eraised.
There is ariskofi njury.
Onl yposit iont he jack at the appropriate jack-
ing point of the vehicle. The base of the jack
must be positioned vertically, directl yunder
the jacking point of the vehicle.
Observe the following when raising the vehi-
cle:
R to rais ethe vehicle, onl yusethe vehicle-
specific jack tha thas been teste dand
approved by Mercedes-Benz. If the jack is
used incorrectly ,itcould tip ove rwhile the
vehicl eisraised.
R the jack is designe donlytor aiseand hold
the vehicl efor as hort time whil eawheel
is being changed. It is not suitabl efor per-
formin gmaintenance work under the vehi-
cle.
R avoi dchanging the whee lonuphilland
downhil lslope s.
R befor eraisi ng the vehicle, safeguard it from
rolling away by applying the parking brake
and positioning whee lchocks. Never
release the parking brake whil ethe vehicle
is raised.
R the jack must be place donafirm, flatand
non-sli psurface. On aloo se surface, a
large ,flatl oad- bearing underlay must be
used .Ona slippery surface, anon-slip
underlay must be used ,e.g.r ubbe rmats.
R do not us ewoode nblocks or similar
objects as ajack underlay .Otherwise, the
jack will not be able to achieve its load-
bearing capacity du etothe restricted
height.
R make sure tha tthe distance between the
undersid eofthe tyres and the ground does
not exceed 3cm.
R neve rplace your hands or fee tunder the
raised vehicle.
R do not li eunder the vehicle.
R do not start the engine when the vehicl eis
raised. R
do not open or close adoorort he boot lid/
tailgate when the vehicl eisraised.
R make sure tha tnopersons ar epresent in
the vehicl ewhent he vehicl eisraised.
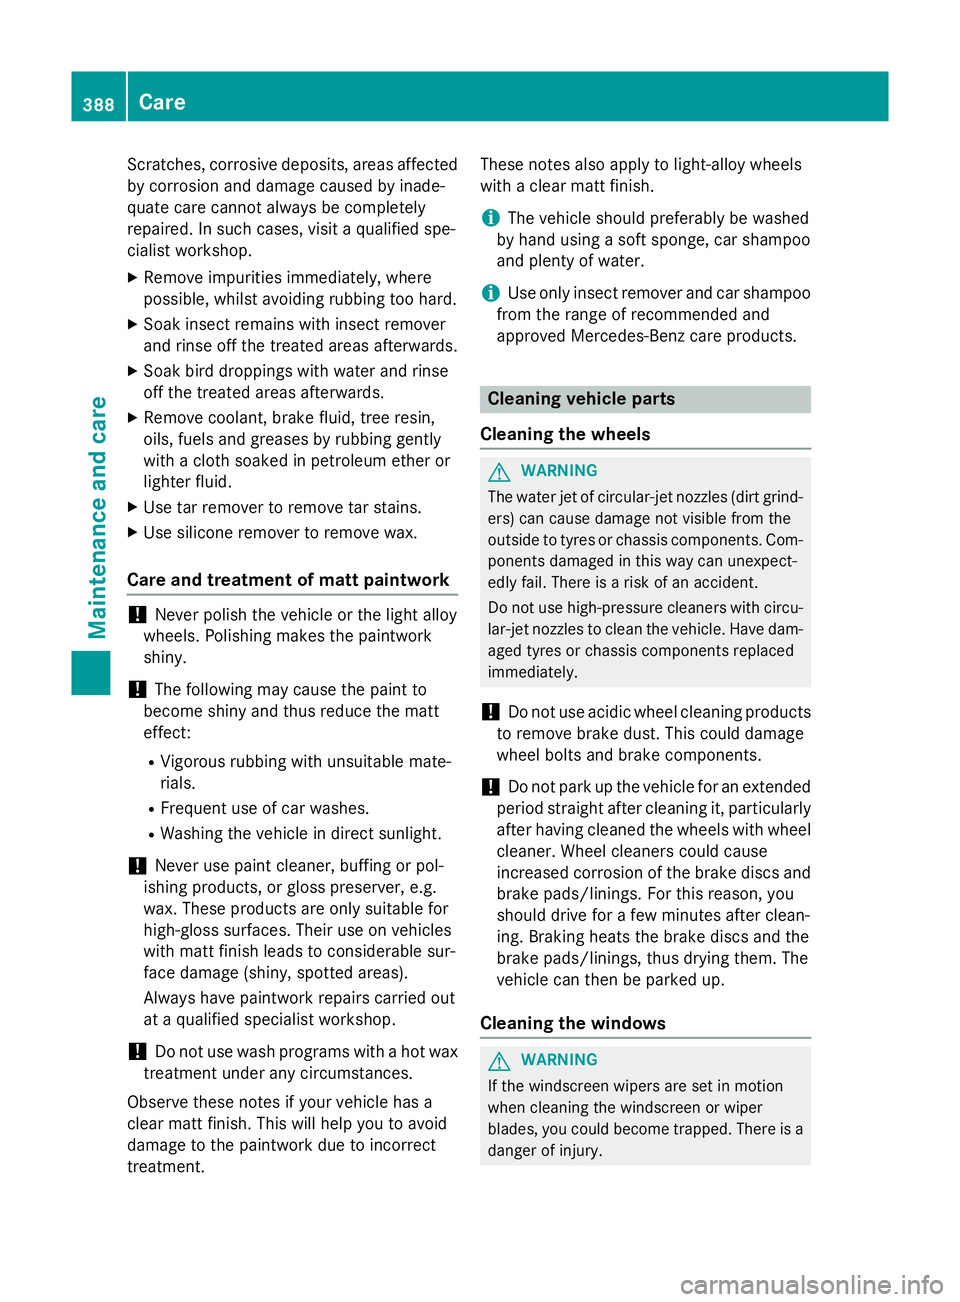
AM Gvehicle swithP erformanc eStudio
equipment: the wheelbolts ar ecovered by a
hu bc ap.B efore yo ucan unscrew the wheel
bolts ,you must remove the hu bcap. X
To remove: turnthe centre cove rofhub
cap :anti-clockwise and remove.
X To fit: beforefitting, ensur etha thub cap :
is in the open position. To do this, tur nthe
centre cove ranti-clockwise.
X Positio nhub cap :and tur nthe centre
cove rclockwise unti lhub cap :engages
physicall yand audibly.
X Make sure tha thub cap :is fitted
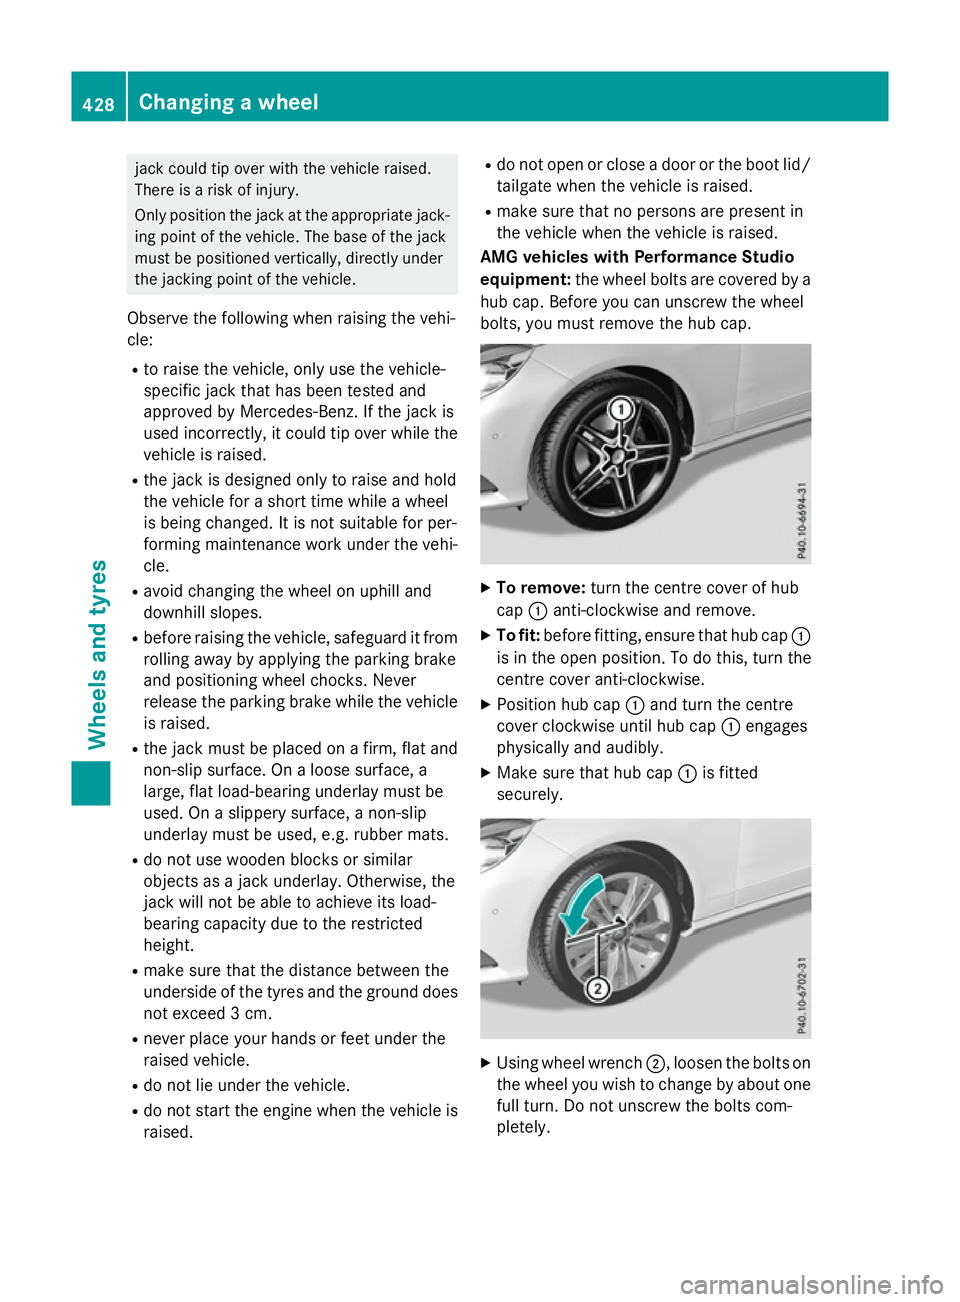
securely. X
Using whee lwrench ;,l oosent he bolts on
the whee lyou wish to change by abou tone
full turn. Do not unscrew the bolts com-
pletely. 428
Changin
gawheelWheels an dtyres
Page 433 of 497

X
Unscrew the remaining wheel bolts fully.
X Remove the wheel.
Fitting anew wheel G
WARNING
Oiled or greased wheel bolts or damaged
wheel bolts/hub threads can cause the wheel bolts to come loose. As aresult, you could
lose awheel while driving. There is arisk of
accident.
Never oil or grease wheel bolts. In the event of damage to the threads, contact aqualified
specialist workshop immediately.H ave the
damagedw heel bolts or hub threads
replaced/renewed. Do not continue driving. G
WARNING
If you tighten the wheel bolts or wheel nuts
when the vehicle is raised, the jack could tip
over. There is arisk of injury.
Only tighten the wheel bolts or wheel nuts
when the vehicle is on the ground.
Observe the instructions and safety notes on "Changing awheel" (Y page 426).
Only use wheel bolts that have been designed
for the wheel and the vehicle. For safety rea-
sons, Mercedes-Benz recommends that you
only use wheel bolts which have been
approved for Mercedes-Benz vehicles and the
respective wheel.
! AMG vehicles:
during removal and repo-
sitioning of the wheel, the wheel rim can
strike the ceramic-brake disc and damage
it. Therefore, take precautions and have a
second person assist you. Alternatively,
you can use asecond centring pin. X
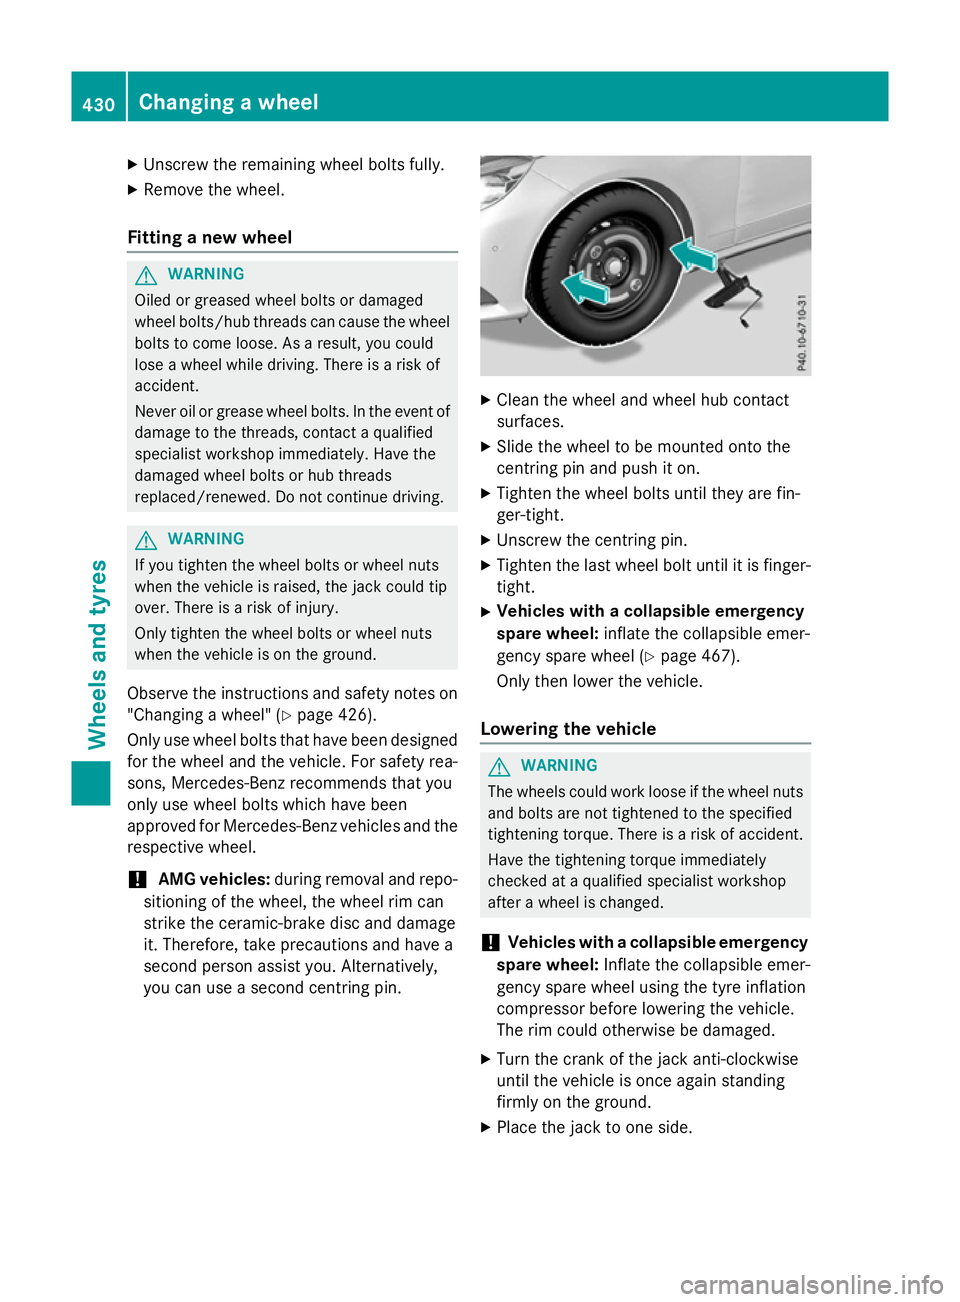
Cleant he wheel and wheel hub contact
surfaces.
X Slide the wheel to be mounted onto the
centring pin and push it on.
X Tighten the wheel bolts until they are fin-
ger-tight.
X Unscrew the centring pin.
X Tighten the last wheel bolt until it is finger-
tight.
X Vehiclesw ithacollapsible emergency
spare wheel: inflate the collapsible emer-
gency spare wheel (Y page 467).
Only then lower the vehicle.
Lowering the vehicle G
WARNING
The wheels could work loose if the wheel nuts and bolts are not tightened to the specified
tightening torque. There is arisk of accident.
Have the tightening torque immediately
checked at aqualified specialist workshop
after awheel is changed.
! Vehiclesw
ithacollapsible emergency
spare wheel: Inflate the collapsible emer-
gency spare wheel using the tyre inflation
compressor before lowering the vehicle.
The rim could otherwise be damaged.
X Turn the crank of the jack anti-clockwise
until the vehicle is once agains tanding
firmly on the ground.
X Place the jack to one side. 430
Changing
awheelWheels and tyres
Page 434 of 497

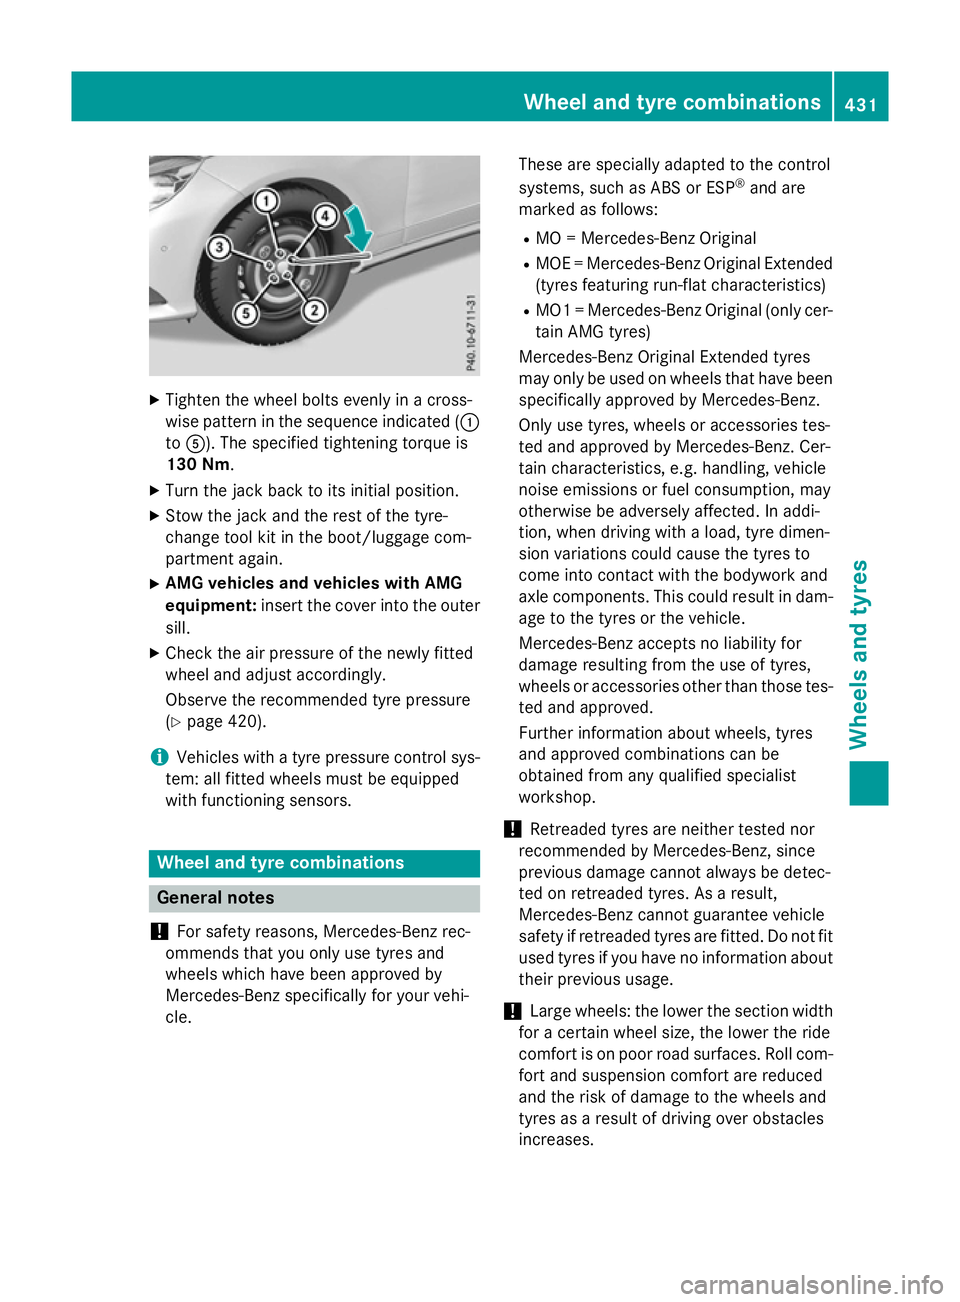
X
Tighten the wheel bolts evenly in across-
wise pattern in the sequence indicated ( :
to A). The specified tightening torque is
130 Nm.
X Turn the jack back to its initial position.
X Stow the jack and the rest of the tyre-
change tool kit in the boot/luggage com-
partmen tagain.
X AMG vehicles and vehicles with AMG
equipment: insert the cover into the outer
sill.
X Check the air pressure of the newly fitted
wheel and adjust accordingly.
Observe the recommended tyre pressure
(Y page 420).
i Vehicles with
atyre pressure control sys-
tem: all fitted wheels must be equipped
with functioning sensors. Wheel and tyrec
ombinations General notes
! For safety reasons, Mercedes-Benz rec-
ommends that you only use tyres and
wheels which have been approved by
Mercedes-Benz specifically for your vehi-
cle. These are specially adapted to the control
systems, such as ABS or ESP
®
and are
marked as follows:
R MO =Mercedes-Benz Original
R MOE =Mercedes-Benz Original Extended
(tyres featuring run-flat characteristics)
R MO1 =Mercedes-Benz Original (only cer-
tain AMG tyres)
Mercedes-Benz Original Extended tyres
may only be used on wheels that have been
specifically approved by Mercedes-Benz.
Only use tyres, wheels or accessories tes-
ted and approved by Mercedes-Benz.C er-
tain characteristics, e.g. handling, vehicle
noise emissions or fuel consumption, may
otherwise be adversely affected. In addi-
tion, when driving with aload, tyre dimen-
sion variations could cause the tyres to
come into contact with the bodywork and
axle components. This could result in dam- age to the tyres or the vehicle.
Mercedes-Benz accepts no liability for
damage resulting from the use of tyres,
wheels or accessories other than those tes-
ted and approved.
Further information about wheels, tyres
and approved combinations can be
obtained from any qualified specialist
workshop.
! Retreaded tyres are neither tested nor
recommended by Mercedes-Benz,s ince
previous damage cannot alway sbedetec-
ted on retreaded tyres. As aresult,
Mercedes-Benz cannot guarantee vehicle
safety if retreaded tyres are fitted. Do not fit
used tyres if you have no information about their previous usage.
! Large wheels: the lower the section width
for acertain wheel size, the lower the ride
comfor tisonp oor road surfaces. Roll com-
fort and suspension comfor tare reduced
and the risk of damage to the wheels and
tyres as aresult of driving over obstacles
increases. Wheel and tyrec
ombinations
431Wheels and tyres Z