roof MERCEDES-BENZ E-CLASS ESTATE 2020 User Guide
[x] Cancel search | Manufacturer: MERCEDES-BENZ, Model Year: 2020, Model line: E-CLASS ESTATE, Model: MERCEDES-BENZ E-CLASS ESTATE 2020Pages: 489, PDF Size: 9.15 MB
Page 95 of 489
The sliding sun
roof cannot be closed and you
cann otsee the cause.
% The term "sliding sun roof" also refers to the
panorama sliding sunroof.
If th e sliding sunroof is obstructed during closing
and reopens again slightly: #
Immediately af ter auto matic reve rsing, pull
and hold the3 button down again tothe
point of resis tance until the sliding sunroof is
closed.
The sliding sunroof will be closed with
increased forc e.
If th e sliding sunroof is obstructed again and
re opens again slightly: #
Repeat the pr evious step.
The sliding sunroof will be closed again with
increased forc e.
Ve hicles without a panorama sliding sun‐
ro of: the sliding sunroof is not operating
smoo thly. #
Reset the sliding sunroof.
Re setting the sliding sunroof #
Push the3 button up tothe point of
re sis tance repeatedly until the sliding sun‐
ro of is fully open. #
Press the3 button for ano ther second. #
Close the sliding sunroof.
Ve hicles with a panorama sliding sunroof:
th e sliding sunroof or thero ller sunblind is
not operating smoo thly. #
Reset the sliding sunroof and thero ller sun‐
blind.
Re setting the sliding sunroof and thero ller
sunblind #
Pull and hold the3 button little bylittle
until the sliding sunroof is fully closed. #
Pull and hold the3 button little bylittle
until thero ller sunblind is fully closed. #
Use automatic operation tofully open and
th en close the sliding sunroof. Ro
ller sunblinds Extending
there ar side window roller sun‐
blinds *
NO
TEDama getothe inertia reel due to
it snapping back If suddenly snapped bac
k,the inertia reel
may be damaged. #
Alw ays mo vethero ller sun blind man‐
uall y. #
Do not drive wi th thero ller sun blind
hooked in and one or more side win‐
do ws open at the same time. 92
Opening and closing
Page 98 of 489
To
w- aw ay protection is automatically primed
af te r appro ximately 60 seconds:
R afte r locking theve hicle with thekey
R afte r locking theve hicle using KEYLESS-GO
To w- aw ay protection is only primed when thefo l‐
lowing components are closed:
R the doors
R theta ilgate
To w- aw ay protection is automatically deactiva‐
te d:
R afte r pressing theÜ orp button on
th ekey
R afte r pressing thest art/ stop button with the
ke y in thestow age compartment
(/ page 164)
R afte r unlocking theve hicle using KEYLESS-
GO
R when using HANDS-FREE ACCESS
In fo rm ation on collision de tection on a pa rked
ve hicle (/ page192). Priming/deactivating
tow- aw ay protection Multimedia sy
stem:
4 © 5
Settings 5
Quick access #
Prime or deactivate Tow-away protection .
To w- aw ay protection is primed again in thefo l‐
lowing cases:
R The vehicle is unloc ked again.
R A door is opened.
R The vehicle is loc ked again.
% Ifqu ick access is una vailable, select the
Vehicle submenu in theSettings main menu
to prime or deactivate tow- aw ay protection. Fu
nction of interior pr otection When interior pr
otection is primed, a visual and
audible alarm is triggered if mo vement is de tec‐
te d in theve hicle interior.
Interior pr otection is primed automatically af ter
appr oximately ten seconds:
R afte r locking theve hicle with thekey
R afte r locking theve hicle using KEYLESS-GO Interior pr
otection is only primed when thefo l‐
lowing components are closed:
R the doors
R theta ilgate
Interior pr otection is automatically deactivated:
R afte r pressing theÜ orp button on
th ekey
R afte r pressing thest art/ stop button with the
ke y in thestow age compartment
(/ page 164)
R afte r unlocking theve hicle using KEYLESS-
GO
R when using HANDS-FREE ACCESS
The following situations can lead toafa lse
alarm:
R moving objects such as masc ots in theve hi‐
cle interior
R when the side window is open
R when the sliding sunroof is open
R when the panoramic sliding sunroof is open Opening and closing
95
Page 131 of 489
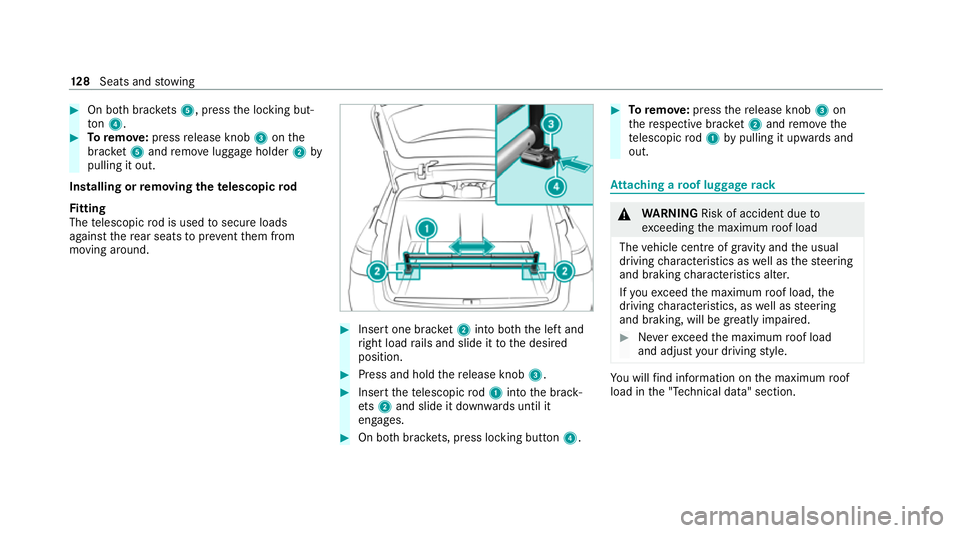
#
On bo thbrac kets 5, press the locking but‐
to n4. #
Toremo ve:press release knob 3onthe
brac ket5 and remo veluggage holder 2by
pulling it out.
Installing or removing the telescopic rod
Fi tting
The telescopic rod is used tosecure loads
against there ar seats topreve ntthem from
moving around. #
Insert one brac ket2 into bo th the left and
ri ght load rails and slide it tothe desired
position. #
Press and hold there lease knob 3. #
Insert thete lescopic rod1 into the brack‐
et s2 and slide it down wards until it
engages. #
On bo thbrac kets, press lo cking button 4. #
Toremo ve: press there lease knob 3on
th ere spective brac ket2 and remo vethe
te lescopic rod1 bypulling it upwards and
out. At
taching a roof luggage rack &
WARNING Risk of accident due to
exc eeding the maximum roof load
The vehicle centre of gravity and the usual
driving characteristics as well as thesteering
and braking characteristics alter.
If yo uexc eed the maximum roof load, the
driving characteristics, as well as steering
and braking, will be greatly impaired. #
Neverexc eed the maximum roof load
and adjust your driving style. Yo
u will find information on the maximum roof
load in the "Technical data" section. 12 8
Seats and stowing
Page 132 of 489
*
NO
TEVehicle damage from non-
appr ovedro of luggage racks The
vehicle could be damaged byroof lug‐
ga ge rack sth at ha venot been tested and
appr ovedfo r Mercedes-Benz. #
Use only roof luggage rack ste sted and
appr ovedfo r Mercedes-Benz. #
Depending on theve hicle equipment,
ensure that the sliding sunroof can be
fully raised when thero of luggage rack
is fitted. #
Depending on theve hicle equipment,
ensure that theta ilgate can be fully
opened when thero of luggage rack is
fi tted. #
Position the load on thero of luggage
ra ck in such a wayth at theve hicle will
not sus tain damage even when it is in
motion. *
NO
TEDama getothe panorama sliding
sunroof due tonon-app rove dro of lug‐
ga ge racks The panorama sliding sunroof may be dam‐
aged bythero of luggage rack ifyo u attem pt
to open it when using a roof luggage rack not
te sted and appr ovedfo r Mercedes-Benz. #
When a roof luggage rack isfitted, open
th e panorama sliding sunroof only if this
has been tested and appr oved for
Mercedes-Benz.
The panorama sliding sunroof may be raised
to allow ventilation of theve hicle interior. #
Secure thero of luggage rack tothero of rail‐
ing. #
Obser vethe manufacturer's ins tallation
instructions. Soc
kets Using the
12V so cket Re
quirements: R
Only connect devices up toa maximum of
18 0 W (15 A).
Depending on theve hicle equipment, theve hicle
has thefo llowing 12V soc kets:
R Inthestow age compartment in the front
cent reconsole
R Inthestow age compartment in the cent re
console of there ar passenger compartment
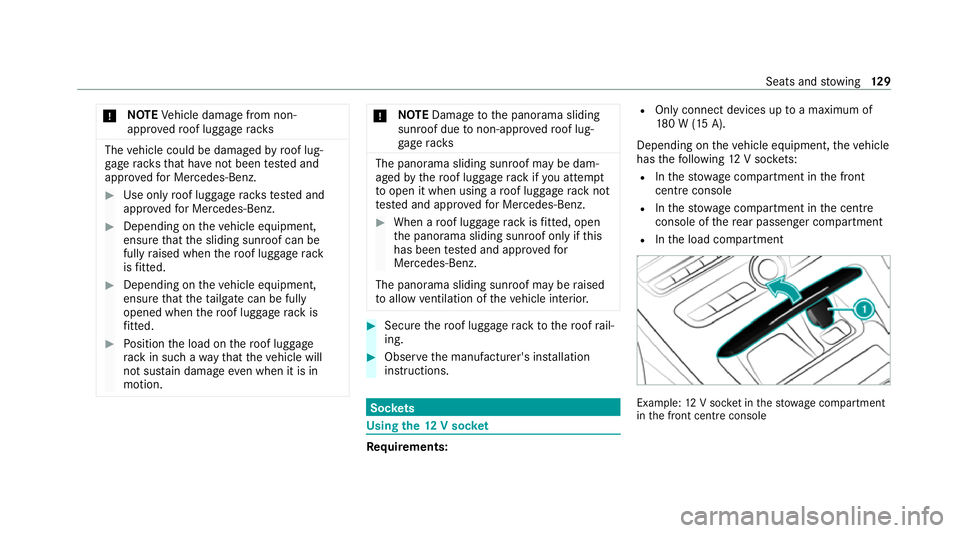
R Inthe load compartment Example:
12V soc ket in thestow age compartment
in the front cent reconsole Seats and
stowing 12 9
Page 169 of 489
#
Alw ays secure the engine against unin‐
te ntional starting before car rying out
maintenance or repair work. Re
quirements:
R park position jis selected.
R the anti- theft alarm sy stem is not activated.
R the panic alarm is not activated.
R the hazard warning light sy stem is switched
off.
R The bonn etis closed.
R the doors are closed and loc ked.
R the windo wsand sliding sun roof are closed. #
Start theve hicle using the smartphone.
Af tereve ryengine start, the engine runs for
te n minu tes.
Yo u can car ryout a maximum of two consecu‐
tive starting attem pts. Yo u must start theve hicle
once with theke y before trying tostart the
engine again with the smartphone. you can stop
th eve hicle again at any time. %
Further information can be found in the
smartphone app.
Securing the engine against starting before
car rying out maintenance or repair work: #
switch on the hazard warning light sy stem.
or #
unlock the doors.
or #
open a side window or the sliding sunroof. Ru
nning-in no tes *
NO
TEMercedes-AMG vehicles #
Obser vethe no tes in the Supplement.
Yo u could otherwise failto recognise
dangers. To
preser vethe engine during thefirs t1, 500 km:
R drive at varying road speeds and engine
speeds.
R do not drive at speeds greater than
14 0 km/h. R
drive theve hicle in drive program A
or ;.
R shift tothe next highest gear at theve ry lat‐
est when the needle reaches the last third
before there d area in there v counter.
R do not shift down a gear manually in order to
brake.
R avoidove rstraining theve hicle, e.g. driving at
full thro ttle.
R do not depress the accelera tor pedal past
th e pressure point (kickdown).
R only increase the engine speed gradually and
accelera tetheve hicle tofull speed af ter
1, 500 km.
This also applies when the engine or parts of the
driv etra in ha vebeen replaced.
Please also obser vethefo llowing running-in
no tes:
R in cer tain driving and driving saf ety sy stems,
th e sensors adjust automatically while a cer‐
ta in dis tance is being driven af terth eve hicle
has been delivered or af terre pairs. Full sys‐ 16 6
Driving and pa rking
Page 191 of 489
#
App lythe electric parking brake. #
Enga getransmission position jin a station‐
ary vehicle with the brake pedal applied
(/ page 178). #
Switch off the engine and the ignition by
pressing the1 button. #
Release the service brake slowl y.#
Get out of theve hicle and lock it.
% When you park theve hicle, you can still
opera tethe side windo wsand the sliding
sunroof for appro ximately five minutes if the
driver's door is closed.
% When you park theve hicle, you can still
opera tethe side windo wsand the panorama
sliding sunroof for appro ximately five
minutes if the driver's door is closed. Garage door opener
Prog
ramming buttons for the garage door
opener &
DANG ER Risk of death caused by
ex haust gases
Combustion engines emit poisonous exhaust
ga ses such as carbon monoxide. Inhaling
th ese exhaust gases is hazardous tohealth
and leads topoisoning. #
Never lea vethe engine or, if present,
th e auxiliary heating running in an
enclosed space wi thout suf ficient venti‐
lation. &
WARNING Risk of inju rywhen opening
or closing a door with thega rage door
opener
When you operate or program the door with
th e integrated garage door opener, persons
in thera nge of mo vement of the door may
become trapped or be stru ck bythe door. #
Alw ays make sure that nobody is within
th era nge of mo vement of the door. Re
quirements:
R The vehicle has been par ked outside the
ga rage or outside thera nge of mo vement of
th e door.
R The engine is switched off.
R The ignition is switched on.
% The garage door opener function is alw ays
av ailable when the ignition is switched on. 18 8
Driving and pa rking
Page 320 of 489
To
avo id damage to yourvehicle when using a
car wash, ensure thefo llowing beforehand:
R Active Dis tance Assi stDISTRONIC is deacti‐
va ted.
R The HOLD function is switched off.
R the 360° Camera or there ve rsing camera is
switched off.
R the side windo wsand sliding sun roof are
comple tely closed.
R the blo werfo rth eve ntilation/heating is
switched off.
R the windscreen wiper switch is in position
g.
R theke y is at a minimum distance of 3 m
aw ay from theve hicle. Otherwise theta ilgate
could open unin tentional ly.
R in car washes with a con veyo r sy stem: neu‐
tral iis engaged.
% In car washes with a con veyo r sy stem: if you
lea vetheve hicle while it is being washed,
make sure theke y is located in theve hicle.
The park position jisotherwise automati‐
cally engaged. %
If, af terth e car wash, youre mo vethewax
from the windscreen and wiper rubbers, this
will pr event smearing and reduce wiper
noise. Information on using a high-p
ressure cleaner &
WARNING Risk of an accident when
using high-pressure cleane rswith round-
spray nozzles
The wate r jet can cause extern ally invisible
damage.
Components damaged in this wa y may unex‐
pec tedly fail. #
Do not use a high-pressure cleaner with
round-spr aynozzles. #
Have damaged tyres or chassis parts
re placed immediatel y. To
avo id damage to yourvehicle, obser vethefo l‐
lowing when using a high-pressure cleaner:
R keep theke y at least 3 m away from theve hi‐
cle. Otherwise theta ilgate could open unin‐
te ntional ly.
R maintain a dis tance of at least 30 cm tothe
ve hicle.
R vehicles with deco rative foil: parts of your
ve hicle are co vered with a decorative foil.
Maintain a dis tance of at least 70 cm
between thefo il-c ove red parts of theve hicle
and the nozzle of the high-pressure cleaner.
Mo vethe high-pressure cleaner nozzle
around whilst cleaning. The waterte mp era‐
ture of the high-pressure cleaner must not
exc eed 60°C.
R obser vethe information on the cor rect dis‐
ta nce in the equipment manufacturer's oper‐
ating instructions.
R do not direct the nozzle of the high-pressure
cleaner directly at sensitive parts, e.g. tyres,
ga ps, elect rical components, batteries, light
sou rces and ventilation slits. Maintenance and care
317
Page 365 of 489
#
When operating two-w ayradios in the
ve hicle, alw ays connect them tothe
lo w- reflection exterior aerial. *
NO
TEInva lidation of the operating per‐
mit due tofailure tocomply wi th the
instructions for ins tallation and use The operating permit may be in
validated if
th e instructions for ins tallation and use of
two-w ayradios are not obser ved. #
Only use appr oved frequency bands. #
Obser vethe maximum permissible out‐
put po wer in these frequency bands. #
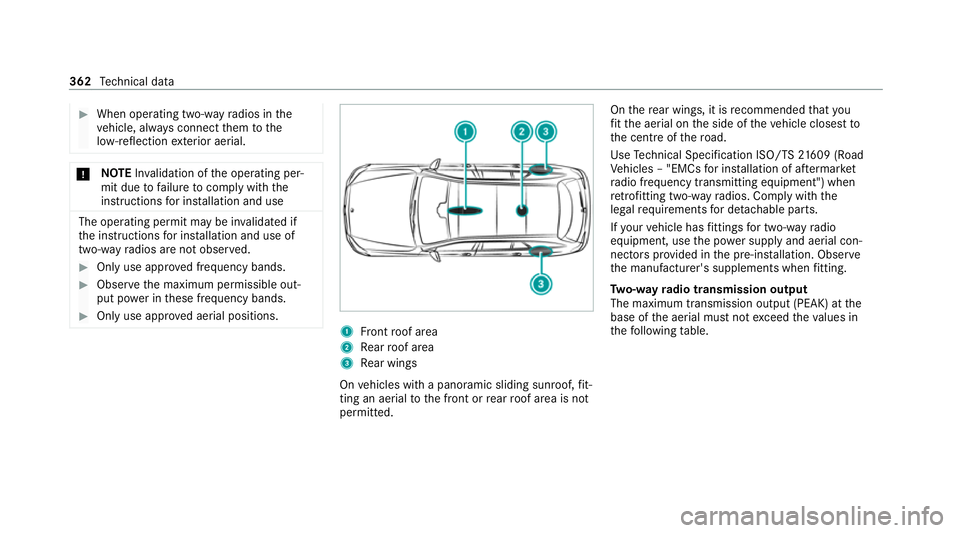
Only use appr oved aerial positions. 1
Front roof area
2 Rear roof area
3 Rear wings
On vehicles with a panoramic sliding sunroof, fit‐
ting an ae rial to the front or rear roof area is not
permitted. On
there ar wings, it is recommended that you
fi t th e aerial on the side of theve hicle closest to
th e cent reofthero ad.
Use Tech nical Specification ISO/TS 21609 (Road
Ve hicles – "EMCs for ins tallation of af term arket
ra dio frequency transmitting equipment") when
re trofitting two-w ayradios. Comply with the
legal requirements for de tach able parts.
If yo ur vehicle has fittings for two-w ayradio
equipment, use the po wer supp lyand aerial con‐
nec tors prov ided in the pre-ins tallation. Obser ve
th e manufacturer's supplements when fitting.
Tw o-w ayradio transmission output
The maximum transmission output (PEAK) at the
base of the aerial must not exceed theva lues in
th efo llowing table. 362
Tech nical da ta
Page 380 of 489
We
ights and loads Please obser
vethefo llowing no tesfo rth e speci‐
fi ed vehicle data:
R Items of optional equipment increase the
unladen weight and reduce the pa yload.
R Vehicle-specific weight information can be
fo und on theve hicle identification plate
(/ page 363).
Ro of load Model
Maximumroof load
All models 100kg Tr
ailer hitch Gene
ral no tes on the trailer hit ch Modifications
tothe engine cooling sy stem may
be necessar y,depending on theve hicle model.
The retrofitting of a trailer hitch is only pe rmissi‐
ble if a towing capacity is specified in your vehi‐
cle documents.
Fu rther information can be obtained at a quali‐
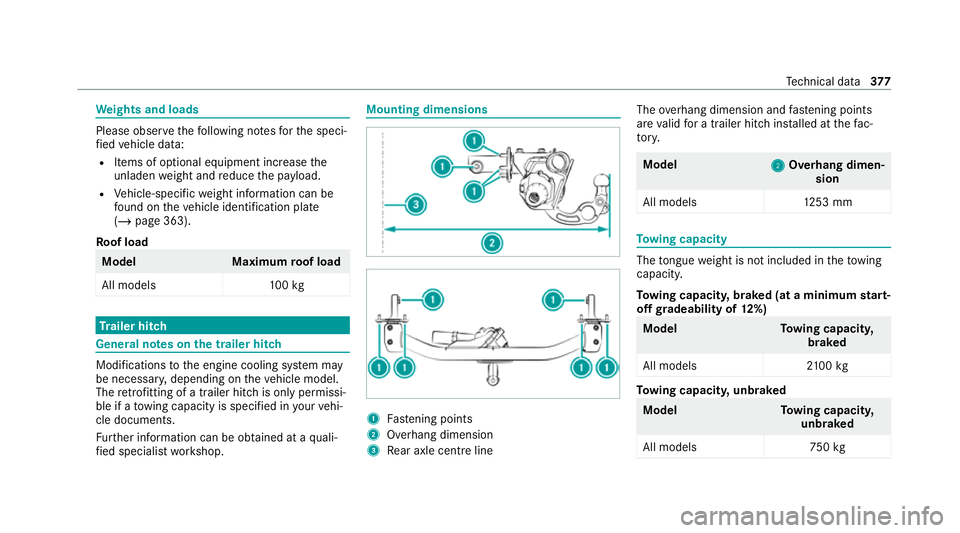
fi ed specialist workshop. Mounting dimensions
1
Fastening points
2 Overhang dimension
3 Rear axle centre line The
overhang dimension and fastening points
are valid for a trailer hitch ins talled at thefa c‐
to ry. Model
2 2Overhang dimen‐
sion
All model s1 253 mm To
wing capacity The
tongue weight is not included in theto wing
capacity.
To wing capacit y,braked (at a minimum start-
off gradeability of 12%) Model
Towing capacit y,
braked
All models 2100 kg To
wing capacit y,unbraked Model
Towing capacit y,
unbraked
All model s7 50kg Te
ch nical da ta377
Page 476 of 489
Opening
the tailgate using your foot
HANDS-FREE ACCESS .......................... .82
Operating fluids
Ad Blue ®
............................................... 370
Ad ditives (fuel) .................................... 368
Brake fluid .......................................... .373
Coolant (engine) .................................. 373
Engine oil ............................................. 371
Fu el (diesel) ......................................... 368
Fu el (petrol) ......................................... 367
No tes .................................................. 365
Wi ndsc reen washer fluid ...................... 374
Operating saf ety
48 V on-boa rdelectrical sy stem ............ 22
Declaration of confo rmity (elect ro‐
magnetic compatibility) ......................... 24
Declaration of conformity (ja ck) ............ 27
Declaration of conformity (TIREFIT kit) .. 28
Declaration of conformity (wireless
ve hicle components) ............................. 24
EQ Boo st............................................... 22
Information ............................................ 22
Ope rating sy stem
see On-board computer Optimised acceleration
...........................167
Ac tivating ............................................ .167
Outside mir rors ............................... 147, 14 8
Anti-dazzle mode (automatic) .............. 14 8
Au tomatic mir rorfo lding function ........ 15 0
Fo lding in/out .................................... .147
Operating the memory function ........... 11 5
Pa rking position .................................. .149
Setting ................................................. 147
Overhead control panel Overview ................................................ 12
Owner's Manual Vehicle equipment ................................. 22
Owner's Manual (digital) ...........................18 P
Pa int code ................................................ 363
Pa intwork (cleaning instructions) ..........318
Pa nel heating
Setting .................................................1 07
Pa norama sliding sunroof
see Sliding sunroof Pa
rk position
Inserting .............................................. 178
Selecting au tomatical ly........................ 178
Pa rking
see Electric parking brake
Pa rking aid
see Parking Assist PARKTRONIC
Pa rking Assist PARKTRONIC .................. 223
Ac tivating ............................................ 226
Ad justing warning tones ...................... 227
Deactivating ........................................ 226
Fu nction .............................................. 223
Sy stem limitations ...............................2 23
Pa rking assistance sy stems
see Active Parking Assist
Pa rking brake
see Electric parking brake
Pa rking lights .......................................... .133
Pa rking position
Outside mir rors ................................... 14 9
St oring the position of the passenger
outside mir ror using reve rsege ar ........ 14 9
Pa rking up ................................................ 19 3 Index
473