ad blue MERCEDES-BENZ E-CLASS ESTATE 2020 Owners Manual
[x] Cancel search | Manufacturer: MERCEDES-BENZ, Model Year: 2020, Model line: E-CLASS ESTATE, Model: MERCEDES-BENZ E-CLASS ESTATE 2020Pages: 489, PDF Size: 9.15 MB
Page 29 of 489
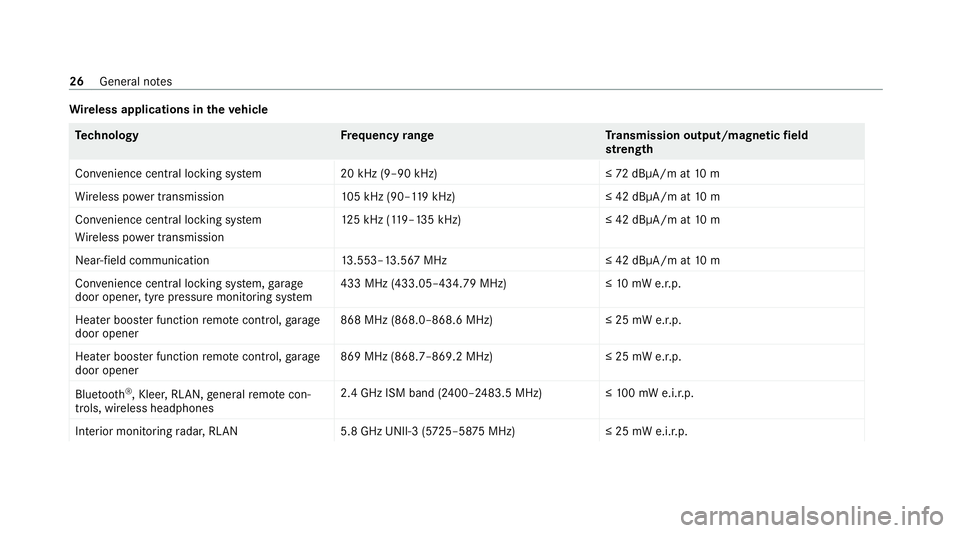
Wire
less applications in theve hicle Te
ch nology Frequency rang eT ransmission output/magnetic field
st re ngth
Con venience central lo cking sy stem 20 kHz (9–90 kHz)≤ 72dBμA/m at 10 m
Wi reless po wer transmission 105 kHz (90–1 19kHz) ≤ 42 dBμA/m at10 m
Con venience central lo cking sy stem
Wi reless po wer transmission 12
5 kHz (1 19–135 kHz)≤ 42 dBμA/m at10 m
Near-field communication 13.553–13.567 MHz ≤ 42 dBμA/m at10 m
Con venience central lo cking sy stem, garage
door opener, tyre pressure monitoring sy stem 433 MHz (433.05–434.79 MHz)≤
10mW e.r.p.
Heater boos ter function remo tecontrol, garage
door opener 868 MHz (868.0–868.6 MHz
)≤25 mW e.r.p.
Heater boos ter function remo tecontrol, garage
door opener 869 MHz (868.7–869.2 MHz
)≤25 mW e.r.p.
Blue tooth ®
, Kleer, RLAN, general remo tecon‐
trols, wi reless headphones 2.4 GHz ISM band (2400–2483.5 MHz
)≤100 mW e.i.r.p.
Interior monitoring radar, RLAN 5.8 GHz UNII-3 (5725–58 75MHz) ≤ 25 mW e.i.r.p.26
General no tes
Page 30 of 489
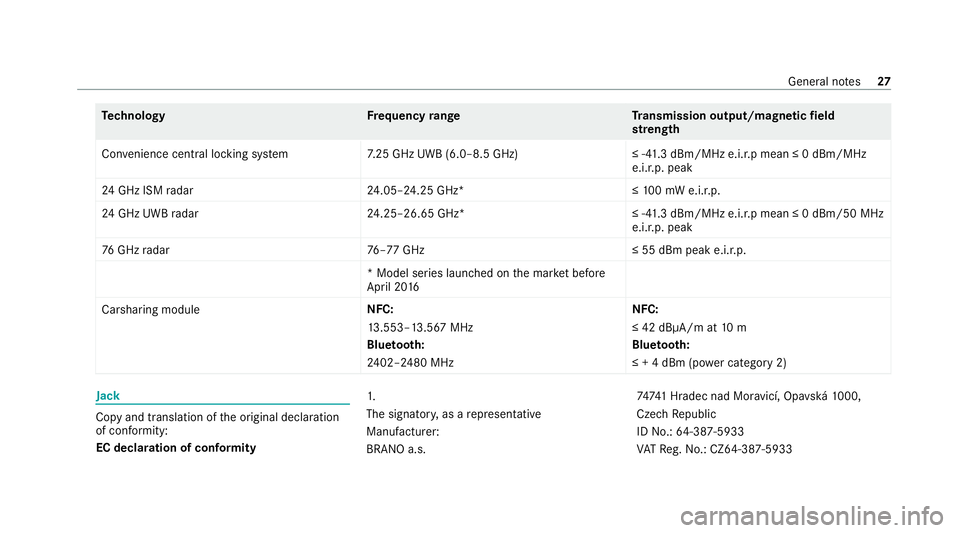
Te
ch nology Frequency rang eT ransmission output/magnetic field
st re ngth
Con venience central lo cking sy stem 7.25 GHz UWB (6.0–8.5 GHz) ≤ -41.3 dBm/MHz e.i.r.p mean ≤ 0 dBm/MHz
e.i.r.p. peak
24 GHz ISM radar 24.05–24.25 GHz* ≤10 0 mW e.i.r.p.
24 GHz UWB radar 24.25–26.65 GHz* ≤ -41.3 dBm/MHz e.i.r.p mean ≤ 0 dBm/50 MHz
e.i.r.p. peak
76 GHz radar 76–77 GHz ≤ 55 dBm peak e.i.r.p.
* Model series launched on the mar ket be fore
April 20 16
Carsharing module NFC:
13
.553–13.567 MHz
Blue tooth:
24 02–2480 MHz NFC:
≤ 42 dBμA/m at
10 m
Blue tooth:
≤ + 4 dBm (po wer category 2) Jack
Copy and translation of
the original declaration
of confo rmity:
EC declaration of conformity 1.
The signator
y,as a representative
Manufacturer:
BRANO a.s. 7474
1 Hradec nad Mor avicí, Opa vská 1000,
Czech Republic
ID No.: 64-387-5933
VA TRe g.No.: CZ64-387-5933 General no
tes27
Page 160 of 489
&
WARNING Risk offire due tohot station‐
ary heater components and exhaust
ga ses
Flammable materials such as lea ves, grass or
twigs may ignite. #
When thest ationary heater is swit ched
on, make sure that:
R hot vehicle parts do not come into
contact with flammable materials.
R theex haust gas can flow out of the
st ationary heater exhaust pipe
unhindered.
R theex haust gas does not come into
contact with flammable materials. *
NO
TEBattery discharge caused bysta‐
tionary heater or stationary ventilation
operation Ope
rating thest ationary heater or stationary
ve ntilation drains the batter y. #
After heating or ventilating theve hicle
twice, drive for a longer period of time. Re
quirements:
R The fuel tank is filled toat least there ser ve
le ve l. #
Set the desired temp erature using thew
button. #
Press the& button.
The red or blue indicator lamp on the button
will light up or go out.
The colours of the indicator lamp ha vethefo l‐
lowing meaning:
R Blue: stationary ventilation is switched on.
R Red:thest ationary heater is swit ched on.
R Yello w: the departure time is preselected.
The stationary heater/ ventilation will switch off
au tomatically af ter 50 minutes.
Operation using the app: thest ationary
heater/ ventilation can also be operated via the
Mercedes me connect app. You can find fur ther
information in the separate Owner's Manual at
https://moba.i.daimler.com/mar kets/ece-r ow/
baix/cars/connectme/en_GB/#emotions/
St artseite.htm l. Setting
thest ationary heater/stationary ven‐
tilation via the multimedia sy stem #
Call up the air conditioning menu
(/ page 152). #
Select Auxiliary heating.
Selecting the departure time #
Select the time TIME A: XX, TIME B: XXor
TIME C: XX.
Setting the departu retime #
Select the time TIME A: XX, TIME B: XXor
TIME C: XX. #
Select the pen beside the time. #
Set a time.
Setting thest ationary heater/ventilation via
re mo tecont rol
Re quirements:
R The fuel tank is filled toat least there ser ve
le ve l. Climate control
157
Page 187 of 489
#
Turn the fuel filler cap anti-clockwise and
re mo veit. #
Insert the fuel filler cap from abo veinto
brac ket2. #
Comp lete ly inse rtthe pump nozzle into the
ta nk filler nec k,hook in place and refuel. #
Only fill th e fuel tank until the pump nozzle
switches off.
% Vehicles with a diesel engine: whenthe
fuel tank is compl etely em pty, top up with at
least 5 litres of diesel. #
Replace the cap on thefiller neck and turn
clockwise until it engages audibl y.#
Close fuel filler flap 1.
% Close the fuel filler flap before locking the
ve hicle. Ad
Blue ®
(vehicles with a diesel engine on ly)Note
s onrefilling AdBlue ®
Ad Blue ®
is a wate r-soluble fluid forth e NOx
ex haust gas af tertre atment of diesel engines. In
order forth eex haust gas af tertre atment tofunc‐ tion proper
ly, only use AdBlue ®
in accordance
wi th ISO 222 41 .
Ad Blue ®
is ch aracterised bythefo llowing:
R non-t oxic
R colourless and odourless
R non-flammable
If yo u open theAd Blue ®
tank, small amounts of
ammonia vapour may be released. Only fill the
Ad Blue ®
tank in well-ventilated areas.
Do not let AdBlue ®
come into contact wi thskin,
ey es or clo thes. Keep AdBlue ®
aw ay from chil‐
dren.
Do not ingest AdBlue ®
. If AdBlue ®
is swallo wed,
immediately rinse your mouth out thoroughly.
Drink plenty of water.Seek medical attention at
once.
Obser vethe no tes on operating fluids
(/ page 365). Ad
Blue ®
is available here:
R AdBlue ®
can be topped up byfast service at
a qu alified specialist workshop, e.g. a
Mercedes-Benz Service Centre.
R AdBlue ®
is available at many filling stations
from AdBlue ®
filling pumps.
R Alternativel y,Ad Blue ®
is available at qualified
specialist workshops, e.g. Mercedes-Benz
Service Centres, and at many filling stations
in Ad Blue ®
re fill canis ters or AdBlue ®
re fill
bottles.
% Ensure the connection between there fill
con tainer and vehicle filler neck does not
drip.
To pping up AdBlue ®
* NOTEEngine dama gedue toAd Blue ®
being in the fuel #
AdBlue ®
must not be used tofill the
fuel tank. 184
Driving and pa rking
Page 188 of 489
#
Only use AdBlue ®
to fill th eAd Blue ®
ta nk. #
Do not overfill theAd Blue ®
tank. *
NO
TEContamination of theve hicle inte‐
ri or due toAd Blue ®
lea kage #
Afterto pping up, carefully close the
Ad Blue ®
re fill con tainer. #
Avoid car rying AdBlue ®
re fill con tainers
permanently in theve hicle. Re
quirements:
R The vehicle is unloc ked.
The following messages appear in order in the
multifunction display when theAd Blue ®
tank
requ irestopping up:
R Refill AdBlue See Owner’s Manual The
Ad Blue ®
leve l has fallen below there ser ve
ra nge. Top up AdBlue ®
immediately.
R Top up AdBlue Emergency op. in XXX miles
See Owner's ManualThe low AdBlue ®
level will lead
tolimited per form ance af terthe
re maining dis tance displ ayed has been
driven. Top up AdBlue ®
immediately.
R XX,X l Top up AdBlue Emer. op.: max. XXX
km/h Start not poss. in XXX kmThe low
AdBlue ®
leve l will lead tolimited per form‐
ance from the speed displa yed. Af terthe
re maining dis tance displ ayed has been cov‐
ered, it will no longer be possible tostart the
engine. Top up with at least the amount of
Ad Blue ®
displ ayed.
R XX,X l Top up AdBlue Switch on ignition, wait
60 sec. or eng. start not poss. TheAdBlue ®
ta nk is em pty. Yo u can no lon gerst art the
engine. Top up with at least the amount of
Ad Blue ®
displ ayed. Switch on the ignition
and waitfor appro ximately 60 seconds. Start
th e engine.
Yo u can see theAd Blue ®
ra nge and le vel in the
Service menu in the multifunction displa y.
% The AdBlue ®
ra nge shown depends strongly
on the driving style and operating condi‐ tions. The actual
range can therefore deviate
from the calculated range.
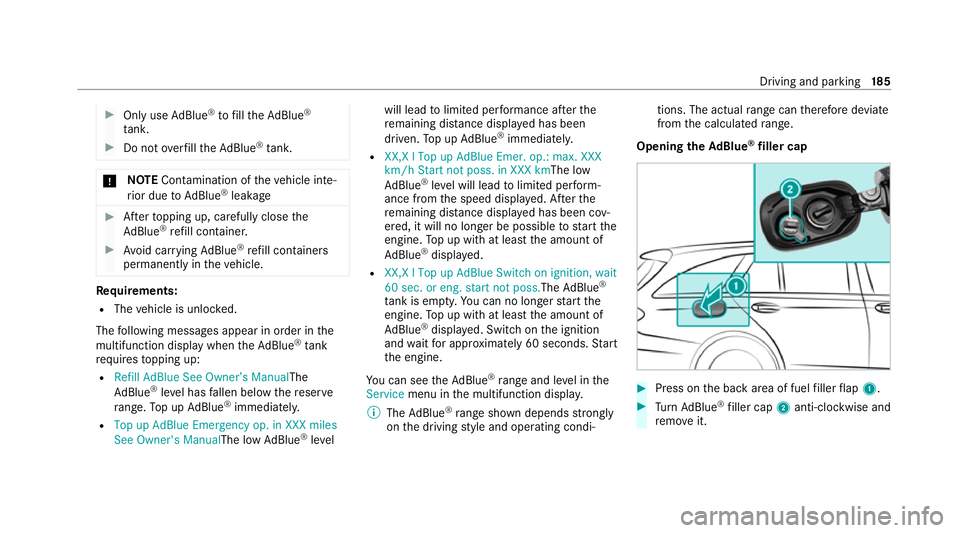
Opening the AdBlue ®
filler cap #
Press on the back area of fuel filler flap 1. #
Turn AdBlue ®
filler cap 2anti-clockwise and
re mo veit. Driving and parking
18 5
Page 189 of 489
%
You can also store theAd Blue ®
filler cap in
th e fuel filler cap holder in the fuel filler flap
hin gearm.
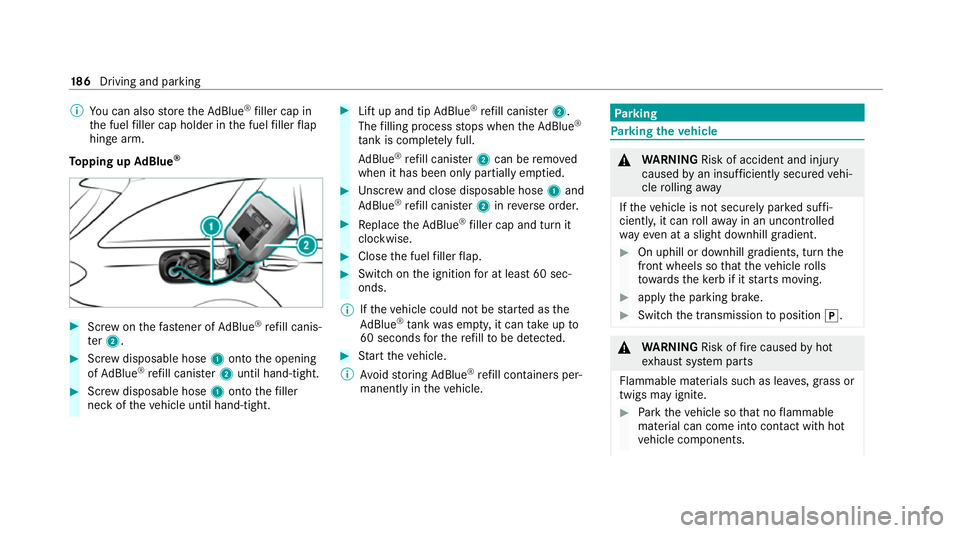
To pping up AdBlue ® #
Screw onthefast ener of AdBlue ®
re fill canis‐
te r2. #
Screw disposable hose 1onto the opening
of Ad Blue ®
re fill canis ter2 until hand-tight. #
Screw disposable hose 1onto thefiller
neck of theve hicle until hand-tight. #
Lift up and tip AdBlue ®
re fill canis ter2.
The filling process stops when theAd Blue ®
ta nk is compl etely full.
Ad Blue ®
re fill canis ter2 can be remo ved
when it has been only partially em ptied. #
Unscr ew and close disposable hose 1and
Ad Blue ®
re fill canis ter2 inreve rse order. #
Replace theAd Blue ®
filler cap and turn it
clockwise. #
Close the fuel filler flap. #
Swit chon the ignition for at least 60 sec‐
onds.
% Ifth eve hicle could not be star ted as the
Ad Blue ®
tan kwa s em pty, it can take up to
60 seconds forth ere fill to be de tected. #
Start theve hicle.
% Avoid storing AdBlue ®
re fill con tainers per‐
manently in theve hicle. Pa
rking Pa
rking theve hicle &
WARNING Risk of accident and inju ry
caused byan insuf ficiently secu redve hi‐
cle rolling away
If th eve hicle is not securely par ked suf fi‐
ciently, it can rollaw ay in an uncont rolled
wa yev en at a slight downhill gradient. #
On uphill or downhill gradients, turn the
front wheels so that theve hicle rolls
to wa rdsth eke rb if it starts moving. #
apply the parking brake. #
Switch the transmission toposition j. &
WARNING Risk offire caused byhot
ex haust sy stem parts
Flammable materials such as lea ves, grass or
twigs may ignite. #
Park theve hicle so that no flammable
material can come into con tact wi thhot
ve hicle components. 18 6
Driving and pa rking
Page 227 of 489
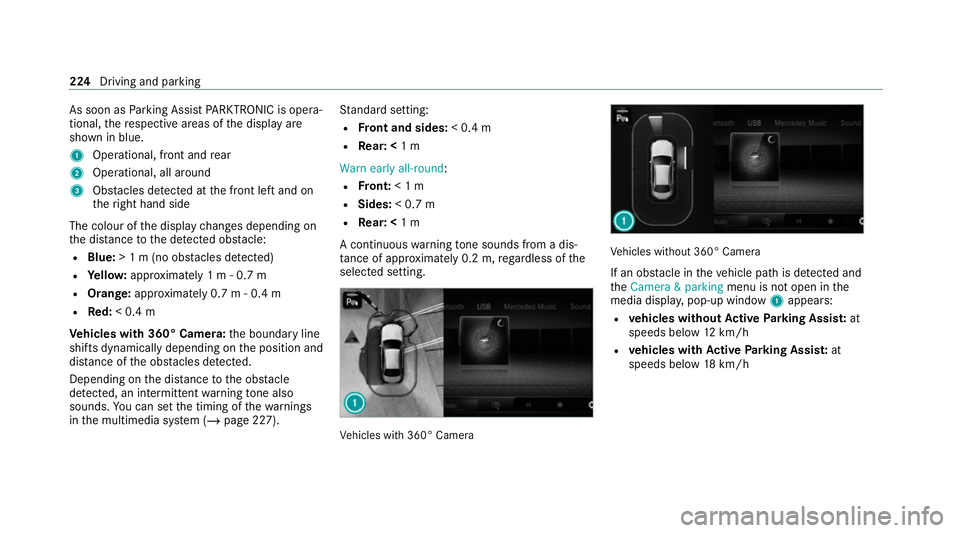
As soon as
Parking Assist PARKTRONIC is opera‐
tional, there spective areas of the display are
shown in blue.
1 Operational, front and rear
2 Operational, all around
3 Obstacles de tected at the front left and on
th eright hand side
The colour of the display changes depending on
th e dis tance tothe de tected obs tacle:
R Blue: > 1 m (no obs tacles de tected)
R Yello w: appr oximately 1 m - 0.7 m
R Orange: approximately 0.7 m - 0.4 m
R Red:< 0.4 m
Ve hicles with 360° Camera: the boundary line
shifts dynamically depending on the position and
dis tance of the obs tacles de tected.
Depending on the dis tance tothe obs tacle
de tected, an intermittent warning tone also
sounds. You can set the timing of thewa rnings
in the multimedia sy stem (/ page 227). St
andard setting:
R Front and sides: < 0.4 m
R Rear: < 1 m
Warn early all-round :
R Front: < 1 m
R Sides: < 0.7 m
R Rear: < 1 m
A continuous warning tone sounds from a dis‐
ta nce of appr oximately 0.2 m, rega rdless of the
selected setting. Ve
hicles with 360° Camera Ve
hicles without 360° Camera
If an obs tacle in theve hicle path is de tected and
th eCamera & parking menu is not open in the
media displa y,pop-up window 1appears:
R vehicles without Active Parking Assis t:at
speeds below 12km/h
R vehicles with Active Parking Assis t:at
speeds below 18km/h 224
Driving and pa rking
Page 232 of 489
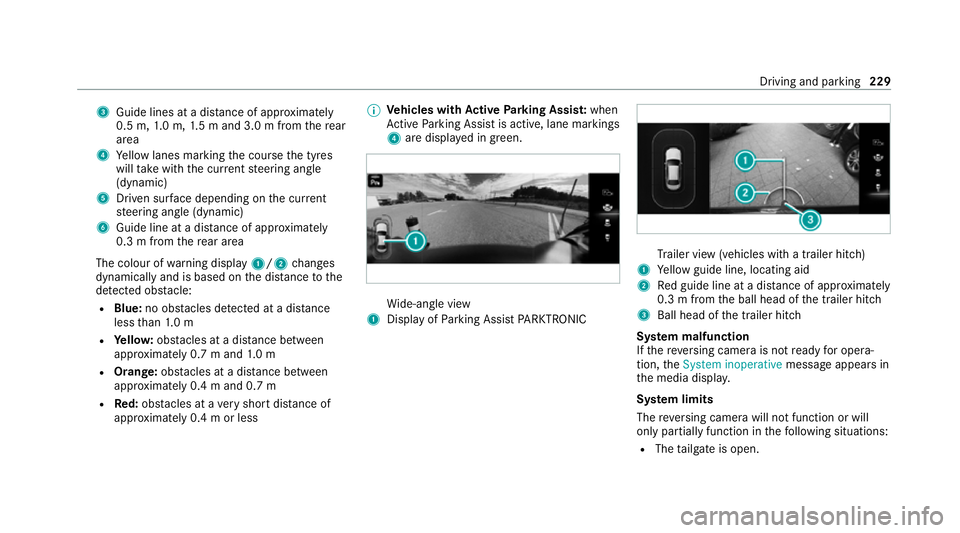
3
Guide lines at a dis tance of appr oximately
0.5 m, 1.0 m, 1.5 m and 3.0 m from there ar
area
4 Yellow lanes marking the course the tyres
will take with the cur rent steering angle
(dynamic)
5 Driven sur face depending on the cur rent
st eering angle (dynamic)
6 Guide line at a dis tance of appr oximately
0.3 m from there ar area
The colour of warning display 1/2changes
dynamically and is based on the dis tance tothe
de tected obs tacle:
R Blue: no obs tacles de tected at a di stance
less than 1.0 m
R Yello w: obs tacles at a di stance between
appr oximately 0.7 m and 1.0 m
R Orange: obstacles at a di stance between
appr oximately 0.4 m and 0.7 m
R Red:obs tacles at a very short dis tance of
appr oximately 0.4 m or less %
Vehicles with Active Parking Assis t:when
Ac tive Parking Assist is active, lane markings
4 are displa yed in green. Wi
de-angle view
1 Display of Parking Assist PARKTRONIC Tr
ailer view (vehicles with a trailer hit ch)
1 Yellow guide line, locating aid
2 Red guide line at a dis tance of appr oximately
0.3 m from the ball head of the trailer hitch
3 Ball head of the trailer hitch
Sy stem malfunction
If th ere ve rsing camera is not ready for opera‐
tion, theSystem inoperative message appears in
th e media displa y.
Sy stem limits
The reve rsing camera will not function or will
only partially function in thefo llowing situations:
R The tailgate is open. Driving and parking
229
Page 234 of 489
ing
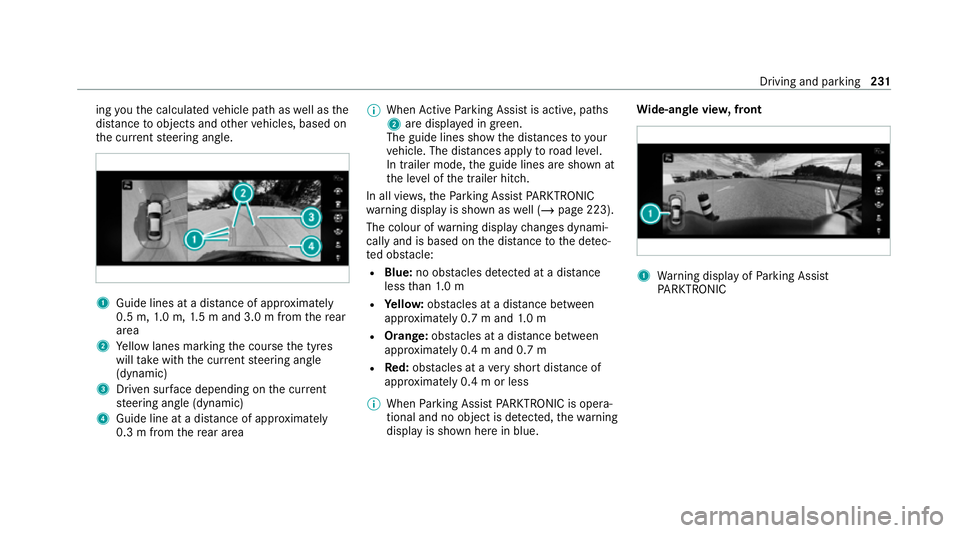
youth e calculated vehicle path as well as the
dis tance toobjects and other vehicles, based on
th e cur rent steering angle. 1
Guide lines at a dis tance of appr oximately
0.5 m, 1.0 m, 1.5 m and 3.0 m from there ar
area
2 Yellow lanes marking the course the tyres
will take with the cur rent steering angle
(dynamic)
3 Driven sur face depending on the cur rent
st eering angle (dynamic)
4 Guide line at a dis tance of appr oximately
0.3 m from there ar area %
When Active Parking Assist is active, paths
2 are displa yed in green.
The guide lines show the dis tances to your
ve hicle. The dis tances apply toroad le vel.
In trailer mode, the guide lines are shown at
th e le vel of the trailer hitch.
In all vie ws,th ePa rking Assist PARKTRONIC
wa rning display is shown as well (/ page 223).
The colour of warning display changes dynami‐
cally and is based on the dis tance tothe de tec‐
te d obs tacle:
R Blue: no obs tacles de tected at a di stance
less than 1.0 m
R Yello w: obs tacles at a di stance between
appr oximately 0.7 m and 1.0 m
R Orange: obstacles at a di stance between
appr oximately 0.4 m and 0.7 m
R Red:obs tacles at a very short dis tance of
appr oximately 0.4 m or less
% When Parking Assist PARKTRONIC is opera‐
tional and no object is de tected, thewa rning
display is shown here in blue. Wi
de-an gle vie w,front 1
Warning display of Parking Assist
PA RKTRONIC Driving and parking
231
Page 279 of 489
Multimedia sy
stem:
4 © 5
Settings 5
System
5 Wi-Fi & Bluetooth
Ac tivating/deactivating Wi-Fi #
Select Wi-Fi.
Connecting the multimedia sy stem with an
ex tern al hotspot using Wi-Fi
The type of connection es tablished must be
selected on the multimedia sy stem and on the
device tobe connec ted.
% The connection procedure may dif fer
depending on the device. Follow the instruc‐
tions that are shown in the displa y.Fu rther
information can be found in the manufactur‐
er's operating instructions. #
Select Internet settings .#
Select Connect via Wi-Fi. #
Select Add hotspot.
Connecting using a security key#
Select the options rofthe desired Wi-Fi
networ k. #
Select Connect using security key . #
Have the security key displa yed on the device
to be connec ted (see the manufacturer's
operating instructions). #
Ente rth is security key on the multimedia sys‐
te m. #
Confirm the entry with¡.
Connecting using a WPS PIN #
Select the options rofthe desired Wi-Fi
networ k. #
Select Connect using WPS PIN input .
The multimedia sy stem generates an eight-
digit PIN. #
Enter this PIN on the device tobe connec ted. #
Confirm the entry.
Connecting using a but ton #
Select the options rofthe desired Wi-Fi
networ k. #
Select Connect via WPS PBC . #
Select "Connect via WPS PBC" in the options
on the device tobe connec ted (see the man‐
ufacturer's operating instructions). #
Press the WPS button on the device tobe
connec ted. #
Select Continue inthe multimedia sy stem.
Ac tivating automatic connection #
Select Connect via Wi-Fi . #
Select the options rofthe desired Wi-Fi
networ k. #
Activate Permanent Internet connection .
Connecting with a known Wi-Fi #
Select Connect via Wi-Fi . #
Select a Wi-Fi networ k.
The connection is es tablished again.
Configuring the multimedia sy stem as a Wi-
Fi hotspot forex tern al devices
The type of connection es tablished depends on
th e device tobe connec ted. The function must
be suppor tedby the multimedia sy stem and by
th e device tobe connec ted. The type of connec‐
tion es tablished must be selected on the multi‐ 276
MBUX multimedia sy stem