MERCEDES-BENZ E-CLASS SALOON 2008 Owners Manual
Manufacturer: MERCEDES-BENZ, Model Year: 2008, Model line: E-CLASS SALOON, Model: MERCEDES-BENZ E-CLASS SALOON 2008Pages: 401, PDF Size: 6.89 MB
Page 191 of 401
Loading and stowing
188 Skibag*
G
Risk of injury
The skibag is designed to carry up to four
pairs of skis. Do not use the skibag to carry
any other type of load.
The skibag must always be secured when
laden. Otherwise, injuries could be caused
by it in the event of an accident.
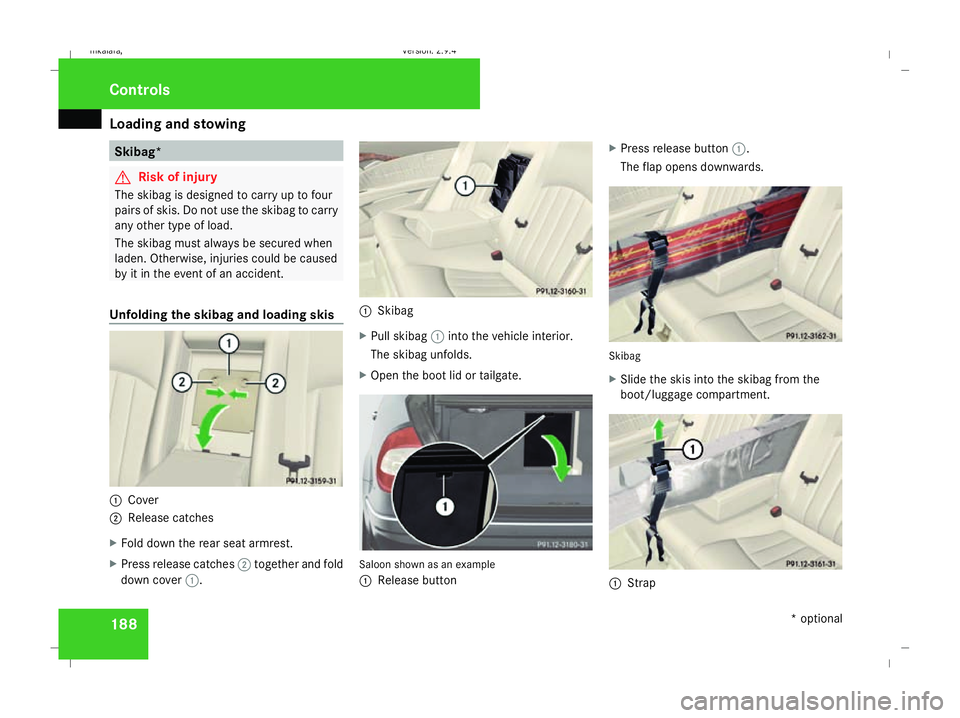
Unfolding the skibag and loading skis 1
Cover
2 Release catches
X Fold down the rear seat armrest.
X Press release catches 2together and fold
down cover 1. 1
Skibag
X Pull skibag 1into the vehicle interior.
The skibag unfolds.
X Open the boot lid or tailgate. Saloon shown as an example
1
Release button X
Press release button 1.
The flap opens downwards. Skibag
X
Slide the skis into the skibag from the
boot/luggage compartment. 1
Strap Controls
* optional
211_AKB; 2; 5, en-GB
mkalafa,
Version: 2.9.4
2008-02-29T16:57:07+01:00 - Seite 188 Dateiname: 6515_3416_02_buchblock.pdf; preflight
Page 192 of 401
Loading and stowing
189
X
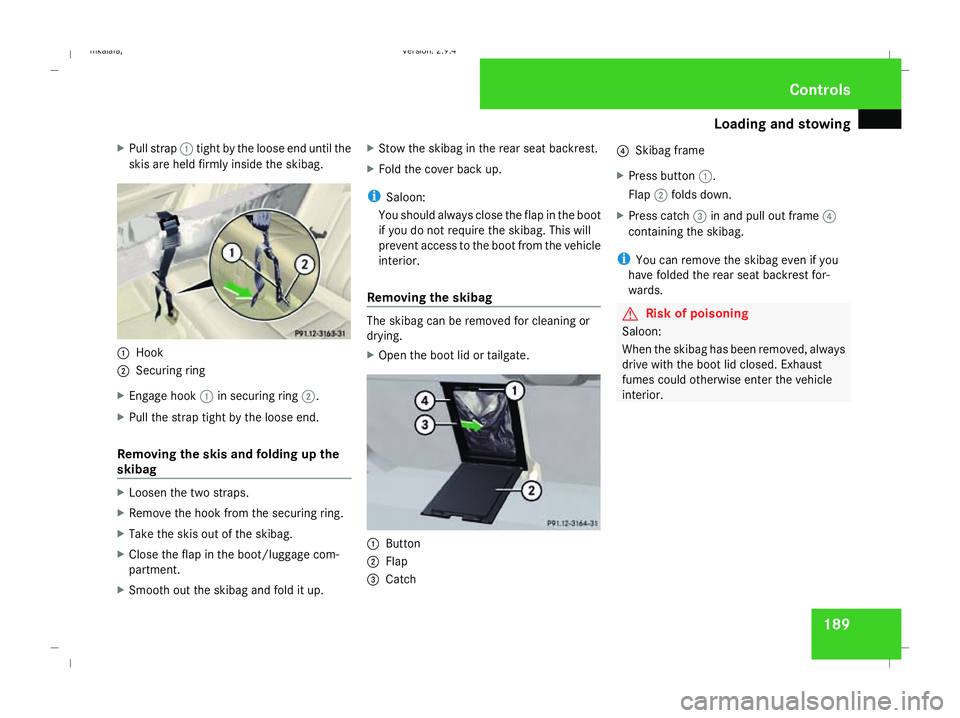
Pull strap 1tight by the loose end until the
skis are held firmly inside the skibag. 1
Hook
2 Securing ring
X Engage hook 1in securing ring 2.
X Pull the strap tight by the loose end.
Removing the skis and folding up the
skibag X
Loosen the two straps.
X Remove the hook from the securing ring.
X Take the skis out of the skibag.
X Close the flap in the boot/luggage com-
partment.
X Smooth out the skibag and fold it up. X
Stow the skibag in the rear seat backrest.
X Fold the cover back up.
i Saloon:
You should always close the flap in the boot
if you do not require the skibag. This will
prevent access to the boot from the vehicle
interior.
Removing the skibag The skibag can be removed for cleaning or
drying.
X
Open the boot lid or tailgate. 1
Button
2 Flap
3 Catch 4
Skibag frame
X Press button 1.
Flap 2folds down.
X Press catch 3in and pull out frame 4
containing the skibag.
i You can remove the skibag even if you
have folded the rear seat backrest for-
wards. G
Risk of poisoning
Saloon:
When the skibag has been removed, always
drive with the boot lid closed. Exhaust
fumes could otherwise enter the vehicle
interior. Controls
211_AKB; 2; 5, en-GB
mkalafa,
Version: 2.9.4 2008-02-29T16:57:07+01:00 - Seite 189 ZDateiname: 6515_3416_02_buchblock.pdf; preflight
Page 193 of 401
Loading and stowing
190 Luggage net in the front-passenger
footwell
G
Risk of injury
Only place lightweight objects in the lug-
gage net. Do not use it to transport heavy,
sharp-edged or fragile objects. The luggage
net cannot secure the objects sufficiently
in the event of an accident. Loading guidelines
G
Risk of injury
Secure and position the load as described
in the loading guidelines.
Otherwise, vehicle occupants could
be injured by the load being thrown around
in the event of sharp braking, a sudden
change in direction or an accident. This also
applies to seats which have been removed.
You will find further information in the
"Securing a load" section.
Even if you follow all the loading guidelines,
the load will increase the risk of injury in the
event of an accident. G
Risk of poisoning
Keep the boot lid/tailgate closed while the
vehicle is in operation. Otherwise, exhaust
fumes could enter the vehicle interior and
poison you.
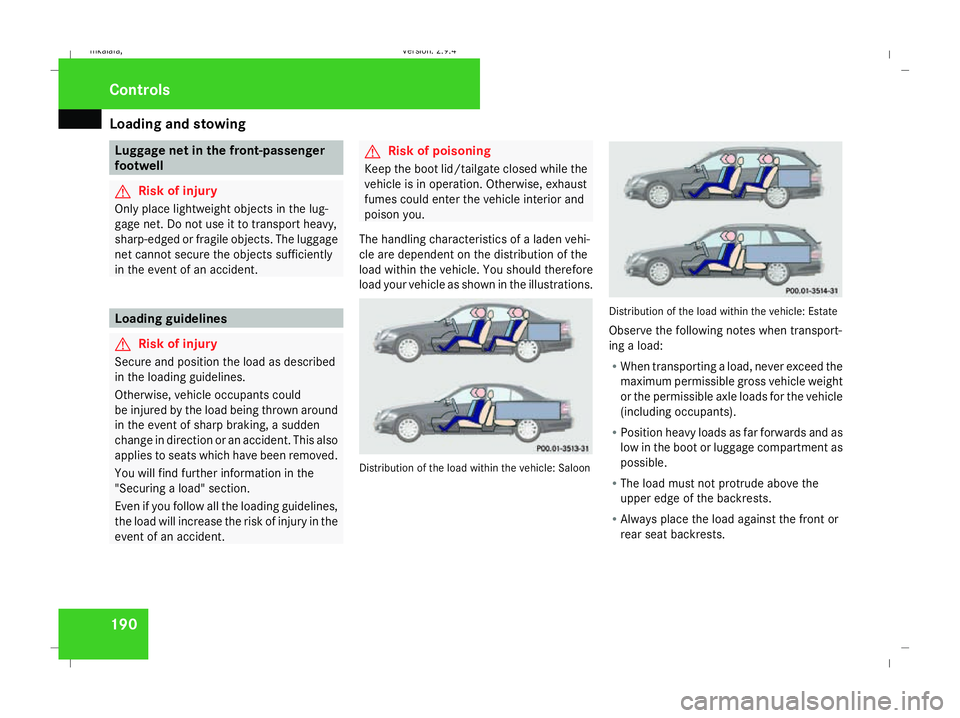
The handling characteristics of a laden vehi-
cle are dependent on the distribution of the
load within the vehicle. You should therefore
load your vehicle as shown in the illustrations. Distribution of the load within the vehicle: Saloon Distribution of the load within the vehicle: Estate
Observe the following notes when transport-
ing a load:
R
When transporting a load, never exceed the
maximum permissible gross vehicle weight
or the permissible axle loads for the vehicle
(including occupants).
R Position heavy loads as far forwards and as
low in the boot or luggage compartment as
possible.
R The load must not protrude above the
upper edge of the backrests.
R Always place the load against the front or
rear seat backrests. Controls
211_AKB; 2; 5, en-GB
mkalafa,
Version: 2.9.4 2008-02-29T16:57:07+01:00 - Seite 190Dateiname: 6515_3416_02_buchblock.pdf; preflight
Page 194 of 401
Loading and stowing
191
R
Only load the additional loading floor in the
boot up to a maximum of 20 kg.
R Secure the load with sufficiently strong and
wear-resistant load restraints. Pad sharp
edges for protection.
i Load restraints are available at any quali-
fied specialist workshop, e.g. a Mercedes-
Benz Service Centre. R
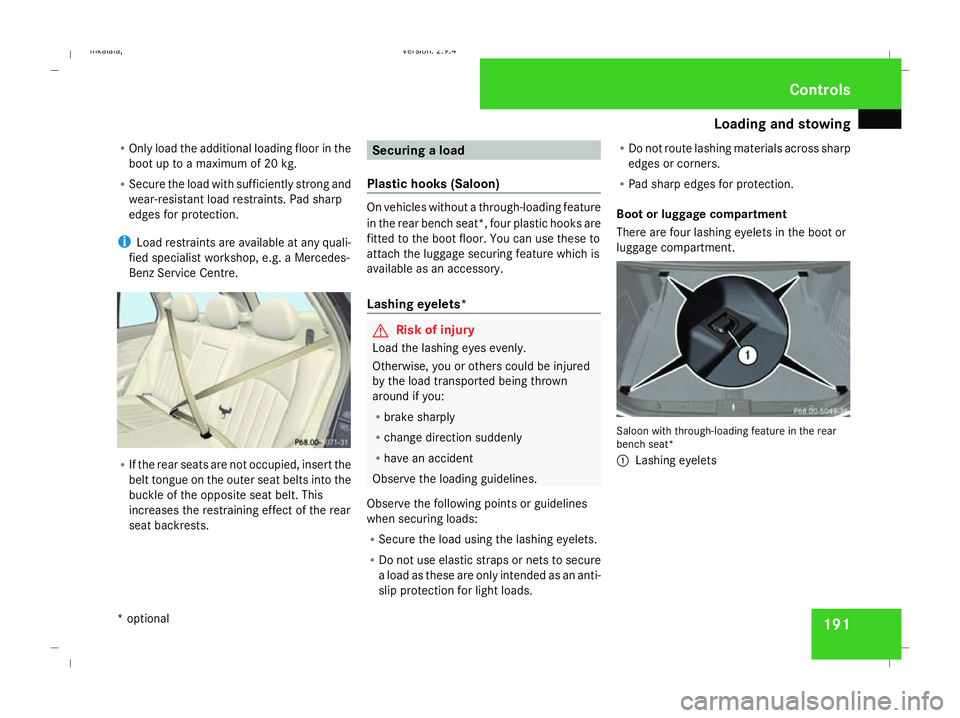
If the rear seats are not occupied, insert the
belt tongue on the outer seat belts into the
buckle of the opposite seat belt. This
increases the restraining effect of the rear
seat backrests. Securing a load
Plastic hooks (Saloon) On vehicles without a through-loading feature
in the rear bench seat*, four plastic hooks are
fitted to the boot floor. You can use these to
attach the luggage securing feature which is
available as an accessory.
Lashing eyelets*
G
Risk of injury
Load the lashing eyes evenly.
Otherwise, you or others could be injured
by the load transported being thrown
around if you:
R brake sharply
R change direction suddenly
R have an accident
Observe the loading guidelines.
Observe the following points or guidelines
when securing loads:
R Secure the load using the lashing eyelets.
R Do not use elastic straps or nets to secure
a load as these are only intended as an anti-
slip protection for light loads. R
Do not route lashing materials across sharp
edges or corners.
R Pad sharp edges for protection.
Boot or luggage compartment
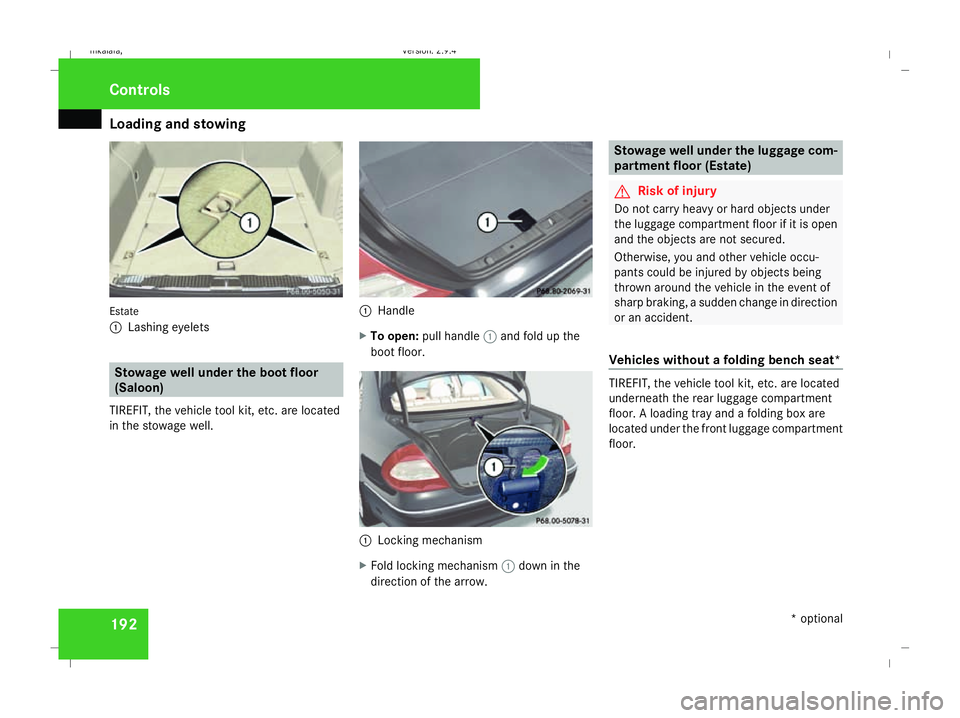
There are four lashing eyelets in the boot or
luggage compartment. Saloon with through-loading feature in the rear
bench seat*
1
Lashing eyelets Controls
* optional
211_AKB; 2; 5, en-GB
mkalafa,
Version: 2.9.4 2008-02-29T16:57:07+01:00 - Seite 191 ZDateiname: 6515_3416_02_buchblock.pdf; preflight
Page 195 of 401
Loading and stowing
192Estate
1
Lashing eyelets Stowage well under the boot floor
(Saloon)
TIREFIT, the vehicle tool kit, etc. are located
in the stowage well. 1
Handle
X To open: pull handle 1and fold up the
boot floor. 1
Locking mechanism
X Fold locking mechanism 1down in the
direction of the arrow. Stowage well under the luggage com-
partment floor (Estate)
G
Risk of injury
Do not carry heavy or hard objects under
the luggage compartment floor if it is open
and the objects are not secured.
Otherwise, you and other vehicle occu-
pants could be injured by objects being
thrown around the vehicle in the event of
sharp braking, a sudden change in direction
or an accident.
Vehicles without a folding bench seat* TIREFIT, the vehicle tool kit, etc. are located
underneath the rear luggage compartment
floor. A loading tray and a folding box are
located under the front luggage compartment
floor.Controls
* optional
211_AKB; 2; 5, en-GB
mkalafa,
Version: 2.9.4 2008-02-29T16:57:07+01:00 - Seite 192Dateiname: 6515_3416_02_buchblock.pdf; preflight
Page 196 of 401
Loading and stowing
193
Opening and closing the luggage compart-
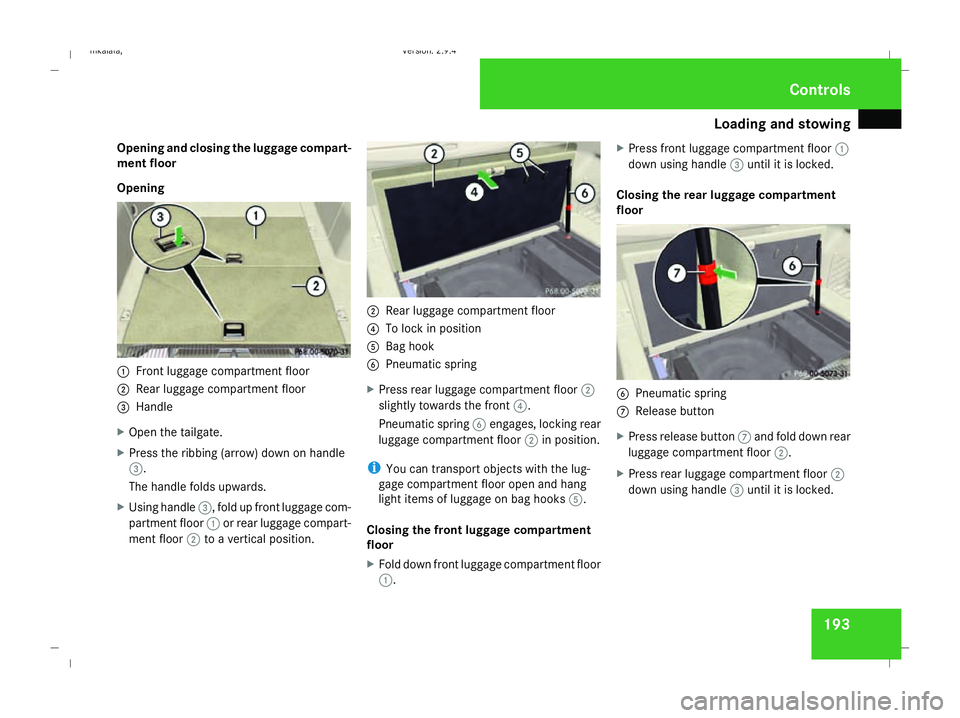
ment floor
Opening
1
Front luggage compartment floor
2 Rear luggage compartment floor
3 Handle
X Open the tailgate.
X Press the ribbing (arrow) down on handle
3.
The handle folds upwards.
X Using handle 3, fold up front luggage com-
partment floor 1or rear luggage compart-
ment floor 2to a vertical position. 2
Rear luggage compartment floor
4 To lock in position
5 Bag hook
6 Pneumatic spring
X Press rear luggage compartment floor 2
slightly towards the front 4.
Pneumatic spring 6engages, locking rear
luggage compartment floor 2in position.
i You can transport objects with the lug-
gage compartment floor open and hang
light items of luggage on bag hooks 5.
Closing the front luggage compartment
floor
X Fold down front luggage compartment floor
1. X
Press front luggage compartment floor 1
down using handle 3until it is locked.
Closing the rear luggage compartment
floor 6
Pneumatic spring
7 Release button
X Press release button 7and fold down rear
luggage compartment floor 2.
X Press rear luggage compartment floor 2
down using handle 3until it is locked. Controls
211_AKB; 2; 5, en-GB
mkalafa,
Version: 2.9.4 2008-02-29T16:57:07+01:00 - Seite 193 ZDateiname: 6515_3416_02_buchblock.pdf; preflight
Page 197 of 401
Loading and stowing
194
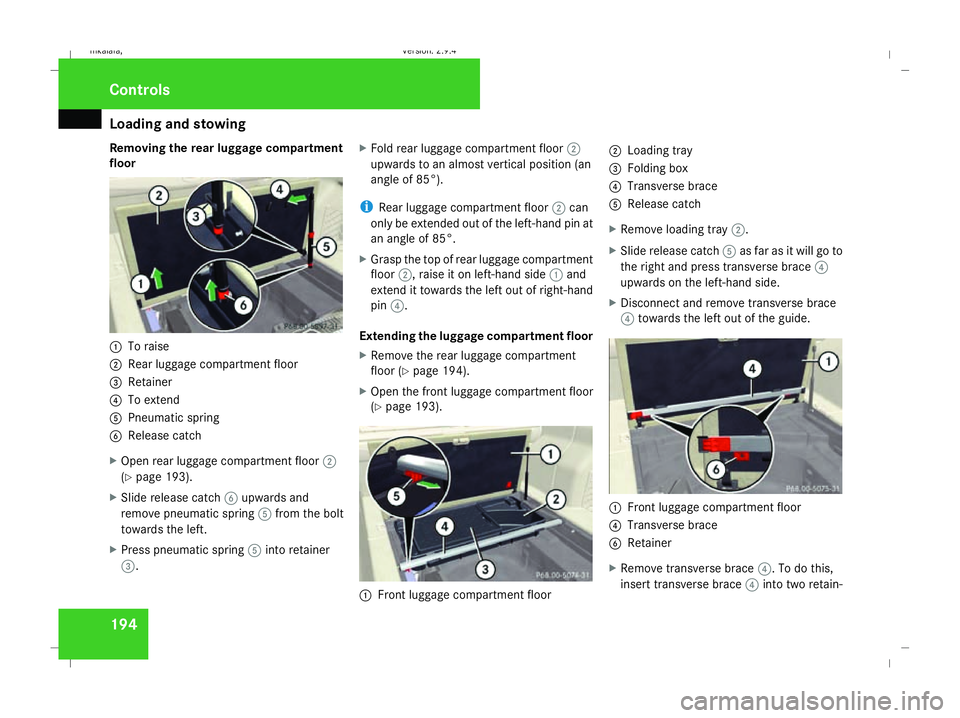
Removing the rear luggage compartment
floor 1
To raise
2 Rear luggage compartment floor
3 Retainer
4 To extend
5 Pneumatic spring
6 Release catch
X Open rear luggage compartment floor 2
(Y page 193).
X Slide release catch 6upwards and
remove pneumatic spring 5from the bolt
towards the left.
X Press pneumatic spring 5into retainer
3. X
Fold rear luggage compartment floor 2
upwards to an almost vertical position (an
angle of 85°).
i Rear luggage compartment floor 2can
only be extended out of the left-hand pin at
an angle of 85°.
X Grasp the top of rear luggage compartment
floor 2, raise it on left-hand side 1and
extend it towards the left out of right-hand
pin 4.
Extending the luggage compartment floor
X Remove the rear luggage compartment
floor (Y page 194).
X Open the front luggage compartment floor
(Y page 193). 1
Front luggage compartment floor 2
Loading tray
3 Folding box
4 Transverse brace
5 Release catch
X Remove loading tray 2.
X Slide release catch 5as far as it will go to
the right and press transverse brace 4
upwards on the left-hand side.
X Disconnect and remove transverse brace
4 towards the left out of the guide. 1
Front luggage compartment floor
4 Transverse brace
6 Retainer
X Remove transverse brace 4. To do this,
insert transverse brace 4into two retain- Controls
211_AKB; 2; 5, en-GB
mkalafa,
Version: 2.9.4 2008-02-29T16:57:07+01:00 - Seite 194Dateiname: 6515_3416_02_buchblock.pdf; preflight
Page 198 of 401
Loading and stowing
195
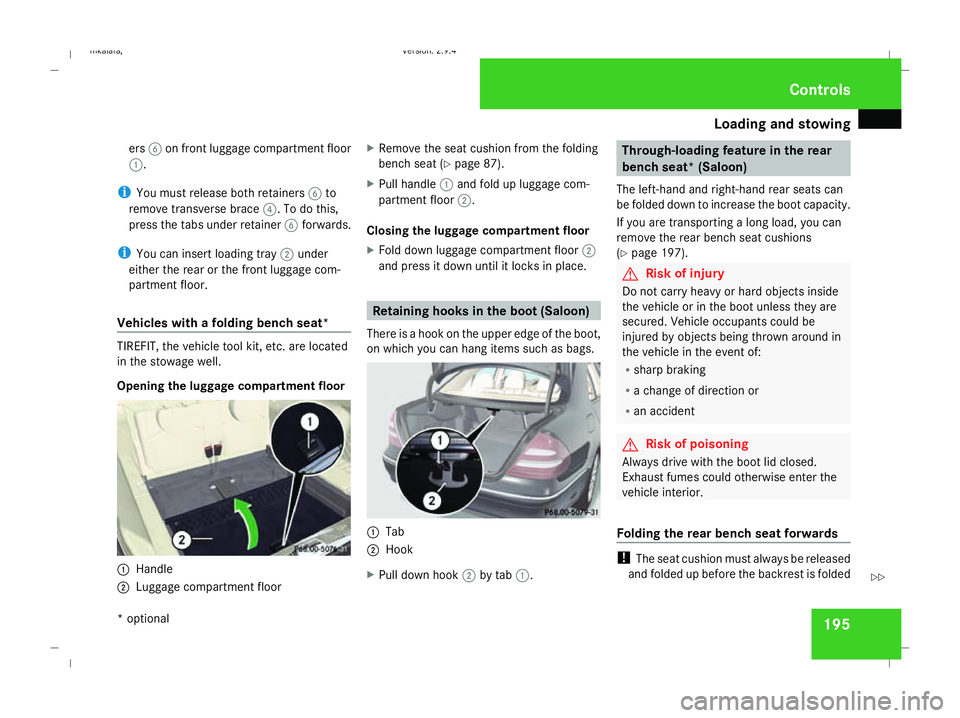
ers
6on front luggage compartment floor
1.
i You must release both retainers 6to
remove transverse brace 4. To do this,
press the tabs under retainer 6forwards.
i You can insert loading tray 2under
either the rear or the front luggage com-
partment floor.
Vehicles with a folding bench seat* TIREFIT, the vehicle tool kit, etc. are located
in the stowage well.
Opening the luggage compartment floor
1
Handle
2 Luggage compartment floor X
Remove the seat cushion from the folding
bench seat (Y page 87).
X Pull handle 1and fold up luggage com-
partment floor 2.
Closing the luggage compartment floor
X Fold down luggage compartment floor 2
and press it down until it locks in place. Retaining hooks in the boot (Saloon)
There is a hook on the upper edge of the boot,
on which you can hang items such as bags. 1
Tab
2 Hook
X Pull down hook 2by tab 1. Through-loading feature in the rear
bench seat* (Saloon)
The left-hand and right-hand rear seats can
be folded down to increase the boot capacity.
If you are transporting a long load, you can
remove the rear bench seat cushions
(Y page 197). G
Risk of injury
Do not carry heavy or hard objects inside
the vehicle or in the boot unless they are
secured. Vehicle occupants could be
injured by objects being thrown around in
the vehicle in the event of:
R sharp braking
R a change of direction or
R an accident G
Risk of poisoning
Always drive with the boot lid closed.
Exhaust fumes could otherwise enter the
vehicle interior.
Folding the rear bench seat forwards !
The seat cushion must always be released
and folded up before the backrest is folded Controls
* optional
211_AKB; 2; 5, en-GB
mkalafa,
Version: 2.9.4 2008-02-29T16:57:07+01:00 - Seite 195 ZDateiname: 6515_3416_02_buchblock.pdf; preflight
Page 199 of 401
Loading and stowing
196forward. Otherwise, the backrest uphols-
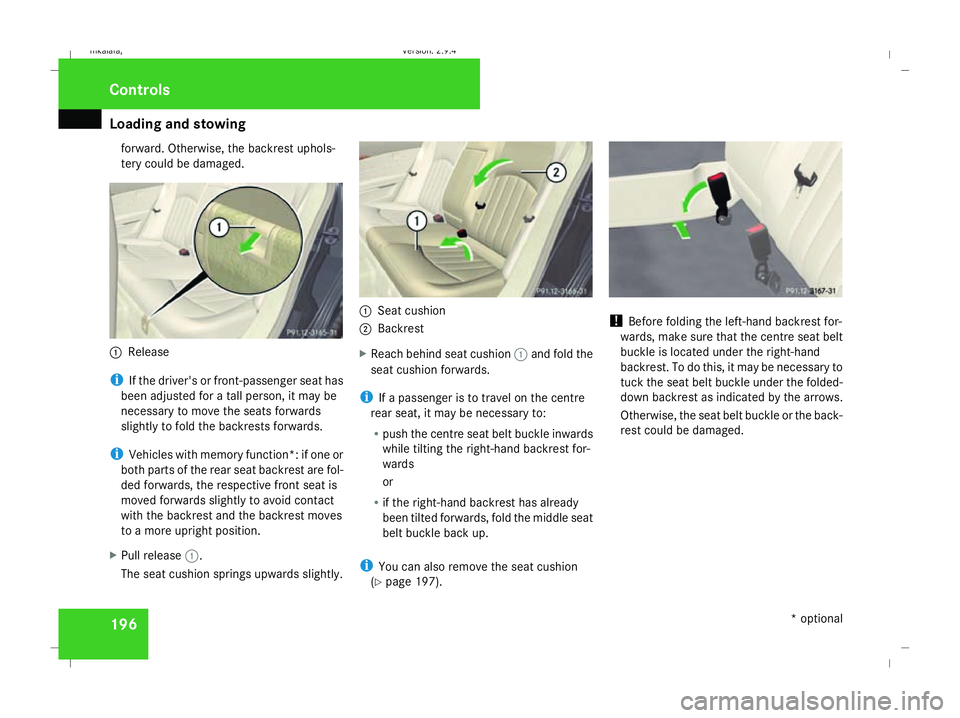
tery could be damaged. 1
Release
i If the driver's or front-passenger seat has
been adjusted for a tall person, it may be
necessary to move the seats forwards
slightly to fold the backrests forwards.
i Vehicles with memory function*: if one or
both parts of the rear seat backrest are fol-
ded forwards, the respective front seat is
moved forwards slightly to avoid contact
with the backrest and the backrest moves
to a more upright position.
X Pull release 1.
The seat cushion springs upwards slightly. 1
Seat cushion
2 Backrest
X Reach behind seat cushion 1and fold the
seat cushion forwards.
i If a passenger is to travel on the centre
rear seat, it may be necessary to:
R push the centre seat belt buckle inwards
while tilting the right-hand backrest for-
wards
or
R if the right-hand backrest has already
been tilted forwards, fold the middle seat
belt buckle back up.
i You can also remove the seat cushion
(Y page 197). !
Before folding the left-hand backrest for-
wards, make sure that the centre seat belt
buckle is located under the right-hand
backrest. To do this, it may be necessary to
tuck the seat belt buckle under the folded-
down backrest as indicated by the arrows.
Otherwise, the seat belt buckle or the back-
rest could be damaged. Controls
* optional
211_AKB; 2; 5, en-GB
mkalafa,
Version: 2.9.4 2008-02-29T16:57:07+01:00 - Seite 196Dateiname: 6515_3416_02_buchblock.pdf; preflight
Page 200 of 401
Loading and stowing
197X
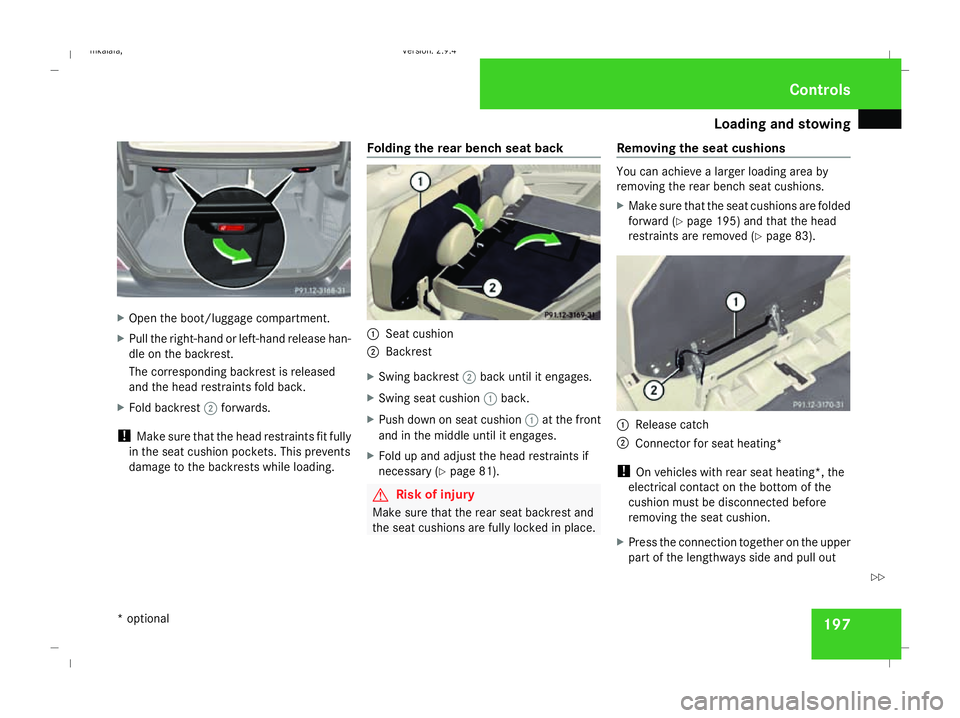
Open the boot/luggage compartment.
X Pull the right-hand or left-hand release han-
dle on the backrest.
The corresponding backrest is released
and the head restraints fold back.
X Fold backrest 2forwards.
! Make sure that the head restraints fit fully
in the seat cushion pockets. This prevents
damage to the backrests while loading. Folding the rear bench seat back 1
Seat cushion
2 Backrest
X Swing backrest 2back until it engages.
X Swing seat cushion 1back.
X Push down on seat cushion 1at the front
and in the middle until it engages.
X Fold up and adjust the head restraints if
necessary (Y page 81). G
Risk of injury
Make sure that the rear seat backrest and
the seat cushions are fully locked in place. Removing the seat cushions You can achieve a larger loading area by
removing the rear bench seat cushions.
X
Make sure that the seat cushions are folded
forward (Y page 195) and that the head
restraints are removed (Y page 83). 1
Release catch
2 Connector for seat heating*
! On vehicles with rear seat heating*, the
electrical contact on the bottom of the
cushion must be disconnected before
removing the seat cushion.
X Press the connection together on the upper
part of the lengthways side and pull out Controls
* optional
211_AKB; 2; 5, en-GB
mkalafa,
Version: 2.9.4 2008-02-29T16:57:07+01:00 - Seite 197 ZDateiname: 6515_3416_02_buchblock.pdf; preflight