service MERCEDES-BENZ E-CLASS SALOON 2008 Workshop Manual
[x] Cancel search | Manufacturer: MERCEDES-BENZ, Model Year: 2008, Model line: E-CLASS SALOON, Model: MERCEDES-BENZ E-CLASS SALOON 2008Pages: 401, PDF Size: 6.89 MB
Page 261 of 401
Display
messages 258 Text messages
G
Risk of accident and injury
The operating safety of the vehicle could be impaired if service work is carried out incorrectly. There is a risk that you could lose control of
the vehicle and cause an accident. The safety systems may no longer be able to protect you or others as they are designed to do.
Always have maintenance work carried out at a qualified specialist workshop which has the necessary specialist knowledge and tools to
carry out the work required.
Mercedes-Benz recommends that you use a Mercedes-Benz Service Centre for this purpose.
In particular, work relevant to safety or on safety-related systems must be carried out at a qualified specialist workshop. Display messages Possible cause/consequence Possible solution
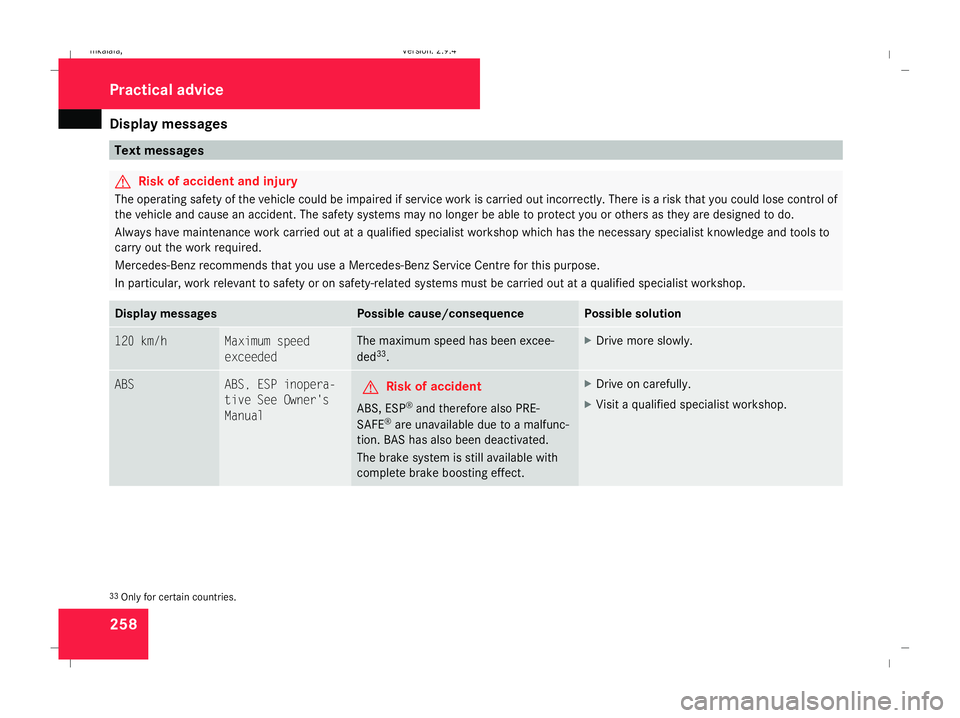
120 km/h Maximum speed
exceeded The maximum speed has been excee-
ded
33
. X
Drive more slowly. ABS ABS, ESP inopera-
tive See Owner's
Manual
G
Risk of accident
ABS, ESP ®
and therefore also PRE-
SAFE ®
are unavailable due to a malfunc-
tion. BAS has also been deactivated.
The brake system is still available with
complete brake boosting effect. X
Drive on carefully.
X Visit a qualified specialist workshop. 33
Only for certain countries. Practical advi
ce
211_AKB; 2; 5, en-GB
mkalafa,
Version: 2.9.4 2008-02-29T16:57:07+01:00 - Seite 258Dateiname: 6515_3416_02_buchblock.pdf; preflight
Page 269 of 401
Display
messages 266 Symbol messages
G
Risk of accident and injury
The operating safety of the vehicle could be impaired if service work is carried out incorrectly. There is a risk that you could lose control of
the vehicle and cause an accident. The safety systems may no longer be able to protect you or others as they are designed to do.
Always have maintenance work carried out at a qualified specialist workshop which has the necessary specialist knowledge and tools to
carry out the work required.
Mercedes-Benz recommends that you use a Mercedes-Benz Service Centre for this purpose.
In particular, work relevant to safety or on safety-related systems must be carried out at a qualified specialist workshop. Display messages Possible cause/consequence Possible solution
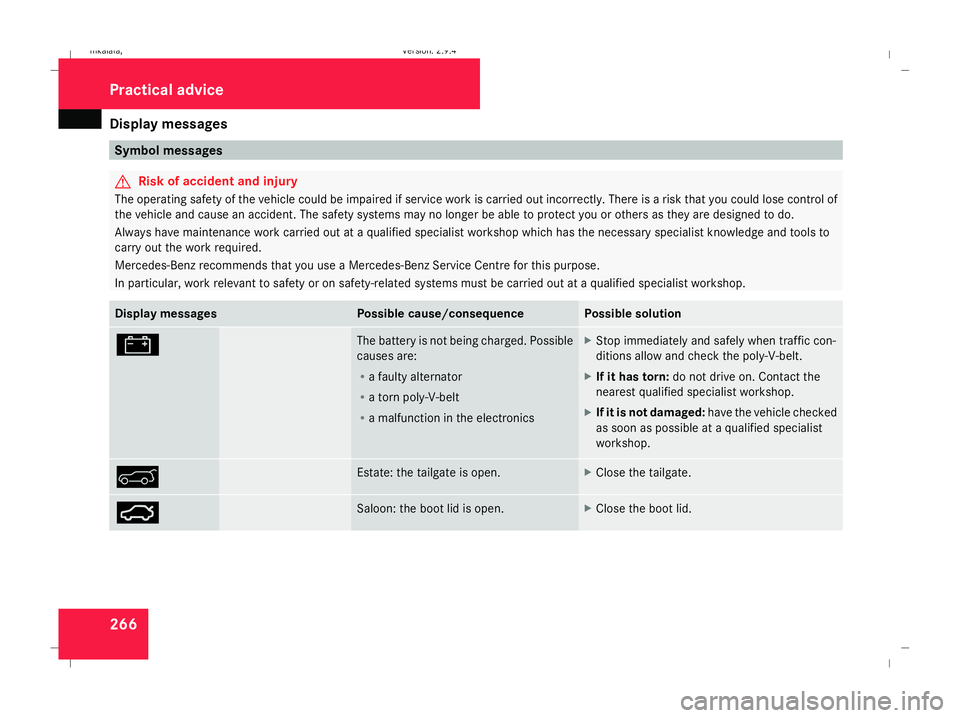
# The battery is not being charged. Possible
causes are:
R
a faulty alternator
R a torn poly-V-belt
R a malfunction in the electronics X
Stop immediately and safely when traffic con-
ditions allow and check the poly-V-belt.
X If it has torn: do not drive on. Contact the
nearest qualified specialist workshop.
X If it is not damaged: have the vehicle checked
as soon as possible at a qualified specialist
workshop. & Estate: the tailgate is open. X
Close the tailgate. Ê Saloon: the boot lid is open. X
Close the boot lid. Practical advi
ce
211_AKB; 2; 5, en-GB
mkalafa,
Version: 2.9.4 2008-02-29T16:57:07+01:00 - Seite 266Dateiname: 6515_3416_02_buchblock.pdf; preflight
Page 285 of 401
Troubleshooting
282 Troubleshooting
Points to remember
G
Risk of accident and injury
The operating safety of the vehicle could be impaired if service work is carried out incorrectly. There is a risk that you could lose control of
the vehicle and cause an accident. The safety systems may no longer be able to protect you or others as they are designed to do.
Always have maintenance work carried out at a qualified specialist workshop which has the necessary specialist knowledge and tools to
carry out the work required.
Mercedes-Benz recommends that you use a Mercedes-Benz Service Centre for this purpose.
In particular, work relevant to safety or on safety-related systems must be carried out at a qualified specialist workshop. Indicator and warning lamps in switches and buttons
Problem Possible cause/consequence Suggested solutions
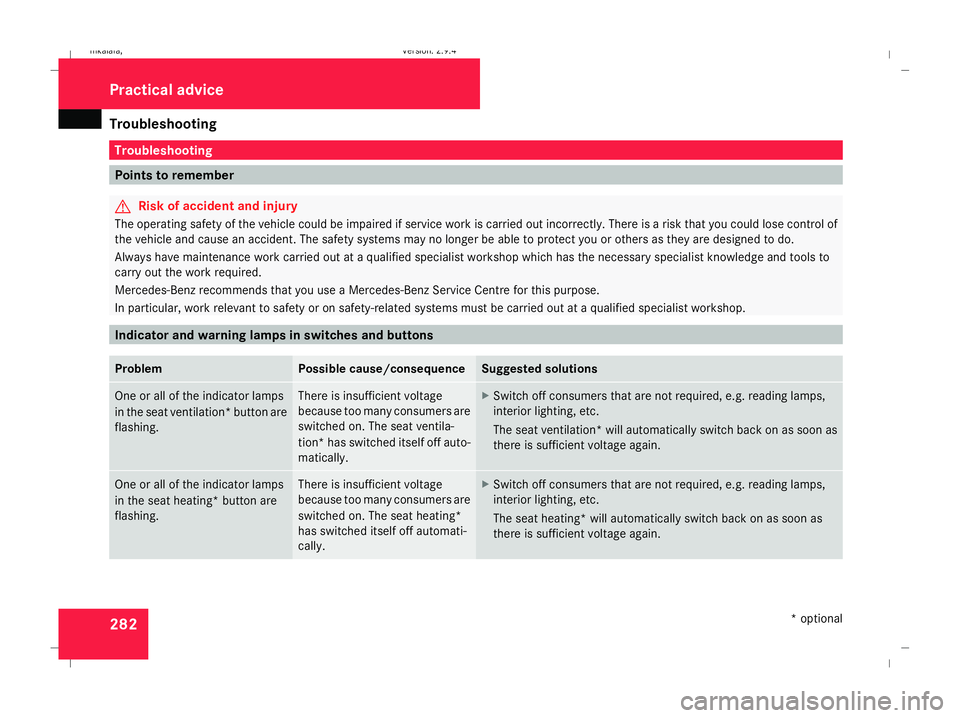
One or all of the indicator lamps
in the seat ventilation* button are
flashing. There is insufficient voltage
because too many consumers are
switched on. The seat ventila-
tion* has switched itself off auto-
matically. X
Switch off consumers that are not required, e.g. reading lamps,
interior lighting, etc.
The seat ventilation* will automatically switch back on as soon as
there is sufficient voltage again. One or all of the indicator lamps
in the seat heating* button are
flashing. There is insufficient voltage
because too many consumers are
switched on. The seat heating*
has switched itself off automati-
cally. X
Switch off consumers that are not required, e.g. reading lamps,
interior lighting, etc.
The seat heating* will automatically switch back on as soon as
there is sufficient voltage again. Practical advice
* optional
211_AKB; 2; 5, en-GB
mkalafa
,V ersion: 2.9.4
2008-02-29T16:57:07+01:00 - Seite 282 Dateiname: 6515_3416_02_buchblock.pdf; preflight
Page 304 of 401
Troubleshooting
301Key
Problem Possible cause/consequence Suggested solutions
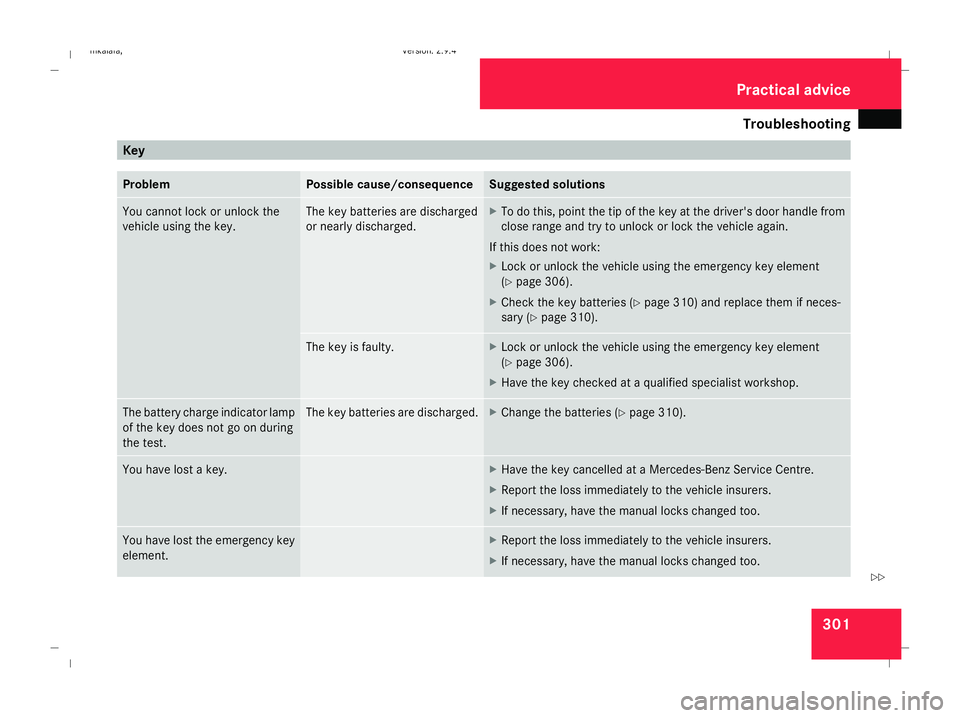
You cannot lock or unlock the
vehicle using the key. The key batteries are discharged
or nearly discharged. X
To do this, point the tip of the key at the driver's door handle from
close range and try to unlock or lock the vehicle again.
If this does not work:
X Lock or unlock the vehicle using the emergency key element
(Y page 306).
X Check the key batteries (Y page 310) and replace them if neces-
sary (Y page 310). The key is faulty. X
Lock or unlock the vehicle using the emergency key element
(Y page 306).
X Have the key checked at a qualified specialist workshop. The battery charge indicator lamp
of the key does not go on during
the test. The key batteries are discharged. X
Change the batteries (Y page 310).You have lost a key. X
Have the key cancelled at a Mercedes-Benz Service Centre.
X Report the loss immediately to the vehicle insurers.
X If necessary, have the manual locks changed too. You have lost the emergency key
element. X
Report the loss immediately to the vehicle insurers.
X If necessary, have the manual locks changed too. Practical advice
211_AKB; 2; 5, en-GB
mkalafa
,V ersion: 2.9.4
2008-02-29T16:57:07+01:00 - Seite 301 ZDateiname: 6515_3416_02_buchblock.pdf; preflight
Page 307 of 401
Troubleshooting
304 Problem Possible cause/consequence Suggested solutions
The vehicle cannot be started
using the KEYLESS GO key and
the KEYLESS GO button. The KEY-
LESS GO key is in the vehicle. A door is open. The key therefore
cannot be detected so easily. X
Close the door and try to start the vehicle again. You did not depress the brake
when starting the engine. X
Depress the brake and press the KEYLESS GO button. There is interference from a pow-
erful source of radio waves. X
Start your vehicle using the KEYLESS GO key in the ignition lock. You have lost the KEYLESS GO
key. X
Have the KEYLESS GO key cancelled at a Mercedes-Benz Service
Centre.
X Report the loss immediately to the vehicle insurers.
X If necessary, have the manual locks changed too. Auxiliary heating*
Problem Possible cause/consequence Suggested solutions
The auxiliary heating is not work-
ing. The fuel level is down to the
reserve level. X
Refuel at the nearest filling station. The battery is not sufficiently
charged. X
Charge the battery. The auxiliary heating is faulty. X
Have the auxiliary heating checked at a qualified specialist work-
shop. Practical advice
* optional
211_AKB; 2; 5, en-GB
mkalafa
,V ersion: 2.9.4
2008-02-29T16:57:07+01:00 - Seite 304 Dateiname: 6515_3416_02_buchblock.pdf; preflight
Page 312 of 401
Resetting triggered NECK-PRO head restraints
309
X
Pull cover 2off the tailgate trim.
X Push release catch 1to the left as far as
the stop and open the tailgate. Releasing the parking lock manually
In the event of an electrical fault, it is possible
to release the selector lever lock manually to
move it out of position P, e.g. if you wish to
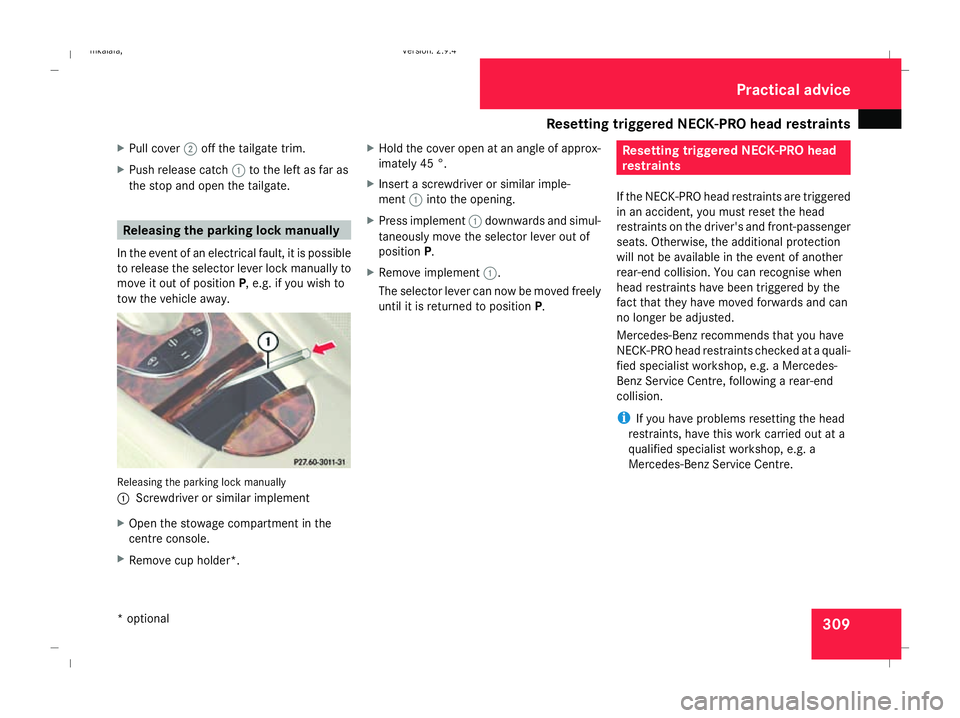
tow the vehicle away. Releasing the parking lock manually
1 Screwdriver or similar implement
X Open the stowage compartment in the
centre console.
X Remove cup holder*. X
Hold the cover open at an angle of approx-
imately 45 °.
X Insert a screwdriver or similar imple-
ment 1into the opening.
X Press implement 1downwards and simul-
taneously move the selector lever out of
position P.
X Remove implement 1.
The selector lever can now be moved freely
until it is returned to position P. Resetting triggered NECK-PRO head
restraints
If the NECK-PRO head restraints are triggered
in an accident, you must reset the head
restraints on the driver's and front-passenger
seats. Otherwise, the additional protection
will not be available in the event of another
rear-end collision. You can recognise when
head restraints have been triggered by the
fact that they have moved forwards and can
no longer be adjusted.
Mercedes-Benz recommends that you have
NECK-PRO head restraints checked at a quali-
fied specialist workshop, e.g. a Mercedes-
Benz Service Centre, following a rear-end
collision.
i If you have problems resetting the head
restraints, have this work carried out at a
qualified specialist workshop, e.g. a
Mercedes-Benz Service Centre. Practical advice
* optional
211_AKB; 2; 5, en-GB
mkalafa
, Version: 2.9.4 2008-02-29T16:57:07+01:00 - Seite 309 ZDateiname: 6515_3416_02_buchblock.pdf; preflight
Page 313 of 401
Changing the batteries
3101
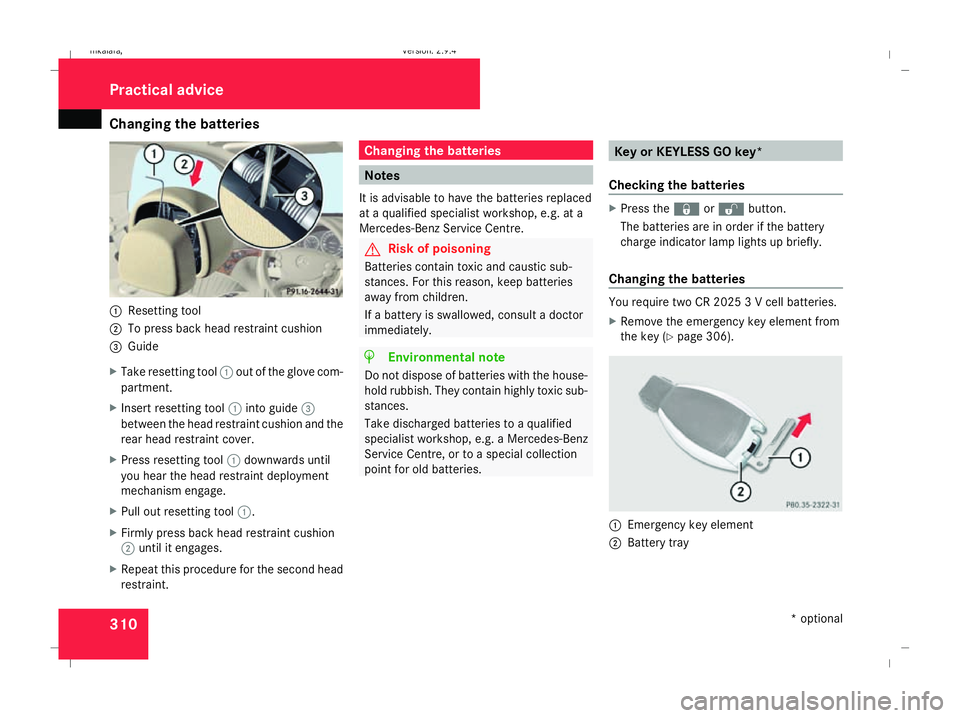
Resetting tool
2 To press back head restraint cushion
3 Guide
X Take resetting tool 1out of the glove com-
partment.
X Insert resetting tool 1into guide 3
between the head restraint cushion and the
rear head restraint cover.
X Press resetting tool 1downwards until
you hear the head restraint deployment
mechanism engage.
X Pull out resetting tool 1.
X Firmly press back head restraint cushion
2 until it engages.
X Repeat this procedure for the second head
restraint. Changing the batteries
Notes
It is advisable to have the batteries replaced
at a qualified specialist workshop, e.g. at a
Mercedes-Benz Service Centre. G
Risk of poisoning
Batteries contain toxic and caustic sub-
stances. For this reason, keep batteries
away from children.
If a battery is swallowed, consult a doctor
immediately. H
Environmental note
Do not dispose of batteries with the house-
hold rubbish. They contain highly toxic sub-
stances.
Take discharged batteries to a qualified
specialist workshop, e.g. a Mercedes-Benz
Service Centre, or to a special collection
point for old batteries. Key or KEYLESS GO key*
Checking the batteries X
Press the jork button.
The batteries are in order if the battery
charge indicator lamp lights up briefly.
Changing the batteries You require two CR 2025 3 V cell batteries.
X
Remove the emergency key element from
the key (Y page 306). 1
Emergency key element
2 Battery tray Practical advice
* optional
211_AKB; 2; 5, en-GB
mkalafa,
Version: 2.9.4 2008-02-29T16:57:07+01:00 - Seite 310Dateiname: 6515_3416_02_buchblock.pdf; preflight
Page 315 of 401
Changing the bulbs
312 Do not change xenon bulbs yourself, but
have them replaced at a qualified specialist
workshop which has the necessary special-
ist knowledge and tools to carry out the
work required.
Mercedes-Benz recommends that you use
a Mercedes-Benz Service Centre for this
purpose. In particular, work relevant to
safety or on safety-related systems must be
carried out at a qualified specialist work-
shop. G
Risk of injury
HiP bulbs are pressurised and may explode
when you change them, thereby injuring
you.
Do not change HiP bulbs yourself; have
them replaced at a qualified specialist
workshop which has the necessary special-
ist knowledge and tools to carry out the
work required.
Mercedes-Benz recommends that you use
a Mercedes-Benz Service Centre for this
purpose. In particular, work relevant to
safety or on safety-related systems must be
carried out at a qualified specialist work-
shop. !
Do not change the LEDs yourself. You
could otherwise damage the LEDs or parts
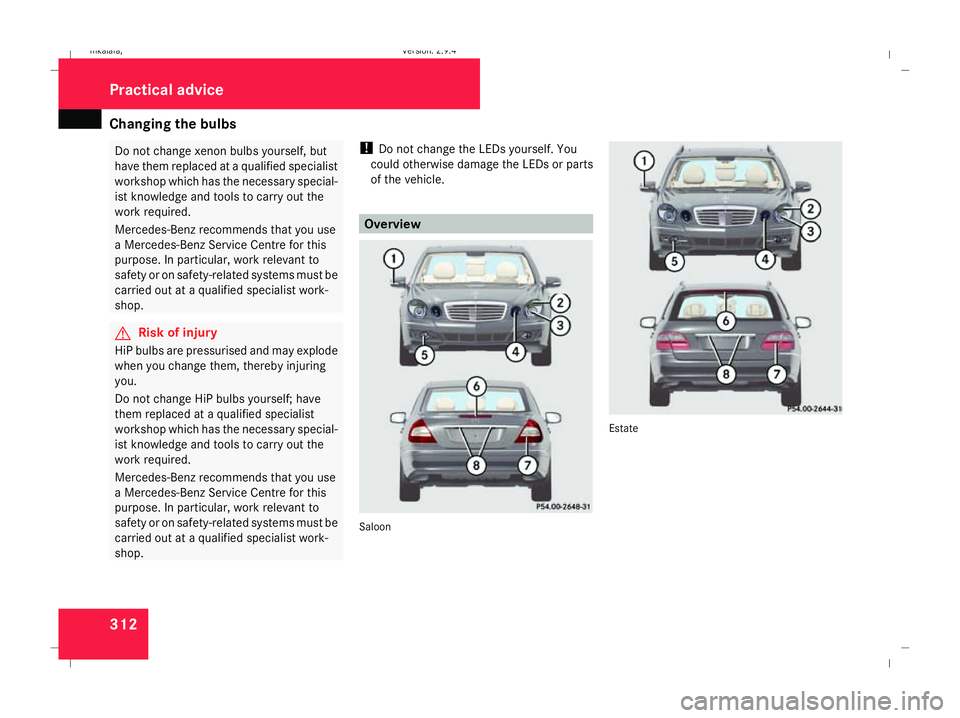
of the vehicle. Overview
Saloon EstatePractical advice
211_AKB; 2; 5, en-GB
mkalafa,
Version: 2.9.4 2008-02-29T16:57:07+01:00 - Seite 312Dateiname: 6515_3416_02_buchblock.pdf; preflight
Page 316 of 401
Changing the bulbs
313
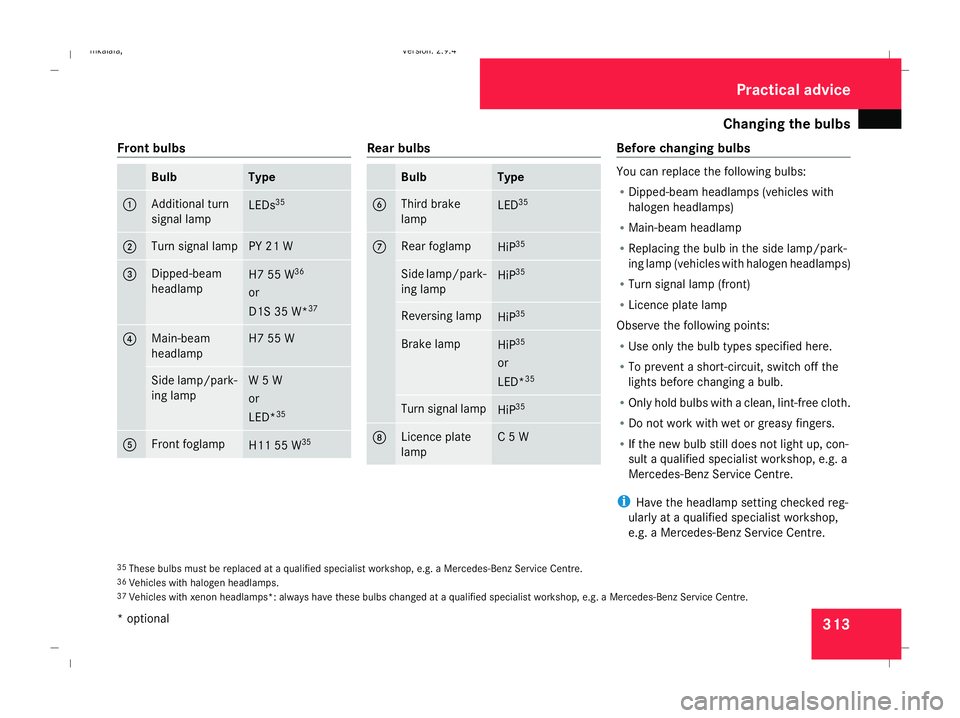
Front bulbs Bulb Type
1 Additional turn
signal lamp
LEDs
35 2 Turn signal lamp PY 21 W
3 Dipped-beam
headlamp
H7 55 W
36
or
D1S 35 W* 37 4 Main-beam
headlamp H7 55 W
Side lamp/park-
ing lamp W 5 W
or
LED*
35 5 Front foglamp
H11 55 W
35 Rear bulbs
Bulb Type
6 Third brake
lamp
LED
35 7 Rear foglamp
HiP
35 Side lamp/park-
ing lamp
HiP
35 Reversing lamp
HiP
35 Brake lamp
HiP
35
or
LED* 35 Turn signal lamp
HiP
35 8 Licence plate
lamp C 5 W Before changing bulbs
You can replace the following bulbs:
R
Dipped-beam headlamps (vehicles with
halogen headlamps)
R Main-beam headlamp
R Replacing the bulb in the side lamp/park-
ing lamp (vehicles with halogen headlamps)
R Turn signal lamp (front)
R Licence plate lamp
Observe the following points:
R Use only the bulb types specified here.
R To prevent a short-circuit, switch off the
lights before changing a bulb.
R Only hold bulbs with a clean, lint-free cloth.
R Do not work with wet or greasy fingers.
R If the new bulb still does not light up, con-
sult a qualified specialist workshop, e.g. a
Mercedes-Benz Service Centre.
i Have the headlamp setting checked reg-
ularly at a qualified specialist workshop,
e.g. a Mercedes-Benz Service Centre.
35 These bulbs must be replaced at a qualified specialist workshop, e.g. a Mercedes-Benz Service Centre.
36 Vehicles with halogen headlamps.
37 Vehicles with xenon headlamps*: always have these bulbs changed at a qualified specialist workshop, e.g. a Mercedes-Benz Service Centre. Practical advice
* optional
211_AKB; 2; 5, en-GB
mkalafa,
Version: 2.9.4
2008-02-29T16:57:07+01:00 - Seite 313 ZDateiname: 6515_3416_02_buchblock.pdf; preflight
Page 321 of 401
Flat tyre
318 Make sure that the jack is placed on a firm,
non-slip, level surface. Do not use wooden
blocks or similar as jacking supports. Oth-
erwise, the jack will not be able to achieve
its load-bearing capacity due to the restric-
ted height.
Do not start the engine at any time while
the wheel is being changed.
Do not lie under the vehicle when it is being
supported by the jack. If you do not raise
the vehicle as described, it could slip off the
jack (e.g. if the engine is started or a door
or the boot lid/tailgate is opened or closed)
and you could sustain serious injuries. Using the TIREFIT kit
You can use the TIREFIT kit to seal small
punctures, particularly those in the tyre tread.
You can use TIREFIT in outdoor temperatures
down to -20 °C. G
Risk of accident
In the following situations, your safety is at
particular risk and TIREFIT is unable to pro-
vide breakdown assistance: R
if there are cuts or punctures in the tyre
greater than 4 mm
R if the wheel rim is damaged
R if you have driven at very low tyre pres-
sures or on a flat tyre
Do not drive any further. Consult a qualified
specialist workshop which has the neces-
sary specialist knowledge and tools to carry
out the work required.
Mercedes-Benz recommends that you use
a Mercedes-Benz Service Centre for this
purpose. In particular, work relevant to
safety or on safety-related systems must be
carried out at a qualified specialist work-
shop.
X Do not remove any foreign objects which
have penetrated the tyre, e.g. screws or
nails.
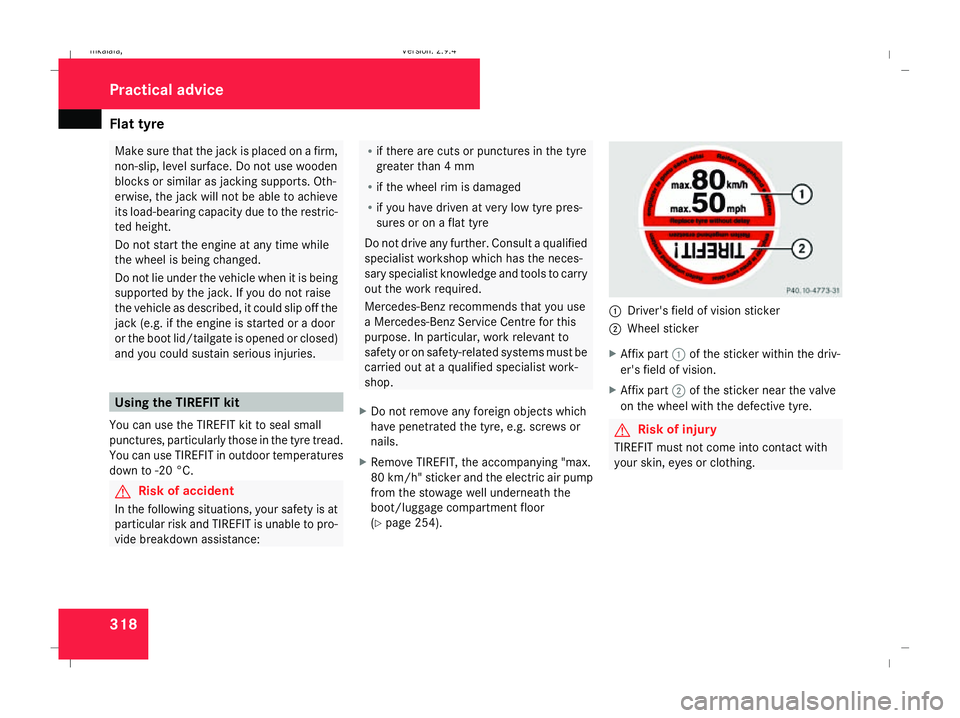
X Remove TIREFIT, the accompanying "max.
80 km/h "sticker and the electric air pump
from the stowage well underneath the
boot/luggage compartment floor
(Y page 254). 1
Driver's field of vision sticker
2 Wheel sticker
X Affix part 1of the sticker within the driv-
er's field of vision.
X Affix part 2of the sticker near the valve
on the wheel with the defective tyre. G
Risk of injury
TIREFIT must not come into contact with
your skin, eyes or clothing. Practical advice
211_AKB; 2; 5, en-GB
mkalafa
, Version: 2.9.4 2008-02-29T16:57:07+01:00 - Seite 318Dateiname: 6515_3416_02_buchblock.pdf; preflight