reset MERCEDES-BENZ E-CLASS SALOON 2011 User Guide
[x] Cancel search | Manufacturer: MERCEDES-BENZ, Model Year: 2011, Model line: E-CLASS SALOON, Model: MERCEDES-BENZ E-CLASS SALOON 2011Pages: 409, PDF Size: 10.47 MB
Page 120 of 409

Exterior mirrors
Adjusting the exterior mirrors G
WARNING
The exterior mirrors reduce the size of the
image .Objects are actually closer than they
appear. You could misjudge the distance from
vehicles driving behind and cause an acci-
dent, e.g. when changing lane. For this rea-
son, make sure of the actual distance from the
vehicle driving behind by glancing over your
shoulder.
The convex exterior mirrors provide a larger
field of vision.
The exterior mirrors are automatically heated
if the rear window heating is switched on and
the outside temperature is low. X
Make sure that the key is in position 1or
2 in the ignition lock.
X Press button :for the left-hand exterior
mirror or button ;for the right-hand exte-
rior mirror.
The indicator lamp in the corresponding
butto nlights up in red.
The indicator lamp goes out again after
some time. You can adjust the selected
mirror using adjustment button =as long
as the indicator lamp is lit.
X Press adjustmen tbutton =up, down, or
to the left or right until you have adjusted
the exterior mirror to the correct position.
You should have a good overview of traffic
conditions. Folding the exterior mirrors in or out
electrically
X
Make sure that the key is in position 1or
2 in the ignition lock.
X Briefly press button :.
Both exterior mirrors fold in or out.
i Make sure that the exterior mirrors are
always folded out fully while driving .They
could otherwise vibrate.
Setting the exterior mirrors If the battery has been disconnected or com-
pletely discharged, the exterior mirrors must
be reset. The exterior mirrors will otherwise
not fold in when you select the "Fold in mir-
rors when locking" function in the on-board
computer .
X
Make sure that the key is in position 1in
the ignition lock.
X Briefly press button :.
Folding the exterior mirrors in or out
automatically If the "Fold in mirrors when locking" function
is activated in the on-board computer :
R
the exterior mirrors fold in automatically as
soon as you lock the vehicle from the out-
side.
R the exterior mirrors fold out again automat-
ically as soon as you unlock the vehicle and
then open the driver's or front-passenger
door. Mirrors
117Seats, steering wheel and mirrors Z
Page 121 of 409

i
If the exterior mirrors have been folded in
manually, they do not fold out.
Exterior mirror out of position If an exterior mirror has been pushed out of
position, proceed as follows:
X
Vehicles without electricall yfolding
exterior mirrors: move the exterior mirror
into the correc tposition manually.
X Vehicles with electrically folding exte-
rior mirrors: press the mirror-folding but-
ton (Y page 117) repeatedly until you hear
the mirror engage in position.
The mirror housing is engaged again and
you can adjust the exterior mirrors as usual
(Y page 117). Automatic anti-dazzle mirrors
G
WARNING
If incident light from headlamps is prevented
from striking the sensor in the rear-view mir-
ror, for instance, by luggage piled too high in
the vehicle, the mirror's automatic anti-dazzle
function will not operate.
Incident light could then blind you. This may
distract you from the traffic conditions and,
as a result, you may cause an accident.
The rear-view mirror and the exterior mirror
on the driver's side automatically go into anti-
dazzle mode if the ignition is switched on and
incident light from headlamps strikes the sen-
sor in the rear-view mirror.
The mirrors do not go into anti-dazzle mode if
reverse gear is engaged or the interior lighting
is switched on. Parking position for the exterior mir-
ror on the front-passenger side
Setting and storing the parking position You can position the front-passenger side
exterior mirror in such a way that you can see the rear wheel on that side as soon as you
engage reverse gear. You can store this posi-
tion.
X
Make sure that the vehicle is stationary and
that the key is in position 2in the ignition
lock.
X Press button ;for the exterior mirror on
the front-passenger side.
X Engage reverse gear.
The exterior mirror on the front-passenger
side moves to the preset parking position.
X Use adjustment button =to adjust the
exterior mirror. You should see the rear
wheel and the kerb in the exterior mirror.
The parking position is stored.
i If you shift the transmission to another
position, the exterior mirror on the front-
passenger side returns to the driving posi-
tion.
i You can also store the parking position
using memory button M?.
X Make sure that the key is in position
2 in the ignition lock.
X With the exterior mirror on the front-
passenger side activated, use adjust-
ment button =to adjust the exterior
mirror. You should see the rear wheel 118
MirrorsSeats, steering wheel and mirrors
Page 122 of 409

and the kerb in the exterior mirror on
the front-passenger side.
X Press memory button M? and one of
the arrows on adjustment button =
within three seconds.
The parking positio nis stored if the
exterior mirror does not move.
If the mirror moves out of position, repeat
the steps.
Calling up astore dparking position set-
ting X
Tur nthe key to position 2in the ignition
lock.
X Adjust the exterior mirror on the front-
passenger side with the corresponding but-
ton (Y page 117).
X Engage reverse gear.
The exterior mirror on the front-passenger
side moves to the stored parking position.
The exterior mirror on the front-passenger
side moves back to its original position:
R as soon as you exceed a speed of
10 km/h
R about ten seconds after you have disen-
gaged reverse gear
R if you press button :for the exterior mir-
ror on the driver's side Memory function
Storing settings
G
WARNING
The memory function can still be used when
the key has been removed. For this reason,
children should never be left unsupervised in
the vehicle. They could otherwise become
trapped when adjusting the seat or the steer-
ing wheel. G
WARNING
Only use the memory function on the driver's
side when the vehicle is stationary. You could otherwise be distracted from the traffic con-
ditions by the steering wheel and seat moving
of their own accord, and as a result, cause an
accident.
With the memory function, you can store up
to three different settings, e.g. for three dif-
ferent people.
The following settings are stored as a single
memory preset:
R position of the seat, backrest and head
restraint
R active multicontour seat: dynamic function
level
R driver's side: steering wheel position
R driver's side: position of the exterior mir-
rors on the driver's and front-passenger
sides X
Adjust the seat (Y page 106).
X On the driver's side, adjust the steering
wheel (Y page 115) and the exterior mirrors
(Y page 117).
X Briefly press the Mmemory button and
then press storage position button 1,2or
3 within three seconds.
The settings are stored in the selected pre-
set position. Atone sounds when the set-
tings have been completed. Calling up
astore dsetting
X Press and hold the relevant storage posi-
tio nb utton 1,2or 3until the seat, steering Memory function
119Seats, steering wheel and mirrors Z
Page 127 of 409

X
Press the Rbutton.
The yellow Rindicator lamp in the
instrument cluster lights up.
X To switch off the rear foglamp: press the
R button.
The yellow Rindicator lamp in the
instrument cluster goes out.
Vehicles with frontf oglamps: when the light
switch is in the Tposition, the rear fog-
lamp can only be switched on if the foglamps
(without dipped-beam headlamps) are
switched on.
i If you switch the engine off (key in posi-
tion 1in the ignition lock) and then restart
it, the previous rear foglamp settings are
restored.
Adjusting the headlam prange (halogen
headlamps) The headlamp range control allows you to
adjust the cone of light from the headlamps
to sui tthe vehicle load. g
Driver's seat and front-passenger seat
occupied
1 Driver's seat, front-passenger seat and
rear seats occupied
2 Driver's seat, front-passenger seat and
rear seats occupied, boot laden
3 Driver's and front-passenger seats occu-
pied and maximum permissible rear axle
load utilised, e.g. when towing a trailer X
Start the engine.
X Turn headlamp range control to the posi-
tion which corresponds to the load in your
vehicle.
Headlampc leaning system If the "Wipe with washer fluid" function is
operated five times (Y
page 132) while the
lights are on and the engine is running, the
headlamps are cleaned automatically. When
you switch off the ignition, the automatic
headlamp cleaning syste mis reset and count-
ing is resumed from 0. Combination switch
Turn signals :
Main-beam headlamps
; Turn signal, right
= Headlamp flasher
? Turn signal, left
X To indicate briefly: press the combination
switch briefly to the pressure point in the
direction of arrow ;or?.
The corresponding turn signal flashes three
times.
X To indicate: press the combination switch
beyond the pressure point in the direction
of arrow ;or?. 124
Exterior lightingLights and windscreen wipers
Page 188 of 409

Making adjustments in 10 km/h incre-
ments
X Briefly press the cruise control lever
beyond the pressure point, up :for a
higher speed or down ?for a lower speed.
or
X Keep the cruise control leve rpressed
beyond the pressure point until the desired
speed is set. Press the cruise control lever
up : for a higher speed or down ?for a
lower speed.
Deactivating variable SPEEDTRONIC
There are several ways to deactivate variable
SPEEDTRONIC:
X Briefly press the cruise control leve rfor-
wards B.
or
X Briefly press the cruise control lever in the
direction of arrow A.
LIM indicator lamp ;in the cruise control
lever goes out. Variable SPEEDTRONIC is
deactivated.
Cruise control or DISTRONIC PLUS is selec-
ted.
Variable SPEEDTRONIC is automatically
deactivated if:
R you depress the accelerator pedal beyond
the pressure point (kickdown), but only if
your current speed does not differ by more
than 20 km/h from the stored speed. You
will hear a warning tone if this is the case.
R on vehicles with manual transmission, if
you shift to a higher gear and as a result,
the engine speed is too low. G
WARNING
It is not possible to deactivate variable Speed-
tronic by braking.
i The last speed stored is cleared when you
switch off the engine. Permanent SPEEDTRONIC You can use the on-board computer to limit
the speed permanently to
avalue between
160 km/h(e.g. for driving on winter tyres) and
the maximum speed ( Ypage 246).
Shortly before the store dspeed is reached, it
appears in the multifunction display.
Permanent SPEEDTRONIC remains active,
even if variable SPEEDTRONIC is deactivated.
You cannot exceed the stored limit speed,
even if you depress the accelerator pedal
beyond the pressure point (kickdown). DISTRONIC PLUS
Important safety notes DISTRONIC PLUS regulates the speed and
automatically helps you maintain the dis-
tance to the vehicle detected in front. DIS-
TRONIC PLUS brakes automatically so that
the set speed is not exceeded.
On long and steep downhill gradients, espe-
cially if the vehicle is laden or towing a trailer,
you must select shift range
1,2or 3in good
time. By doing so, you will make use of the
braking effec tofthe engine. This relieves the
load on the brake system and prevents the
brakes from overheating and wearing too
quickly.
If DISTRONIC PLUS detects a slower-moving
vehicle in front, your vehicle is braked in order
to maintain the preset distance to the vehicle
in front. G
WARNING
Do not change down for additional engine
braking on a slippery road surface. This could
cause the drive wheels to lose their grip and
the vehicle could skid. G
WARNING
DISTRONIC PLUS is only an aid designed to
assist driving. The driver remains fully respon-
sible for the vehicle's distance from other Driving systems
185Driving and parking
Z
Page 211 of 409

R
if you are currently using COMAND APS or
making a telephone call with COMAND APS
R if the time has been set incorrectly
R in active driving situations, such as when
you change lanes or change your speed
Warning and display messages in the
multifunction display Example: vehicles featuring automatic transmis-
sion with a DIRECT SELECT lever
X Activate ATTENTION ASSIST using the on-
board computer (Y page 242).
Symbol :appears in the multifunction
display.
If ATTENTION ASSIST is active, you will be
warned no sooner than 20 minutes after your
journey has begun. You will the nhear an
intermittent warning tonet wice, and the
Attention Assist: Time for a break? message appears in the multifunction dis-
play.
X
If necessary, take a break.
X Press the abutton to confirm th emes-
sage.
On long journeys, take regular breaks in good
time to allow yourself to rest properly. If you
do not take a break, you will be warned again
after 15 minutes at the earliest. This will only
happen if ATTENTION ASSIST still detects
typical indicators of fatigue or increasing lap-
ses in concentration.
ATTENTION ASSIST is reset and starts
assessing your tiredness again when you con-
tinue your journey if:
R you switch off the engine.
R you take off your seat belt and open the
driver's door, e.g. for a change of drivers or
to take a break. Speed Limit Assist
Important safety notes Speed Limit Assist shows you detected speed
limits in the multifunction display. Data from
the navigation system is also used for this
purpose. If a traffic sign indicating a speed
limit or the end of a speed limit is detected,
it is shown in the multifunction display. If
Speed Limit Assist does not detec tany traffic
signs, the speed limit from the digital road
map is take nand shown in the display.
Speed Limit Assist detects the traffic signs
with a camera attached behind the top of the
windscreen. :
Speed Limit Assist camera G
WARNING
Speed Limit Assist is onl yanaid and may
detect speed limit signs incorrectly or not at
all.
The system may be impaired or may not func-
tion if:
R there is poor visibility, e.g. due to snow,
rain, fog or spray.
R there is glare, e.g. from the sun or from
oncoming traffic.
R the windscreen is dirty, misted up or cov-
ered, for instance by a sticker, in the vicinity
of the camera.
R the traffic signs are covered, for instance
by dirt, snow or trees. 208
Driving systemsDriving and parking
Page 238 of 409
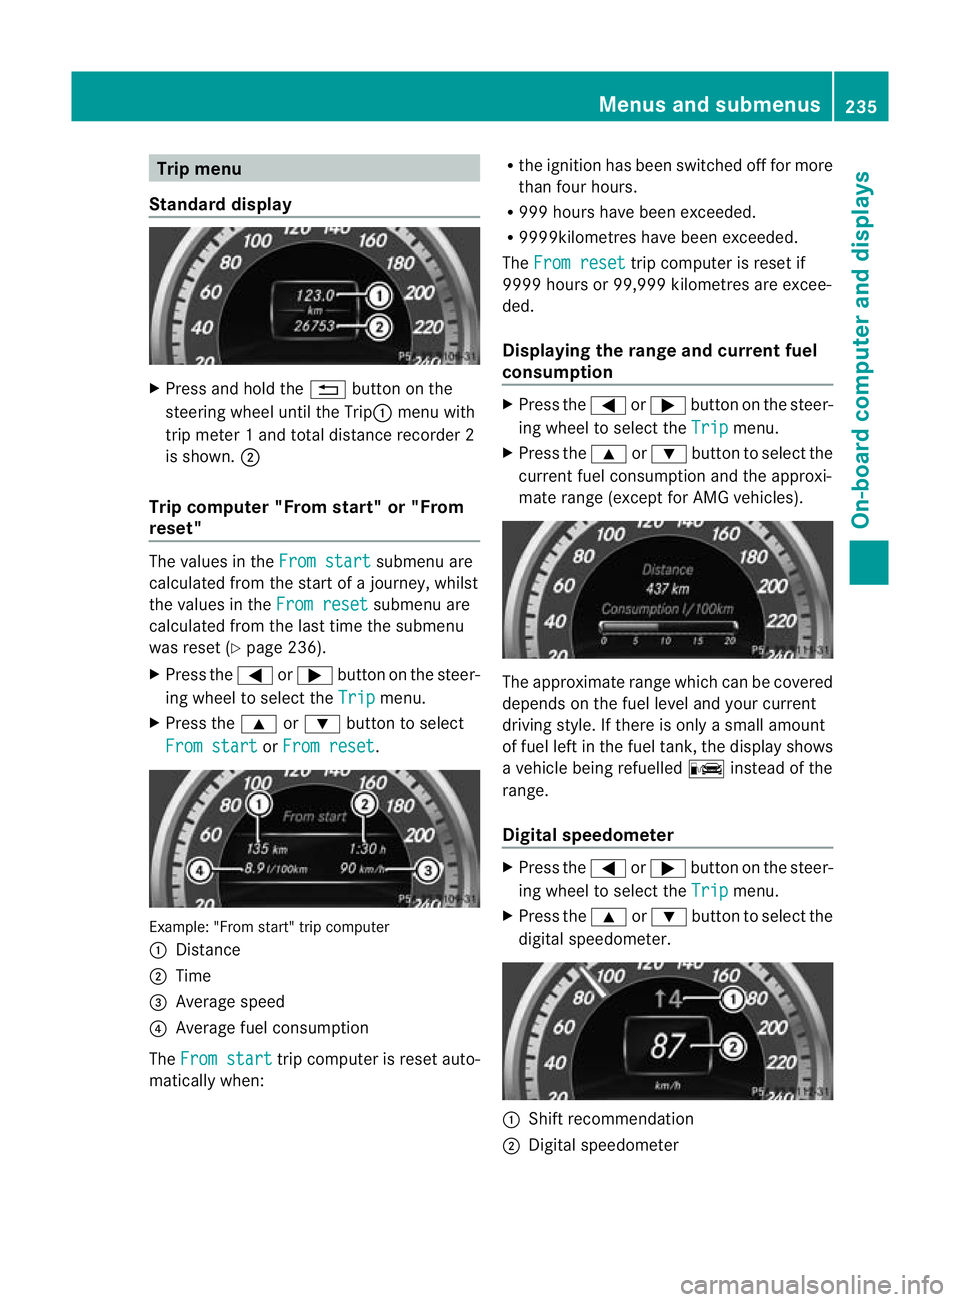
Trip menu
Standard display X
Press and hold the %button on the
steering wheel until the Trip: menu with
trip meter 1 and total distance recorder 2
is shown. ;
Trip computer "From start" or "From
reset" The values in the
From start submenu are
calculated fro mthe start of a journey, whilst
the values in the From reset submenu are
calculated from the last time the submenu
was reset (Y page 236).
X Press the =or; button on the steer-
ing wheel to select the Trip menu.
X Press the 9or: button to select
From start or
From reset .
Example: "From start" trip computer
:
Distance
; Time
= Average speed
? Average fuel consumption
The From start trip computer is reset auto-
matically when: R
the ignition has been switched off for more
than four hours.
R 999 hours have been exceeded.
R 9999kilometres have been exceeded.
The From reset trip computer is reset if
9999 hours or 99,999 kilometres are excee-
ded.
Displaying the range and current fuel
consumption X
Press the =or; button on the steer-
ing wheel to select the Trip menu.
X Press the 9or: button to select the
current fuel consumption and the approxi-
mate range (except for AMG vehicles). The approximate range which can be covered
depends on the fuel level and your current
driving style. If there is only a small amount
of fuel left in the fuel tank, the display shows
a vehicle being refuelled
Cinstead of the
range.
Digital speedometer X
Press the =or; button on the steer-
ing wheel to select the Trip menu.
X Press the 9or: button to select the
digital speedometer. :
Shift recommendation
; Digital speedometer Menus and submenus
235On-board computer and displays Z
Page 239 of 409
.
Resetting values Y")
i
If the gearshift recommendation is shown
in the multifunction display, it is not shown
in the status bar.
For further information on gearshift recom-
mendations, see (Y page 164).
Resetting values You can reset the values of the following func-
tions:
R
trip meter
R trip computer "From start"
R trip computer "From reset"
X Press the =or; button on the steer-
ing wheel to select the Trip menu.
X Press the 9or: button to select the
function that you wish to reset.
X Press a. Example: resetting the trip computer "From start"
X
Press :to select Yes and press
a
to confirm. Navigation menu
Displaying navigation instructions In the
Navi menu, the multifunction display
shows navigation instructions. For more
information, see the separate operating
instructions.
X Switch on the audio system or COMAND
APS (see the separate operating instruc-
tions).
X Press the =or; button on the steer-
ing wheel to select the Navi menu.Route guidance not active :
Direction of travel
; Current street
Activated route guidance No change of direction announced
:
Distance to the destination
; Distance to the next change of direction
= Current street
? Symbol "follow the road's course"
Change of direction announced without a
lane recommendation :
Road to which the change of direction
leads
; Distance to change of direction and visual
distance display
= Current street
? Change-of-direction icon
When a change of direction has been
announced, you will see visuald istance dis-
play ;next to the symbol for change of
direction ?.This shortens from the bottom 236
Menus and submenusOn-board computer and displays
Page 252 of 409

X
Press the abutton to confirm.
X Press the :or9 button to select the
Easy Entry/Exit function.
If the Easy Entry/Exit function is activa-
ted, the vehicle steering wheel is displayed
in red in the multifunction display.
X Press the abutton to save the setting.
Switching the belt adjustment on/off
For further information on belt adjustment,
see (Y page 51).
X Press the =or; button on the steer-
ing wheel to select the Settings menu.
X Press the :or9 button to select the
Convenience submenu.
X Press the abutton to confirm.
X Press the :or9 button to select the
Belt adjustment function.
When the Belt adjustment function is
activated, the vehicle seat belt is displayed
in red in the multifunction display.
X Press the abutton to save the setting.
Switching the fold in mirrors when lock-
ing function on/off
If you switch on the Auto. fold in function,
the exterior mirrors fold in when you lock the
vehicle. When you unlock the vehicle and then
open the driver's or front-passenger door, the
exterior mirrors fold out again.
If you have switched the function on and you
fold the exterior mirrors in using the button
on the door (Y page 117), they will not fold
out automatically. The exterior mirrors can
then only be folded out using the button on
the door.
X Press the =or; button on the steer-
ing wheel to select the Settings menu.
X Press the :or9 button to select the
Convenience submenu.
X Press the abutton to confirm. X
Press the :or9 button to select the
Auto. fold in function.
If the Auto. fold in function is activated,
the vehicle's exterior mirror is displayed in
red in the multifunction display.
X Press the abutton to save the setting.
Resetting to factor ysettings For safety reasons, no
tall functions are reset:
the Limit speed (winter tyres) function
in permanent SPEEDTRONIC can only be set
in the Vehicle submenu. If you want to reset
the Day lights function in the
Light sub-
menu, you must tur nthe key in the ignition
lock to position 1.
X Press the =or; button on the steer-
ing wheel to select the Settings menu.
X Press the :or9 button to select the
Factory setting submenu.
X Press the abutton to confirm.
The Reset all settings? message
appears.
X Press the :or9 button to select
No or
Yes .
X Press the abutton to confirm the selec-
tion.
If you have selected Yes , the multifunction
display shows a confirmation message. AMG menu in AMG vehicles
AMG displays X
Press =or; on the steering wheel
to select the AMG menu.
:
Digital speedometer
; Gear indicator Menus and submenus
249On-board computer and displays Z
Page 254 of 409

= Lap
i It is possible to store a maximum of six-
teen laps. The 16th lap can only be com-
pleted with Finish Lap .
Stopping the RACETIMER
X Press the %button")
:
RACETIMER
; Fastest lap time (bes tlap)
= Lap
i It is possible to store a maximum of six-
teen laps. The 16th lap can only be com-
pleted with Finish Lap .
Stopping the RACETIMER
X Press the %button on the steering
wheel. X
Press ato confirm Yes .
The RACETIMER interrupts timing when you
stop the vehicle and tur nthe key to position
1 in the ignition lock. When you turn the key
to position 2or 3and then press the ato
confirm Start , timing is continued.
Resetting the current lap
X Stop the RACETIMER.
X Press =or; to select Reset Lap .
X Press ato reset the lap time to "0”.
Deleting all laps
If you switch off the engine, the RACETIMER
is reset to "0" after 30 seconds. All laps are
deleted.
You cannot delete individual stored laps. If
you have stopped 16 laps, the current lap
does not have to be reset. X
Reset the current lap.
X Press ato confirm Reset .
Reset Race Timer? appears in the multi-
function display. X
Press the :button to select Yes and
press the abutton to confirm.
All laps are deleted.
Overall evaluation This function is shown if you have stored at
least one lap and stopped the RACETIMER.
X
Press =or; on the steering wheel
to select the AMG menu.
X Press the 9button repeatedly until the
overall evaluation is shown. :
RACETIMER overall evaluation
; Total time driven
= Average speed
? Distance covered
A Top speed Menus and submenus
251On-board computer and displays Z