steering MERCEDES-BENZ E-CLASS SALOON 2011 Workshop Manual
[x] Cancel search | Manufacturer: MERCEDES-BENZ, Model Year: 2011, Model line: E-CLASS SALOON, Model: MERCEDES-BENZ E-CLASS SALOON 2011Pages: 409, PDF Size: 10.47 MB
Page 221 of 409

The course-correcting brake application is
available in the range between 30 km/ha nd
200 km/h.
If a course-correcting brake application
occurs, red warning lamp :flashes in the
exterio rmirro rand the following is shown in
the multifunctio ndisplay, for example: Example: vehicles featuring automatic transmis-
sion with a DIRECT SELECT lever G
WARNING
Active Blind Spot Assist is only an aid
designed to assist driving. It is not a substitute
for attentive driving. Automatic braking by the
system may not always be sufficien tto avoid
a collision. In such cases, you need to steer,
brake or accelerate yourself.
In very rare cases, the system may detect a
risk of collision where there is none and brake
in error near crash barriers or similar road
boundaries. Active Blind Spot Assist cannot
detect all traffic situations and road users.
Ensure at all times that there is sufficient lat-
eral distance between you and other road
users or obstacles. You can, for example,
countersteer gently or depress the accelera-
tor pedal at any time to cancel inappropriate
braking action.
You are responsible for the vehicle's speed,
correc tsteering and for braking in good time.
Always adap tyour driving style to suit the
prevailing road and weather conditions.
Always pay attention to traffic conditions and
your surroundings. Otherwise, you may fail to
recognise dangers in time, cause an accident
and injure yourself and others. Either a very slight course-correcting brake
application, or none at all, may occur if:
R
there are vehicles or obstacles, e.g. crash
barriers, on both sides of your vehicle.
R a vehicle approaches too closely on the
side.
R you have adopted a sporty driving style with
high cornering speeds.
R you brake or accelerate decisively.
R a driving safety system intervenes, such as
ESP ®
or PRE-SAFE ®
Brake.
R ESP ®
is deactivated.
R a loss of tyre pressure or a defective tyre is
detected.
Activating Active Blind Spot Assist
X Make sure that the radar sensor system
(Y page 247) and Active Blind Spot Assist
(Y page 242) are activated in the on-board
computer.
X Turn the key to position 2in the ignition
lock.
Warning lamps :in the exterior mirrors
light up red for approximately
1.5 seconds and then turn yellow.
Trailer towing
If you attach a trailer, make sure that you have
correctly established the electrical connec-
tion. This can be accomplished by checking
the trailer lighting. Active Blind Spot Assist is
then deactivated. The indicator lamp in the
exterior mirrors lights up yellow, and the
Active Blind Spot Assist currently unavailable See Owner's Manual mes-
sage appears in the multifunction display.
Active Lane Keeping Assist Important safety notes
Active Lane Keeping Assist monitors the area
in front of your vehicle by means of a camera
mounted at the top of the windscreen. Active
Lane Keeping Assist detect slane markings on
the road and warns you before you leave your
lane unintentionally. If you do no treact to the 218
Driving systemsDriving and parking
Page 222 of 409

warning, a lane-correcting applicatio
nofthe
brakes can bring the vehicle back into the
original lane. :
Active Lane Keeping Assist camera
If you have selected the Display unitSpeed-/odometer (Y
page 243) function in
the on-board computer and select km as the
unit of measurement, Active Lane Keeping
Assist is active from speeds of 60 km/h. If
the miles display unit is selected, the assis-
tance range begins at 40 mph. G
WARNING
Active Lane Keeping Assist does not keep
your vehicle in its lane. It is only an aid and
may detect the lane markings on the road
incorrectly or not at all.
The system may be impaired or may not func-
tion if:
R several or no lane markings for a single lane
are present.
R there is poor visibility, e.g. due to insuffi-
cient illumination of the road, or due to
snow, rain, fog or spray.
R there is glare, e.g. from oncoming traffic,
the sun, or reflection from other vehicles.
R the windscreen is dirty, misted up or cov-
ered, for instance by a sticker, in the vicinity
of the camera.
R the lane markings are worn away, dark or
covered up, e.g. by dirt or snow.
R the distance to the vehicle in front is too
small and the lane markings thus cannot be
detected. R
the lane markings on the road are unclear,
e.g. near roadworks.
R the lane markings change quickly, e.g.
lanes branch off, cross one another or
merge.
R the road is narrow and winding.
Active Lane Keeping Assist cannot detect
road and traffic conditions. It is not a substi-
tute for attentive driving. You are responsible
for the vehicle's speed, braking in good time,
and steering correctly. Always adapt your
driving style to suit the prevailing road and
weather conditions. Always pay attention to
traffic conditions and your surroundings. Oth-
erwise, you may fail to recognise dangers in
time, cause an accident and injure yourself
and others.
Warning vibration in the steering wheel
A warning may be given if a front wheel
passes over a lane marking. It will warn you
by means of intermittent vibration in the
steering wheel for up to 1.5 seconds.
In order that you are warned only when nec-
essary and in good time if you cross the lane
marking, the system recognises certain con-
ditions and warns you accordingly.
The warning vibration occurs earlier if:
R you approach the outer lane marking on a
bend.
R the road has very wide lanes, e.g. a motor-
way.
R the system recognises solid lane markings.
The warning vibration occurs later if:
R the road has narrow lanes.
R you cut the corner on a bend.
No warning vibration occurs if:
R you clearly and actively steer, brake, or
accelerate.
R you cut the corner on a sharp bend. Driving systems
219Driving and parking Z
Page 223 of 409

R
a driving safety system intervenes, such as
ABS, BAS or ESP ®
.
R you have switched on the tur nsignals .In
this event, the warnings are suppressed for
a certai nperiod of time.
Lane-correcting brake application
If you leave your lane under certain circum-
stances, the vehicle will brake briefly on one
side. This is designed to help you bring the
vehicle back into the original lane.
This function is available in the range between
60 km/h and 200 km/h.
A lane-correcting brake application can only
be made after driving over a solid, recognis-
able lane marking. Befor ethis, a warning
must be emitted by means of intermittent
vibration in the steering wheel. In addition, a
lane with lane markings on both sides must
be recognised. The brake application also
slightly reduces driving speed.
If a lane-correcting brake application occurs,
the following appears in the multifunction dis-
play: Example: vehicles featuring automatic transmis-
sion with a DIRECT SELECT lever
i
A further lane-correcting brake applica-
tion can only occur after your vehicle has
returned to the original lane. G
WARNING
Active Lane Keeping Assist does not keep
your vehicle in its lane. It is only an aid
designed to assist driving. It is not a substitute
for attentive driving. Corrective braking may
not always be sufficient to return your vehicle
to its original lane. In such cases, you must
steer the vehicle yourself to ensure that it
does not leave the lane. Active Lane Keeping Assist cannot detect the
current traffic situation or other road users.
Ensure at all times that there is sufficient lat-
eral distance between you and other road
users or obstacles. In rare cases, broken lines
or certain structures on the road surface may
be detected by the system as solid lane mark-
ings. You can, for example, countersteer gen-
tly at any time to cancel inappropriate braking
action, e.g. if you intentionally drive across a
solid lane marking.
Active Lane Keeping Assist cannot take
weather conditions into account.
You are responsible for the vehicle's speed,
correct steering and for braking in good time.
Always adapt your driving style to suit the
prevailing road and weather conditions.
Always pay attention to traffic conditions and
your surroundings. Otherwise, you may fail to
recognise dangers in time, cause an accident
and injure yourself and others.
No lane-correcting brake application occurs
if:
R you clearly and actively steer, brake, or
accelerate.
R you cut the corner on a sharp bend.
R you have switched on the turn signals.
R a driving safety system intervenes, such as
ESP ®
, PRE-SAFE ®
Brake or Active Blind
Spot Assist.
R you have adopted a sporty driving style with
high cornering speeds or high rates of
acceleration.
R on vehicles with a trailer tow hitch, the
electrical connection to the trailer has been
correctly established.
R ESP ®
is deactivated.
R the transmission is not in position D.
R a loss of tyre pressure or a defective tyre
has been detected and displayed. 220
Driving systemsDriving and parking
Page 225 of 409

The vehicle/trailer combination:
R
is heavier
R is restricted in its acceleration and gradi-
ent-climbing capability
R has an increased braking distance
R is affected more by strong crosswinds
R demands more sensitive steering
R has a larger turning circle
As a result, the handling characteristics may
be impaired and you may lose control of the
vehicle. This could lead to an accident with
serious or even fatal injuries.
When towing a trailer, always adjust your
speed to the current road and weather con-
ditions. Do not exceed the maximum permis-
sible speed for your vehicle/trailer combina-
tion. G
WARNING
Never depress the brake pedal continuously
while the vehicle is in motion, e.g. never cause
the brakes to rub by applying constant slight
pedal pressure. This causes the brake system
to overheat, increases the braking distance
and can lead to the brakes failing completely. G
WARNING
On no account should you attempt to draw the
vehicle/trailer combination out by increasing
speed. G
WARNING
If you exceed the maximum noseweight when
using a carrier system on the ball coupling:
R the carrier system may be thrown around.
R the ball coupling and the carrier system
may become detached from the vehicle.
As a result, you may injure others or cause an
accident.
Do not exceed the maximum noseweight.
When driving with a loaded carrier system,
always adjust your driving style to the prevail- ing road, traffic and weather conditions and
drive particularly carefully.
You can use carrier systems, e.g. bicycle
racks or load-bearing implements, on the ball
coupling. The maximum noseweight of
75 kg applies when using carrier systems on
the ball coupling.
General notes i
When towing a trailer, set the tyre pres-
sure on the rear axle of the towing vehicle
for a maximum load; see the tyre pressure
table in the fuel filler flap (Y page 365).
You will find installation dimensions and loads
in the "Technical data" section
(Y page 395).
The maximum noseweight of the trailer draw-
bar on the ball coupling is 84 kg 21
. However,
the actual noseweight must not exceed the
value given on the trailer tow hitch or trailer
identification plates. The lowest weight
applies.
! Use a drawbar noseweight as close as
possible to the maximum permissible nose-
weight. Do not use a noseweight of less
than 50kg, otherwise the trailer may come
loose.
Note that the payload and the rear axle load
are reduced by the actual payload.
Please note that when towing a trailer, PARK-
TRONIC (Y page 200), parking guidance
(Y page 203) and Blind Spot Assist
(Y page 212) are only available with limita-
tions, or not at all.
i On vehicles without level control, the
height of the ball coupling will alter accord-
ing to the load placed on the vehicle. If nec-
essary, use a trailer with a height-adjusta-
ble drawbar.
21 Missing values for the E300 model were not available at the time of going to print. 222
Towing
atrailerDriving an d parking
Page 234 of 409

or on bridges. If you do not adapt your driving
style to the conditions, the vehicle could skid.
For this reason, adapt your driving style and
speed to the weather conditions.
Changes in the outside temperature are dis-
played after a short delay. Speedometer with segments
The segments in the speedometer indicate
which speed range is available.
Cruise control (Y page 181) activated:
The segments light up from the stored speed
to the maximum speed.
Variable SPEEDTRONIC (Y page 183) activa-
ted:
The segments light up from the start of the
scale to the selected limit speed.
DISTRONIC PLUS (Y page 185) activated:
One or two segments in the set speed range
light up.
DISTRONIC PLUS detects a vehicle in front:
The segments between the speed of the vehi-
cle in front and the stored speed light up. Operating the on-board computer
Overview The on-board computer is activated as soon
as you turn the key to position 1in the ignition
lock.
You can control the multifunction display and
the settings in the on-board computer using
the buttons on the multifunction steering
wheel. :
Multifunction display
; Right control panel
= Switches on LINGUATRONIC; see the sep-
arate operating instructions
? Back button
A Left control panel
Left control panel =
; R
Calls up the menu and menu bar 9
:
Press briefly:
R
Scrolls through lists
R Selects a submenu or function
R In the Audio menu: selects a
stored station, an audio track or
a video scene
R In the Tel (telephone) menu:
switches to the phone book and
selects a name or telephone
number Displays and operation
231On-board computer and displays Z
Page 235 of 409
 menu:
starts rapid scrolling throug")
9
:
Press and hold:
R
In the Audio menu: selects the
previous/next station or selects
an audio track or a video scene
using rapid scrolling
R In the Tel (telephone) menu:
starts rapid scrolling through the
phone book a R
Confirms selection/display mes-
sage
R In the Tel (telephone) menu:
switches to the telephone book
and starts dialling the selected
number
R In the Audio menu: stops the
station search function at the
desired station Right control panel
~ R
Rejects or ends a call
R Exits telephone book/redial
memory 6 R
Makes or accepts a call
R Switches to the redial memory W
X R
Adjusts the volume 8 R
Mute Back button
%
Press briefly:
R
Back
R Switches off LINGUATRONIC;
see the separate operating
instructions
R Hides display messages or calls
up the last Trip menu function
used
R Exits the telephone book/redial
memory %
Press and hold:
R
Calls up the standard display in
the Trip menu
Multifunction display
Values and settings as well as display mes-
sages are shown in the multifunction display. Example: DIRECT SELECT automatic transmission
multifunction display
:
Description field
; Menu bar
= Drive program
? Transmission position
A Outside temperature or speed
(Ypage 243)
X To show menu bar ;:press the =
or ; button on the steering wheel.
The indicators in the lower part of the display
differ from those shown here, depending on
the transmission. 232
Displays and operationOn-board computer and displays
Page 238 of 409
Trip menu
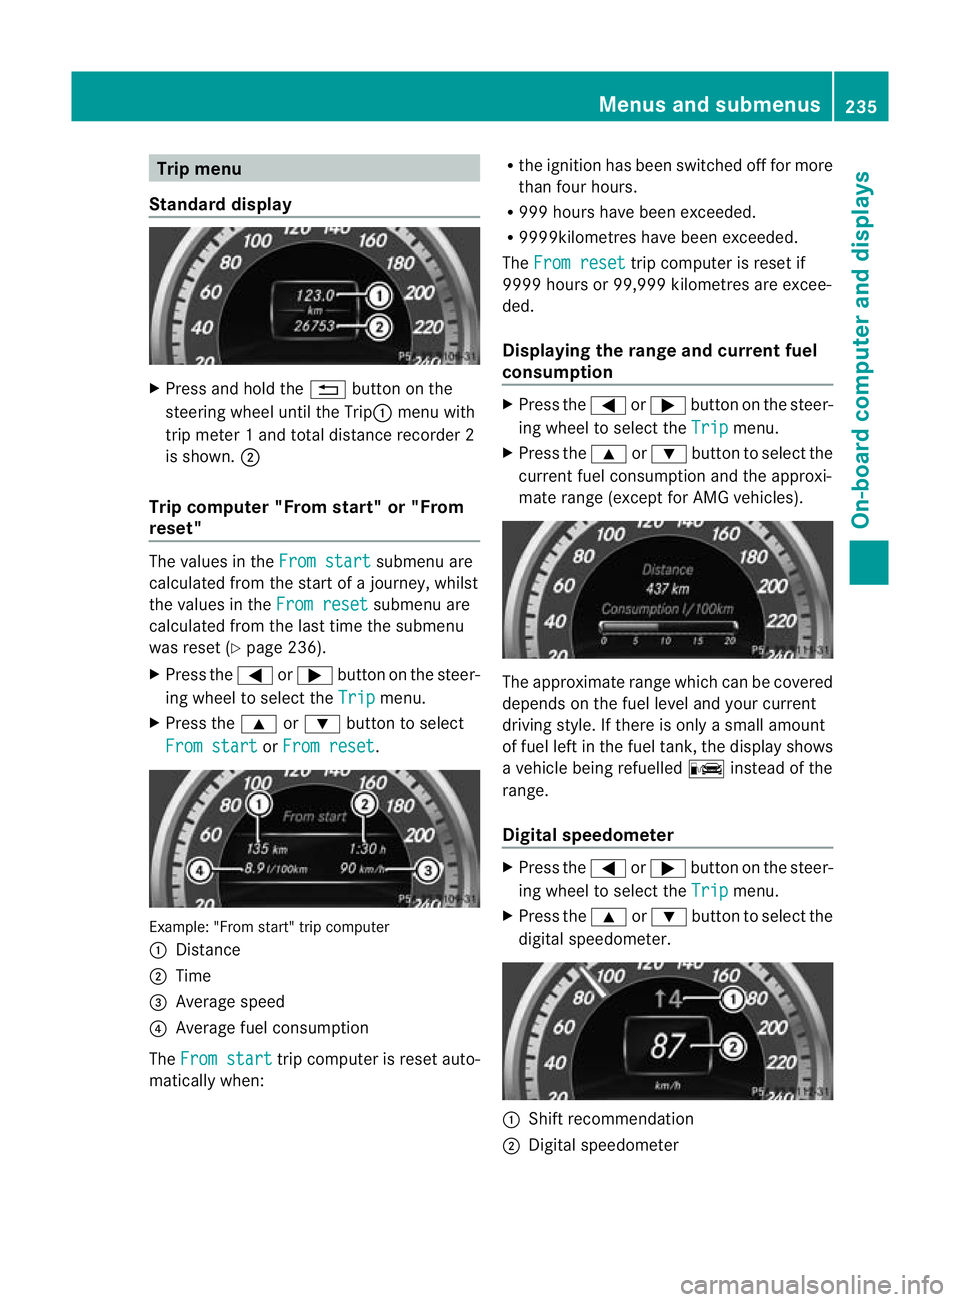
Standard display X
Press and hold the %button on the
steering wheel until the Trip: menu with
trip meter 1 and total distance recorder 2
is shown. ;
Trip computer "From start" or "From
reset" The values in the
From start submenu are
calculated fro mthe start of a journey, whilst
the values in the From reset submenu are
calculated from the last time the submenu
was reset (Y page 236).
X Press the =or; button on the steer-
ing wheel to select the Trip menu.
X Press the 9or: button to select
From start or
From reset .
Example: "From start" trip computer
:
Distance
; Time
= Average speed
? Average fuel consumption
The From start trip computer is reset auto-
matically when: R
the ignition has been switched off for more
than four hours.
R 999 hours have been exceeded.
R 9999kilometres have been exceeded.
The From reset trip computer is reset if
9999 hours or 99,999 kilometres are excee-
ded.
Displaying the range and current fuel
consumption X
Press the =or; button on the steer-
ing wheel to select the Trip menu.
X Press the 9or: button to select the
current fuel consumption and the approxi-
mate range (except for AMG vehicles). The approximate range which can be covered
depends on the fuel level and your current
driving style. If there is only a small amount
of fuel left in the fuel tank, the display shows
a vehicle being refuelled
Cinstead of the
range.
Digital speedometer X
Press the =or; button on the steer-
ing wheel to select the Trip menu.
X Press the 9or: button to select the
digital speedometer. :
Shift recommendation
; Digital speedometer Menus and submenus
235On-board computer and displays Z
Page 242 of 409
, or set
up")
Telephone menu
Introduction Functions and displays ar
edependen tonthe
optional equipment installed in your vehicle.
You can place your mobile phone in the
mobile phone bracket (Y page 312), or set
up a Bluetooth ®
connection to the audio sys-
tem or COMAND APS (see the separate oper-
ating instructions).
i You can obtain further information about
suitable mobile phones and connecting
mobile phones via Bluetooth ®
:
R in any Mercedes Benz Service Centre
R on the Internet at http://
www.mercedes-benz.com/connect G
WARNING
Observe the legal requirements of the country
in which you are currently driving regarding
the use of mobile phones in the vehicle.
If it is permitted to use mobile phones while
the vehicle is in motion, you should only use
them when the road and traffic conditions
allow.O therwise, you may be distracted from
the traffic conditions, cause an accident and
injure yourself and others.
X Switch on the mobile phone and audio sys-
tem or COMAND APS (see the separate
operating instructions).
X Press the =or; button on the steer-
ing wheel to select the Tel menu.
You will see one of the following display mes-
sages in the multifunctio ndisplay:
R Please enter PIN :t
he mobile phone has
been placed in the mobile phone bracket
and the PIN has not been entered.
X Enter the PIN using the mobile phone, LIN-
GUATRONIC, the audio system or
COMAND APS.
The mobile phone will search for a network. R
Telephone ready or the name of the net-
work provider: the mobile phone has found
a network and is ready to receive.
R Telephone No Service : no network is
available, or the mobile phone is searching
for a network.
Accepting acall If someone calls you whe
nyou are in the
Tel menu, a display message appears in the
multifunction display, for example: X
Press the 6button on the steering
wheel to accept an incoming call.
If you are not in the Tel menu, you can still
accept a call.
Rejecting or ending acall X
Press the ~button on the steering
wheel.
If you are not in the Tel menu, you can still
reject or end a call.
Dialling anumber from the phone book If you
rmobile phone is able to receive calls,
you can search for and dial a number from the
phone book in the audio system or COMAND
Online.
X Copy the telephone book of the mobile
phone into the audio system or to COMAND
APS (see the separate operating instruc-
tions).
X Press the =or; button on the steer-
ing wheel to select the Tel menu.
X Press the 9,:ora button to call
up the phone book. Menus and submenus
239On-board computer and displays Z
Page 243 of 409

X
Press the 9or: button to select the
desired name.
To start scrolling rapidly, press and hold the
9 or: button for longer than one
second. After a short time, rapid scroll
speeds up.
Rapid scrolling stops when you release the
button or reach the end of the list.
X If only one telephone number is stored
for a name: press the6ora button
to start dialling.
or
X If there is more than one number for a
particular name: press the6ora
button to display the numbers.
X Press the 9or: button to select the
number you want to dial.
X Press the 6ora button to start dial-
ling.
or
X If you do not want to make a call: press
the ~ or% button.
Redialling The on-board computer saves the last names
or numbers dialled in the redial memory.
X
Press the =or; button on the steer-
ing wheel to select the Tel menu.
X Press the 6button to switch to the
redial memory.
X Press the 9or: button to select the
desired name or number.
X Press the 6ora button to start dial-
ling.
or
X If you do not want to make a call: press
the ~ or% button. Assistance menu
Introduction In the
Assist. menu you can:
R display Speed Limit Assist and activate/
deactivate the message function of Speed
Limit Assist
R show the distance display
R activate/deactivate ESP ®
R activate/deactivate PRE-SAFE ®
Brake
R activate/deactivate ATTENTION ASSIST
R activate/deactivate Blind Spot Assist or
Active Blind Spot Assist
R activate/deactivate Lane Keeping Assist or
Active Lane Keeping Assist
Speed Limit Assist Displaying Speed Limit Assist
In the
Speed Lim. Asst. function, a detec-
ted speed limit is displayed under certain
conditions (Y page 208).
X Press =or; on the steering wheel
to select the Assist. menu.
X Press 9or: to select Speed Lim.
Asst. .
X Press a.
The multifunction display shows Speed
Limit Assist.
Activating/deactivating the Speed Limit
Assist message function
You can set Speed Limit Assist (Y page 208)
to display a detected speed limit automati-
cally for five seconds. Other messages in the
multifunction display will be faded out for this
length of time. 240
Menus and submenusOn-board computer and displays
Page 244 of 409

X
Press =or; on the steering wheel
to select the Assist. menu.
X Press 9or: to select Speed Lim.
Asst. .
X Press a.
The multifunction display shows Speed
Limit Assist.
X Press :.
The curren tselection is displayed.
X To activate or deactivate: pressa.
If Speed Limit Assist is operational and the
message function is activated, the multifunc-
tion display shows the Äsymbol when the
ignition is switched on.
Showing the distance display This function is only available with DIS-
TRONIC PLUS.
X
Press =or; on the steering wheel
to select the Assist. menu.
X Press the 9or: button to select
Distance display .
X Press a.
The DISTRONIC PLUS distance display
(Y page 191) appears in the multifunction
display.
Deactivating/activating ESP ®G
WARNING
If the ä warning lamp in the instrument
cluster flashes, proceed as follows:
R do not deactivate ESP ®
under any circum-
stances.
R only depress the accelerator pedal as far as
necessary when pulling away.
R adapt your driving style to suit the prevail-
ing road and weather conditions.
Otherwise, the vehicle could skid.
ESP ®
cannot reduce the risk of an acciden tif
you drive too fast. ESP ®
cannot override the
laws of physics. Activating/deactivatin
gESP®
on AMG vehi-
cles (Y page 73).
For further information about ESP ®
, see
(Y page 72).
X Start the engine.
X Press =or; on the steering wheel
to select the Assist. menu.
X Press the 9or: button to select
ESP .
X Press the abutton.
X To deactivate: pressaagain.
The å warning lamp in the instrument
cluster comes on. G
WARNING
If the å warning lamp in the instrument
cluster lights up when the engine is running,
ESP ®
is deactivated or is unavailable due to a
malfunction. The risk that your vehicle may
start to skid then increases in certain situa-
tions.
Always adap tyour driving style to the prevail-
ing road and weather conditions.
X To activate: pressaagain.
The å warning lamp in the instrument
cluster goes out.
Activating/deactivating the PRE-SAFE ®
Brake PRE-SAFE
®
Brake is only available in vehicles
with DISTRONIC PLUS.
X Press =or; on the steering wheel
to select the Assist. menu.
X Press 9or: to select PRE-SAFE Brake .
X Press the abutton.
The current selection is displayed.
X To activate/deactivate: pressa
again.
When PRE-SAFE ®
Brake (Y page 75) is acti-
vated, the multifunction display shows the Menus and submenus
241On-board computer and displays Z