oil temperature MERCEDES-BENZ E-CLASS SALOON 2011 Owners Manual
[x] Cancel search | Manufacturer: MERCEDES-BENZ, Model Year: 2011, Model line: E-CLASS SALOON, Model: MERCEDES-BENZ E-CLASS SALOON 2011Pages: 409, PDF Size: 10.47 MB
Page 14 of 409

Display message
............................ 264
Filling capacity ............................... 389
Notes about oil grades ................... 388
Notes on oil level/consumption ....322
Temperature (on-board computer) .249
Topping up ..................................... 323
Viscosity ........................................ 390
Environmental protection
Note ................................................ .23
Returning an end-of-life vehicle .......23
ESP ®
(Electronic Stability Pro-
gram) AMG menu (on-board computer) ...250
Deactivating/activating (AMG
vehicles) .......................................... 73
Deactivating/activating (except
AMG vehicles) ................................ 241
Deactivating/activating (notes;
except AMG vehicles) ......................72
Display message ............................ 254
ETS/4ETS ........................................ 72
Function/notes ................................ 72
Important safety guidelines .............72
Trailer stabilisatio n.......................... 75
Warning lamp ................................. 283
ETS/4ETS (Electronic Traction Sys-
tem) ...................................................... 72
Exhaus ttail pipe (cleaning instruc-
tions) .................................................. 330
Exterior lighting see Lights
Exterior mirrors
Adjusting ....................................... 117
Anti-dazzle mode (automatic) ........118
Folding in/ou t(automatically) .......117
Folding in/ou t(electrically) ...........117
Folding in whe nlocking (on-board
computer) ...................................... 249
Out of position (troubleshooting) ...118
Parking position ............................. 118
Resetting ....................................... 117
Storing settings (memory func-
tion) ............................................... 119 F
Fatigue Assist see ATTENTION ASSIST
Faul tmessage
see Display messages
Filler cap
see Fuel filler flap
Fire extinguisher ............................... 337
First-aid kit ......................................... 336
Flat tyre Changing a wheel/fitting the
spare wheel ................................... 344
MOExtended run-fla tsystem ......... 349
Preparing the vehicle .....................340
Raising the vehicle .........................345
TIREFIT kit ...................................... 341
Floormat ............................................ .318
Foglamps Extended range .............................. 126
Switching on/off ........................... 123
Folding bench seat (luggage com-
partment) ........................................... 111
Frequencies Garage door opene r....................... 318
Mobile phone ................................. 381
Two-way radio ................................ 381
Front foglamps
Display message ............................ 261
Fron twindscreen
see Windscreen
Fuel
Additives ........................................ 386
Consumption statistic s.................. 235
Displaying the current consump-
tion ................................................ 235
Displaying the range ......................235
Fuel gauge ....................................... 30
Grade (petrol) ................................ 385
Important safety notes ..................384
Notes about consumption .............387
Notes for AMG vehicles .................385
Problem (malfunction) ...................175
Quality (diesel )............................... 386
Refuelling ...................................... .172
Tank content/reserve fuel .............384 Index
11
Page 18 of 409
Menu (on-board computer)
............239
Notes/placing in the bracket ......... 312
Sliding adapter ............................... 314
Transmission output (maximum) .... 381
Mobile telephone
Pre-installe dbracket ...................... 314
Modifying the programming (key) .....83
MOExtended run-flat system ...........349
Motorway mode ................................ 126
MP3 Operating ...................................... .238
see Separate operating instructions
Multicontour seat .............................. 109
Multifunction display Function/notes ............................. 232
Permanent displa y......................... 243
Multifunction steering wheel
Operating the on-board computer .231
Overview .......................................... 33N
Navigation Menu (on-board computer) ............236
On-board computer .......................236
see separate operating instructions
NECK-PRO head restraints
Operation ........................................ .49
Resetting after being triggered ........49
Night View Assist Plus
Activating/deactivating .................210
Cleaning ......................................... 331
Function/notes ............................. 209
Problem (fault) ............................... 212
Notes on running in anew vehicle ..154 O
Occupant safety Childre ninthe vehicle ..................... 53
Important safety notes ....................42
Odometer ........................................... 235
see Total distance recorder
see Trip meter
Oil
see Engine oil On-board computer
AMG menu ..................................... 249
Assistance menu ........................... 240
Audi omenu ................................... 237
Convenience submenu ..................248
Displaying a service message ........325
Display messages ..........................253
DISTRONI CPLUS ........................... 191
Factory setting submenu ...............249
Heating submenu ........................... 247
Important safety notes ..................230
Instrument cluster submenu ..........243
Ligh tsubmenu ............................... 244
Menu overview .............................. 234
Message memory .......................... 253
Navigation menu ............................ 236
Operating the TV ............................ 238
Operating vide oDVD ..................... 238
Operation ....................................... 231
RACETIMER ................................... 250
Service menu ................................. 242
Settings menu ............................... 243
Standard displa y............................ 235
Telephone menu ............................ 239
Time/Date submenu .....................244
Trip menu ...................................... 235
Vehicle submenu ........................... 246
Operating safety
Diagnostics connection ...................25
Operating system
see On-board computer
Outside temperature display ...........230
Overhead control panel ......................38
Override feature Rea rside windows ........................... 69 P
Pain tcode .......................................... 382
Paintwork (cleaning instructions) ...328
Panorama sliding sunroof Important safety information ...........98
Opening/closing ............................ 100
Opening/closing the roller sun-
blind ............................................... 100
Problem (malfunction) ...................101
Rain closing feature .......................100
Resetting ....................................... 101 Index
15
Page 23 of 409
Temperature
Coolant .......................................... 230
Coolant (on-board computer) ......... 249
Engine oil (on-board computer) ...... 249
Outside temperature ..................... .230
Setting (climate control) ................141
TEMPOMAT
Function/notes ............................. 181
Theft-deterrent system
ATA (Anti-Theft Alarm system) .........77
Immobiliser ...................................... 77
Through-loading ................................ 295
Through-loading feature ...................295
Tilt/sliding sunroof see Sliding sunroof
Time (on-board computer) ................244
Timing (RACETIMER) .........................250
TIREFIT kit .......................................... 341
Top Tether ............................................ 58
Total distance recorder ....................235
Tow-away protection ..........................78
Towing Important safety notes ..................355
With the rear axle raised ................357
Towing atrailer
Activ eBlind Spot Assist .................218
Active Lane Keeping Assist ............221
Axle load, permissible ....................397
Bulb failure indicator for LED
lamps ............................................. 226
Trailer tow hitch display message ..277
Towing away
Fitting the towing eye. ...................356
Removing the towing eye. ..............357
With both axles on the ground .......357
Tow-starting
Emergency engine starting ............358
Fitting the towing eye. ...................356
Important safety notes ..................355
Removing the towing eye. ..............357
Trailer coupling
see Towing atrailer
Trailer towing
7-pin connector ............................. 226
Blind Spot Assist ............................ 214
Cleaning the trailer tow hitch ......... 330
Coupling up atrailer ...................... 224Decoupling
atrailer ....................... 225
Driving tips .................................... 221
ESP ®
................................................ 75
Folding in the ball coupling ............225
Folding out the ball coupling ..........223
Important safety notes ..................221
Lights displa ymessage .................. 259
Mounting dimensions ....................395
Parking Guidance ........................... 206
Parktroni c...................................... 202
Power supply ................................. 226
Shift range ..................................... 168
Trailer loads ................................... 396
Transmission
see Automatic transmission
see Manual transmission
Transmission position display .........166
Transmission position display
(DIRECT SELECTl ever)...................... 166
Transporting the vehicle ..................358
Trim pieces (cleaning instructions) .332
Trip computer (on-board com-
puter) ................................................. .235
Trip meter Calling up ....................................... 235
Resetting (on-board computer) ......236
Trip odometer
see Trip meter
Turn signals
Changing bulbs (front) ...................132
Switching on/off ........................... 124
TV
Operating (on-board computer) .....238
see Separate operating instructions
Two-way radio
Frequencies ................................... 381
Installatio n..................................... 381
Transmission output (maximum) .... 381
Type identification plate
see Vehicle identification plate
Tyre pressure
Calling up (on-board computer) .....368
Display message ............................ 272
Not reached (TIREFIT) ....................343
Pressure loss warning ....................367
Reached (TIREFIT) ..........................343
Recommended ............................... 365 20
Index
Page 158 of 409
not be able to brake, declutch or accelerate
as intended. This could lead to accidents and
injury. G
WARNING
Do not change down for additional engine
braking on a slippery roa dsurface. This could
cause the drive wheels to lose their grip and
the vehicle could skid. This could cause you
to lose control of your vehicle and cause an
accident.
! Warm up the engine quickly. Do no tuse
the engine's full performance until it has
reached operating temperature.
Only set the automatic transmission to the
respective drive positions when the vehicle
is stationary.
Where possible, avoid spinning the drive
wheels when pulling away on slippery
roads. Otherwise, you could damage the
drive train.
! AMG vehicles: at low engine oil temper-
atures (below +20 †), the maximum
engine speed is restricted in order to pro-
tect the engine. To protect the engine and
maintain smooth engine operation, avoid
driving at full throttle when the engine is
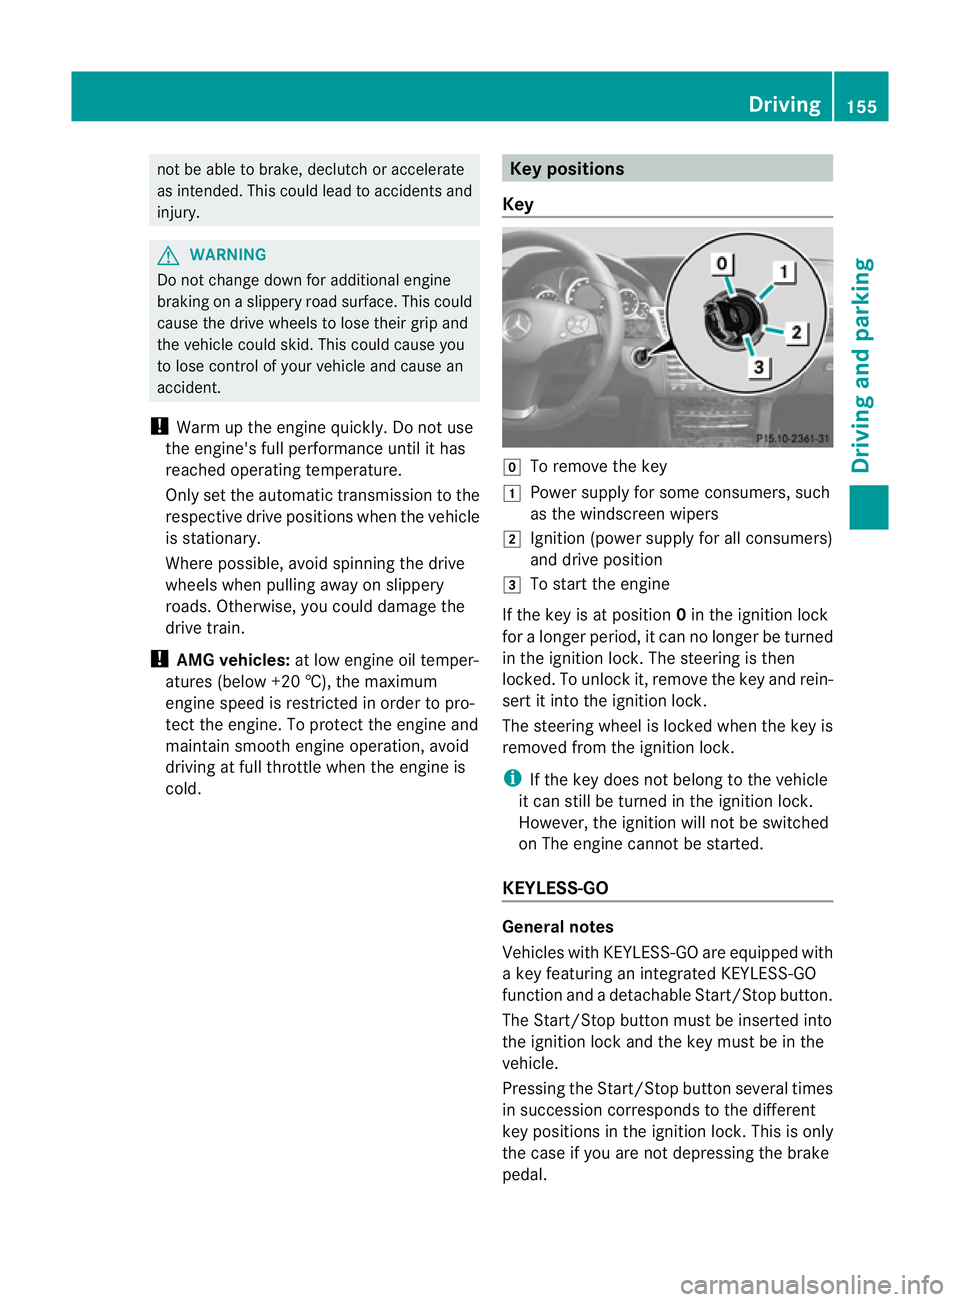
cold. Key positions
Key g
To remove the key
1 Power supply for some consumers, such
as the windscreen wipers
2 Ignition (power supply for all consumers)
and drive position
3 To start the engine
If the key is at position 0in the ignition lock
for a longer period, it can no longer be turned
in the ignition lock. The steering is then
locked. To unlock it, remove the key and rein-
sert it into the ignition lock.
The steering wheel is locked when the key is
removed from the ignition lock.
i If the key does not belong to the vehicle
it can still be turned in the ignition lock.
However, the ignition will not be switched
on The engine cannot be started.
KEYLESS-GO General notes
Vehicles with KEYLESS-GO are equipped with
a key featuring an integrated KEYLESS-GO
function and a detachable Start/Stop button.
The Start/Stop button must be inserted into
the ignition lock and the key must be in the
vehicle.
Pressing the Start/Stop button several times
in succession corresponds to the different
key positions in the ignition lock. This is only
the case if you are not depressing the brake
pedal. Driving
155Driving and parking Z
Page 199 of 409
to lock the vehicle, the tone becomes louder.
The vehicle is not locked until the HOL Dfunc-
tion is deactivated.
i If the engine has been switched off, it
cannot be started again until the HOLD
function has been deactivated.
If there is a fault in the system or power supply
while the HOLD function is activated, the
Brake immediately message is shown in
the multifunction display. Immediately
depress the brake firmly until the warning
message in the multifunction display goes
out.
On vehicles with automatic transmission, you
can also shif tinto position P.This deactivates
the HOLD function. RACE START
Important safety notes i
RACE START is only available in AMG vehi-
cles.
RACE START enables optimal acceleration
from a standing start. The precondition for
this is a suitable high-grip road surface. G
WARNING
RACE START is only available when SPORT
handling mode is activated. SPORT handling
mode will only be able to stabilise the vehicle
to a limited degree if the vehicle starts to skid
or a wheel starts to spin. The vehicle is there-
fore harder to control at the threshold range.
You could lose control of the vehicle and
cause an accident.
RACE START should only be used on closed
off circuits. Always adapt your driving style to
suit the prevailing road and weather condi-
tions. Activation conditions RACE START can be activated when:
R
the doors are closed.
R the engine is running and it has reached an
operating temperature of approximately
80 †. This is the case when the engine oil
temperature in the multifunction display
stops flashing.
R SPORT handling mode is activated.
(Y page 73)
R the steering wheel is in the straight-ahead
position.
R the vehicle is stationary and the brake
pedal is depressed (left foot).
R the transmission is in position D.
Activating RACE START X
Depress the brake pedal with your left foot,
and keep it depressed.
X Turn the drive program selector clockwise
(Y page 168) until the RSlamp lights up.
The multifunction display shows the RACE START Confirm: Paddle UP Cancel:
Paddle DOWN message.
i If the activation conditions are no longer
fulfilled, RACE START is cancelled. The mul-
tifunction display shows the RACE START cancelled message.
X To cancel: pull the left steering wheel shift
paddle (Y page 169).
or
X To confirm:p ull the right steering wheel
shif tpaddle (Y page 169).
The multifunction display shows the RACE START available Depress accelera‐
tor. message.
i If you do no tdepress the accelerator
pedal fully within two seconds, RACE
START is cancelled. The multifunction dis-
play shows the RACE START not possi‐ ble See Owner's Manual message.196
Driving systemsDriving and parking
Page 253 of 409
=
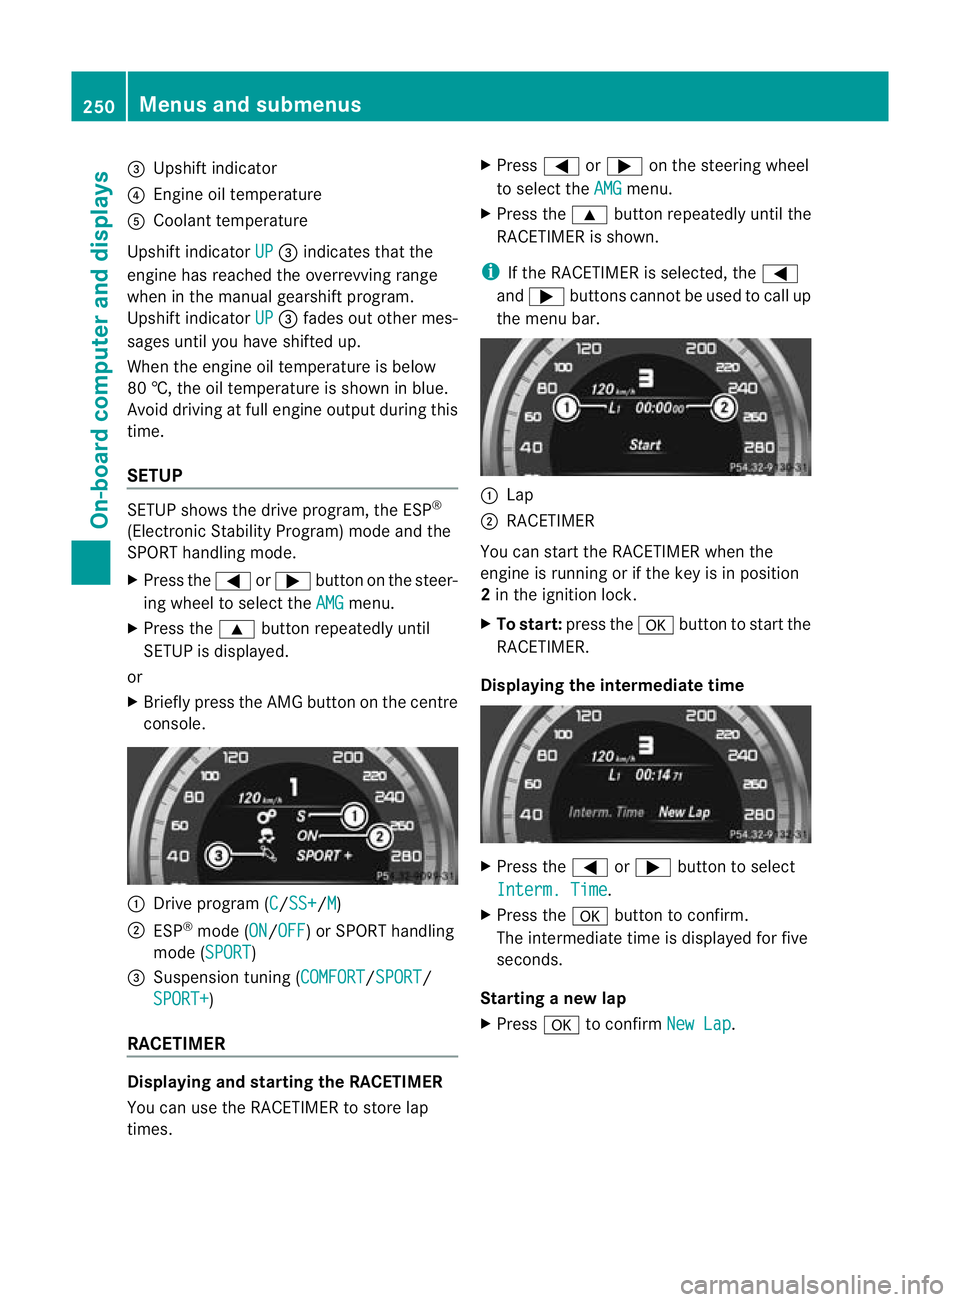
Upshift indicator
? Engine oil temperature
A Coolant temperature
Upshift indicator UP =
indicates that the
engine has reached the overrevving range
when in the manual gearshift program.
Upshift indicator UP =
fades out other mes-
sages until you have shifted up.
When the engine oil temperature is below
80 †, the oil temperature is shown in blue.
Avoid driving at full engine output during this
time.
SETUP SETUP shows the drive program, the ESP
®
(Electronic Stability Program) mode and the
SPORT handling mode.
X Press the =or; button on the steer-
ing wheel to select the AMG menu.
X Press the 9button repeatedly until
SETUP is displayed.
or
X Briefly press the AMG button on the centre
console. :
Drive program (C /SS+ /M )
; ESP ®
mode (ON /OFF ) or SPORT handling
mode (SPORT )
3 Suspension tuning (COMFORT /SPORT /
SPORT+ )
RACETIMER Displaying and starting the RACETIMER
You can use the RACETIMER to store lap
times. X
Press =or; on the steering wheel
to select the AMG menu.
X Press the 9button repeatedly until the
RACETIMER is shown.
i If the RACETIMER is selected, the =
and ; buttons cannot be used to call up
the menu bar. :
Lap
; RACETIMER
You can start the RACETIMER when the
engine is running or if the key is in position
2 in the ignition lock.
X To start: press the abutton to start the
RACETIMER.
Displaying the intermediate time X
Press the =or; button to select
Interm. Time .
X Press the abutton to confirm.
The intermediate time is displayed for five
seconds.
Starting a new lap
X Press ato confirm New Lap .250
Menus and submenusOn-board computer and displays
Page 325 of 409
X
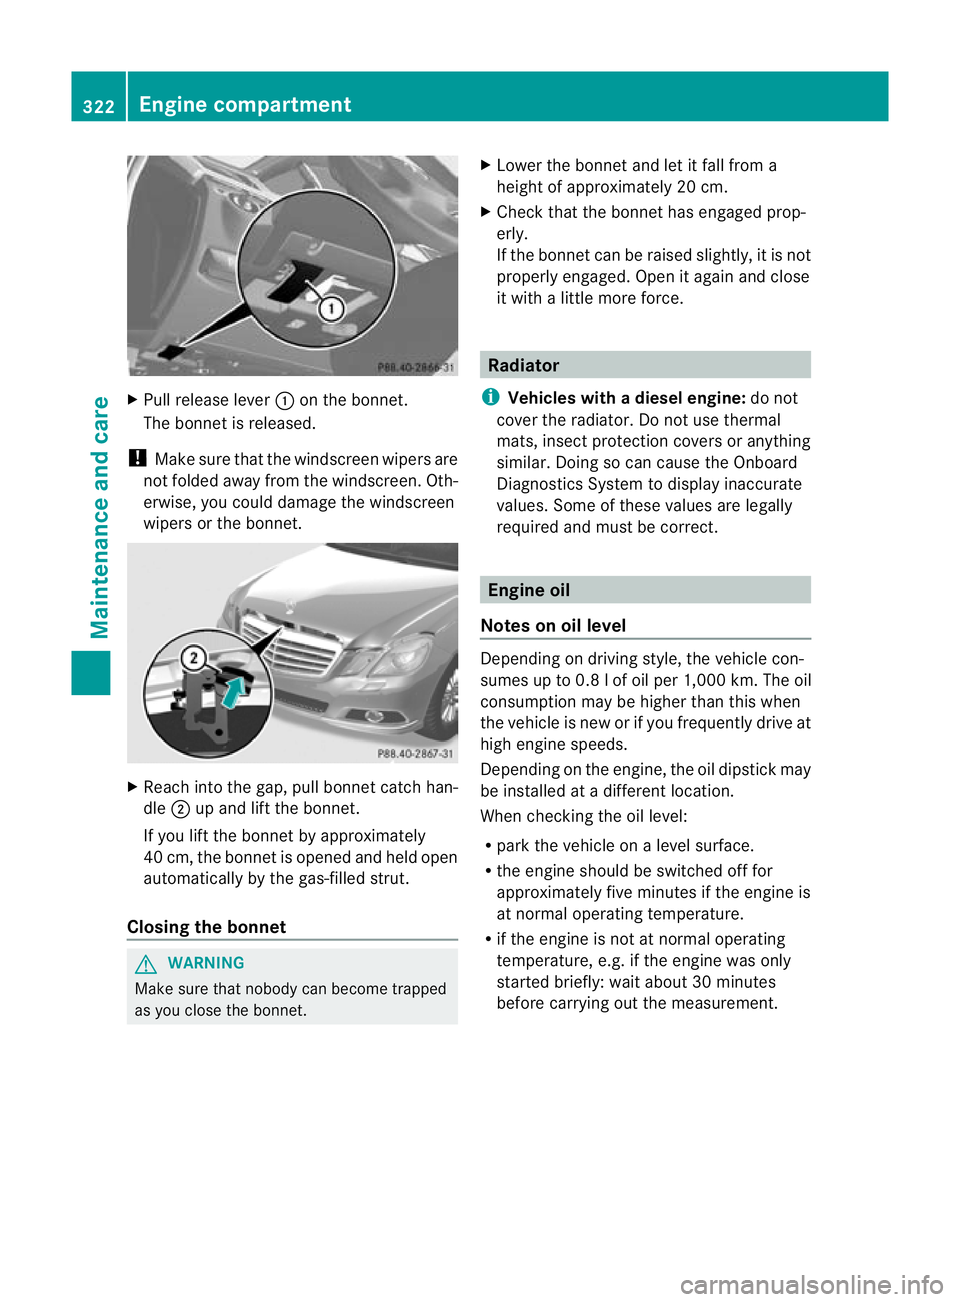
Pull release lever :on the bonnet.
The bonnet is released.
! Make sure that the windscreen wipers are
not folded away from the windscreen .Oth-
erwise, you could damage the windscreen
wipers or the bonnet. X
Reach into the gap, pull bonnet catch han-
dle ;up and lift the bonnet.
If you lift the bonnet by approximately
40 cm, the bonnet is opened and held open
automatically by the gas-filled strut.
Closing the bonnet G
WARNING
Make sure tha tnobody can become trapped
as you close the bonnet. X
Lower the bonnet and let it fall from a
height of approximately 20 cm.
X Check that the bonnet has engaged prop-
erly.
If the bonnet can be raised slightly, it is not
properly engaged. Open it again and close
it with a little more force. Radiator
i Vehicles with adiesel engine: do not
cover the radiator. Do not use thermal
mats, insect protection covers or anything
similar. Doing so can cause the Onboard
Diagnostics System to display inaccurate
values. Some of these values are legally
required and must be correct. Engine oil
Notes on oil level Depending on driving style, the vehicle con-
sumes up to 0.
8lof oil per 1,000 km .The oil
consumption may be higher than this when
the vehicle is new or if you frequently drive at
high engine speeds.
Depending on the engine, the oil dipstick may
be installed at a different location.
When checking the oil level:
R park the vehicle on a level surface.
R the engine should be switched off for
approximately five minutes if the engine is
at normal operating temperature.
R if the engine is not at normal operating
temperature, e.g. if the engine was only
started briefly: wait about 30 minutes
before carrying out the measurement. 322
Engine compartmentMaintenance and care
Page 327 of 409
X
Replace cap :on the filler neck and turn
clockwise.
Make sure that the cap locks into place
securely.
X Chec kthe oil level again with the oil dip-
stick (Y page 323).
Further information on engine oil
(Y page 388). Checking and adding other service
products
Checking the coolant level G
WARNING
The cooling system is pressurised. Therefore,
only unscrew the cap once the engine has
cooled down. The coolant temperature gauge
must display less than 70 †.Otherwise, you
could be scalded if hot coolant escapes. X
Park the vehicle on a level surface.
Only check the coolant level if the vehicle
is on a level surface and the engine has
cooled down.
X Turn the key to position 2in the ignition
lock (Y page 155).
On vehicles with KEYLESS-GO, press the
Start/Stop button twice (Y page 155).
X Check the coolant temperature display in
the instrument cluster.
The coolant temperature must be below
70 †.
X Turn the key to position 0(Ypage 155) in
the ignition lock. X
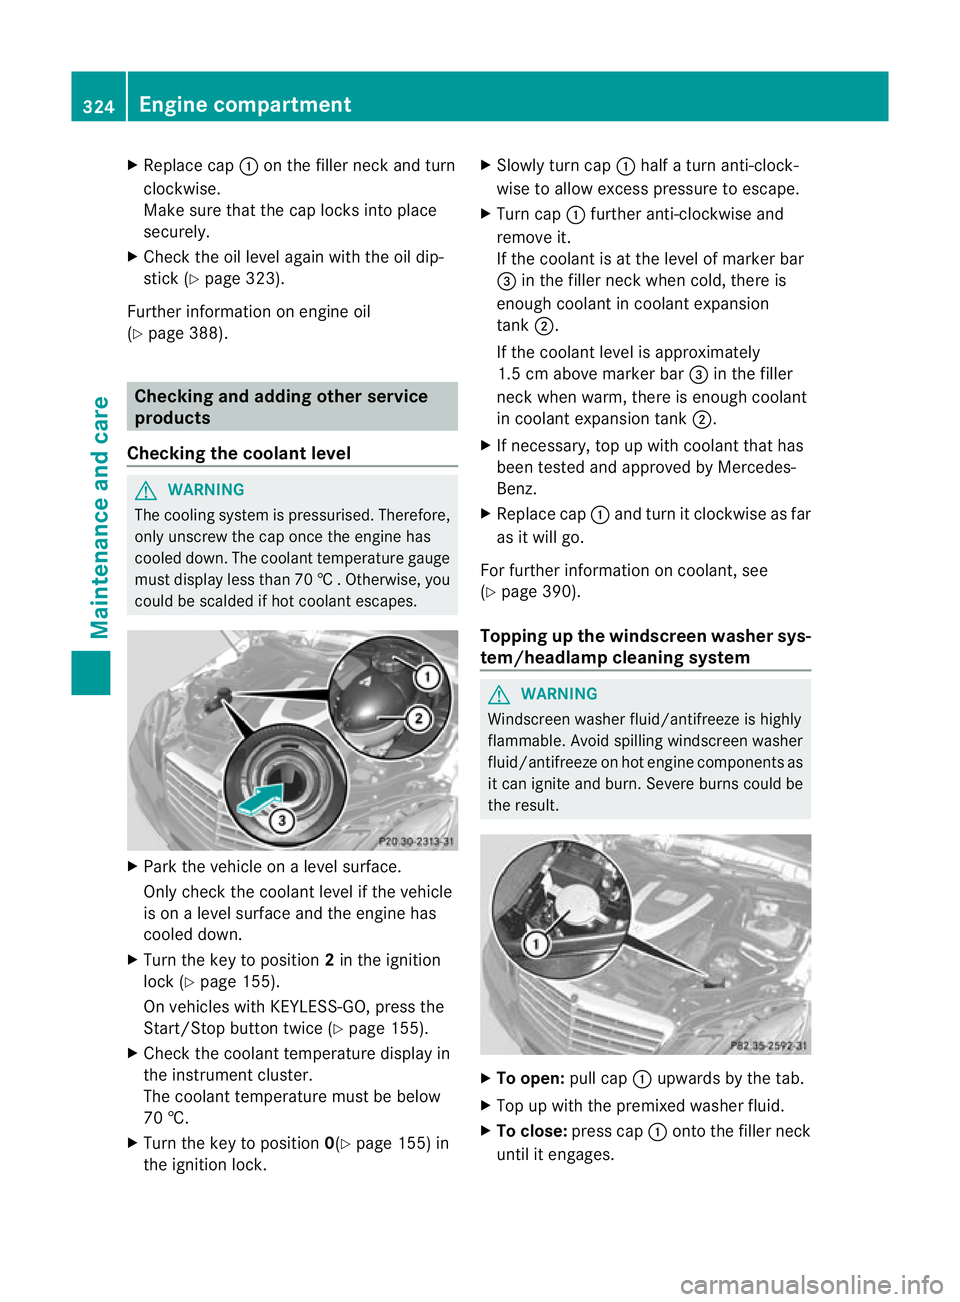
Slowly tur ncap : half a turn anti-clock-
wise to allow excess pressure to escape.
X Turn cap :further anti-clockwise and
remove it.
If the coolant is at the level of marker bar
= in the fille rneck when cold, there is
enough coolant in coolant expansion
tank ;.
If the coolant level is approximately
1.5 cm above marker bar =in the filler
neckw hen warm, there is enough coolant
in coolant expansion tank ;.
X If necessary, top up with coolant that has
been tested and approved by Mercedes-
Benz.
X Replace cap :and turn it clockwise as far
as it will go.
For further information on coolant, see
(Y page 390).
Topping up the windscreen washer sys-
tem/headlampc leaning system G
WARNING
Windscreen washer fluid/antifreeze is highly
flammable. Avoid spilling windscreen washer
fluid/antifreeze on hot engine components as
it can ignite and burn. Severe burns could be
the result. X
To open: pull cap:upwards by the tab.
X Top up with the premixed washer fluid.
X To close: press cap :onto the filler neck
until it engages. 324
Engine compartmentMaintenance and care
Page 335 of 409
parts may break away and be thrown around
the interior when an airbag is deployed, which
may result in severe injuries.
! Do not affix the following to plastic surfa-
ces:
R stickers
R films
R scented oil bottles or similar items
You could otherwise damage the plastic.
! Do not allow cosmetics, insec trepellent
or sunscreen to come in contact with the
plastic trim .This maintains the high-quality
look of the surfaces.
X Wipe the plastic trim with a damp, lint-free
cloth, e.g. a microfibre cloth.
X Heavy soiling: use car care and cleaning
products recommended and approved by
Mercedes-Benz.
The surface may change colour tempora-
rily. Wait until the surface is dry again.
Cleaning the steering wheel and gear or
selector lever X
Thoroughly wipe with a damp cloth or use
leather care agents that have been recom-
mended and approved by Mercedes-Benz.
Cleaning wooden trim and trim ele-
ments X
Wipe the wooden trim and trim pieces with
a damp, lint-free cloth, e.g. a microfibre
cloth.
X Heavy soiling: use car care and cleaning
products recommended and approved by
Mercedes-Benz.
! Do not use solvent-based cleaning agents
such as tar remover, wheel cleaners, pol-
ishes or waxes. There is otherwise a risk of
damaging the surface. Cleaning the seat covers !
Do not use microfibre cloths to clean gen-
uine leather, artificial leather or
Alcantara® covers. If used often, these can
damage the cover.
! Observe the following when cleaning:
R clean genuine leather covers carefully
with a damp cloth and then wipe the cov-
ers down with a dry cloth. Make sure that
the leather does not become soaked. It
may otherwise become rough and
cracked. Only use leather care agents
that have been tested and approved by
Mercedes-Benz. You can obtain these
from a qualified specialist workshop.
R clean artificial leather covers with a cloth
moistened with a solution containing 1%
detergent (e.g. washing-up liquid).
R clean cloth covers with a microfibre cloth
moistened with a solution containing 1%
detergent (e.g. washing-up liquid). Rub
carefully and always wipe entire seat sec-
tions to avoid leaving visible lines. Leave
the seat to dry afterwards. Cleaning
results depend on the type of dirt and
how long it has been there.
R clean Alcantara® covers with a damp
cloth. Make sure that you wipe entire
seat sections to avoid leaving visible
lines.
i Note that regular care is essential to
make sure that the appearance and com-
fort of the covers are retained over time.
Cleaning the seat belts X
Use clean, lukewarm water and soap solu-
tion.
! Do not clean the seat belts using chemical
cleaning agents. Do not dry the seat belts
at temperatures above 80 † or in direct
sunlight. 332
CareMaintenance and care
Page 389 of 409
E 300 BlueEFFICIENCY, E 300 4MATIC
BlueEFFICIENCY, E 350 BlueEFFICIENCY
and E 350 4MATIC BlueEFFICIENCY
!
Only refuel using premium-grade sulphur-
free unleaded petrol with at least 95 RON/
85 MON that conforms to European stand-
ard EN 228 or an equivalent specification.
You could otherwise impair engine output
or damage the emission control system.
i In some countries, the available petrol
may no tbe sufficiently low in sulphur. This
fuel can temporarily produce unpleasant
odours, especially on short journeys. As
soon as sulphur-free fuel (sulphur content
<10p pm) is used for refuelling, the odours
are reduced.
Additives
! Do not refuel with low grade fuel and do
not use fuel additives that have not been
tested and approved for Mercedes-Benz
vehicles. Otherwise the fuel system could
malfunction or be damaged.
One of the major problems with low-grade
fuel is the creation of carbon deposits during
the process of burning fuel. Mercedes-Benz
recommends that you use fuel brands that
have additives.
If you use fuels without these additives for a
longer period of time, there may be a build-up
of carbon deposits. These will form especially
on the inlet valves and in the combustion
chamber.
This could lead to engine running problems,
e.g.:
R longer engine warm-up phase
R uneven idle
R engine noise
R misfiring
R loss of power
In areas where petrol with the required addi-
tives is not available, carbon deposits can
build up. In this case, Mercedes-Benz recom-
mends the use of additives that have been approved for Mercedes-Benz vehicles; see
http://bevo.mercedes-benz.com.
Consult a Mercedes-Benz Service Centre to
view a list of approved products. Observe the
instructions for use in the product descrip-
tion.
Do not mix other fuel additives with fuel. This
causes unnecessary costs and could damage
the engine.
Diesel (EN 590)
Fuel grade
G
WARNING
Do not use petrol to refuel vehicles with a die-
sel engine. Do not mix diesel with petrol. This
would result in damage to the fuel system and
engine, which could lead to a vehicle fire.
! When refuelling, only use diesel fuel that
conform stothe European standard EN 590
or is of equivalent quality. Fuel that does
not conform to EN 590 can lead to
increased wear as well as damage to the
engine and exhaust system.
! Do not use the following:
R marine diesel
R heating oil
R bio-diesel
R vegetable oil
R petrol
R paraffin
R kerosene
Do not mix these fuels with diesel fuels and
do not use any special additives. Other-
wise, this can lead to damage to the engine.
This excludes flow improver; see "Low out-
side temperatures".
! Vehicles with adiesel particle filter: in
countries outside the EU, only refuel with
low-sulphur Euro diesel with a sulphur con-
ten tunde r50p pm; otherwise the emission
control system could be damaged. 386
Service products and capacitiesTechnical data