climate control MERCEDES-BENZ E-CLASS SALOON 2015 User Guide
[x] Cancel search | Manufacturer: MERCEDES-BENZ, Model Year: 2015, Model line: E-CLASS SALOON, Model: MERCEDES-BENZ E-CLASS SALOON 2015Pages: 497, PDF Size: 16.23 MB
Page 164 of 497
deactivate the "Cooling with air-dehumidifi-
cation "function only briefly.
The "Cooling with air dehumidification" func-
tion is only available when the engin eisrun-
ning. The air inside the vehicle is cooled and
dehumidified according to the temperature
selected.
Condensation may drip from the underside of the vehicle when coolin gmode is active. This
is normal and not asign that ther eisamal-
function.
Switching on/off X
To activate: press the¿button.
The indicator lamp above the ¿button
lights up.
i In vehicles with auxiliary heating, one of
the indicator lamps on the auxiliary heating
button lights up when the "Cooling with air dehumidification" function is activated.
X To deactivate: press the¿button.
The indicator lamp above the ¿button
goes out. The coolin gwith air dehumidifi-
cation function has adelayed switch-off
feature. Operating thec
limatecontrol system
161Climatecontrol
Page 165 of 497
Problems with the "Cooling with air dehumidification" function
Problem
Possible causes/consequences and
M
MSolutions The indicator lamp over
the ¿ button
flashes three times or
remains off. The cool-
ing with air dehumidifi-
cation function cannot
be activated. The cooling with air dehumidification function has been deactiva-
ted due to amalfunction.
X Visit aqualified specialist workshop. Setting climate control to automatic
mode
General notes In automatic mode, the set temperature is
maintained automatically at
aconstant level.
The system automatically regulates the tem-
perature of the dispensed air, the airflow and
the air distribution.
The automatic mode functions optimally
when the "Cooling with air dehumidification"
function is activated. If desired, cooling with
air dehumidification can be deactivated.
If you deactivate the "Cooling with air-dehu-
midification" function, the air inside the vehi-
cle will not be cooled. The air inside the vehi- cle will also not be dehumidified. The win-
dows can mist up more quickly. Therefore,
deactivate the "Cooling with air-dehumidifi-
cation" function only briefly.
Activating and changing the mode X
Turn the key to position 2in the ignition
lock (Y page 179).
X Set the desired temperature.
X To activate: press theÃbutton.
The indicator lamp above the Ãbutton
lights up. Automatic air distribution and air-
flow are activated.
i THERMOTRONIC automatic climate con-
trol: when automatic mode is activated, you can set the climate mode (Y page 162).
X To switch to manualm ode:THERMATIC automatic climate control:
press air distribution adjustment switch
F
(Y page 157).
THERMOTRONIC automatic climate con-
trol: press air distribution adjustment
switch I(Ypage 159).
The indicator lamp above the Ãbutton
goes out.
or
X THERMATIC automatic climate control:
press airflow adjustment switch G
(Y page 157).
THERMOTRONIC automatic climate con-
trol: press airflow adjustment switch H
(Y page 159).
The indicator lamp above the Ãbutton
goes out. Setting the climate mode
The "Set climate mode" function is only avail-
able with THERMOTRONIC automatic climate control.
In automatic mode you can select the follow-
ing climate modes:
FOCUS high airflow that is set slightly cooler
MEDIUM medium airflow, standard setting
DIFFUSE low airflow that is set slightly warmer and with less of adraught 162
Operating the climate control systemClimatec
ontrol
Page 166 of 497
X
Turn the key to position 2in the ignition
lock (Y page 179).
X Press the Ãbutton.
X Press climate mode selection button Gup
or down and select the desired level
(Y page 159). Setting the temperature
THERMATIC automatic climate control Different temperatures can be set for the
driver's and front-passenger sides.
X Turn the key to position 2in the ignition
lock (Y page 179).
X To increase or reduce the temperature
in the front compartment: press temper-
ature adjustmen tswitch EorH up or
down (Y page 157).
Only change the temperature setting in
small increments. Start at 22 †.
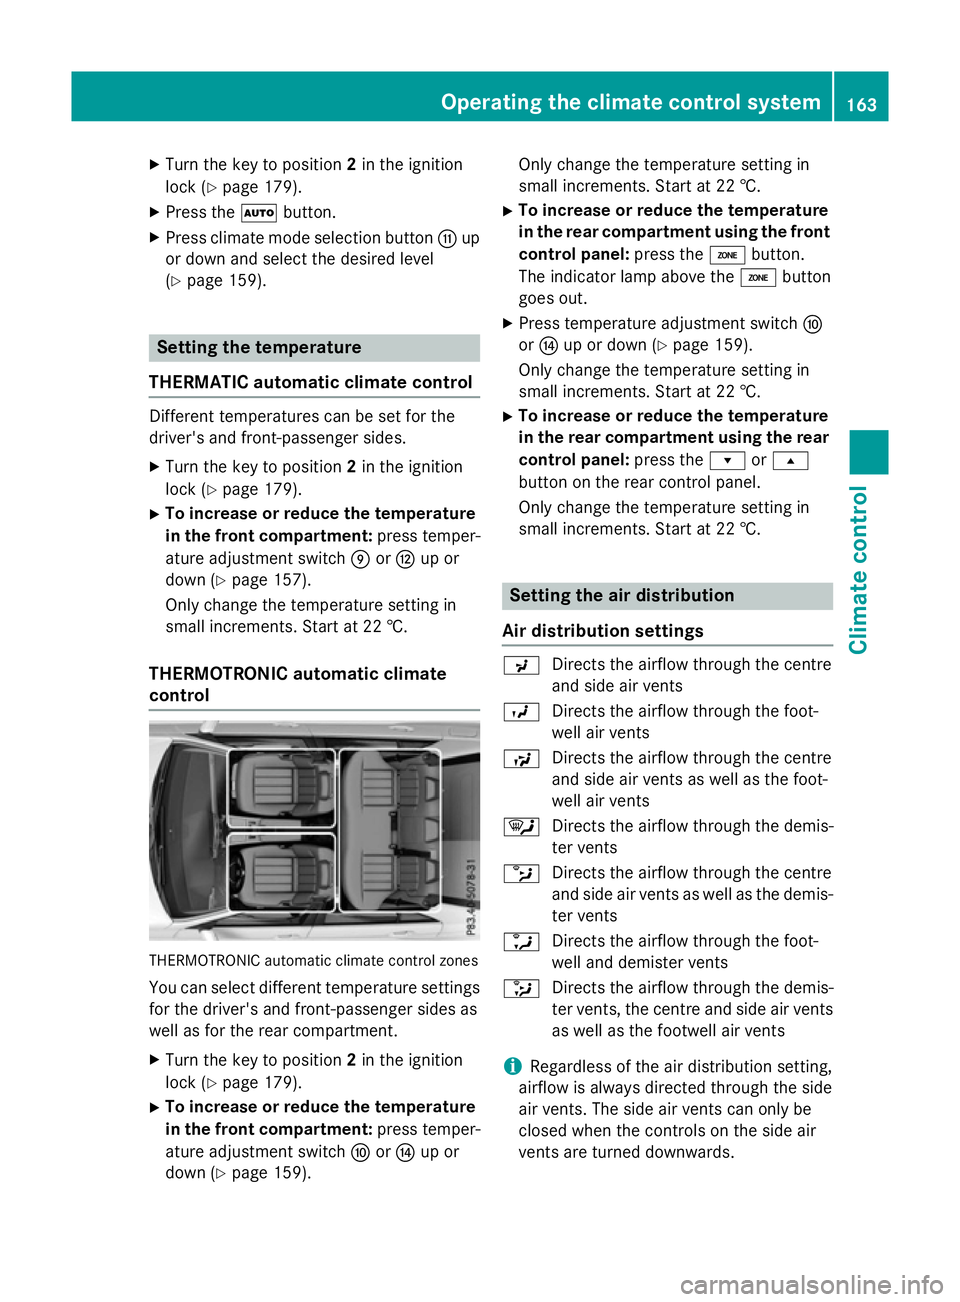
THERMOTRONIC automatic climate
control THERMOTRONIC automatic climate control zones
You can select different temperature settings for the driver's and front-passenger sides as
well as for the rear compartment.
X Turn the key to position 2in the ignition
lock (Y page 179).
X To increase or reduce the temperature
in the front compartment: press temper-
ature adjustmen tswitch ForJ up or
down (Y page 159). Only change the temperature setting in
small increments. Start at 22 †.
X To increase or reduce the temperature
in the rear compartment using the front
control panel: press theábutton.
The indicator lamp above the ábutton
goes out.
X Press temperature adjustmen tswitch F
or J up or down (Y page 159).
Only change the temperature setting in
small increments. Start at 22 †.
X To increase or reduce the temperature
in the rear compartment using the rear
control panel: press therors
button on the rear control panel.
Only change the temperature setting in
small increments. Start at 22 †. Setting the air distribution
Air distribution settings P
Directsthe airflow through the centre
and side air vents
O Directsthe airflow through the foot-
well air vents
S Directsthe airflow through the centre
and side air ventsasw ell as the foot-
well air vents
¯ Directsthe airflow through the demis-
ter vents
b Directsthe airflow through the centre
and side air ventsasw ell as the demis-
ter vents
a Directsthe airflow through the foot-
well and demister vents
_ Directsthe airflow through the demis-
ter vents, the centre and side air vents
as well as the footwell air vents
i Regardless of the air distribution setting,
airflow is alway sdirected through the side
air vents. The side air ventsc an only be
closed when the controls on the side air
ventsa re turned downwards. Operating the climate control system
163Climate control
Page 167 of 497
Setting the air distribution
X
Turn the key to position 2in the ignition
lock (Y page 179).
X THERMATIC automatic climate control:
press air distribution adjustment switch F
up or down, until the desired symbol
appears in the display (Y page 157).
X THERMOTRONIC automatic climate con-
trol: press air distribution adjustment
switch Iup or down, until the desired
symbol appears in the display
(Y page 159). Setting the airflow
THERMATIC automatic climate control X
Turn the key to position 2in the ignition
lock (Y page 179).
X To increase or reduce: press airflow
adjustment switch Gup or down
(Y page 157).
THERMOTRONIC automatic climate
control X
Turn the key to position 2in the ignition
lock (Y page 179).
X To increase or reduce the front-com-
partment airflow: press airflow adjust-
ment switch Hup or down (Y page 159).
X To increase/reduce the rear-compart-
ment airflow: press theKorI but-
ton.
If the battery is not charged sufficiently, the
blower output may be reduced. Once the bat- tery is sufficiently charged again, full blower
output will be available. Switching the ZONE function on/off
X To activate: press theábutton.
The indicator lamp above the ábutton
lights up. THERMATIC automatic climate control: the
temperature settingf or the driver's side is
not adopted for the front-passenger side.
THERMOTRONIC automatic climate con-
trol: the temperature settingf or the driver's
side is not adopted for the front-passenger side and the rear compartment.
X To deactivate: press theábutton.
The indicator lamp above the ábutton
goes out.
THERMATIC automatic climate control: the
temperature settingf or the driver's side is
adopted for the front-passenger side.
THERMOTRONIC automatic climate con-
trol: the temperature settingf or the driver's
side is adopted for the front-passenger side and the rear compartment. Demisting the windscreen
You can use this function to defrost the wind-
screen or to demist the inside of the wind-
screen and the side windows.
Switch off the windscreen demisting function
as soon as the windscreen is clear again.
X Turn the key to position 2in the ignition
lock (Y page 179).
X To activate: press the¬button.
The indicator lamp above the ¬button
lights up.
The climate control system switches to the
following functions:
R high airflow
R high temperature
R air distribution to the windscreen and
front side windows
R air-recirculation mode off
If the battery is not charged sufficiently, the
blower output may be reduced. Once the bat- tery is sufficiently charged again, full blower
output will be available again. 164
Operating the climate control systemClimatec
ontrol
Page 168 of 497
X
To deactivate: press the¬button.
The indicator lamp above the ¬button
goe sout.T he previous settings ar ereacti-
vated .Air-recirculatio nmoder emains
deactivated.
or X Press the Ãbutton.
The indicator lamp above the ¬button
goe sout.A irflo wand ai rdistributio nareset
to automatic mode.
or
X THERMATI Cautomatic climate control:
press temperatur eadjustment switch E
or H up or down (Y page 157).
THERMOTRONIC automatic climate con-
trol :press temperatur eadjustment switch
F orJ up or down (Y page 159). Demistin
gthe windows
Window smisted up on the inside X
Activate the ¿cooling with ai rdehu-
midification function.
X Activate automatic mode Ã.
X Adjust the side ai rvents so tha tthe heated
ai risd irecte dtowards the side windows.
X If the windows continue to mis tup,activate
the "Windscreen demisting "fun ction ¬.
i Yo
us houl donlys elect thi ssetting until
the windscree nisc lear again.
Window smisted up on the outside X
THERMATI Cautomatic climate control:
press ai rdistributio nadjustment switch F
up or down (Y page 157), unti lthe P or
O symbo lappears in the display.
X THERMOTRONIC automatic climate con-
trol :press ai rdistributio nadjustment
switch Iup or down (Y page 159), until
the P orO symbo lappears in the
display.
X Adjust the side ai rvents so tha tnoairis
directe dtowards the side windows. Rea
rwindo wh eating
General notes The rea
rwindo wh eating ha sahighc urrent
draw. Yo ushoul dtherefore switch it off as
soo nasthe windo wisclear.Ito therwise
switches off automaticall yafter several
minutes.
If the battery voltag eistoo low, the rea rwin-
do wh eating ma yswitch off.
Switchin gon/off X
Turn the key to position 2in the ignition
lock (Y page 179).
X Press the ¤button.
The indicator lamp above the ¤button
lights up or goe sout. Operatin
gthe climate contro lsystem
165Climate control
Page 169 of 497
Problems with the rear window heating
Problem
Possible causes/consequences and
M
MSolutions The rear window heat-
ing has switched off
prematurely or cannot
be activated. The battery has not been sufficiently charged.
X Switch off any consumers that are not required, e.g. reading
lamps, interior lighting or the seat heating.
When the battery is sufficiently charged, the rear window heat- ing can be activated again. Switching air-recirculation mode
on/off
General notes You can deactivate the flow of fresh air if
unpleasant odours are enteringt he vehicle
from outside. The air already inside the vehi-
cle will then be recirculated.
If you activate air-recirculation mode, the win-
dows can mist up more quickly, in particular
at low temperatures. Only use air-recircula-
tion mode briefly to prevent the windows
misting up.
Activating/deactivating X
Turn the key to position 2in the ignition
lock (Y page 179).
X To activate: press thegbutton.
The indicator lamp above the gbutton
lights up.
i THERMATIC automatic climate control:
air-recirculation mode is activated auto-
matically at high outside temperatures.
THERMOTRONIC automatic climate con-
trol: air-recirculation mode is automatically
activated at high levels of pollution or at
high outside temperatures.
When air-recirculation mode is activated
automatically, the indicator lamp above the g button does not light up. Outside air is
added after about 30 minutes.
X To deactivate: press thegbutton.
The indicator lamp above the gbutton
goes out. i
Air-recirculation mode is deactivated
automatically:
R after approximately five minutes at out-
side temperatures below approximately
5†
R after approximately five minutes if cool-
ing with air dehumidification is deactiva-
ted
R after approximately 30 minutes at out-
side temperatures above approximately
5† if the cooling with air dehumidifica-
tion function is activated Convenience opening or closing using
the air-recirculation button G
WARNING
When the convenience closing feature is oper- ating, parts of the body could become trapped
in the closing area of the side window and the
sliding sunroof. There is arisk of injury.
Observe the complete closing procedure
when the convenience closing feature is oper-
ating. When closing make sure that no parts of the body are in the closing area. G
WARNING
During convenience opening parts of the body could be drawn in or become trapped
between the side window and window frame.
There is arisk of injury.
When opening, make sure that nobody is
touching the side window. If someone
becomes trapped, press the Wswitch 166
Operating the climate control systemClimatec
ontrol
Page 170 of 497
immediately to open/close the side window
in the door. The side window stops. To con-
tinue closing the side window, pull on the
W switch.
X Convenience closing feature: press and
hold the gbutton until the side win-
dows and the sliding sunroof or the pano-
rama sliding sunroof are closed.
The indicator lamp above the gbutton
light sup. Air-recirculation mode is activa-
ted.
If part softhe body are in the closin garea
during convenienc eclosing, proceed as fol-
lows:
X Press the Wbutton to sto pthe side win-
dows.
The side windows stop.
X To the nopen the side windows ,press the
W button again.
X Press the 3button to sto pthe sliding
sunroof or panorama sliding sunroof.
The sliding sunroof or panorama sliding
sunroof stops.
X To the nopen the sliding sunroof or pano-
rama sliding sunroof, pull back on the 3
button.
i Notes on the automatic reversin gfeature
for:
R the side windows (Y page 110)
R the sliding sunroof (Y page 115)
R the panorama sliding sunroof
(Y page 115)
X Convenience opening feature: press and
hold the gbutton until the side win-
dows and the sliding sunroof or panorama
sliding sunroof have opened. The side win-
dows and the sliding sunroof or panorama
sliding sunroof move back to their original
position.
The indicator lamp above the gbutton
goes out. Air-recirculation mode is deacti-
vated. i
If you open the side windows
,the sliding
sunroof or the panorama sliding sunroof
manually after closing the mwith the con-
venienc eclosing feature, the ywill remain in
this position when opened using the con-
venienc eopening feature. Activating/deactivating th
eresidual
heat function
General notes The residual heat function is only available
with THERMOTRONI
Cautomatic climat econ-
trol.
It is possible to make use of the residual heat
of the engin etocontinue heatin gthe vehicle
for approximately 30 minutes after the engine
has been switched off .The heatin gtime
depends on the set interior temperature.
Activating/deactivating X
Turn the key to position 0in the ignition
lock or remove it (Y page 179).
X To activate: press theÌbutton.
The indicator lamp above the Ìbutton
light sup.
i If the residual heat function is activated,
the windows may mist up on the inside.
i The blower will run at
alow speed regard-
less of the airflow setting.
i If you activate the residual heat function
at high temperatures, only the ventilation
will be activated. The blower runs at
medium speed.
X To deactivate: press theÌbutton.
The indicator lamp above the Ìbutton
goes out.
Residual heat is deactivate dautomatically:
R after approximately 30 minutes
R when the ignition is switched on
R if the battery voltage drops
R when the auxiliary heatin gisswitched on Operating thec
limate control system
167Climate control Z
Page 172 of 497
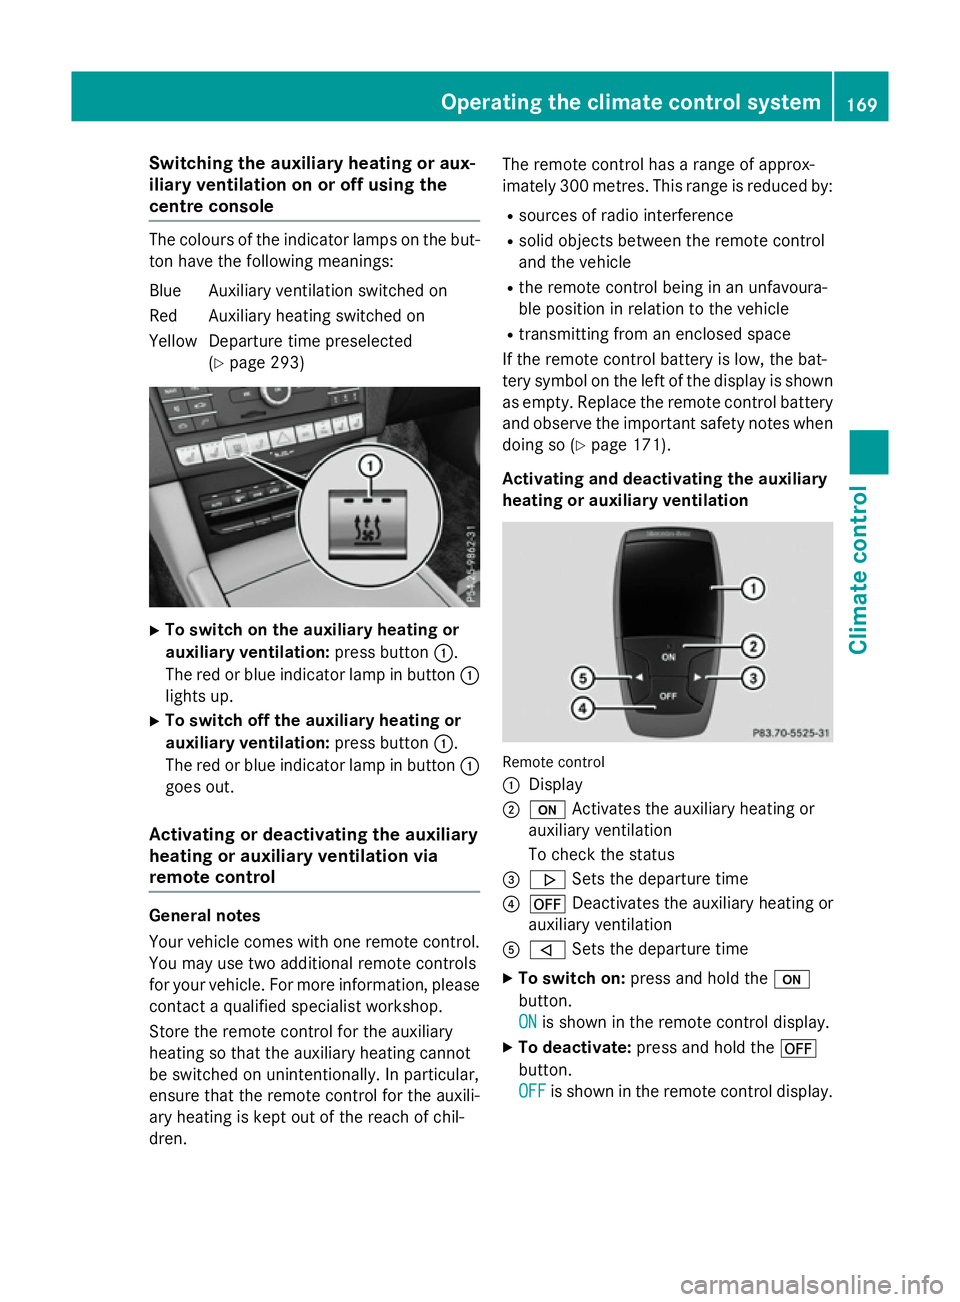
Switching the auxiliary heating or aux-
iliary ventilation on or off using the
centre console The colours of the indicator lamps on the but-
ton have the following meanings:
Blue Auxiliary ventilation switched on
Red Auxiliary heating switched on
Yellow Departure time preselected (Ypage 293) X
To switch on the auxiliary heating or
auxiliary ventilation: press button:.
The red or blue indicator lamp in button :
lights up.
X To switch off the auxiliary heating or
auxiliary ventilation: press button:.
The red or blue indicator lamp in button :
goes out.
Activating or deactivating the auxiliary
heating or auxiliary ventilation via
remote control General notes
Your vehicle comes with one remote control.
You may use two additional remote controls
for your vehicle. For more information ,please
contact aqualified specialist workshop.
Storet he remote control for the auxiliary
heating so that the auxiliary heating cannot
be switched on unintentionally. In particular,
ensure that the remote control for the auxili-
ary heating is kept out of the reach of chil-
dren. The remote control has
arange of approx-
imately 300 metres. This range is reduced by:
R sources of radio interference
R solid objectsb etween the remote control
and the vehicle
R the remote control being in an unfavoura-
ble position in relation to the vehicle
R transmittingf rom an enclosed space
If the remote control battery is low, the bat-
tery symbol on the left of the display is shown as empty. Replace the remote control battery
and observe the important safety notes when doing so (Y page 171).
Activating and deactivating the auxiliary
heating or auxiliary ventilation Remote control
:
Display
; u Activates the auxiliary heating or
auxiliary ventilation
To check the status
= . Sets the departure time
? ^ Deactivates the auxiliary heating or
auxiliary ventilation
A , Sets the departure time
X To switch on: press and hold the u
button.
ON ON is shown in the remote control display.
X To deactivate: press and hold the ^
button.
OFF OFF is shown in the remote control display. Operating the climate control system
169Climatecontrol Z
Page 173 of 497
Checking th
estatus of theauxiliary heat-
ing or auxiliary ventilation
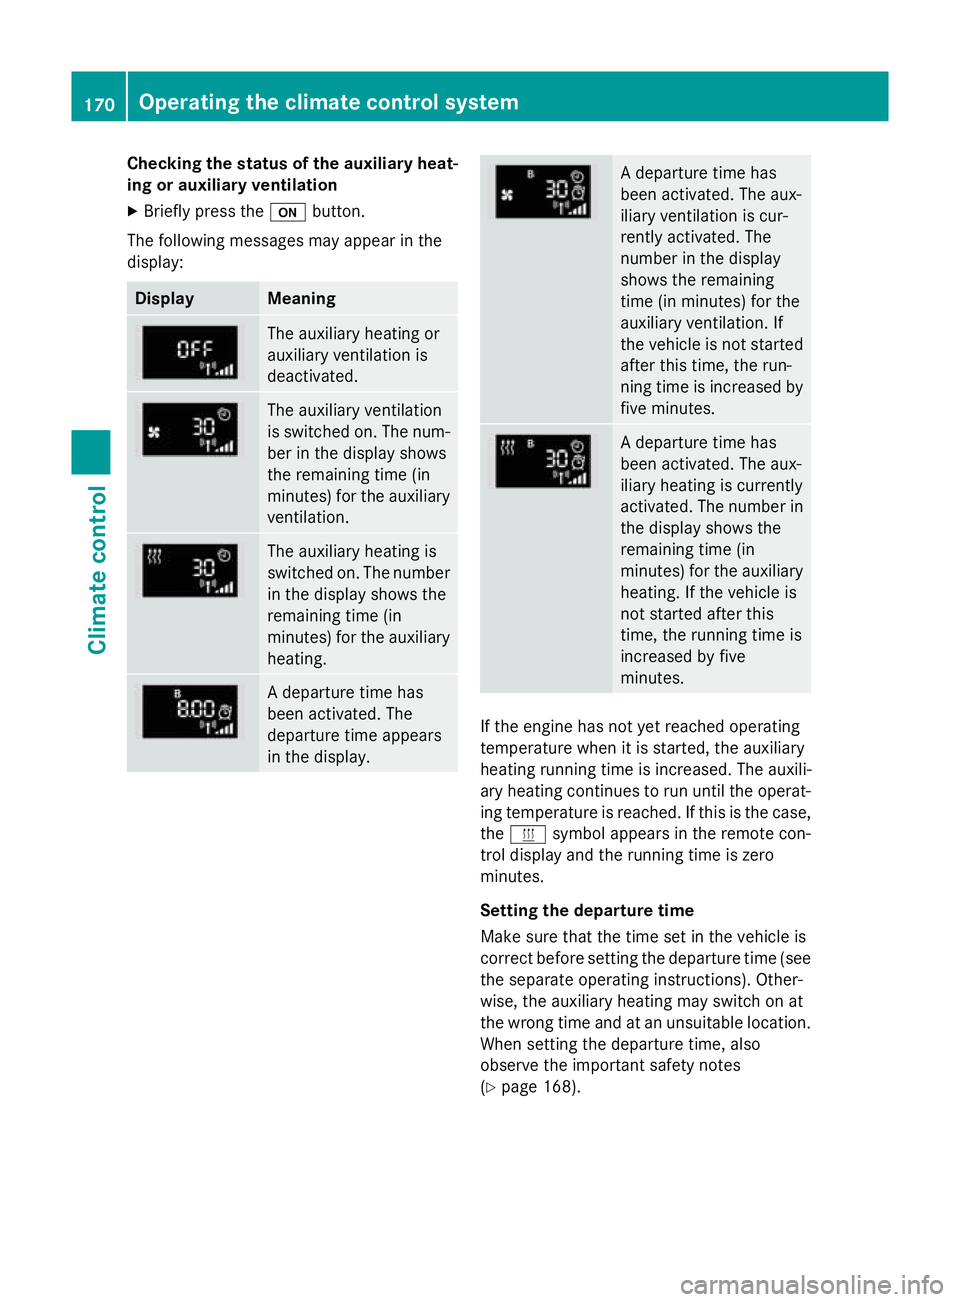
X Briefly pres sthe u button.
The followin gmessages may appear in the
display: Display Meaning
The auxiliar
yheating or
auxiliar yventilatio nis
deactivated. The auxiliar
yventilation
is switched on .The num-
ber in th edisplay shows
th er emainin gtime( in
minutes )for th eauxiliary
ventilation. The auxiliar
yheating is
switched on .The number
in th edisplay show sthe
remainin gtime( in
minutes )for th eauxiliary
heating. Ad
epartur etimeh as
been activated. The
departur etimea ppears
in th edisplay. Ad
epartur etimeh as
been activated. The aux-
iliary ventilatio niscur-
rently activated. The
number in th edisplay
show sthe remaining
tim e(in minutes )for the
auxiliar yventilation. If
th ev ehicle is no tstarted
after this time, th erun-
nin gtimeisi ncreased by
fiv em inutes. Ad
epartur etimeh as
been activated. The aux-
iliary heating is currently
activated. The number in
th ed isplay show sthe
remainin gtime( in
minutes )for th eauxiliary
heating .Ifthevehicle is
no tstarted after this
time, th erunnin gtimeis
increased by five
minutes. If th
eengine has no tyet reached operating
temperatur ewhen it is started, th eauxiliary
heating runnin gtimeisi ncreased. The auxili-
ary heating continues to run until th eoperat-
ing temperatur eisreached. If this is th ecase,
the y symbo lappear sintheremot econ-
trol display and th erunnin gtimeisz ero
minutes.
Settin gthe departure time
Mak esure that th etimes et in th evehicle is
correc tbefore settin gthe departur etim e(see
th es eparate operatin ginstructions). Other-
wise, th eauxiliar yheating may switch on at
th ew rongtimea nd at an unsuitable location.
When settin gthe departur etime, also
observ ethe important safety notes
(Y page 168). 170
Operating th
eclimate control systemClimate control
Page 174 of 497
X
Briefly press the ubutton.
X Press the ,or. button repeatedly
unti lthe time to be changed appears in the
display.
X Press the uand^ buttons simulta-
neously.
The Îsymbo linthe remote control dis-
play flashes.
X Press the ,or. button to set the
desire ddeparture time.
i The longer yo
upress the ,or.
button, the faster the time changes.
X Press the uand^ button simulta-
neously.
The new departure time is stored.
Activating the se tdeparture time
X Briefly press the ubutton.
X Press the ,or. button repeatedly
unti lthe desire ddeparture time appears in
the display.
X Press the ubutton.
The Ísymbol, the departure time and,
depending on the selected departure time, the letter A, BorCappea rinthe display.
Deactivatin gthe se tdeparture time
X Briefly press the ubutton.
The statu softhe auxiliary heating is shown
in the display.
X Press the .button.
The firs tdeparture time store dappears in
the display.
X Press the ^button.
OFF
OFF is shown in the remote control display.
Replacing the remote control battery Important safety notes
G
WARNING
Batterie scontai ntoxic and corrosiv esubstan-
ces. If batterie sare swallowed, it can result in
severe health problems. There is ariskoff atal
injury. Kee
pbatterie soutof the reach of children. If
ab attery is swallowed, see kmedica lattention
immediately. H
Environmental note Batterie
scontai npollutants.
It is illega ltodispose of them
with the household rubbish.
The ym ustb ec ollected sep-
arately and disposed of in an environmentally responsible
recycling system. Dispose of batterie
sinan
environmentally responsible
manner. Take discharged
batterie stoaqualified spe-
cialist worksho portoacol-
lection point for used batter-
ies.
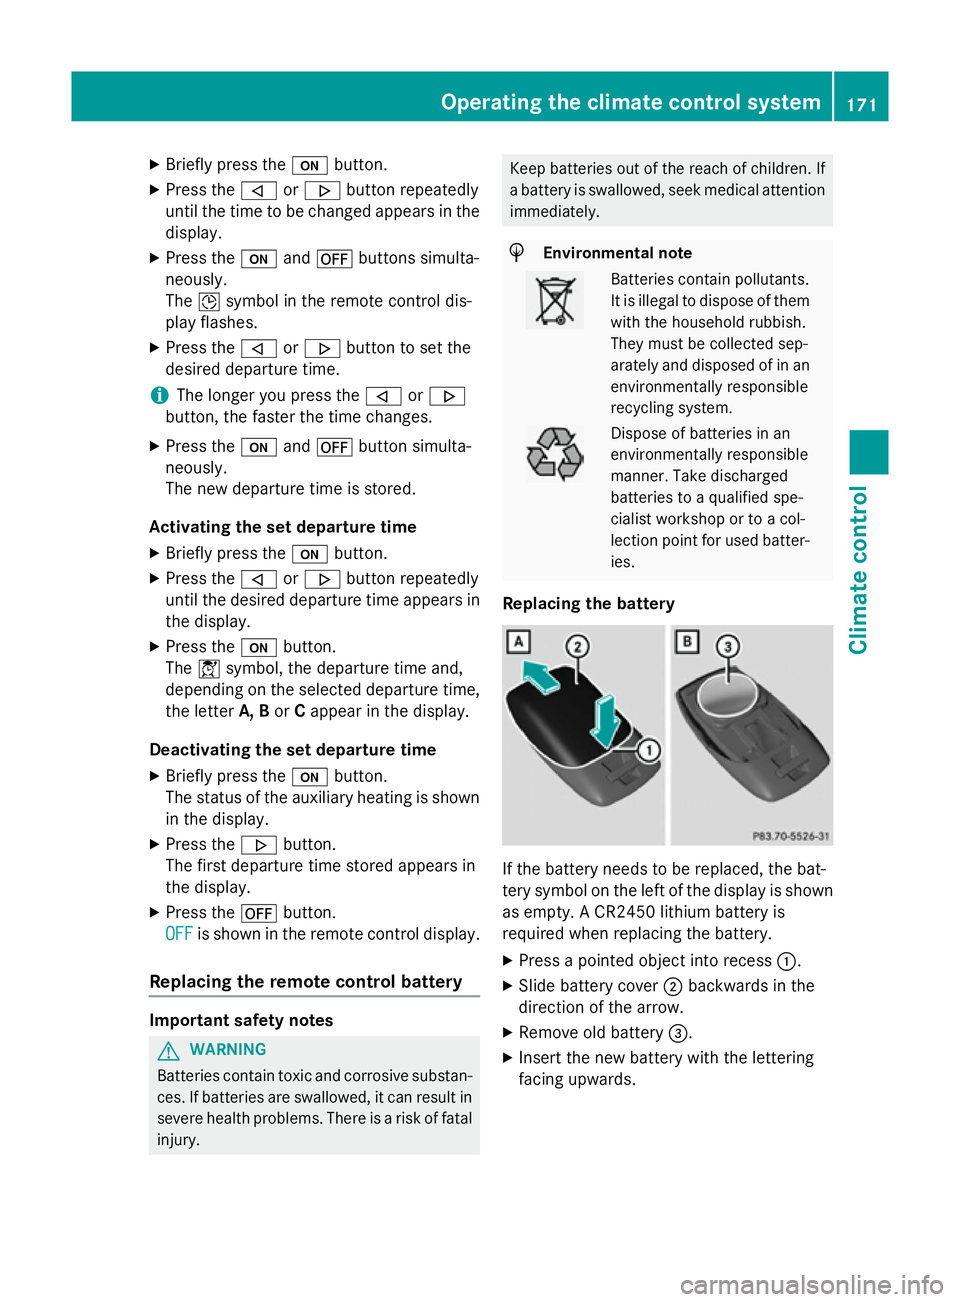
Replacing the battery If the battery need
stobereplaced, the bat-
tery symbo lonthe left of the display is shown
as empty. ACR2450 lithiu mbattery is
required whe nreplacing the battery.
X Press apointed object into recess :.
X Slide battery cover ;backwards in the
direction of the arrow.
X Remove old battery =.
X Inser tthe new battery with the lettering
facing upwards. Operating the climate control system
171Climate control Z