headlamp MERCEDES-BENZ E-CLASS SALOON 2015 User Guide
[x] Cancel search | Manufacturer: MERCEDES-BENZ, Model Year: 2015, Model line: E-CLASS SALOON, Model: MERCEDES-BENZ E-CLASS SALOON 2015Pages: 497, PDF Size: 16.23 MB
Page 148 of 497
The blue
Kindicator lamp in the instru-
ment cluster lights up when the main-beam headlamps are switched on.
X To deactivate: move the combination
switch back to its normal position.
The blue Kindicator lamp in the instru-
ment cluster goes out.
Vehicles with Adaptive Highbeam Assist
Plus: when Adaptive Highbeam Assist Plus is
activated, it automatically controls activation
and deactivation of the main-beam head-
lamps (Y page 147).
Headlam pflasher X
To switch on: turn the key in the ignition
lock to position 1or 2,ors tart the engine.
X Pull the combination switch in the direction
of arrow =. Hazard warning lamps
X
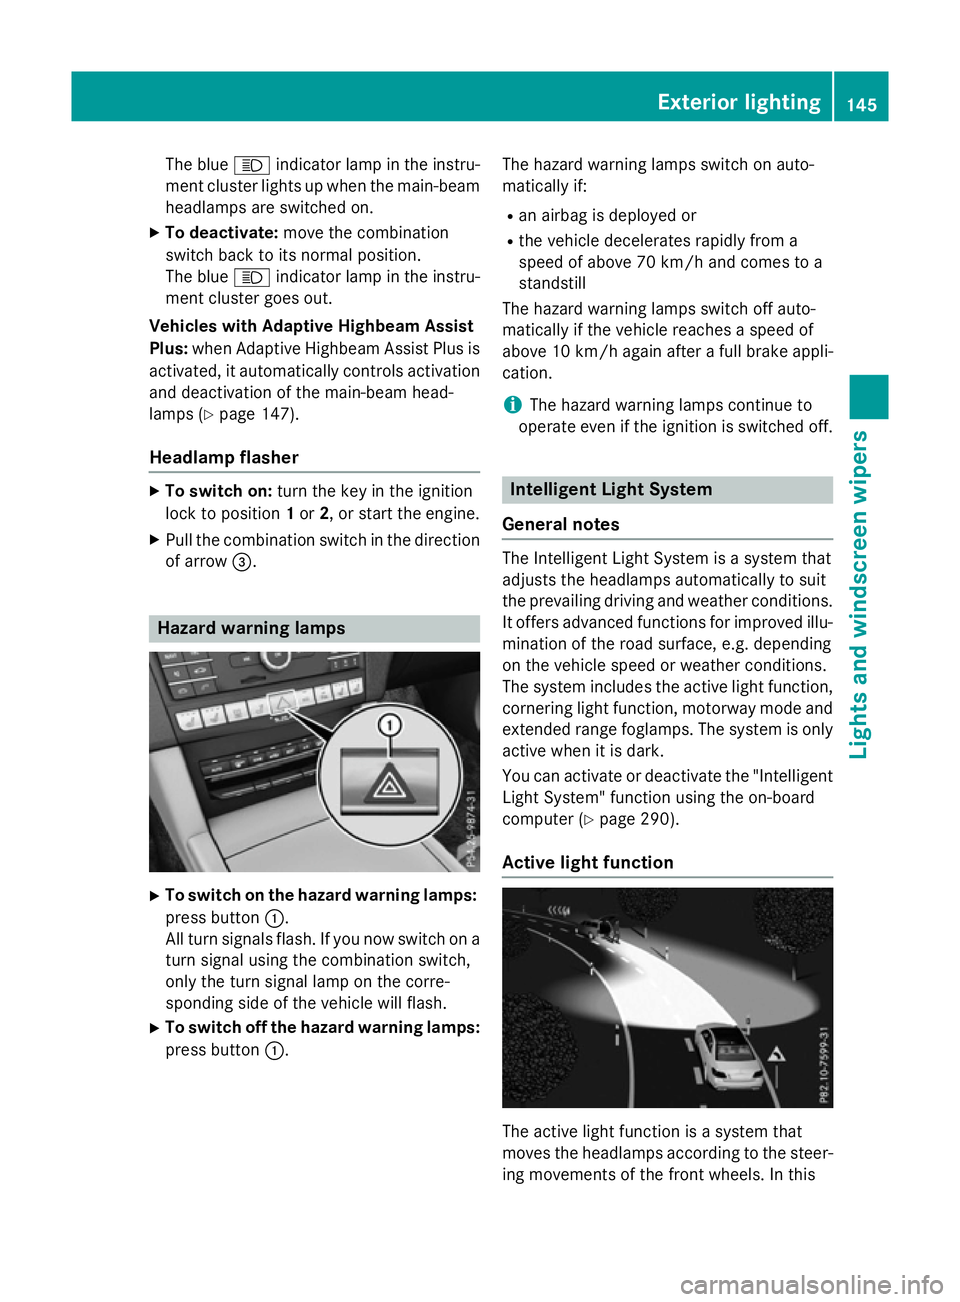
To switch on the hazard warning lamps:
press button :.
All turn signals flash. If you now switch on a turn signal using the combination switch,
only the turn signal lamp on the corre-
sponding side of the vehicle will flash.
X To switch off the hazard warning lamps:
press button :. The hazard warning lamps switch on auto-
matically if:
R an airbag is deployed or
R the vehicle decelerates rapidly from a
speed of above 70 km/ha nd comes to a
standstill
The hazard warning lamps switch off auto-
matically if the vehicle reaches aspeed of
above 10 km/ha gain afterafull brake appli-
cation.
i The hazard warning lamps continue to
operate even if the ignition is switched off. Intelligent Light System
General notes The Intelligent Light System is
asystem that
adjusts the headlamps automatically to suit
the prevailing driving and weather conditions.
It offers advanced functions for improved illu-
mination of the road surface, e.g. depending
on the vehicle speed or weather conditions.
The system includes the active light function, cornering light function, motorway mode and
extended range foglamps. The system is only active when it is dark.
You can activate or deactivate the "IntelligentLight System" function using the on-board
computer (Y page 290).
Active light function The active light function is
asystem that
moves the headlamps according to the steer-
ing movements of the front wheels. In this Exterior lighting
145Lights and windscreen wipers Z
Page 150 of 497
Adaptive Highbeam Assis
tPlus
Genera lnotes Wit
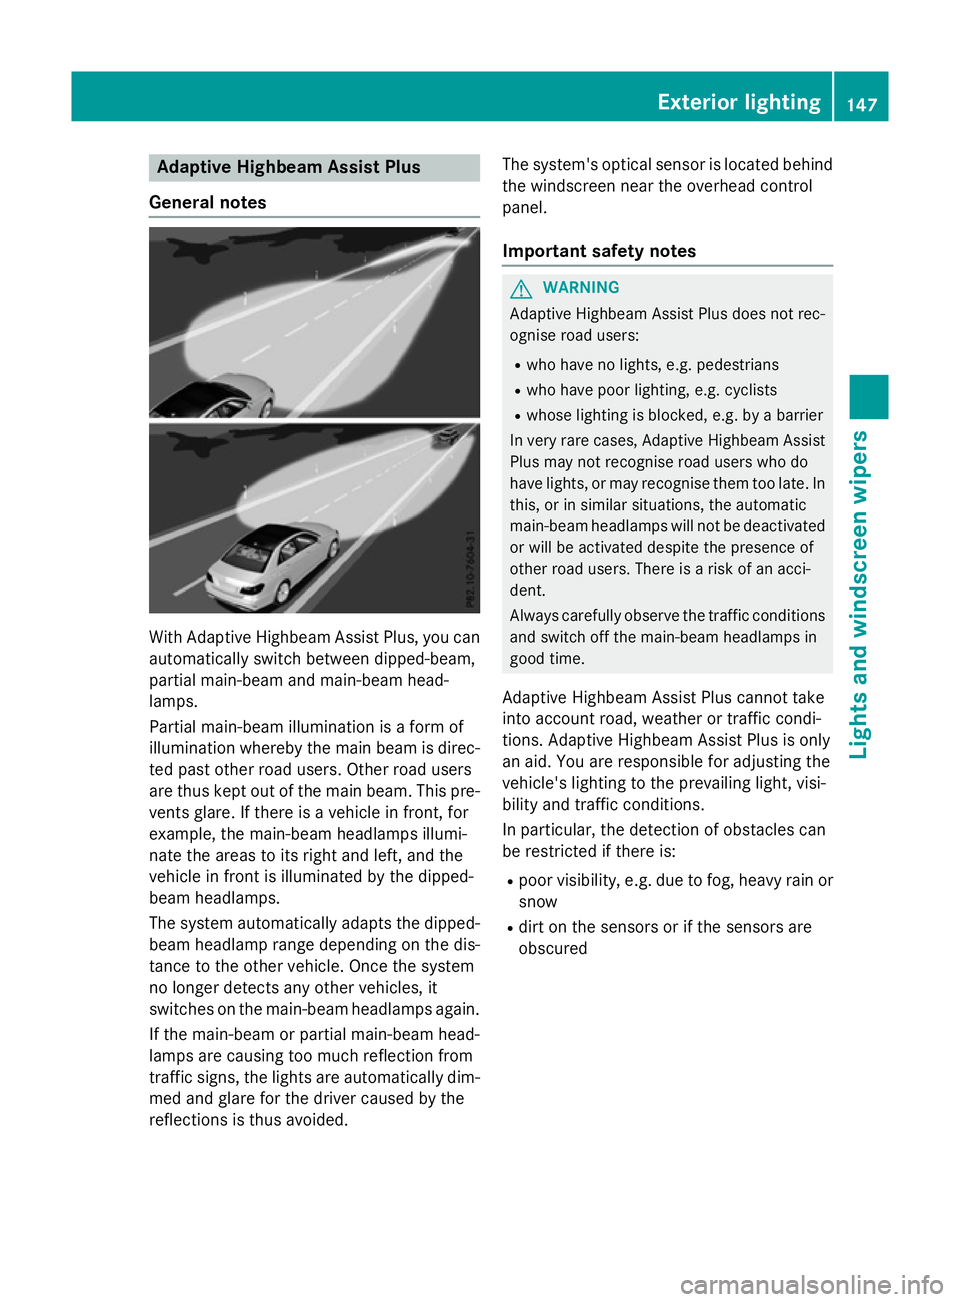
hAdaptive Highbeam Assis tPlus, you can
automatically switch between dipped-beam,
partial main-beam and main-beam head-
lamps.
Partial main-beam illumination is aformof
illumination whereby th emain beam is direc-
te dp ast other road users. Other road users
are thus kept out of th emain beam .This pre-
vents glare. If there is avehicl einf ront,for
example, th emain-beam headlamps illumi-
nat ethe areas to it sright and left, and the
vehicl einfrontis illuminate dbythedipped-
beam headlamps.
The system automatically adapt sthe dipped-
beam headlamp range depending on th edis-
tance to th eother vehicle. Once th esystem
no longer detects any other vehicles, it
switches on th emain-beam headlamps again.
If th emain-beam or partial main-beam head-
lamp sare causing to omuchr eflection from
traffic signs, th elights are automatically dim-
med and glar efor th edriver caused by the
reflection sisthusa voided. The system'
soptical sensor is locate dbehind
th ew indscree nnearthe overhead control
panel.
Important safety notes G
WARNING
Adaptive Highbea mAssistP lus does no trec-
ognise road users:
R who hav enolights,e.g.p edestrians
R who hav epoor lighting ,e.g.c yclists
R whos elighting is blocked, e.g. by abarrier
In ver yrarec ases, Adaptive Highbea mAssist
Plus may no trecognise road user swho do
hav elights ,orm ay recognise them to olate. In
this, or in similar situations, th eautomatic
main-beam headlamp swill no tbed eactivated
or will be activated despit ethe presence of
other road users. There is ariskofana cci-
dent.
Always carefully observ ethe traffic conditions
and switch off th emain-beam headlamp sin
goo dtime.
Adaptive Highbeam Assis tPlus canno ttake
int oa ccoun troad ,weather or traffic condi-
tions. Adaptive Highbeam Assis tPlus is only
an aid. You are responsible for adjusting the
vehicle's lighting to th eprevailing light, visi-
bilit yand traffic conditions.
In particular, th edetection of obstacles can
be restricted if there is:
R poor visibility, e.g. due to fog ,heav yrain or
snow
R dirt on th esensor sorift hesensor sare
obscured Exterior lighting
147Lightsand windscreen wipers Z
Page 151 of 497
Switching Adaptive Highbeam Assist
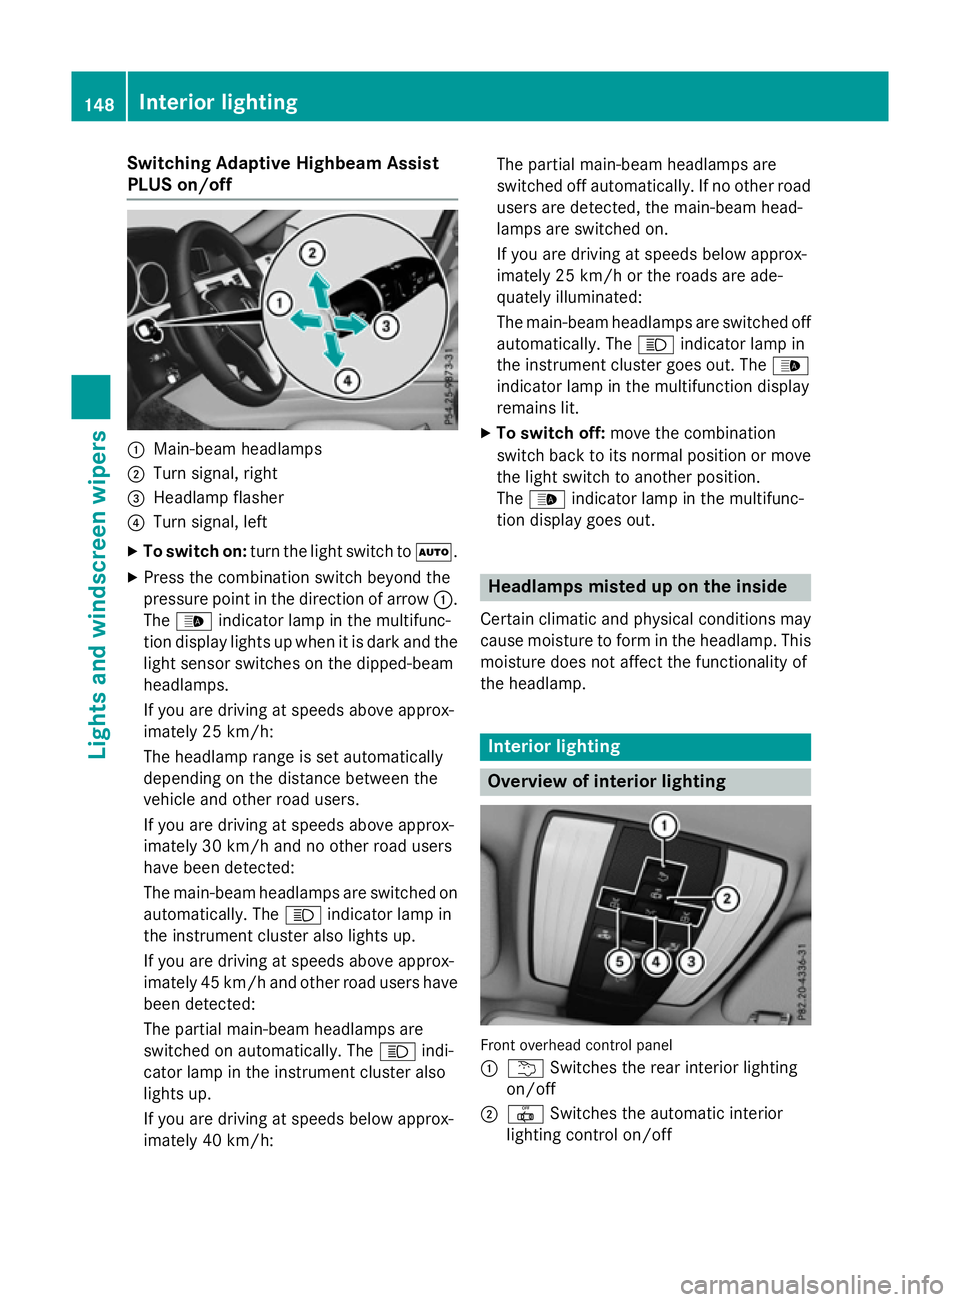
PLUS on/off :
Main-beam headlamps
; Turn signal, right
= Headlamp flasher
? Turn signal, left
X To switch on: turn the light switch to Ã.
X Press the combination switch beyond the
pressure point in the direction of arrow :.
The _ indicator lamp in the multifunc-
tion display lights up when it is dark and the
light sensor switches on the dipped-beam
headlamps.
If you are driving at speeds above approx-
imately 25 km/h:
The headlamp range is set automatically
depending on the distance between the
vehicle and other road users.
If you are driving at speeds above approx-
imately 30 km/ha nd no other road users
have been detected:
The main-beam headlamps are switched on automatically. The Kindicator lamp in
the instrumen tcluster also lights up.
If you are driving at speeds above approx-
imately 45 km/ha nd otherroa du sers have
been detected:
The partia lmain-bea mheadlamps are
switched on automatically. The Kindi-
cato rlam pint he instrument cluster also
lights up.
If yo uaredriving at speed sbelow approx-
imatel y40k m/h: The partia
lmain-bea mheadlamps are
switched off automatically. If no othe rroad
users ar edetected, the main-bea mhead-
lamps ar eswitched on.
If yo uaredriving at speed sbelow approx-
imatel y25k m/h or the roads ar eade-
quately illuminated:
The main-bea mheadlamps ar eswitched off
automatically. The Kindicator lamp in
the instrument cluster goe sout.T he _
indicator lamp in the multifunctio ndisplay
remains lit.
X To switc hoff:mov ethe combination
switch back to its normal positio normove
the light switch to another position.
The _ indicator lamp in the multifunc-
tio nd isplay goe sout. Headlamps misted up on the inside
Certai nclimatic and physica lconditions may
cause moisture to form in the headlamp. This
moisture does not affect the functionality of
the headlamp. Interior lighting
Overview of interior lighting
Front overhead contro
lpan el
: u Switche sthe rea rinterio rlighting
on/off
; | Switche sthe automatic interior
lighting contro lon/off 148
Interior lightingLights and
windscreen wipers
Page 152 of 497
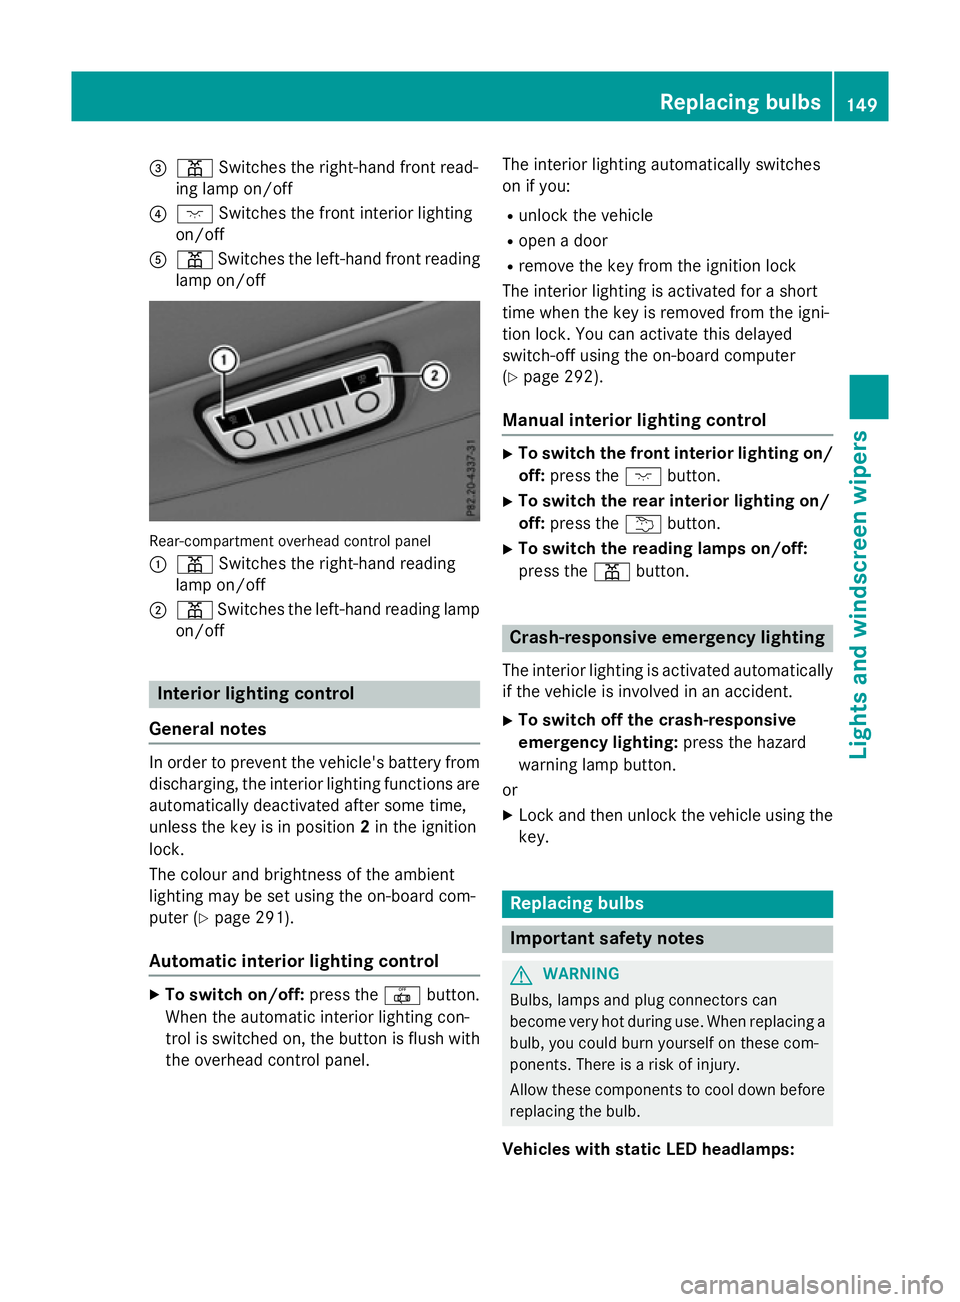
=
p Switches the right-hand front read-
ing lamp on/off
? c Switches the front interio rlighting
on/off
A p Switches the left-hand front reading
lamp on/off Rear-compartment overhead contro
lpan el
: p Switches the right-hand reading
lamp on/off
; p Switches the left-hand reading lamp
on/off Interior lighting control
General notes In order to prevent the vehicle's battery from
discharging, the interio rlighting functions are
automaticall ydeactivate daftersom etime,
unless the key is in position 2in the ignition
lock.
The colou rand brightness of the ambient
lighting may be set using the on-board com-
puter (Y page 291).
Automatic interior lighting control X
To switc hon/off: press the |button.
Whe nthe automatic interio rlighting con-
trol is switche don, the button is flush with
the overhead control panel. The interio
rlighting automaticall yswitches
on if you:
R unlock the vehicle
R ope nad oor
R remove the key from the ignition lock
The interio rlighting is activate dfor as hort
time when the key is removed from the igni-
tion lock. Yo ucan activate this delayed
switch-off using the on-board computer
(Y page 292).
Manua lint erior lighting control X
To switc hthe fron tint erior lighting on/
off: press the cbutton.
X To switc hthe rear interior lighting on/
off: press the ubutton.
X To switc hthe reading lamps on/off:
press the pbutton. Crash-responsive emergenc
ylighting
The interio rlighting is activate dautomatically
if the vehicl eisinvolve dinana ccident.
X To switc hoff the crash-responsive
emergenc ylighting: press the hazard
warning lamp button.
or X Lock and then unlock the vehicl eusing the
key. Replacing bulbs
Important safety notes
G
WARNING
Bulbs, lamps and plug connectors can
become very hot during use. Whe nreplacing a
bulb ,you could burn yoursel fonthesecom-
ponents. There is ariskofi njury.
Allow thes ecomponents to cool dow nbefore
replacing the bulb.
Vehicles with stati cLED headlamps: Replacing bulbs
149Lights and windscree nwipers Z
Page 153 of 497
Do not us
eabulbt hath as been dropped or if
its glas stub eh asbeen scratched.
Th eb ulbm ayexplode if:
R yo ut ouch it
R it is hot
R yo ud ropit
R yo us cratch it
Onl yoperate bulb sinenclose dlam ps
designe dfor tha tpurpose .Onlyf it spare
bulb soft he same typ eand the specifie dvolt-
age.
Marks on the glas stub er educe the service
life of the bulbs. Do not touch the glas stube
with your bare hands .Ifnecessary ,clean the
glas stub ew henc oldw itha lcohol or spirit and
ru bito ff with alint-fre ecloth.
Protect bulb sfromm oisture during opera-
tion. Do not allo wbulbs to come into contact
with liquids.
Replace onl ythe bulb sliste d( Ypage 150).
Have the bulb sthatyou cannot replace your-
self replaced at aquali fied specialis twork-
shop.
If yo urequire assistance replacing bulbs, con-
sult aquali fied specialis tworkshop.
If the new bulb still does not ligh tup,consult
aq uali fied specialis tworkshop.
Bulb sand lamps ar eanimportant aspect of
vehicl esafety .You must therefore make sure
tha tthese functio ncorrectl yatalltimes.
Have the headlamp setting checked regularly.
Vehicle swithI ntelligent Light System
Th ef ront and rea rlight clusters of your vehi-
cle ar eequippe dwithL ED ligh tbulbs .Don ot
replace the bulb syoursel f. Contact aquali fied
specialis tworkshop which ha sthe necessary
specialis tknowledg eand tools to carry out
the work required.
Lamps ar eanimportant aspect of vehicle
safety .You must therefore make sure that
these functio ncorrectl yatalltimes .Havet he
headlamp setting checked regularly. Overvie
wofbulbr eplacement –bulbs
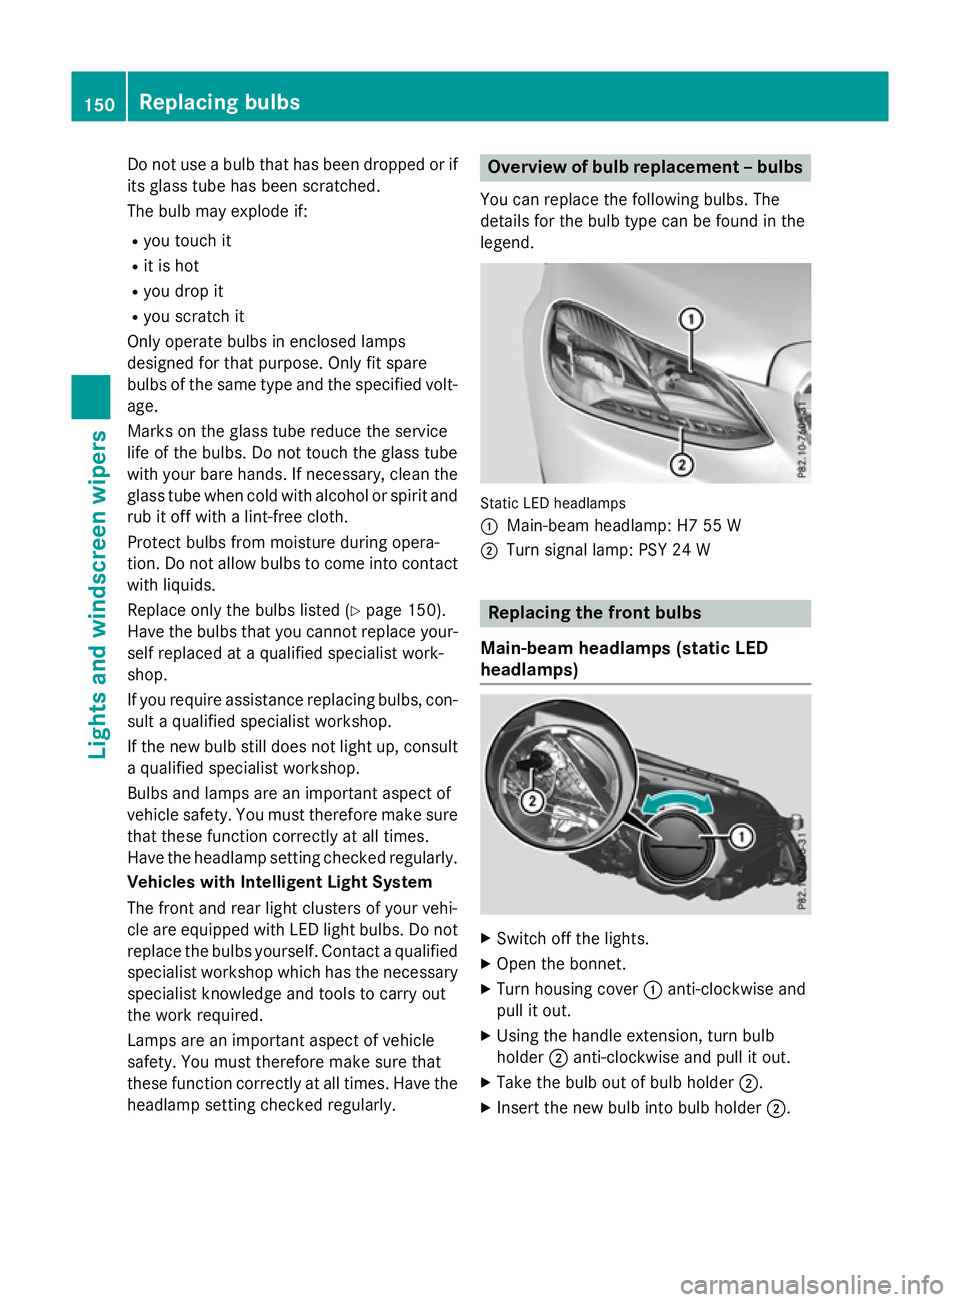
Yo uc an replace the following bulbs. The
details for the bulb typ ecan be found in the
legend. Static LED headlamps
:
Main-bea mheadlam p: H7 55 W
; Turn signa llam p: PSY 24 W Replacin
gthe front bulbs
Main-bea mheadlamps (static LED
headlamps) X
Switch off the lights.
X Open the bonnet.
X Turn housing cover :anti-clockwise and
pull it out.
X Using the handl eextension, tur nbulb
holder ;anti-clockwise and pull it out.
X Take the bulb ou tofbulbh older ;.
X Insert the new bulb into bulb holder ;.150
Replacin
gbulbsLights and windscreen wipers
Page 294 of 497
X
Press the :or9 button to select the
Intell. Light Sys.
Intell. Light Sys. function.
If the Intell. Light Sys.
Intell. Light Sys. function has
been switched on, the cone of light and the L symbol in the multifunction display
are shown in orange.
X Press the abutton to save the setting.
When you switch the Intell. Light Sys.
Intell. Light Sys.
function on, you activat ethe following func-
tions:
R Motorway mode
R Active light function
R Cornerin glight function
R Extended range foglamps
If you set the dipped-beam headlamps for
driving on the right/left, the multifunction
display shows the Intell.
Intell. Light LightSystem:
System:
System inoperative Inactive for
System inoperative Inactive for
left-side traffic left-side traffic orIntell. Light
Intell. Light
System:
System: System
Systeminoperative
inoperative Inactive
Inactive
for right-sid etraffic
for right-sid etraffic display message
instead of the Intell.
Intell. Light
LightSys.
Sys.function
in the Light
Light submenu (Y page 291). This
display message will only appear if the setting for driving on the left/right is set opposite to
your vehicle's country version.
Observe the additional information on the
Intelligent Light System (Y page 145).
Setting the dipped-beam headlamps for
driving on the left/right
This function is only availabl eonvehicles with
the Intelligent Light System.
You can use this function to switch between
symmetrical and asymmetrical dipped beam
(Y page 142).
X Press the =or; button on the steer-
ing wheel to select the Settings
Settings menu.
X Press the :or9 button to select the
Light
Light submenu.
X Press ato confirm. X
Press the :or9 button to select the
Dipped beams Setting for: Dipped beams Setting for: function.
You will see the selected setting: Right-
Right-
side traffic
side traffic orLeft-side traffic
Left-side traffic.
X Press the abutton to save the setting.
If you change the setting, conversion does
not take place until the next time the vehi-
cle is stationary.
If you set the dipped-beam headlamps for
driving on the right/left, then motorway
mode and the extended range foglamps are
unavailable. These are only deactivated if the
setting for driving on the left/right is set
opposite to your vehicle's country version.
Aq ualified specialist workshop can set the
dipped-beam headlamps for driving on the
left/right.
Setting the brightness of the ambient
lighting
X Press the =or; button on the steer-
ing wheel to select the Settings
Settings menu.
X Press the :or9 button to select the
Lights Lights submenu.
X Press ato confirm.
X Press the :or9 button to select the
Amb. light +/-
Amb. light +/- function.
You will see the selected setting.
X Press ato confirm.
X Press the :or9 button to adjust the
brightness to any level from Off
OfftoLevel 5
Level 5
(bright).
X Press the aor% button to save the
setting.
Setting the ambient lighting colour X Press the =or; button on the steer-
ing wheel to select the Settings
Settingsmenu.
X Press the :or9 button to select the
Lights
Lights submenu.
X Press ato confirm.
X Press the :or9 button to select the
Amb. light col.
Amb. light col. function.
X Press ato confirm. Menus and submenus
291On-board computer and displays Z
Page 295 of 497
X
Press the :or9 button to set the
colour to SOLAR SOLAR,NEUTRAL NEUTRAL orPOLAR
POLAR.
X Press the aor% button to save the
setting.
Activating/deactivating the surround
lighting and exterior lighting delayed
switch-off
X Press the =or; button on the steer-
ing wheel to select the Settings
Settings menu.
X Press the :or9 button to select the
Light Light submenu.
X Press ato confirm.
X Press the :or9 button to select the
Surround lighting
Surround lighting function.
If the Surround
Surround lighting
lightingfunction is acti-
vated, the light cone and the area around
the vehicle are displayed in orange in the
multifunction display.
X Press the abutton to save the setting.
Deactivating delayed switch-off of the exte-
rior lighting temporarily:
X Before leaving the vehicle, turn the key to
position 0in the ignition lock.
X Turn the key to position 2in the ignition
lock.
The exterior lighting delayed switch-off is
deactivated.
Delayed switch-off of the exterior lighting is
reactivated the next time you start the
engine.
If you have activated the Surround light‐
Surround light‐
ing
ing function and the light switch is set to
Ã,t he following functions are activated
when it is dark:
R surround lighting: the exterior lighting
remains lit for 40 seconds after unlocking
with the key. If you start the engine, the
surround lighting is switched off and auto-
matic headlamp mode is activated
(Y page 143).
R exterior lighting delayed switch-off: the
exterior lighting remains lit for 60 seconds
after the engine is switched off. If you close all the doors and the boot lid/tailgate, the
exterior lighting goes off after 15 seconds.
i Dependin
gonyour vehicle's equipment,
when the surround lighting and delayed
switch-off exterior lighting are on, the fol-
lowing light up:
R Side lamps
R Surround lighting in the exterior mirrors
Activating/deactivating the interior light-
ing delayed switch-off
If you activat ethe Light. delay Switch Light. delay Switch
off
off function, the interior lighting remains on
for 20 seconds after you remove the key from the ignition lock.
X Press the =or; button on the steer-
ing wheel to select the Settings
Settings menu.
X Press the :or9 button to select the
Light
Light submenu.
X Press ato confirm.
X Press the :or9 button to select the
Light. delay
Light. delay function.
If the Light. delay
Light. delay function has been
switched on, the vehicle interior is dis-
played in orange in the multifunction dis-
play.
X Press the abutton to save the setting.
Vehicle Setting permanent SPEEDTRONIC
X Press the =or; button on the steer-
ing wheel to select the Settings Settingsmenu.
X Press the :or9 button to select the
Vehicle
Vehicle submenu.
X Press ato confirm.
X Press :or9 to select the Limit
Limit
speed (winter tyres):
speed (winter tyres): function.
You will see the curren tsetting.
X Press ato confirm.
X Press the :or9 button to adjust
permanen tSPEEDTRONIC in increment sof
ten (240 km/h 240 km/h to160 km/h
160 km/h). The Off
Offset- 292
Menus and submenusOn-board computer and displays
Page 310 of 497
Display messages
Possible causes/consequences and
M
MSolutions 6
Rea
rc entre mal‐
Rea rc entre mal‐
function Consult function Consult
workshop workshop The restrain
tsystem has malfunctioned at th erear centre. The
6 warnin glamp also lights up in th einstrument cluster.
G WARNING
The airbags or belt tensioners may either be triggered uninten-
tionally or, in th eevent of an accident, may no tbetriggered.
This poses an increase driskofi njury.
X Consult aqualified specialist workshop. 6
Left Left
windowbag
windowbag mal‐
mal‐
function Consult
function Consult
workshop workshopor Right
Right
windowbag malfunc‐
windowbag malfunc‐
tio nC onsul twork‐
tio nC onsul twork‐
shop shop The lef
torright windowbag is malfunctioning.
The 6 warnin glamp also lights up in th einstrument cluster.
G WARNING
The lef torright windowbag may either be triggered unintentionally
or, in th eevent of an accident, may no tbetriggered.
This poses an increase driskofi njury.
X Consult aqualified specialist workshop. Lights
i Vehicles wit
hLED ligh tbulbs in th eligh tclusters:
The display message fo rthe correspondin gligh twill only appea rifall theLEDsh avef ailed. Display messages
Possible causes/consequences and
M
MSolutions b
Lef
tc ornering
Lef tc ornering
light light orRight cor‐
Right cor‐
nering light
nering light The lef
torright-hand cornering ligh tisfaulty.
X Consult aqualified specialist workshop. b
Lef
td ipped beam
Lef td ipped beam
or Right dipped Right dipped
beam
beam The lef
torright-hand dipped-beam headlamp is faulty.
X Consult aqualified specialist workshop. b
Traile
rleftt ail
Traile rleftt ail
lamp lampor Trailer
Trailer
right tai llamp
right tai llamp The lef
torright-hand trailer tai llamp is faulty.
X Consult th emanufacturer' soperating instructions. Display
messages
307On-boardcomputer an ddisplays Z
Page 311 of 497
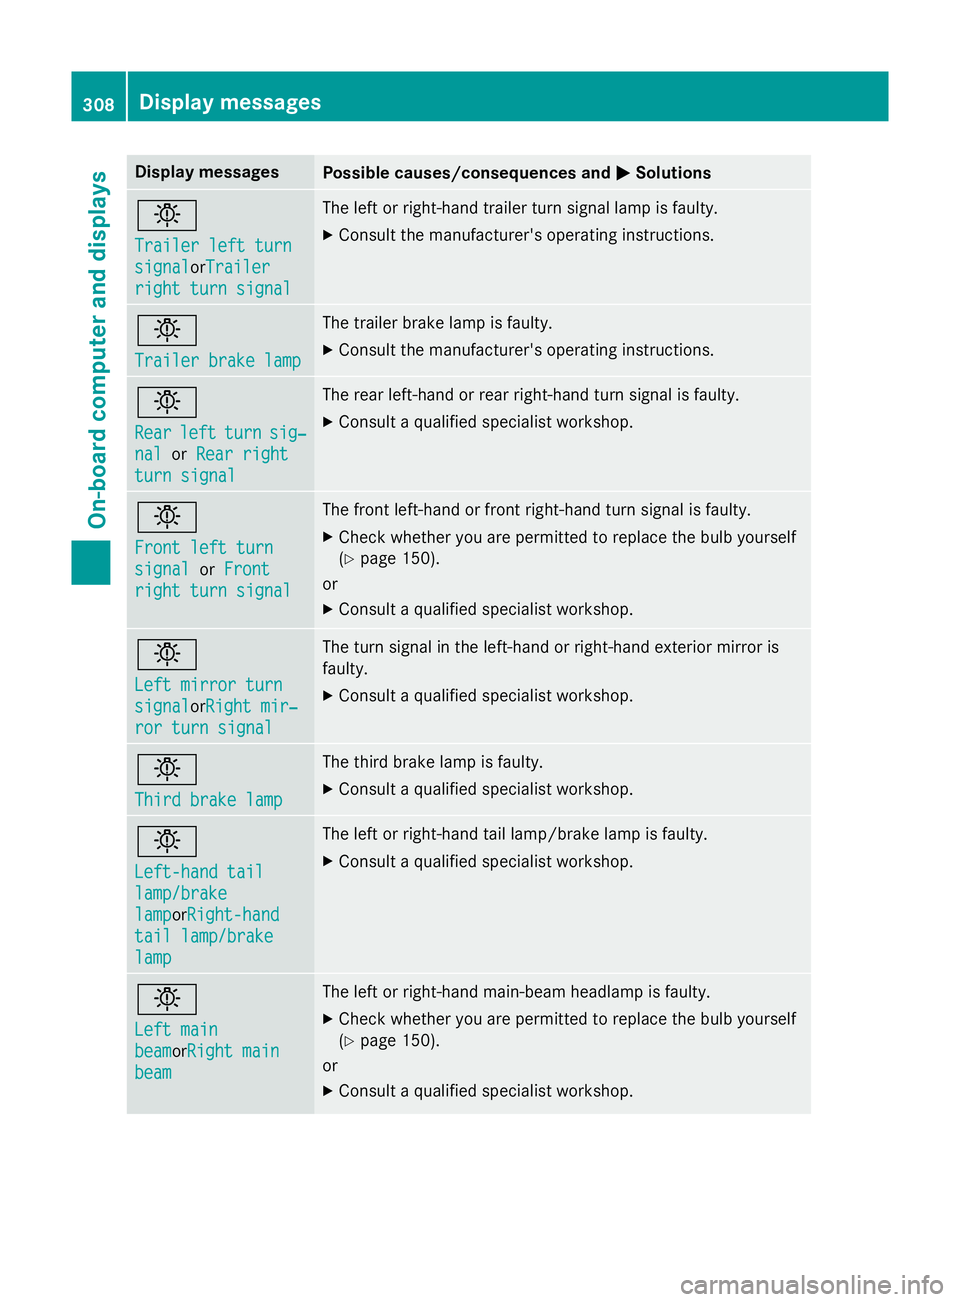
Display messages
Possible causes/consequences and
M
MSolutions b
Traile
rleftt urn
Traile rleftt urn
signal signal orTrailer
Trailer
right tur nsignal
right tur nsignal The lef
torright-hand trailer tur nsignal lamp is faulty.
X Consult th emanufacturer' soperating instructions. b
Traile
rbrake lamp
Traile rbrake lamp The trailer brak
elamp is faulty.
X Consult th emanufacturer' soperating instructions. b
Rear Rear
left
leftturn
turn sig‐
sig‐
nal
nal orRea rr ight
Rea rr ight
tur ns ignal
tur ns ignal The rear left-han
dorrear right-hand tur nsignal is faulty.
X Consult aqualified specialist workshop. b
Front lef
tturn
Front lef tturn
signal signal orFront
Front
right tur nsignal
right tur nsignal The fron
tleft-han dorfrontright-hand tur nsignal is faulty.
X Chec kwhether you are permitte dtor eplac ethe bulb yourself
(Y page 150).
or
X Consult aqualified specialist workshop. b
Lef
tm irror turn
Lef tm irror turn
signal signal orRightm ir‐
Right mir‐
ror tur nsignal
ror tur nsignal The tur
nsignal in th eleft-han dorright-hand exterio rmirror is
faulty.
X Consult aqualified specialist workshop. b
Third brake lamp Third brake lamp The third brak
elamp is faulty.
X Consult aqualified specialist workshop. b
Left-hand tail Left-hand tail
lamp/brake lamp/brake
lamp lampor
Right-hand
Right-hand
tai ll amp/brake
tai ll amp/brake
lamp
lamp The lef
torright-hand tai llamp/brak elamp is faulty.
X Consult aqualified specialist workshop. b
Lef
tm ain
Lef tm ain
beam beamor Right main
Right main
beam
beam The lef
torright-hand main-beam headlamp is faulty.
X Chec kwhether you are permitte dtor eplac ethe bulb yourself
(Y page 150).
or
X Consult aqualified specialist workshop. 308
Display
messagesOn-boardcomputer an ddisplays