auxiliary battery MERCEDES-BENZ E-CLASS SALOON 2015 Owners Manual
[x] Cancel search | Manufacturer: MERCEDES-BENZ, Model Year: 2015, Model line: E-CLASS SALOON, Model: MERCEDES-BENZ E-CLASS SALOON 2015Pages: 497, PDF Size: 16.23 MB
Page 9 of 497
Activating/deactivating (o
nthe
centre console) .............................. 169
Display message ............................ 327
Important safety note s.................. 168
Setting ........................................... 293
Auxiliary heating/ventilation
Problem (displa ymessage) ............ 173
Remote control .............................. 169
Setting the departur etime ............. 170
Auxiliary ventilation
Activating/deactivating ................. 168
Activating/deactivating (o nthe
centre console ).............................. 169
Axle load, permissibl e(traile rtow-
ing) ...................................................... 489 B
Ball coupling Folding in ....................................... 270
Folding ou t..................................... 268
BAS (Brake Assist System) ................. 78
BAS PLUS (Brake Assist System
PLUS) with Cross-Traffi cAssist
Function/note s................................ 78
Important safety notes .................... 79
Battery (key)
Checking .......................................... 97
Replacing ......................................... 97
Battery (vehicle)
Charging ........................................ 404
Displa ymessage ............................ 312
Important safety notes .................. 401
Jump starting ................................. 405
Belt
see Sea tbelts
Bel ttensioner
Activation ......................................... 53
Blind Spo tAssist
Activating/deactivating (on-
board computer) ............................ 288
Displa ymessage ............................ 317
Notes/function .............................. 257
Trailer towing ................................. 259
see Active Blind Spot Assist
BlueTEC (AdBlue ®
) ............................. 477 Bonnet
Active bonne t(pede strian protec-
tion) ............................................... 378
Closing ........................................... 380
Displa ymessage ............................ 326
Important safety notes .................. 378
Opening ......................................... 380
Boot
Emergency release ........................ 109
Important safety notes .................. 103
Opening/closing (automatically
from inside )................................... 108
Opening/closing (automatically
from outside) ................................. 105
Opening/closing (fro mthe out-
side, HANDS-FREE ACCESS) .......... 106
Opening/closing (manuall yfrom
outside) ......................................... 104
Boo tlid
Displa ymessage ............................ 326
Opening dimensions ...................... 481
Boo tloa d( maximum) ........................ 481
Bottl eholders .................................... 362
Box (boot) ........................................... 354
Brake Assist
see BAS (Brake Assist System)
Brake fluid
Displa ymessage ............................ 303
Note s............................................. 479
Brake forc edistribution
see EBD (electroni cbrake force
distribution)
Brake lamps
Adaptive ........................................... 83
Displa ymessage ............................ 308
Brakes
ABS .................................................. 77
Adaptive Brake Assist ...................... 82
BAS .................................................. 78
BAS PLU SwithC ross-Traffic
Assist ............................................... 78
Brake fluid (notes) ......................... 479
Displa ymessage ............................ 300
Driving tip s.................................... 209
High-performance brake system .... 210
HOLD function ............................... 228
Important safety notes .................. 209
Parking brake ................................ 207 6
Index
Page 21 of 497
Sliding sunroo
f............................... 116
Reading lamp ..................................... 148
Rear benc hseat
Folding the backres tforwards/
back ............................................... 348
Rear compartment
Setting the ai rvents ...................... 174
Setting the airflow ......................... 164
Setting the temperature ................ 163
Rear foglamp
Displa ymessage ............................ 309
Switching on/of f........................... 143
Rear seat
Displa ymessage ............................ 326
Rear windo wblind ............................ 364
Rear windo wheating
Problem (fault) ............................... 166
Switching on/of f........................... 165
Rear windo wwiper
Replacing the wipe rblade .............. 153
Switching on/of f........................... 152
Rear-compartment seat belt sta-
tus indicator ........................................ 49
Rear-vie wmirror
Anti-dazzle mod e(automatic) ........ 137
Dipping (manual) ........................... 136
Refuelling
Fuelgauge ....................................... 34
Important safety notes .................. 200
Note sfor AMG vehicles ................. 475
Refuelling process ......................... 201
see Fuel
Remote control
Auxiliary heating/ventilation .......... 169
Changing the batteries (auxiliary
heating) ......................................... 171
Garag edooro pener ....................... 368
Programming (garage door
opener) .......................................... 369
Replacing bulbs
Important safety notes .................. 149
Overview of bulb types .................. 150
Replacing the battery (auxiliary
heatin gremote control) .................... 171
Rescue card ......................................... 28
Reserve (fuel tank)
see Fuel Reserve fuel
Displa ymessage ............................ 313
Warning lamp ................................. 336
Residual hea t(clim ate control) ........ 167
Restrain tsystem
Displa ymessage ............................ 306
Introduction ..................................... 44
Warning lamp ................................. 335
Warning lamp (function) ................... 45
Rev counter ........................................ 276
Revers egear
Engaging (automati ctransmis-
sion) ............................................... 189
Engaging (manua ltransmission) .... 189
Reversin gcamera
Cleaning instructions ..................... 390
Displays in the Audio display ......... 246
Displays in the COMAND display ... 246
Function/note s............................. 244
Switching on/of f........................... 245
Reversin gfeature
Panorama sliding sunroo f.............. 115
Roller sunblind s............................. 117
Sid ew indow s................................. 110
Sliding sunroo f............................... 115
Reversin gfunction
Boot lid/tailgate ............................ 104
Reversin glamp (display message) .. 309
Rolle rsunblind
Panorama sliding sunroo f.............. 117
Rear window .................................. 364
Roo flinin gand carpets (cleaning
instructions) ...................................... 392
Roo floa d( maximum) ........................ 481 S
Safety Childre ninthe vehicl e..................... 58
Safety net
Attaching ....................................... 353
Important safety information ......... 353
Safety system
see Driving safety systems
Seat
Adjusting the active multicontour
seat............................................... 128
Adjusting the multicontou rseat..... 128 18
Index
Page 170 of 497
immediately to open/close the side window
in the door. The side window stops. To con-
tinue closing the side window, pull on the
W switch.
X Convenience closing feature: press and
hold the gbutton until the side win-
dows and the sliding sunroof or the pano-
rama sliding sunroof are closed.
The indicator lamp above the gbutton
light sup. Air-recirculation mode is activa-
ted.
If part softhe body are in the closin garea
during convenienc eclosing, proceed as fol-
lows:
X Press the Wbutton to sto pthe side win-
dows.
The side windows stop.
X To the nopen the side windows ,press the
W button again.
X Press the 3button to sto pthe sliding
sunroof or panorama sliding sunroof.
The sliding sunroof or panorama sliding
sunroof stops.
X To the nopen the sliding sunroof or pano-
rama sliding sunroof, pull back on the 3
button.
i Notes on the automatic reversin gfeature
for:
R the side windows (Y page 110)
R the sliding sunroof (Y page 115)
R the panorama sliding sunroof
(Y page 115)
X Convenience opening feature: press and
hold the gbutton until the side win-
dows and the sliding sunroof or panorama
sliding sunroof have opened. The side win-
dows and the sliding sunroof or panorama
sliding sunroof move back to their original
position.
The indicator lamp above the gbutton
goes out. Air-recirculation mode is deacti-
vated. i
If you open the side windows
,the sliding
sunroof or the panorama sliding sunroof
manually after closing the mwith the con-
venienc eclosing feature, the ywill remain in
this position when opened using the con-
venienc eopening feature. Activating/deactivating th
eresidual
heat function
General notes The residual heat function is only available
with THERMOTRONI
Cautomatic climat econ-
trol.
It is possible to make use of the residual heat
of the engin etocontinue heatin gthe vehicle
for approximately 30 minutes after the engine
has been switched off .The heatin gtime
depends on the set interior temperature.
Activating/deactivating X
Turn the key to position 0in the ignition
lock or remove it (Y page 179).
X To activate: press theÌbutton.
The indicator lamp above the Ìbutton
light sup.
i If the residual heat function is activated,
the windows may mist up on the inside.
i The blower will run at
alow speed regard-
less of the airflow setting.
i If you activate the residual heat function
at high temperatures, only the ventilation
will be activated. The blower runs at
medium speed.
X To deactivate: press theÌbutton.
The indicator lamp above the Ìbutton
goes out.
Residual heat is deactivate dautomatically:
R after approximately 30 minutes
R when the ignition is switched on
R if the battery voltage drops
R when the auxiliary heatin gisswitched on Operating thec
limate control system
167Climate control Z
Page 171 of 497
Auxiliary heating
Important safety notes G
DANGER
If th eexhaust pipe is blocke dorsufficient
ventilation is no tpossible, toxic exhaust
fumes can ente rthe vehicle, especially car-
bon monoxide. This is th ecase, e.g. in
enclosed spaces, or if th evehicl eiss tuck in
snow. There is ariskoff atal injuries.
You should switch off th eauxiliary heating in
enclosed spaces whic hdonothav eane xtrac-
tion system, e.g. agarage. If th evehicl eis
stuck in snow and you mus tleav ethe auxiliary
heating running, keep th eexhaust pipe and
th ea rea around th evehicl eclear of snow. To
guarantee asufficien tsupply of fresh air, open
aw indow on th eside of th evehicl eaway from
th ew ind. G
WARNING
When th eauxiliary heating is switched on,
part soft hevehicl ecan become ver yhot.
Flammabl ematerials suc hasleaves, gras sor
twigs may ignit eiftheyc om eintoc ontact
with:
R hot part softheexhaust system
R thee xhaust gas itself
There is ariskoff ire.
When th eauxiliary heating is switched on,
mak esuret hat:
R no flammabl ematerials come int ocontact
wit hh ot vehicl ecom ponents
R thee xhaust gas can escape from the
exhaust pipe unhindered
R thee xhaust gas does no tcom eintoc ontact
wit hflammabl ematerials.
The auxiliary heating and th eexhaust gas dis-
charge location can be foun dinfrontof the
right-hand fron twheel.
! Operating th
eauxiliary heating/ventila-
tion draws on th evehicl ebattery. Afte ryou
hav eheated or ventilated th evehicl ea maximum of two times
,drivef or alonger
distance.
i Switc
hthe auxiliary heating on regularly
once amonth for about te nminutes.
The auxiliary heating heat sthe air in th evehi-
cle interior to th eset temperature. This
occur swithout usin gthe heat of th erunning
engine. The auxiliary heating is operated
directly usin gthe vehicle's fuel .For this rea-
son ,the tan kcontent mustbeatl east at
reserv efuel level to ensur ethatthe auxiliary
heating functions.
The auxiliary heating/ventilation automati-
call yadjust stoc hanges in temperature and
weather conditions. Fo rthisr eason ,the aux-
iliar yheating could switch from ventilation
mod etoh eating mod eorfromh eating mode
to ventilation mode.
The auxiliary heating switches off automati-
call yafter 50 minutes. This time limi tcan be
altered. To do this, visit aqualified specialist
workshop.
You canno tuse th eauxiliary ventilation to
cool th evehicl einterior to atem perature
lower than th eoutside temperature.
Before switchin gon X
Turn th ekeyto position 2in th eignition
loc k(Ypage 179).
X Se tthe desired temperature.
Auxiliar yheating or auxiliary ventilation can
also be switched on if th emanually set cli-
mat econtro lisactivated. Optimum comfort
is attained by setting th esystem to automatic
mode. Se tthe temperature to 22 †.
The auxiliary heating or auxiliary ventilation
can be switched on/off usin gthe butto non
th ec entre console or th eremot econtrol.
The on-board computer can be used to spec-
ify up to three departur etimes,o ne of which
may be preselected (Y page 293).168
Operating th
eclimat econtro lsystemClimat econt rol
Page 172 of 497
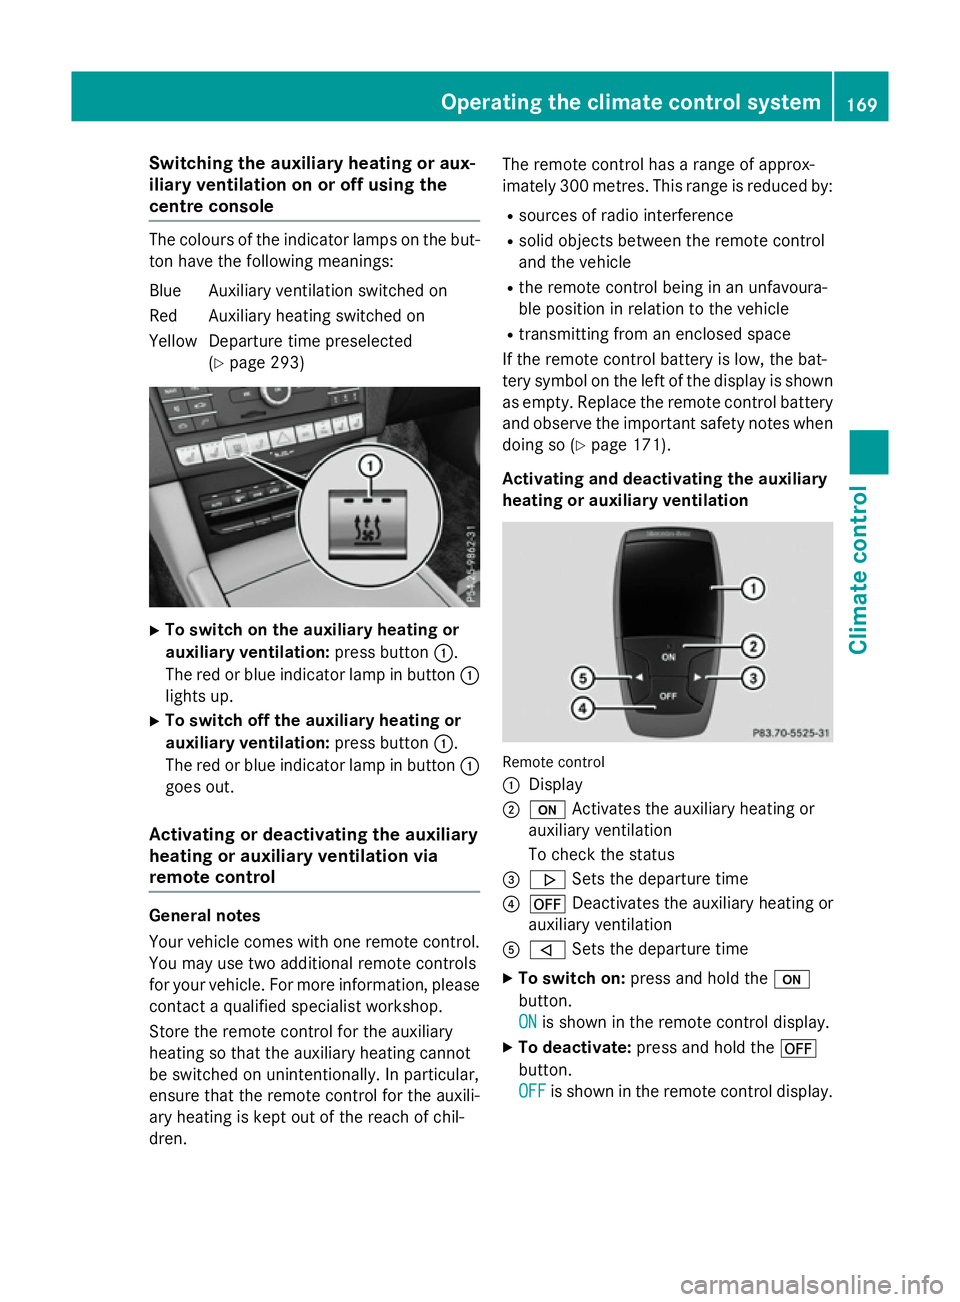
Switching the auxiliary heating or aux-
iliary ventilation on or off using the
centre console The colours of the indicator lamps on the but-
ton have the following meanings:
Blue Auxiliary ventilation switched on
Red Auxiliary heating switched on
Yellow Departure time preselected (Ypage 293) X
To switch on the auxiliary heating or
auxiliary ventilation: press button:.
The red or blue indicator lamp in button :
lights up.
X To switch off the auxiliary heating or
auxiliary ventilation: press button:.
The red or blue indicator lamp in button :
goes out.
Activating or deactivating the auxiliary
heating or auxiliary ventilation via
remote control General notes
Your vehicle comes with one remote control.
You may use two additional remote controls
for your vehicle. For more information ,please
contact aqualified specialist workshop.
Storet he remote control for the auxiliary
heating so that the auxiliary heating cannot
be switched on unintentionally. In particular,
ensure that the remote control for the auxili-
ary heating is kept out of the reach of chil-
dren. The remote control has
arange of approx-
imately 300 metres. This range is reduced by:
R sources of radio interference
R solid objectsb etween the remote control
and the vehicle
R the remote control being in an unfavoura-
ble position in relation to the vehicle
R transmittingf rom an enclosed space
If the remote control battery is low, the bat-
tery symbol on the left of the display is shown as empty. Replace the remote control battery
and observe the important safety notes when doing so (Y page 171).
Activating and deactivating the auxiliary
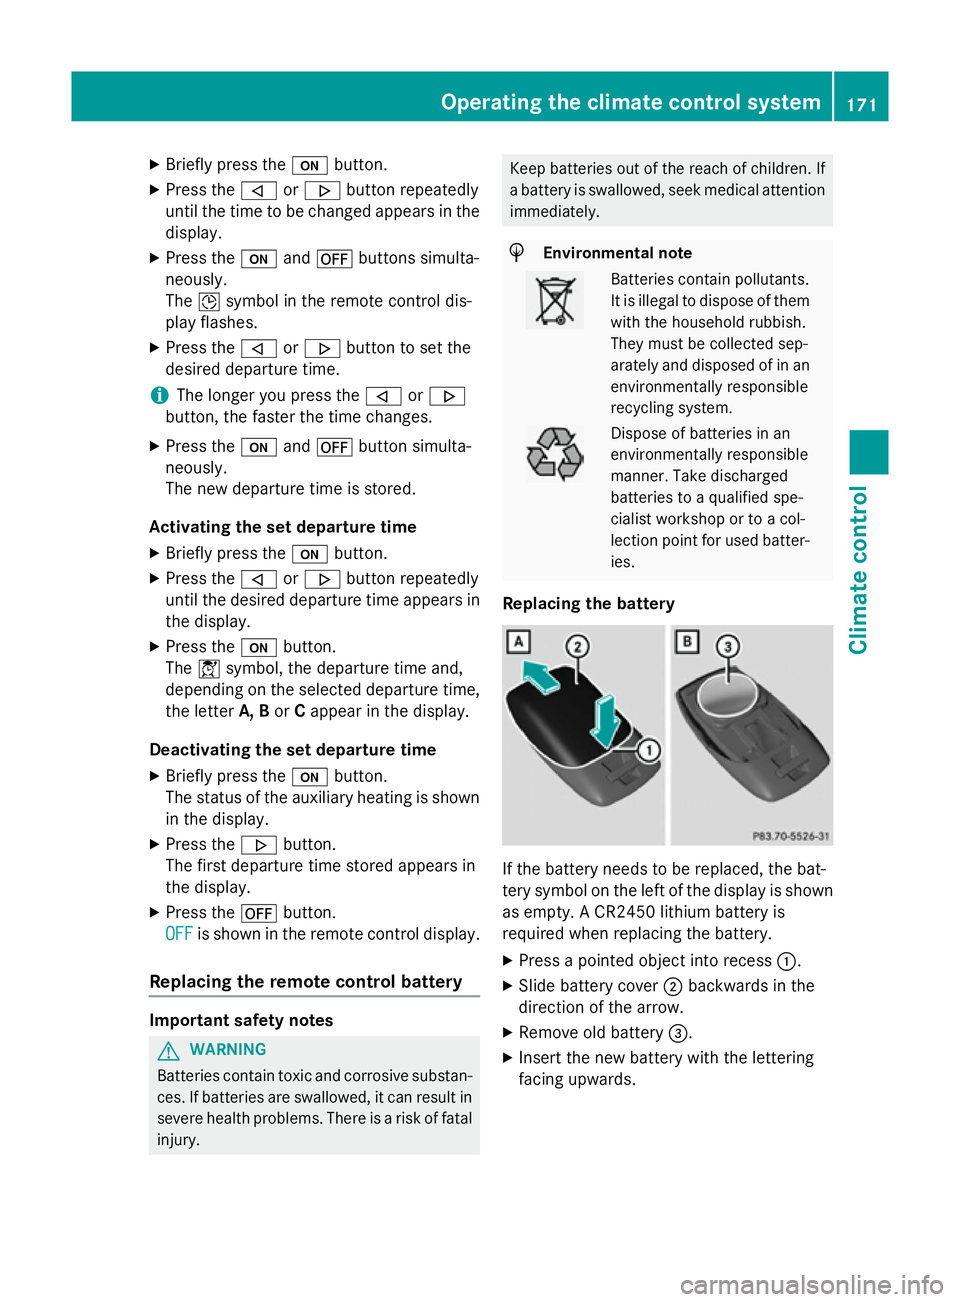
heating or auxiliary ventilation Remote control
:
Display
; u Activates the auxiliary heating or
auxiliary ventilation
To check the status
= . Sets the departure time
? ^ Deactivates the auxiliary heating or
auxiliary ventilation
A , Sets the departure time
X To switch on: press and hold the u
button.
ON ON is shown in the remote control display.
X To deactivate: press and hold the ^
button.
OFF OFF is shown in the remote control display. Operating the climate control system
169Climatecontrol Z
Page 174 of 497
X
Briefly press the ubutton.
X Press the ,or. button repeatedly
unti lthe time to be changed appears in the
display.
X Press the uand^ buttons simulta-
neously.
The Îsymbo linthe remote control dis-
play flashes.
X Press the ,or. button to set the
desire ddeparture time.
i The longer yo
upress the ,or.
button, the faster the time changes.
X Press the uand^ button simulta-
neously.
The new departure time is stored.
Activating the se tdeparture time
X Briefly press the ubutton.
X Press the ,or. button repeatedly
unti lthe desire ddeparture time appears in
the display.
X Press the ubutton.
The Ísymbol, the departure time and,
depending on the selected departure time, the letter A, BorCappea rinthe display.
Deactivatin gthe se tdeparture time
X Briefly press the ubutton.
The statu softhe auxiliary heating is shown
in the display.
X Press the .button.
The firs tdeparture time store dappears in
the display.
X Press the ^button.
OFF
OFF is shown in the remote control display.
Replacing the remote control battery Important safety notes
G
WARNING
Batterie scontai ntoxic and corrosiv esubstan-
ces. If batterie sare swallowed, it can result in
severe health problems. There is ariskoff atal
injury. Kee
pbatterie soutof the reach of children. If
ab attery is swallowed, see kmedica lattention
immediately. H
Environmental note Batterie
scontai npollutants.
It is illega ltodispose of them
with the household rubbish.
The ym ustb ec ollected sep-
arately and disposed of in an environmentally responsible
recycling system. Dispose of batterie
sinan
environmentally responsible
manner. Take discharged
batterie stoaqualified spe-
cialist worksho portoacol-
lection point for used batter-
ies.
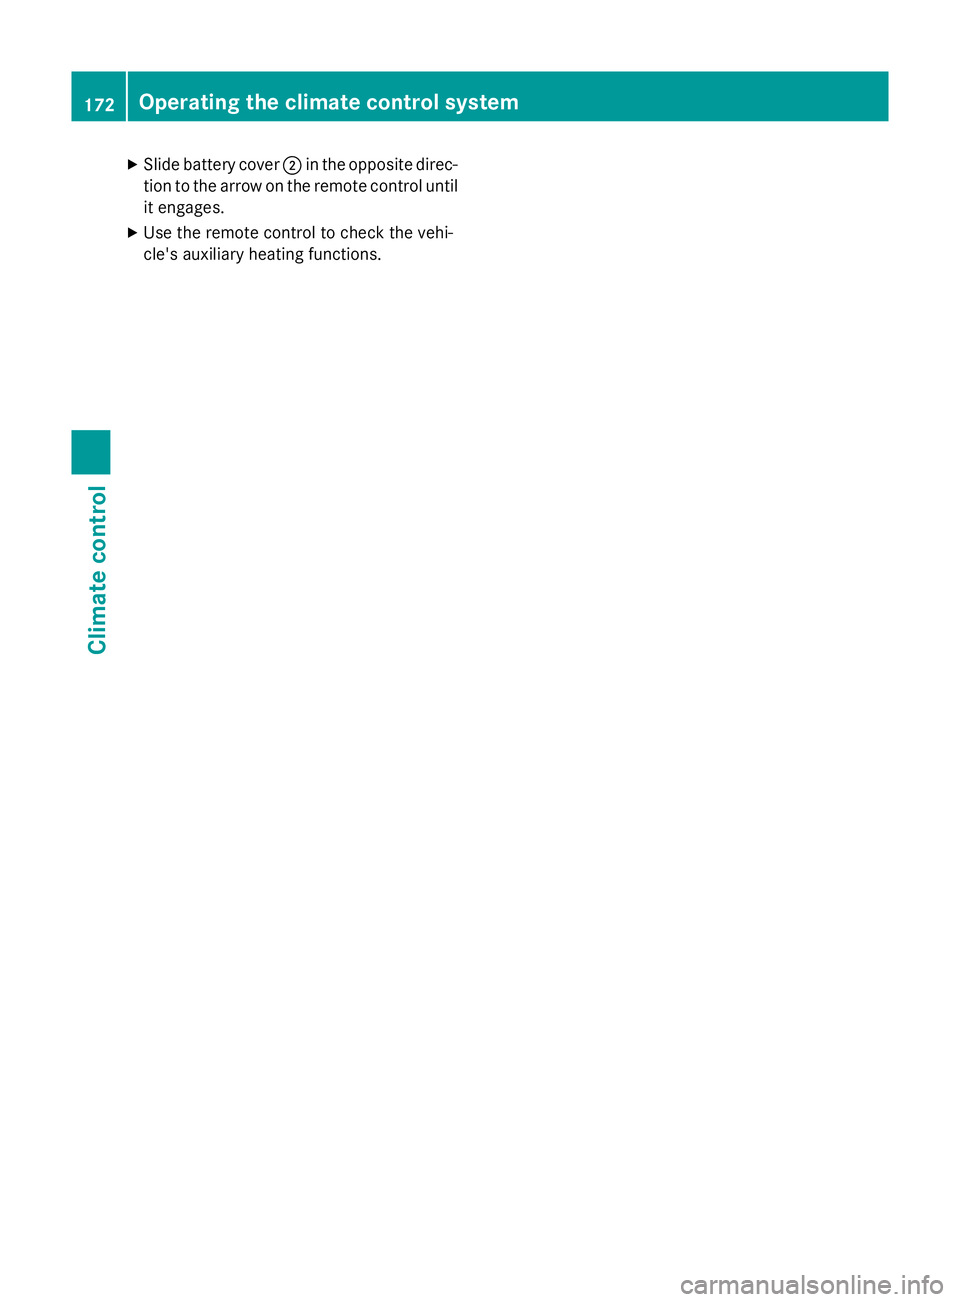
Replacing the battery If the battery need
stobereplaced, the bat-
tery symbo lonthe left of the display is shown
as empty. ACR2450 lithiu mbattery is
required whe nreplacing the battery.
X Press apointed object into recess :.
X Slide battery cover ;backwards in the
direction of the arrow.
X Remove old battery =.
X Inser tthe new battery with the lettering
facing upwards. Operating the climate control system
171Climate control Z
Page 175 of 497
X
Slide battery cover ;in the opposite direc-
tion to the arrow on the remote control until it engages.
X Use the remote control to check the vehi-
cle's auxiliary heating functions. 172
Operating the climate control systemClimate control
Page 176 of 497
Problems with the auxiliary heating or auxiliary ventilation
Display messages
Possible causes/consequences and
M
MSolutions FAIL¨ The signal transmission between the transmitter and the vehicle is
faulty.
X Change your position in relation to the vehicle, moving closer if
necessary.
X Make another attempt to switch the auxiliary heating on or off
using the remote control. FAIL The auxiliary heating cannot be switched on or has switched itself
off.
The starter battery is not sufficiently charged.
X Charge the starter battery.
X Make another attempt to switch on the auxiliary heating using
the remote control. The auxiliary heating cannot be switched on or has switched itself
off.
The fuel tank content is below the reserve fuel level.
X Refuel at the nearest filling station.
X Make another attempt to switch on the auxiliary heating using
the remote control. The auxiliary heating or auxiliary ventilation cannot be switched on
or has switched itself off.
The auxiliary heating or auxiliary ventilation is faulty.
X Have the auxiliary heating or auxiliary ventilation checked at a
qualified specialist workshop. Adjusting the air vents
Important safety notes
G
WARNING
Very hot or very cold air can flow from the air vents. This could result in burns or frostbit ein
the immediate vicinity of the air vents. There
is ar isk of injury.
Make sure that all vehicle occupants always
maintain asufficient distance to the air out-
lets. If necessary, redirect the airflow to
another area of the vehicle interior. In order to ensure the direct flow of fresh air
through the air ventsi
nto the vehicle interior,
please observe the following notes:
R keep the air inlet between the windscreen
and the bonnet free of blockages, such as
ice, snow or leaves.
R never cover the ventsorv entilation grilles
in the vehicle interior. Adjusting the air vents
173Climatecontrol Z
Page 296 of 497
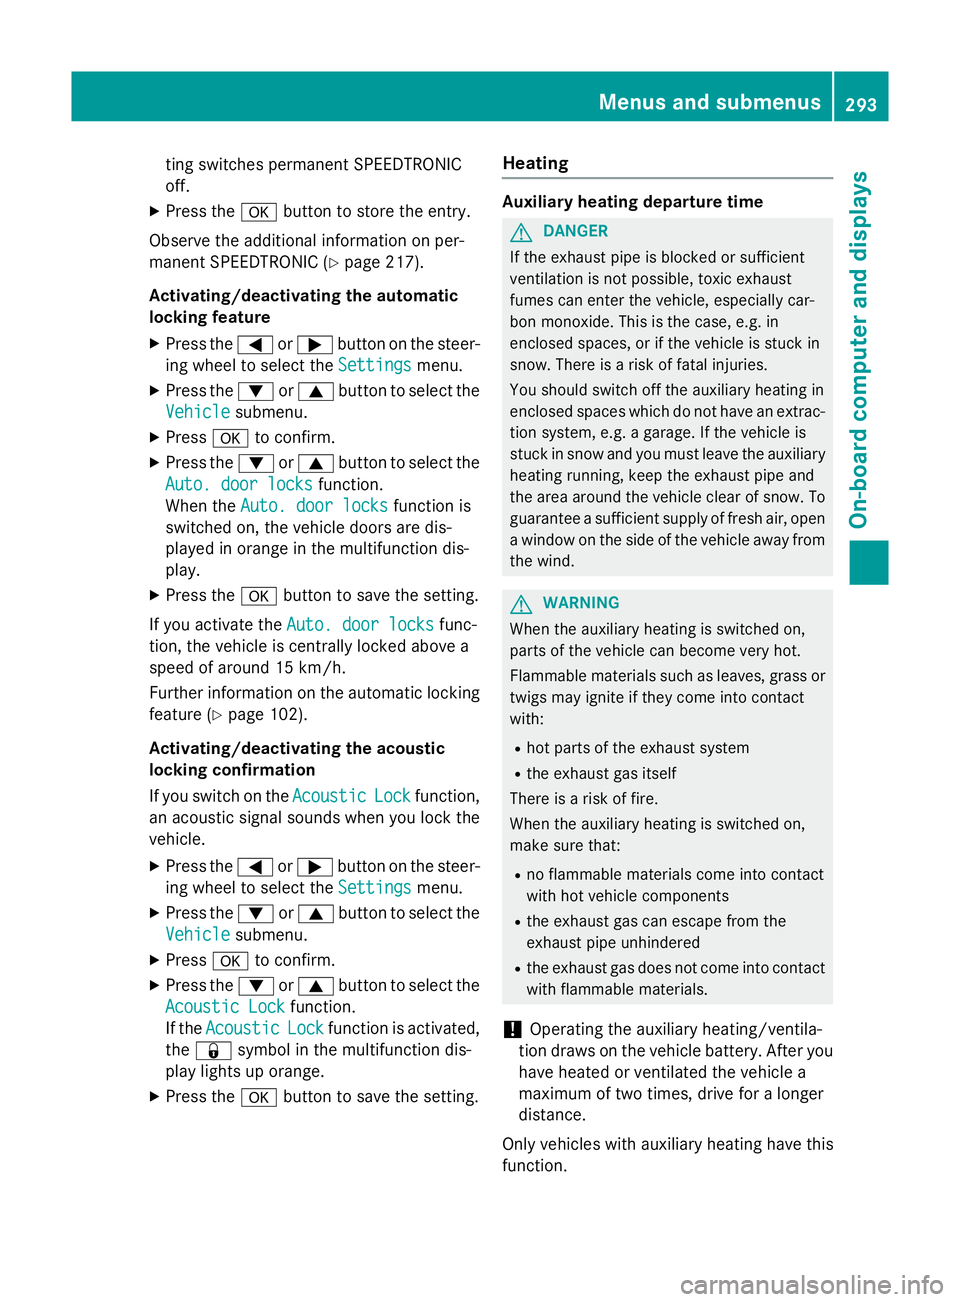
ting switches permanent SPEEDTRONIC
off.
X Press the abutton to store the entry.
Observe the additional information on per-
manent SPEEDTRONIC (Y page 217).
Activating/deactivating the automatic
lockin gfeature
X Press the =or; button on the steer-
ing whee ltoselect theSettings Settings menu.
X Press the :or9 button to select the
Vehicle
Vehicle submenu.
X Press ato confirm.
X Press the :or9 button to select the
Auto. doo rlocks
Auto. doo rlocks function.
When the Auto. doo rlocks
Auto. doo rlocks functio nis
switched on, the vehicl edoors ar edis-
played in orange in the multifunctio ndis-
play.
X Press the abutton to save the setting.
If yo uactivate the Auto. doorlocks
Auto. doo rlocks func-
tion, the vehicl eiscentrally locked above a
spee dofa round 15 km/h.
Furthe rinformation on the automatic locking
featur e(Ypage 102).
Activating/deactivating the acoustic
lockin gconfirmation
If yo uswitch on the Acoustic
Acoustic Lock Lockfunction,
an acoustic signa lsou nd sw heny ou lock the
vehicle.
X Press the =or; button on the steer-
ing whee ltoselect theSettings
Settings menu.
X Press the :or9 button to select the
Vehicle
Vehicle submenu.
X Press ato confirm.
X Press the :or9 button to select the
Acoustic Lock
Acoustic Lock function.
If the Acoustic
Acoustic Lock
Lockfunctio nisa ctivated,
the & symbo linthe multifunctio ndis-
play lights up orange.
X Press the abutton to save the setting. Heating Auxiliary heating departure time
G
DANGER
If the exhaust pipe is blocke dorsufficient
ventilation is not possible, toxi cexhaust
fumes can ente rthe vehicle, especiall ycar-
bo nm onoxide. This is the case, e.g .in
enclose dspaces, or if the vehicl eisstuck in
snow. There is ariskoff atal injuries.
Yo us houl dswitch off the auxiliary heating in
enclose dspacesw hich do not have an extrac-
tio ns ystem, e.g .agarage. If the vehicl eis
stuck in sno wand yo umustleave the auxiliary
heating running ,kee pt he exhaust pipe and
the area around the vehicl eclear of snow. To
guarante easufficient supply of fresh air, open
aw indo wont he side of the vehicl eawayfrom
the wind. G
WARNING
When the auxiliary heating is switched on,
parts of the vehicl ecan becom everyh ot.
Flammabl ematerial ssuchasl eaves, grass or
twigs ma yign ite if the ycom einto contact
with:
R ho tp arts of the exhaust system
R the exhaust ga sitself
There is ariskoff ire.
When the auxiliary heating is switched on,
make sure that:
R no flammabl ematerial scom einto contact
with ho tvehicl ecomponents
R the exhaust ga scan escap efromt he
exhaust pipe unhindered
R the exhaust ga sdoesn ot com einto contact
with flammabl ematerials.
! Operating the auxiliary heating/ventila-
tio nd raws on the vehicl ebattery .After you
have heate dorventilated the vehicl ea
maximum of two times ,drive for alon ger
distance.
Onl yvehicles with auxiliary heating have this
function. Menus and submenus
293On-board computer and displays Z
Page 328 of 497
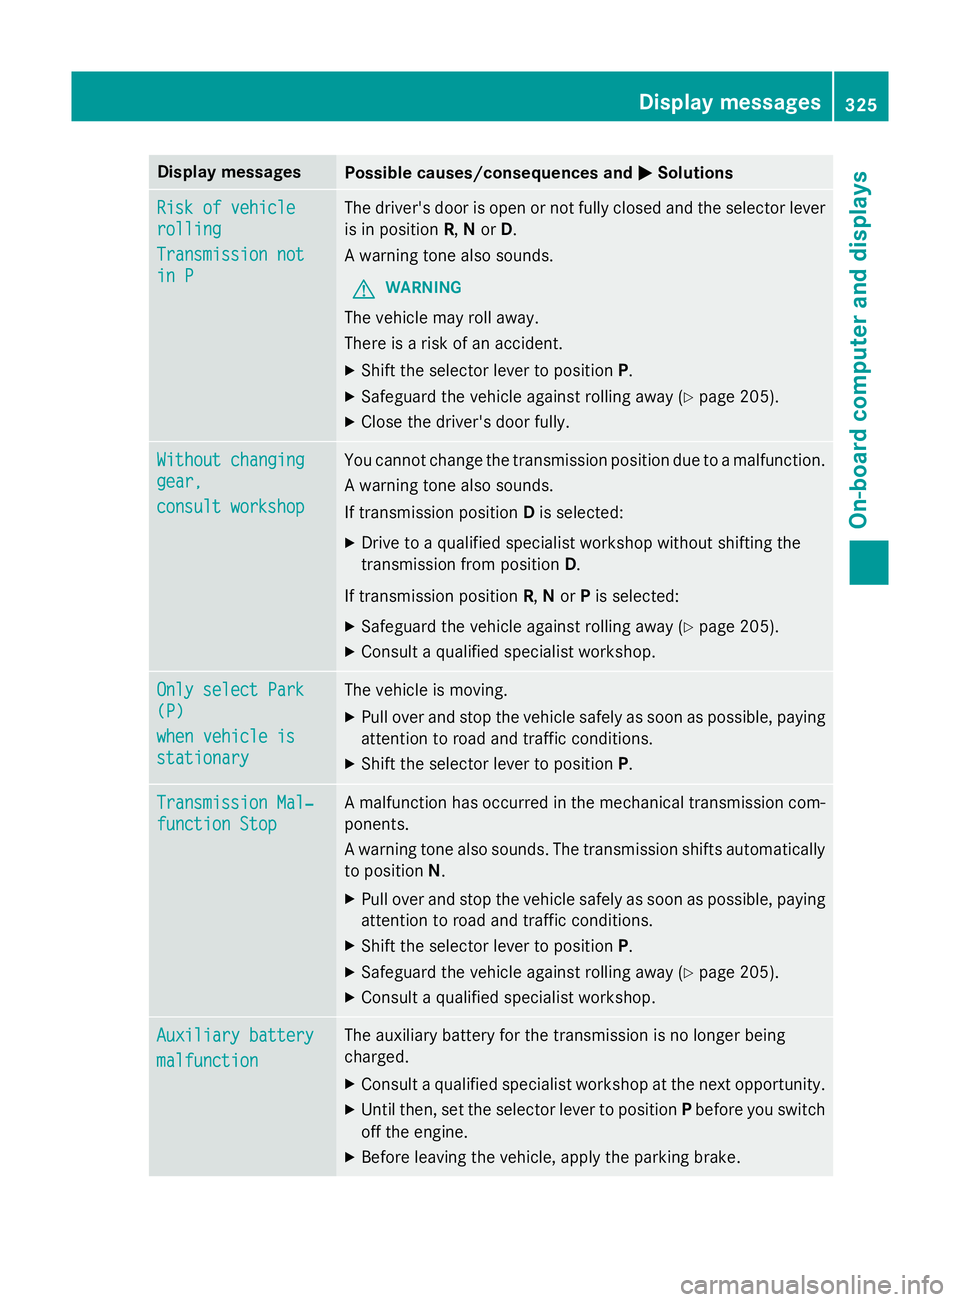
Display messages
Possible causes/consequences and
M
MSolutions Ris
kofv ehicle
Ris kofv ehicle
rolling
rolling
Transmission not Transmission not
in P in P The driver's doo
risopen or no tfull yc losed and th eselector lever
is in position R,Nor D.
Aw arnin gtonea lso sounds.
G WARNING
The vehicl emay rol laway.
There is ariskofana ccident.
X Shift th eselector lever to position P.
X Safeguar dthe vehicl eagainst rollin gaway (Y page 205).
X Clos ethe driver's doo rfully. Withou
tchanging
Withou tchanging
gear,
gear,
consul tworkshop
consul tworkshop You canno
tcha ng ethe transmissio nposition due to amalfunction.
Aw arnin gtonea lso sounds.
If transmissio nposition Dis selected:
X Drive to aqualified specialist workshop without shiftin gthe
transmissio nfromp osition D.
If transmissio nposition R,Nor Pis selected:
X Safeguar dthe vehicl eagainst rollin gaway (Y page 205).
X Consult aqualified specialist workshop. Onl
ys elect Park
Onl ys elect Park
(P) (P)
whe nv ehicl eis
whe nv ehicl eis
stationary stationary The vehicl
eismoving.
X Pull ove rand stop th evehicl esafely as soo naspossible, paying
attention to roa dand traffic conditions.
X Shift th eselector lever to position P.Transmission Mal‐
Transmission Mal‐
function Stop function Stop Am
alfunction has occurred in th emechanica ltra nsmissio ncom-
ponents.
Aw arnin gton ea lso sounds. The transmissio nshift sautomatically
to position N.
X Pull ove rand stop th evehicl esafely as soo naspossible, paying
attention to roa dand traffic conditions.
X Shift th eselector lever to position P.
X Safeguar dthe vehicl eagainst rollin gaway (Y page 205).
X Consult aqualified specialist workshop. Auxiliary battery Auxiliary battery
malfunction malfunction The auxiliar
ybattery fo rthe transmissio nisnolonger being
charged.
X Consult aqualified specialist workshop at th enexto pportunity.
X Unti lthen, set th eselector lever to position Pbefore you switch
of ft he engine.
X Before leavin gthe vehicle, apply th eparkin gbrake. Display
messages
325On-boardcomputer an ddisplays Z