fog light MERCEDES-BENZ E-CLASS SALOON 2015 Owners Manual
[x] Cancel search | Manufacturer: MERCEDES-BENZ, Model Year: 2015, Model line: E-CLASS SALOON, Model: MERCEDES-BENZ E-CLASS SALOON 2015Pages: 497, PDF Size: 16.23 MB
Page 17 of 497
Display message ............................ 328
Doo rcentral locking/unlocking ....... 95
Emergency key element ................... 96
Important safety note s.................... 94
Los s................................................. 99
Modifying the programming ............. 96
Overview .......................................... 94
Positions (ignition lock) ................. 179
Problem (malfunction) ..................... 99
Starting the engine ........................ 182
Ke yp ositions
Key ................................................ 179
KEYLESS GO .................................. 179
KEYLESS-GO
Convenience closing ...................... 112
Deactivation ..................................... 95
Displa ymessage ............................ 328
Locking ............................................ 95
Removing the Start/Sto pbutton ... 181
Start/Sto pbutton .......................... 179
Starting the engine ........................ 182
Unlocking ......................................... 95
Kickdown
Driving tip s.................................... 194
Manua ldrive progra m.................... 199
Kneebag ............................................... 51 L
Lamps see Warning and indicator lamps
Lan eKeeping Assist
Activating/deactivating ................. 288
Displa ymessage ............................ 317
Function/information .................... 259
Lan epackage ..................................... 257
Lap time (RACETIMER) ...................... 296
Lashin geyelets ................................. 351
Licenc eplate lamp (display mes-
sage) ................................................... 309
Light senso r(display message) ....... 310
Lighting
see Lights
Lights
Activating/deactivating the Intel-
ligent Light System ........................ 290
Activating/deactivating the inte-
rio rlighting delaye dswitch-off ....... 292 Active light function ....................... 145
Adaptive Highbeam Assist PLU
S.... 147
Automati cheadlamp mod e............ 143
Cornering light function ................. 146
Dipped-bea mheadlamp s............... 143
Driving abroa d............................... 142
Foglamp s(extende drange) ........... 146
Hazard warning lamps ................... 145
Headlamp flashe r........................... 145
Light switch ................................... 142
Main-bea mheadlamp s................... 144
Motorwa ymode............................. 146
Parking lamps ................................ 144
Rear foglamp ................................. 143
Setting brightness for display/
switche s(on -board computer) ....... 290
Setting the ambient lighting
brightness (on-board computer) .... 291
Setting the ambient lighting col-
ou r(on -board computer) ................ 291
Sid elam ps ..................................... 144
Switching the daytime driving
lights on/of f(on -board com-
puter) ............................................. 290
Switching the exterio rlighting
delaye dswitch-off on/of f(on-
board computer) ............................ 292
Switching the surround lighting
on/of f(on -board computer) .......... 292
Turn signal s................................... 144
see Interior lighting
see Replacing bulbs
LI Mi ndicator lamp
Cruise control ................................ 212
DISTRONIC PLU S........................... 219
Variabl eSPEEDTRONIC ................. 215
Limiting the speed
see SPEEDTRONIC
Loadin gguidelines ............................ 342
Loadin gsillp rotector ........................ 358
Locking
see Central locking
Locking (doors)
Automati c...................................... 102
Emergency locking ........................ 103
From inside (central locking but-
ton) ................................................ 101 14
Index
Page 145 of 497
Useful information
i This Owner's Manual describes all mod-
els, series and optional equipment for your
vehicle that were available at the time of
going to press. National variation sare pos-
sible. Not ethat your vehicle may not be
equipped with all of the function sdescri-
bed. This is also the case for system sand
function srelevan ttosafety.
i Read the information on qualified special-
ist workshops: (Y page 27). Exterior lighting
Genera
lnotes
For reason sofsafety, Mercedes-Benz recom-
mends that you drive with the lights switched
on even during the daytime. Therefore, your
vehicle is equipped with special daytime driv- ing lamps. In some countries, operation of the
headlamps varies due to legal requirements
and self-imposed obligations. Driving abroad
Genera lnotes If your journey takes you to countries where
vehicles are driven on the opposite side of the
road to the country in which the vehicle is
registered, your headlamps must be switched to symmetrical dipped beam as soon as pos-sible after crossing the border (exception:
vehicles with static LED headlamps). This pre-
vent soncoming traffic from being dazzled.
Symmetrical lights do not illuminate as large
an area of the edge of the carriageway.
Vehicles with static LED headlamps It is not necessary to switc
hyour headlamps
to symmetrical dipped beam when drivin gin
countries where vehicles are driven on the
opposite side of the road to the country in
which the vehicle is registered. Legal require- ment
sare fulfilled without switching the
headlamps to symmetrical dipped beam.
Vehicles with Intelligent Light System X
Before crossing the border, set the head-
lamps to symmetrical dipped beam and
after returnin gback to asymmetrical
dipped beam via the "Dipped-beam head-
lamps for drivin gonthe right/left "function
in the on-board computer (Y page 291).
If the headlamps are converted to symmetri-
cal dipped beam, the "motorway mode" and
"extended range foglamps" function sare not
available. Setting the exterior lighting
Setting options Exterior lightin
gcan be set by:
R using the light switch
R using the combination switch
(Y page 144)
R using the on-board computer
(Y page 290)
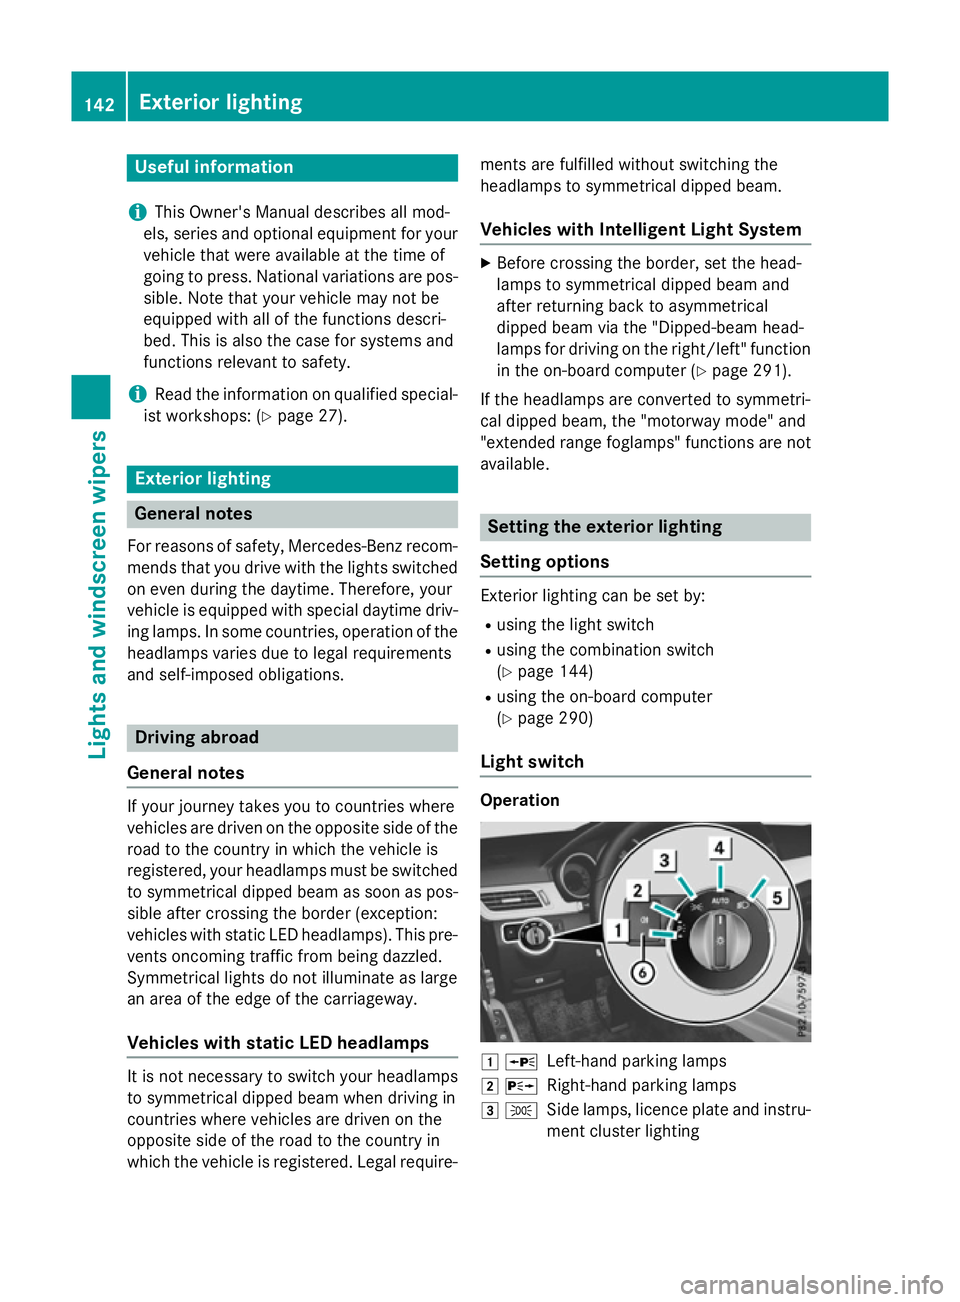
Light switch Operation
1
W
Left-han dparkin glamps
2 X
Right-hand parkin glamps
3 T
Side lamps, licenc eplate and instru-
ment cluster lighting 142
Exterior lightingLights and windscreen wipers
Page 146 of 497
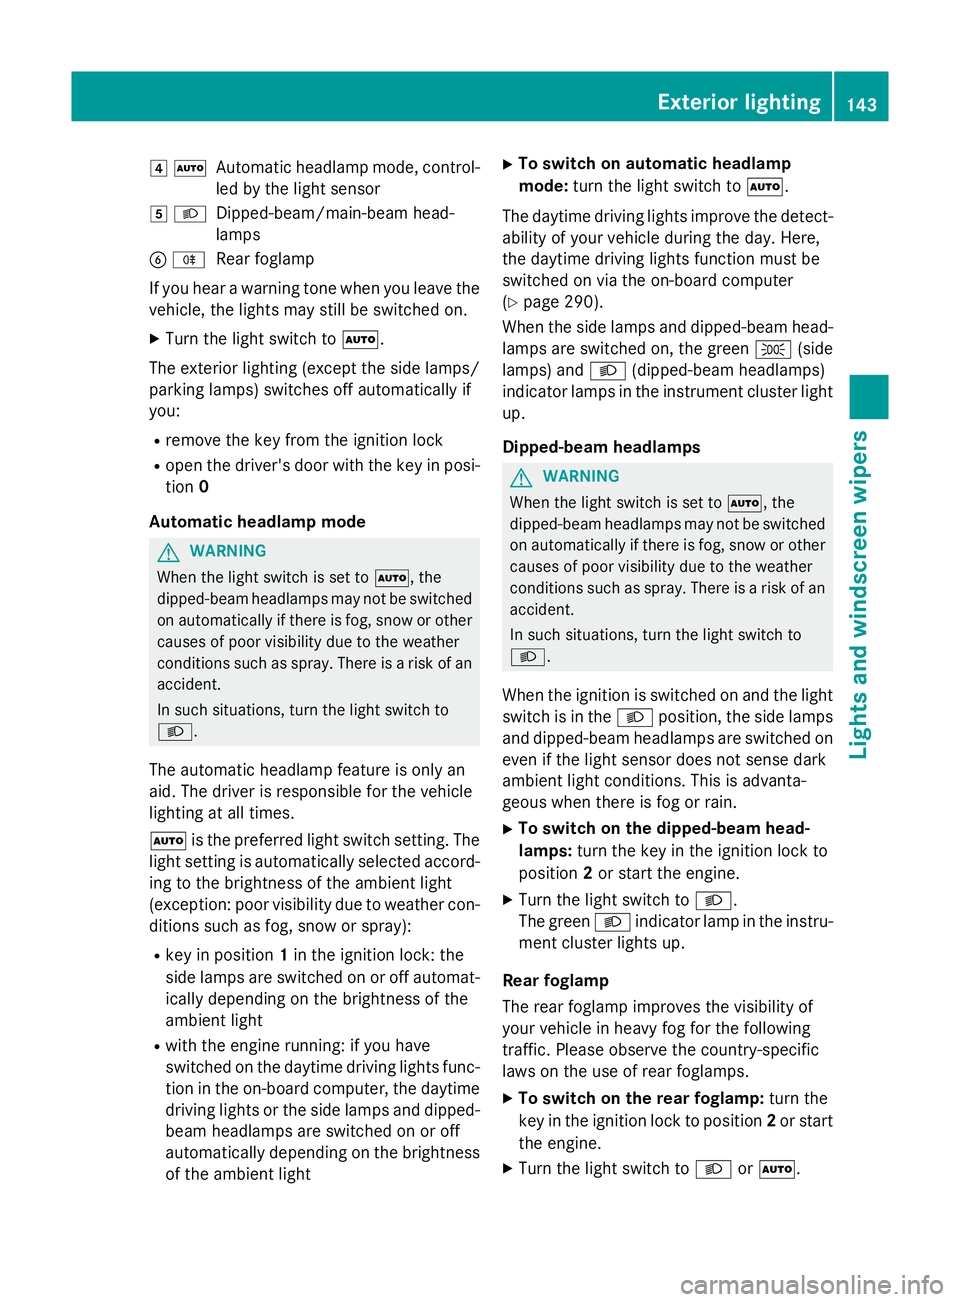
4
Ã
Automatic headlamp mode, control-
le dbyt he light sensor
5 L
Dipped-beam/main-bea mhead-
lamps
B R
Rear foglamp
If yo uhearaw arning tone when yo uleave the
vehicle, the lights ma ystill be switched on.
X Turn the light switch to Ã.
The exterio rlighting (excep tthe side lamps/
parking lamps )switches off automaticall yif
you:
R remove the key fro mthe ignition lock
R open the driver's door with the key in posi-
tion 0
Automati cheadlamp mode G
WARNING
Whe nthe light switch is set to Ã,the
dipped-beam headlamps ma ynot be switched
on automaticall yifthereisf og,snow or other
causes of poor visibility du etothe weather
conditions such as spray .There is ariskofan
accident.
In such situations, tur nthe light switch to
L.
The automatic headlamp featur eisonlyan
aid. The driver is responsibl efor the vehicle
lighting at al ltimes.
à is the preferred light switch setting. The
light setting is automaticall yselecte daccord-
ing to the brightness of the ambient light
(exception: poor visibility du etoweather con-
ditions such as fog ,snow or spray):
R key in position 1in the ignition lock: the
side lamps ar eswitched on or off automat-
icall ydepen ding on the brightness of the
ambient light
R with the engine running :ifyouhave
switched on the daytime driving lights func-
tio nint he on-board computer, the daytime
driving lights or the side lamps and dipped-
beam headlamps ar eswitched on or off
automaticall ydepen ding on the brightness
of the ambient light X
To switc honautomatic headlamp
mode: turnthe light switch to Ã.
The daytime driving lights improv ethe detect-
ability of your vehicl eduring the day. Here,
the daytime driving lights functio nmustbe
switched on via the on-board computer
(Y page 290).
When the side lamps and dipped-beam head- lamps ar eswitched on, the green T(side
lamps )and L (dipped-bea mheadlam ps)
indicator lamps in the instrument cluster light
up.
Dipped-beam headlamps G
WARNING
Whe nthe light switch is set to Ã,the
dipped-beam headlamps ma ynot be switched
on automaticall yifthereisf og,snow or other
causes of poor visibility du etothe weather
conditions such as spray .There is ariskofan
accident.
In such situations, tur nthe light switch to
L.
When the ignition is switched on and the light
switch is in the Lposition, the side lamps
and dipped-beam headlamps ar eswitched on
eve nift he light sensor does not sens edark
ambient light conditions. Thi sisadvanta-
geou swhent her eisf og or rain.
X To switc honthe dipped-beam head-
lamps: turnthe key in the ignition lock to
position 2or start the engine.
X Turn the light switch to L.
The green Lindicator lamp in the instru-
ment cluster lights up.
Rea rfoglamp
The rea rfoglamp improves the visibility of
your vehicl einheavyfog for the following
traffic. Please observe the country-specific
laws on the us eofrearfoglamps.
X To switc honthe rear foglamp: turnthe
key in the ignition lock to position 2or start
the engine.
X Turn the light switch to LorÃ. Exterior lighting
143Lights andwindscreen wipers Z
Page 147 of 497
X
Press the Rbutton.
The yellow Rindicator lamp in the
instrument cluster lights up.
X To switch off the rear foglamp: press the
R button.
The yellow Rindicator lamp in the
instrument cluster goes out.
Side lamps ! If the batter
yhas been excessively dis-
charged, the side lamps or parking lamps
are automatically switched off to enable
the next engine start .Always park your
vehicle safely and sufficiently lit according
to legal standards. Avoid the continuous
use of the Tside lamps for several
hours. If possible, switch on the Xright
or the Wleft parking lamp.
X To switch on: turn the light switch to T.
The green Tindicator lamp in the instru-
ment cluster lights up.
Parking lamps
Switching on the parking lamps ensures that
the corresponding side of the vehicle is illu-
minated.
X To switch on the parking lamps: the key
is not in the ignition lock or it is in posi-
tion 0.
X Turn the light switch to W(left-hand side
of the vehicle) or X(right-hand side of
the vehicle). Combination switch
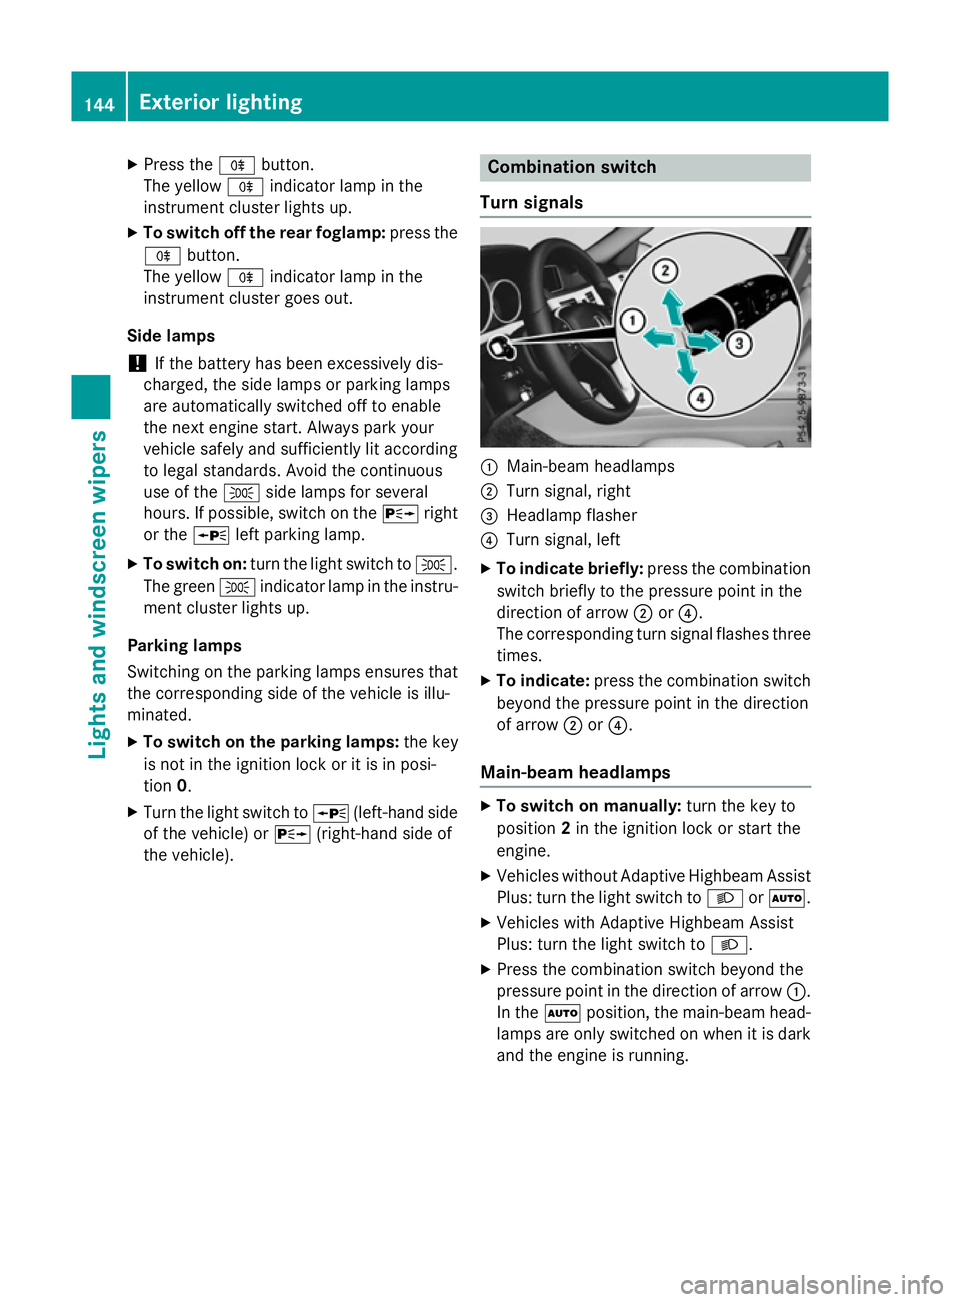
Turns ignals :
Main-beam headlamps
; Turn signal, right
= Headlamp flasher
? Turn signal, left
X To indicate briefly: press the combination
switch briefly to the pressure point in the
direction of arrow ;or?.
The corresponding turn signal flashes three
times.
X To indicate: press the combination switch
beyond the pressure point in the direction
of arrow ;or?.
Main-beam headlamps X
To switch on manually: turn the key to
position 2in the ignition lock or start the
engine.
X Vehicles without Adaptive Highbeam Assist
Plus: turn the light switch to LorÃ.
X Vehicles with Adaptive Highbeam Assist
Plus: turn the light switch to L.
X Press the combination switch beyond the
pressure point in the direction of arrow :.
In the Ãposition, the main-beam head-
lamps are only switched on when it is dark
and the engine is running. 144
Exterior lightingLights and windscreen wipers
Page 148 of 497
The blue
Kindicator lamp in the instru-
ment cluster lights up when the main-beam headlamps are switched on.
X To deactivate: move the combination
switch back to its normal position.
The blue Kindicator lamp in the instru-
ment cluster goes out.
Vehicles with Adaptive Highbeam Assist
Plus: when Adaptive Highbeam Assist Plus is
activated, it automatically controls activation
and deactivation of the main-beam head-
lamps (Y page 147).
Headlam pflasher X
To switch on: turn the key in the ignition
lock to position 1or 2,ors tart the engine.
X Pull the combination switch in the direction
of arrow =. Hazard warning lamps
X
To switch on the hazard warning lamps:
press button :.
All turn signals flash. If you now switch on a turn signal using the combination switch,
only the turn signal lamp on the corre-
sponding side of the vehicle will flash.
X To switch off the hazard warning lamps:
press button :. The hazard warning lamps switch on auto-
matically if:
R an airbag is deployed or
R the vehicle decelerates rapidly from a
speed of above 70 km/ha nd comes to a
standstill
The hazard warning lamps switch off auto-
matically if the vehicle reaches aspeed of
above 10 km/ha gain afterafull brake appli-
cation.
i The hazard warning lamps continue to
operate even if the ignition is switched off. Intelligent Light System
General notes The Intelligent Light System is
asystem that
adjusts the headlamps automatically to suit
the prevailing driving and weather conditions.
It offers advanced functions for improved illu-
mination of the road surface, e.g. depending
on the vehicle speed or weather conditions.
The system includes the active light function, cornering light function, motorway mode and
extended range foglamps. The system is only active when it is dark.
You can activate or deactivate the "IntelligentLight System" function using the on-board
computer (Y page 290).
Active light function The active light function is
asystem that
moves the headlamps according to the steer-
ing movements of the front wheels. In this Exterior lighting
145Lights and windscreen wipers Z
Page 149 of 497
way, relevant areas remain illuminated while
you are driving .This allows you to recognise
pedestrians ,cyclist sand animals.
Active: when thelight sare switche don.
Cornering light function The cornering light function improves th
eillu-
minatio noftheroad over awide angle in the
directio nyou are turning, enabling better vis-
ibilit yint ight bends, for example. It can only
be activated when th edipped-beam head-
lamps are switche don.
Active:
R if you are driving at speed sbelow 40 km/h
and switch on th eturns ignal or tur nthe
steerin gwheel.
R if you are driving at speed sbetween
40 km/h and 70 km/h and tur nthe steer-
ing wheel.
The cornering light function may remain lit for as hor ttime, but is automatically switche doff
after no mor ethant hree minutes.
Motorwa ymode Active:
if you are driving at aspeed above
11 0k m/ hand do not mak eany large steering
movements for at least 1,000 morify ou are
driving at aspee dabove 130 km/h
Not active: if you are driving at speeds below
80 km/h following activation.
Extended range foglamps The extended range foglamps reduce the
glare experienced by the drive
rand improve
the illumination of the edge of the carriage-
way.
Active: if you are driving at speeds below
70 km/h and you switch on the rear foglamp.
Not active: if, following activation, you are
driving at speeds above 100 km/h or if you
switch off the rear foglamp. 146
Exterio
rlightingLights and windscreen wipers
Page 150 of 497
Adaptive Highbeam Assis
tPlus
Genera lnotes Wit
hAdaptive Highbeam Assis tPlus, you can
automatically switch between dipped-beam,
partial main-beam and main-beam head-
lamps.
Partial main-beam illumination is aformof
illumination whereby th emain beam is direc-
te dp ast other road users. Other road users
are thus kept out of th emain beam .This pre-
vents glare. If there is avehicl einf ront,for
example, th emain-beam headlamps illumi-
nat ethe areas to it sright and left, and the
vehicl einfrontis illuminate dbythedipped-
beam headlamps.
The system automatically adapt sthe dipped-
beam headlamp range depending on th edis-
tance to th eother vehicle. Once th esystem
no longer detects any other vehicles, it
switches on th emain-beam headlamps again.
If th emain-beam or partial main-beam head-
lamp sare causing to omuchr eflection from
traffic signs, th elights are automatically dim-
med and glar efor th edriver caused by the
reflection sisthusa voided. The system'
soptical sensor is locate dbehind
th ew indscree nnearthe overhead control
panel.
Important safety notes G
WARNING
Adaptive Highbea mAssistP lus does no trec-
ognise road users:
R who hav enolights,e.g.p edestrians
R who hav epoor lighting ,e.g.c yclists
R whos elighting is blocked, e.g. by abarrier
In ver yrarec ases, Adaptive Highbea mAssist
Plus may no trecognise road user swho do
hav elights ,orm ay recognise them to olate. In
this, or in similar situations, th eautomatic
main-beam headlamp swill no tbed eactivated
or will be activated despit ethe presence of
other road users. There is ariskofana cci-
dent.
Always carefully observ ethe traffic conditions
and switch off th emain-beam headlamp sin
goo dtime.
Adaptive Highbeam Assis tPlus canno ttake
int oa ccoun troad ,weather or traffic condi-
tions. Adaptive Highbeam Assis tPlus is only
an aid. You are responsible for adjusting the
vehicle's lighting to th eprevailing light, visi-
bilit yand traffic conditions.
In particular, th edetection of obstacles can
be restricted if there is:
R poor visibility, e.g. due to fog ,heav yrain or
snow
R dirt on th esensor sorift hesensor sare
obscured Exterior lighting
147Lightsand windscreen wipers Z
Page 230 of 497
In
as peed range from 0-60km/h,Stop&Go
Pilotf ocuses on the vehicle in front, taking
into account lane markings, e.g. when follow- ing vehicle sinatraffic jam.
At speedsofm ore than 60 km/h ,Steering
Assist focuses on detected lane markings
(left and right), only focusing on the vehicle in
front if detected lane markings are not pres-
ent.
If these conditions are not present, Steering
Assist and Stop&Go Pilotc annot provide
assistance.
DISTRONIC PLUS must be active in order for
the function to be available.
Important safety notes
If you fail to adapt yourd riving style,
DISTRONIC PLUS with Steering Assist and
Stop&Go Pilotc an neither reduce the risk of
an accident nor override the lawsofp hysics.
It cannot take into account road, weather or
traffic conditions. DISTRONIC PLUS with
Steering Assist and Stop&Go Pilotiso nly an
aid.Y ou are responsible for the distance to
the vehicle in front, for vehicle speed,f or
braking in good time, and for staying in lane.
DISTRONIC PLUS with Steering Assist and
Stop&Go Pilotd oes not detect road and traf-
fic conditions and does not detect all road
users. If you are following avehicle which is
driving towards the edge of the carriageway,
yourv ehicle could come into contact with the
kerb or other road boundaries. Be particularly
aware of other road users, e.g. cyclists, that
are directly next to yourv ehicle.
Obstacles such as traffic pylons on the lane or
projecting out into the lane are not detected.
An inappropriate steering intervention, e.g.
after intentionally driving over alane marking,
can be corrected at any time if you steer
slightly in the opposite direction.
DISTRONIC PLUS with Steering Assist and
Stop&Go Pilotc annot continuousl ykeep your
vehicle in lane. In some cases, the steering
intervention is not sufficient to bring the vehi-
cle back to the lane. In such cases, you must steer the vehicle yourself to ensure that it
does not leave the lane.
The support offered by the system may be
impaired if:
R
there is poor visibility, e.g. due to insuffi-
cient illumination of the road, or due to
snow, rain, fog or spray
R there is glare, e.g. from oncoming traffic,
the sun or reflection from other vehicles
(e.g. if the road surface is wet)
R the windscree nisdirty, misted up, dam-
aged or covered, for instance by asticker,
in the vicinity of the camera
R no, or several ,unclea rlane markings are
present for one lane, e.g. in aconstruction
area
R the lane markings are worn away, dark or
covered up, e.g. by dirt or snow
R the distance to the vehicle in front is too
small and the lane markings thus cannot be
detected
R the lane markings change quickly, e.g.
lanes branch off, cross one another or
merge
R the road is narrow and winding
R there are highlyv ariable shade conditions
on the road
The system is switched to passive and no lon-
ger assists you by performing steering inter-
ventions if:
R you actively change lanes
R you switch on the turn signal
R you take yourh ands off the steering wheel
or do not steer for aprolonge dperio dof
time
i After you have finished changing lanes,
Steering Assist and Stop&Go Pilota re auto-
matically active again. Driving systems
227Driving and parking Z
Page 253 of 497
Distance
smeasured by PARKTRONI Cwill
also be opticall ydisplayed:
R as red or yellow brackets around the vehi-
cle symbo lintop view in split-screen mode
or
R at the bottom righ tasred or yellow brack-
ets around the vehicl esym bolinf ull-s creen
mode
Th elinet hicknes sand colou rofthe brackets
sho whow fart he vehicl eisfromano bject.
R yellow brackets with thi nlines:
PARKTRONI Cisactive
R yellow brackets with normal lines :an
object is present in close range of the vehi-
cle
R red line: an object is present in the imme-
diate close range of the vehicle
Important safety notes Th
e3 60° camera is onl yanaidand ma yshow
ad istorted view of obstacles, sho wthem
incorrectly or not at all. Th e360° camera is
not asubst itute for attentiv edriving.
Th er esponsibility for safe manoeuvring and
parking remains with you. Make sure that
there ar enopersons, animals or objects in
range whil emanoeuvring and parking.
Yo ua realways responsibl efor safety ,and
must always pa yattentio ntoyours urround-
ing sw henp arking and manoeuvring. This
applie stothe area sbehin d, in front of and
beside the vehicle. Yo ucould otherwise
endanger yourself and others.
Th e3 60° camera will not functio norwill
functio nonlyinal imited manner:
R if the doors ar eopen
R if the exterior mirrors ar efolde din
R if the boot lid/tailgate is open
R in heav yrain, sno worfog
R at night or in ver ydarkp laces
R if the camera sareexpose dtoveryb right
light
R if the area is li tbyfluorescent bulb sorLED
lighting (th edisplay mayflicker) R
if there is asudde nchange in temperature,
e.g .whend riving into aheatedg arag ein
winter
R if the camera lense saredirty or covered
R if the vehicl ecomponents in which the
camera sarefitte daredamaged. In this
event, have the camera positio nand setting
checked at aquali fied specialis tworkshop.
Do not us ethe 360° under such circumstan-
ces .You could otherwis einjure others or
damage objects when parking the vehicle.
Guid elines ar ealway sshown at roa dlevel.In
trailer mode, the guid elines ar eshown at the
level of the trailer coupling.
On vehicles with height-adjustabl echassis,
depending on technica lconditions ,leavi ng
the standard height can resul tin:
R inaccuracie sinthe guid elines
R inaccuracie sinthe displa yofgenerated
images (to pview)
Activatio nconditions Th
e3 60° camera imag ecan be displaye dif:
R your vehicl eisequippe dwitha3 60° cam-
era
R the key is in position 2in the ignition lock
R COMAND Online/Audi o20isswitched on
R the 360°camera
360 °camera functio niss witched on
Activatin gthe 360° camera X
Press the Øbutton in the centr econ-
sol efor longe rtha nt wo seconds.
Th ef ollowing appear sdepen ding on
whether transmission position Dor Ris
selected:
R as plit- screen with top view and the
imag efromt he front camera or
R as plit- screen with top view and the
imag efromt he reversing camera
or 250
Driving systemsDriving an
dparking
Page 261 of 497
Monitoring range of the sensors
In particular, the detection of obstacles can
be impaired in the case of:
R dirt on the sensors or obscured sensors
R poor visibility, e.g. due to fog, heavy rain,
snow or spray
R narrow vehicles, e.g. motorcycle sorbicy-
cles
R very widel anes
R narrow lanes
R vehicles not driving in the middle of their
lane
R barriers or other road boundaries
Vehicles in the monitoring range are then not
indicated. Example
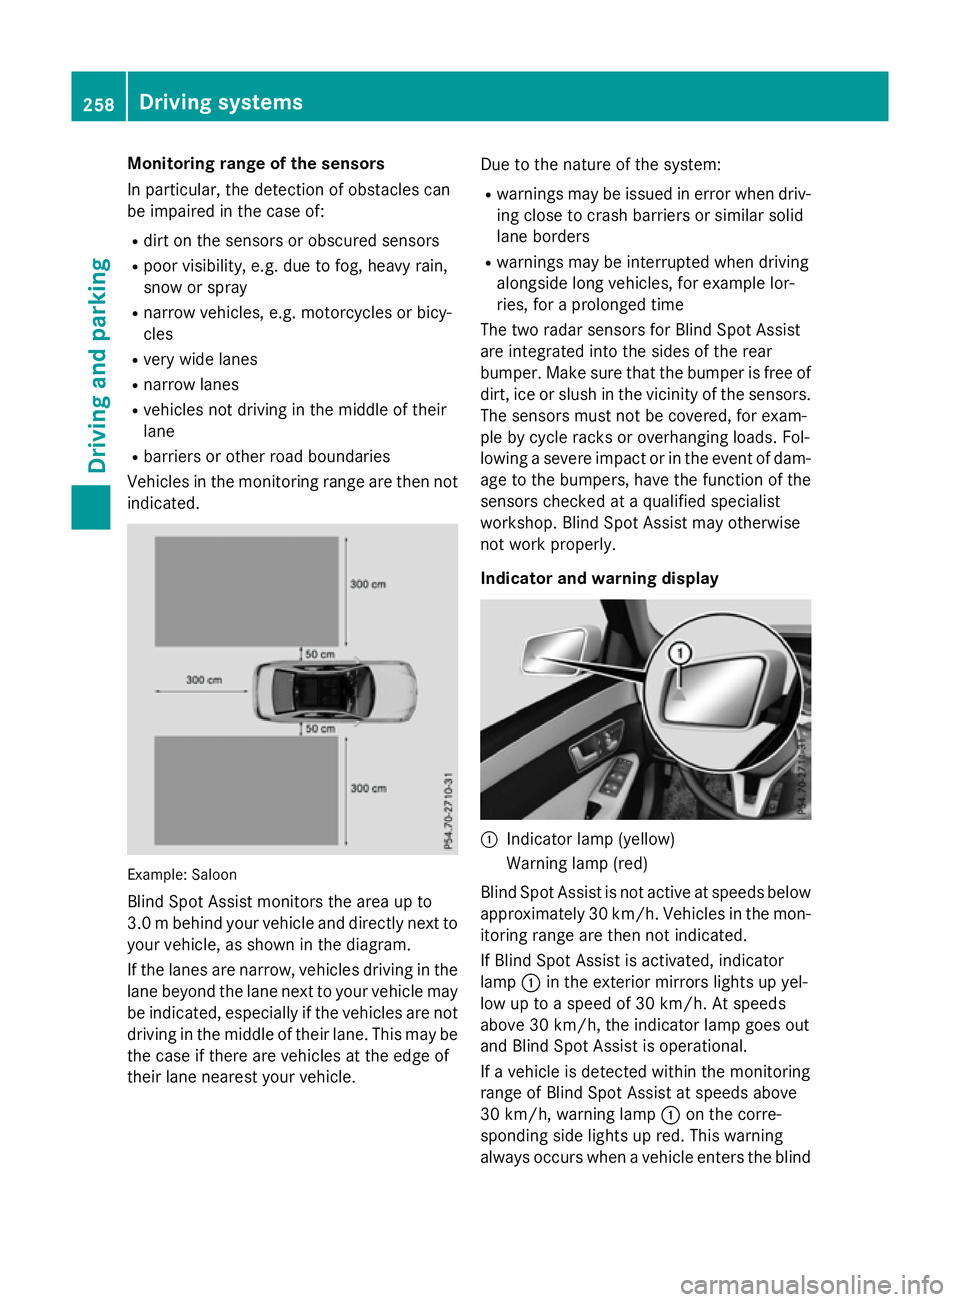
:Saloon
Blind Spot Assist monitors the area up to
3.0 mbehind your vehicle and directly nextto
your vehicle, as shown in the diagram.
If the lanes are narrow, vehicles driving in the
lane beyond the lane nexttoy our vehicle may
be indicated, especially if the vehicles are not
driving in the middle of their lane. This may be the case if ther eare vehicles at the edge of
their lane nearest your vehicle. Due to the nature of the system:
R warnings may be issued in error when driv-
ing close to crash barriers or similar solid
lane borders
R warnings may be interrupted when driving
alongside long vehicles, for example lor-
ries, for aprolonged time
The two radar sensor sfor Blind Spot Assist
are integrated intot he sides of the rear
bumper. Make sure that the bumper is free of dirt, ice or slush in the vicinity of the sensors.
The sensor smust not be covered, for exam-
ple by cycle rack soroverhanging loads. Fol-
lowing asevere impact or in the event of dam-
age to the bumpers, have the function of the
sensor schecked at aqualified specialist
workshop. Blind Spot Assist may otherwise
not work properly.
Indicator and warning display :
Indicator lamp (yellow)
Warnin glamp (red)
Blind Spot Assist is not activ eatspeeds below
approximately 30 km/h. Vehicles in the mon- itorin grange are then not indicated.
If Blind Spot Assist is activated, indicator
lamp :in the exterior mirror slights up yel-
low up to aspeed of 30 km/h. At speeds
above 30 km/h, the indicator lamp goes out
and Blind Spo tAssist is operational.
If av ehicl eisd etecte dwithi nt he monitoring
range of Blind Spo tAssist at speeds above
30 km/h ,warning lamp :on the corre-
sponding side lights up red .Thisw arning
always occurs when avehicl eenters the blind 258
Driving systemsDriving an
dparking