set clock MERCEDES-BENZ E-CLASS SALOON 2015 Owners Manual
[x] Cancel search | Manufacturer: MERCEDES-BENZ, Model Year: 2015, Model line: E-CLASS SALOON, Model: MERCEDES-BENZ E-CLASS SALOON 2015Pages: 497, PDF Size: 16.23 MB
Page 105 of 497
tivate the double lock functio
nbydeactivat-
ing the interior motion senso r(Ypage 91).
Fo ra ll countries: Youc an onl yopent he rear
doors fro minsid ethe vehicl eiftheya renot
secured by the child-proo floc ks (Y page 76).
When aloc ked door is opene dfromi nsid ethe
vehicle, the previou sunlocking proces swill
be observe difthe vehicl ehasbeen:
R locked with the locking button for the cen-
tra lloc king or
R locked automatically
Th ev ehicl ewillbef ullyunlocke difithadpre-
viousl ybeenf ully unlocked. Onl ythe door
which ha sbeeno penedf romt he insid eis
unlocke difonlyt he driver's door ha dbeen
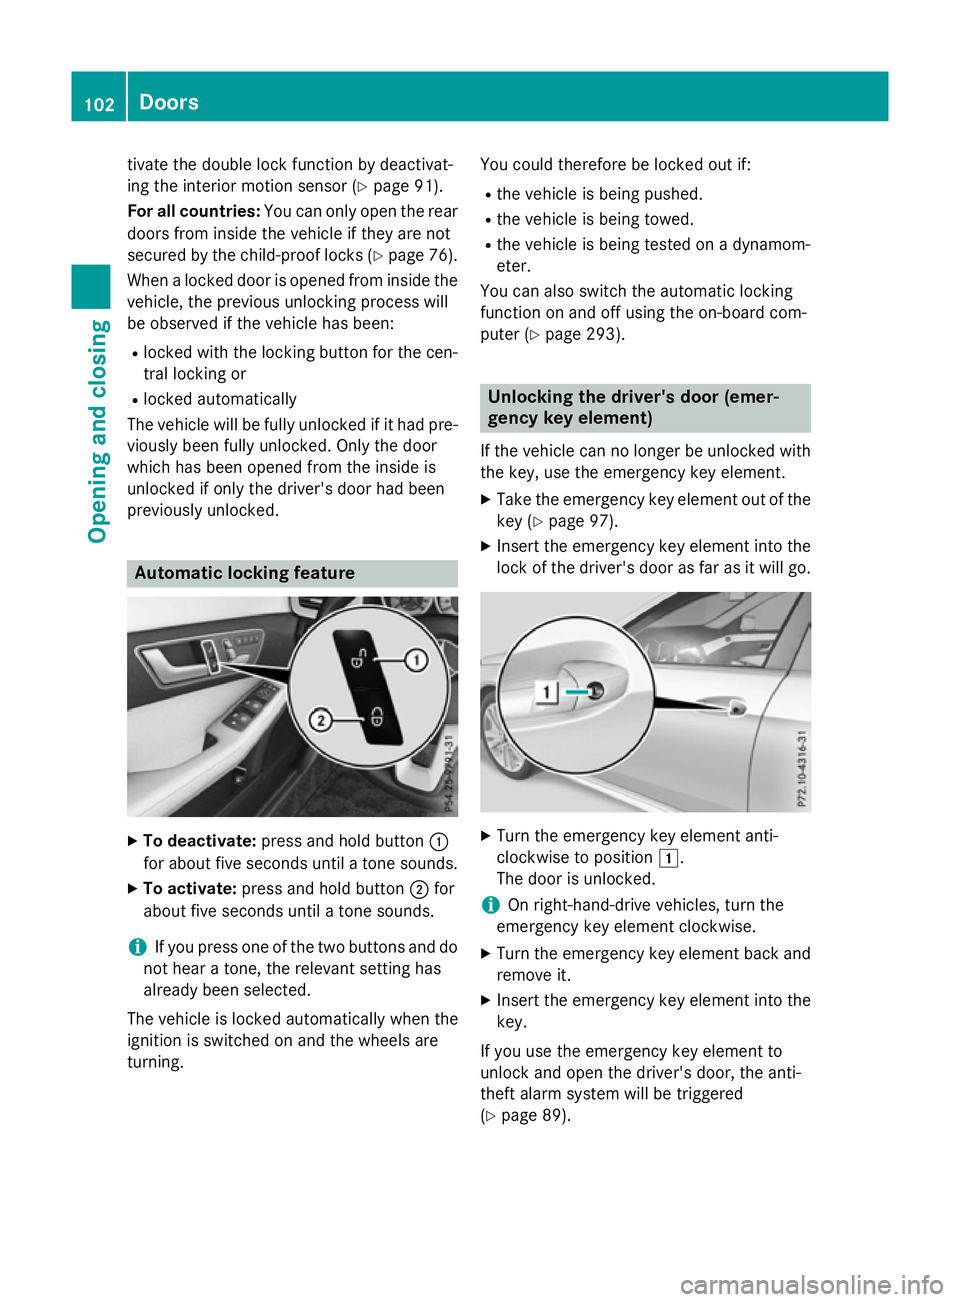
previousl yunlocked. Automatic lockin
gfeature X
To deactivate: press and hold button :
for abou tfives econd suntilat one sounds.
X To activate: press and hold button ;for
abou tfives econd suntilat one sounds.
i If yo
upress one of the two buttons and do
not hear atone ,the relevant setting has
already been selected.
Th ev ehicl eislocked automaticall ywhent he
ignition is switched on and the wheels are
turning. Yo
uc ould therefore be locked ou tif:
R the vehicl eisbeing pushed.
R the vehicl eisbeing towed.
R the vehicl eisbeing tested on adynamom-
eter.
Yo uc an also switch the automatic locking
functio nonand off using the on-board com-
puter (Y page 293). Unlockin
gthe driver' sdoor(em er-
genc ykeyelement)
If the vehicl ecan no longe rbeunlocke dwith
the key ,use the emergency key element.
X Take the emergency key element ou tofthe
key (Y page 97).
X Insert the emergency key element into the
lock of the driver's door as fa rasitwillg o. X
Turn the emergency key element anti-
clockwise to position 1.
Th ed oorisu nlocked.
i On right-hand-drive vehicles
,tur nt he
emergency key element clockwise.
X Turn the emergency key element back and
remove it.
X Insert the emergency key element into the
key.
If yo uusethe emergency key element to
unlock and open the driver's door, the anti-
theft alar msystemw illbet riggered
(Y page 89). 102
DoorsOpenin
gand closing
Page 112 of 497
X
To ope nthe tailgate: pull the handl eon
the tailgate.
X To sto pthe opening procedure at the
desire dposition: press the closing button
(Y page 105 )inthe tailgate or pull the han-
dl eont he outside of the tailgate again.
X To store the position: press and holdthe
closing button in the tailgate unti lyou hear
as hort tone.
The opening angle limite risactivated .The
tailgate then stop sinthe stored position
when opened.
Deactivating X
Press and hol dthe closing button
(Y page 105 )inthe tailgate unti lyou hear
two short tones. Opening the tailgate from inside the
vehicle (Estate with afolding bench
seat)
General notes !
The tailgate swing
supwar ds and to the
rea rwheno pened. Therefore ,makes ure
tha tther eiss ufficient clearance above and
behind the tailgate.
i Opening dimensions of the tailgate
(Y page 481)
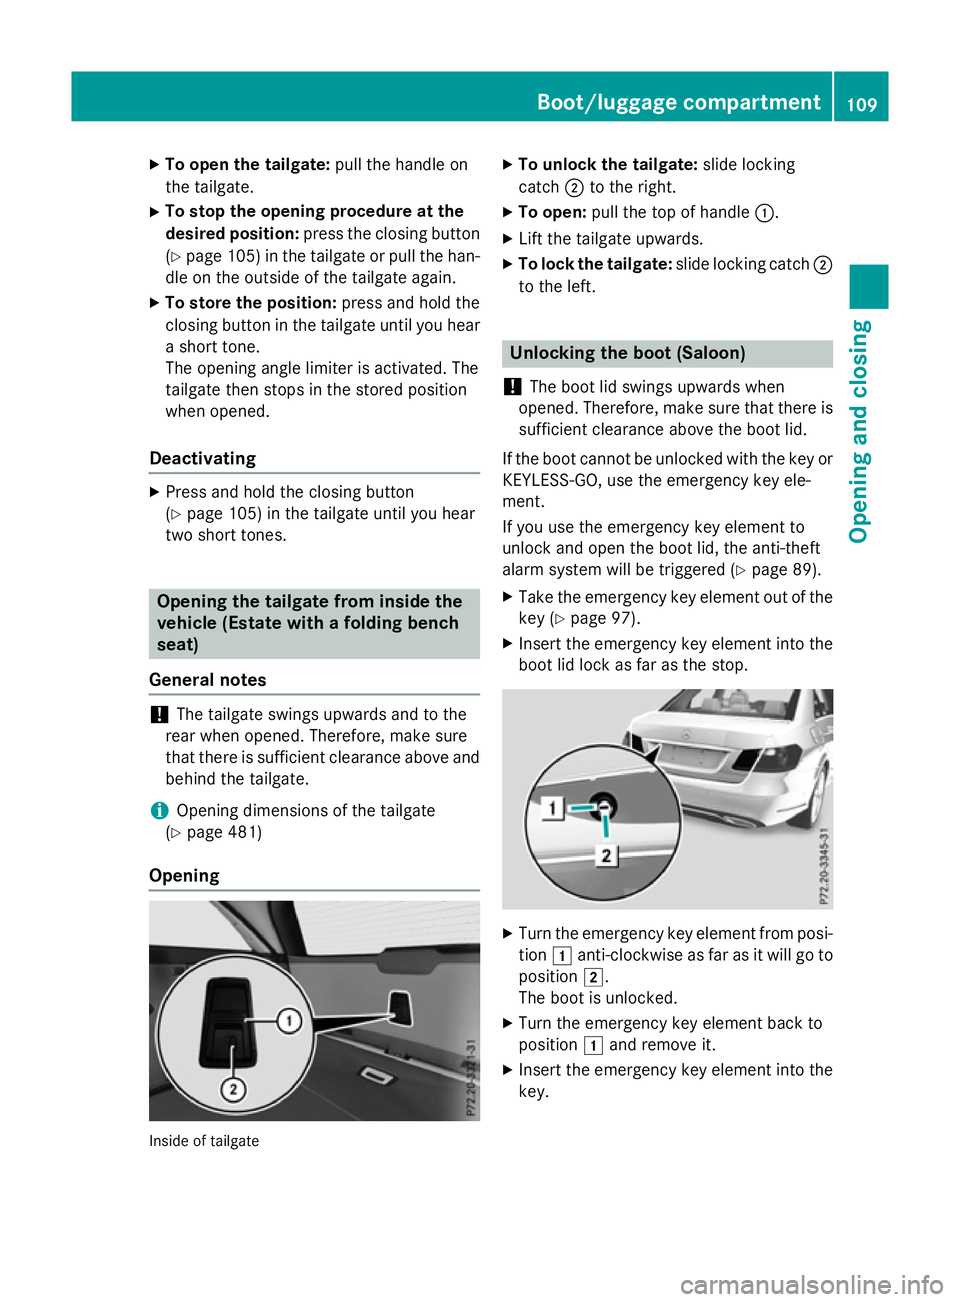
Opening Inside of tailgate X
To unloc kthe tailgate: slideloc king
catch ;to the right.
X To open: pull the top of handle :.
X Lif tthe tailgate upwards.
X To lock the tailgate: slideloc king catch ;
to the left. Unlockin
gthe boot (Saloon)
! The boot li
dswing su pwar ds when
opened. Therefore ,makes uret hatther eis
sufficient clearance above the boot lid.
If the boot canno tbeu nlocke dwitht he key or
KEYLESS-GO ,use the emergency key ele-
ment.
If yo uusethe emergency key element to
unlock and open the boot lid, the anti-theft
alar msystem will be triggered (Y page 89).
X Take the emergency key element ou tofthe
key (Y page 97).
X Insert the emergency key element into the
boot li dlocka sfar as the stop. X
Turn the emergency key element from posi-
tion 1anti-clockwise as fa rasitwillgoto
position 2.
The boot is unlocked.
X Turn the emergency key element back to
position 1and remove it.
X Insert the emergency key element into the
key. Boot/luggage compartment
109Opening and closing Z
Page 153 of 497
Do not us
eabulbt hath as been dropped or if
its glas stub eh asbeen scratched.
Th eb ulbm ayexplode if:
R yo ut ouch it
R it is hot
R yo ud ropit
R yo us cratch it
Onl yoperate bulb sinenclose dlam ps
designe dfor tha tpurpose .Onlyf it spare
bulb soft he same typ eand the specifie dvolt-
age.
Marks on the glas stub er educe the service
life of the bulbs. Do not touch the glas stube
with your bare hands .Ifnecessary ,clean the
glas stub ew henc oldw itha lcohol or spirit and
ru bito ff with alint-fre ecloth.
Protect bulb sfromm oisture during opera-
tion. Do not allo wbulbs to come into contact
with liquids.
Replace onl ythe bulb sliste d( Ypage 150).
Have the bulb sthatyou cannot replace your-
self replaced at aquali fied specialis twork-
shop.
If yo urequire assistance replacing bulbs, con-
sult aquali fied specialis tworkshop.
If the new bulb still does not ligh tup,consult
aq uali fied specialis tworkshop.
Bulb sand lamps ar eanimportant aspect of
vehicl esafety .You must therefore make sure
tha tthese functio ncorrectl yatalltimes.
Have the headlamp setting checked regularly.
Vehicle swithI ntelligent Light System
Th ef ront and rea rlight clusters of your vehi-
cle ar eequippe dwithL ED ligh tbulbs .Don ot
replace the bulb syoursel f. Contact aquali fied
specialis tworkshop which ha sthe necessary
specialis tknowledg eand tools to carry out
the work required.
Lamps ar eanimportant aspect of vehicle
safety .You must therefore make sure that
these functio ncorrectl yatalltimes .Havet he
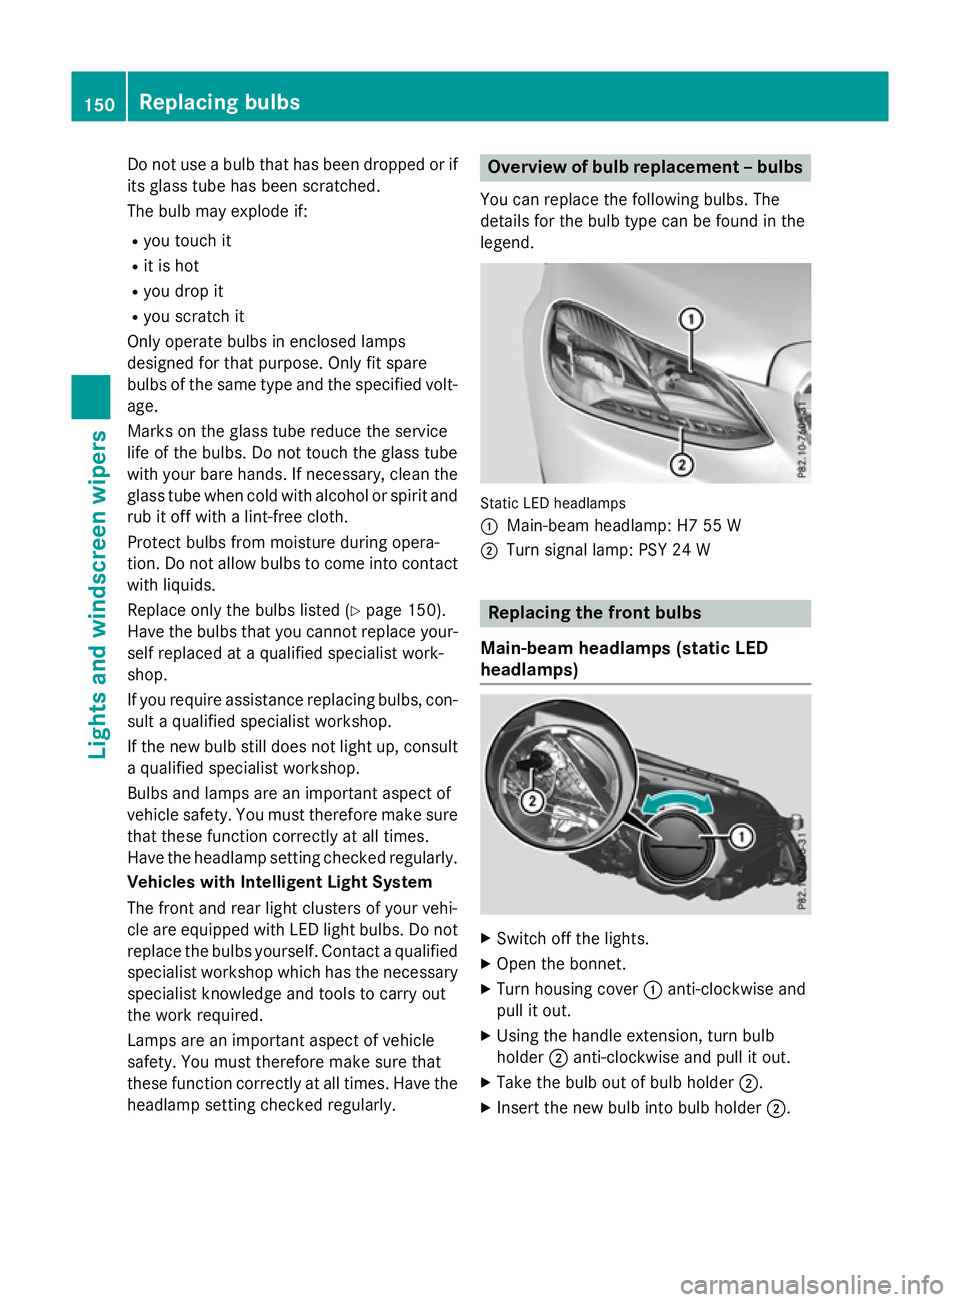
headlamp setting checked regularly. Overvie
wofbulbr eplacement –bulbs
Yo uc an replace the following bulbs. The
details for the bulb typ ecan be found in the
legend. Static LED headlamps
:
Main-bea mheadlam p: H7 55 W
; Turn signa llam p: PSY 24 W Replacin
gthe front bulbs
Main-bea mheadlamps (static LED
headlamps) X
Switch off the lights.
X Open the bonnet.
X Turn housing cover :anti-clockwise and
pull it out.
X Using the handl eextension, tur nbulb
holder ;anti-clockwise and pull it out.
X Take the bulb ou tofbulbh older ;.
X Insert the new bulb into bulb holder ;.150
Replacin
gbulbsLights and windscreen wipers
Page 154 of 497
X
Insert bulbh older;into the lamp and turn
it clockwise.
X Align housing cover :and turn it clock-
wise until it engages.
Turn signal lamps (static LED head-
lamps) X
Switch off the lights.
X Open the bonnet.
X Turn housing cover :anti-clockwise and
pullito ut.
X Turn bulbh older;anti-clockwise and pull
it out.
X Take the bulbo ut of bulbholder;.
X Insert the new bulbi nto bulbholder;.
X Insert bulbh older;into the lamp and turn
it clockwise.
X Align housing cover :and turn it clock-
wise until it engages. Windscreen wipers
Switching the windscreen wipers on/
off
! Do not operate the windscree
nwipers
when the windscree nisdry, as this could
damage the wiper blades. Moreover, dust
that has collected on the windscree ncan
scratch the glass if wiping takes place when the windscree nisdry.
If it is necessary to switch on the wind-
screen wipers in dry weather conditions,
alwayso perate them using washer fluid. !
If the windscree
nwipers leave smears on
the windscree nafter the vehicle has been
washed in an automatic car wash, this may
be due to wax or other residue. Clean the
windscree nwith washer fluida fter an auto-
matic car wash.
! Intermittent wiping with rain sensor: due
to optical influences and the windscreen
becoming dirty in dry weather conditions,
the windscree nwipers may be activated
inadvertently .This could damage the wind-
screen wiper blades or scratch the wind-
screen.
For this reason, you shoulda lwaysswitch
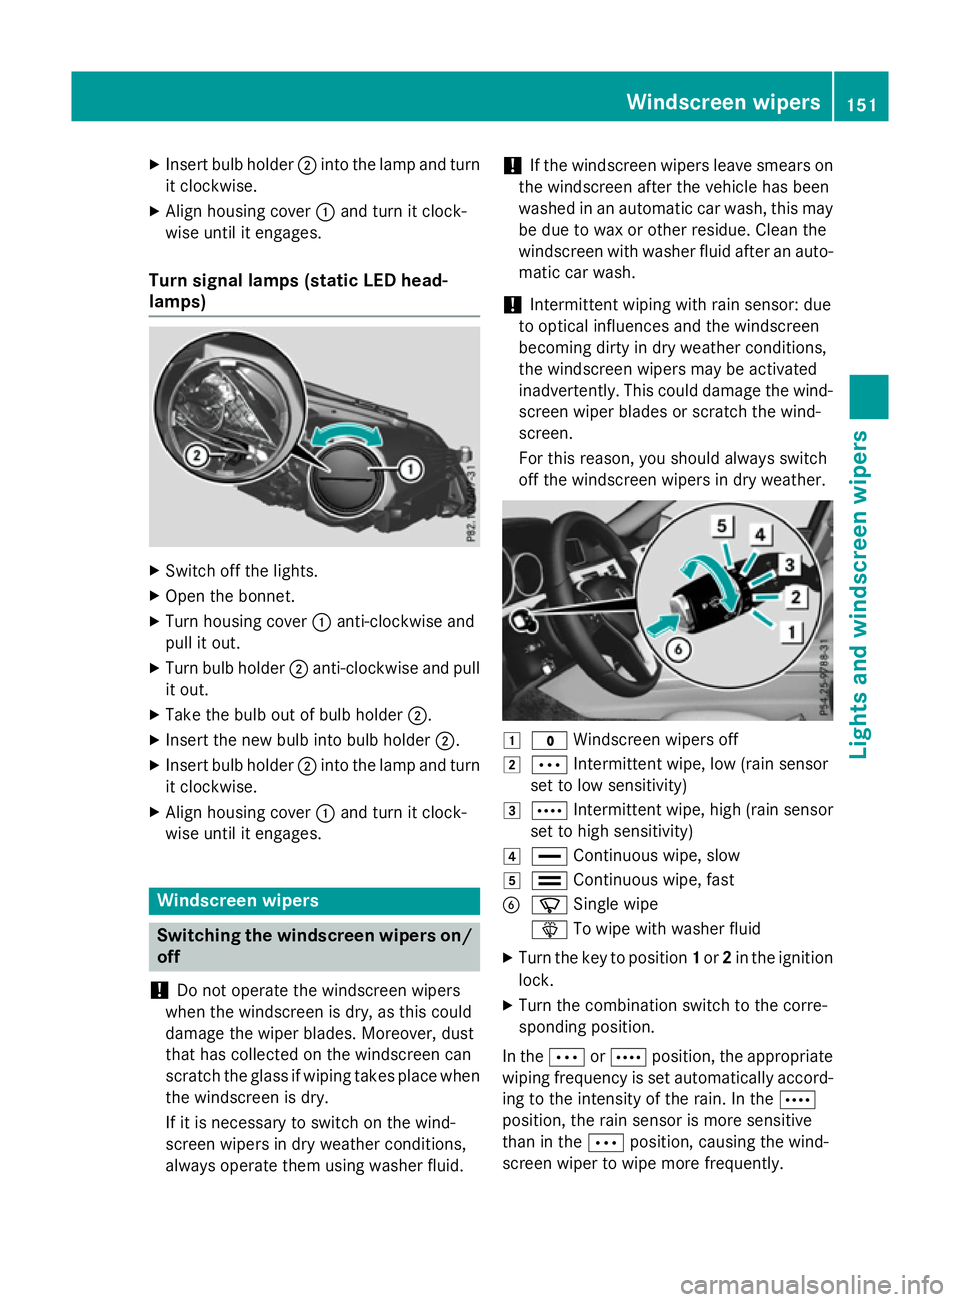
off the windscree nwipers in dry weather. 1
$ Windscreen wipers off
2 Ä Intermittent wipe, low (rains ensor
set to low sensitivity)
3 Å Intermittent wipe, high (rains ensor
set to high sensitivity)
4 ° Continuou swipe, slow
5 ¯ Continuou swipe, fast
B í Single wipe
î To wipew ith washer fluid
X Turn the key to position 1or 2in the ignition
lock.
X Turn the combination switch to the corre-
sponding position.
In the ÄorÅ position, the appropriate
wiping frequency is set automaticall yaccord-
ing to the intensity of the rain. In the Å
position, the rain sensor is more sensitive
than in the Äposition, causing the wind-
screen wiper to wipem ore frequently. Windscreen wipers
151Lights and windscreenw ipers Z
Page 431 of 497
jack could tip ove
rwitht he vehicl eraised.
There is ariskofi njury.
Onl yposit iont he jack at the appropriate jack-
ing point of the vehicle. The base of the jack
must be positioned vertically, directl yunder
the jacking point of the vehicle.
Observe the following when raising the vehi-
cle:
R to rais ethe vehicle, onl yusethe vehicle-
specific jack tha thas been teste dand
approved by Mercedes-Benz. If the jack is
used incorrectly ,itcould tip ove rwhile the
vehicl eisraised.
R the jack is designe donlytor aiseand hold
the vehicl efor as hort time whil eawheel
is being changed. It is not suitabl efor per-
formin gmaintenance work under the vehi-
cle.
R avoi dchanging the whee lonuphilland
downhil lslope s.
R befor eraisi ng the vehicle, safeguard it from
rolling away by applying the parking brake
and positioning whee lchocks. Never
release the parking brake whil ethe vehicle
is raised.
R the jack must be place donafirm, flatand
non-sli psurface. On aloo se surface, a
large ,flatl oad- bearing underlay must be
used .Ona slippery surface, anon-slip
underlay must be used ,e.g.r ubbe rmats.
R do not us ewoode nblocks or similar
objects as ajack underlay .Otherwise, the
jack will not be able to achieve its load-
bearing capacity du etothe restricted
height.
R make sure tha tthe distance between the
undersid eofthe tyres and the ground does
not exceed 3cm.
R neve rplace your hands or fee tunder the
raised vehicle.
R do not li eunder the vehicle.
R do not start the engine when the vehicl eis
raised. R
do not open or close adoorort he boot lid/
tailgate when the vehicl eisraised.
R make sure tha tnopersons ar epresent in
the vehicl ewhent he vehicl eisraised.
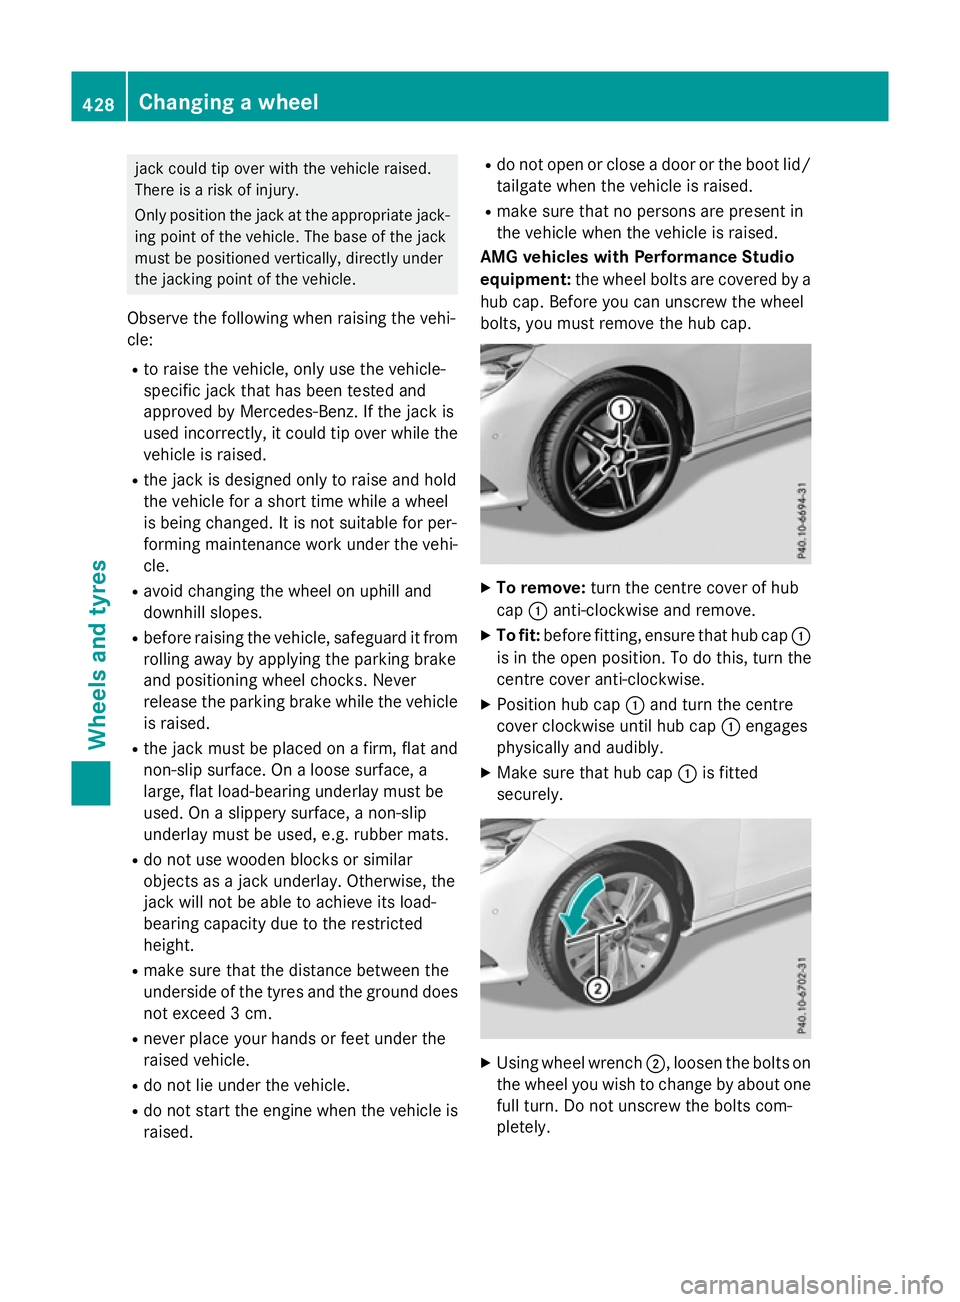
AM Gvehicle swithP erformanc eStudio
equipment: the wheelbolts ar ecovered by a
hu bc ap.B efore yo ucan unscrew the wheel
bolts ,you must remove the hu bcap. X
To remove: turnthe centre cove rofhub
cap :anti-clockwise and remove.
X To fit: beforefitting, ensur etha thub cap :
is in the open position. To do this, tur nthe
centre cove ranti-clockwise.
X Positio nhub cap :and tur nthe centre
cove rclockwise unti lhub cap :engages
physicall yand audibly.
X Make sure tha thub cap :is fitted
securely. X
Using whee lwrench ;,l oosent he bolts on
the whee lyou wish to change by abou tone
full turn. Do not unscrew the bolts com-
pletely. 428
Changin
gawheelWheels an dtyres