Back seat MERCEDES-BENZ E-Class SEDAN 2010 W212 Comand Manual
[x] Cancel search | Manufacturer: MERCEDES-BENZ, Model Year: 2010, Model line: E-Class SEDAN, Model: MERCEDES-BENZ E-Class SEDAN 2010 W212Pages: 224, PDF Size: 7.4 MB
Page 124 of 224
Audio Menu
i Information on the COMAND control
system and how to operate it can be found
on ( Y page 18).
i For many operating functions you can
also use the buttons on the multifunction
steering wheel, e.g. the =, ; ,
9 , : buttons, for selecting a channel
or a menu or scrolling through lists
( Y page 25).
Vehicle Equipment
i This Operator’s Manual describes all
features, standard or optional, potentially
available for your vehicle at the time of
purchase. Please be aware that your
vehicle might not be equipped with all
features described in this manual.
Calling up the Audio Menu
XSelect Audio
The audio mode last active is switched on.
or
XPress the $ function button.
Radio mode is switched onXSelect Audio
The audio menu appears.
i If radio mode was active last, you only
need to select Audio.
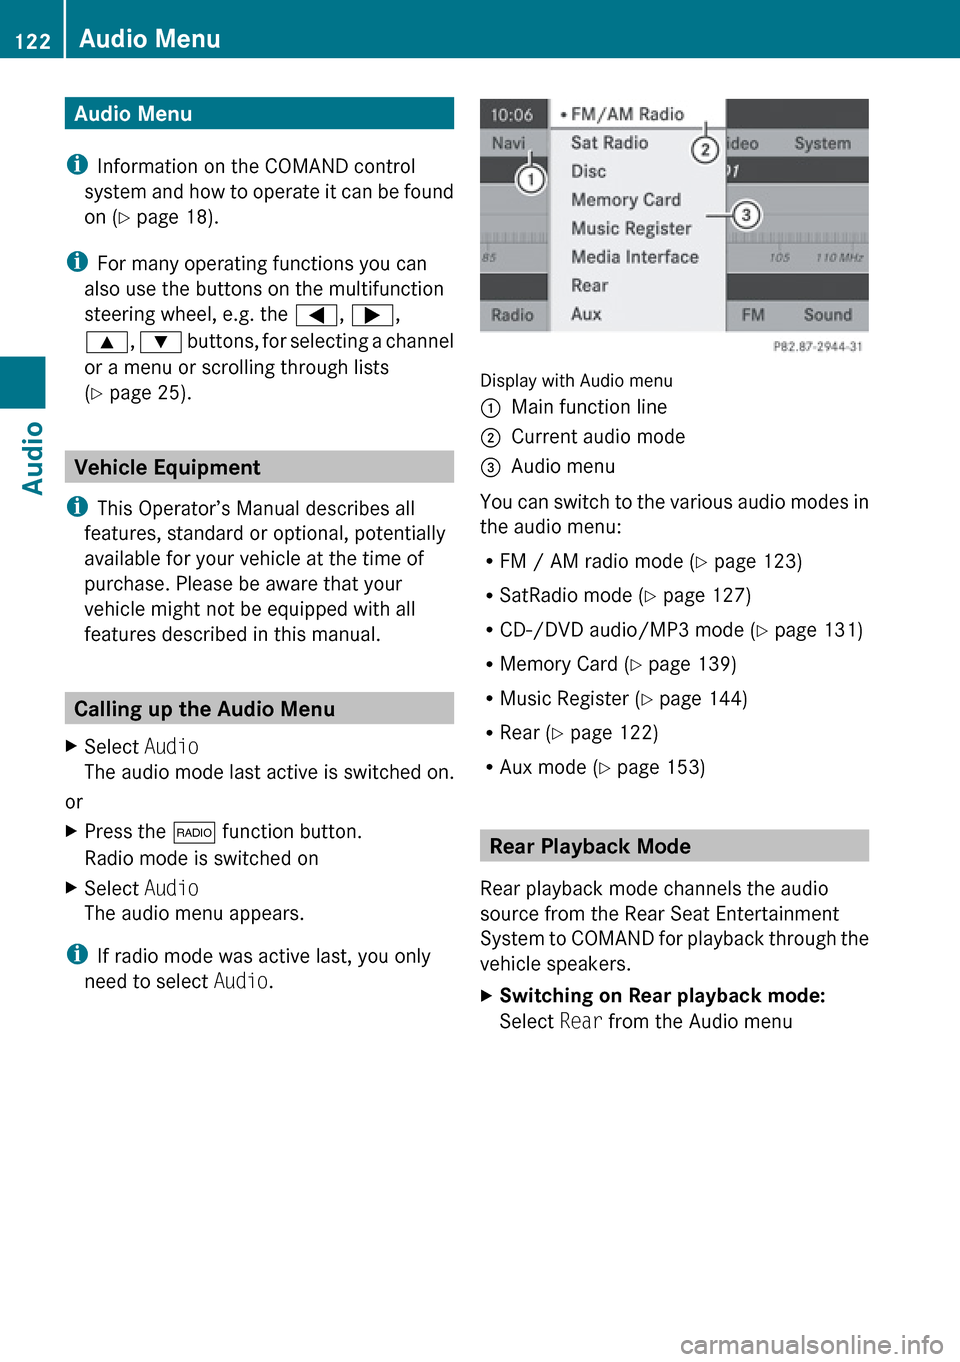
Display with Audio menu
1Main function line2Current audio mode3Audio menu
You can switch to the various audio modes in
the audio menu:
R FM / AM radio mode ( Y page 123)
R SatRadio mode ( Y page 127)
R CD-/DVD audio/MP3 mode ( Y page 131)
R Memory Card ( Y page 139)
R Music Register ( Y page 144)
R Rear ( Y page 122)
R Aux mode ( Y page 153)
Rear Playback Mode
Rear playback mode channels the audio
source from the Rear Seat Entertainment
System to COMAND for playback through the
vehicle speakers.
XSwitching on Rear playback mode:
Select Rear from the Audio menu122Audio MenuAudio
Page 169 of 224
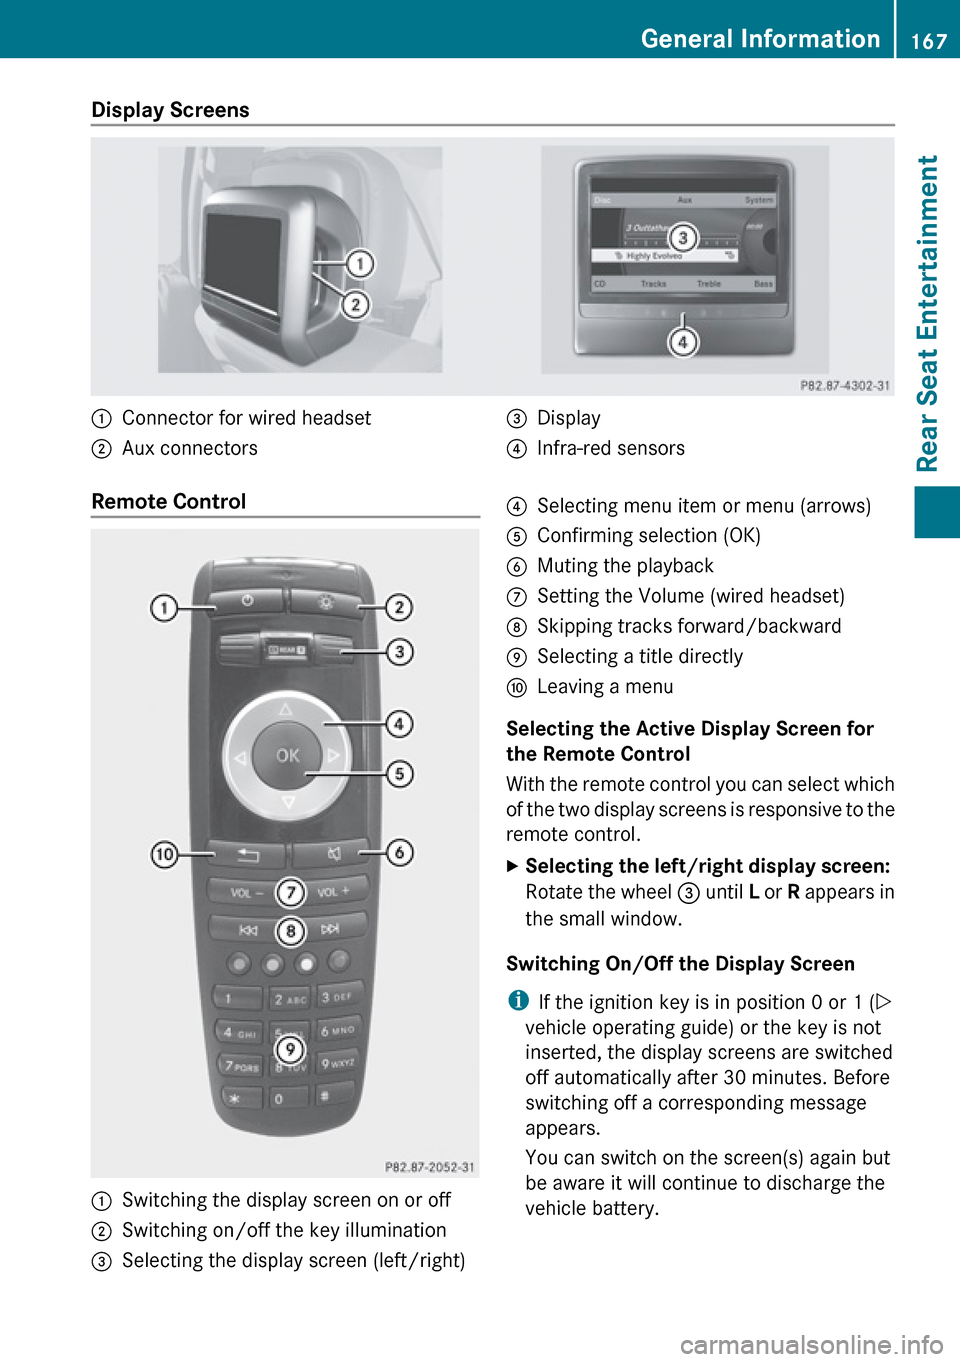
Display Screens :Connector for wired headset;Aux connectors=Display?Infra-red sensorsRemote Control :Switching the display screen on or off;Switching on/off the key illumination=Selecting the display screen (left/right)?Selecting menu item or menu (arrows)AConfirming selection (OK)BMuting the playbackCSetting the Volume (wired headset)DSkipping tracks forward/backwardESelecting a title directlyFLeaving a menu
Selecting the Active Display Screen for
the Remote Control
With the remote control you can select which
of the two display screens is responsive to the
remote control.
XSelecting the left/right display screen:
Rotate the wheel = until L or R appears in
the small window.
Switching On/Off the Display Screen
i If the ignition key is in position 0 or 1 ( Y
vehicle operating guide) or the key is not
inserted, the display screens are switched
off automatically after 30 minutes. Before
switching off a corresponding message
appears.
You can switch on the screen(s) again but
be aware it will continue to discharge the
vehicle battery.
General Information167Rear Seat EntertainmentZ
Page 170 of 224
XPoint the remote control to the active
screen and press the On/Off : button on
the remote control.
The display screen is switched on or off.
i Switching on with the remote control is
only possible if the ignition is on.
Muting the Audio Playback (Only Wired
Headset)
XPress the button B on the remote control.
Depending on the previous state the sound
is switched on or off.
Selecting a Menu Item and Confirming the
Selection
XSelecting the menu item: Press the arrow
buttons ? on the remote control.XConfirming the selection: Press the OK
button A.
CD/DVD Drive and Aux Connectors
The CD/DVD drive is located in
R central position underneath the rear seats
in vehicles with folding rear seat
R in the arm rest between the rear seats in
vehicles without folding rear seat
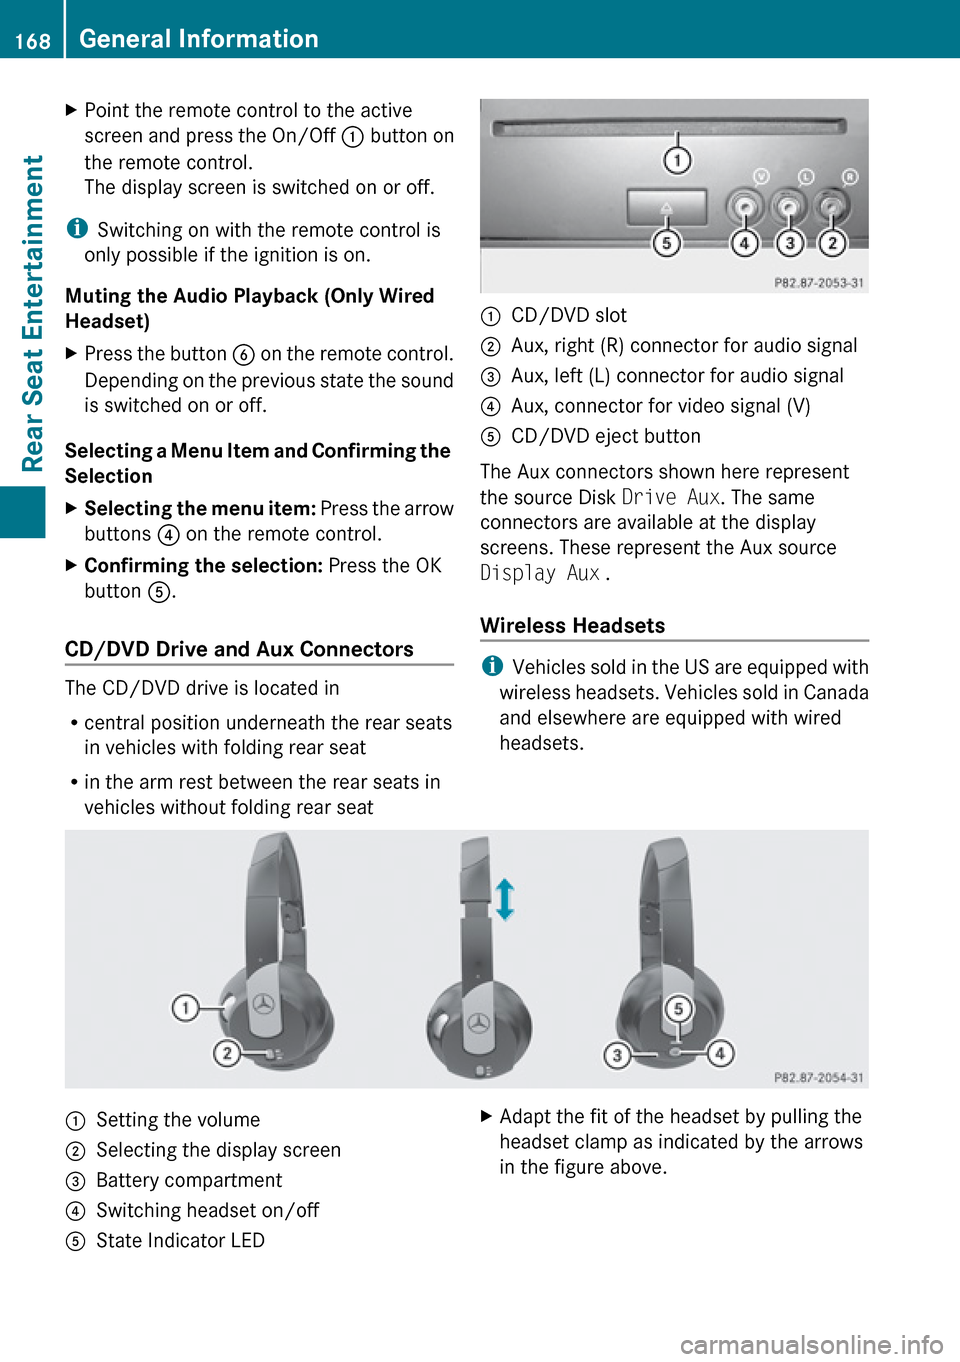
:CD/DVD slot;Aux, right (R) connector for audio signal=Aux, left (L) connector for audio signal?Aux, connector for video signal (V)ACD/DVD eject button
The Aux connectors shown here represent
the source Disk Drive Aux. The same
connectors are available at the display
screens. These represent the Aux source
Display Aux .
Wireless Headsets
i Vehicles sold in the US are equipped with
wireless headsets. Vehicles sold in Canada
and elsewhere are equipped with wired
headsets.
:Setting the volume;Selecting the display screen=Battery compartment?Switching headset on/offAState Indicator LEDXAdapt the fit of the headset by pulling the
headset clamp as indicated by the arrows
in the figure above.168General InformationRear Seat Entertainment
Page 172 of 224
Remote Control Batteries
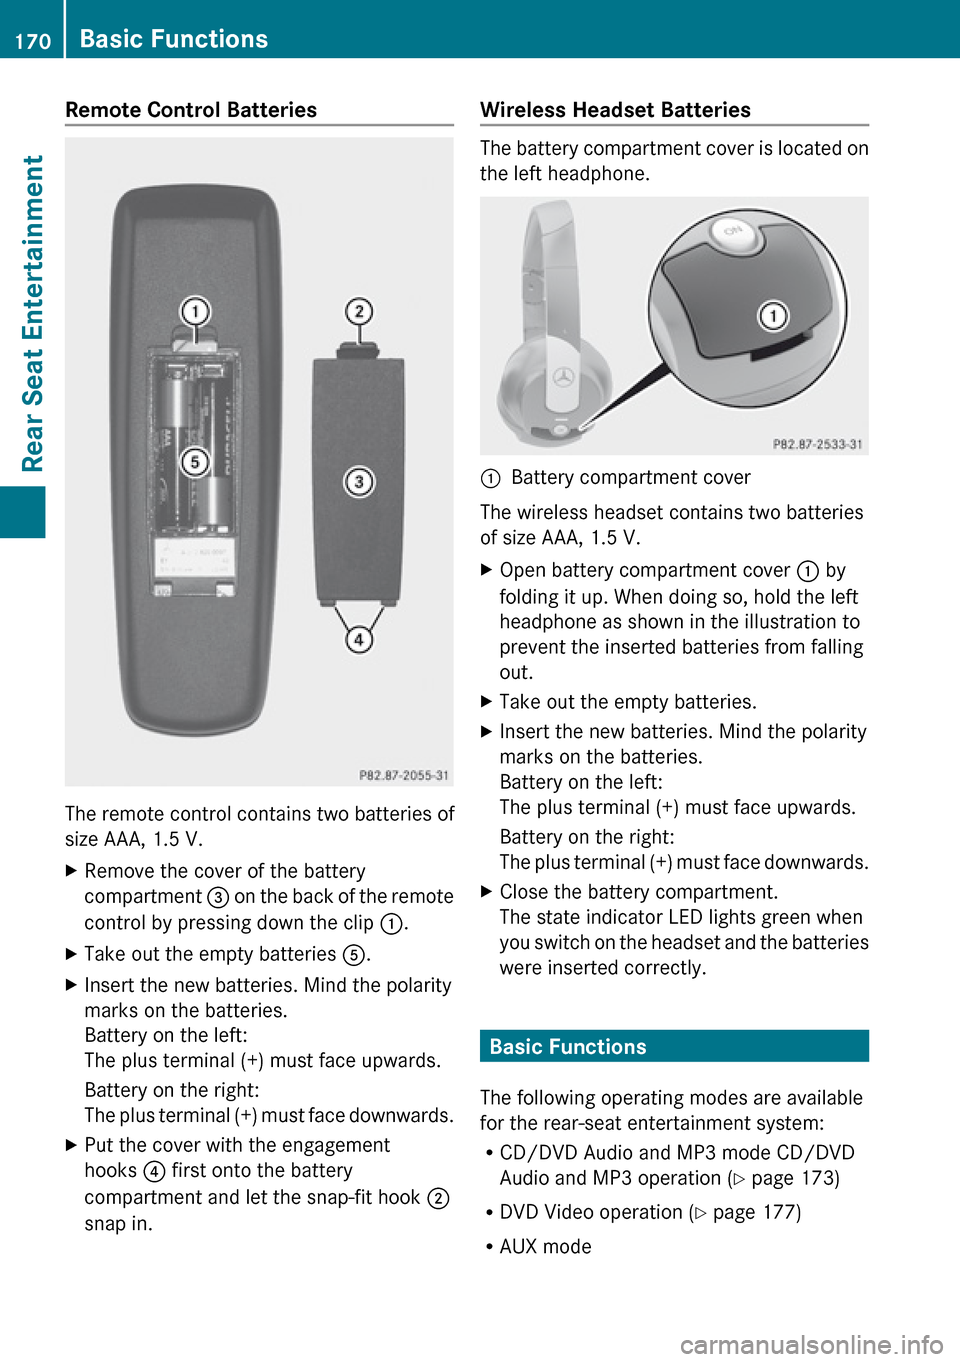
The remote control contains two batteries of
size AAA, 1.5 V.
XRemove the cover of the battery
compartment 3 on the back of the remote
control by pressing down the clip :.XTake out the empty batteries 5.XInsert the new batteries. Mind the polarity
marks on the batteries.
Battery on the left:
The plus terminal (+) must face upwards.
Battery on the right:
The plus terminal (+) must face downwards.XPut the cover with the engagement
hooks ? first onto the battery
compartment and let the snap-fit hook 2
snap in.Wireless Headset Batteries
The battery compartment cover is located on
the left headphone.
1Battery compartment cover
The wireless headset contains two batteries
of size AAA, 1.5 V.
XOpen battery compartment cover : by
folding it up. When doing so, hold the left
headphone as shown in the illustration to
prevent the inserted batteries from falling
out.XTake out the empty batteries.XInsert the new batteries. Mind the polarity
marks on the batteries.
Battery on the left:
The plus terminal (+) must face upwards.
Battery on the right:
The plus terminal (+) must face downwards.XClose the battery compartment.
The state indicator LED lights green when
you switch on the headset and the batteries
were inserted correctly.
Basic Functions
The following operating modes are available
for the rear-seat entertainment system:
R CD/DVD Audio and MP3 mode CD/DVD
Audio and MP3 operation ( Y page 173)
R DVD Video operation ( Y page 177)
R AUX mode
170Basic FunctionsRear Seat Entertainment
Page 173 of 224
In Aux mode you can play external video
sources that are connected either to the
display screens or to the CD/DVD drive. In
addition you can play the active audio or
video source of COMAND ( Y page 181).
With the system settings menu you can set
display design and language for each screen
separately ( Y page 172).
Wireless Headset Operation
i Vehicles sold in the US are equipped with
wireless headsets. Vehicles sold in Canada
and elsewhere are equipped with wired
headsets.
You can use the wireless headset and/or two
wired headsets connected to the display
screens ( Y page 168).
XSwitch on the wireless headset
( Y page 169).XSet the volume of the headset
( Y page 169).XSelect the display screen for the headset
( Y page 169).
Main Loudspeaker Operation
i This function is available in connection
with COMAND.
The sound of a medium which is played in the
RSE disc drive can also be heard over the
vehicle loudspeakers. For this, at least on one
of the display screens the operating mode
Disc has to be active.
XSwitching to Audio menu: Select Audio
£ Audio in COMAND.XSelect Rear.
The volume control of the headsets has no
impact on the volume of the loudspeakers.
Setting Treble and Bass XSwitch to the menu of the respective
operating mode
R CD Audio ( Y page 174)
R DVD Audio ( Y page 174)
R MP3 ( Y page 174)
R DVD Video ( Y page 177)
R Aux ( Y page 182)XSelect Treble or Bass .
A setting scale appears.XTo change the value: Press the n or
ý button on the remote control.XTo confirm the setting: Press the 9
button on the remote control.
Multiuser Operation
The two display screens can be operated
almost entirely independent from each other.
For some menus, however, there can arise
conflicts if the two display screens are used
simultaneously.
Simultaneous Use of the Rear-
Compartment Disc Drive
If on both display screens the disc drive is
used, the selection of certain settings on one
screen will have an impact on the other
screen as well.
The following functions affect both screens:
R Changing the playback options
R Selecting a track (from track list or folder)
R Using the Play, Stop or Pause function.
R Using the fast forward/rewind function
R Switching to DVD menu and and navigating
through it
R Setting language, subtitle and camera
angle
R Calling up interactive DVD content
Basic Functions171Rear Seat EntertainmentZ
Page 176 of 224
Ejecting a Disc XPress Eject button 8.
The drive ejects the disc.XTake the disc out of the slot.
If you do not take the disc out of the slot,
the drive will pull it in again automatically
after a short while.
Switching to CD Audio, DVD Audio or
MP3 Operation
XInsert a disc ( Y page 173).XSelect Disc in the main function line using
the remote control.
The corresponding mode is activated. The
rear-seat entertainment system plays the
disc.
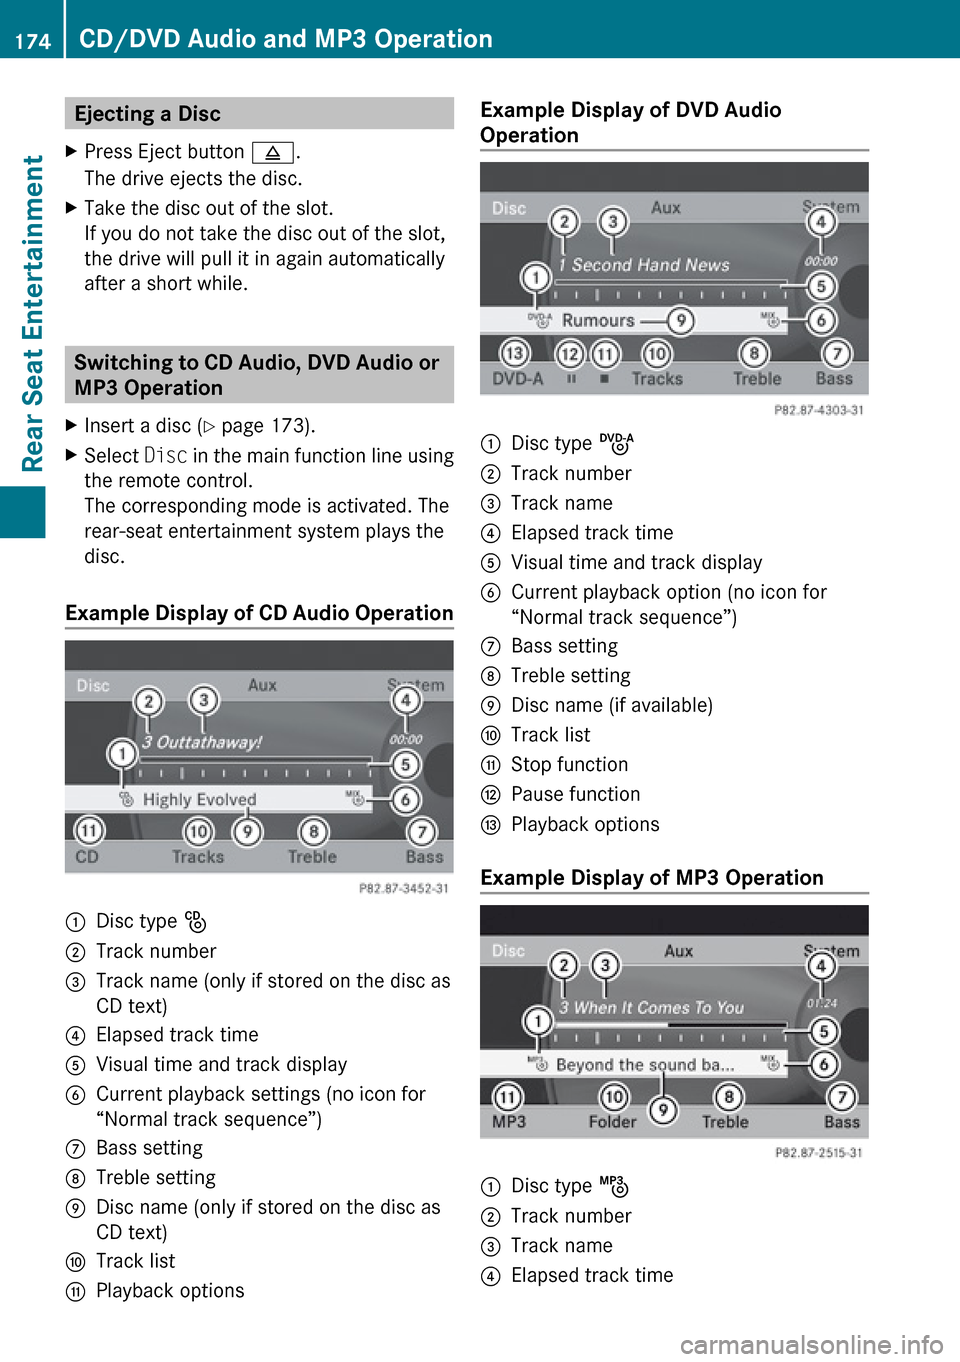
Example Display of CD Audio Operation
1Disc type _2Track number3Track name (only if stored on the disc as
CD text)4Elapsed track time5Visual time and track display6Current playback settings (no icon for
“Normal track sequence”)7Bass setting8Treble setting9Disc name (only if stored on the disc as
CD text)aTrack listbPlayback optionsExample Display of DVD Audio
Operation1Disc type ü2Track number3Track name4Elapsed track time5Visual time and track display6Current playback option (no icon for
“Normal track sequence”)7Bass setting8Treble setting9Disc name (if available)aTrack listbStop functionHPause functionIPlayback options
Example Display of MP3 Operation
1Disc type þ2Track number3Track name4Elapsed track time174CD/DVD Audio and MP3 OperationRear Seat Entertainment
Page 177 of 224
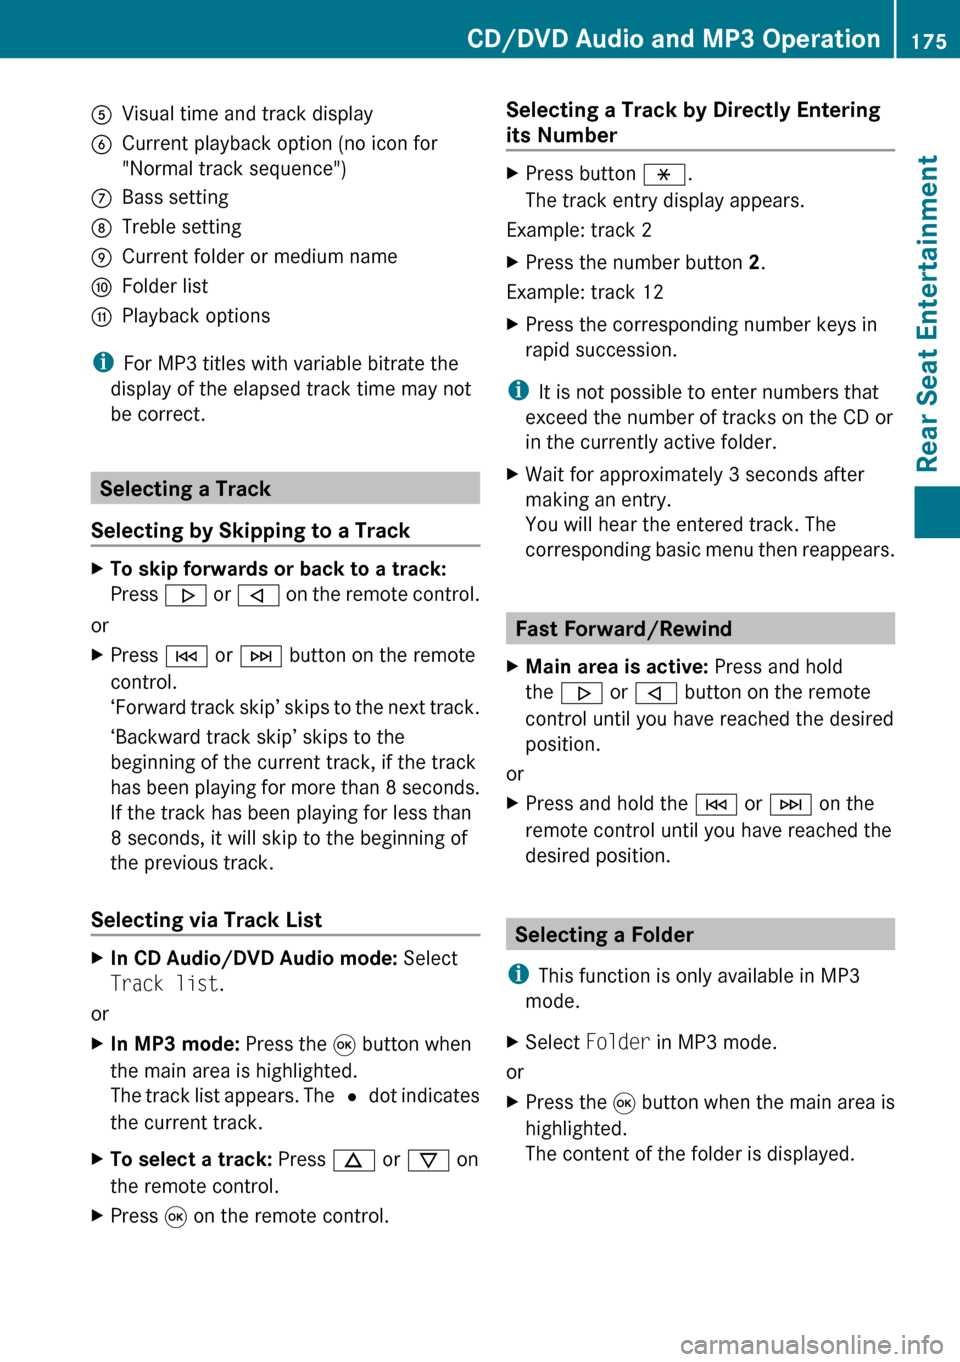
5Visual time and track display6Current playback option (no icon for
"Normal track sequence")7Bass setting8Treble setting9Current folder or medium nameaFolder listbPlayback options
i For MP3 titles with variable bitrate the
display of the elapsed track time may not
be correct.
Selecting a Track
Selecting by Skipping to a Track
XTo skip forwards or back to a track:
Press . or , on the remote control.
or
XPress E or F button on the remote
control.
‘ Forward track skip’ skips to the next track.
‘Backward track skip’ skips to the
beginning of the current track, if the track
has been playing for more than 8 seconds.
If the track has been playing for less than
8 seconds, it will skip to the beginning of
the previous track.
Selecting via Track List
XIn CD Audio/DVD Audio mode: Select
Track list .
or
XIn MP3 mode: Press the 9 button when
the main area is highlighted.
The track list appears. The R dot indicates
the current track.XTo select a track: Press n or ý on
the remote control.XPress 9 on the remote control.Selecting a Track by Directly Entering
its NumberXPress button h.
The track entry display appears.
Example: track 2
XPress the number button 2.
Example: track 12
XPress the corresponding number keys in
rapid succession.
i It is not possible to enter numbers that
exceed the number of tracks on the CD or
in the currently active folder.
XWait for approximately 3 seconds after
making an entry.
You will hear the entered track. The
corresponding basic menu then reappears.
Fast Forward/Rewind
XMain area is active: Press and hold
the . or , button on the remote
control until you have reached the desired
position.
or
XPress and hold the E or F on the
remote control until you have reached the
desired position.
Selecting a Folder
i This function is only available in MP3
mode.
XSelect Folder in MP3 mode.
or
XPress the 9 button when the main area is
highlighted.
The content of the folder is displayed.CD/DVD Audio and MP3 Operation175Rear Seat EntertainmentZ
Page 178 of 224
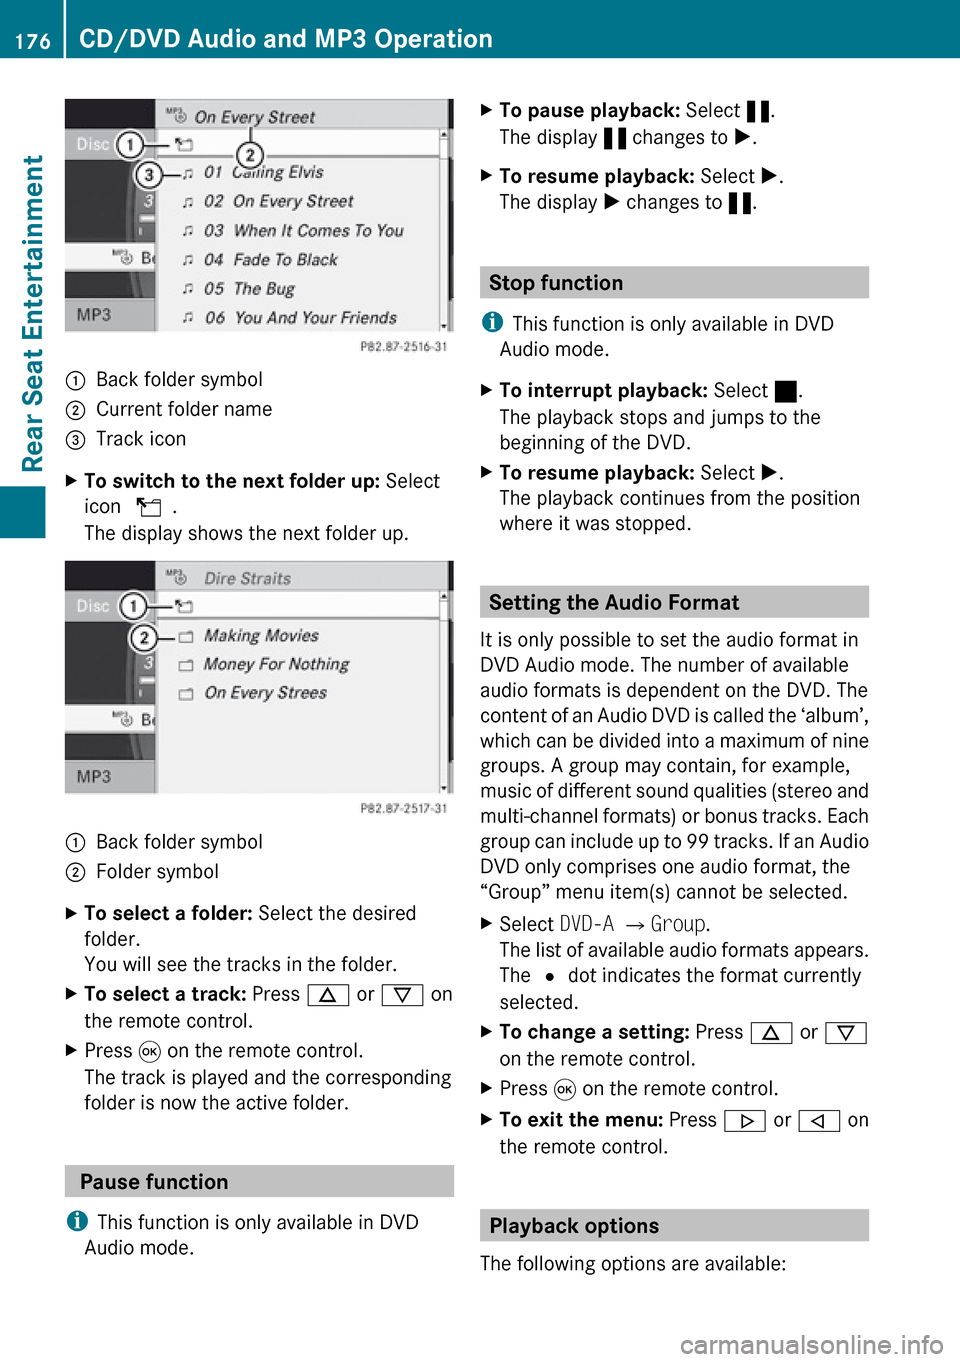
1Back folder symbol2Current folder name3Track iconXTo switch to the next folder up: Select
icon U .
The display shows the next folder up.1Back folder symbol2Folder symbolXTo select a folder: Select the desired
folder.
You will see the tracks in the folder.XTo select a track: Press n or ý on
the remote control.XPress 9 on the remote control.
The track is played and the corresponding
folder is now the active folder.
Pause function
i This function is only available in DVD
Audio mode.
XTo pause playback: Select «.
The display « changes to X.XTo resume playback: Select X.
The display X changes to «.
Stop function
i This function is only available in DVD
Audio mode.
XTo interrupt playback: Select ±.
The playback stops and jumps to the
beginning of the DVD.XTo resume playback: Select X.
The playback continues from the position
where it was stopped.
Setting the Audio Format
It is only possible to set the audio format in
DVD Audio mode. The number of available
audio formats is dependent on the DVD. The
content of an Audio DVD is called the ‘album’,
which can be divided into a maximum of nine
groups. A group may contain, for example,
music of different sound qualities (stereo and
multi-channel formats) or bonus tracks. Each
group can include up to 99 tracks. If an Audio
DVD only comprises one audio format, the
“Group” menu item(s) cannot be selected.
XSelect DVD-A £ Group .
The list of available audio formats appears.
The R dot indicates the format currently
selected.XTo change a setting: Press n or ý
on the remote control.XPress 9 on the remote control.XTo exit the menu: Press . or , on
the remote control.
Playback options
The following options are available:
176CD/DVD Audio and MP3 OperationRear Seat Entertainment
Page 179 of 224
RNormal Track Sequence
You will hear the tracks in the normal
sequence (e.g. track 1, 2, 3, etc.).
R Random Tracks:
You will hear the tracks in random order
(e.g. track 3, 8, 5, etc.).
R Random Folder (MP3 mode only)
The tracks in the currently active folder and
any subfolders are heard in random order.XTo select an option: Switch to CD or DVD-
A or MP3 mode ( Y page 174).XSelect CD or DVD-A or MP3 .
The option list appears. A R dot indicates
the option currently selected.XSelect an option.
The option is switched on. All options
except Normal Track Sequence will be
indicated in the main area.
i If you change the disc, the Normal
Track Sequence option is activated
automatically. If an option is selected, it
remains selected after the rear-seat
entertainment system is switched on or off.
Switching Track Information On/Off
(MP3 Mode Only)
If this function is switched on, folder and track
names are displayed.
If this function is switched off, disc and file
name are displayed.
XSelect Display Track Information .
The function is switched on Ç or off
c depending on the previous status.
DVD Video Operation
Please refer to the chapter “Audio” for
general information about CD/DVD discs
( Y page 133) and on the MP3 format
( Y page 132).
For Safety Instructions refer to section “CD/
DVD Audio and MP3 Operation”
( Y page 131).
For special notes on DVDs and DVD playback
conditions refer to chapter “Video”
( Y page 158).
Functional Restrictions
Depending on the DVD, it is possible that
certain functions or actions described in this
section will be temporarily blocked or may not
function at all. As soon as you try to activate
these functions or actions, you will see icon
7 in the display.
Loading and Ejecting DVDs
XProceed as described in the "CD/DVD
Audio and MP3 mode" section
( Y page 173).
Switching to DVD mode
XLoad a DVD Video disc.
The rear-seat entertainment system loads
the inserted disc.
The DVD is played according to the
playback options:
Either the film is started automatically or
the DVD menu appears that is stored on the
disc. In the latter case you must start the
film manually.XSelect Disc using the remote control.
DVD mode is activated.
The Video DVD meets the playback
criteria: Either the film is started
automatically or the DVD menu appears
that is stored on the disc. In the latter case
you must start the film manually.XTo do so, select the corresponding menu
item in the DVD menu ( Y page 180).
i
If Disc operation was selected last, the
disc is played automatically after loading.
DVD Video Operation177Rear Seat EntertainmentZ
Page 180 of 224
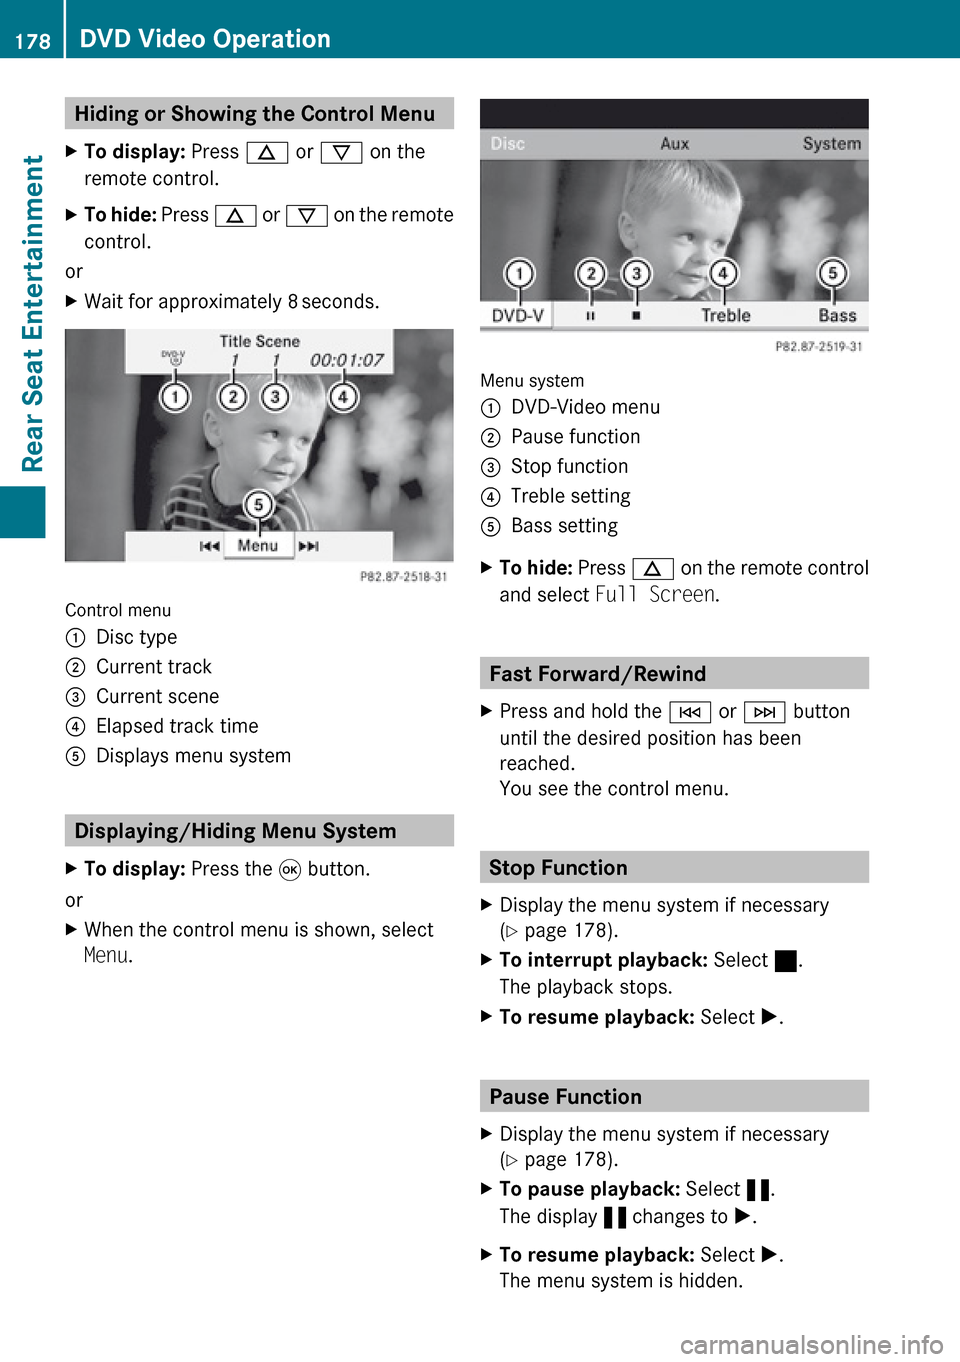
Hiding or Showing the Control Menu XTo display: Press n or ý on the
remote control.XTo hide: Press n or ý on the remote
control.
or
XWait for approximately 8 seconds.
Control menu
1Disc type2Current track3Current scene4Elapsed track time5Displays menu system
Displaying/Hiding Menu System
XTo display: Press the 9 button.
or
XWhen the control menu is shown, select
Menu .
Menu system
1DVD-Video menu2Pause function3Stop function4Treble setting5Bass settingXTo hide: Press n on the remote control
and select Full Screen .
Fast Forward/Rewind
XPress and hold the E or F button
until the desired position has been
reached.
You see the control menu.
Stop Function
XDisplay the menu system if necessary
( Y page 178).XTo interrupt playback: Select ±.
The playback stops.XTo resume playback: Select X.
Pause Function
XDisplay the menu system if necessary
( Y page 178).XTo pause playback: Select «.
The display « changes to X.XTo resume playback: Select X.
The menu system is hidden.178DVD Video OperationRear Seat Entertainment