Button MERCEDES-BENZ E-Class SEDAN 2013 W212 User Guide
[x] Cancel search | Manufacturer: MERCEDES-BENZ, Model Year: 2013, Model line: E-Class SEDAN, Model: MERCEDES-BENZ E-Class SEDAN 2013 W212Pages: 420, PDF Size: 14.26 MB
Page 42 of 420
Useful information
i This Operator's Manual describes all
models and all standard and optional
equipment of your vehicle available at the
time of publication of the Operator's
Manual. Country-specific differences are
possible.
Please note that your vehicle may
not be equipped with all features
described. This also applies to safety-
related systems and functions.
i Read the information on qualified
specialist workshops: ( Y page 25).Panic alarm
X
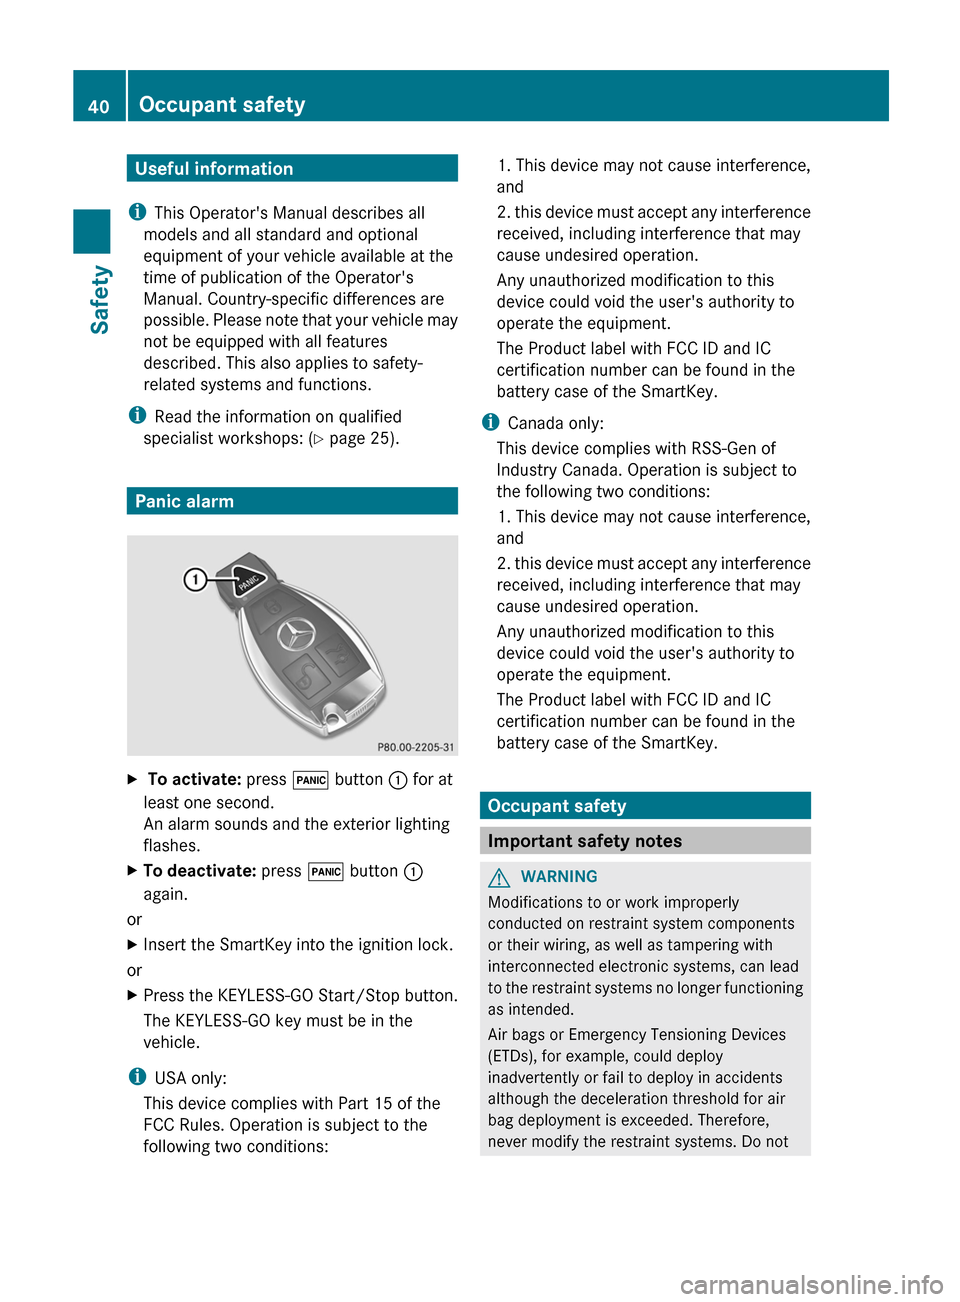
To activate: press ! button : for at
least one second.
An alarm sounds and the exterior lighting
flashes.
X To deactivate: press ! button :
again.
or
X Insert the SmartKey into the ignition lock.
or
X Press the KEYLESS-GO Start/Stop button.
The KEYLESS-GO key must be in the
vehicle.
i USA only:
This device complies with
Part 15 of the
FCC Rules. Operation is subject to the
following two conditions: 1. This device may not cause interference,
and
2.
this device must accept any interference
received, including interference that may
cause undesired operation.
Any unauthorized modification to this
device could void the user's authority to
operate the equipment.
The Product label with FCC ID and IC
certification number can be found in the
battery case of the SmartKey.
i Canada only:
This device complies with RSS-Gen of
Industry Canada. Operation is subject to
the following two conditions:
1. This device may not cause interference,
and
2. this device must accept any interference
received, including interference that may
cause undesired operation.
Any unauthorized modification to this
device could void the user's authority to
operate the equipment.
The Product label with FCC ID and IC
certification number can be found in the
battery case of the SmartKey. Occupant safety
Important safety notes
G
WARNING
Modifications to or work improperly
conducted on restraint system components
or their wiring, as well as tampering with
interconnected electronic systems, can lead
to
the restraint systems no longer functioning
as intended.
Air bags or Emergency Tensioning Devices
(ETDs), for example, could deploy
inadvertently or fail to deploy in accidents
although the deceleration threshold for air
bag deployment is exceeded. Therefore,
never modify the restraint systems. Do not 40
Occupant safety
Safety
Page 53 of 420
backrest of the front-passenger seat
backrest.
If necessary, adjust the tilt of the passenger
seat backrest.
An
incorrectly mounted child seat could cause
injuries to the child in case of an accident,
instead of increasing protection for the child.
Follow the manufacturer's instructions for
installation of child restraint systems.
The 45 indicator lamp lights up:
R if you turn the SmartKey in the ignition lock
to position 1 or 2
R if you press the KEYLESS-GO Start/Stop
button once or twice on vehicles with
KEYLESS-GO
R if an adult is seated properly on the front-
passenger seat and the OCS classifies the
occupant as an adult
The 45 indicator lamp goes out
after approximately six seconds.
If the seat is not occupied and the OCS
detects that the front-passenger seat is
empty, the 45 indicator lamp will
continue to light up. The 45 front-
passenger front air bag warning lamp then
stays lit continuously.
For more information about the OCS, see
"Problems with the Occupant Classification
System" ( Y page 52). Occupant safety
51
Safety Z
Page 59 of 420
R
Never place your feet on the instrument
panel, dashboard, or on the seat. Always
keep both feet on the floor in front of the
seat.
R When using a seat belt to secure infant
restraints, toddler restraints, or children in
booster seats, always follow the child seat
manufacturer's instructions. G
WARNING
Do not pass seat belts over sharp edges. They
could tear.
Do
not allow the seat belt to get caught in the
door or in the seat adjustment mechanism.
This could damage the seat belt.
Never attempt to make modifications to seat
belts. This could impair the effectiveness of
the seat belts.
Fastening seat belts G
WARNING
According to accident statistics, children are
safer when properly restrained on the rear
seats
than on the front-passenger seat. Thus,
we strongly recommend that children be
placed in the rear seat whenever possible.
Regardless of seating position, children 12
years old and under must be seated and
properly secured in an appropriately sized
child restraint system or booster seat
recommended for the size and weight of the
child. For additional information, see the
"Children in the vehicle" section.
A child's risk of serious or fatal injuries is
significantly increased if the child restraints
are not properly secured in the vehicle and/
or the child is not properly secured in the child
restraint. Example: Sedan
X
Adjust the seat and move the backrest to
an almost vertical position ( Y page 102).
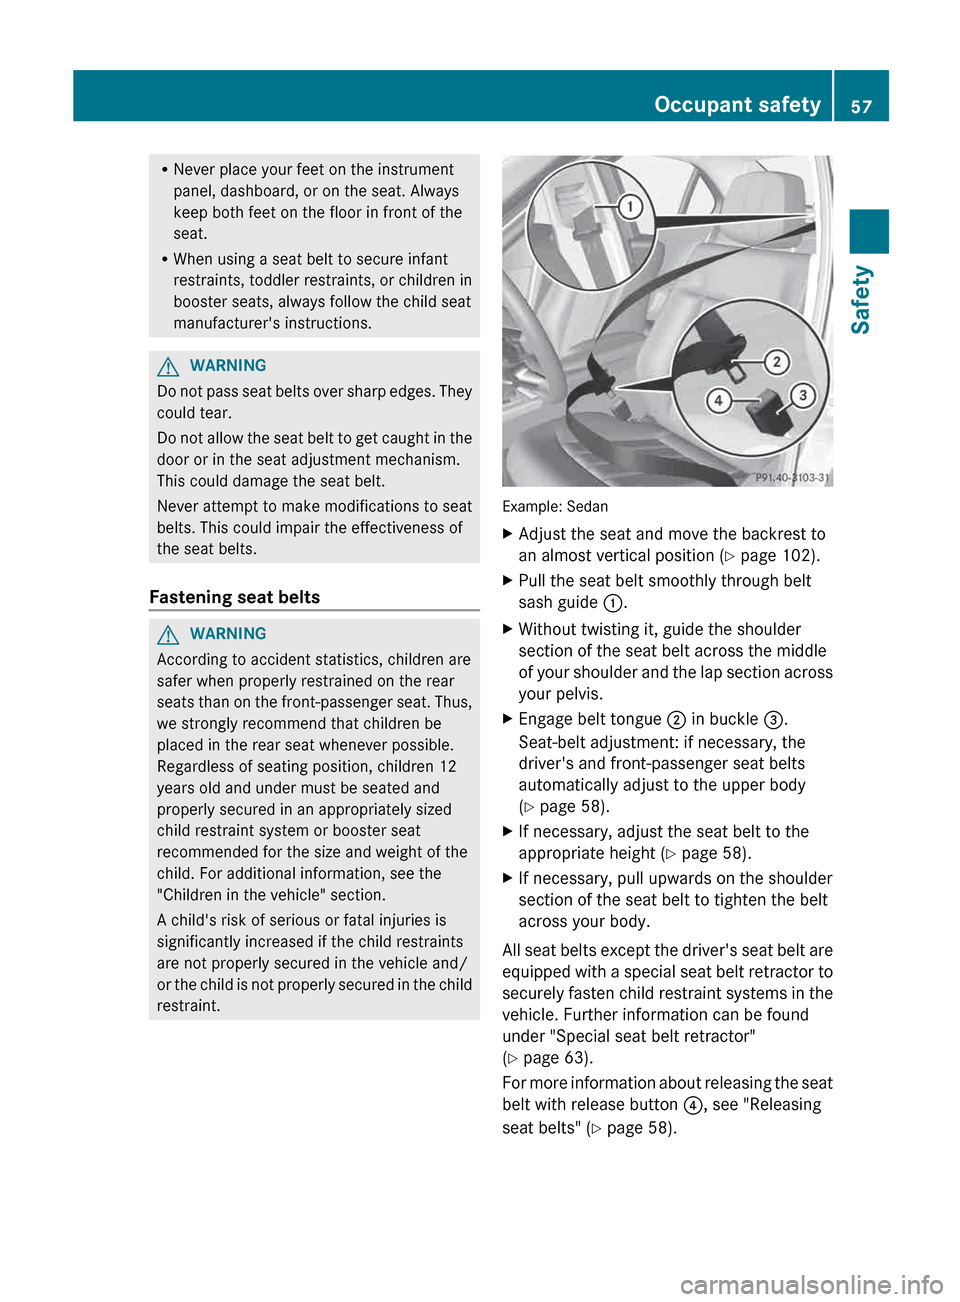
X Pull the seat belt smoothly through belt
sash guide :.
X Without twisting it, guide the shoulder
section of the seat belt across the middle
of
your shoulder and the lap section across
your pelvis.
X Engage belt tongue ; in buckle =.
Seat-belt adjustment: if necessary, the
driver's and front-passenger seat belts
automatically adjust to the upper body
(Y page 58).
X If necessary, adjust the seat belt to the
appropriate height
(Y page 58).
X If necessary, pull upwards on the shoulder
section of the seat belt to tighten the belt
across your body.
All seat belts except the driver's seat belt are
equipped
with a special seat belt retractor to
securely fasten child restraint systems in the
vehicle. Further information can be found
under "Special seat belt retractor"
(Y page 63).
For more information about releasing the seat
belt with release button ?, see "Releasing
seat belts" ( Y page 58). Occupant safety
57
Safety Z
Page 61 of 420
Example: Sedan
X
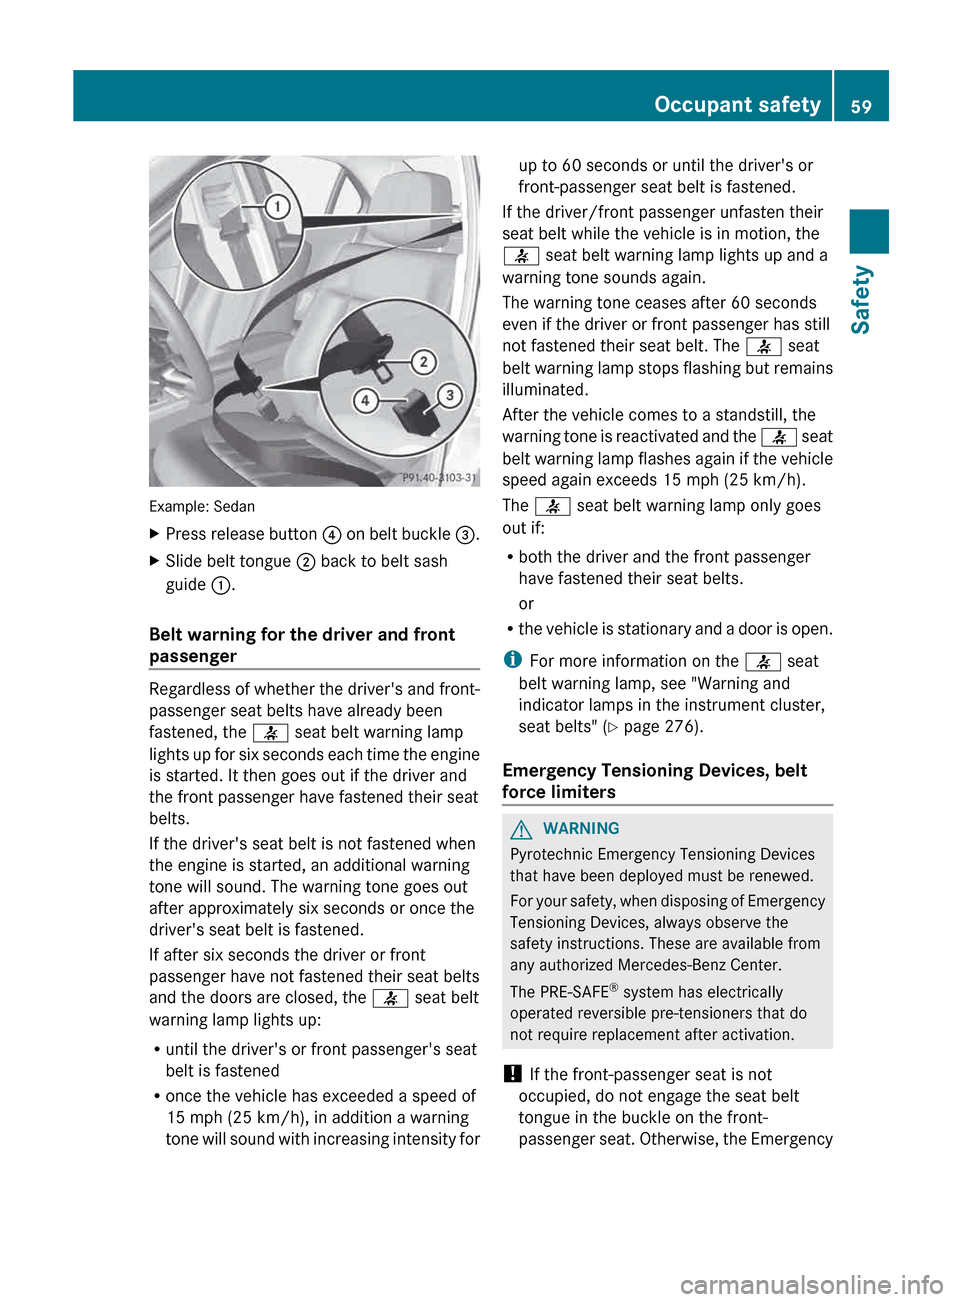
Press release button ? on belt buckle =.
X Slide belt tongue ; back to belt sash
guide :.
Belt warning for the driver and front
passenger Regardless of whether the driver's and front-
passenger seat belts have already been
fastened, the 7 seat belt warning lamp
lights
up for six seconds each time the engine
is started. It then goes out if the driver and
the front passenger have fastened their seat
belts.
If the driver's seat belt is not fastened when
the engine is started, an additional warning
tone will sound. The warning tone goes out
after approximately six seconds or once the
driver's seat belt is fastened.
If after six seconds the driver or front
passenger have not fastened their seat belts
and the doors are closed, the 7 seat belt
warning lamp lights up:
R until the driver's or front passenger's seat
belt is fastened
R once the vehicle has exceeded a speed of
15 mph (25 km/h), in addition a warning
tone will sound with increasing intensity for up to 60 seconds or until the driver's or
front-passenger seat belt is fastened.
If the driver/front passenger unfasten their
seat belt while the vehicle is in motion, the
7 seat belt warning lamp lights up and a
warning tone sounds again.
The warning tone ceases after 60 seconds
even if the driver or front passenger has still
not fastened their seat belt. The 7 seat
belt
warning lamp stops flashing but remains
illuminated.
After the vehicle comes to a standstill, the
warning tone is reactivated and the 7 seat
belt warning lamp flashes again if the vehicle
speed again exceeds 15 mph (25 km/h).
The 7 seat belt warning lamp only goes
out if:
R both the driver and the front passenger
have fastened their seat belts.
or
R the vehicle is stationary and a door is open.
i For more information on the 7 seat
belt warning lamp, see "Warning and
indicator lamps in the instrument cluster,
seat belts" ( Y page 276).
Emergency Tensioning Devices, belt
force limiters G
WARNING
Pyrotechnic Emergency Tensioning Devices
that have been deployed must be renewed.
For
your safety, when disposing of Emergency
Tensioning Devices, always observe the
safety instructions. These are available from
any authorized Mercedes-Benz Center.
The PRE-SAFE ®
system has electrically
operated reversible pre-tensioners that do
not require replacement after activation.
! If the front-passenger seat is not
occupied, do not engage the seat belt
tongue in the buckle on the front-
passenger seat. Otherwise, the Emergency Occupant safety
59
Safety Z
Page 65 of 420
Special seat belt retractor
G
WARNING
If you release the seat belt when driving, the
special seat belt retractor is deactivated.
The released seat belt cannot be engaged
again while driving, because the inertia reel
pulls in the seat belt a small distance. The
child restraint system is no longer properly
secured.
There is an increased risk of serious
injury or even fatal injury.
Always keep the seat belt of the activated
special seat belt retractor engaged when
driving.
With the exception of the driver's seat belt
and the seat belts on the folding bench seat
in the cargo compartment, all seat belts in the
vehicle are equipped with a special seat belt
retractor. When activated, the special seat
belt retractor ensures that the seat belt will
not slacken once the child restraint system
has been secured.
Installing a child restraint system:
X Always comply with the manufacturer's
installation instructions.
X Pull the seat belt smoothly from the seat
belt retractor.
X Engage the seat belt tongue in the belt
buckle.
Activating the special seat belt retractor:
X Pull the seat belt out fully and let the seat
belt retractor retract it again.
While
the seat belt is retracting, you should
hear a ratcheting sound. The special seat
belt retractor is activated.
X Push down on the child restraint system to
take up any slack. Removing a child restraint system/
deactivating the special seat belt retractor:
X
Always comply with the manufacturer's
installation instructions.
X Press the seat belt release button and
guide the belt tongue to the belt outlet.
The special seat belt retractor is
deactivated.
LATCH-type (ISOFIX) child seat anchors
in the rear G
WARNING
Children that are too large for a child restraint
must travel in seats using normal seat belts.
Position shoulder belt across the chest and
shoulder, not face or neck.
A booster seat may be necessary to achieve
proper seat belt positioning for children over
41 lb (18 kg) until they reach a height where
a lap/shoulder belt fits properly without a
booster.
Install the child restraint system in
accordance with the manufacturer's
instructions.
Attach the child restraint system to both
securing rings.
An
incorrectly installed child restraint system
could come loose during an accident and
seriously or even fatally injure the child.
Child restraint systems or child seat securing
rings that are malfunctioning or damaged as
the result of a collision must be replaced.
! When installing the child restraint system,
make sure that the seat belt for the middle
seat does not get trapped. The seat belt
could otherwise be damaged. Children in the vehicle
63
Safety Z
Page 68 of 420
ignition lock or removed from the vehicle,
such as seat adjustment, steering wheel
adjustment, or the memory function
If
children open a door, they could injure other
persons or get out of the vehicle and injure
themselves or be injured by following traffic.
Do not expose the child restraint system to
direct sunlight. The child restraint system's
metal parts, for example, could become very
hot, and the child could be burned on these
parts.
Child-proof locks for the rear doors G
WARNING
Children could open a rear door from inside
the vehicle. This could result in serious
injuries or an accident. Therefore, when
children
ride in the rear always secure the rear
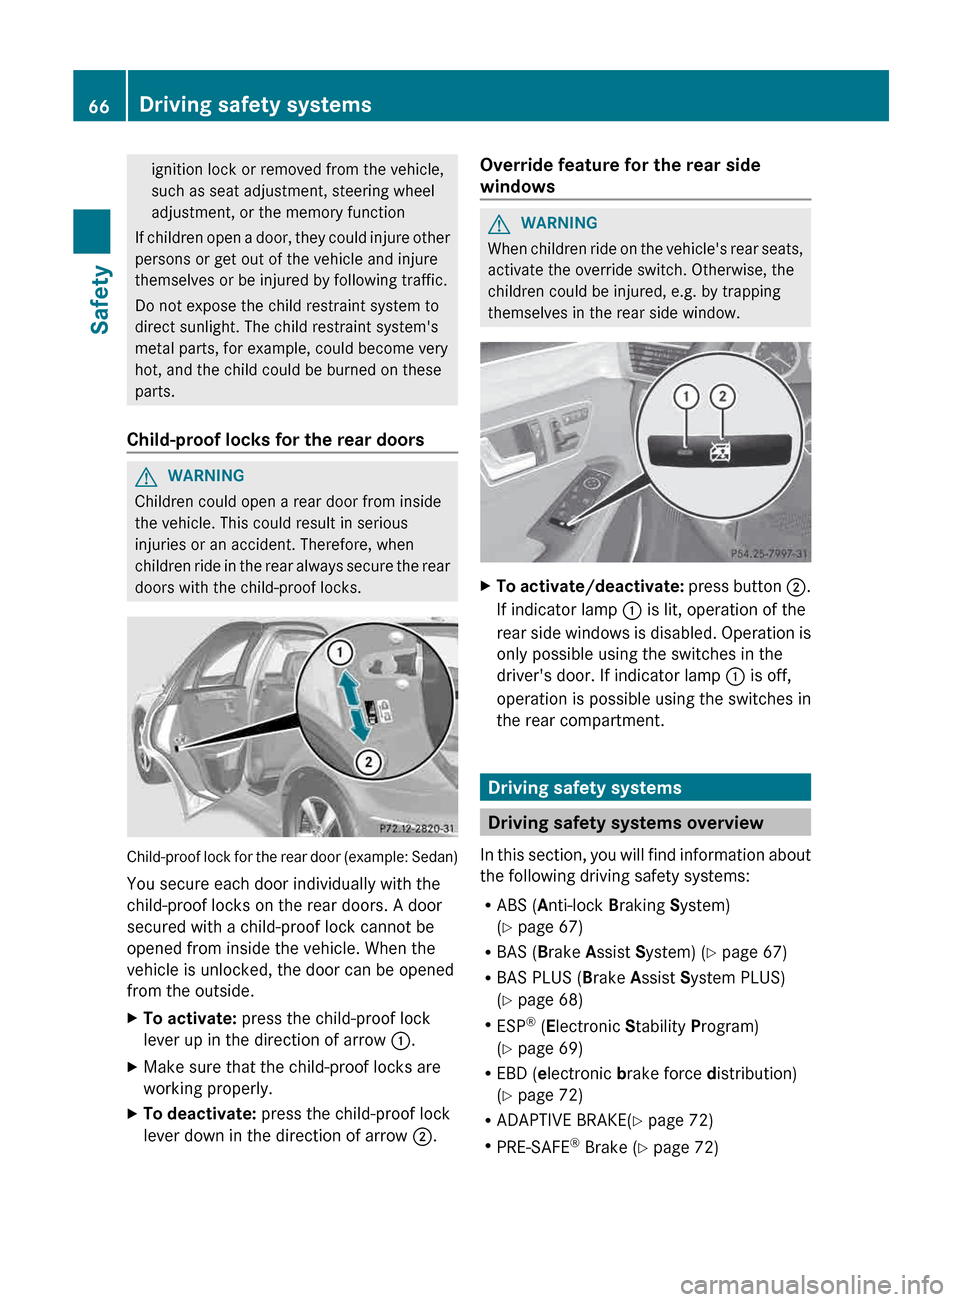
doors with the child-proof locks. Child-proof lock for the rear door (example: Sedan)
You secure each door individually with the
child-proof locks on the rear doors. A door
secured with a child-proof lock cannot be
opened from inside the vehicle. When the
vehicle is unlocked, the door can be opened
from the outside.
X
To activate: press the child-proof lock
lever up in the direction of arrow :.
X Make sure that the child-proof locks are
working properly.
X To deactivate: press the child-proof lock
lever down in the direction of arrow ;. Override feature for the rear side
windows G
WARNING
When children ride on the vehicle's rear seats,
activate the override switch. Otherwise, the
children could be injured, e.g. by trapping
themselves in the rear side window. X
To activate/deactivate: press
button ;.
If indicator lamp : is lit, operation of the
rear side windows is disabled. Operation is
only possible using the switches in the
driver's door. If indicator lamp : is off,
operation is possible using the switches in
the rear compartment. Driving safety systems
Driving safety systems overview
In
this section, you will find information about
the following driving safety systems:
R ABS ( Anti-lock Braking System)
(Y page 67)
R BAS ( Brake Assist System) ( Y page 67)
R BAS PLUS ( Brake Assist System PLUS)
(Y page 68)
R ESP ®
(Electronic Stability Program)
(Y page 69)
R EBD ( electronic brake force distribution)
(Y page 72)
R ADAPTIVE BRAKE(Y page 72)
R PRE-SAFE ®
Brake (Y page 72) 66
Driving safety systems
Safety
Page 72 of 420
ETS/4ETS (Electronic Traction System)
Traction control is part of ESP
®
.
Traction control brakes the drive wheels
individually if they spin. This enables you to
pull
away and accelerate on slippery surfaces,
for example if the road surface is slippery on
one side. On vehicles with 4MATIC, more
drive torque is also transferred to the wheel
or wheels with traction.
Traction control remains active if you
deactivate ESP ®
.
Deactivating/activating ESP ®
(except
AMG vehicles) G
WARNING
If you deactivate ESP ®
, ESP ®
no longer
stabilizes the vehicle. There is an increased
risk of skidding and an accident.
Only deactivate ESP ®
in the situations
described in the following.
! Avoid spinning the driven wheels for an
extended period with ESP ®
deactivated.
You
could otherwise damage the drivetrain.
X To deactivate: (Y page 236).
The å ESP ®
OFF warning lamp in the
instrument cluster lights up.
X To activate: (Y page 236).
The å ESP ®
OFF warning lamp in the
instrument cluster goes out.
ESP ®
is activated automatically when the
engine is started.
The ECO start/stop function switches the
engine off automatically when the vehicle
stops moving. The engine starts
automatically when the driver wants to pull
away again. ESP ®
remains in its previously
selected status. Example: if ESP ®
was
deactivated before the engine was switched
off, ESP ®
remains deactivated when the
engine is switched on again.
If
ESP ®
is deactivated and one or more wheels
start to spin, the ÷ ESP®
warning lamp in the instrument cluster flashes. In such
situations, ESP
®
will not stabilize the vehicle.
It may be best to deactivate ESP ®
in the
following situations:
R when using snow chains
R in deep snow
R on sand or gravel
If you deactivate ESP ®
:
R ESP ®
no longer improves driving stability.
R traction control is still activated.
R ESP ®
still provides support when you
brake.
R engine torque is not limited and the drive
wheels are able to spin. The spinning
wheels produce a cutting effect for better
traction.
Deactivating/activating ESP ®
(AMG
vehicles) Activating/deactivating SPORT handling
mode
G
WARNING
When SPORT handling mode is activated,
there is a greater risk of skidding and
accidents.
Only activate SPORT handling mode in the
situations described in the following. X
To activate: briefly press button :.
The M SPORT handling mode warning
lamp in the instrument cluster lights up.
The SPORT handling mode message
appears in the multifunction display. 70
Driving safety systems
Safety
Page 73 of 420
SPORT handling mode is designed for
driving on designated roads when the
vehicle's own oversteering and
understeering characteristics are desired.
Driving in SPORT handling mode requires
an extremely qualified and experienced
driver
who is able to cope with these critical
driving conditions.
X To deactivate: briefly press button :.
The M SPORT handling mode warning
lamp in the instrument cluster goes out.
ESP ®
is activated automatically when the
engine is started.
It may be best to activate SPORT handling
mode in the following situations:
R when using snow chains
R in deep snow
R on sand or gravel
If
SPORT handling mode is activated and one
or more wheels start to spin, the ÷ ESP ®
warning lamp in the instrument cluster
flashes. ESP ®
only stabilizes the vehicle to a
limited degree.
When SPORT handling mode is activated:
R ESP ®
only improves driving stability to a
limited degree.
R traction control is still activated.
R ESP ®
still provides support when you
brake.
R engine torque is only restricted to a limited
degree, and the drive wheels are able to
spin. The spinning wheels produce a
cutting effect for better traction.
Vehicles with ECO start/stop function: the
ECO start/stop function switches the engine
off automatically when the vehicle comes to
a stop. The engine starts automatically when
the driver wants to pull away again. ESP ®
remains in its previously selected status.
Example: if ESP ®
was deactivated before the
engine was switched off, ESP ®
remains
deactivated when the engine is switched on
again. Deactivating/activating ESP
® G
WARNING
If you deactivate ESP ®
, ESP ®
no longer
stabilizes the vehicle. There is an increased
risk of skidding and an accident.
Only deactivate ESP ®
in the situations
described in the following.
! Avoid spinning the driven wheels for an
extended period with ESP ®
deactivated.
You
could otherwise damage the drivetrain. X
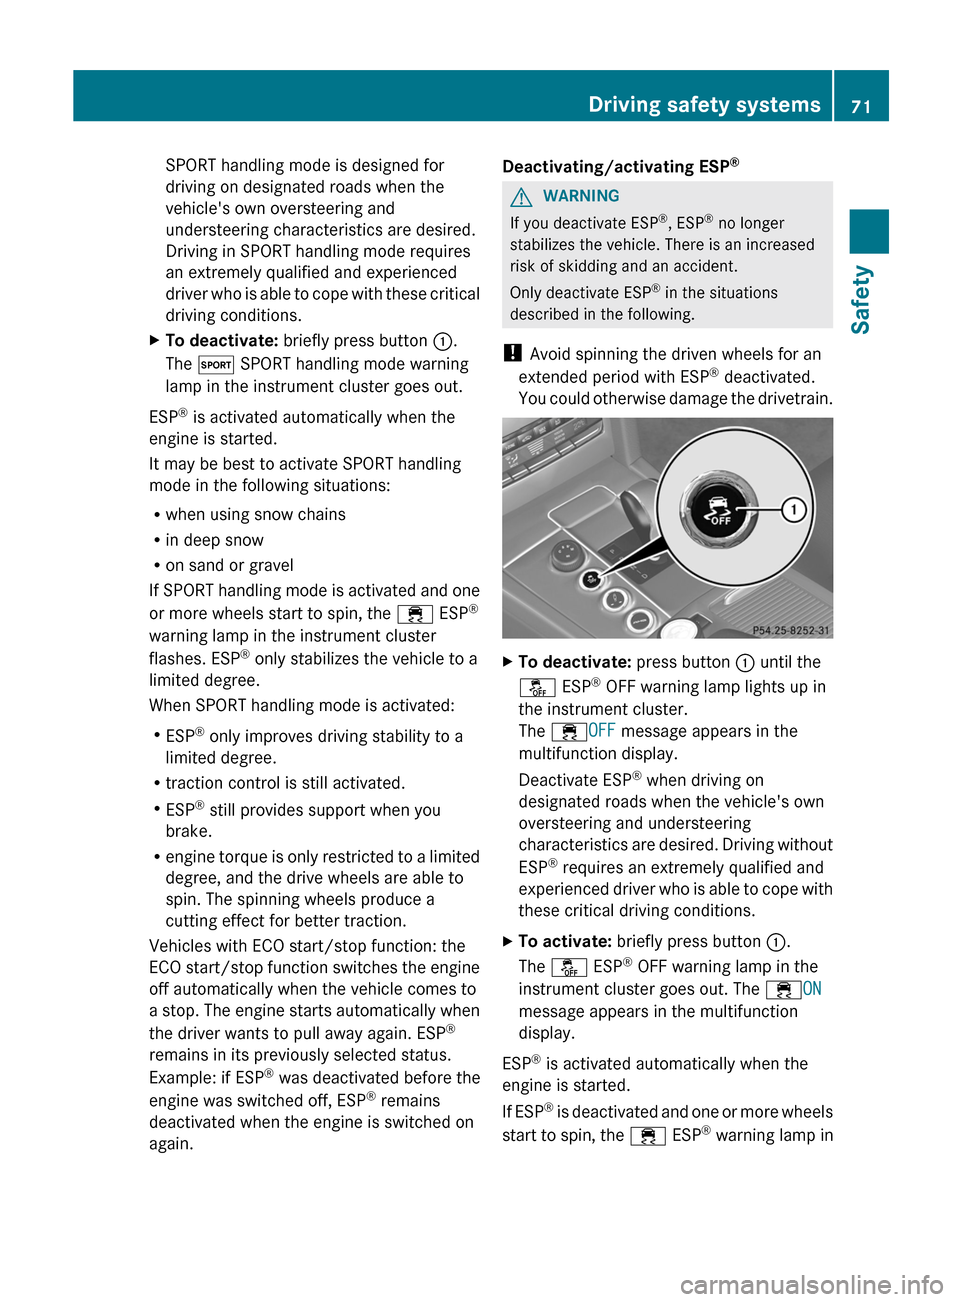
To deactivate: press button : until the
å ESP ®
OFF warning lamp lights up in
the instrument cluster.
The ÷OFF message appears in the
multifunction display.
Deactivate ESP ®
when driving on
designated roads when the vehicle's own
oversteering and understeering
characteristics
are desired. Driving without
ESP ®
requires an extremely qualified and
experienced driver who is able to cope with
these critical driving conditions.
X To activate: briefly press button :.
The å ESP ®
OFF warning lamp in the
instrument cluster goes out. The ÷ON
message appears in the multifunction
display.
ESP ®
is activated automatically when the
engine is started.
If
ESP ®
is deactivated and one or more wheels
start to spin, the ÷ ESP®
warning lamp in Driving safety systems
71
Safety Z
Page 77 of 420
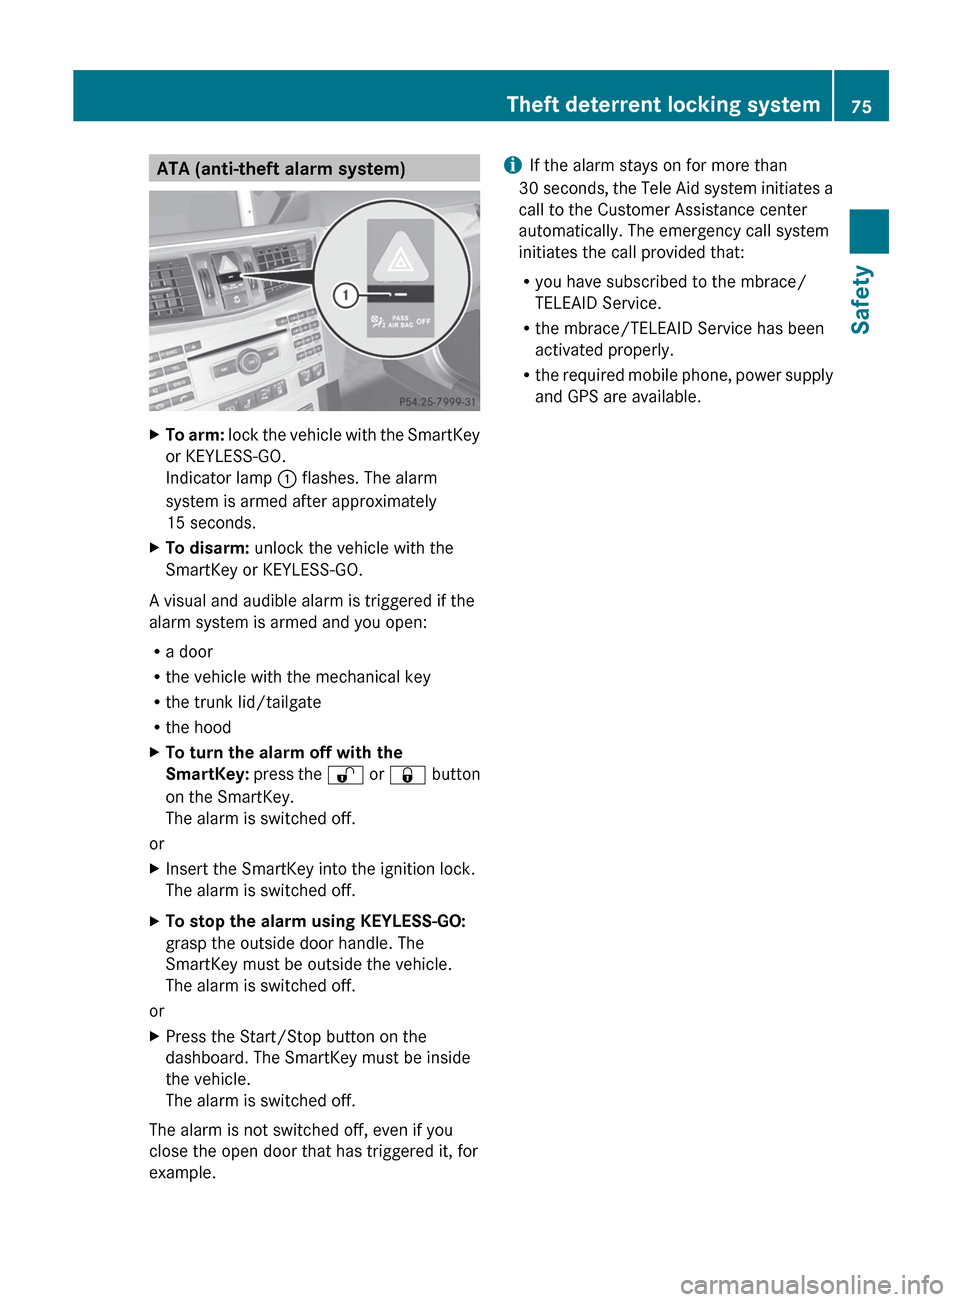
ATA (anti-theft alarm system)
X
To arm: lock the vehicle with the SmartKey
or KEYLESS-GO.
Indicator lamp : flashes. The alarm
system is armed after approximately
15 seconds.
X To disarm: unlock the vehicle with the
SmartKey or KEYLESS-GO.
A visual and audible alarm is triggered if the
alarm system is armed and you open:
R a door
R the vehicle with the mechanical key
R the trunk lid/tailgate
R the hood
X To turn the alarm off with the
SmartKey:
press the % or & button
on the SmartKey.
The alarm is switched off.
or
X Insert the SmartKey into the ignition lock.
The alarm is switched off.
X To stop the alarm using KEYLESS-GO:
grasp the outside door handle. The
SmartKey must be outside the vehicle.
The alarm is switched off.
or
X Press the Start/Stop button on the
dashboard. The SmartKey must be inside
the vehicle.
The alarm is switched off.
The alarm is not switched off, even if you
close the open door that has triggered it, for
example. i
If the alarm stays on for more than
30 seconds,
the Tele Aid system initiates a
call to the Customer Assistance center
automatically. The emergency call system
initiates the call provided that:
R you have subscribed to the mbrace/
TELEAID Service.
R the mbrace/TELEAID Service has been
activated properly.
R the required mobile phone, power supply
and GPS are available. Theft deterrent locking system
75
Safety Z
Page 81 of 420
The Product label with FCC ID and IC
certification number can be found in the
battery case of the SmartKey.
R Do not keep the SmartKey:
-with electronic devices, e.g. a mobile
phone or another SmartKey
- with
metallic objects, e.g. coins or metal
foil
- inside metallic objects, e.g. a metal case
This can affect the SmartKey's
functionality.
Keep the SmartKey away from strong
magnetic fields. Otherwise, the remote
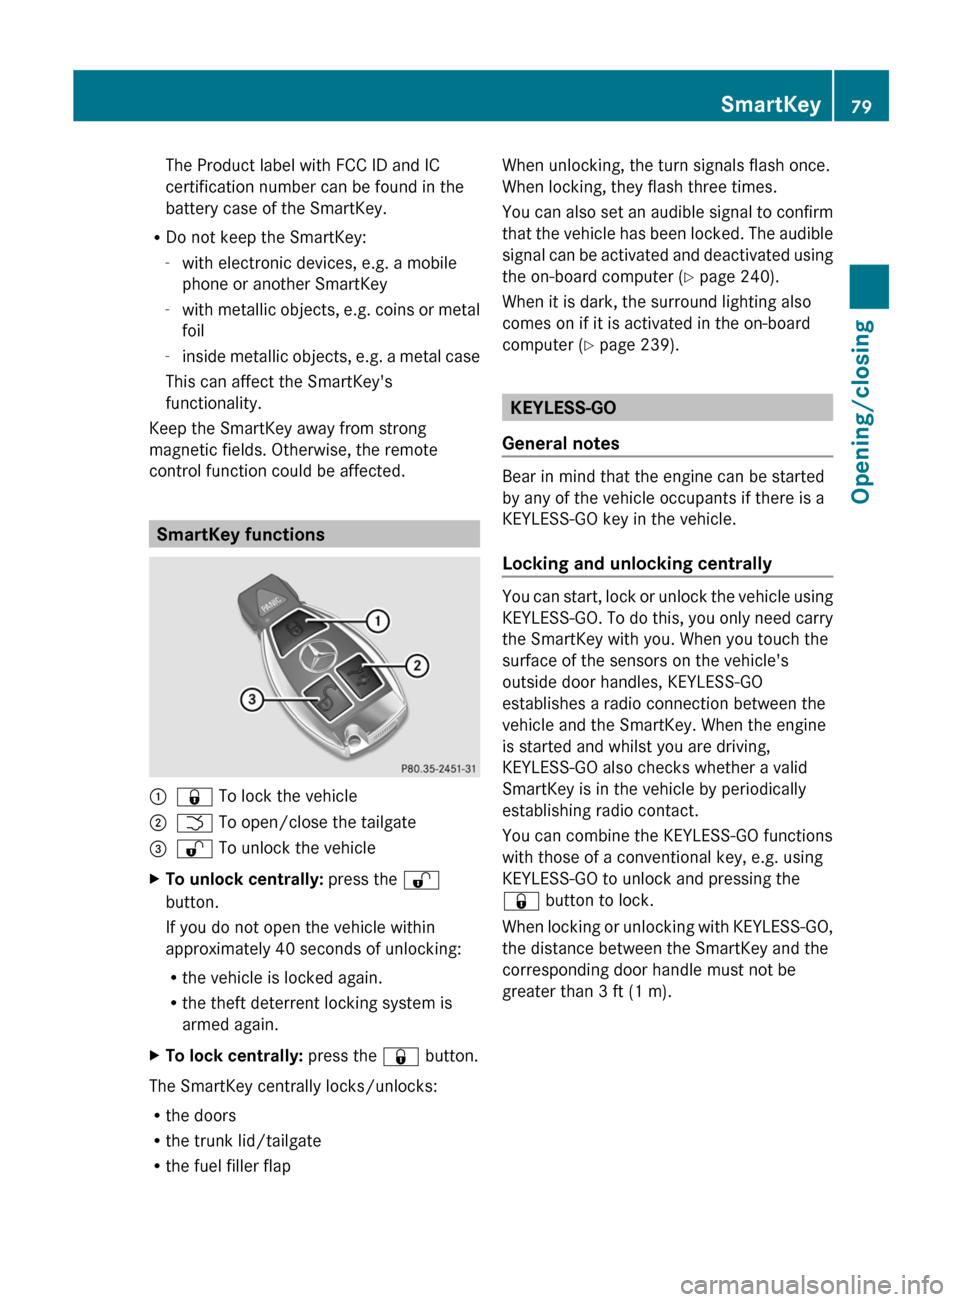
control function could be affected. SmartKey functions
:
& To lock the vehicle
; F To open/close the tailgate
= % To unlock the vehicle
X To unlock centrally: press the %
button.
If you do not open the vehicle within
approximately
40 seconds of unlocking:
R the vehicle is locked again.
R the theft deterrent locking system is
armed again.
X To lock centrally: press the & button.
The SmartKey centrally locks/unlocks:
R the doors
R the trunk lid/tailgate
R the fuel filler flap When unlocking, the turn signals flash once.
When locking, they flash three times.
You
can also set an audible signal to confirm
that the vehicle has been locked. The audible
signal can be activated and deactivated using
the on-board computer (Y page 240).
When it is dark, the surround lighting also
comes on if it is activated in the on-board
computer (Y page 239). KEYLESS-GO
General notes Bear in mind that the engine can be started
by any of the vehicle occupants if there is a
KEYLESS-GO key in the vehicle.
Locking and unlocking centrally
You can start, lock or unlock the vehicle using
KEYLESS-GO.
To do this, you only need carry
the SmartKey with you. When you touch the
surface of the sensors on the vehicle's
outside door handles, KEYLESS-GO
establishes a radio connection between the
vehicle and the SmartKey. When the engine
is started and whilst you are driving,
KEYLESS-GO also checks whether a valid
SmartKey is in the vehicle by periodically
establishing radio contact.
You can combine the KEYLESS-GO functions
with those of a conventional key, e.g. using
KEYLESS-GO to unlock and pressing the
& button to lock.
When locking or unlocking with KEYLESS-GO,
the distance between the SmartKey and the
corresponding door handle must not be
greater than 3 ft (1 m). SmartKey
79
Opening/closing Z