indicator lamp MERCEDES-BENZ E-Class SEDAN 2013 W212 Owner's Guide
[x] Cancel search | Manufacturer: MERCEDES-BENZ, Model Year: 2013, Model line: E-Class SEDAN, Model: MERCEDES-BENZ E-Class SEDAN 2013 W212Pages: 420, PDF Size: 14.26 MB
Page 109 of 420
X
Release the rear seat backrest and fold it
slightly forwards
(Y page 293).
X To remove: pull the head restraint up to
the stop.
X Press release catch : and pull the head
restraint out of the guides.
X To re-install: insert the head restraint so
that the notches on the bar are on the left
when viewed in the direction of travel.
X Push the head restraint down until you hear
it engage in position.
X Fold back the rear seat backrest until it
engages. Adjusting the active multicontour
seat
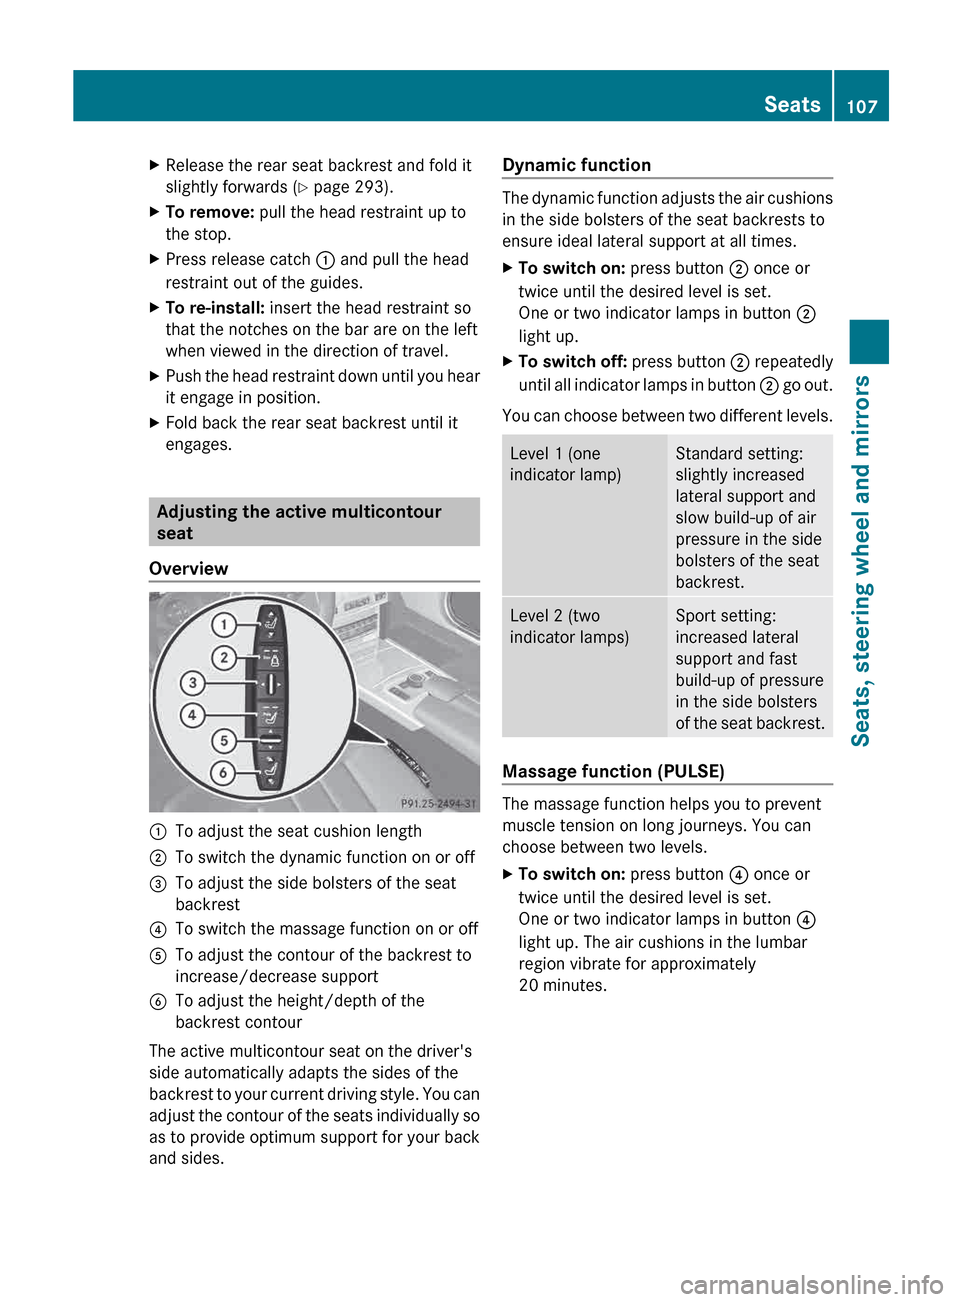
Overview :
To adjust the seat cushion length
; To switch the dynamic function on or off
= To adjust the side bolsters of the seat
backrest
? To switch the massage function on or off
A To adjust the contour of the backrest to
increase/decrease support
B To adjust the height/depth of the
backrest contour
The active multicontour seat on the driver's
side automatically adapts the sides of the
backrest
to your current driving style. You can
adjust the contour of the seats individually so
as to provide optimum support for your back
and sides. Dynamic function The dynamic function adjusts the air cushions
in the side bolsters of the seat backrests to
ensure ideal lateral support at all times.
X
To switch on: press button ; once or
twice until the desired level is set.
One or two indicator lamps in button ;
light up.
X To switch off: press button ; repeatedly
until
all indicator lamps in button ; go out.
You can choose between two different levels. Level 1 (one
indicator lamp) Standard setting:
slightly increased
lateral support and
slow build-up of air
pressure in the side
bolsters of the seat
backrest.
Level 2 (two
indicator lamps) Sport setting:
increased lateral
support and fast
build-up of pressure
in the side bolsters
of
the seat backrest. Massage function (PULSE)
The massage function helps you to prevent
muscle tension on long journeys. You can
choose between two levels.
X
To switch on: press button ? once or
twice until the desired level is set.
One or two indicator lamps in button ?
light up. The air cushions in the lumbar
region vibrate for approximately
20 minutes. Seats
107
Seats, steering wheel and mirrors Z
Page 112 of 420
!
In order to avoid causing damage, push
the head restraints completely into their
guides and click the seat belt buckles into
their guides. X
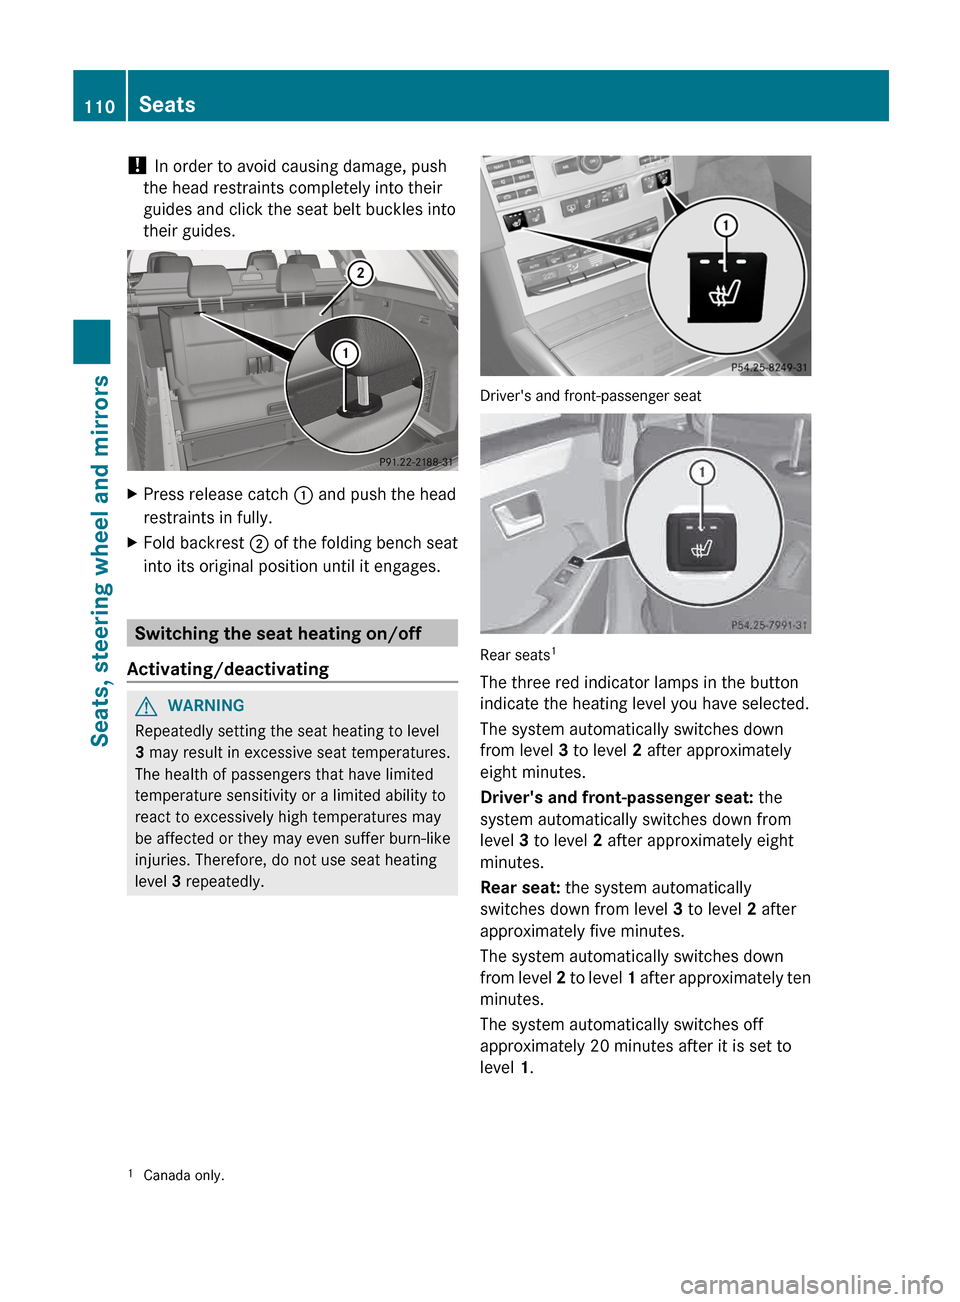
Press release catch : and push the head
restraints in fully.
X Fold backrest ; of the folding bench seat
into its original position until it engages. Switching the seat heating on/off
Activating/deactivating G
WARNING
Repeatedly setting the seat heating to level
3 may result in excessive seat temperatures.
The health of passengers that have limited
temperature sensitivity or a limited ability to
react to excessively high temperatures may
be affected or they may even suffer burn-like
injuries. Therefore, do not use seat heating
level 3 repeatedly. Driver's and front-passenger seat
Rear seats
1
The three red indicator lamps in the button
indicate the heating level you have selected.
The system automatically switches down
from level 3 to level 2 after approximately
eight minutes.
Driver's and front-passenger seat: the
system automatically switches down from
level 3 to level 2 after approximately eight
minutes.
Rear seat: the system automatically
switches down from level 3 to level 2 after
approximately five minutes.
The system automatically switches down
from
level 2 to level 1 after approximately ten
minutes.
The system automatically switches off
approximately 20 minutes after it is set to
level 1.
1 Canada only.110
Seats
Seats, steering wheel and mirrors
Page 113 of 420
X
Make sure that the SmartKey is in position
1 or 2 in the ignition lock.
X To switch on: press button : repeatedly
until the desired heating level is set.
X To switch off: press button : repeatedly
until all the indicator lamps go out.
i If the battery voltage is too low, the seat
heating may switch off.
Problems with the seat heating The seat heating has switched off
prematurely or cannot be switched on. The
vehicle's electrical system voltage is too low
because too many electrical consumers are
switched on.
X
Switch off electrical consumers that you do
not need, such as the rear window
defroster or interior lighting. Switching the seat ventilation on/off
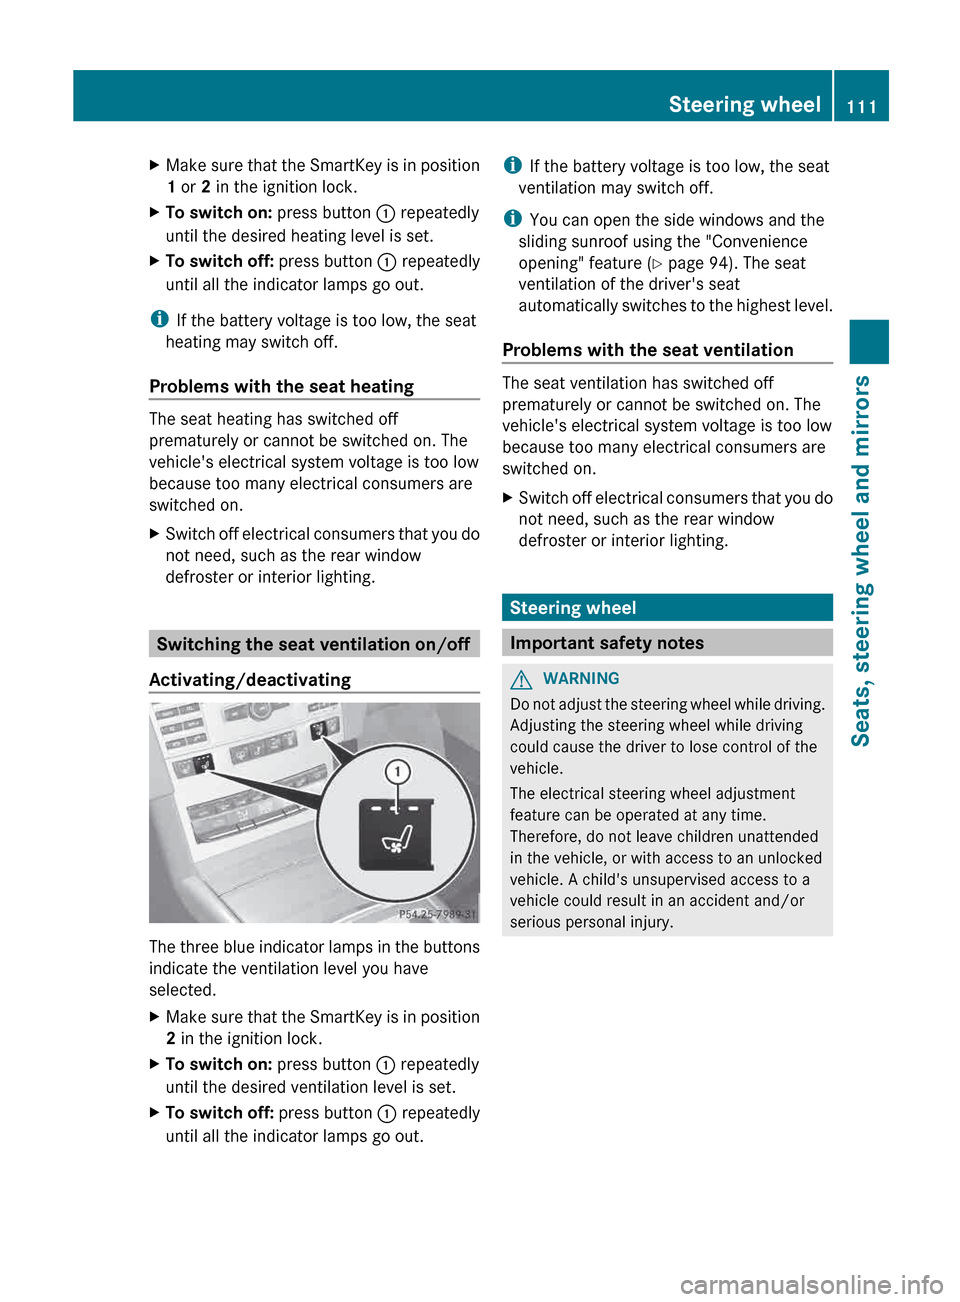
Activating/deactivating The three blue indicator lamps in the buttons
indicate the ventilation level you have
selected.
X
Make sure that the SmartKey is in position
2 in the ignition lock.
X To switch on: press button : repeatedly
until the desired ventilation level is set.
X To switch off: press button : repeatedly
until all the indicator lamps go out. i
If the battery voltage is too low, the seat
ventilation may switch off.
i You can open the side windows and the
sliding sunroof using the "Convenience
opening" feature ( Y page 94). The seat
ventilation of the driver's seat
automatically
switches to the highest level.
Problems with the seat ventilation The seat ventilation has switched off
prematurely or cannot be switched on. The
vehicle's electrical system voltage is too low
because too many electrical consumers are
switched on.
X
Switch off electrical consumers that you do
not need, such as the rear window
defroster or interior lighting. Steering wheel
Important safety notes
G
WARNING
Do not adjust the steering wheel while driving.
Adjusting the steering wheel while driving
could cause the driver to lose control of the
vehicle.
The electrical steering wheel adjustment
feature can be operated at any time.
Therefore, do not leave children unattended
in the vehicle, or with access to an unlocked
vehicle. A child's unsupervised access to a
vehicle could result in an accident and/or
serious personal injury. Steering wheel
111
Seats, steering wheel and mirrors Z
Page 114 of 420
Adjusting the steering wheel
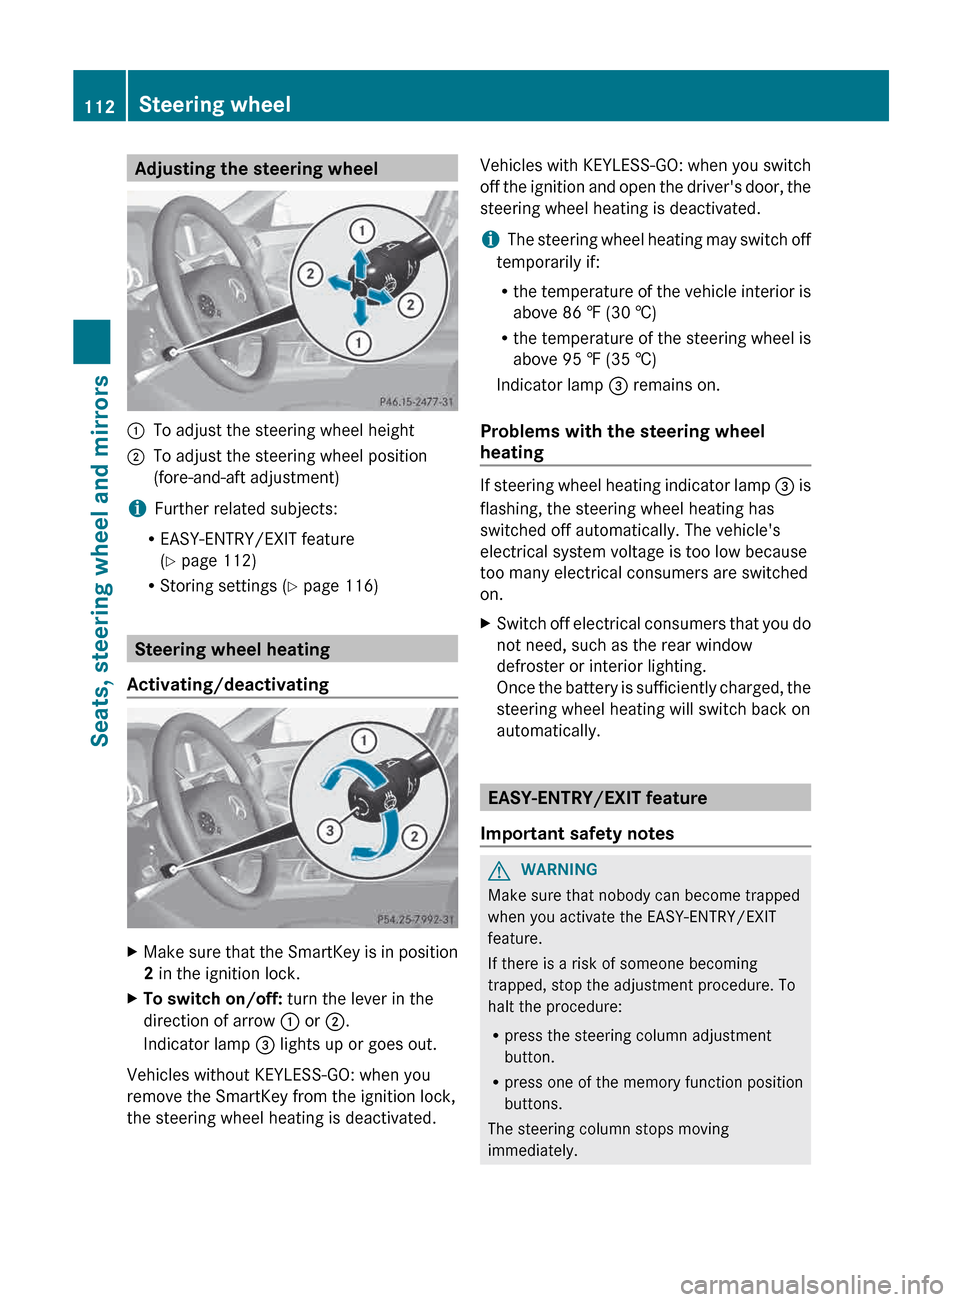
:
To adjust the steering wheel height
; To adjust the steering wheel position
(fore-and-aft adjustment)
i Further related subjects:
R EASY-ENTRY/EXIT feature
(Y page 112)
R Storing settings
(Y page 116) Steering wheel heating
Activating/deactivating X
Make sure that the SmartKey is in position
2 in the ignition lock.
X To switch on/off: turn the lever in the
direction of arrow : or ;.
Indicator lamp = lights up or goes out.
Vehicles without KEYLESS-GO: when you
remove the SmartKey from the ignition lock,
the steering wheel heating is deactivated. Vehicles with KEYLESS-GO: when you switch
off
the ignition and open the driver's door, the
steering wheel heating is deactivated.
i The steering wheel heating may switch off
temporarily if:
R the temperature of the vehicle interior is
above 86 ‡ (30 †)
R the temperature of the steering wheel is
above 95 ‡ (35 †)
Indicator lamp = remains on.
Problems with the steering wheel
heating If steering wheel heating indicator lamp
=
is
flashing, the steering wheel heating has
switched off automatically. The vehicle's
electrical system voltage is too low because
too many electrical consumers are switched
on.
X Switch off electrical consumers that you do
not need, such as the rear window
defroster or interior lighting.
Once
the battery is sufficiently charged, the
steering wheel heating will switch back on
automatically. EASY-ENTRY/EXIT feature
Important safety notes G
WARNING
Make sure that nobody can become trapped
when you activate the EASY-ENTRY/EXIT
feature.
If there is a risk of someone becoming
trapped, stop the adjustment procedure. To
halt the procedure:
R press the steering column adjustment
button.
R press one of the memory function position
buttons.
The steering column stops moving
immediately. 112
Steering wheel
Seats, steering wheel and mirrors
Page 116 of 420
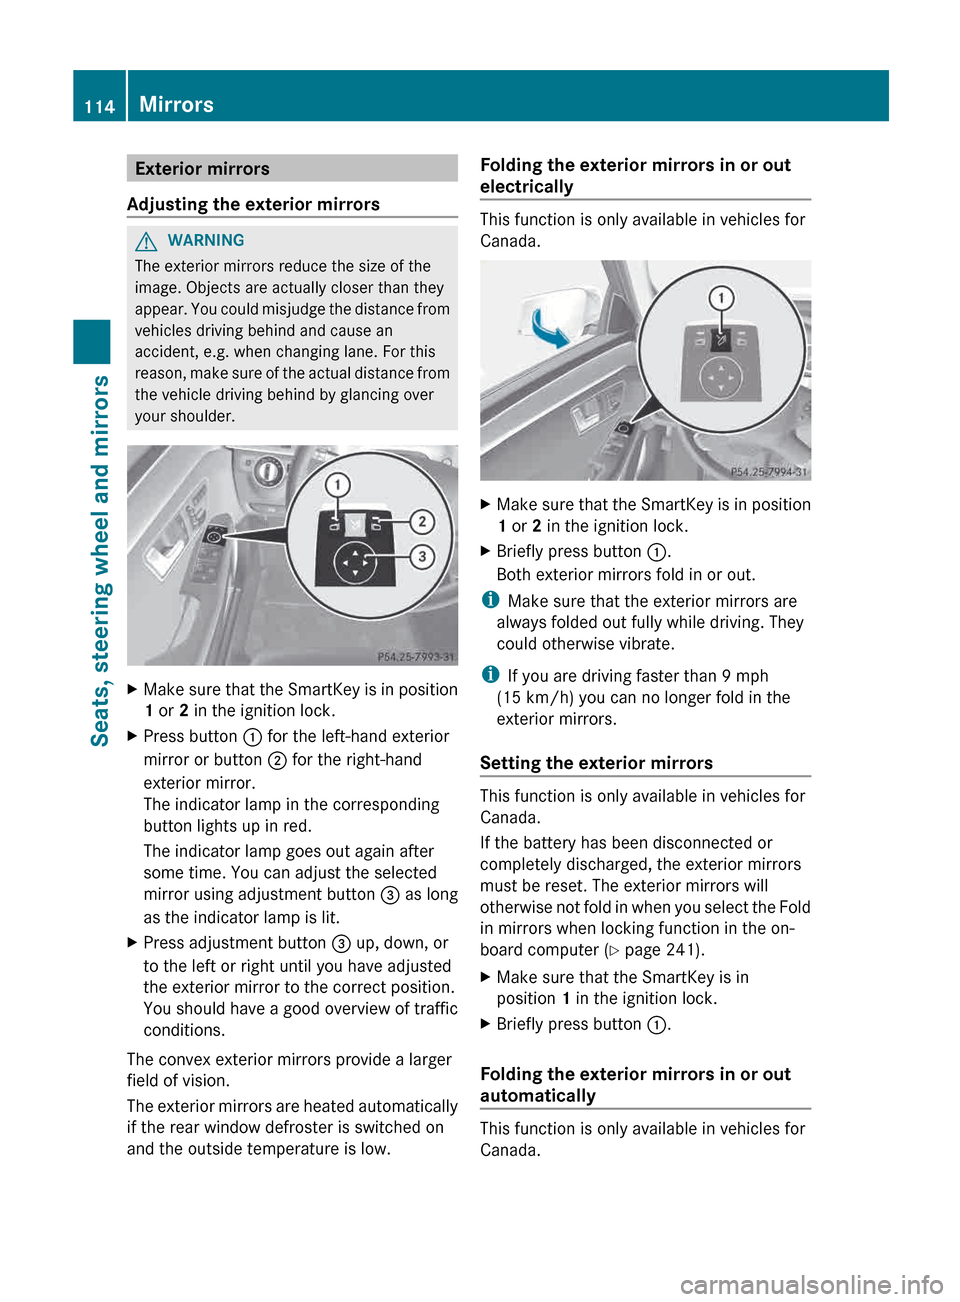
Exterior mirrors
Adjusting the exterior mirrors G
WARNING
The exterior mirrors reduce the size of the
image. Objects are actually closer than they
appear.
You could misjudge the distance from
vehicles driving behind and cause an
accident, e.g. when changing lane. For this
reason, make sure of the actual distance from
the vehicle driving behind by glancing over
your shoulder. X
Make sure that the SmartKey is in position
1 or 2 in the ignition lock.
X Press button : for the left-hand exterior
mirror or button ; for the right-hand
exterior mirror.
The indicator lamp in the corresponding
button lights up in red.
The indicator lamp goes out again after
some time. You can adjust the selected
mirror using adjustment button = as long
as the indicator lamp is lit.
X Press adjustment button = up, down, or
to the left or right until you have adjusted
the exterior mirror to the correct position.
You should have a good overview of traffic
conditions.
The convex exterior mirrors provide a larger
field of vision.
The
exterior mirrors are heated automatically
if the rear window defroster is switched on
and the outside temperature is low. Folding the exterior mirrors in or out
electrically This function is only available in vehicles for
Canada.
X
Make sure that the SmartKey is in position
1 or 2 in the ignition lock.
X Briefly press button :.
Both exterior mirrors fold in or out.
i Make sure that the exterior mirrors are
always folded out fully while driving. They
could otherwise vibrate.
i If you are driving faster than 9 mph
(15 km/h
) you can no longer fold in the
exterior mirrors.
Setting the exterior mirrors This function is only available in vehicles for
Canada.
If the battery has been disconnected or
completely discharged, the exterior mirrors
must be reset. The exterior mirrors will
otherwise
not fold in when you select the Fold
in mirrors when locking function in the on-
board computer ( Y page 241).
X Make sure that the SmartKey is in
position 1 in the ignition lock.
X Briefly press button :.
Folding the exterior mirrors in or out
automatically This function is only available in vehicles for
Canada.114
Mirrors
Seats, steering wheel and mirrors
Page 124 of 420
take precedence over the daytime running
lamps.
i
In
the USA, the daytime running lamps are
deactivated upon delivery from the factory.
Low-beam headlamps G
WARNING
If the light switch is set to Ã
and it is foggy,
snowing or there is poor visibility, the low-
beam headlamps will not come on
automatically. This could endanger you and
others. In such situations turn the light switch
to L.
The automatic headlamp feature is only an
aid. The driver is responsible for the vehicle's
lighting at all times. 1W
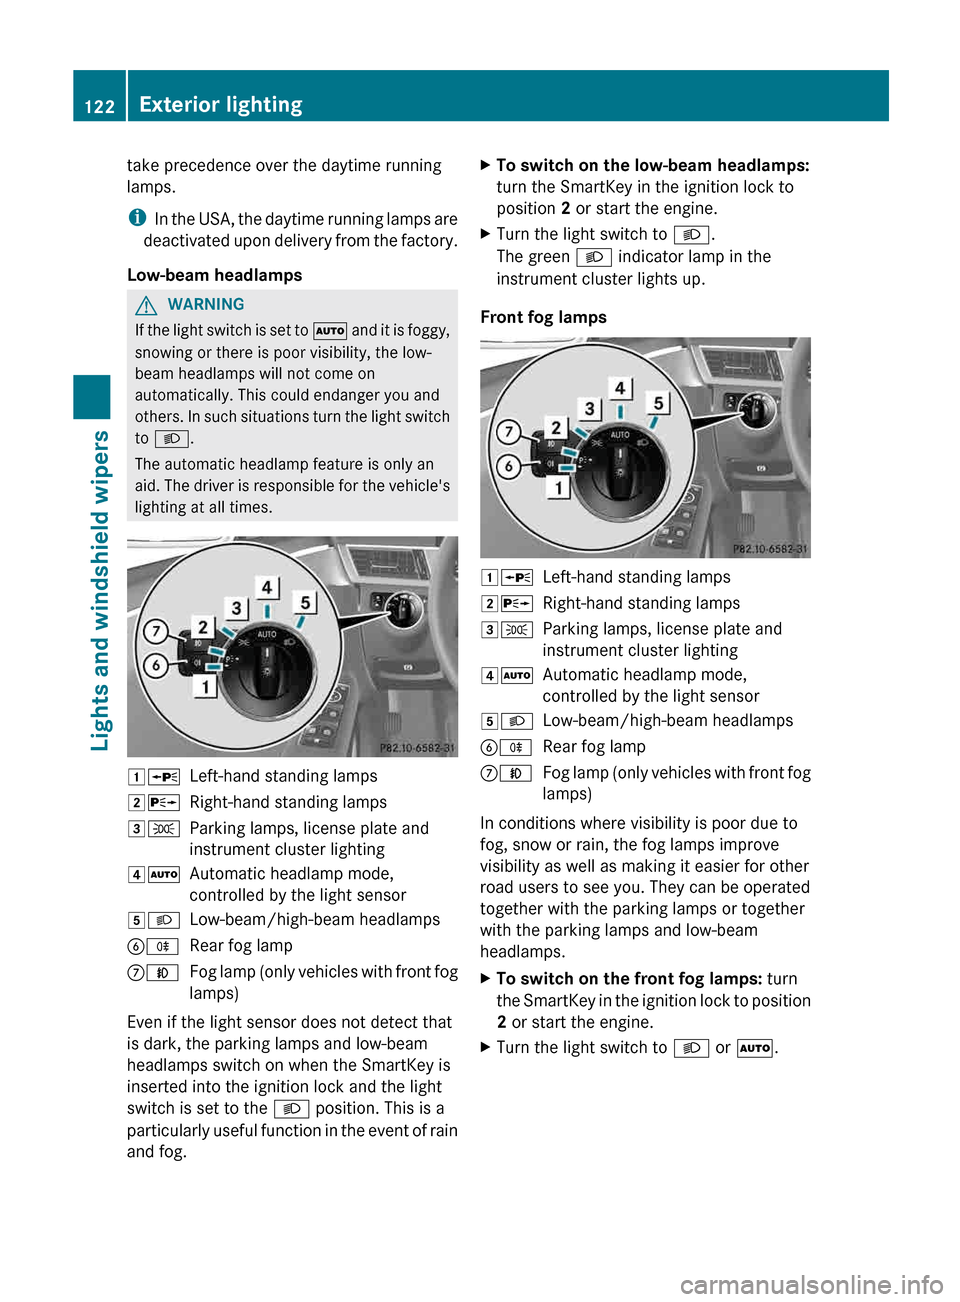
Left-hand standing lamps
2X Right-hand standing lamps
3T Parking lamps, license plate and
instrument cluster lighting
4Ã Automatic headlamp mode,
controlled by the light sensor
5L Low-beam/high-beam headlamps
BR Rear fog lamp
CN Fog lamp (only vehicles with front fog
lamps)
Even if the light sensor does not detect that
is dark, the parking lamps and low-beam
headlamps switch on when the SmartKey is
inserted into the ignition lock and the light
switch is set to the L position. This is a
particularly
useful function in the event of rain
and fog. X
To switch on the low-beam headlamps:
turn the SmartKey in the ignition lock to
position 2 or start the engine.
X Turn the light switch to L.
The green L indicator lamp in the
instrument cluster lights up.
Front fog lamps 1W
Left-hand standing lamps
2X Right-hand standing lamps
3T Parking lamps, license plate and
instrument cluster lighting
4Ã Automatic headlamp mode,
controlled by the light sensor
5L Low-beam/high-beam headlamps
BR Rear fog lamp
CN Fog lamp (only vehicles with front fog
lamps)
In conditions where visibility is poor due to
fog, snow or rain, the fog lamps improve
visibility as well as making it easier for other
road users to see you. They can be operated
together with the parking lamps or together
with the parking lamps and low-beam
headlamps.
X To switch on the front fog lamps: turn
the
SmartKey in the ignition lock to position
2 or start the engine.
X Turn the light switch to L or Ã.122
Exterior lighting
Lights and windshield wipers
Page 125 of 420
X
Press the N button.
The green N indicator lamp in the
instrument cluster lights up.
X To switch off the front fog lamps: press
the N button.
The green N indicator lamp in the
instrument cluster goes out.
Only vehicles with front fog lamps have the
fog lamps function.
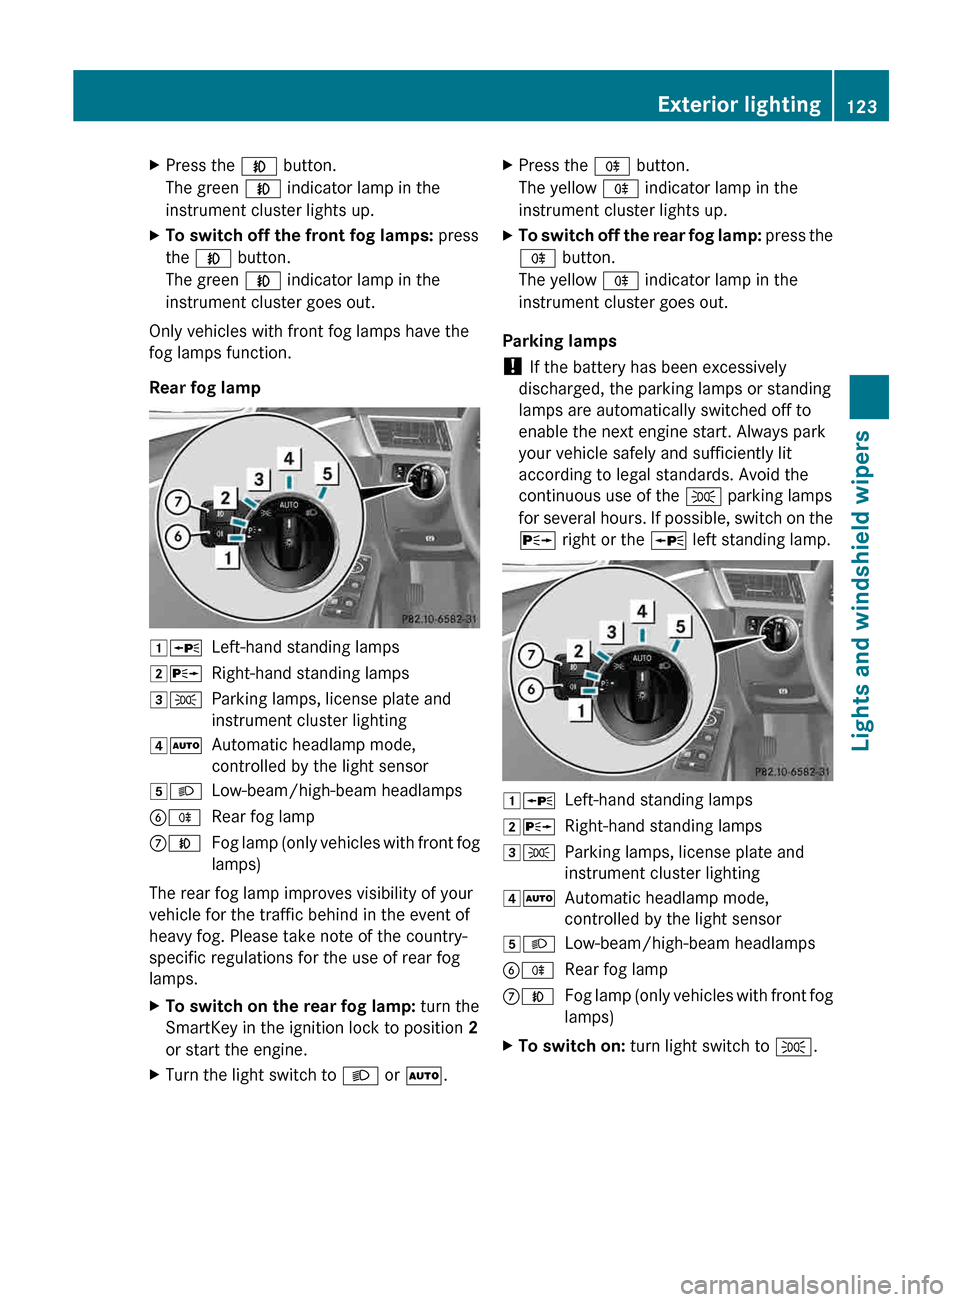
Rear fog lamp 1W
Left-hand standing lamps
2X Right-hand standing lamps
3T Parking lamps, license plate and
instrument cluster lighting
4Ã Automatic headlamp mode,
controlled by the light sensor
5L Low-beam/high-beam headlamps
BR Rear fog lamp
CN Fog lamp (only vehicles with front fog
lamps)
The rear fog lamp improves visibility of your
vehicle for the traffic behind in the event of
heavy fog. Please take note of the country-
specific regulations for the use of rear fog
lamps.
X To switch on the rear fog lamp: turn the
SmartKey in the ignition lock to position 2
or start the engine.
X Turn the light switch to L or Ã.X
Press the R button.
The yellow R indicator lamp in the
instrument cluster lights up.
X To switch off the rear fog lamp: press the
R button.
The yellow R indicator lamp in the
instrument cluster goes out.
Parking lamps
! If the battery has been excessively
discharged, the parking lamps or standing
lamps are automatically switched off to
enable the next engine start. Always park
your vehicle safely and sufficiently lit
according to legal standards. Avoid the
continuous use of the T parking lamps
for
several hours. If possible, switch on the
X right or the W left standing lamp. 1W
Left-hand standing lamps
2X Right-hand standing lamps
3T Parking lamps, license plate and
instrument cluster lighting
4Ã Automatic headlamp mode,
controlled by the light sensor
5L Low-beam/high-beam headlamps
BR Rear fog lamp
CN Fog lamp (only vehicles with front fog
lamps)
X To switch on: turn light switch to T. Exterior lighting
123
Lights and windshield wipers Z
Page 127 of 420
X
To switch on the high-beam headlamps:
turn the SmartKey in the ignition lock to
position 2 or start the engine.
X Turn the light switch to L or Ã.
X Press the combination switch beyond the
pressure point in the direction of
arrow :.
In the à position, the high-beam
headlamps are only switched on when it is
dark and the engine is running.
The blue K indicator lamp in the
instrument
cluster lights up when the high-
beam headlamps are switched on.
X To switch off the high-beam
headlamps: move
the combination switch
back to its normal position.
The blue K indicator lamp in the
instrument cluster goes out.
i Vehicles with Adaptive Highbeam Assist:
when Adaptive Highbeam Assist is active,
it controls activation of the high-beam
headlamps
(Y page 126).
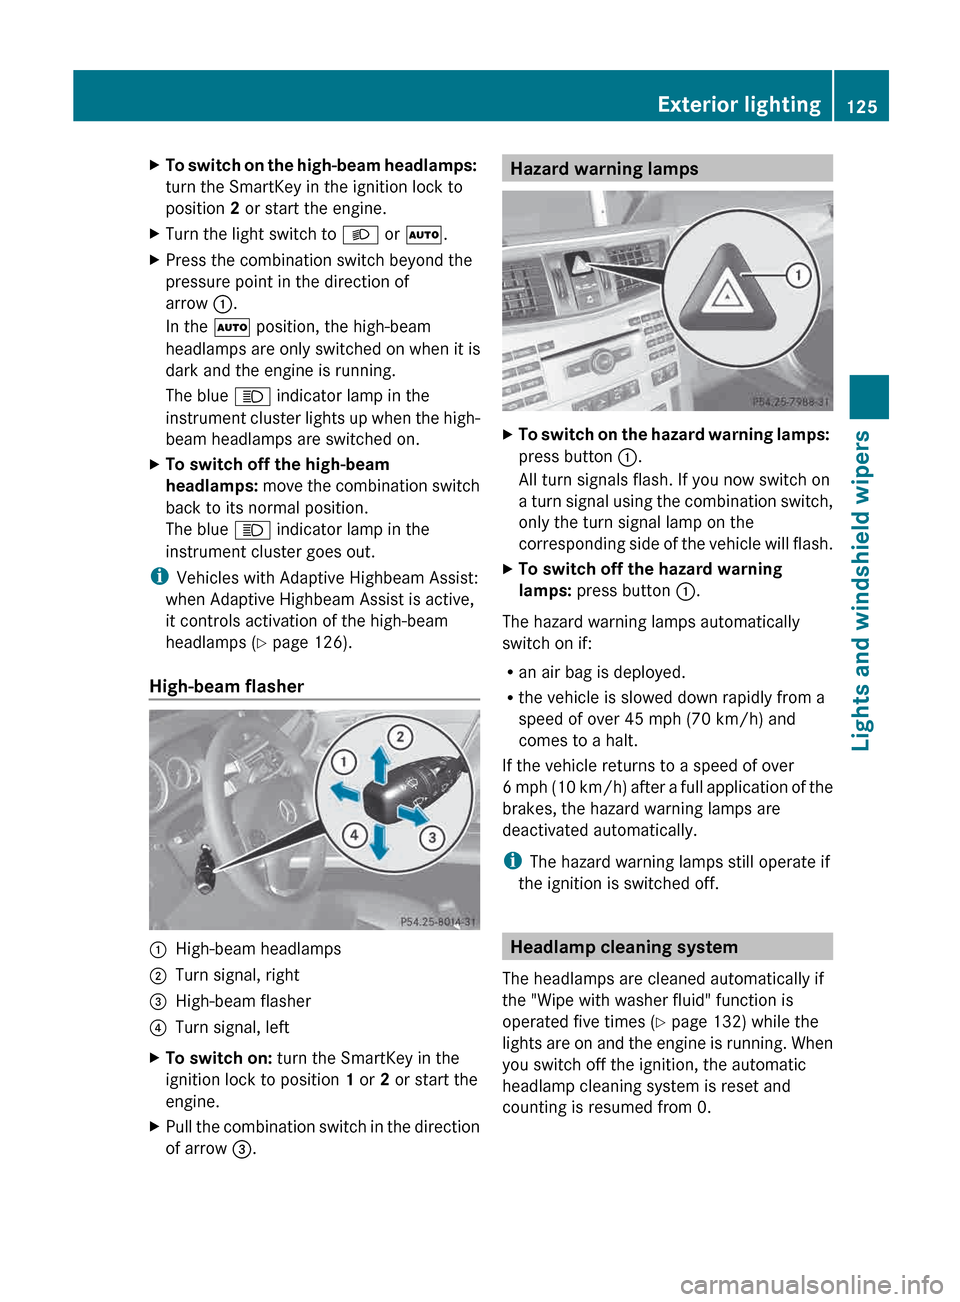
High-beam flasher :
High-beam headlamps
; Turn signal, right
= High-beam flasher
? Turn signal, left
X To switch on: turn the SmartKey in the
ignition lock to position 1 or 2 or start the
engine.
X Pull the combination switch in the direction
of arrow =. Hazard warning lamps
X
To switch on the hazard warning lamps:
press button :.
All turn signals flash. If you now switch on
a
turn signal using the combination switch,
only the turn signal lamp on the
corresponding side of the vehicle will flash.
X To switch off the hazard warning
lamps: press button :.
The hazard warning lamps automatically
switch on if:
R an air bag is deployed.
R the vehicle is slowed down rapidly from a
speed of over 45 mph (70 km/h) and
comes to a halt.
If the vehicle returns to a speed of over
6
mph (10 km/h) after a full application of the
brakes, the hazard warning lamps are
deactivated automatically.
i The hazard warning lamps still operate if
the ignition is switched off. Headlamp cleaning system
The headlamps are cleaned automatically if
the "Wipe with washer fluid" function is
operated five times ( Y page 132) while the
lights
are on and the engine is running. When
you switch off the ignition, the automatic
headlamp cleaning system is reset and
counting is resumed from 0. Exterior lighting
125
Lights and windshield wipers Z
Page 129 of 420
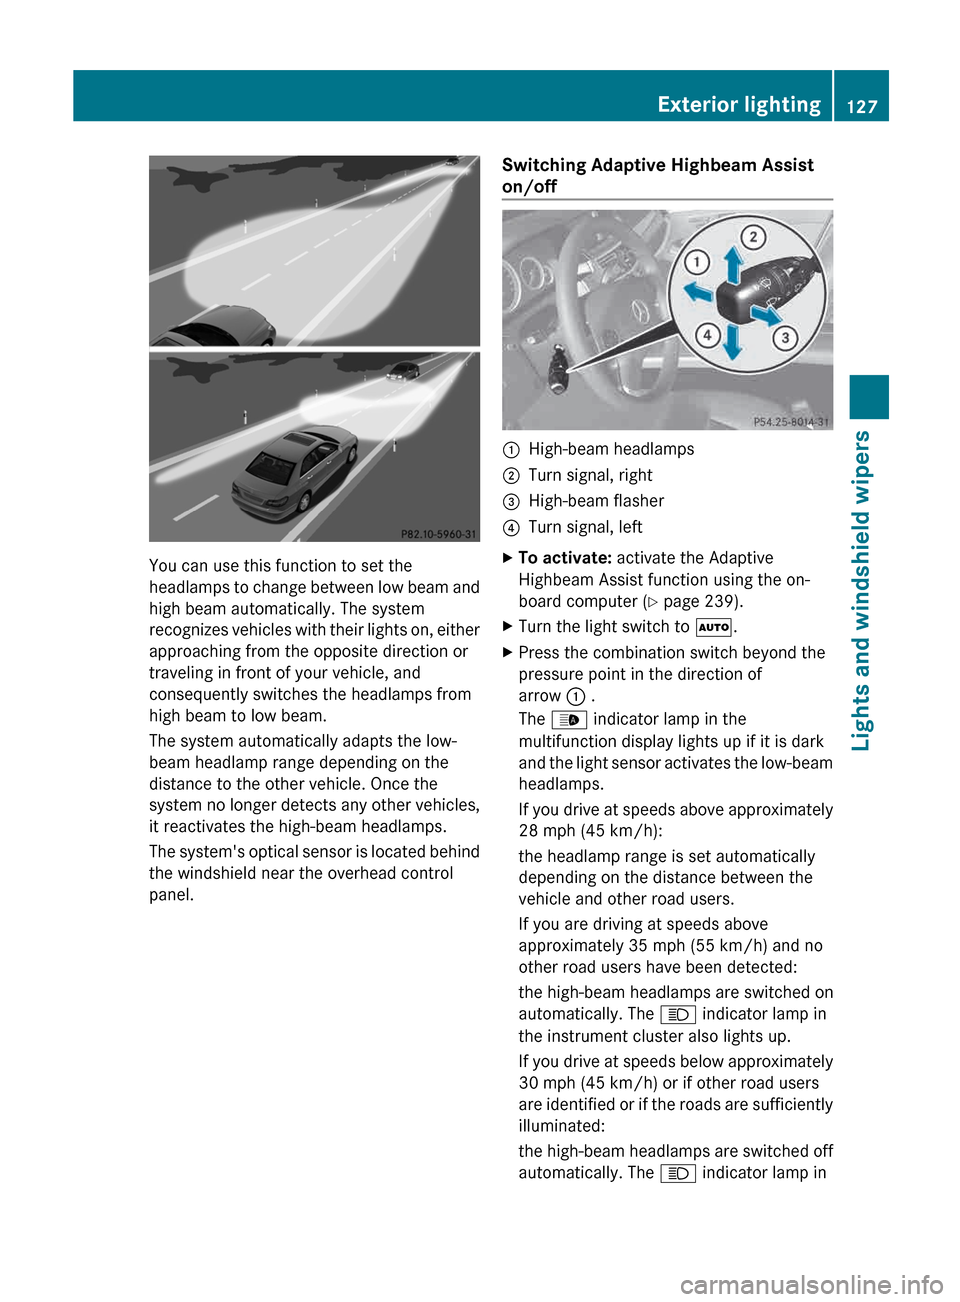
You can use this function to set the
headlamps
to change between low beam and
high beam automatically. The system
recognizes vehicles with their lights on, either
approaching from the opposite direction or
traveling in front of your vehicle, and
consequently switches the headlamps from
high beam to low beam.
The system automatically adapts the low-
beam headlamp range depending on the
distance to the other vehicle. Once the
system no longer detects any other vehicles,
it reactivates the high-beam headlamps.
The system's optical sensor is located behind
the windshield near the overhead control
panel. Switching Adaptive Highbeam Assist
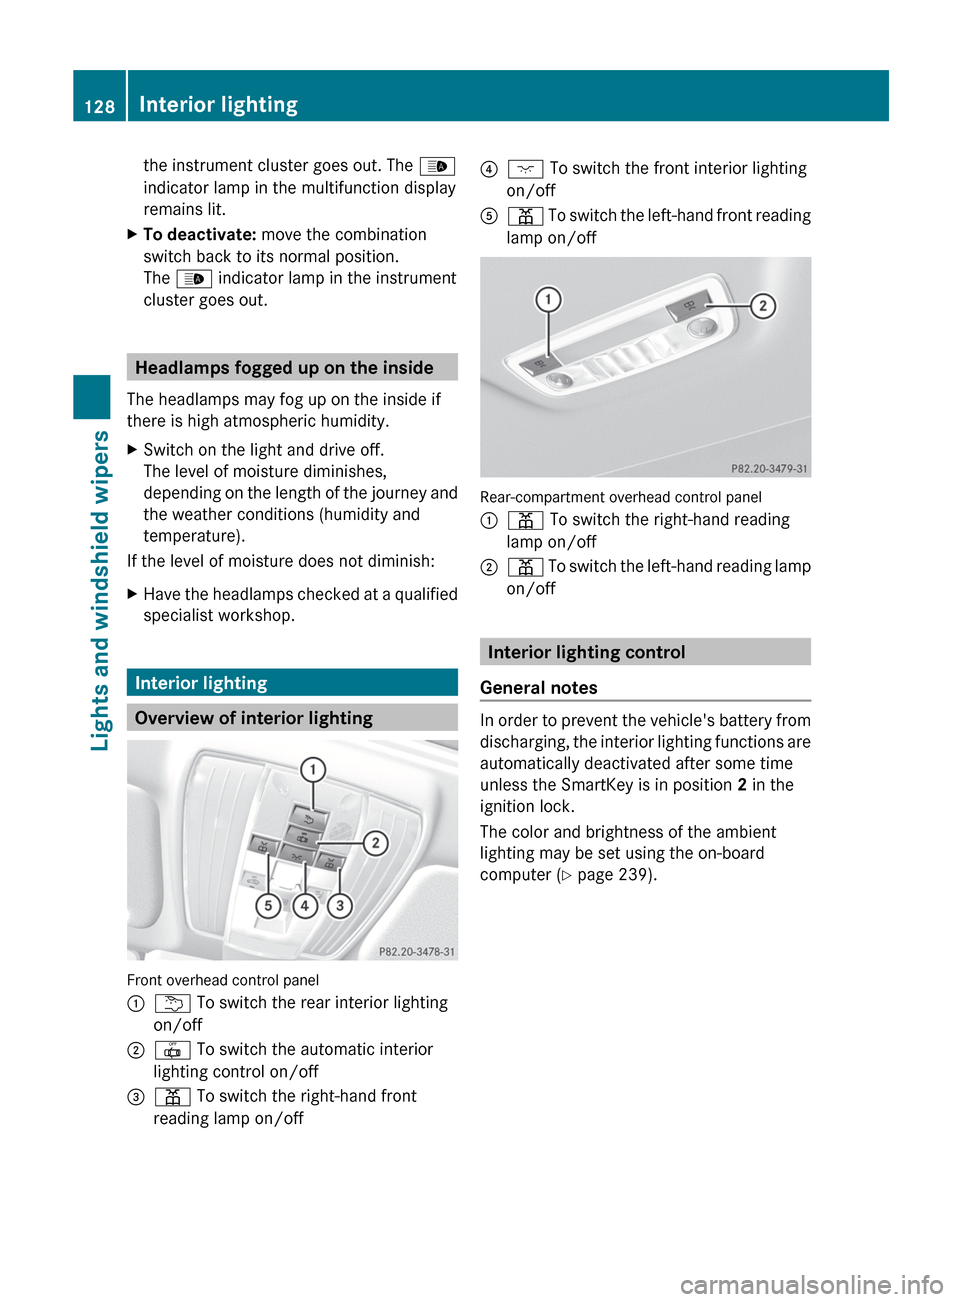
on/off :
High-beam headlamps
; Turn signal, right
= High-beam flasher
? Turn signal, left
X To activate: activate the Adaptive
Highbeam Assist function using the on-
board computer ( Y page 239).
X Turn the light switch to Ã.
X Press the combination switch beyond the
pressure point in the direction of
arrow : .
The _ indicator lamp in the
multifunction display lights up if it is dark
and
the light sensor activates the low-beam
headlamps.
If you drive at speeds above approximately
28 mph (45 km/h):
the headlamp range is set automatically
depending on the distance between the
vehicle and other road users.
If you are driving at speeds above
approximately 35 mph (55 km/h) and no
other road users have been detected:
the high-beam headlamps are switched on
automatically. The K indicator lamp in
the instrument cluster also lights up.
If you drive at speeds below approximately
30 mph (45 km/h) or if other road users
are identified or if the roads are sufficiently
illuminated:
the high-beam headlamps are switched off
automatically. The K indicator lamp in Exterior lighting
127
Lights and windshield wipers Z
Page 130 of 420
the instrument cluster goes out. The
_
indicator lamp in the multifunction display
remains lit.
X To deactivate: move the combination
switch back to its normal position.
The _ indicator lamp in the instrument
cluster goes out. Headlamps fogged up on the inside
The headlamps may fog up on the inside if
there is high atmospheric humidity.
X Switch on the light and drive off.
The level of moisture diminishes,
depending
on the length of the journey and
the weather conditions (humidity and
temperature).
If the level of moisture does not diminish:
X Have the headlamps checked at a qualified
specialist workshop. Interior lighting
Overview of interior lighting
Front overhead control panel
:
u To switch the rear interior lighting
on/off
; | To switch the automatic interior
lighting control on/off
= p To switch the right-hand front
reading lamp on/off ?
c To switch the front interior lighting
on/off
A p
To switch the left-hand front reading
lamp on/off Rear-compartment overhead control panel
:
p To switch the right-hand reading
lamp on/off
; p
To switch the left-hand reading lamp
on/off Interior lighting control
General notes In order to prevent the vehicle's battery from
discharging,
the interior lighting functions are
automatically deactivated after some time
unless the SmartKey is in position 2 in the
ignition lock.
The color and brightness of the ambient
lighting may be set using the on-board
computer (Y page 239). 128
Interior lighting
Lights and windshield wipers