oil MERCEDES-BENZ E-Class SEDAN 2013 W212 Owner's Guide
[x] Cancel search | Manufacturer: MERCEDES-BENZ, Model Year: 2013, Model line: E-Class SEDAN, Model: MERCEDES-BENZ E-Class SEDAN 2013 W212Pages: 420, PDF Size: 14.26 MB
Page 335 of 420
Hiding a service message
X
Press the % or a button on the
steering wheel.
Displaying service messages X
Switch on the ignition.
X Press the = or ; button on the
steering wheel to select the Serv. menu.
X Press the 9 or : button to select the
ASSYST PLUS submenu and confirm with
a.
The service due date appears in the
multifunction display.
Information about Service Resetting the ASSYST PLUS service
interval display
!
If the ASSYST PLUS service interval
display has been inadvertently reset, this
setting can be corrected at a qualified
specialist workshop.
Have
service work carried out as described
in the Maintenance Booklet. This may
otherwise lead to increased wear and
damage to the major assemblies or the
vehicle.
A qualified specialist workshop, e.g. an
authorized Mercedes-Benz Center, will reset
the ASSYST PLUS service interval display
after the service work has been carried out.
You can also obtain further information on
maintenance work, for example.
Special service requirements
Arduous operating conditions or increased
loads on the vehicle will require some service
work to be performed more often than for a
vehicle in normal use. Such arduous
conditions include regular city driving with
frequent intermediate stops and use in
mountainous terrain or on poor road
surfaces.
For example, if the vehicle is used under
arduous operating conditions, have air filters, engine oil and oil filters changed frequently
and check the wheels often. Further
information can be obtained at a qualified
specialist workshop, e.g. an authorized
Mercedes-Benz Center.
Driving abroad
An
extensive Mercedes-Benz Service network
is also available in other countries. You can
obtain further information from any
authorized Mercedes-Benz Center. Care
General notes
G
WARNING
Many cleaning products can be hazardous.
Some are poisonous, others are flammable.
Always follow the instructions on the
particular container. Always open your
vehicle's
doors or windows when cleaning the
inside.
Never use fluids or solvents that are not
designed for cleaning your vehicle.
Always lock away cleaning products and keep
them out of reach of children. H
Environmental note
Dispose of empty packaging and cleaning
cloths in an environmentally responsible
manner.
! For cleaning your vehicle, do not use any
of the following:
R dry, rough or hard cloths
R abrasive cleaning agents
R solvents
R cleaning agents containing solvents
Do not scrub.
Do not touch the surfaces or protective
films with hard objects, e.g. a ring or ice
scraper. You could otherwise scratch or
damage the surfaces and protective film. Care
333
Maintenance and care Z
Page 337 of 420
If the vehicle is very dirty, pre-wash it before
cleaning it in an automatic car wash.
After using an automatic car wash, wipe off
wax from the windshield and the wiper
blades. This will prevent smears and reduce
wiping noises caused by residue on the
windshield.
Washing by hand
In some countries, washing by hand is only
allowed at specially equipped washing bays.
Observe the legal requirements in all
countries concerned.
X
Do not use hot water and do not wash the
vehicle in direct sunlight.
X Use a soft sponge to clean.
X Use a mild cleaning agent, such as a car
shampoo approved by Mercedes-Benz.
X Thoroughly hose down the vehicle with a
gentle jet of water.
X Do not point the water jet directly towards
the air inlet.
X Use plenty of water and rinse out the
sponge frequently.
X Rinse the vehicle with clean water and dry
thoroughly with a chamois.
X Do not let the cleaning agent dry on the
paintwork.
When using the vehicle in winter, remove all
traces of road salt deposits carefully and as
soon as possible.
Power washers G
WARNING
Do not use power washers with circular-jet
nozzles (dirt grinders) to clean your vehicle, in
particular the tires. You could otherwise
damage the tires and cause an accident.
! Always maintain a distance of at least
11.8 in (30 cm) between the vehicle and the
power washer nozzle. Information about
the correct distance is available from the
equipment manufacturer. Move the power washer nozzle around
when cleaning your vehicle.
Do
not aim directly at any of the following:
R tires
R door gaps, roof gaps, joints, etc.
R electrical components
R battery
R connectors
R lights
R seals
R trim
R ventilation slots
Damaged seals or electrical components
can lead to leaks or failures.
Cleaning the paintwork !
Do not affix:
R stickers
R films
R magnetic plates or similar items
to painted surfaces. You could otherwise
damage the paintwork.
Scratches,
corrosive deposits, areas affected
by corrosion and damage caused by
inadequate care cannot always be completely
repaired. In such cases, visit a qualified
specialist workshop.
X Remove dirt immediately, where possible,
while avoiding rubbing too hard.
X Soak insect remains with insect remover
and rinse off the treated areas afterwards.
X Soak bird droppings with water and rinse
off the treated areas afterwards.
X Remove coolant, brake fluid, tree resin,
oils, fuels and greases by rubbing gently
with a cloth soaked in petroleum ether or
lighter fluid.
X Use tar remover to remove tar stains.
X Use silicone remover to remove wax.
If water no longer forms "beads" on the paint
surface, use the paint care products
recommended and approved by Mercedes- Care
335
Maintenance and care Z
Page 341 of 420
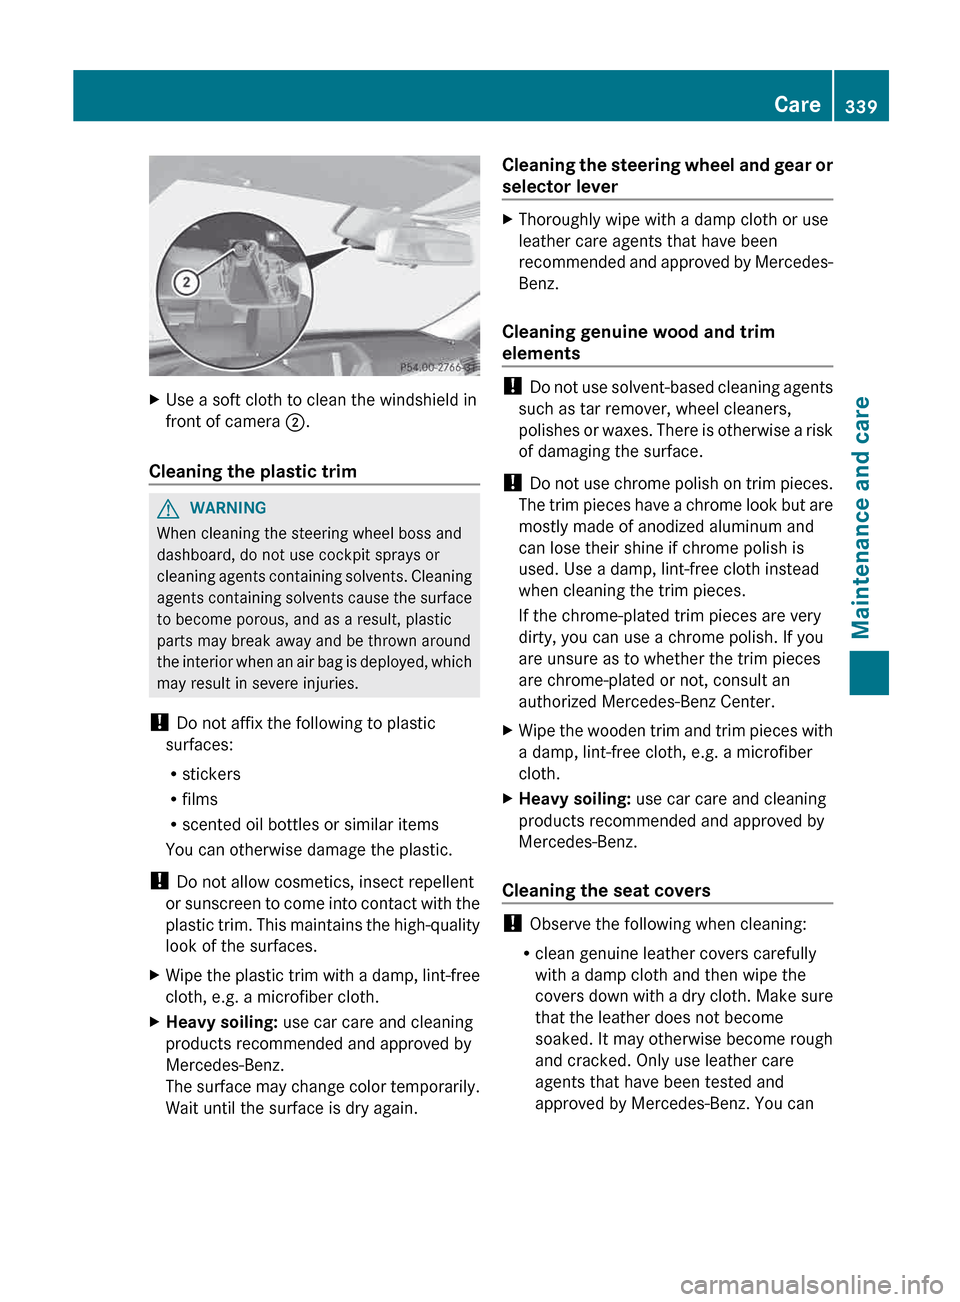
X
Use a soft cloth to clean the windshield in
front of camera ;.
Cleaning the plastic trim G
WARNING
When cleaning the steering wheel boss and
dashboard, do not use cockpit sprays or
cleaning
agents containing solvents. Cleaning
agents containing solvents cause the surface
to become porous, and as a result, plastic
parts may break away and be thrown around
the interior when an air bag is deployed, which
may result in severe injuries.
! Do not affix the following to plastic
surfaces:
R stickers
R films
R scented oil bottles or similar items
You can otherwise damage the plastic.
! Do not allow cosmetics, insect repellent
or sunscreen to come into contact with the
plastic trim. This maintains the high-quality
look of the surfaces.
X Wipe the plastic trim with a damp, lint-free
cloth, e.g. a microfiber cloth.
X Heavy soiling: use car care and cleaning
products recommended and approved by
Mercedes-Benz.
The
surface may change color temporarily.
Wait until the surface is dry again. Cleaning the steering wheel and gear or
selector lever X
Thoroughly wipe with a damp cloth or use
leather care agents that have been
recommended
and approved by Mercedes-
Benz.
Cleaning genuine wood and trim
elements !
Do
not use solvent-based cleaning agents
such as tar remover, wheel cleaners,
polishes or waxes. There is otherwise a risk
of damaging the surface.
! Do not use chrome polish on trim pieces.
The trim pieces have a chrome look but are
mostly made of anodized aluminum and
can lose their shine if chrome polish is
used. Use a damp, lint-free cloth instead
when cleaning the trim pieces.
If the chrome-plated trim pieces are very
dirty, you can use a chrome polish. If you
are unsure as to whether the trim pieces
are chrome-plated or not, consult an
authorized Mercedes-Benz Center.
X Wipe the wooden trim and trim pieces with
a damp, lint-free cloth, e.g. a microfiber
cloth.
X Heavy soiling: use car care and cleaning
products recommended and approved by
Mercedes-Benz.
Cleaning the seat covers !
Observe the following when cleaning:
R clean genuine leather covers carefully
with a damp cloth and then wipe the
covers
down with a dry cloth. Make sure
that the leather does not become
soaked. It may otherwise become rough
and cracked. Only use leather care
agents that have been tested and
approved by Mercedes-Benz. You can Care
339
Maintenance and care Z
Page 349 of 420
Do not switch off the tire inflation
compressor during this phase.
X Allow the tire inflation compressor to run
for five minutes. The tire should then have
attained a pressure of at least
180 kPa
(1.8 bar/26 psi).
If a tire pressure of 180 kPa
(1.8 bar/26 psi)
has been attained after five minutes:
(Y page 347).
If a tire pressure of 180 kPa (1.8 bar/26 psi)
has not been attained after five minutes:
(Y page 347).
i If tire sealant leaks out, allow it to dry. It
can then be removed like a layer of film.
If your clothes are soiled with tire sealant,
have them cleaned with perchloroethylene
at a dry cleaner as soon as possible.
Tire pressure not reached If a pressure of 180 kPa
(1.8 bar/26 psi) has
not been achieved after five minutes:
X Switch off the tire inflation compressor.
X Unscrew the filler hose from the valve of
the faulty tire.
X Very slowly drive forwards or reverse
approximately
30 ft (10 m).
X Pump up the tire again.
After a maximum of five minutes the tire
pressure
must be at least 180 kPa (1.8 bar/
26 psi). G
WARNING
If the required tire pressure is not reached
after the specified time, the tire is too badly
damaged. The tire sealant cannot repair the
tire
in this instance. Damaged tires and a tire
pressure that is too low can significantly
impair the vehicle's braking and driving
characteristics. There is a risk of accident.
Do not continue driving. Contact a qualified
specialist workshop. Tire pressure reached G
WARNING
A tire temporarily sealed with tire sealant
impairs the driving characteristics and is not
suitable for higher speeds. There is a risk of
accident.
You should therefore adapt your driving style
accordingly
and drive carefully. Do not exceed
the specified maximum speed with a tire that
has been repaired using tire sealant.
! Residue from the tire sealant may come
out of the filler hose after use. This could
cause stains.
Therefore, place the filler hose in the plastic
bag which contained the TIREFIT kit. H
Environmental note
Have the used tire sealant bottle disposed of
professionally, e.g. at a qualified specialist
workshop.
If
a tire pressure of 180 kPa (1.8 bar/26 psi)
has been attained after five minutes:
X Switch off the tire inflation compressor.
X Unscrew the filler hose from the valve of
the faulty tire.
X Stow the tire sealant bottle and the tire
inflation compressor.
X Pull away immediately.
The
maximum speed for a tire treated with
tire sealant is 50 mph (80 km/h). The upper
part of the TIREFIT sticker must be affixed
to the instrument cluster in the driver's
field of vision.
X Stop after driving for approximately ten
minutes and check the tire pressure with
the tire inflation compressor.
The tire pressure must now be at least
130 kPa (1.3 bar/19 psi). G
WARNING
If the required tire pressure is not reached
after driving for a short period, the tire is too
badly
damaged. The tire sealant cannot repair
the tire in this instance. Damaged tires and a Flat tire
347
Breakdown assistance
Z
Page 385 of 420
Speed rating
The speed rating is part of the tire
identification.
It specifies the speed range for
which the tire is approved.
GVW (Gross Vehicle Weight)
The gross vehicle weight includes the weight
of the vehicle including fuel, tools, the spare
wheel, accessories installed, occupants,
luggage and the drawbar noseweight, if
applicable. The gross vehicle weight must not
exceed the gross vehicle weight rating GVWR
as specified on the vehicle identification plate
on the B-pillar on the driver's side.
GVWR (Gross Vehicle Weight Rating)
The GVWR is the maximum permissible gross
weight of a fully loaded vehicle (the weight of
the vehicle including all accessories,
occupants, fuel, luggage and the drawbar
noseweight, if applicable). The gross vehicle
weight rating is specified on the vehicle
identification plate on the B-pillar on the
driver's side.
Maximum loaded vehicle weight
The maximum weight is the sum of:
R the curb weight of the vehicle
R the weight of the accessories
R the load limit
R the weight of the factory installed optional
equipment
Kilopascal (kPa)
Metric unit for tire pressure. 6.9 kPa
corresponds to 1 psi. Another unit for tire
pressure is bar. There are 100 kilopascals
(kPa) to 1 bar.
Load index
In addition to the load-bearing index, the load
index may also be imprinted on the sidewall
of the tire. This specifies the load-bearing
capacity more precisely. Curb weight
The weight of a vehicle with standard
equipment including the maximum capacity
of
fuel, oil and coolant. It also includes the air-
conditioning system and optional equipment
if these are installed in the vehicle, but does
not include passengers or luggage.
Maximum load rating
The maximum tire load is the maximum
permissible weight in kilograms or lbs for
which a tire is approved.
Maximum permissible tire pressure
Maximum permissible tire pressure for one
tire.
Maximum load on one tire
Maximum load on one tire. This is calculated
by dividing the maximum axle load of one axle
by two.
PSI (pounds per square inch)
A standard unit of measure for tire pressure.
Aspect ratio
Relationship between tire height and tire
width in percent.
Tire pressure
This is pressure inside the tire applying an
outward force to each square inch of the tire's
surface. The tire pressure is specified in
pounds per square inch (psi), in kilopascal
(kPa) or in bar. The tire pressure should only
be corrected when the tires are cold.
Cold tire pressure
The tires are cold:
R if the vehicle has been parked without
direct sunlight on the tires for at least three
hours and
R if the vehicle has been driven for less than
1 mile (1.6 km). All about wheels and tires
383
Wheels and tires Z
Page 387 of 420
Always observe the instructions and safety
notes in the "Mounting a wheel" section
(Y page 385).
The wear patterns on the front and rear tires
differ,
depending on the operating conditions.
Rotate the wheels before a clear wear pattern
has formed on the tires. Front tires typically
wear more on the shoulders and the rear tires
in the center.
If your vehicle's tire configuration allows, you
can rotate the wheels according to the
intervals in the tire manufacturer's warranty
book in your vehicle documents. If this is not
available, the tires should then be replaced
every 3,000 to 6,000 miles (5,000 to
10,000 km), or earlier if the tire wear requires
this. Do not change the direction of wheel
rotation.
Clean the contact surfaces of the wheel and
the brake disc thoroughly every time a wheel
is interchanged. Check the tire pressure and,
if necessary, restart the tire pressure loss
warning system or the tire pressure monitor. Direction of rotation
Tires with a specified direction of rotation
have
additional benefits, e.g. if there is a risk
of hydroplaning. You will only gain these
benefits if the correct direction of rotation is
maintained.
An arrow on the sidewall of the tire indicates
its correct direction of rotation. Storing wheels
Store
wheels that are not being used in a cool,
dry and preferably dark place. Protect the
tires from oil, grease, gasoline and diesel. Cleaning the wheels
G
WARNING
The water jet from a circular jet nozzle (dirt
blasters)
can cause invisible exterior damage to the tires or chassis components.
Components damaged in this way may fail
unexpectedly. There is a risk of an accident.
Do not use power washers with circular jet
nozzles to clean the vehicle. Have damaged
tires or chassis components replaced
immediately.
Mounting a wheel
Preparing the vehicle X
Park the vehicle on firm, non-slippery and
level ground.
X Apply the parking brake.
X Bring the front wheels into the straight-
ahead position.
X Shift the transmission to position P.
X Vehicles with AIRMATIC: make sure that
"normal" level is selected
(Y page 199).
X Switch off the engine.
X Vehicles without KEYLESS-GO: remove
the SmartKey from the ignition lock.
X Vehicles with KEYLESS-GO: open the
driver's door.
The on-board electronics have status 0,
which is the same as the SmartKey having
been removed.
X Vehicles with KEYLESS-GO: remove the
Start/Stop button from the ignition lock
(Y page 154).
X If included in the vehicle equipment, take
the tire-change tool kit out of the vehicle.
X Secure the vehicle to prevent it from rolling
away. Changing a wheel
385
Wheels and tires Z
Page 390 of 420
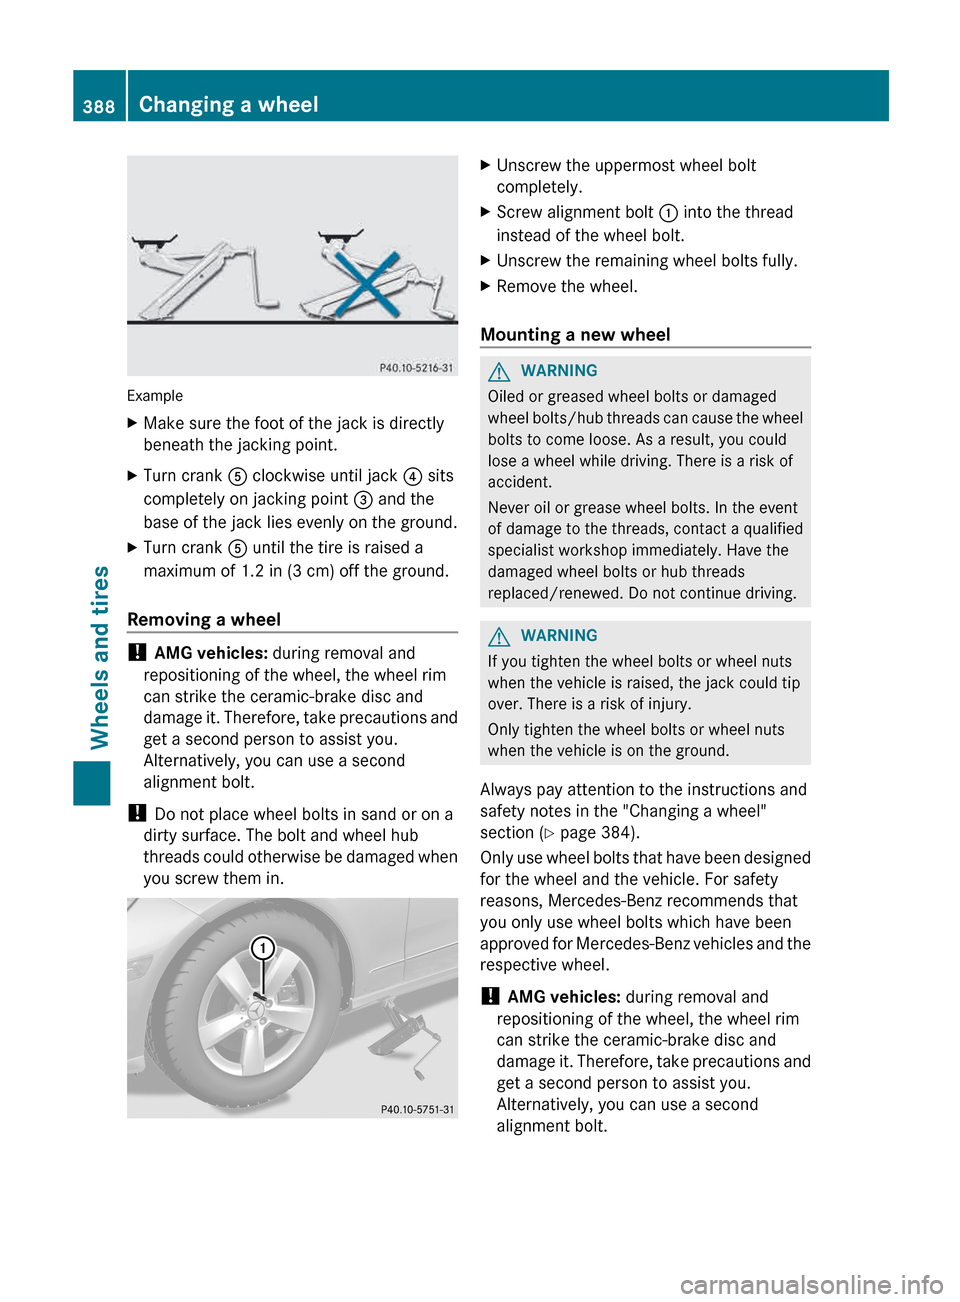
Example
X
Make sure the foot of the jack is directly
beneath the jacking point.
X Turn crank A clockwise until jack ? sits
completely on jacking point = and the
base of the jack lies evenly on the ground.
X Turn crank A until the tire is raised a
maximum of 1.2 in (3 cm ) off the ground.
Removing a wheel !
AMG vehicles: during removal and
repositioning of the wheel, the wheel rim
can strike the ceramic-brake disc and
damage
it. Therefore, take precautions and
get a second person to assist you.
Alternatively, you can use a second
alignment bolt.
! Do not place wheel bolts in sand or on a
dirty surface. The bolt and wheel hub
threads could otherwise be damaged when
you screw them in. X
Unscrew the uppermost wheel bolt
completely.
X Screw alignment bolt : into the thread
instead of the wheel bolt.
X Unscrew the remaining wheel bolts fully.
X Remove the wheel.
Mounting a new wheel G
WARNING
Oiled or greased wheel bolts or damaged
wheel
bolts/hub threads can cause the wheel
bolts to come loose. As a result, you could
lose a wheel while driving. There is a risk of
accident.
Never oil or grease wheel bolts. In the event
of damage to the threads, contact a qualified
specialist workshop immediately. Have the
damaged wheel bolts or hub threads
replaced/renewed. Do not continue driving. G
WARNING
If you tighten the wheel bolts or wheel nuts
when the vehicle is raised, the jack could tip
over. There is a risk of injury.
Only tighten the wheel bolts or wheel nuts
when the vehicle is on the ground.
Always pay attention to the instructions and
safety notes in the "Changing a wheel"
section ( Y page 384).
Only
use wheel bolts that have been designed
for the wheel and the vehicle. For safety
reasons, Mercedes-Benz recommends that
you only use wheel bolts which have been
approved for Mercedes-Benz vehicles and the
respective wheel.
! AMG vehicles: during removal and
repositioning of the wheel, the wheel rim
can strike the ceramic-brake disc and
damage it. Therefore, take precautions and
get a second person to assist you.
Alternatively, you can use a second
alignment bolt. 388
Changing a wheel
Wheels and tires
Page 409 of 420
R
Lubricants (e.g. engine oil, transmission oil)
R Coolant
R Brake fluid
R Windshield washer fluid
R Climate control system refrigerant
Components and service products must be
matched. You should therefore only use
products that have been tested and approved
by Mercedes-Benz.
Information on tested and approved products
can be obtained at an authorized Mercedes-
Benz Center or on the Internet at
http://bevo.mercedes-benz.com.
You can recognize service products approved
by Mercedes-Benz by the following
inscription on the containers:
R MB-Freigabe (e.g. MB-Freigabe 229.51)
R MB Approval (e.g. MB Approval 229.51)
Other designations or recommendations
indicate a level of quality or a specification in
accordance with an MB Sheet number (e.g.
MB 229.5). They have not necessarily been
approved by Mercedes-Benz. Fuel
Important safety notes G
WARNING
Gasoline and diesel fuels are highly flammable
and poisonous. They burn violently and can
cause serious injury.
Never allow sparks, flames or smoking
materials near gasoline or diesel fuel!
Turn off the engine before refueling.
Whenever you are around gasoline or diesel
fuel, avoid inhaling fumes and any skin or
clothing contact. Extinguish all smoking
materials.
Direct skin contact with fuels and the
inhalation of fuel vapors are damaging your
health. Tank capacity Model Total
capacity All models
21.1 US gal
(80.0 l) Model Of which
reserve All models (except E 63
AMG)
Approx.
2.4 US gal (9.0 l) E 63 AMG
Approx.
3.7 US gal (14.0 l) Gasoline
Fuel grade
!
Do
not use diesel to refuel vehicles with a
gasoline engine. Even small amounts of the
wrong fuel result in damage to the fuel
system and engine.
! You should only refuel with unleaded
premium-grade gasoline as this avoids
damaging the catalytic converter.
If engine running problems are apparent,
have the cause checked immediately and
repaired. Excess unburned fuel can
otherwise enter the catalytic converter,
leading to overheating and possibly
causing a fire.
! To ensure the longevity and full
performance of the engine, only premium-
grade unleaded gasoline may be used.
If there is no premium-grade unleaded
gasoline available and regular unleaded
gasoline must be used, please observe the
following precautions:
R only fill the fuel tank to half full with
regular unleaded gasoline and fill the rest Service products and filling capacities
407
Technical data Z
Page 410 of 420
with premium-grade unleaded gasoline
as soon as possible.
R do not drive at the maximum speed.
R avoid sudden acceleration.
R if
the vehicle is carrying a light load, e.g.
two passengers without luggage, do not
allow the engine to rev above 3000 rpm.
R if the vehicle is fully loaded or is being
operated in mountainous terrain, do not
depress the accelerator pedal further
than Ô of the pedal travel.
Only refuel using premium-grade unleaded
gasoline with a minimum octane rating of 91.
Reformulated Gasoline (RFG) and/or
unleaded gasoline with additives can be used.
The concentration of additives in the fuel,
however, must not exceed 10%, e.g.:
R Ethanol
R TAME
R ETBE
R IPA
R TBA
For MTBE, the concentration should not
exceed 15%.
The concentration of methanol in gasoline,
including other additives, must not exceed
3%.
Using mixtures of methanol and ethanol is not
permitted. Gasohol, a mixture of 10% ethanol
and 90% unleaded gasoline, may be used.
All of these mix fuels must fulfill the fuel
requirements, e.g.:
R knock resistance
R boiling point
R vapor pressure
You will usually find information about the fuel
grade on the pump. If you cannot find the
label on the pump, ask the staff for
assistance.
i For further information, consult an
authorized Mercedes-Benz Center or on
the Internet at http://www.mbusa.com
(USA only). Information on refueling (Y page 170).
Additives
!
Do not refuel with low-grade fuel and do
not use fuel additives that are not tested
and approved for Mercedes-Benz vehicles.
Damage to or malfunctions of the fuel
system may otherwise occur.
One
of the main problems of poor fuel quality
is the forming of deposits that are created
during the gasoline combustion process.
Mercedes-Benz recommends that you use
branded fuels that have additives.
If you use fuels without these additives over
a longer period of time, carbon deposits may
build up. These deposits form at the inlet
valves and in the combustion chamber in
particular.
This could lead to engine problems, e.g.:
R longer engine warm-up phase
R uneven idle
R engine noise
R misfiring
R loss of power
Carbon deposits may form if the availability
of gasoline with relevant additives is
insufficient (in certain regions). In this case,
Mercedes-Benz recommends additives
approved for use in Mercedes-Benz vehicles;
see http://bevo.mercedes-benz.com.
For a list of approved products, consult an
authorized Mercedes-Benz Center. Comply
with the instructions for use on the product
label.
Do not mix other fuel additives with fuel. This
causes unnecessary costs and could damage
the engine.
Diesel Fuel grade
G
WARNING
Do not use gasoline to refuel vehicles with a
diesel
engine. Never mix diesel with gasoline.
This causes damage to the fuel system and 408
Service products and filling capacities
Technical data
Page 411 of 420
engine and could result in the vehicle catching
fire.
! Only
use commercially available vehicular
ULTRA-LOW SULFUR DIESEL FUEL (ULSD,
15 ppm maximum sulfur content) that
meets the ASTM D975 standard. If you do
not refuel with ULSD, you may damage the
BlueTEC exhaust gas aftertreatment
system of the vehicle.
! Do not use gasoline to refuel vehicles with
a diesel engine. Do not mix diesel fuel with
gasoline, kerosene or paraffin. This may
otherwise result in damage to the fuel
system and engine.
You will usually find information about the fuel
grade on the pump. If you cannot find the
label on the pump, ask the staff for
assistance.
i For further information, consult a
qualified specialist workshop or on the
Internet at http://www.mbusa.com (USA
only).
Information on refueling (Y page 170).
Low outside temperatures
i Diesel fuel with improved cold flow
properties is available during the winter
months. Further information about fuel
properties can be obtained from oil
companies, e.g. at gas stations.
Flow improver
To improve the low-temperature resistance of
diesel fuel, a flow improver can be attached.
The effectiveness of a flow improver is not
guaranteed for every fuel.
Only use flow improvers tested and approved
by Mercedes-Benz. During use, please
observe the information on operation.
Correct dosage and sufficient mixing are
decisive in improving low-temperature
resistance with the flow improver.
Overdosage can potentially even decrease
low-temperature resistance and must therefore be avoided. Follow the
manufacturer's guidelines on dosage.
Mix the additive into the diesel in good time,
before the flow characteristics of the diesel
become
insufficient. Otherwise, malfunctions
can arise through heating the fuel system,
e.g. through parking in a heated garage.
More information about recommended flow
improvers can be obtained from any qualified
specialist workshop.
Flexible fuel vehicles Important safety notes
G
WARNING
E85 fuel (ethanol) and its vapours are
poisonous, highly flammable and highly
combustible. E85 fuel can cause serious
injury
if ignited, if you come into contact with
it you or if you inhale fuel vapors. Avoid
inhaling E85 fuel vapors and avoid skin
contact with E85 fuel. Extinguish any naked
flames before refueling. Keep sparks away
from E85 fuel, and do not smoke.
Flexible Fuel vehicles can be refueled with the
following fuel types:
R premium-grade unleaded gasoline
R E85 fuel
R a mixture of E85 fuel and premium-grade
unleaded gasoline
i Flexible Fuel vehicles can be recognized
by the Ethanol up to E85 sticker on the
inside of the fuel filler flap.
Fuel consumption
The energy content of E85 fuel is less than
that of the same amount of premium-grade
gasoline. The amount of fuel consumed when
operating the vehicle with E85 fuel is
therefore higher than with premium-grade
gasoline. Service products and filling capacities
409
Technical data Z