clear MERCEDES-BENZ E-Class SEDAN 2013 W212 Owner's Guide
[x] Cancel search | Manufacturer: MERCEDES-BENZ, Model Year: 2013, Model line: E-Class SEDAN, Model: MERCEDES-BENZ E-Class SEDAN 2013 W212Pages: 420, PDF Size: 14.26 MB
Page 326 of 420
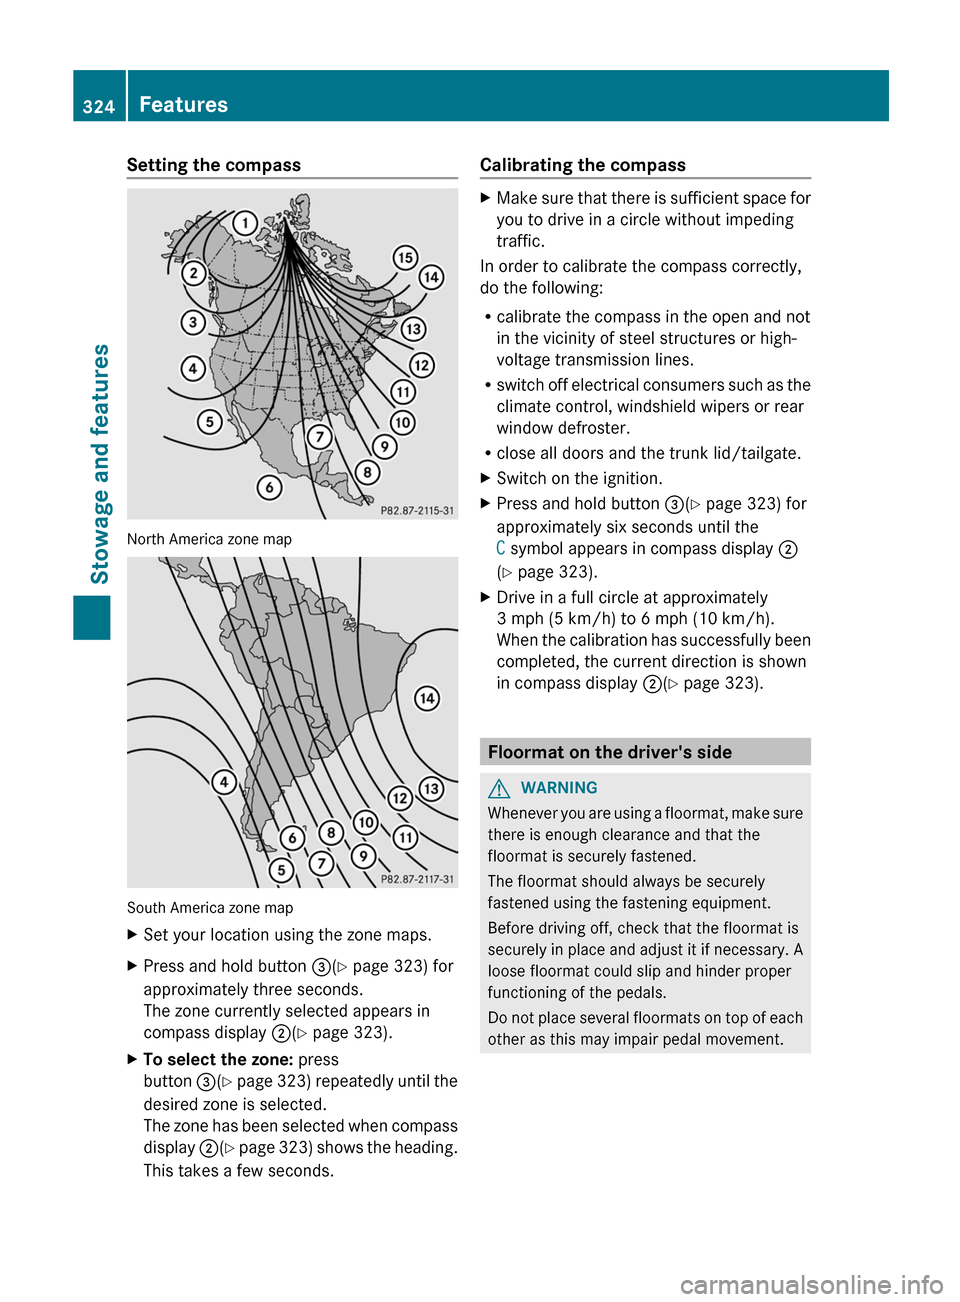
Setting the compass
North America zone map
South America zone map
X
Set your location using the zone maps.
X Press and hold button =(Y page 323) for
approximately three seconds.
The zone currently selected appears in
compass display ;(Y page 323).
X To select the zone: press
button =(Y
page 323) repeatedly until the
desired zone is selected.
The zone has been selected when compass
display ;(Y page 323) shows the heading.
This takes a few seconds. Calibrating the compass X
Make sure that there is sufficient space for
you to drive in a circle without impeding
traffic.
In order to calibrate the compass correctly,
do the following:
R calibrate the compass in the open and not
in the vicinity of steel structures or high-
voltage transmission lines.
R switch
off electrical consumers such as the
climate control, windshield wipers or rear
window defroster.
R close all doors and the trunk lid/tailgate.
X Switch on the ignition.
X Press and hold button =(Y page 323) for
approximately six seconds until the
C symbol appears in compass display ;
(Y page 323).
X Drive in a full circle at approximately
3 mph (5 km/h) to
6 mph (10 km/h).
When the calibration has successfully been
completed, the current direction is shown
in compass display ;(Y page 323). Floormat on the driver's side
G
WARNING
Whenever you are using a floormat, make sure
there is enough clearance and that the
floormat is securely fastened.
The floormat should always be securely
fastened using the fastening equipment.
Before driving off, check that the floormat is
securely
in place and adjust it if necessary. A
loose floormat could slip and hinder proper
functioning of the pedals.
Do not place several floormats on top of each
other as this may impair pedal movement. 324
Features
Stowage and features
Page 330 of 420
Useful information
i This Operator's Manual describes all
models and all standard and optional
equipment of your vehicle available at the
time of publication of the Operator's
Manual. Country-specific differences are
possible.
Please note that your vehicle may
not be equipped with all features
described. This also applies to safety-
related systems and functions.
i Read the information on qualified
specialist workshops: ( Y page 25).Engine compartment
Hood
Opening the hood G
WARNING
Do not pull the release lever while the vehicle
is in motion. Otherwise, the hood could be
forced open by passing air flow.
This
could cause the hood to come loose and
injure you and/or others. G
WARNING
Hybrid vehicles: be sure to read the "HYBRID"
supplement. Otherwise, you could fail to
recognize dangers. G
WARNING
Do not open the hood when the engine is
overheated. You could be seriously injured.
Observe the coolant temperature gauge to
determine whether the engine may be
overheated. If you see flames or smoke
coming from the engine compartment, move
away from the vehicle. Wait until the engine
has cooled. If necessary, call the fire
department. G
WARNING
There is a risk of injury if the hood is open,
even if the engine is not running. Some engine components can become very
hot.
To avoid the risk of burns, only touch those
components described in the Operator's
Manual
and observe the relevant safety notes. G
WARNING
To avoid injury, stay clear of moving parts
when the hood is open and the engine is
running.
The radiator fan may continue to run for
approximately 30seconds
or may even restart
after the engine has been switched off. For
this reason, you must not reach into the fan
rotation area. G
WARNING
Vehicles with gasoline engine:
The engine is equipped with a transistorized
ignition system. Because of the high voltage
it is dangerous to touch any components
(ignition coils, spark plug sockets, diagnostic
socket) of the ignition system
R with the engine running
R while starting the engine
R when the ignition is switched on and the
engine is turned manually G
WARNING
Vehicles with diesel engine:
The engine is equipped with a high-voltage
electronic control unit for the injection
system. Because of the high voltage it is
dangerous to touch any components of the
injection system (injectors, electrical wires)
R with the engine running
R while starting the engine
R when the ignition is switched on G
WARNING
The windshield wipers and wiper linkage
could be set in motion.
When the hood is open, you or others could
be injured by the wiper linkage. 328
Engine compartment
Maintenance and care
Page 338 of 420
Benz. This is the case approximately every
three to five months, depending on the
climate
conditions and the care product used.
If dirt has penetrated the paint surface or if
the paint has become dull, the paint cleaner
recommended and approved by Mercedes-
Benz should be used.
Do not use these care products in the sun or
on the hood while the hood is hot.
X Use a suitable touch-up stick, e.g. MB
Touch-Up Stick, to repair slight damage to
the paintwork quickly and provisionally.
Matte finish care !
Never polish the vehicle or the light alloy
wheels. Polishing causes the finish to
shine.
! The following may cause the paint to
become shiny and thus reduce the matte
effect:
R Vigorous rubbing with unsuitable
materials.
R Frequent use of car washes.
R Washing the vehicle in direct sunlight.
! Never use paint cleaner, buffing or
polishing
products, or gloss preserver, e.g.
wax. These products are only suitable for
high-gloss surfaces. Their use on vehicles
with matte finish leads to considerable
surface damage (shiny, spotted areas).
Always have paintwork repairs performed
at a qualified specialist workshop, e.g. an
authorized Mercedes-Benz Center.
! Do not use wash programs with a hot wax
treatment under any circumstances.
Observe these notes if your vehicle has a
clear matte finish. This will help you to avoid
damage to the paintwork due to incorrect
treatment.
These notes also apply to light alloy wheels
with a clear matte finish. i
The vehicle should preferably be washed
by hand using a soft sponge, car shampoo
and plenty of water.
i Use
only insect remover and car shampoo
from the range of recommended and
approved Mercedes-Benz care products. Cleaning the vehicle parts
Cleaning the wheels !
Do
not use acidic wheel cleaning products
to remove brake dust. This could damage
wheel bolts and brake components.
! Do not park the vehicle for an extended
period straight after cleaning it, particularly
after having cleaned the wheels with wheel
cleaner. Wheel cleaners could cause
increased corrosion of the brake discs and
brake pads/linings. For this reason, you
should drive for a few minutes after
cleaning. Braking heats the brake discs and
the brake pads/linings, thus drying them.
The vehicle can then be parked.
Cleaning the windows G
WARNING
Before cleaning the windshield or wiper
blades, switch off the windshield wipers and
remove the SmartKey from the ignition lock.
On vehicles with KEYLESS-GO, press the
Start/Stop button repeatedly until all
indicator
lamps in the instrument cluster have
gone out. The windshield wipers could
otherwise move and injure you.
! Do not use dry cloths, abrasive products,
solvents or cleaning agents containing
solvents to clean the inside of the windows.
Do not touch the insides of the windows
with hard objects, e.g. an ice scraper or
ring. There is otherwise a risk of damaging
the windows.
! Clean the water drainage channels of the
windshield and the rear window at regular 336
Care
Maintenance and care
Page 340 of 420
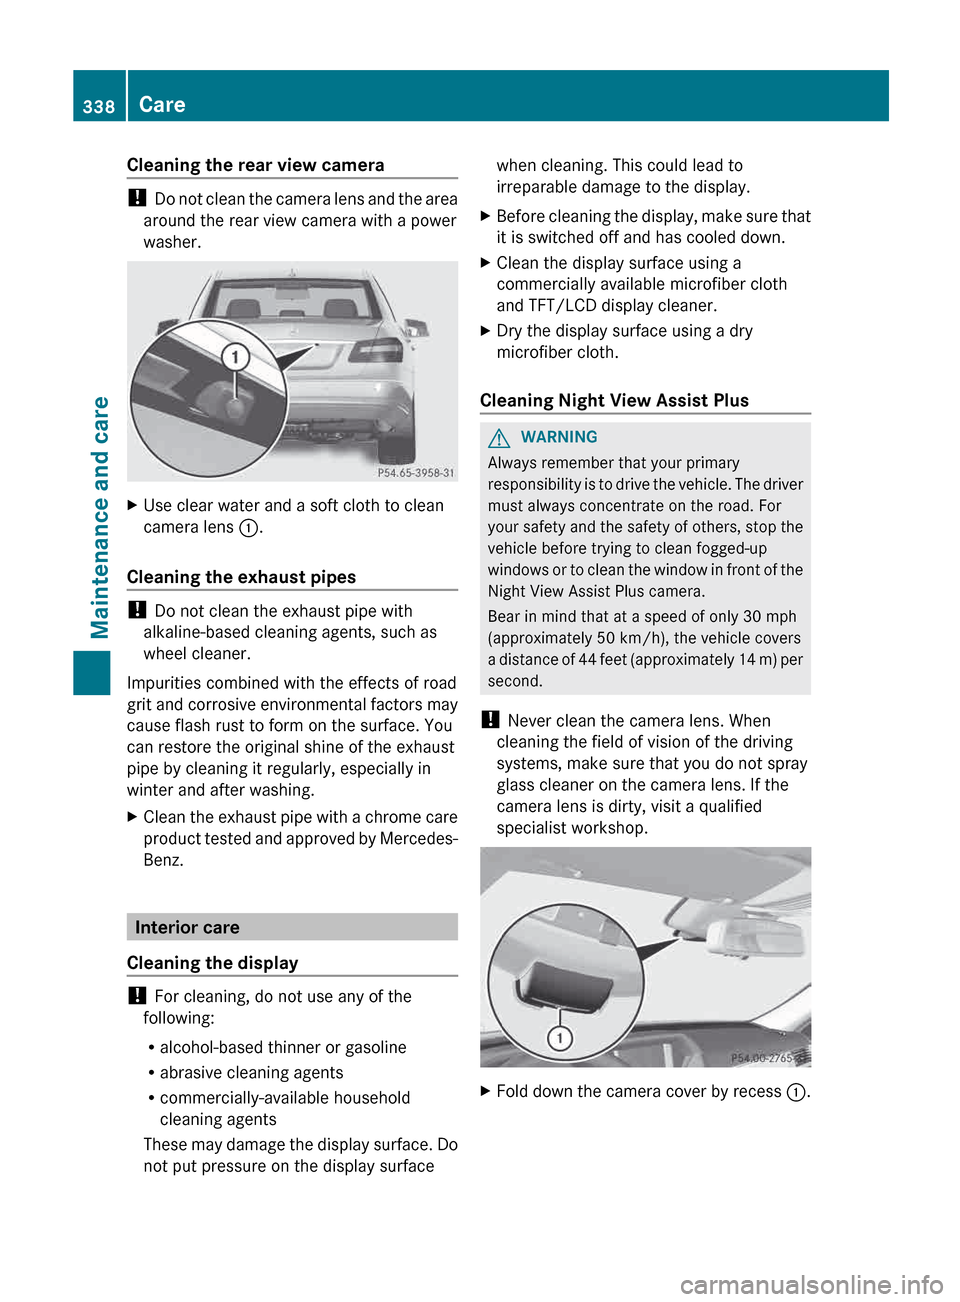
Cleaning the rear view camera
!
Do not clean the camera lens and the area
around the rear view camera with a power
washer. X
Use clear water and a soft cloth to clean
camera lens :.
Cleaning the exhaust pipes !
Do not clean the exhaust pipe with
alkaline-based cleaning agents, such as
wheel cleaner.
Impurities combined with the effects of road
grit
and corrosive environmental factors may
cause flash rust to form on the surface. You
can restore the original shine of the exhaust
pipe by cleaning it regularly, especially in
winter and after washing.
X Clean the exhaust pipe with a chrome care
product
tested and approved by Mercedes-
Benz. Interior care
Cleaning the display !
For cleaning, do not use any of the
following:
R alcohol-based thinner or gasoline
R abrasive cleaning agents
R commercially-available household
cleaning agents
These
may damage the display surface. Do
not put pressure on the display surface when cleaning. This could lead to
irreparable damage to the display.
X Before cleaning the display, make sure that
it is switched off and has cooled down.
X Clean the display surface using a
commercially available microfiber cloth
and TFT/LCD display cleaner.
X Dry the display surface using a dry
microfiber cloth.
Cleaning Night View Assist Plus G
WARNING
Always remember that your primary
responsibility
is to drive the vehicle. The driver
must always concentrate on the road. For
your safety and the safety of others, stop the
vehicle before trying to clean fogged-up
windows or to clean the window in front of the
Night View Assist Plus camera.
Bear in mind that at a speed of only 30 mph
(approximately 50 km/h), the vehicle covers
a distance of 44 feet (approximately 14 m) per
second.
! Never clean the camera lens. When
cleaning the field of vision of the driving
systems, make sure that you do not spray
glass cleaner on the camera lens. If the
camera lens is dirty, visit a qualified
specialist workshop. X
Fold down the camera cover by recess :.338
Care
Maintenance and care
Page 374 of 420
values indicated by a pressure gauge are
higher than those shown by the on-board
computer.
In this case, do not reduce the tire
pressures.
The operation of the tire pressure monitor can
be affected by interference from radio
transmitting equipment (e.g. radio
headphones, two-way radios) that may be
being operated in or near the vehicle.
i USA only:
This device complies with part 15 of the
FCC Rules. Operation is subject to the
following two conditions:
1. This device may not cause interference,
and
2. this device must accept any interference
received, including interference that may
cause undesired operation of the device.
Any unauthorized modification to this
device could void the user's authority to
operate the equipment.
i Canada only:
This device complies with RSS-210 of
Industry Canada. Operation is subject to
the following two conditions:
1. This device may not cause interference,
and
2. this device must accept any interference
received, including interference that may
cause undesired operation.
Any unauthorized modification to this
device could void the user's authority to
operate the equipment.
Checking tire pressure electronically X
Make sure that the SmartKey is in
position 2 (Y
page 153) in the ignition lock.
X Press the = or ; button on the
steering wheel to select the Serv. menu. X
Press the 9 or : button to select
Tire Pressure.
X Press button a.
The
current tire pressure for each wheel will
be displayed in the multifunction display.
If the vehicle was parked for longer than
20 minutes the Tire pressures will be
displayed after driving a few
minutes message is shown.
After a teach-in period, the tire pressure
monitor
automatically recognizes new wheels
or new sensors. If a clear allocation of the tire
pressure values to the individual wheels is not
possible, the message is shown instead of the
tire pressure display. The tire pressures are
already being monitored.
i If an emergency spare wheel is mounted,
the system may continue to show the tire
pressure of the wheel that has been
removed for a few minutes. If this occurs,
note that the value displayed for the
position where the spare wheel is mounted
is not the same as the current tire pressure
of the emergency spare wheel.
Tire pressure monitor warning
messages If the tire pressure monitor detects a
significant
pressure loss on one or more tires,
a warning message is shown in the
multifunction display. A warning tone also
sounds and the tire pressure warning lamp
lights up in the instrument cluster.
Each tire that is affected by a significant loss
of pressure is highlighted in the pressure
display.
X If the Correct Tire Pressure message
appears
in the multifunction display, check
the tire pressure on all four wheels and
correct it if necessary.
i If the wheel positions on the vehicle are
interchanged, the tire pressures may be
displayed for the wrong positions for a
short time. This is rectified after a few 372
Tire pressure
Wheels and tires
Page 387 of 420
Always observe the instructions and safety
notes in the "Mounting a wheel" section
(Y page 385).
The wear patterns on the front and rear tires
differ,
depending on the operating conditions.
Rotate the wheels before a clear wear pattern
has formed on the tires. Front tires typically
wear more on the shoulders and the rear tires
in the center.
If your vehicle's tire configuration allows, you
can rotate the wheels according to the
intervals in the tire manufacturer's warranty
book in your vehicle documents. If this is not
available, the tires should then be replaced
every 3,000 to 6,000 miles (5,000 to
10,000 km), or earlier if the tire wear requires
this. Do not change the direction of wheel
rotation.
Clean the contact surfaces of the wheel and
the brake disc thoroughly every time a wheel
is interchanged. Check the tire pressure and,
if necessary, restart the tire pressure loss
warning system or the tire pressure monitor. Direction of rotation
Tires with a specified direction of rotation
have
additional benefits, e.g. if there is a risk
of hydroplaning. You will only gain these
benefits if the correct direction of rotation is
maintained.
An arrow on the sidewall of the tire indicates
its correct direction of rotation. Storing wheels
Store
wheels that are not being used in a cool,
dry and preferably dark place. Protect the
tires from oil, grease, gasoline and diesel. Cleaning the wheels
G
WARNING
The water jet from a circular jet nozzle (dirt
blasters)
can cause invisible exterior damage to the tires or chassis components.
Components damaged in this way may fail
unexpectedly. There is a risk of an accident.
Do not use power washers with circular jet
nozzles to clean the vehicle. Have damaged
tires or chassis components replaced
immediately.
Mounting a wheel
Preparing the vehicle X
Park the vehicle on firm, non-slippery and
level ground.
X Apply the parking brake.
X Bring the front wheels into the straight-
ahead position.
X Shift the transmission to position P.
X Vehicles with AIRMATIC: make sure that
"normal" level is selected
(Y page 199).
X Switch off the engine.
X Vehicles without KEYLESS-GO: remove
the SmartKey from the ignition lock.
X Vehicles with KEYLESS-GO: open the
driver's door.
The on-board electronics have status 0,
which is the same as the SmartKey having
been removed.
X Vehicles with KEYLESS-GO: remove the
Start/Stop button from the ignition lock
(Y page 154).
X If included in the vehicle equipment, take
the tire-change tool kit out of the vehicle.
X Secure the vehicle to prevent it from rolling
away. Changing a wheel
385
Wheels and tires Z
Page 389 of 420
R
before raising the vehicle, secure it from
rolling away by applying the parking brake
and inserting wheel chocks. Never
disengage the parking brake while the
vehicle is raised.
R the jack must be placed on a firm, flat and
non-slip surface. On a loose surface, a
large,
load-bearing underlay must be used.
On a slippery surface, a non-slip underlay
must be used, e.g. rubber mats.
R do not use wooden blocks or similar
objects as a jack underlay. Otherwise, the
jack will not be able to achieve its load-
bearing capacity due to the restricted
height.
R the maximum clearance between the
underside of the tire and the ground must
be 1.2 in (3 cm).
R never place your hands and feet under the
raised vehicle.
R never lie under the raised vehicle.
R never start the engine when the vehicle is
raised.
R never open or close a door or the trunk lid/
tailgate when the vehicle is raised.
R make sure that no persons are present in
the vehicle when the vehicle is raised. X
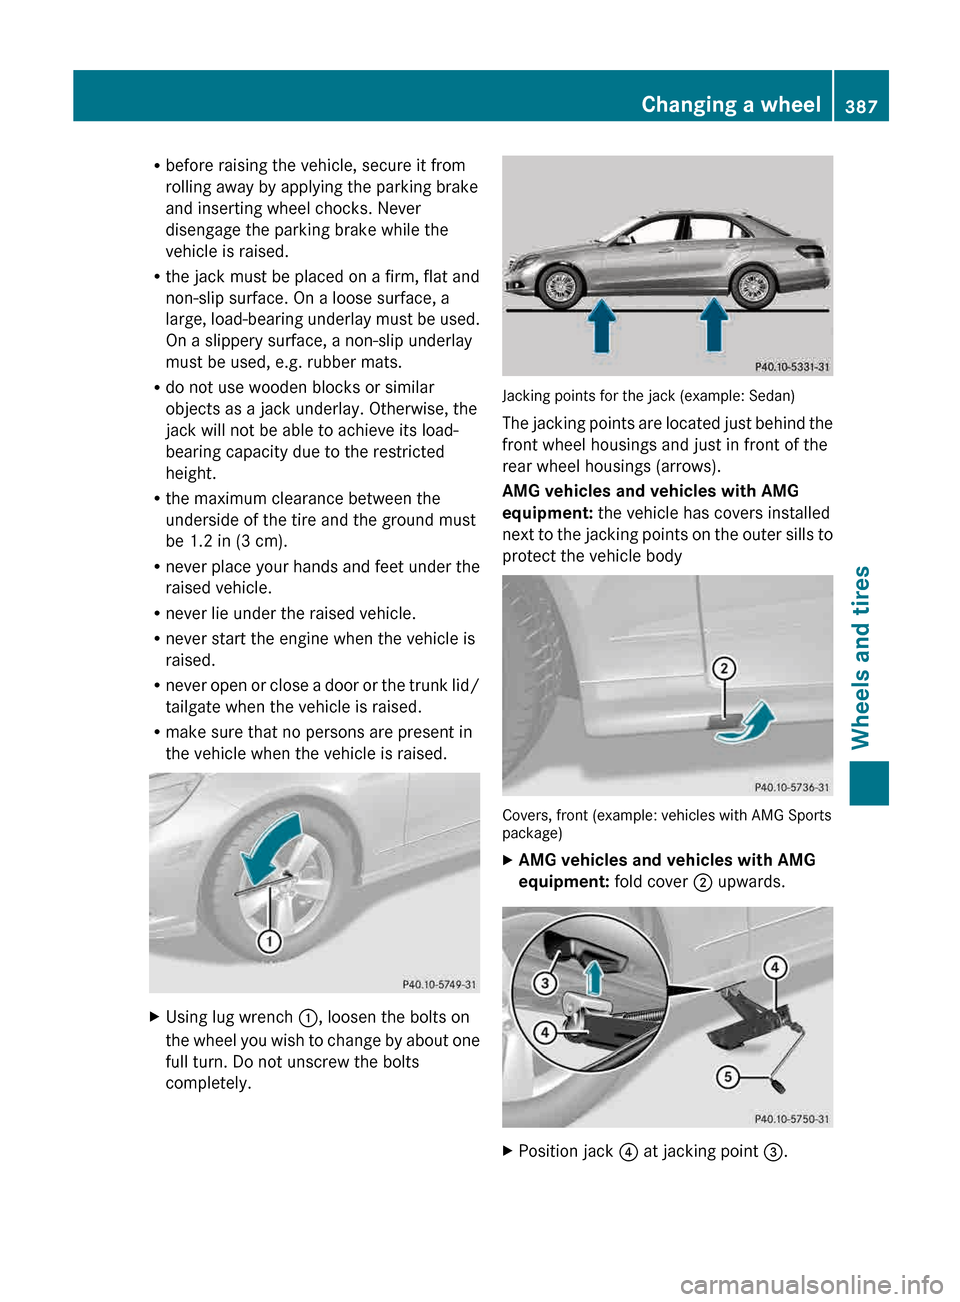
Using lug wrench :, loosen the bolts on
the
wheel you wish to change by about one
full turn. Do not unscrew the bolts
completely. Jacking points for the jack (example: Sedan)
The
jacking points are located just behind the
front wheel housings and just in front of the
rear wheel housings (arrows).
AMG vehicles and vehicles with AMG
equipment: the vehicle has covers installed
next to the jacking points on the outer sills to
protect the vehicle body Covers, front (example: vehicles with AMG Sports
package)
X
AMG vehicles and vehicles with AMG
equipment: fold cover ; upwards. X
Position jack ? at jacking point =. Changing a wheel
387
Wheels and tires Z