Gear MERCEDES-BENZ E-Class SEDAN 2013 W212 Owner's Manual
[x] Cancel search | Manufacturer: MERCEDES-BENZ, Model Year: 2013, Model line: E-Class SEDAN, Model: MERCEDES-BENZ E-Class SEDAN 2013 W212Pages: 420, PDF Size: 14.26 MB
Page 7 of 420
ATTENTION ASSIST
Activating/deactivating .................237
Display message ............................ 261
Function/notes ............................. 210
Audio system
see separate operating instructions
Authorized Centers
see Qualified specialist workshop
Authorized Mercedes-Benz Center
see Qualified specialist workshop
Authorized workshops
see Qualified specialist workshop
AUTO lights
Display message ............................ 257
see Lights
Automatic engine start (ECO start/
stop function) .................................... 159
Automatic engine switch-off (ECO
start/stop function) .......................... 158
Automatic headlamp mode ..............121
Automatic transmission Automatic drive program ............... 166
Changing gear ............................... 164
DIRECT SELECT lever .....................162
Display message ............................ 271
Drive program display ....................162
Driving tips .................................... 164
Emergency running mode ..............169
Engaging drive position .................. 163
Engaging neutral ............................ 163
Engaging park position (AMG
vehicles) ........................................ 163
Engaging reverse gear ................... 163
Engaging the park position ............ 162
Kickdown ....................................... 165
Manual drive program ....................167
Overview ........................................ 161
Problem (malfunction) ...................169
Program selector button ................165
Pulling away ................................... 156
Selector lever ................................ 161
Shift ranges ................................... 166
Starting the engine ........................ 155
Steering wheel paddle shifters ...... 166
Transmission position display ........ 161
Transmission position display
(DIRECT SELECT lever) ................... 162
Transmission positions .................. 164Automatic transmission
emergency mode
...............................
169 B
Bag hook ............................................ 296
BAS (Brake Assist System) ................. 67
BAS PLUS (Brake Assist System
PLUS) .................................................... 68
Battery (SmartKey) Checking ..........................................
81
Important safety notes .................... 81
Replacing ......................................... 81
Battery (vehicle)
Charging ........................................ 350
Display message ............................ 259
Important safety notes .................. 348
Jump starting ................................. 352
Blind Spot Assist
Activating/deactivating ................. 237
Display message ............................ 264
Notes/function .............................. 214
see Active Blind Spot Assist
BlueTEC
Adding DEF .................................... 173
BlueTEC (DEF) .................................... 410
Bottle holder ...................................... 306
Box (trunk) ......................................... 299
Brake Assist see BAS (Brake Assist System)
Brake fluid
Display message ............................ 249
Notes ............................................. 412
Brake lamps
Display message ............................ 255
Brakes
ABS .................................................. 67
BAS .................................................. 67
BAS PLUS ........................................ 68
Brake fluid (notes) .........................412
Display message ............................ 247
Driving tips .................................... 180
High-performance brake system .... 181
Important safety notes .................. 180
Maintenance .................................. 181
Parking brake ................................ 176
Warning lamp ................................. 277 Index
5
Page 8 of 420
Breakdown
see Flat tire
Bulbs
see Changing bulbs C
California Important notice for retail
customers and lessees ....................23
Calling up a malfunction
see Display messages
Car
see Vehicle
Care
Carpets .......................................... 340
Car wash ........................................ 334
Display ........................................... 338
Exterior lights ................................ 337
Gear or selector lever ....................339
Interior ........................................... 338
Matte finish ................................... 336
Night View Assist Plus ...................338
Notes ............................................. 333
Paint .............................................. 335
Plastic trim .................................... 339
Power washer ................................ 335
Rear view camera .......................... 338
Roof lining ...................................... 340
Seat belt ........................................ 340
Seat cover ..................................... 339
Sensors ......................................... 337
Steering wheel ............................... 339
Tail pipes ....................................... 338
Trim pieces .................................... 339
Washing by hand ........................... 335
Wheels ........................................... 336
Windows ........................................ 336
Wiper blades .................................. 337
Wooden trim .................................. 339
Cargo compartment cover ...............296
Cargo compartment enlargement ...294
Cargo compartment floor .................302
Cargo net Attaching ....................................... 298
Important safety information ......... 298
Cargo tie down rings .........................296
Car wash (care) ................................. 334CD player/CD changer (on-board
computer) ..........................................
234
Center console Lower section .................................. 35
Upper section .................................. 34
Central locking
Automatic locking (on-board
computer) ...................................... 240
Locking/unlocking (SmartKey)
........79
Changing bulbs
High-beam headlamps ...................131
Important safety notes .................. 130
Infrared lamp ................................. 132
Low-beam headlamps .................... 131
Overview of bulb types ..................130
Parking lamps ................................ 132
Standing lamps (front) ...................132
Turn signals (front) ......................... 132
Child-proof locks
Important safety notes .................... 65
Rear doors ....................................... 66
Children
In the vehicle ................................... 60
Restraint systems ............................ 60
Special seat belt retractor ............... 63
Child seat
LATCH-type (ISOFIX) child seat
anchors ............................................ 63
Top Tether ....................................... 64
Cigarette lighter ................................ 309
Cleaning Mirror turn signal ........................... 337
Climate control
Automatic climate control (3-
zone) .............................................. 141
Controlling automatically ...............143
Cooling with air dehumidification ..143
Defrosting the windows ................. 146
Defrosting the windshield .............. 145
Dual-zone automatic climate
control ........................................... 139
Important safety notes .................. 138
Indicator lamp ................................ 143
Information on using 3-zone
automatic climate control .............. 142
Maximum cooling .......................... 146
Notes on using automatic climate
control ........................................... 1406
Index
Page 13 of 420
Quality (diesel)
............................... 408
Refueling ........................................ 169
Tank content/reserve fuel .............407
Fuel filler flap
Emergency release ........................ 171
Opening/closing ............................ 170
Fuel filter (display message) ............260
Fuel level Calling up the range (on-board
computer) ...................................... 231
Fuel tank
Capacity ........................................ 407
Problem (malfunction) ...................172
Fuse allocation chart (vehicle tool
kit) ...................................................... 342
Fuses Allocation chart ............................. 357
Before changing ............................. 357
Fuse box in the cargo
compartment ................................. 358
Fuse box in the engine
compartment ................................. 358
Fuse box in the trunk ..................... 358
Important safety notes .................. 357G
Garage door opener Clearing the memory
.....................323
Important safety notes .................. 320
Opening/closing the garage door ..323
Programming (button in the rear-
view mirror) ................................... 321
Gear indicator (on-board
computer) .......................................... 242
Genuine Mercedes-Benz parts ......... 404
Glove box ........................................... 289H
Handbrake see Parking brake
Hazard warning lamps ......................125
Head bags Display message ............................ 251
Headlamps
Adding fluid to cleaning system .....332
Cleaning system (capacity) ............ 413Cleaning system (function) ............
125
Cleaning system (notes) ................413
Fogging up ..................................... 128
see Automatic headlamp mode
Head restraints
Adjusting ....................................... 105
Adjusting (angle) ............................ 105
Adjusting (electrically) ...................105
Adjusting (rear) .............................. 105
Installing/removing (rear) .............. 106
Luxury ............................................ 105
Heating
see Climate control
High-beam headlamps
Changing bulbs .............................. 131
Display message ............................ 255
Switching Adaptive Highbeam
Assist on/off ................................. 127
Switching on/off ........................... 124
Hill start assist .................................. 156
HOLD function Display message ............................ 262
Function/notes ............................. 196
Hood
Closing ........................................... 329
Display message ............................ 272
Opening ......................................... 328
Hydroplaning ..................................... 182 I
Ignition lock see Key positions
Immobilizer .......................................... 74
Indicator lamps see Warning and indicator lamps
Infrared lamps (changing bulbs) ......132
Insect protection on the radiator .... 329
Instrument cluster Overview .................................. 31, 227
Settings ......................................... 238
Warning and indicator
lamps ....................................... 32, 275
Instrument cluster lighting .............. 227
Interior lighting ................................. 128
Automatic control .......................... 129
Delayed switch-off (on-board
computer) ...................................... 240 Index
11
Page 18 of 420
Reverse gear
Engaging (automatic
transmission) ................................. 161
Reversing lamps (display
message) ............................................ 256
Roadside Assistance (breakdown) ....23
Roller sunblind Panorama roof with power tilt/
sliding panel
..................................... 98
Rear side windows ......................... 307
Rear window .................................. 307
Roof carrier ........................................ 303
Roof lining and carpets (cleaning
guidelines) ......................................... 340
Roof load (maximum) ........................414S
Safety Children in the vehicle .....................60
Child restraint systems ....................60
Occupant Classification System
(OCS) ............................................... 48
Safety system
see Driving safety systems
Seat belts
Adjusting the driver's and front-
passenger seat belt .........................58
Adjusting the height ......................... 58
Belt force limiters ............................ 59
center rear-compartment seat ......... 58
Cleaning ......................................... 340
Correct usage .................................. 56
Emergency Tensioning Devices ........ 59
Fastening ......................................... 57
Important safety guidelines .............55
Releasing ......................................... 58
Safety guidelines ............................. 42
Switching belt adjustment on/off
(on-board computer) ...................... 241
Warning lamp ................................. 276
Warning lamp (function) ................... 59
Seats
Adjusting (electrically) ...................104
Adjusting the 4-way lumbar
support .......................................... 108
Adjusting the head restraint .......... 105
Cleaning the cover ......................... 339Correct driver's seat position ........
102
Folding the backrest (rear
compartment) forwards/back .......294
Important safety notes
..................103
Overview ........................................ 103
Seat heating problem .................... 111
Seat ventilation problem ................ 111
Storing settings (memory
function) ........................................ 116
Switching seat heating on/off ....... 110
Switching seat ventilation on/off ..111
Selector lever
Cleaning ......................................... 339
Sensors (cleaning instructions) .......337
Service see ASSYST PLUS
Service menu (on-board computer) . 238
Service products Brake fluid ..................................... 412
Coolant (engine) ............................ 412
DEF special additives .....................410
Engine oil ....................................... 410
Fuel ................................................ 407
Important safety notes .................. 406
Washer fluid ................................... 413
Service work
see ASSYST PLUS
Settings
Factory (on-board computer) ......... 242
On-board computer ....................... 238
Setting the air distribution ...............145
Setting the airflow ............................ 145
SETUP (on-board computer) ............. 243
Short journeys (diesel particle
filter) ................................................... 180
Side impact air bag ............................. 45
Side marker lamp (display
message) ............................................ 256
Side windows Cleaning ......................................... 336
Convenience closing feature ............ 94
Convenience opening feature .......... 94
Important safety information ........... 93
Opening/closing .............................. 93
Problem (malfunction) .....................96
Resetting ......................................... 95
Skibag ................................................ 29116
Index
Page 117 of 420
If the "Fold in mirrors when locking" function
is activated in the on-board computer
(Y page 241):
R
the
exterior mirrors fold in automatically as
soon as you lock the vehicle from the
outside.
R the exterior mirrors fold out again
automatically as soon as you unlock the
vehicle and then open the driver's or front-
passenger door.
i If the exterior mirrors have been folded in
manually, they do not fold out.
Exterior mirror out of position If an exterior mirror has been pushed out of
position, proceed as follows:
X
Vehicles without electrically folding
exterior
mirrors: move the exterior mirror
into the correct position manually.
X Vehicles with electrically folding
exterior
mirrors (only for Canada): press
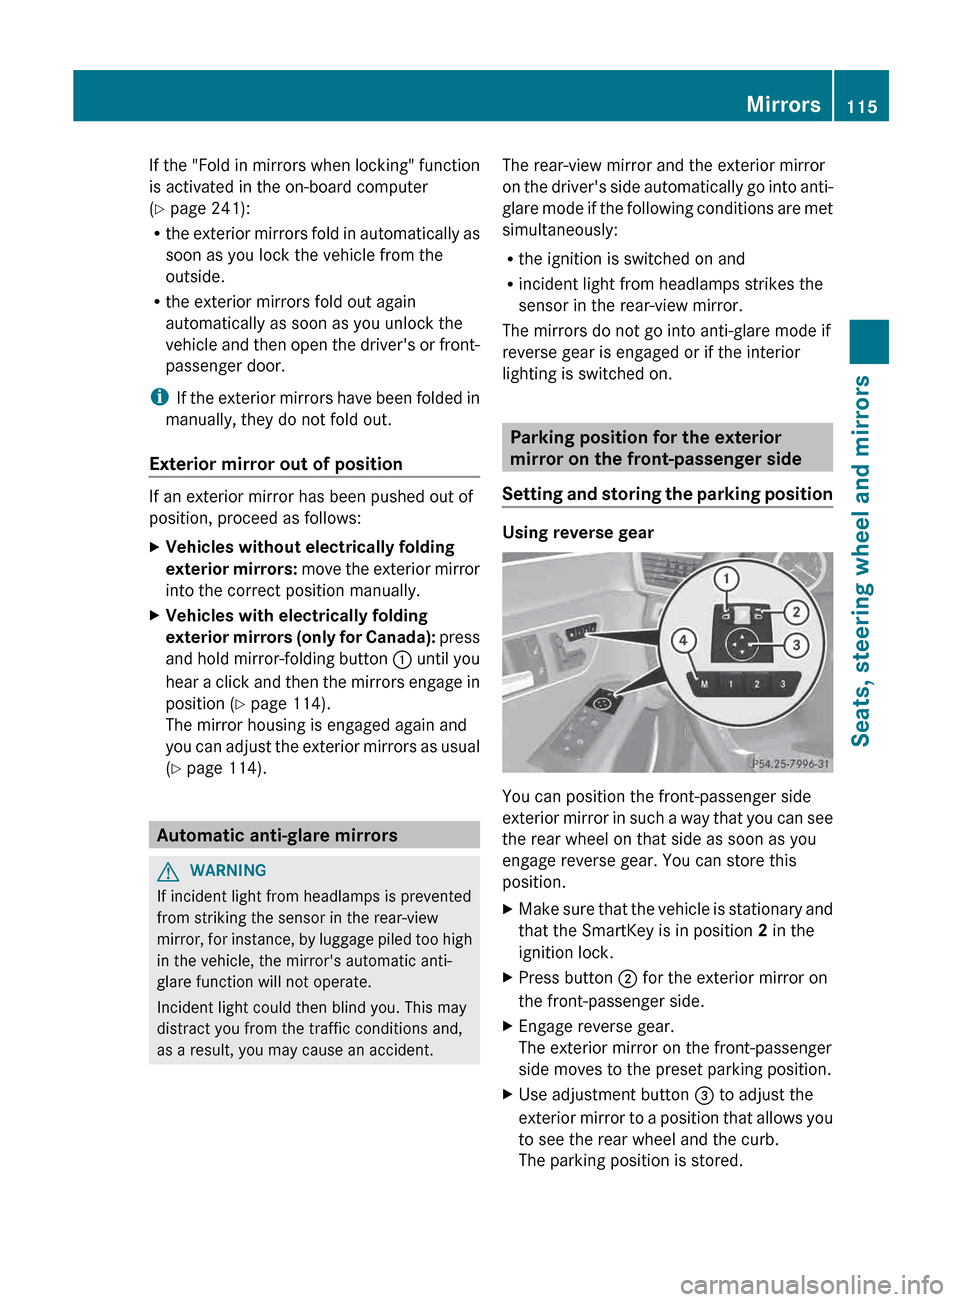
and hold mirror-folding button : until you
hear a click and then the mirrors engage in
position (Y page 114).
The mirror housing is engaged again and
you can adjust the exterior mirrors as usual
(Y page 114). Automatic anti-glare mirrors
G
WARNING
If incident light from headlamps is prevented
from striking the sensor in the rear-view
mirror,
for instance, by luggage piled too high
in the vehicle, the mirror's automatic anti-
glare function will not operate.
Incident light could then blind you. This may
distract you from the traffic conditions and,
as a result, you may cause an accident. The rear-view mirror and the exterior mirror
on
the driver's side automatically go into anti-
glare mode if the following conditions are met
simultaneously:
R the ignition is switched on and
R incident light from headlamps strikes the
sensor in the rear-view mirror.
The mirrors do not go into anti-glare mode if
reverse gear is engaged or if the interior
lighting is switched on. Parking position for the exterior
mirror on the front-passenger side
Setting
and storing the parking position Using reverse gear
You can position the front-passenger side
exterior
mirror in such a way that you can see
the rear wheel on that side as soon as you
engage reverse gear. You can store this
position.
X Make sure that the vehicle is stationary and
that the SmartKey is in position 2 in the
ignition lock.
X Press button ; for the exterior mirror on
the front-passenger side.
X Engage reverse gear.
The exterior mirror on the front-passenger
side moves to the preset parking position.
X Use adjustment button = to adjust the
exterior
mirror to a position that allows you
to see the rear wheel and the curb.
The parking position is stored. Mirrors
115
Seats, steering wheel and mirrors Z
Page 118 of 420
i
If you shift the transmission to another
position, the exterior mirror on the front-
passenger side returns to the driving
position.
Using the memory button
You can position the front-passenger side
exterior
mirror in such a way that you can see
the rear wheel on that side as soon as you
engage reverse gear. This setting can be
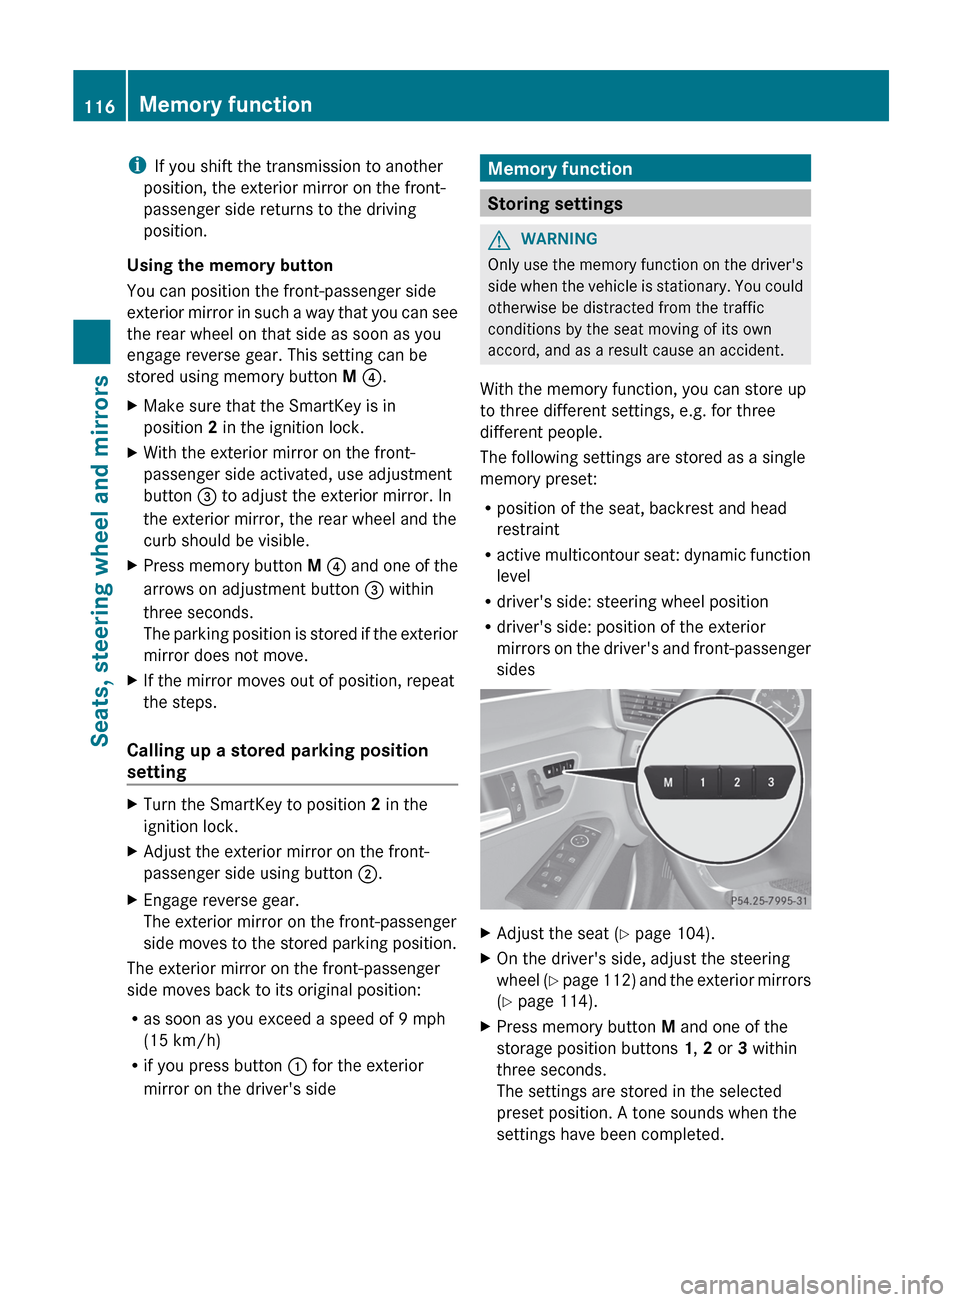
stored using memory button M ?.
X Make sure that the SmartKey is in
position 2 in the ignition lock.
X With the exterior mirror on the front-
passenger side activated, use adjustment
button = to adjust the exterior mirror. In
the exterior mirror, the rear wheel and the
curb should be visible.
X Press memory button M ?
and one of the
arrows on adjustment button = within
three seconds.
The parking position is stored if the exterior
mirror does not move.
X If the mirror moves out of position, repeat
the steps.
Calling up a stored parking position
setting X
Turn the SmartKey to position 2 in the
ignition lock.
X Adjust the exterior mirror on the front-
passenger side using button ;.
X Engage reverse gear.
The exterior mirror on the front-passenger
side moves to the stored parking position.
The exterior mirror on the front-passenger
side moves back to its original position:
R as soon as you exceed a speed of
9 mph
(15 km/h)
R if you press button : for the exterior
mirror on the driver's side Memory function
Storing settings
G
WARNING
Only use the memory function on the driver's
side
when the vehicle is stationary. You could
otherwise be distracted from the traffic
conditions by the seat moving of its own
accord, and as a result cause an accident.
With the memory function, you can store up
to three different settings, e.g. for three
different people.
The following settings are stored as a single
memory preset:
R position of the seat, backrest and head
restraint
R active multicontour seat: dynamic function
level
R driver's side: steering wheel position
R driver's side: position of the exterior
mirrors on the driver's and front-passenger
sides X
Adjust the seat ( Y page 104).
X On the driver's side, adjust the steering
wheel (Y
page 112) and the exterior mirrors
(Y page 114).
X Press memory button M and one of the
storage position buttons 1, 2 or 3 within
three seconds.
The settings are stored in the selected
preset position. A tone sounds when the
settings have been completed.116
Memory function
Seats, steering wheel and mirrors
Page 154 of 420
Useful information
i This Operator's Manual describes all
models and all standard and optional
equipment of your vehicle available at the
time of publication of the Operator's
Manual. Country-specific differences are
possible.
Please note that your vehicle may
not be equipped with all features
described. This also applies to safety-
related systems and functions.
i Read the information on qualified
specialist workshops: ( Y page 25).Breaking-in notes
Important safety notes
New and replaced brake pads and discs only
reach their optimum braking effect after
several hundred kilometers of driving.
Compensate
for this by applying greater force
to the brake pedal. The first 1,000 miles (1,500 km)
The
more you look after the engine when it is
new, the more satisfied you will be with its
performance in the future.
R You should therefore drive at varying
vehicle and engine speeds for the first
1,000 miles (1,500 km).
R Avoid heavy loads, e.g. driving at full
throttle, during this period.
R Change gear in good time, before the
tachometer needle is Ô of the way to the
red area of the tachometer.
R If possible, do not depress the accelerator
pedal past the point of resistance
(kickdown).
R Only select shift ranges 3, 2 or 1 when
driving slowly, e.g. in mountainous terrain.
After 1,000 miles (1,500 km), you can
increase the engine speed gradually and
accelerate the vehicle to full speed. Additional breaking-in notes for AMG
vehicles:
R
Do not drive faster than
85 mph
(140 km/h) for the first 1000 miles
(1500 km).
R Only allow the engine to reach a maximum
engine speed of 4500 rpm briefly.
R Change gear in good time.
i You should also observe these notes on
running in if the engine or parts of the drive
train on your vehicle have been replaced.
i Always observe the respective speed
limits. AMG vehicles with rear axle locking
differential
Your vehicle is equipped with a self-locking
differential on the rear axle. To improve the
protection
of the differential on the rear axle,
change the oil after a break-in distance of
2,000 miles (3,000 km). This oil change
extends the service life of the differential.
Have the oil change carried out at a qualified
specialist workshop. Driving
Important safety notes
G
WARNING
Objects in the driver's footwell can restrict the
pedal travel or obstruct a depressed pedal.
The operating and road safety of the vehicle
is jeopardized. There is a risk of an accident.
Make sure that all objects in the vehicle are
stowed correctly, and that they cannot enter
the driver's footwell. Install the floormats
securely and as specified in order to ensure
sufficient
clearance for the pedals. Do not use
loose floormats. 152
Driving
Driving and parking
Page 161 of 420
Automatic engine start
Method of operation
The engine starts automatically if:
R
you have switched off the ECO start/stop
function by pressing the ECO button.
R you release the brakes when in
transmission
position D or N and when the
HOLD function is not active.
R you depress the accelerator pedal.
R you remove your foot from the brake pedal.
R you engage reverse gear R.
R you move the transmission out of position
P.
R you switch to drive program S, S+ or M.
R you unfasten your seat belt or open the
driver's door.
R the vehicle starts to roll.
R the brake system requires this.
R the temperature in the vehicle interior
deviates from the set range.
R the system detects moisture on the
windshield when the air-conditioning
system is switched on.
R the charge level of the battery is too low. Driving
159
Driving and parking Z
Page 163 of 420
Automatic transmission
Important safety notes
G
WARNING
If the engine speed is above the idling speed
and you engage transmission position D or
R,
the vehicle could pull away suddenly. There
is a risk of an accident.
When engaging transmission position D or R,
always firmly depress the brake pedal and do
not simultaneously accelerate. G
WARNING
The automatic transmission switches to
neutral position N when you switch off the
engine. The vehicle may roll away. There is a
risk of an accident.
After switching off the engine, always switch
to parking position P. Prevent the parked
vehicle from rolling away by applying the
parking brake. G
WARNING
HYBRID vehicles: It is imperative that you read
the HYBRID Supplemental Operating
Instructions
included in your vehicle literature
portfolio. You may otherwise not receive all
necessary safety information and warning for
the operation of your vehicle. Selector lever
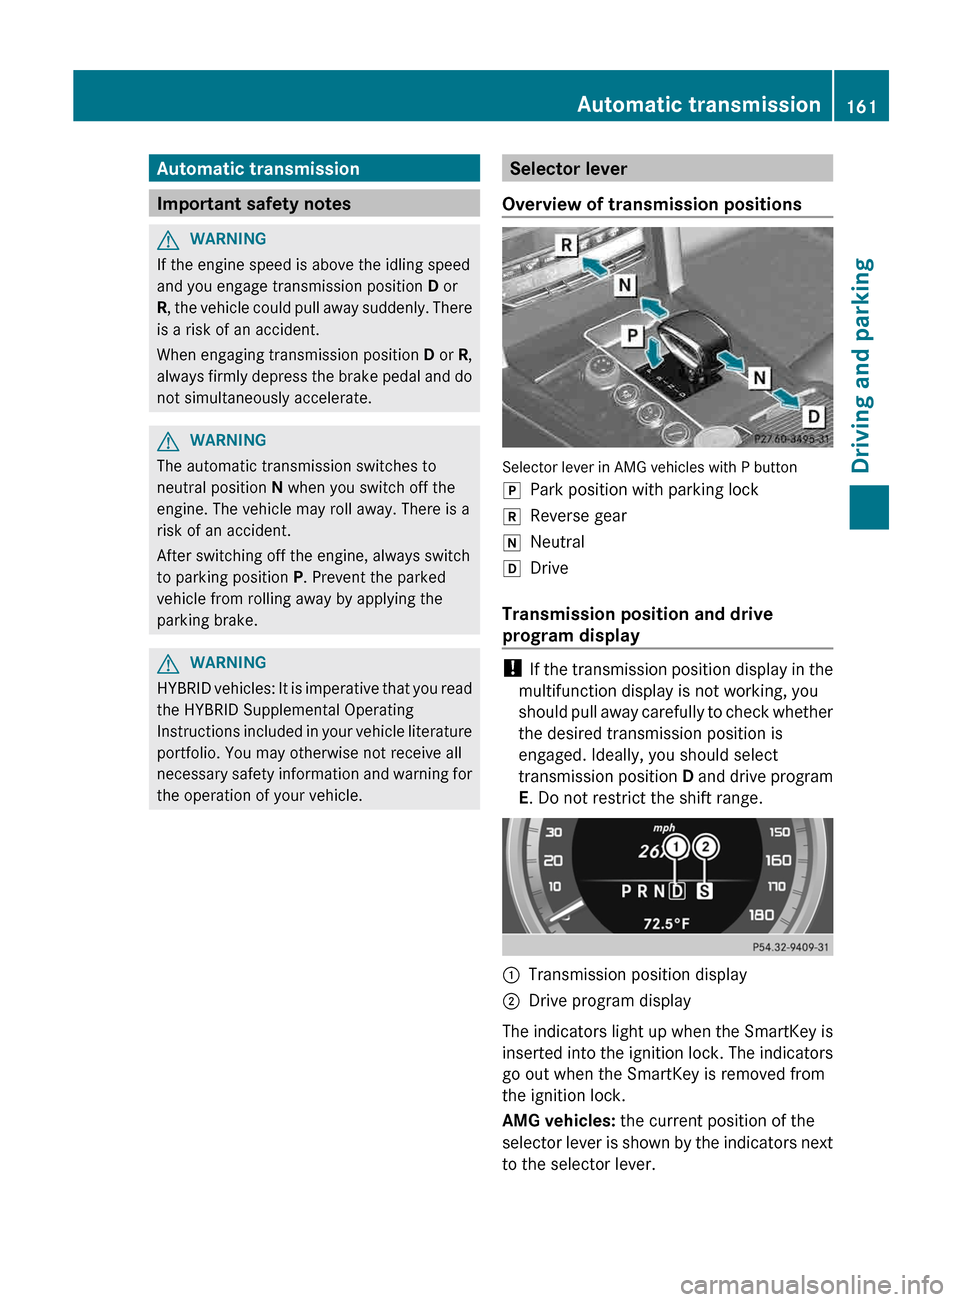
Overview of transmission positions Selector lever in AMG vehicles with P button
j
Park position with parking lock
k Reverse gear
i Neutral
h Drive
Transmission position and drive
program display !
If
the transmission position display in the
multifunction display is not working, you
should pull away carefully to check whether
the desired transmission position is
engaged. Ideally, you should select
transmission position D and drive program
E. Do not restrict the shift range. :
Transmission position display
; Drive program display
The indicators light up when the SmartKey is
inserted
into the ignition lock. The indicators
go out when the SmartKey is removed from
the ignition lock.
AMG vehicles: the current position of the
selector lever is shown by the indicators next
to the selector lever. Automatic transmission
161
Driving and parking Z
Page 164 of 420
DIRECT SELECT lever
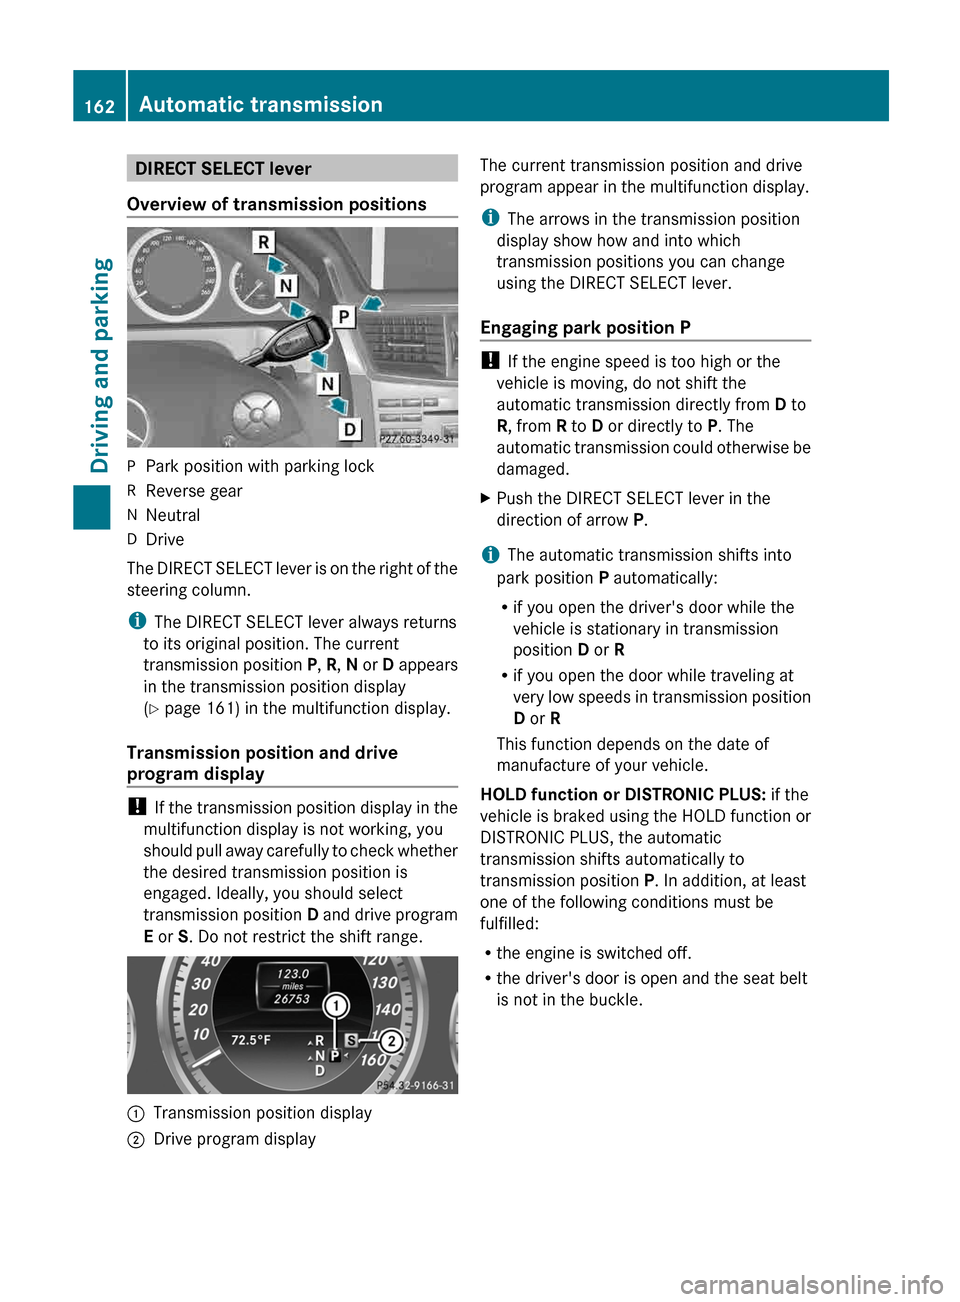
Overview of transmission positions P
Park position with parking lock
R Reverse gear
N Neutral
D Drive
The DIRECT SELECT lever is on the right of the
steering column.
i The DIRECT SELECT lever always returns
to its original position. The current
transmission
position P, R, N or D appears
in the transmission position display
(Y page 161) in the multifunction display.
Transmission position and drive
program display !
If
the transmission position display in the
multifunction display is not working, you
should pull away carefully to check whether
the desired transmission position is
engaged. Ideally, you should select
transmission position D and drive program
E or S. Do not restrict the shift range. :
Transmission position display
; Drive program display The current transmission position and drive
program appear in the multifunction display.
i
The arrows in the transmission position
display show how and into which
transmission positions you can change
using the DIRECT SELECT lever.
Engaging park position P !
If the engine speed is too high or the
vehicle is moving, do not shift the
automatic transmission directly from D to
R, from R to D or directly to P. The
automatic
transmission could otherwise be
damaged.
X Push the DIRECT SELECT lever in the
direction of arrow P.
i The automatic transmission shifts into
park position P automatically:
R if you open the driver's door while the
vehicle is stationary in transmission
position D or R
R if you open the door while traveling at
very
low speeds in transmission position
D or R
This function depends on the date of
manufacture of your vehicle.
HOLD function or DISTRONIC PLUS: if the
vehicle is braked using the HOLD function or
DISTRONIC PLUS, the automatic
transmission shifts automatically to
transmission position P. In addition, at least
one of the following conditions must be
fulfilled:
R the engine is switched off.
R the driver's door is open and the seat belt
is not in the buckle.162
Automatic transmission
Driving and parking