check engine MERCEDES-BENZ E-Class SEDAN 2015 W212 Owner's Guide
[x] Cancel search | Manufacturer: MERCEDES-BENZ, Model Year: 2015, Model line: E-Class SEDAN, Model: MERCEDES-BENZ E-Class SEDAN 2015 W212Pages: 426, PDF Size: 8.27 MB
Page 167 of 426
Automatic transmission
Important safety notes
G
WARNING
If the engine speed is above the idling speed
and you engage transmission position Dor R,
the vehicle could pull away suddenly. There is a risk of an accident.
When engaging transmission position Dor R,
always firmly depress the brake pedal and do not simultaneously accelerate. G
WARNING
The automatic transmission switches to neu-
tral position Nwhen you switch off the engine.
The vehicle may roll away. There is a risk of an
accident.
After switching off the engine, always switch
to parking position P. Prevent the parked vehi-
cle from rolling away by applying the parking
brake.
HYBRID vehicles: ensure that you read the
"HYBRID" supplement included in the vehicle
literature. Otherwise, you may not recognize
dangers. Selector lever (AMG vehicles)
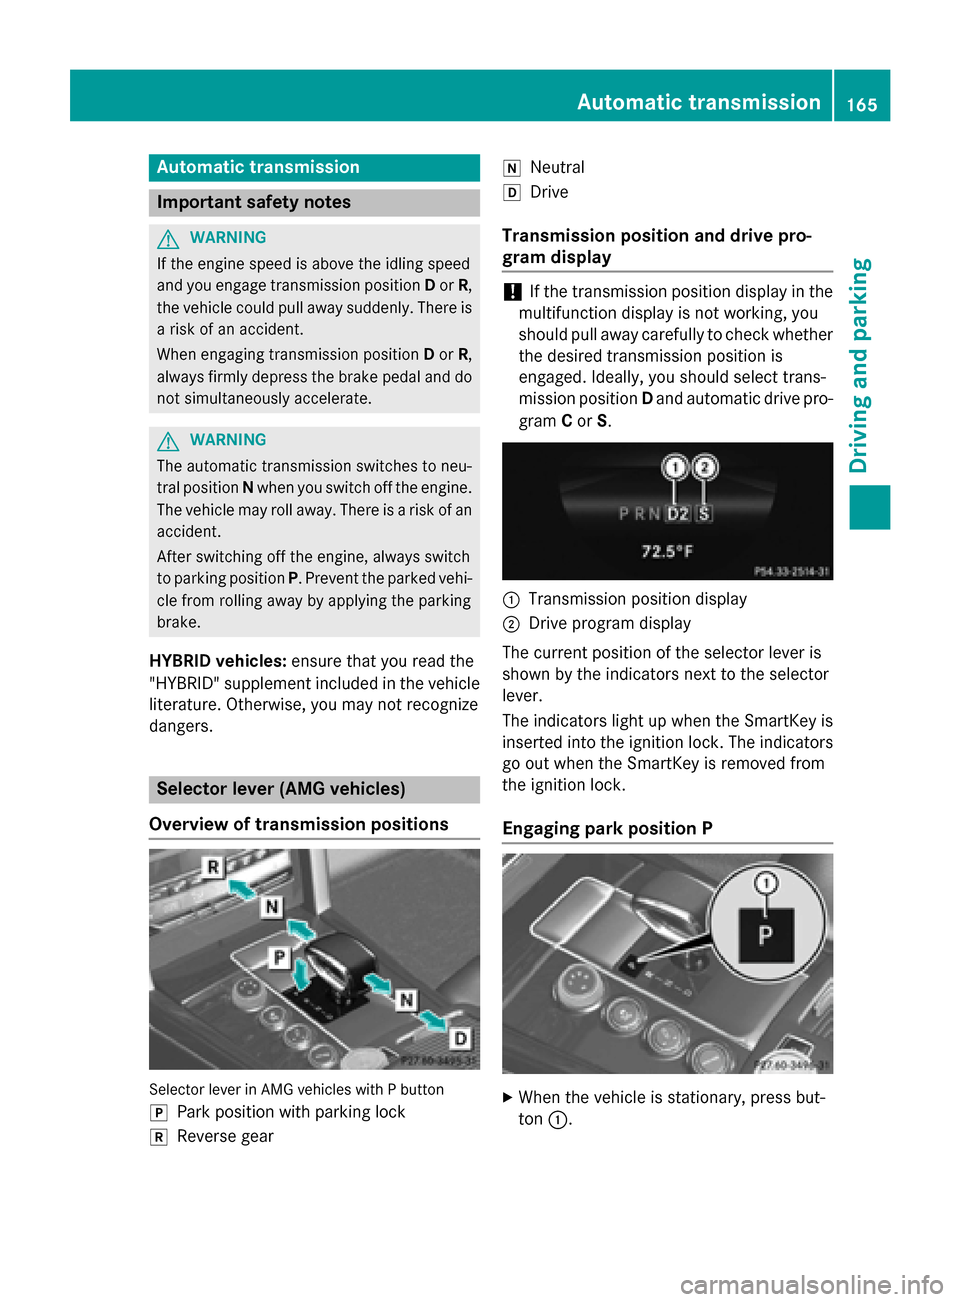
Overview of transmission positions Selector lever in AMG vehicles with P button
005D Park position with parking lock
005E Reverse gear 005C
Neutral
005B Drive
Transmission position and drive pro-
gram display !
If the transmission position display in the
multifunction display is not working, you
should pull away carefully to check whether the desired transmission position is
engaged. Ideally, you should select trans-
mission position Dand automatic drive pro-
gram Cor S. 0043
Transmission position display
0044 Drive program display
The current position of the selector lever is
shown by the indicators next to the selector
lever.
The indicators light up when the SmartKey is inserted into the ignition lock. The indicators go out when the SmartKey is removed from
the ignition lock.
Engaging park position P X
When the vehicle is stationary, press but-
ton 0043. Automatic trans
mission
165Driving an d parking Z
Page 168 of 426

DIRECT SELECT lever
Overview of transmission positions 005D
Park position with parking lock
005E Reverse gear
005C Neutral
005B Drive
The DIRECT SELECT lever is on the right of the
steering column.
i The DIRECT SELECT lever always returns
to its original position. The current trans-
mission position P,R, Nor Dappears in the
transmission position display in the multi-
function display (Y page 166).
Transmission position and drive pro-
gram display !
If the transmission position display in the
multifunction display is not working, you
should pull away carefully to check whether
the desired transmission position is
engaged. Ideally, you should select trans-
mission position Dand drive program Eor
S.
The current transmission position and drive
program appear in the multifunction display.
i The arrows in the transmission position
display show how and into which transmis-
sion positions you can change using the
DIRECT SELECT lever. 0043
Transmission position display
0044 Drive program display
Engaging park position P !
If the engine speed is too high or the vehi-
cle is moving, do not shift the automatic
transmission directly from Dto R, from Rto
D or directly to P. The automatic transmis-
sion could otherwise be damaged. 005D
Park position with parking lock
005E Reverse gear
005C Neutral
005B Drive
X Push the DIRECT SELECT lever in the direc-
tion of arrow P.
i The automatic transmission shifts into
park position Pautomatically:
R if you open the driver's door while the
vehicle is stationary in transmission posi-
tion Dor R
R if you open the door while traveling at
very low speeds in transmission position
D or R 166
Automatic transmissionDriving and pa
rking
Page 170 of 426

Engaging drive position D
X
If the transmission is in position Ror N:
push the DIRECT SELECT lever down past
the first point of resistance.
X If the transmission is in position P: depress
the brake pedal and push the DIRECT
SELECT lever down past the first point of
resistance. Transmission positions
0045 Park position
Do not shift the transmission into
position P(Y page 179) unless the
vehicle is stationary. The parking
lock should not be used as a brake when parking. Always apply the
parking brake in addition to the
parking lock in order to secure the
vehicle.
If the vehicle electronics are mal-
functioning, the transmission may
be locked in position P. Have the
vehicle electronics checked imme-
diately at a qualified specialist
workshop. 0046 Reverse gear
Only shift the transmission to R
when the vehicle is stationary. 0044 Neutral
Do not shift the transmission to
N
while driving. Otherwise, the auto-
matic transmission could be dam-
aged.
No power is transmitted from the
engine to the drive wheels.
Releasing the brakes will allow you
to move the vehicle freely, e.g. to
push it or tow it.
If ESP ®
is deactivated or faulty:
only shift the transmission to posi-
tion Nif the vehicle is in danger of
skidding, e.g. on icy roads.
! Rolling in neutral
Ncan damage
the drive train. 003A Drive
The automatic transmission
changes gear automatically. All
forward gears are available.
Driving tips
Changing gear The automatic transmission shifts to the indi-
vidual gears automatically when it is in trans-
mission position D. This automatic gear shift-
ing behavior is determined by:
R the selected drive program (Y page 169)
R the position of the accelerator pedal
(Y page 168)
R the road speed
Accelerator pedal position Your style of driving influences how the auto-
matic transmission shifts gear:
R little throttle: early upshifts
R more throttle: late upshifts 168
Automatic transmissionDriving and parking
Page 175 of 426
Problems with the transmission
Problem
Possible causes/consequences and
0050
0050Solutions The transmission has
problems shifting gear. The transmission is losing oil.
X Have the transmission checked at a qualified specialist work-
shop immediately. The acceleration ability
is deteriorating.
The transmission no
longer changes gear. The transmission is in emergency mode.
It is only possible to shift into
secondgear and reverse gear.
X Stop the vehicle.
X Shift the transmission to position P.
X Switch off the engine.
X Wait at least ten seconds before restarting the engine.
X Shift the transmission to position Dor R.
If D is selected, the transmission shifts into secondgear; ifRis
selected, the transmission shifts into reverse gear.
X Have the transmission checked at a qualified specialist work-
shop immediately. Transfer case
! Performance tests may only be carried
out on a 2-axle dynamometer. The brake
system or transfer case could otherwise be
damaged. Contact a qualified specialist
workshop for a performance test.
! To prevent ESP ®
from intervening, the
ignition must be switched off (SmartKey or
the Start/Stop button in position 0or 1) if:
R the parking brake is being tested on a
brake dynamometer.
R the vehicle is being towed with only one
axle raised (not permitted for vehicles
with 4MATIC).
The brake system could otherwise be dam-
aged.
! Vehicles with 4MATIC must not be towed
with either the front or the rear axle raised,
as doing so will damage the transmission.
This section is only valid for vehicles with 4-
wheel drive (4MATIC). Power is always trans- mitted to both axles. Refueling
Important safety notes
G
WARNING
Fuel is highly flammable. If you handle fuel
incorrectly, there is a risk of fire and explo-
sion.
You must avoid fire, open flames, creating
sparks and smoking. Switch off the engine
and, if applicable, the auxiliary heating before refueling. G
WARNING
Fuel is poisonous and hazardous to health.
There is a risk of injury.
You must make sure that fuel does not come into contact with your skin, eyes or clothing
and that it is not swallowed. Do not inhale fuel
vapors. Keep fuel away from children. Refueling
173Driving and parking
Z
Page 177 of 426
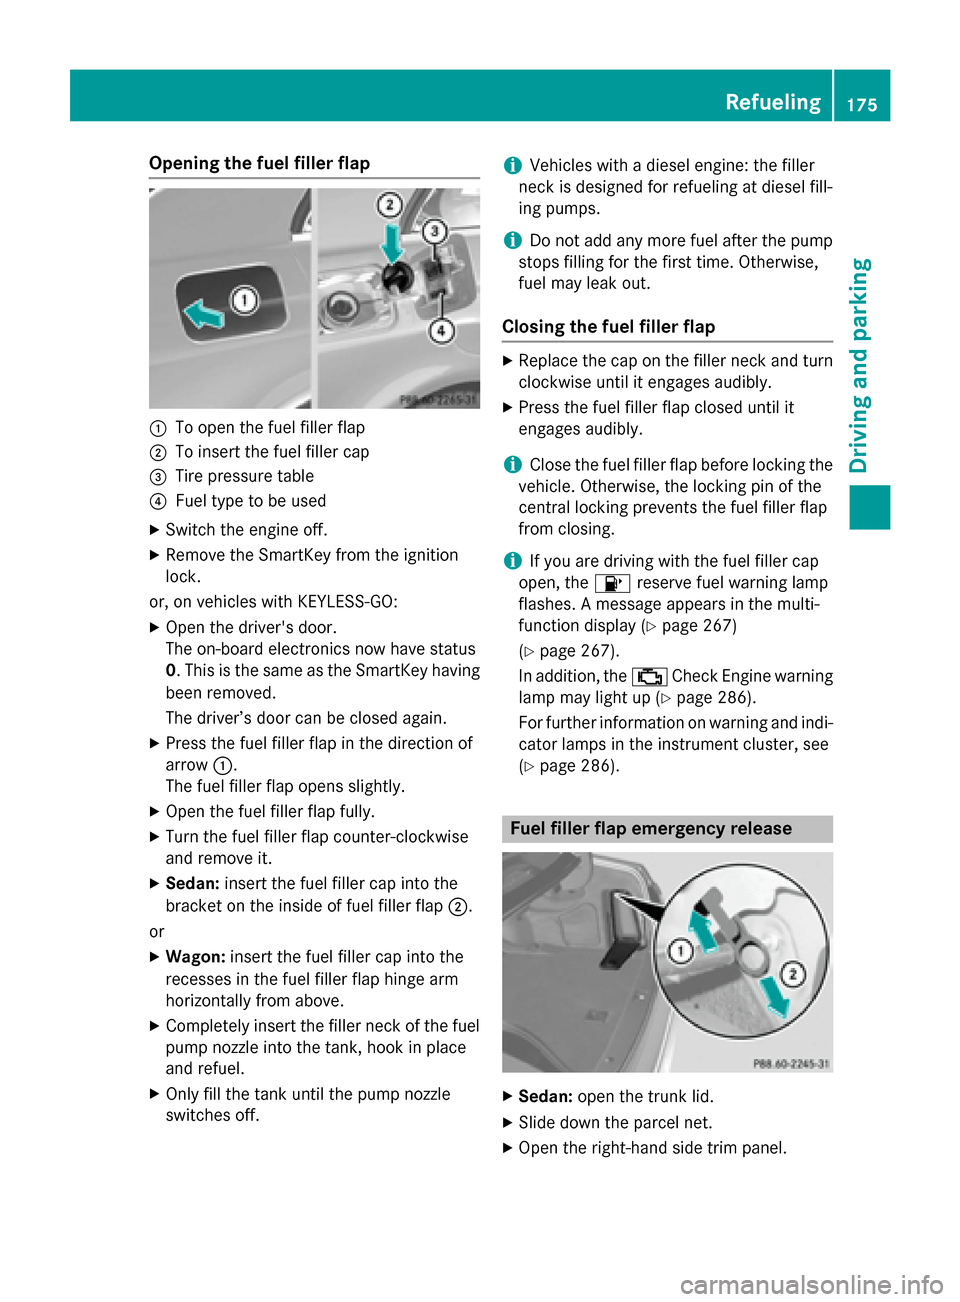
Opening the fuel filler flap
0043
To open the fuel filler flap
0044 To insert the fuel filler cap
0087 Tire pressure table
0085 Fuel type to be used
X Switch the engine off.
X Remove the SmartKey from the ignition
lock.
or, on vehicles with KEYLESS‑GO: X Open the driver's door.
The on-board electronics now have status
0. This is the same as the SmartKey having
been removed.
The driver’s door can be closed again.
X Press the fuel filler flap in the direction of
arrow 0043.
The fuel filler flap opens slightly.
X Open the fuel filler flap fully.
X Turn the fuel filler flap counter-clockwise
and remove it.
X Sedan: insert the fuel filler cap into the
bracket on the inside of fuel filler flap 0044.
or X Wagon: insert the fuel filler cap into the
recesses in the fuel filler flap hinge arm
horizontally from above.
X Completely insert the filler neck of the fuel
pump nozzle into the tank, hook in place
and refuel.
X Only fill the tank until the pump nozzle
switches off. i
Vehicles with a diesel engine: the filler
neck is designed for refueling at diesel fill-
ing pumps.
i Do not add any more fuel after the pump
stops filling for the first time. Otherwise,
fuel may leak out.
Closing the fuel filler flap X
Replace the cap on the filler neck and turn
clockwise until it engages audibly.
X Press the fuel filler flap closed until it
engages audibly.
i Close the fuel filler flap before locking the
vehicle. Otherwise, the locking pin of the
central locking prevents the fuel filler flap
from closing.
i If you are driving with the fuel filler cap
open, the 00B6reserve fuel warning lamp
flashes. A message appears in the multi-
function display (Y page 267)
(Y page 267).
In addition, the 00B9Check Engine warning
lamp may light up (Y page 286).
For further information on warning and indi- cator lamps in the instrument cluster, see
(Y page 286). Fuel filler flap emergency release
X
Sedan: open the trunk lid.
X Slide down the parcel net.
X Open the right-hand side trim panel. Refueling
175Driving and parking Z
Page 179 of 426
Problems with fuel and the fuel tank
This section provides descriptions of and solutions to safety-relevant problems. Descriptions
of and solutions to further problems can be found in the Digital Operator's Manual. Problem
Possible causes/consequences and
0050
0050Solutions Fuel is leaking from the
vehicle. The fuel line or the fuel tank is faulty.
G WARNING
Risk of explosion or fire. X Turn the SmartKey to position 0in the ignition lock and remove
it immediately (Y page 157).
X Do not restart the engine under any circumstances.
X Consult a qualified specialist workshop. DEF (BlueTEC vehicles only)
Important notes on use To function properly, BlueTEC exhaust gas
aftertreatment must be operated with the
reducing agent DEF. Adding DEF is one of the
tasks performed during maintenance. Under
normal operating conditions, a tank of DEF
lasts until the next service due date.
When the supply of DEF is almost used up, the
Check
Check Additive Additive See
SeeOperator's
Operator's Manual
Manual
message is shown in the multifunction dis-
play.
When the DEF supply drops to a minimum, the
Remaining Starts: 16
Remaining Starts: 16 message is shown
in the multifunction display.
If the Remaining Starts: 16 Remaining Starts: 16 message
appears in the multifunction display, you can start the engine another 16 times. If DEF is
not refilled, you will subsequently be unable
to start the engine.
X Add at least 1 gal (3.8 l)of DEF.
X Switch on the ignition for at least 60 sec-
onds.
X Start the engine.
i Have the DEF tank refilled at a qualified
specialist workshop. Use the special DEF refill bottle when adding
DEF between maintenance intervals. Contact
an authorized Mercedes-Benz Center with
any questions or, if necessary, contact Road-
side Assistance (Y page 25).
If the outside temperature is below 12 ‡
(00F811 †) it may be difficult to top up. If DEF is frozen and there is an active warning indica-
tor, it may not be possible to add DEF. Park
the vehicle in a warmer place, e.g. in a garage,
until DEF has become fluid again. It will then
be possible to add DEF again. Alternatively,
have the DEF tank refilled at a qualified spe-
cialist workshop.
Further information about BlueTEC exhaust
gas aftertreatment and DEF is available at any
authorized Mercedes-Benz Center.
Important safety notes on the refilling
procedure DEF is a water-soluble fluid for the exhaust
gas aftertreatment of diesel engines. It is:
R not poisonous
R colorless and odorless
R not flammable
When you open the DEF container, small
amounts of ammonia vapor may be released.
Ammonia vapors have a pungent odor and are particularly irritating to the skin, to mucous Refueling
177Driving and parking Z
Page 181 of 426
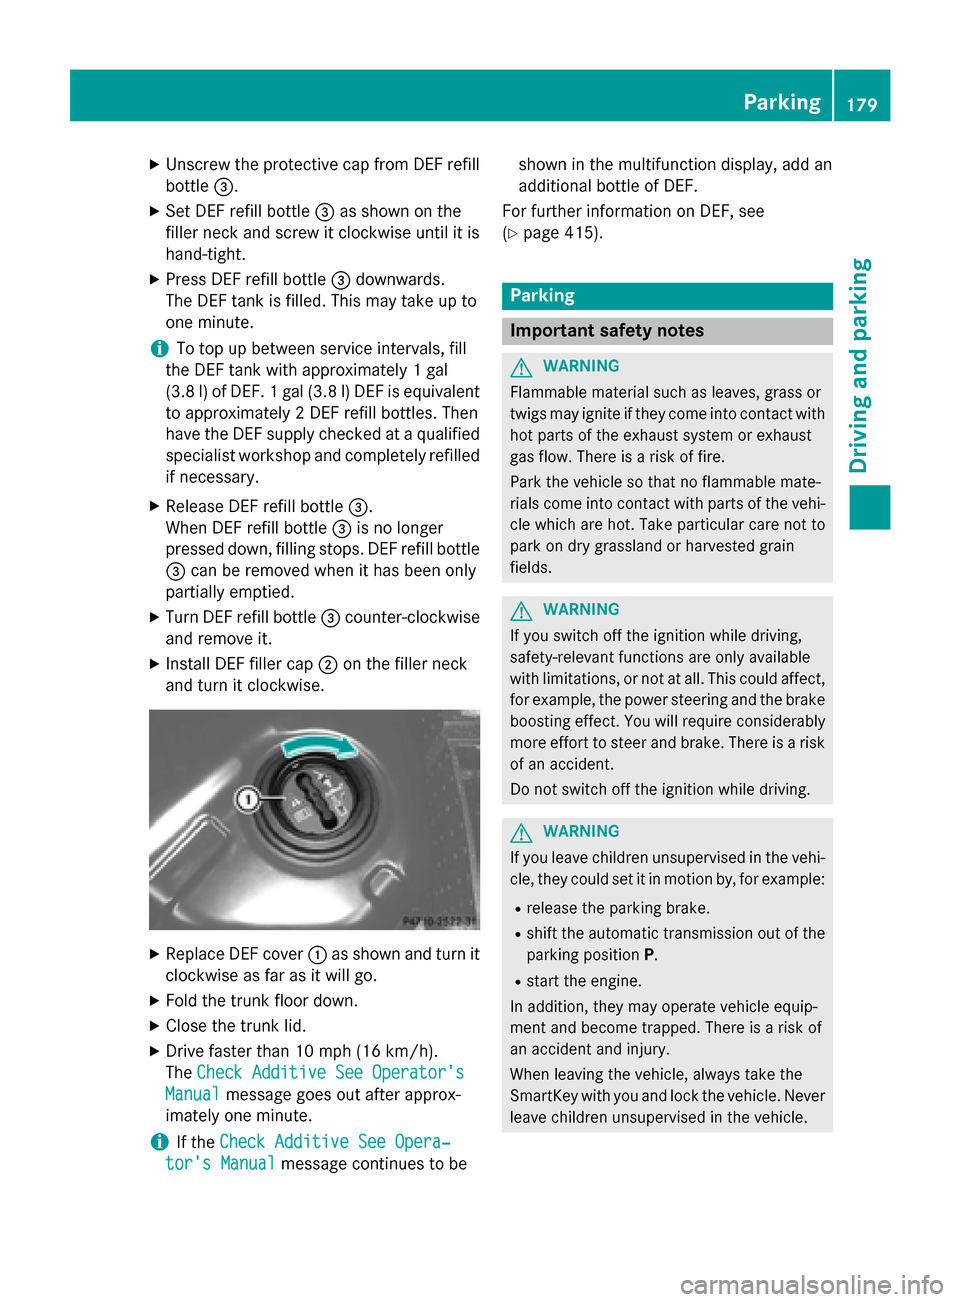
X
Unscrew the protective cap from DEF refill
bottle 0087.
X Set DEF refill bottle 0087as shown on the
filler neck and screw it clockwise until it is
hand-tight.
X Press DEF refill bottle 0087downwards.
The DEF tank is filled. This may take up to
one minute.
i To top up between service intervals, fill
the DEF tank with approximately 1 gal
(3.8 l) of DEF. 1 gal (3.8 l)DEF is equivalent
to approximately 2 DEF refill bottles. Then
have the DEF supply checked at a qualified specialist workshop and completely refilled
if necessary.
X Release DEF refill bottle 0087.
When DEF refill bottle 0087is no longer
pressed down, filling stops. DEF refill bottle 0087 can be removed when it has been only
partially emptied.
X Turn DEF refill bottle 0087counter-clockwise
and remove it.
X Install DEF filler cap 0044on the filler neck
and turn it clockwise. X
Replace DEF cover 0043as shown and turn it
clockwise as far as it will go.
X Fold the trunk floor down.
X Close the trunk lid.
X Drive faster than 10 mph (16 km/h).
The Check Additive See Operator's Check Additive See Operator's
Manual
Manual message goes out after approx-
imately one minute.
i If the
Check Additive See Opera‐
Check Additive See Opera‐
tor's Manual
tor's Manual message continues to be shown in the multifunction display, add an
additional bottle of DEF.
For further information on DEF, see
(Y page 415). Parking
Important safety notes
G
WARNING
Flammable material such as leaves, grass or
twigs may ignite if they come into contact with hot parts of the exhaust system or exhaust
gas flow. There is a risk of fire.
Park the vehicle so that no flammable mate-
rials come into contact with parts of the vehi- cle which are hot. Take particular care not to
park on dry grassland or harvested grain
fields. G
WARNING
If you switch off the ignition while driving,
safety-relevant functions are only available
with limitations, or not at all. This could affect, for example, the power steering and the brake
boosting effect. You will require considerably
more effort to steer and brake. There is a risk of an accident.
Do not switch off the ignition while driving. G
WARNING
If you leave children unsupervised in the vehi- cle, they could set it in motion by, for example:
R release the parking brake.
R shift the automatic transmission out of the
parking position P.
R start the engine.
In addition, they may operate vehicle equip-
ment and become trapped. There is a risk of
an accident and injury.
When leaving the vehicle, always take the
SmartKey with you and lock the vehicle. Never
leave children unsupervised in the vehicle. Parking
179Driving an d parking Z
Page 186 of 426
Heavy and light loads
G
WARNING
If you rest your foot on the brake pedal while
driving, the braking system can overheat. This increases the stopping distance and can even
cause the braking system to fail. There is a
risk of an accident.
Never use the brake pedal as a footrest. Never
depress the brake pedal and the accelerator
pedal at the same time.
! Depressing the brake pedal constantly
results in excessive and premature wear to
the brake pads.
If the brakes have been subjected to a heavy load, do not stop the vehicle immediately, but
drive on for a short while. This allows the air- flow to cool the brakes more quickly.
Wet roads If you have driven for a long time in heavy rain
without braking, there may be a delayed reac- tion from the brakes when braking for the first
time. This may also occur after the vehicle has been washed or driven through deep water.
You have to depress the brake pedal more
firmly. Maintain a greater distance from the
vehicle in front.
After driving on a wet road or having the vehi-
cle washed, brake firmly while paying atten-
tion to the traffic conditions. This will warm up the brake discs, thereby drying them more
quickly and protecting them against corro-
sion.
Limited braking performance on salt-
treated roads If you drive on salted roads, a layer of salt
residue may form on the brake discs and
brake pads. This can result in a significantly
longer braking distance. R
In order to prevent any salt build-up, apply
the brakes occasionally while paying atten-
tion to the traffic conditions.
R Carefully depress the brake pedal and the
beginning and end of a journey.
R Maintain a greater distance to the vehicle
ahead.
Servicing the brakes !
If the red brake warning lamp lights up in
the instrument cluster and you hear a warn-
ing tone while the engine is running, the
brake fluid level may be too low. Observe
additional warning messages in the multi-
function display.
The brake fluid level may be too low due to brake pad wear or leaking brake lines.
Have the brake system checked immedi-
ately. This work should be carried out at a
qualified specialist workshop.
! Vehicles with 4MATIC:
function or per-
formance tests may only be carried out on
a 2-axle dynamometer. If you are planning
to have the vehicle tested on such a dyna-
mometer, contact an authorized Mercedes- Benz Center to obtain further information
first. Otherwise, you could damage the
drive train or the brake system.
! Vehicles with 4MATIC:
as the ESP®
sys-
tem operates automatically, the engine and the ignition must be switched off (Smart-
Key in position 0or 1in the ignition lock or
Start/Stop button in position 0or 1) while
the parking brake is being tested on a brake dynamometer.
Braking maneuvers triggered automatically
by ESP ®
may seriously damage the brake
system. 184
Driving tipsDriving and parking
Page 187 of 426
!
Vehicles with 4MATIC:
as the ESP®
sys-
tem operates automatically, the engine and
the ignition system must be switched off
(SmartKey in position 0or 1in the ignition
lock or Start/Stop button in position 0or 1)
when:
R testing the parking brake on a brake
dynamometer.
R you intend to have the vehicle towed with
one of the axles raised.
Braking maneuvers triggered automatically
by ESP ®
may seriously damage the brake
system.
All checks and maintenance work on the
brake system must be carried out at a quali-
fied specialist workshop. Consult a qualified
specialist workshop to arrange this.
Have brake pads installed and brake fluid
replaced at a qualified specialist workshop.
If the brake system has only been subject to
moderate loads, you should test the function-
ality of your brakes at regular intervals. To do so, press firmly on the brake pedal when driv-
ing at a high speed. This improves the grip of
the brake pads.
You can find a description of Brake Assist
(BAS) at (Y page 70) or of BAS PLUS with
Intersection Assist at (Y page 70).
The braking characteristics of the vehicle can be seriously impaired if:
R brake pads other than those recommended
are installed
R the recommended brake fluid is not used
Safe braking can no longer be guaranteed.
AMG high-performance and ceramic
brakes The high-performance brake system is only
available on AMG vehicles. The AMG brake systems are designed for
heavy loads. This may lead to noise when
braking. This will depend on:
R speed
R braking force
R environmental conditions, such as temper-
ature and humidity
The wear of individual components of the
brake system, such as the brake pads/linings
or brake discs, depends on the individual driv-
ing style and operating conditions.
For this reason, it is impossible to state a
mileage that will be valid under all circum-
stances. An aggressive driving style will lead
to high wear. You can obtain further informa- tion about this from your authorized
Mercedes-Benz Center.
New and replaced brake pads and discs only
reach their optimum braking effect after sev-
eral hundred kilometers of driving. Compen-
sate for this by applying greater force to the
brake pedal. Keep this in mind, and adapt
your driving and braking accordingly during
this break-in period.
Excessive heavy braking results in corre-
spondingly high brake wear. Observe the
brake wear warning lamp in the instrument
cluster and note any brake status messages
in the multifunction display. Especially for
high performance driving, it is important to
maintain and have the brake system checked regularly. Driving on wet roads
Hydroplaning If water has accumulated to a certain depth
on the road surface, there is a danger of
hydroplaning occurring, even if:
R
you drive at low speeds.
R the tires have adequate tread depth. Driving tips
185Driving and parking Z
Page 188 of 426
For this reason, in the event of heavy rain or in
conditions in which hydroplaning may occur,
you must drive in the following manner:
R lower your speed.
R avoid ruts.
R avoid sudden steering movements.
R brake carefully.
Driving on flooded roads !
Do not drive through flooded areas.
Check the depth of any water before driving
through it. Drive slowly through standing
water. Otherwise, water may enter the
vehicle interior or the engine compartment.
This can damage the electronic compo-
nents in the engine or the automatic trans- mission. Water can also be drawn in by the engine's air suction nozzles and this can
cause engine damage. Winter driving
G
WARNING
If you shift down on a slippery road surface in an attempt to increase the engine's braking
effect, the drive wheels could lose their grip.
There is an increased danger of skidding and
accidents.
Do not shift down for additional engine brak-
ing on a slippery road surface. G
DANGER
If the exhaust pipe is blocked or adequate
ventilation is not possible, poisonous gases
such as carbon monoxide (CO) may enter the vehicle. This is the case, e.g. if the vehicle
becomes trapped in snow. There is a risk of
fatal injury.
If you leave the engine or the auxiliary heating
running, make sure the exhaust pipe and area
around the vehicle are clear of snow. To
ensure an adequate supply of fresh air, open a window on the side of the vehicle that is not
facing into the wind. Have your vehicle winter-proofed at a quali-
fied specialist workshop at the onset of win-
ter.
Drive particularly carefully on slippery road
surfaces. Avoid sudden acceleration, steering and braking maneuvers. Do not use the cruise
control or DISTRONIC PLUS.
If the vehicle threatens to skid or cannot be
stopped when moving at low speed:
X Shift the transmission to position N.
i Vehicles with a diesel engine:
do not
cover the radiator, e.g. with a protective
cover. The measuring function of the
onboard diagnosis system may otherwise
provide inaccurate values. Some of these
values are required by law and must there- fore always be accurate.
The outside temperature indicator is not
designed to serve as an ice-warning device
and is therefore unsuitable for that purpose.
Changes in the outside temperature are dis-
played after a short delay.
Indicated temperatures just above the freez-
ing point do not guarantee that the road sur-
face is free of ice. The road may still be icy,
especially in wooded areas or on bridges. The vehicle could skid if you fail to adapt your
driving style. Always adapt your driving style
and drive at a speed to suit the prevailing
weather conditions.
You should pay special attention to road con-
ditions when temperatures are around freez-
ing point.
For more information on driving with snow
chains, see (Y page 365).
For more information on driving with summer
tires, see (Y page 364).
Observe the notes in the "Winter operation"
section (Y page 364). 186
Driving tipsDriving and parking