rear turn MERCEDES-BENZ E-Class SEDAN 2016 W213 Owner's Guide
[x] Cancel search | Manufacturer: MERCEDES-BENZ, Model Year: 2016, Model line: E-Class SEDAN, Model: MERCEDES-BENZ E-Class SEDAN 2016 W213Pages: 350, PDF Size: 6.71 MB
Page 260 of 350
door system with the integrated garage door
opener in the rear-view mirror. To do this you
will need to use the programming button on
the door drive control panel. The program-
ming button may be positioned in different
places depending on the manufacturer. It is
usually located on the door drive unit on the
garage ceiling.
Familiarize yourself with the garage door
drive operating instructions, e.g. under "Pro-
gramming of additional remote controls",
before carrying out the following steps.
Your vehicle must be within reach of the
garage door or gate opener drive. Make sure
that neither your vehicle nor any persons/
objects are present within the sweep of the
door or gate.
XTurn the SmartKey to position2in the igni-
tion lock (
Ypage 137).
XGet out of the vehicle.
XPress the programming button on the door drive unit.
Usually, you now have 30 seconds to ini-
tiate the next step.
XGet into the vehicle.
XPress previously programmed button ;,
= or? on the integrated garage door
opener until the door closes.
The rolling code synchronization is then
complete.
Notes on programming the remote con-
trol
Canadian radio frequency laws require a
"break" (or interruption) of the transmission
signals after broadcasting for a few seconds. Therefore, these signals may not last long
enough for the integrated garage door
opener. The signal is not recognized during
programming. Comparable with Canadian
law, some U.S. garage door openers also fea-
ture a "break". Proceed as follows:
Rif you live in Canada
Rif you have difficulties programming the
garage door opener (regardless of where
you live) when using the programming
steps.
XPress and hold one of buttons
;to? on
the integrated garage door opener.
After a short time, indicator lamp :lights
up yellow.
XRelease the button.
Indicator lamp :flashes yellow.
XPress button Bof garage door remote
control Afor two seconds, then release it
for t
wo seconds.
XPress button Bagain for two seconds.
XRepeat this sequence on button Bof
remote control Auntil indicator lamp :
lights up green.
When indicator lamp :lights up green:
programming is finished.
When indicator lamp :flashes green: pro-
gramming was successful. The next step is
to synchronize the rolling code.
XRelease button Bof remote control Aof
the garage door drive.
If indicator lamp :lights up red: repeat the
programming process for the correspond-
ing button on the rear-view mirror. When
doing so, vary the distance between remote
control Aand the rear-view mirror.
The required distance between remote
control Aand the integrated garage door
opener depends on the garage door drive
system. Several attempts might be neces-
sary. You should test every position for at
least 25 seconds before trying another
position.
258Features
Stowage and features
Page 261 of 350
Problems when programming
If you are experiencing problems programing
the integrated garage door opener on the
rear-view mirror, take note of the following
instructions:
RCheck the transmitter frequency used by
garage door drive remote controlAand
whether it is supported. The transmitter
frequency can usually be found on the back
of the garage door drive remote control.
The integrated garage door opener is com-
patible with devices that have units which
operate in the frequency range of 280 to
433 MHz.
RReplace the batteries in garage door
remote control A. This increases the like-
lihood that garage door remote control A
will transmit a strong and precise signal to
the integrated garage door opener.
RWhen programming, hold remote control
A at varying distances and angles from the
button which you are programming. Try var-
ious angles at a distance between 2and
12 inches (5to 30 cm) or at the same angle
but at varying distances.
RIf another remote control is available for the
same garage door drive, repeat the same
programming steps with this remote con-
trol. Before performing these steps, make
sure that new batteries have been installed
in garage door drive remote control A.
RNote that some remote controls only trans-
mit for a limited amount of time (the indi-
cator lamp on the remote control goes out).
Press buttonBon remote control Aagain
before transmission ends.
RAlign the antenna cable of the garage door
opener unit. This can improve signal recep-
tion/transmission.
Opening/closing the garage door
After it has been programmed, the integrated
garage door opener performs the function of
the garage door system remote control. Please also read the operating instructions
for the garage door system.
XTurn the SmartKey to position
2in the igni-
tion lock (
Ypage 137).
XPress button ;,=or? which you have
programmed to operate the garage door.
Garage door system with a fixed code: indi-
cator lamp :lights up green.
Garage door system with a rolling code:
indicator lamp :flashes green.
The transmitter will transmit a signal as
long as the button is pressed. The trans-
mission is halted after a maximum of ten
seconds and indicator lamp :lights up
yellow.
XPress button ;,=or? again if neces-
sary.
Clearing the memory
Make sure that you clear the memory of the
integrated garage door opener before selling
the vehicle.
XTurn the SmartKey to position 2in the igni-
tion lock (
Ypage 137).
XPress and hold buttons ;and ?.
The indicator lamp initially lights up yellow
and then green.
XRelease buttons ;and ?.
The memory of the integrated garage door
opener in the rear-view mirror is cleared.
Floormats
GWARNING
Objects in the driver's footwell can restrict the pedal travel or obstruct a depressed pedal.
The operating and road safety of the vehicle is
jeopardized. There is a risk of an accident.
Make sure that all objects in the vehicle are
stowed correctly, and that they cannot enter
the driver's footwell. Install the floormats
securely and as specified in order to ensure
sufficient clearance for the pedals. Do not use
Features259
Stowage and features
Z
Page 269 of 350
Regular careof your vehicl eis acondition for
retainin gth equalit yin th elon gterm .
Use car eproducts and cleaning agents rec -
ommended and approve dby Mercedes-Benz.
Exterior car e
Automatic car wash
GWARNIN G
Braking efficiency is reduce dafter washin g
th evehicle. There is aris kof an accident.
Afte rth evehicl ehas been washed, brak e
carefully while payin gattention to th etraffic
condition suntil full brakin gpowe ris restored .
!If DISTRONI CPLU Sor th eHOLD function
is activated, th evehicl ebrakes automati-
call yin certain situations.
To preven tdamag eto th evehicle, deacti -
vat eDISTRONI CPLU Sand th eHOLD func-
tion in th efollowin gor other similar situa-
tions:
Rwhen towin gth evehicl e
Rin thecar wash
!Never clean your vehicl ein aTouchles s
Automati cCar Wash as these use special
cleaning agents .These cleaning agents can
damag eth epaintwork or plastic parts.
!Mak esur ethat:
Rth eside windows and th eslidin gsunroo f
are fully closed .
Rtheventilation/heatin gis switched off
(the OF Fbutto nhas been pressed).
Rth ewindshield wiper switch is in position
0 .
Otherwise ,th evehicl emight be damaged.
!In car washes wit h atowin gmechanism ,
mak esur ethat th eautomatic transmission
is in transmission position N,otherwise th e
vehicl ecould be damaged.
RVehicles wit h aSmartKey:
Do no tremove th eSmartKey fr om the
i
gnition lock. Do no topen th edriver's doo
ror front-passenger door when th e
engin eis switched off .Otherwise ,th e
automatic transmission select spark
position Pautomatically and locks th e
wheels. You can preven tthis by shiftin g
th eautomatic transmission to Nbefore -
hand.
RVehicles wit hKEYLESS-GO :
Do no topen th edriver's doo ror front-
passenger doo rwhen th eengin eis
switched off .Otherwise ,th eautomatic
transmission select spark position P
automatically and locks th ewheels.
!If th eke yis within th erear detection
range of KEYLESS-GO ,situation ssuc has
th efollowin gcould lead to th euninten -
tional openin gof th etrunk lid/tailgate:
Rusin g acar wash
Rusin g apowe rwasher
Mak esur ethat th eSmartKey is at least
10 ft (3 m) away from th evehicle.
Observ eth efollowin gto mak esur ethat th e
automatic transmission stays in position N:
XMak esur eth evehicl eis stationary and th e
ignition is switched off .
XTurn theSmartKey to position 2in th eigni-
tion loc k (
Ypage 137).
Use th eSmartKey instead of th eStart /
Stop butto non vehicles wit hKEYLESS-GO .
XDepress and hold th ebrak epedal .
XShift theautomatic transmission to posi-
tion N.
XReleas eth ebrak epedal .
XReleas eth eparkin gbrake.
XSwitc hoff th eignition and leav eth eSmart -
Key in th eignition lock.
You can wash th evehicl ein an automatic car
wash from th ever ystart .
If th evehicl eis ver ydirty, pre-wash it before
cleaning it in an automatic car wash .
Afte rusin gan automatic car wash ,wipe off
wax from th ewindshield and th ewiper
blades. This will preven tsmears and reduce
Care267
Maintenance and care
Z
Page 270 of 350
wiping noises caused by residue on the wind-
shield.
Information in the Digital Operator's
Manual
In the Digital Operator's Manual you will find
information on the following topics:
RWashing by hand
RPower washers
RCleaning the paintwork
RMatte finish care
RCleaning the wheels
RCleaning the windows
RCleaning wiper blades
RCleaning the exterior lighting
RCleaning the mirror turn signals
RCleaning the sensors
RCleaning the rear view camera
RCleaning the 360° camera
RCleaning the exhaust pipes
Interior care
In the Digital Operator's Manual you will find
information on the following topics:
RCleaning the display
RCleaning the plastic trim
RCleaning the steering wheel and gear or
selector lever
RCleaning genuine wood and trim strips
RCleaning the seat covers
RCleaning the seat belts
RCleaning the headliner and carpets
268Care
Maintenance and care
Page 284 of 350
!When towing, pull away slowly and
smoothly. If the tractive power is too high,
the vehicles could be damaged.
!Do not tow with sling-type equipment.
This could damage the vehicle.
!When towing vehicles with KEYLESS-GO,
use the key instead of the Start/Stop but-
ton. Otherwise, the automatic transmission
may shift to position Pwhen the driver's or
front-passenger door are opened, which
could lead to damage to the transmission.
!The vehicle can be towed a maximum of
30 miles (50km). The towing speed of
30 mph (50 km/h) must not be exceeded.
If the vehicle has to be towed more than
30 miles (50km), the entire vehicle must be
raised and transported.
!If you tow or tow-start another vehicle, its
weight must not exceed the maximum per-
missible gross vehicle weight of your vehi-
cle.
HYBRID vehicles : make sure that you read
the "HYBRID" supplement included in the
vehicle literature. You could otherwise fail to
recognize dangers e.g. due to high voltage.
It is better to have the vehicle transported
than to have it towed away.
If the vehicle has suffered transmission dam-
age, have it transported on a transporter or
trailer.
The automatic transmission must be in posi-
tion Nwhen the vehicle is being towed.
The battery must be connected and charged. Otherwise, you:
Rcannot turn the SmartKey to position 2in
the ignition lock
Rcannot shift the automatic transmission to position N
In the event of damage to the electrical
system
If the battery is defective, the automatic
transmission will be locked in position P. To
shift the automatic transmission to position N, you must provide power to the vehicle's
electrical system in the same way as when
jump-starting (
Ypage 279).
Have the vehicle transported on a transporter
or trailer.
iDisarm the automatic locking feature
(
Ypage 95). You could otherwise be locked
out when pushing or towing the vehicle.
Installing/removing the towing eye
Installing the towing eye
GWARNING
The exhaust tail pipe may be very hot. There is
a risk of burns when removing the rear cover.
Do not touch the exhaust pipe. Take particular
care when removing the rear cover.
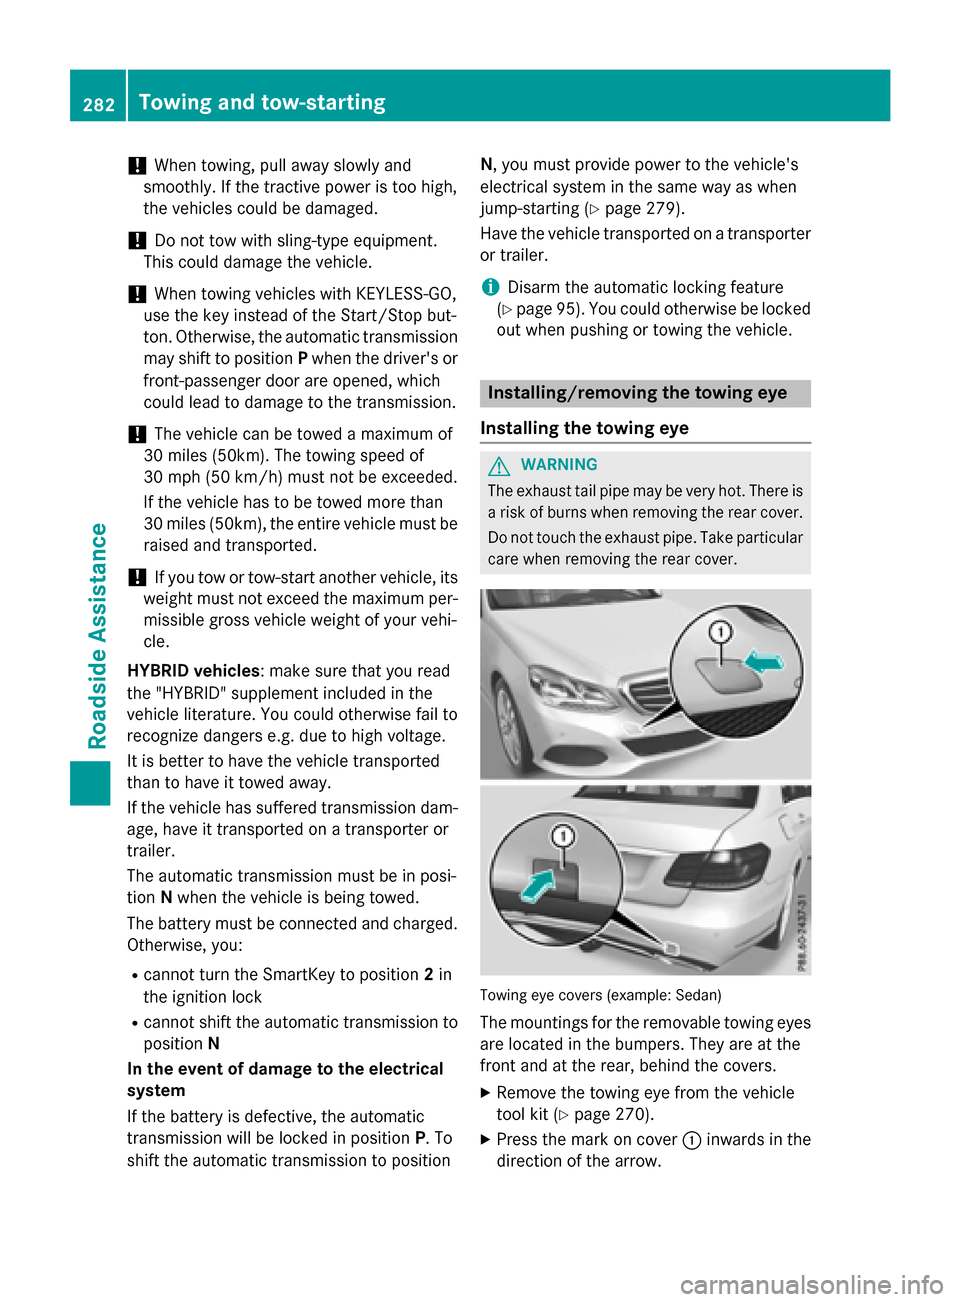
Towing eye covers (example: Sedan)
The mountings for the removable towing eyes
are located in the bumpers. They are at the
front and at the rear, behind the covers.
XRemove the towing eye from the vehicle
tool kit (
Ypage 270).
XPress the mark on cover :inwards in the
direction of the arrow.
282Towing and tow-starting
Roadside Assistance
Page 285 of 350
XTake cover:off the opening.
XScrew in the towing eye clockwise as far as
it will go and tighten it.
Removing the towing eye
XUnscrew and remove the towing eye.
XAttach cover :to the bumper and press
until it engages.
XPlace the towing eye in the vehicle tool kit.
Towing a vehicle with both axles on
the ground
It is important that you observe the safety
instructions when towing away your vehicle
(
Ypage 281).
The automatic transmission automatically
shifts to position Pwhen you open the driver's
or front-passenger door or when you remove
the SmartKey from the ignition lock. In order
to ensure that the automatic transmission
stays in position Nwhen towing the vehicle,
you must observe the following points:
XMake sure that the vehicle is stationary and
the SmartKey in the ignition lock is in posi- tion 0.
XTurn the SmartKey to position 2in the igni-
tion lock.
On vehicles with KEYLESS-GO, use the
SmartKey instead of the Start/Stop button
(
Ypage 139).
XDepress and hold the brake pedal.
XShift the automatic transmission to posi-
tion N.
XRelease the brake pedal.
XRelease the parking brake.
XSwitch on the hazard warning lamps, see
the Digital Operator's Manual.
XLeave the SmartKey in position 2in the
ignition lock.
iWhen towing with the hazard warning
lamps switched on, use the combination
switch as usual to signal a change of direc- tion. In this case, only the indicator lamps
for the direction of travel flash. After reset-
ting the combination switch, the hazard
warning lamp starts flashing again.
Towing the vehicle with the rear axle
raised
!
Vehicles with 4MATIC must not be towed
with either the front or the rear axle raised,
as doing so will damage the transmission.
!Vehicles with automatic transmission
must not be towed with the rear axle raised.
The vehicle/trailer combination may oth-
erwise swerve or even roll over.
!The ignition must be switched off if you
are towing the vehicle with the rear axle
raised. Intervention by ESP
®could other-
wise damage the brake system.
Transporting the vehicle
!
You may only secure the vehicle by the
wheels, not by parts of the vehicle such as
axle or steering components. Otherwise,
the vehicle could be damaged.
The towing eye can be used to pull the vehicle
onto a trailer or transporter for transporting
purposes.
XTurn the SmartKey to position 2in the igni-
tion lock.
XShift the automatic transmission to posi-
tion N.
As soon as the vehicle has been loaded:
XPrevent the vehicle from rolling away by
applying the parking brake.
XShift the automatic transmission to posi-
tion P.
XTurn the SmartKey to position 0in the igni-
tion lock and remove the SmartKey from
the ignition lock.
XSecure the vehicle.
Towing and tow-starting283
Roadside Assistance
Z
Page 287 of 350
Fuse box in the engine compartment
Pay attention to the important safety notes
(
Ypage 284).
GWARNING
When th ehoo dis open and th ewindshield
wiper sare set in motion ,you can be injured by
th ewiper linkage. Ther eis aris kof injury.
Always switch off th ewindshield wiper sand
th eignition before opening th ehood.
!Make sure that no moisture can enter the
fuse box when the cover isopen.
!When closing the cover, make sure that it
is lyin g correctly on the fuse box. Moisture
seeping inor dirt could otherwise impair
the operation of the fuses.
XMake sure that the windshield wipers are
turned off.
XOpen the hood.
XUse a dry cloth to remove any moisture
from the fuse box.
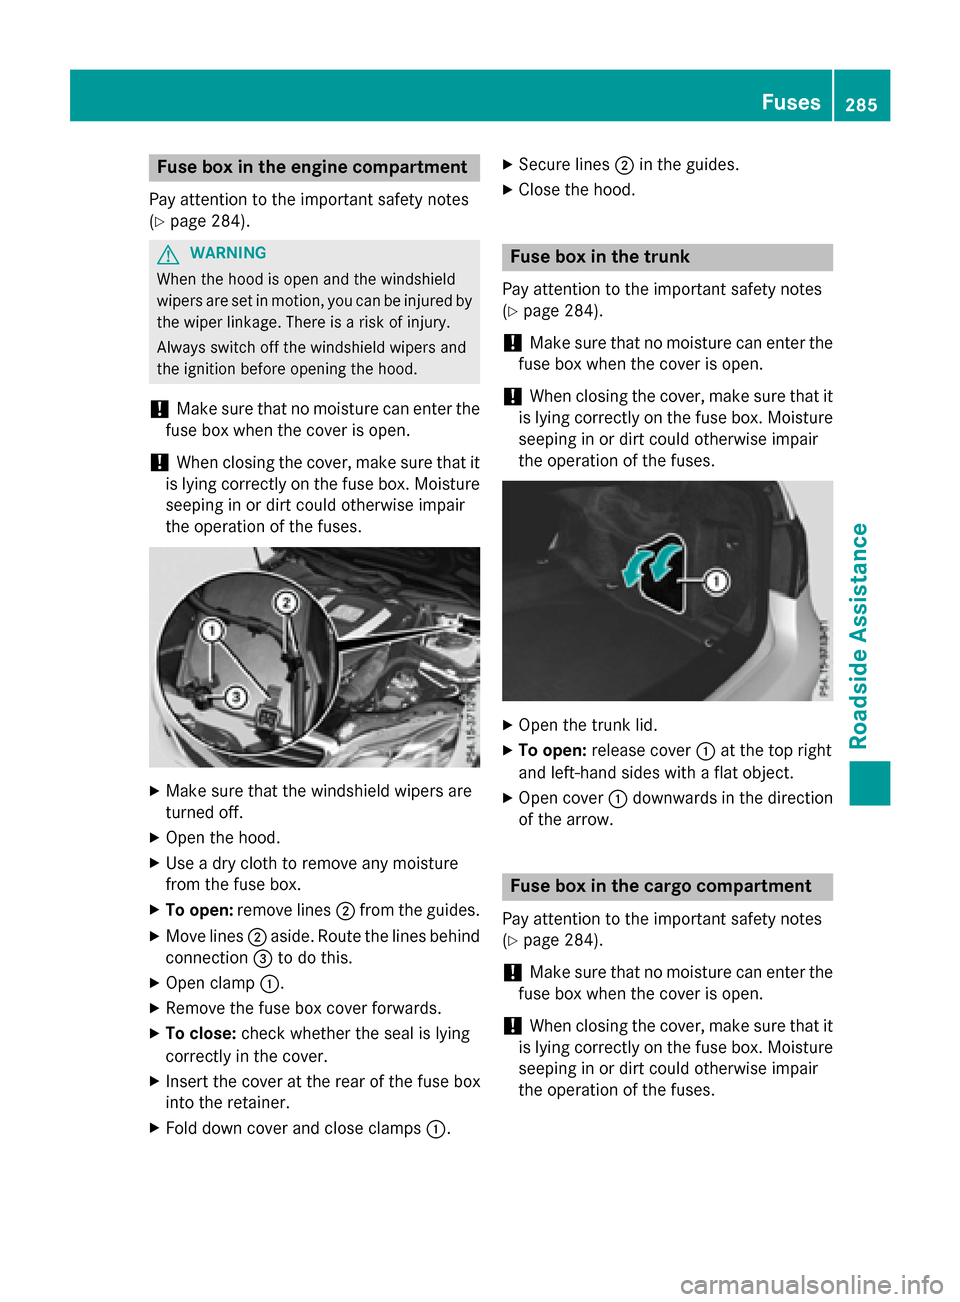
XTo open: remove lines ;from the guides.
XMove lines ; aside. Route the lines behind
connection =todo this.
XOpen clamp :.
XRemove the fuse box cover forwards.
XTo close:check whether the seal is lying
correctly inthe cover.
XInsert the cover at the rear of the fuse box
into the retainer.
XFo ld down cover and close clam ps:.
XSecure lines ; inthe guides.
XClose the hood.
Fuse box in the trunk
Pay attention to the important safety notes
(
Ypage 284).
!Make sure that no moisture can enter the
fuse box when the cover isopen.
!When closing the cover, make sure that it
is lying correctly on the fuse box. Moisture
seeping inor dirt could otherwise impair
the operation of the fuses.
XOpen the trunk lid.
XTo open:release cover :at the top right
and left-hand sides with a flat object.
XOpen cover :down wards inthe direction
of the arrow.
Fuse box in the cargo compartment
Pay attention to the important safety notes
(
Ypage 284).
!Make sure that no moisture can enter the
fuse box when the cover isopen.
!When closing the cover, make sure that it
is lying correctly on the fuse box. Moisture
seeping inor dirt could otherwise impair
the operation of the fuses.
Fuses285
Roadside Assistance
Z
Page 314 of 350
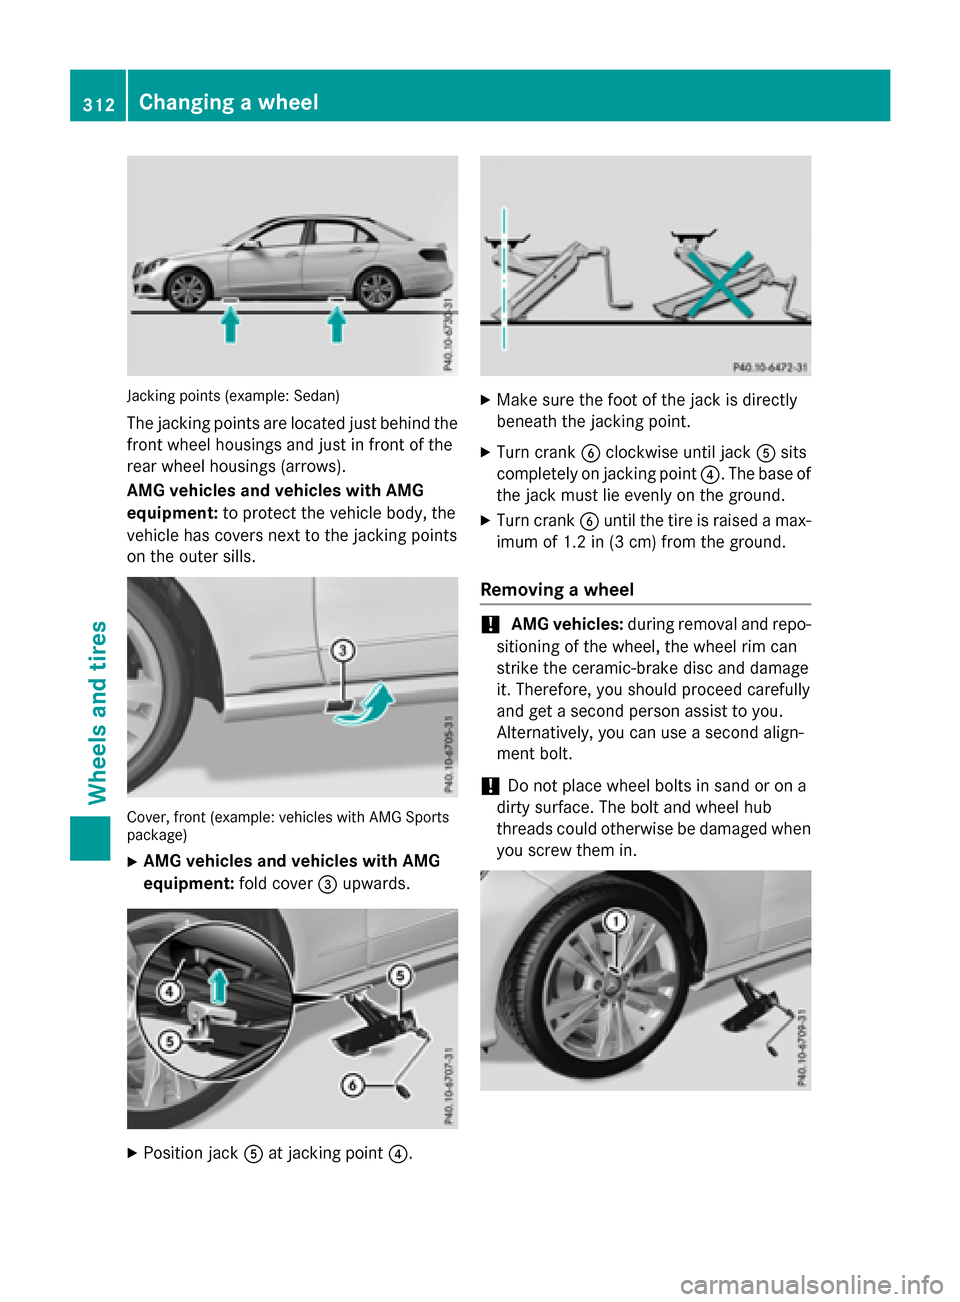
Jacking points (example: Sedan)
The jacking points are located just behind thefront wheel housings and just in front of the
rear wheel housings (arrows).
AMG vehicles and vehicles with AMG
equipment: to protect the vehicle body, the
vehicle has covers next to the jacking points
on the outer sills.
Cover, front (example: vehicles with AMG Sports
package)
XAMG vehicles and vehicles with AMG
equipment: fold cover=upwards.
XPosition jack Aat jacking point ?.
XMake sure the foot of the jack is directly
beneath the jacking point.
XTurn crankBclockwise until jack Asits
completely on jacking point ?. The base of
the jack must lie evenly on the ground.
XTurn crank Buntil the tire is raised a max-
imum of 1.2 in (3 cm) from the ground.
Removing a wheel
!AMG vehicles: during removal and repo-
sitioning of the wheel, the wheel rim can
strike the ceramic-brake disc and damage
it. Therefore, you should proceed carefully
and get a second person assist to you.
Alternatively, you can use a second align-
ment bolt.
!Do not place wheel bolts in sand or on a
dirty surface. The bolt and wheel hub
threads could otherwise be damaged when
you screw them in.
312Changing a wheel
Wheels and tires
Page 316 of 350
XTurn the crank of the jack counter-clock-
wise until the vehicle is once again standing
firmly on the ground.
XPlace the jack to one side.
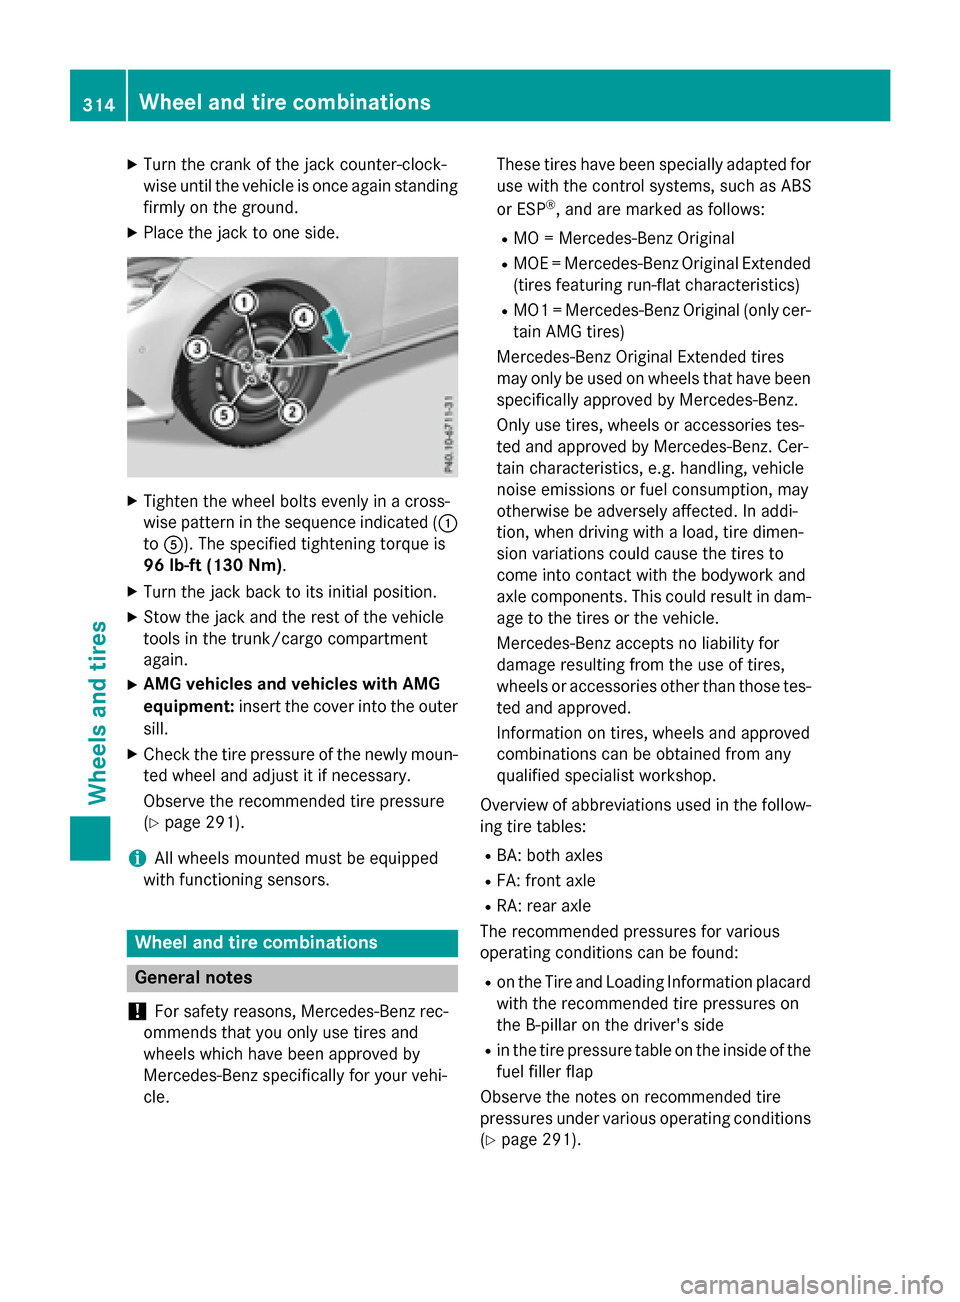
XTighten the wheel bolts evenly in a cross-
wise pattern in the sequence indicated (:
to A). The specified tightening torque is
96 lb-ft (130 Nm).
XTurn the jack back to its initial position.
XStow the jack and the rest of the vehicle
tools in the trunk/cargo compartment
again.
XAMG vehicles and vehicles with AMG
equipment: insert the cover into the outer
sill.
XCheck the tire pressure of the newly moun-
ted wheel and adjust it if necessary.
Observe the recommended tire pressure
(
Ypage 291).
iAll wheels mounted must be equipped
with functioning sensors.
Wheel and tire combinations
General notes
!
For safety reasons, Mercedes-Benz rec-
ommends that you only use tires and
wheels which have been approved by
Mercedes-Benz specifically for your vehi-
cle. These tires have been specially adapted for
use with the control systems, such as ABS
or ESP
®, and are marked as follows:
RMO = Mercedes-Benz Original
RMOE = Mercedes-Benz Original Extended
(tires featuring run-flat characteristics)
RMO1 = Mercedes-Benz Original (only cer-
tain AMG tires)
Mercedes-Benz Original Extended tires
may only be used on wheels that have been
specifically approved by Mercedes-Benz.
Only use tires, wheels or accessories tes-
ted and approved by Mercedes-Benz. Cer-
tain characteristics, e.g. handling, vehicle
noise emissions or fuel consumption, may
otherwise be adversely affected. In addi-
tion, when driving with a load, tire dimen-
sion variations could cause the tires to
come into contact with the bodywork and
axle components. This could result in dam-
age to the tires or the vehicle.
Mercedes-Benz accepts no liability for
damage resulting from the use of tires,
wheels or accessories other than those tes-
ted and approved.
Information on tires, wheels and approved
combinations can be obtained from any
qualified specialist workshop.
Overview of abbreviations used in the follow-
ing tire tables:
RBA: both axles
RFA: front axle
RRA: rear axle
The recommended pressures for various
operating conditions can be found:
Ron the Tire and Loading Information placard with the recommended tire pressures on
the B-pillar on the driver's side
Rin the tire pressure table on the inside of the
fuel filler flap
Observe the notes on recommended tire
pressures under various operating conditions
(
Ypage 291).
314Wheel and tire combinations
Wheels and tires