MERCEDES-BENZ E-CLASS WAGON 2001 W210 Owner's Manual
Manufacturer: MERCEDES-BENZ, Model Year: 2001, Model line: E-Class WAGON, Model: MERCEDES-BENZ E-Class WAGON 2001 W210Pages: 345, PDF Size: 16.08 MB
Page 301 of 345
298 Electronic main key
Te ch n ica l
data Instruments
and controlsOperation DrivingInstrument
cluster displayPractical hintsCar care Index
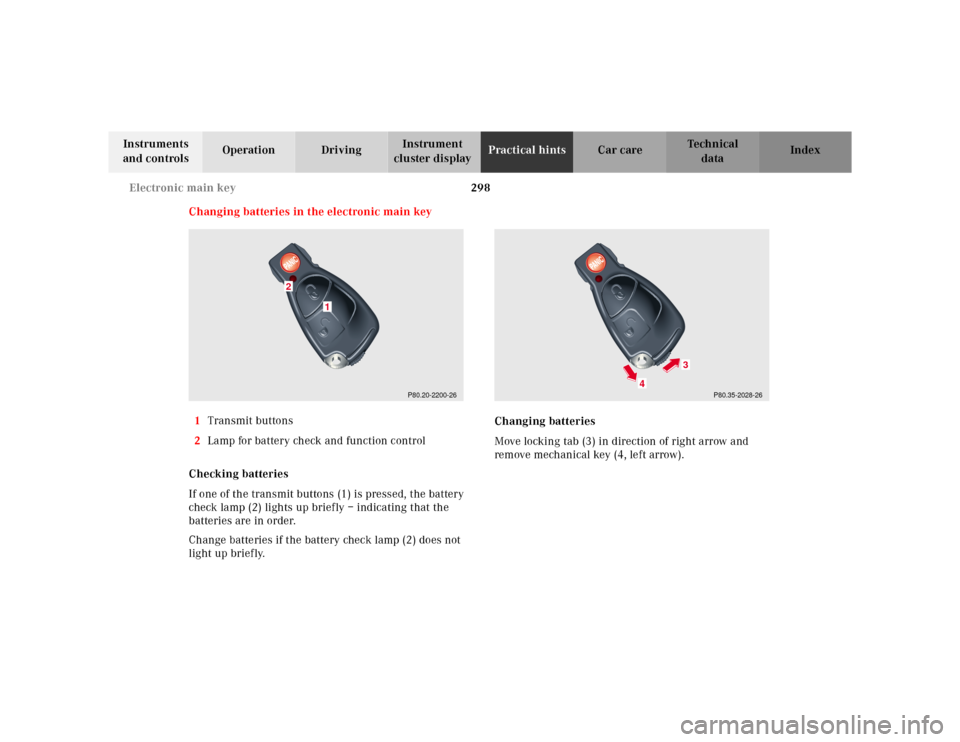
Changing batteries in the electronic main key
1Transmit buttons
2Lamp for battery check and function control
Checking batteries
If one of the transmit buttons (1) is pressed, the battery
check lamp (2) lights up briefly – indicating that the
batteries are in order.
Change batteries if the battery check lamp (2) does not
light up briefly.Changing batteries
Move locking tab (3) in direction of right arrow and
remove mechanical key (4, left arrow).
P80.20-2200-26
1
2
P80.35-2028-26
4
3
Page 302 of 345
299 Electronic main key
Te ch n ica l
data Instruments
and controlsOperation DrivingInstrument
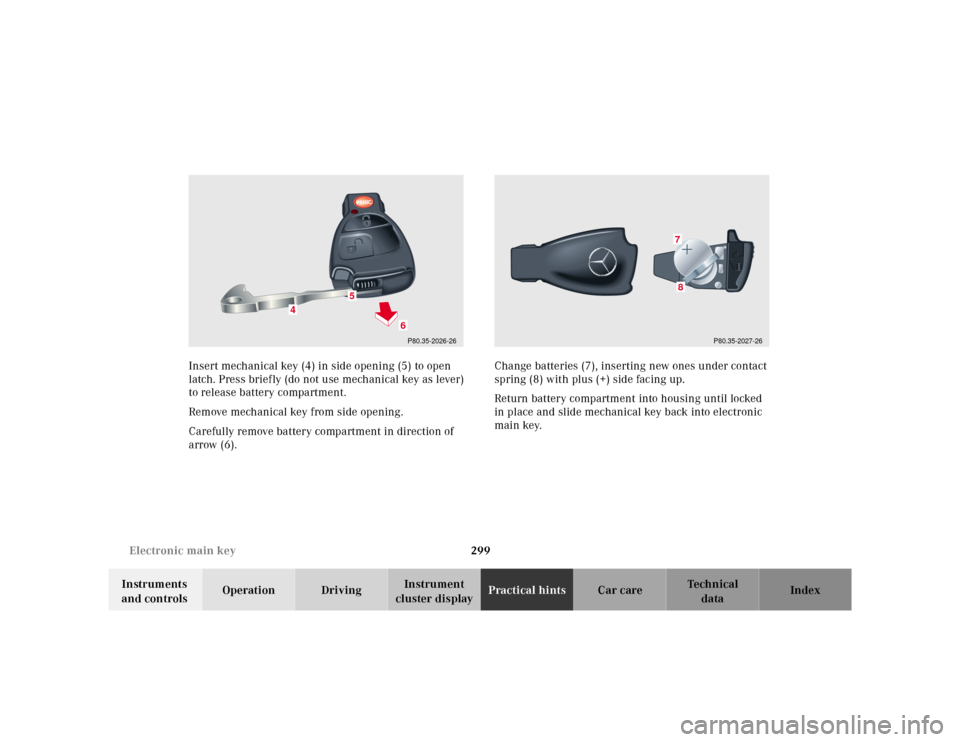
cluster displayPractical hintsCar care Index Insert mechanical key (4) in side opening (5) to open
latch. Press briefly (do not use mechanical key as lever)
to release battery compartment.
Remove mechanical key from side opening.
Carefully remove battery compartment in direction of
arrow (6).Change batteries (7), inserting new ones under contact
spring (8) with plus (+) side facing up.
Return battery compartment into housing until locked
in place and slide mechanical key back into electronic
main key.
P80.35-2026-26
5
4
6
P80.35-2027-26
78
Page 303 of 345
300 Electronic main key
Te ch n ica l
data Instruments
and controlsOperation DrivingInstrument
cluster displayPractical hintsCar care Index
Important!
Batteries contain materials that can harm the
environment if disposed of improperly. Recycling of
batteries is the preferred method of disposal. For
disposal, please follow manufacturer’s recommendation
on battery package.
Replacement Battery:
Lithium, type CR 2025 or equivalent.
Synchronizing remote control
The remote control may have to be resynchronized, if
the vehicle cannot be locked or unlocked.
To synchronize insert electronic key in starter switch.
The remote control should once again be operational.Emergency engine shut-down
If the engine can no longer be stopped using the
electronic key, the engine can be turned off by removing
two fuses.
For easy removal of fuses use the fuse extractor
(supplied with vehicle tool kit) to pull out the fuses
marked on the fuse chart as “ENGINE EMERGENCY
OFF”.
The fuse chart is also located in the vehicle tool kit,
seepage272.
For fuses see page 263.
Page 304 of 345
301 Emergency operation of sliding / pop-up roof
Te ch n ica l
data Instruments
and controlsOperation DrivingInstrument
cluster displayPractical hintsCar care Index Emergency operation of sliding / pop-up roof
The sliding / pop-up roof can be opened or closed
manually should an electrical malfunction occur.
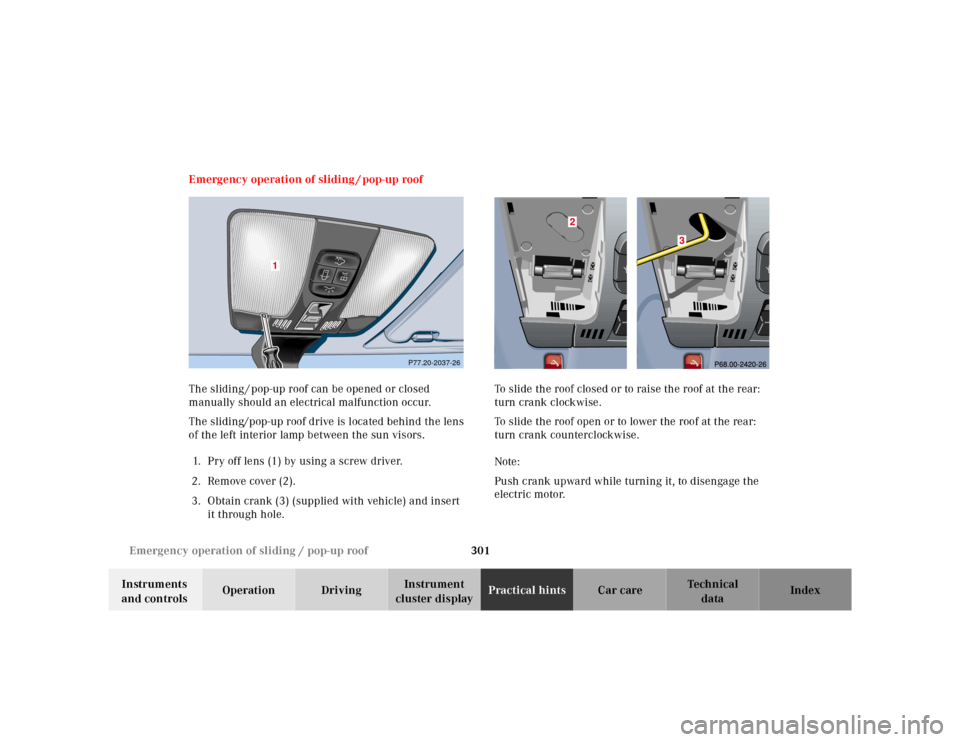
The sliding/pop-up roof drive is located behind the lens
of the left interior lamp between the sun visors.
1. Pry off lens (1) by using a screw driver.
2. Rem ove cover (2).
3. Obtain crank (3) (supplied with vehicle) and insert
it through hole.To slide the roof closed or to raise the roof at the rear:
turn crank clockwise.
To slide the roof open or to lower the roof at the rear:
turn crank counterclockwise.
Note:
Push crank upward while turning it, to disengage the
electric motor.
1
P77.20-2037-26
Page 305 of 345
302 Manual release for fuel filler flap
Te ch n ica l
data Instruments
and controlsOperation DrivingInstrument
cluster displayPractical hintsCar care Index
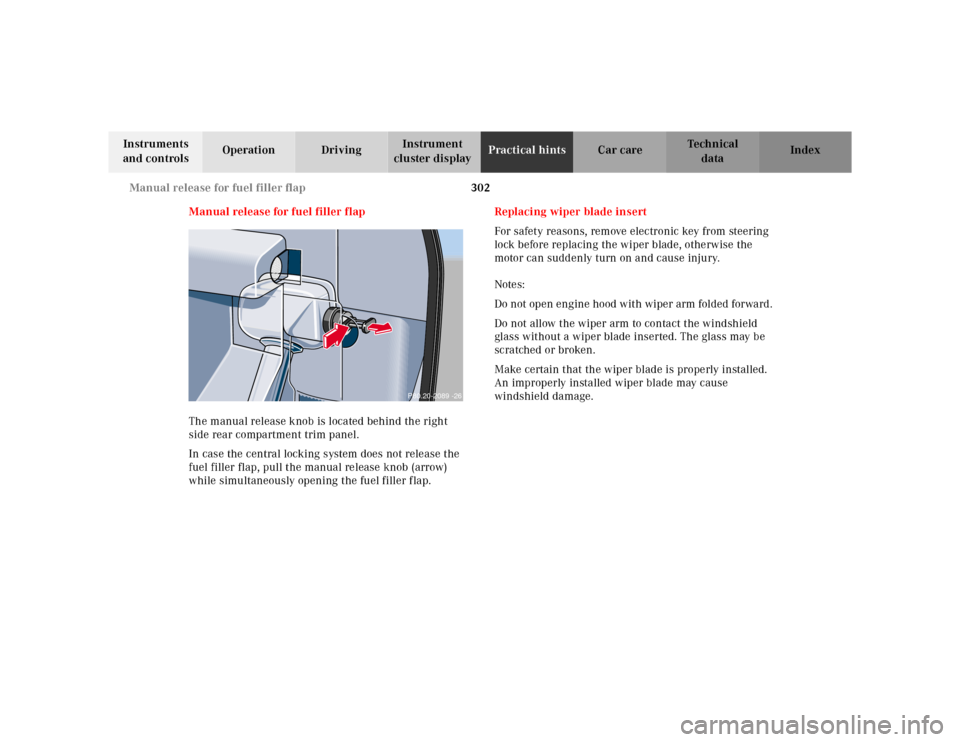
Manual release for fuel filler flap
The manual release knob is located behind the right
side rear compartment trim panel.
In case the central locking system does not release the
fuel filler flap, pull the manual release knob (arrow)
while simultaneously opening the fuel filler f lap.Replacing wiper blade insert
For safety reasons, remove electronic key from steering
lock before replacing the wiper blade, otherwise the
motor can suddenly turn on and cause injury.
Notes:
Do not open engine hood with wiper arm folded forward.
Do not allow the wiper arm to contact the windshield
glass without a wiper blade inserted. The glass may be
scratched or broken.
Make certain that the wiper blade is properly installed.
An improperly installed wiper blade may cause
windshield damage.
P80.20-2089 -26
Page 306 of 345
303 Replacing wiper blade insert
Te ch n ica l
data Instruments
and controlsOperation DrivingInstrument
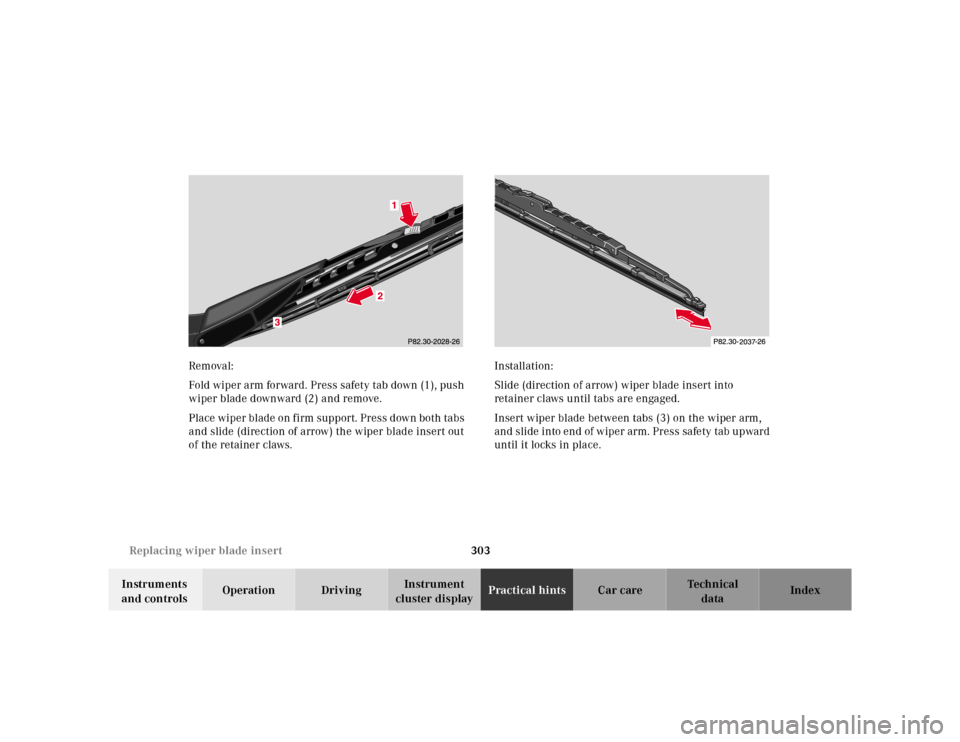
cluster displayPractical hintsCar care Index Removal:
Fold wiper arm forward. Press safety tab down (1), push
wiper blade downward (2) and remove.
Place wiper blade on firm support. Press down both tabs
and slide (direction of arrow) the wiper blade insert out
of the retainer claws.Installation:
Slide (direction of arrow) wiper blade insert into
retainer claws until tabs are engaged.
Insert wiper blade between tabs (3) on the wiper arm,
and slide into end of wiper arm. Press safety tab upward
until it locks in place.
Page 307 of 345
304 Replacing wiper blade insert
Te ch n ica l
data Instruments
and controlsOperation DrivingInstrument
cluster displayPractical hintsCar care Index
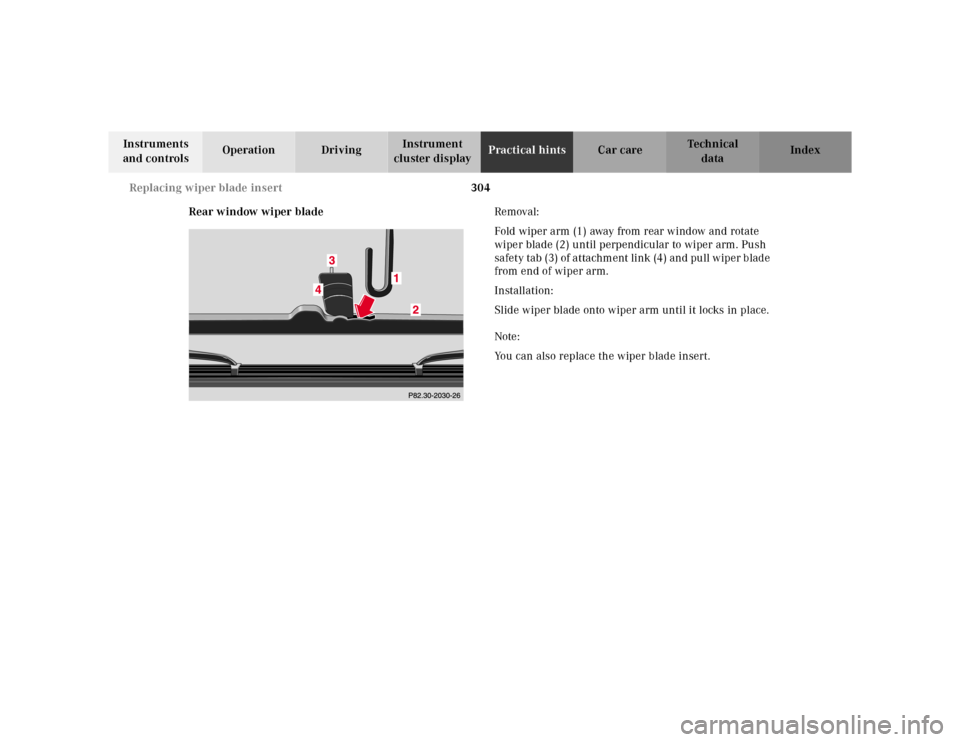
Rear window wiper bladeRemoval:
Fold wiper arm (1) away from rear window and rotate
wiper blade (2) until perpendicular to wiper arm. Push
safety tab (3) of attachment link (4) and pull wiper blade
from end of wiper arm.
Installation:
Slide wiper blade onto wiper arm until it locks in place.
Note:
You can also replace the wiper blade insert.
Page 308 of 345
305 Roof rack
Te ch n ica l
data Instruments
and controlsOperation DrivingInstrument
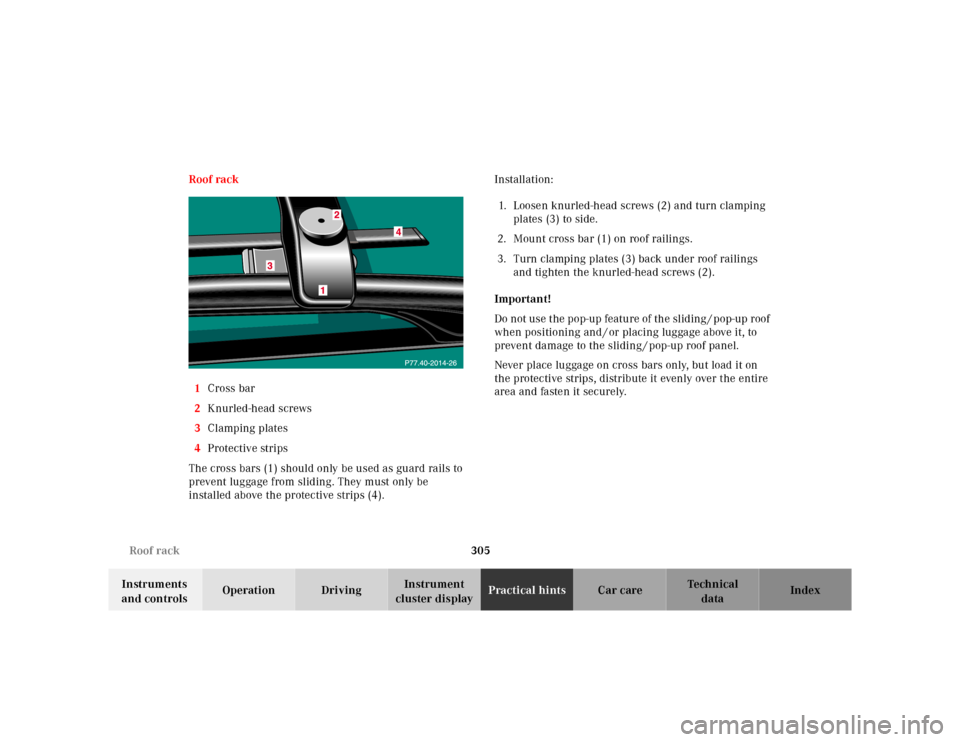
cluster displayPractical hintsCar care Index Roof rack
1Cross bar
2Knurled-head screws
3Clamping plates
4Protective strips
The cross bars (1) should only be used as guard rails to
prevent luggage from sliding. They must only be
installed above the protective strips (4).Installation:
1. Loosen knurled-head screws (2) and turn clamping
plates (3) to side.
2. Mount cross bar (1) on roof railings.
3. Turn clamping plates (3) back under roof railings
and tighten the knurled-head screws (2).
Important!
Do not use the pop-up feature of the sliding / pop-up roof
when positioning and / or placing luggage above it, to
prevent damage to the sliding / pop-up roof panel.
Never place luggage on cross bars only, but load it on
the protective strips, distribute it evenly over the entire
area and fasten it securely.
Page 309 of 345
306 Roof rack
Te ch n ica l
data Instruments
and controlsOperation DrivingInstrument
cluster displayPractical hintsCar care Index
Long cargo items should not extend beyond the vehicle
length and should be securely fastened at the front and
rear.
Prior to and during an extended trip check the roof load,
and retighten the knurled-head screws if necessary.
The heaviest portion of the cargo should always be kept
as low as possible since it influences the handling
characteristics of the vehicle.
When driving without roof luggage, the cross bars may
be removed to reduce wind noise.
For load capacity see page 321.Note:
Use only roof racks approved by Mercedes-Benz. They
mount to the roof railings and do not require additional
supports (e.g. suction cups or legs). Such supports may
lead to marring of the paint or denting of the roof. For
further information inquire at your Mercedes-Benz
Center.
Page 310 of 345
307 Contents - Vehicle care
Te ch n ica l
data Instruments
and controlsOperation DrivingInstrument
cluster displayPractical hintsCar careIndex
Vehicle careCleaning and care of
the vehicle .................................. 308
Power washer ..............................309
Tar stains .....................................309
Paintwork, painted body
components .................................309
Engine cleaning .......................... 310Vehicle washing ..........................310
Ornamental moldings ................310
Headlamps, taillamps,
turn signal lenses .......................310
Cleaning the parktronic
system sensors ............................ 311
Window cleaning ........................ 311
Wiper blades ............................... 311
Light alloy wheels ......................312Instrument cluster ..................... 312
Steering wheel and
gear selector lever ...................... 312
Cup holder ................................... 312
Seat belts ..................................... 312
Headliner ..................................... 312
Upholstery ................................... 313
Hard plastic trim items ............. 313
Plastic and rubber parts ............ 313