MERCEDES-BENZ E-Class WAGON 2011 S212 Comand Manual
Manufacturer: MERCEDES-BENZ, Model Year: 2011, Model line: E-Class WAGON, Model: MERCEDES-BENZ E-Class WAGON 2011 S212Pages: 234, PDF Size: 8.64 MB
Page 141 of 234

num
berint he phone bookandcanbe
diale dimmediately.
X Select Save and
press Wtoconfirm .
The new category isstored. Calling
anumber storedinan entry
Co nditio ns The
mobi lephone mustbeconnected viathe
Blue tooth ®
interface .
Option 1 X
Displ aydetai lsfor anadd ress book entry
(Y pag e137).
X Select thephone numbe rdata fieldb y
tur nin gcVd theC OMA NDcontroll erand
pres sW toconfirm .
The telepho nemak esthec all. The displ ay
swit ches totelepho nemod e.
Opt ion 2 X
Dis play details foranaddre ssbook entry.
X Sel ect thep hon enum ber datafieldb y
tur nin gcVd theC OMA NDcontroll er.
X Sel ect thel ist symb olto ther igh tofthe
data fieldbysliding VYtheCOMAND
cont roller andpress Wtoconfirm .
X Select Call and
press Wtoconfirm .
The telephone makesthecall. Storing
thephone number asas pee d
dial numb er
X Disp layd etails for anaddre ssboo kentry .
X Sel ect the phone num berd ata fieldb y
tur nin gcVd theC OMA NDcontroll er. X
Sel ect thel ist symb olto ther igh tofthe
data fieldbysliding VYtheCOMAND
cont roller andpress Wtoconfirm .
X Select Speed Dial and
press Wto
confirm .
You cannow store thenumber inone ofthe
ten speed dialpresets. Star
ting route guidance toan entry
Note This
funct ionisavaila bleassoon asyou have
stored adestination inthe destination
memory (Ypage 95).COMAND alsosaves
destinations inthe address booktogether
with allthe data required forroute guidance.
Option 1 X
Search foranaddress bookentry
(Y page 136)withtheLicon andselect it
from thelist.
X Display detailsforanaddress bookentry
(Y page 138).
X Select theaddress datafieldbyturning
cVd theCOMAND controller andpress
W toconfirm .
Option 2 X
Search foranaddress bookentry
(Y page 136)withtheLicon andselect it
from thelist.
X Select thelistsymbol tothe right ofthe
entr ybysliding VYtheCOMAND
cont roller andpress Wtoconfirm .
X Select Navigate and
press Wtoconfirm .
Irrespect iveofthe option chosen, route
guida ncestarts.
Option 3 Route
guidancecanalso bestarted foran
address bookentrywithout the¤symbol. If
the address dataordesignations donot Using
theaddress book
139Telephone Z
Page 142 of 234

match
thedigitalmap, COMAND promptsyou
to re-enter theaddress.
i Itis best then tostore thenew address
under theaddress book entry. Thiswill
provid eyou with anadd ress book entry that
is sui table fornaviga tion.
X Enter thedestina tionaddress (Ypag e54).
X Select Save from
theaddress entry menu
and press Wtoconfirm.
X Assigning adestina tiontoan add ress book
entry (Ypag e96). Voic
etags
Adding orchang ingavoice tag You
canentervoic etagsv iatheV oiceC ont rol
Syst em(see thes epar ateoper ating
ins truct ions).Onceyou have assign edavoic e
tag toan addre ssbook entry,you can callup
th is ent rywith avoic ec om man dand dial a
phon enum ber, forexam ple.You canadd one
voic etag per addre ssbook entry.
X Sear chfor anaddre ssbook entrywith or
with outavoic etag (¦ symbo l)
(Y page 136).
X Sele ctthel ist symbo ltot he righ tofthe
entr ybysliding VYtheCOMAND
cont roller andpress Wtoconfirm .
X Select Voice Name and
press Wto
confirm .
X Select Add or
Change and
press Wto
confirm .
Subsequent operationisvoice-con trolled.
The Voice Control System guidesyou
through thedialo gs.
Dele ting avoice tag X
Sear chfor anaddre ssbook entrywith a
voic etag (Ypage 136).
X Sele ctthel ist symbo ltot he righ tofthe
entr ybysliding VYtheCOMAND
cont roller andpress Wtoconfirm . X
Select Voice Name and
press Wto
confirm .
X Select Delete and
press Wtoconfirm .
Ad eletion prompt appears.
X Select Yes or
No and
press the9button
to con firm.
If you select Yes ,C
OMAND deletesthe
voice tag.
If you select No ,t
he process willbeaborted.
Listening toav oice tag X
Sear chfor anaddre ssbook entrywith a
voic etag (Ypage 136).
X Sele ctthel ist symbo ltot he righ tofthe
entr ybysliding VYtheCOMAND
cont roller andpress Wtoconfirm .
X Select Voice Name and
press Wto
confirm .
X Select Listen and
press Wtoconfirm .
You hear thevoice tag. Storing
aphone book entry fromthe
mobile phoneinthe address book
Using thisfunct ionyou can save imported
phone bookentriesinthe address book.
The following canbeused asas ource:
R the mobile phone
R the memory card
R the USB device
R the Bluetooth ®
Int erface
Imported phonebookentriesare indicated in
the phone bookbydifferent icons
(Y page 126). 140
Using
theaddress bookTelephone
Page 143 of 234

X
Sea rch foranentry inthe phoneboo kon
the mob ilep hone d (Ypage 126) .
X Sel ect the list symbo ltot he right ofthe
entry bysliding VY theCOMAND
control lera nd pre ssW toconfi rm.
X Sel ect SaveEntry and
pressW to
confi rm.
The Saving Proced ure Successful mes
sage appe ars. The phone book entry is
now saved asan addre ssbook entry .
The diconisr eplaced bythe ¥icon. Importing
contacts
Information andrequirem ents You
canimport contacts (vCards) fromthe
memory cardandaUSBdevice intothe
address book,orreceive vCardsvia
Bluetooth ®
.
i Upto2500 entries canbeimported into
the address book.Amessage notifies you
when themaximum numberisreached.
You now have todelete existingentries
(Y page 137)ino rder toimport newentries.
Dependi ngon the source ofthe contact data,
differe ntrequ ireme ntsapply: Source Con
dition s Memory
card The
SDmemory cardmust
be inserted (Ypag e157)
and must contain
importa blecontact data. USB
device The
USB devicemust be
inserted inthe USB port
and must contain
importa blecontact data. Requiremen
tsfor rece ivingvCards via
Bluetoo th®
You canreceive vCards from devices(e.g.
from aPC)whi chsup port thesending of
vCa rds viaBlue tooth ®
. It
is not necessary toauthorize thedevi cein
COMAND todo so.
Plea sebea rthe following inmind:
R Bluetooth ®
must beactivated inCOMAND
and onthe Bluetooth ®
device (see
operating instructionsforthe device).
R the Bluetooth ®
device mustbeable tosend
vCards viaBluetooth ®
(see operating
instruct ionsforthe device).
R the Bluetooth ®
device inthe vehicle must
be switched on.
Import ingfrom thememory cardorUSB
device Ent
ries imported fromthememory cardor
from aUSBdevice havethe¯ symbol.
The following conditionsmust befulfilled in
order toimport vCards:
R vCards (vcffiles) maybelocated inthe main
directory orinfolders. COMAND allowsfor
at argeted selection ofthe corresponding
directories.
R vCards musthavethefileexten sion".vcf".
i Avcffilec an also contai nseveral vCards.
COMAND supportsvCardsinversion s2.1
and 3.0.
X Select Address Book in
the address book
or, ifthe telephon ebasic menu isshown,
select Phone by
sliding VÆandturning
cVd theCOMAND controller andpress
W tocon firm.
X Select Downloa dContact s and
press W
to con firm.
Am enu appears.
X Select FromTheMemory Card or
From USB
Device in
the menu byturn ingcVd
the COMAND controller andpress Wto
con firm.
X Select Add or
Overwri te and
press Wto
con firm.
Add import
sthe ent ries from thememory
card orUSB device intot he address book. Using
thea ddress book
141Telephone Z
Page 144 of 234

Overwrite imports
theentries fromthe
memory cardorUSB device andoverwrites
all entries inthe address bookwiththe
¯ symbol. Theprevious entriesarethen
no longer available.
Aft erthe cont actdata hasbeen imported
successfully ,you will see amessage tothis
effec t.The address bookorthe respect ive
telephon ebasic menu isdisplayed.
i You canselect theOverwri te menu
item
if the address bookalready contains
corr espondin gentries. Amessage notifies
you when theaddress bookisfull.
Receiving vCardsviaBluet ooth® Received
vCardsareidentif iedbythe ®
symbol inthe address book.
i Ifyou switch toanoth ermain function,
e.g. navigation ,while receivin gvCards, the
recept ionofvCards willbeterm inated.
X Select Address Book in
the address book
or, ifthe telephon ebasic menu isshown,
select Phone by
sliding VÆandturning
cVd theCOMAND controller andpress
W tocon firm.
Am enu appears.
X Select Downloa dContact s and
press W
to con firm.
X Select Receive dBusines sCards in
the
menu byturn ingcVd theCOMAND
con troller andpress Wtocon firm.
This interrupts theBluetoot h®
con nection
between COMAND andyour active mobile
phone. COMAND is,however, readyto
receive vCardsfromanoth erBluetoot h®
device (PC,mobile phone).
X Start the data transfer onthe external
Bluetoot h®
device (seetheoperatin g
inst ruct ions forthe device).
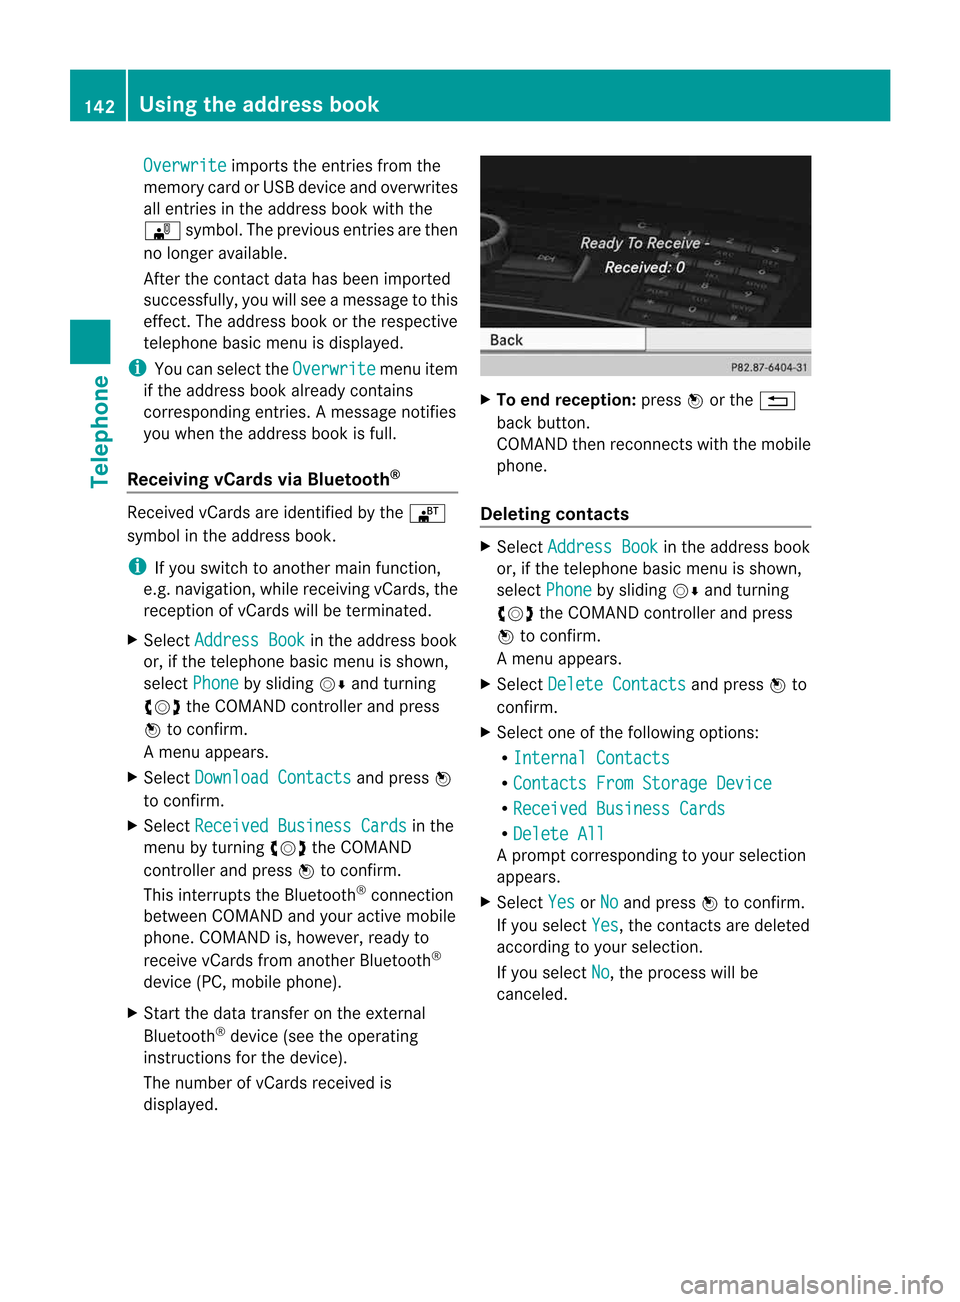
The number ofvCards received is
displayed. X
To end recept ion:press Worthe %
back button .
COMAND thenrecon nectswith themobile
phone.
Deleting contacts X
Select Address Book in
the address book
or, ifthe telephon ebasic menu isshown,
select Phone by
sliding VÆandturning
cVd theCOMAND controller andpress
W tocon firm.
Am enu appears.
X Select Delete Contact s and
press Wto
con firm.
X Select oneofthe following options:
R Interna lContact s R
Contact sFrom Storage Device R
Receive dBusines sCards R
Delete All Ap
rompt correspo ndingtoyou rselection
appears.
X Select Yes or
No and
press Wtocon firm.
If you select Yes ,t
he con tact saredeleted
accor dingtoyour select ion.
If you select No ,t
he process willbe
canc eled. 142
Using
thea ddress bookTelephone
Page 145 of 234

COMAN
Dfeatures .... .... .... ...... ........ ... 144
Ra dio mod e.... .... .... ...... ........ ........ ...... 144
Sat ellit eradio<003B003B003B003B003B003B003B003B003B003B003B003B003B003B003B003B
003B003B003B003B003B003B003B003B003B003B003B003B003B003B003B003B
003B003B003B003B> 148
Audio CD/DVD andMP3 mode ........ 154
Music search <003B003B003B003B003B003B003B003B003B003B003B003B003B003B003B003B
003B003B003B003B003B003B003B003B003B003B003B003B003B003B003B003B
003B003B003B003B003B> 165
MUSIC REGISTER<003B003B003B003B003B003B003B003B003B003B003B003B003B003B003B003B
003B003B003B003B003B003B003B003B003B003B003B003B003B003BV 168
Bluet ooth®
aud iomode <003B003B003B003B003B003B003B003B003B003B003B003B003B003B003B003B
003B003B003B003BV 172
Media Interfacemode <003B003B003B003B003B003B003B003B003B003B003B003B003B003B003B003B
003B003B003B003B003B003BV 178
Audio AUXmode <003B003B003B003B003B003B003B003B003B003B003B003B003B003B003B003B
003B003B003B003B003B003B003B003B003B003B003B003B003B003B003BV 182 143Audio
Page 146 of 234

COMAN
Dfeatures
Thes eOperatin gInstruc tio ns desc ribeall
st andar dand opt ionalequipm enta vail able
for you rCOMAND systematthe time of
purcha se.Cou ntry-specifi cdeviation sare
possible. Pleasenotethat your COMAND
system maynotbeequipped withallthe
features described. Rad
iomode General
information
i Portable electronicdevices inthe vehicle
may seriously impairradiorecept ion. Switching
torad iomode
Opt ion 1 X
Press $thefunc tion button .
The radio display appears. Youwillhear the
last stationplayed onthe last waveband.
i Repeatedly pressingthisfunc tion button
switch esbetween theFM, AMand WB
wavebands inthat order andthen calls up
SatRadio mode.Pressin gthe button again
takes youback toFM radio mode.
Opt ion 2 X
Select Audio in
the main function barby
sliding ZVandturningcVd theCOMAND
con troller andpress Wtocon firm.
If radio mode wasthelast mode selected,
it will now beactive.
If anoth eraudio mode isswitch edon, you
can now switch toradio mode inthe audio
menu.
X Select Audio by
sliding ZVtheCOMAND
con troller andpress Wtocon firm.
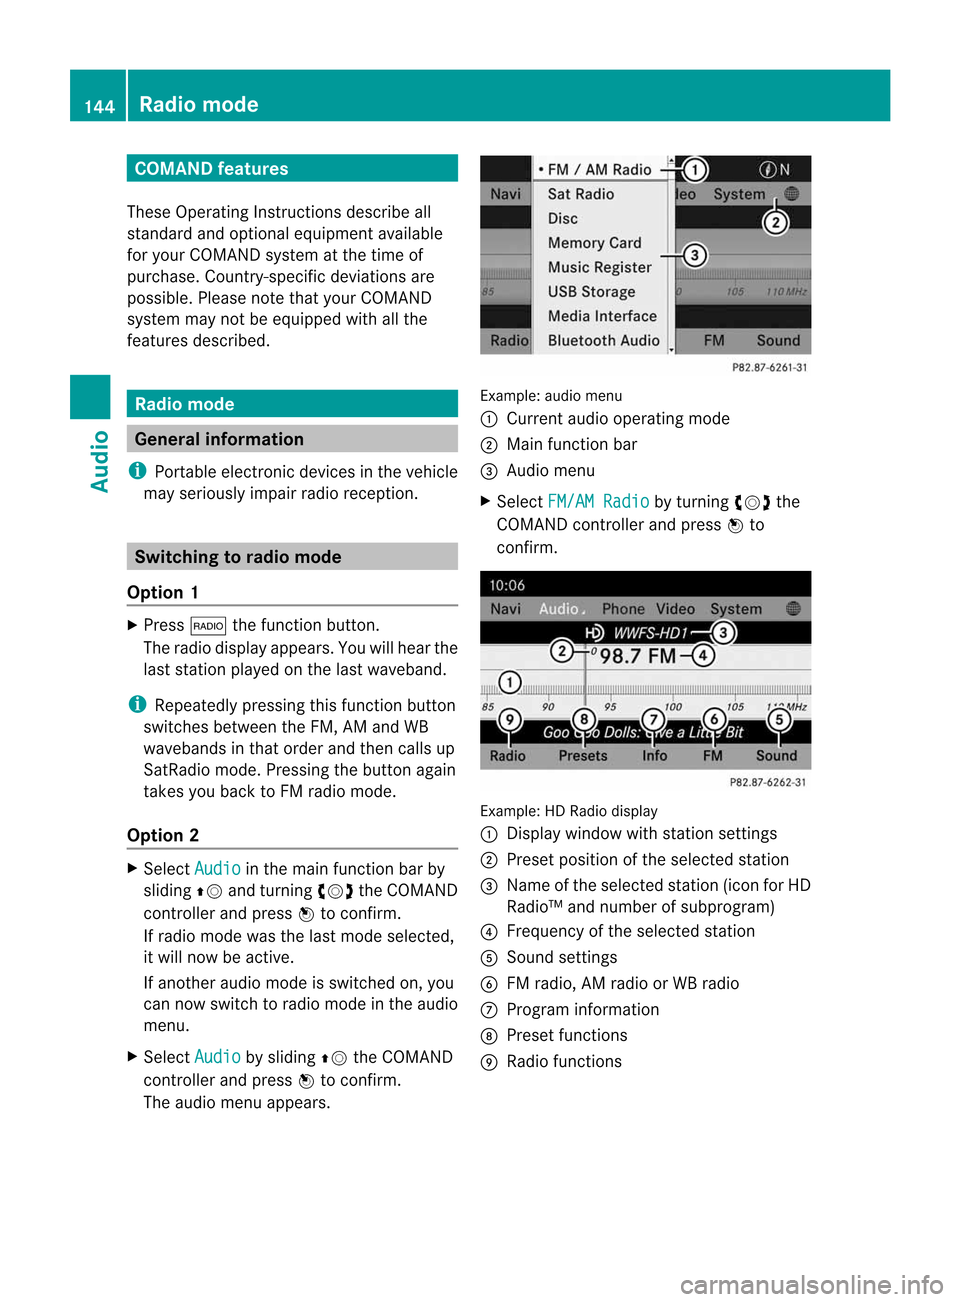
The audio menu appears. Ex
ample: audiomenu
: Current audiooperatin gmode
; Main function bar
= Audio menu
X Select FM/AM Radio by
turn ingcVd the
COMAND controller andpress Wto
con firm. Ex
ample: HDRadio display
: Display window withstationsett ings
; Preset position ofthe select edstat ion
= Name ofthe select edstat ion(icon forHD
Radio™ andnumber ofsubprogram)
? Frequenc yofthe select edstat ion
A Sound settings
B FM radio, AMradio orWB radio
C Program information
D Preset functions
E Radio functions 144
Rad
iomodeAudio
Page 147 of 234

Note
sonH DR adio™
i Thef unctio nsofHD Radio™ include:
R digital transmi ssion inthe same
wa veb and sasa nalogA M/FM .The
analog AM/FMstations remain inthe
same position whenselecting astati on.
R the ability tobro adcas tseveral program
str eams overasingle FMfrequenc y(e.g.
HD 1,HD 2e tc.).
R int erferen ce-free, clear recept ion.
R FM: sound inCD quality; AM:sound as
on analog FMstat ions.
R tex t-based information (e.g.artist ,trac k
name) inthe display.
For furth erinfor mation onHD Radio™, visit
htt p://ww w.hdradio.com.
You candeactivat eHDR adio™ forthe
select edfrequenc yint he radio submenu. X
Select Radio in
the radio display bysliding
VÆ theCOMAND controller andpress W
to con firm.
X Select HDRadio and
press Wtocon firm.
HD Radio™ isdeactivat edifthe ªchec k
box isempty.
You hear theanalog program ofthis
frequenc y.
As soon asyou change toanoth erHD Radio
frequenc y,the HDRadio™ isreact ivated. Switching
wavebands
Opt ion 1 You
canswitch theradio between theFM, AM
and WBwaveband.
X Press the$ function button repeatedly
until thedesired waveband isselect ed.
i Repeatedly pressingthisfunc tion button
switches betweentheFM, AMand WB
wavebands inthat order andthen calls up
SatRadio mode.Pressin gthe button again
takes youback toFM radio mode.
Opt ion 2 X
Select FM ,
AM or
WB in
the radio display by
sliding VÆandturningcVd theCOMAND
con troller andpress Wtocon firm.
Waveband submenuisopened. 1
Waveband submenu
The #dot shows thecurren tlyselect ed
waveband.
X Select awaveband andpress Wtocon firm.
You willhear thelast stationplayed onthe
select edwaveband. Rad
iomode
145Audio
Page 148 of 234

Selec
tingastatio n
Se lecti ng astatio nusing the stati on
se arc hfuncti on X
Press theE orF button.
or
X Turn cVd orslide XVY theCOMAND
controlle rwhile thedispla y/selection
window inthe radio displa yisa ctive.
Stat ionsearch scansupordown andstops
at the next station found.
Selec tingstations viathe stat ion
presets X
Quick setting: pressanumber key,e.g.
l.
X Directly inthe stat ionpresets: select
Presets by
sliding VÆandturning cVd
the COMAND controller andpress Wto
confirm .
or
X Press Wthe COMAND controller when the
displa y/selection windowisactive.
The station presetmemory appears.The
# dot indicates underwhich preset the
current lyselected stationisstored.
X Select astation byturning cVdand
pressing Wtoconfirm orpress anumber
key, e.g.l.
Selec tingstations byentering the
frequency manually X
Option 1:press thel button.
X Option 2:select Radio in
the radio displa y
by sliding VÆandturning cVdthe
COMAND controller andpress Wto
confirm .
X Select Enter Frequency and
press Wto
confirm .
Irrespect iveofthe option chosen, aninput
menu willappea r. X
Ent erafrequency usingthenumber keys.
COMAND tunesinto the frequency
entered. Waveband Frequency
AM
(MF) 530
–1700 kHz FM
(VHF) 87.7
–107. 9M Hz WB
(Weather Band) Weather
report
channels i
You canonly enter current lypermitted
numbers.
i Ifyou enter afrequency inthe FMorAM
waveba ndswhich isoutside thefrequency
range, COMAND tunesinto the next lower
frequency. Storing
stations
Storing stations manua lly There
areten presets availableforthe FMand
AM waveba nds.
X Quick save:pressandhold anumber key,
e.g. l,u ntilyou hear atone.
The station isstored.
X Directly inthe stat ionpresets: pressW
the COMAND controller when thedispla y/
selection windowisactive.
or
X Select Presets by
sliding VÆandturning
cVd theCOMAND controller andpress
W toconfirm .
In both cases, thestation presets appear.
The #dot indicates underwhich preset
the current lyselected stationisstored. 146
Rad
iomodeAudio
Page 149 of 234

Stati
onmemo ry(exa mple)
X Sel ect apreset byturni ngcVd the
CO MAND controllera nd pre ssand hold
W unti lyou hea rat one.
Th es tatio niss tored under thepreset.
Storing stations automatically This
function automaticall ystores stations
with adequ atereception underthepresets.
The search startsatthe lowest frequency.
COMAND storesanystations found,
beginning withpreset 1.The storing process
ends once thehighest frequency hasbeen
reached oronce tenstations havebeen
found. Anystations storedmanuall yunder
the presets willbelost. COMAND maynot
occupy allmemory slotswhen storing.
X Option 1:press Wthe COMAND controller
when thedispla y/selection windowis
active.
The station presetmemory appears.
X Option 2:select Presets by
sliding VÆ
and turning cVdtheCOMAND controller
and press Wtoconfirm.
The station presetmemory appears.
X Irrespective ofthe option, select
Autostore and
press Wtoconfirm.
In both cases, COMAND searchesfor
stations thatcanbereceived. Youwillsee
am essage tothis effect. Theavail able
stations areautomaticall ystored inthe
preset positions.
X To cance lstoring: selectCancel and
press Wtoconfirm. Weather
Band
Switching on X
Press the$ function buttonrepeatedly
until theWeather Bandisswitched on.
or
X Select thecurrently setwaveba ndFM or
AM by
sliding VÆandturning cVdthe
COMAND controller andpress Wto
confirm.
X Select WB from
themenu andpress Wto
confirm.
Searching forachanne l X
Quic kselect: turncVd orslide XVY the
COMA NDcontroller while thed isplay/
selec tionwindow isact ive.
or
X Press theE orF button.
Chann elsearc hscan supo rdown and
st ops atthe nextchan nelfoun d.
Selecting achanne lfrom thechann el
lis t X
Select Channe l by
sliding VÆandturning
cVd theCOMAND controllerand press
W toconfirm.
The channel lista ppears. Ra
dio mod e
147Audio
Page 150 of 234

X
Sel ect achannel byturni ngcVd the
CO MAND controllera nd pre ssW to
confi rm.
or
X Pre ssan um berk ey on the control panel,
e.g. 4,atany time. Displaying
stationinform ation
This function isonly available foranalog FM
programs anddigital AM/FMprograms (HD
Radio™).
Inf ormation relevanttothe curren tstat ion is
shown belowthemain function bar.
X Select Radio in
the radio display bysliding
VÆ andturningcVd theCOMAND
con troller andpress Wtocon firm. X
Select ShowStation Information by
sliding VÆandturningcVd theCOMAND
con troller andpress Wtocon firm.
Depen dingonthe previous status,you
switch ShowStation Information on
O oroff ª. Displaying
program information
This function isonly available foranalog FM
programs anddigital AM/FMprograms (HD
Radio™).
Inf ormation relevanttothe curren tstat ion is
shown inthe display window. X
Select Info in
the radio display bysliding
VÆ andturningcVd theCOMAND
con troller andpress Wtocon firm.
Inf ormation onthe curren tlyselect ed
stat ionisdisplayed. Contentisd ependent
on the station. X
To retur ntothe radio display: confirm
Info by
pressing W.
X Slide ZVtheCOMAND controller up. Satellite
radio Importa
ntnotes
This section provides detailedinformation on
the followi ngtopics:
R selecting achannel andprogram category
R memory functions
R sound settings
i The satellite radiomode described below
requires optionally available satellite radio
equip ment andregistration withasatellite
radio provider.
i Note thatthecategories andchannels
shown inthe illustrations dependonthe
program contentoffered bythe provider.
The program contents mayvary. The
illu strations anddescriptions inthese
operating instructionsmay therefore differ
from thechannels andcategories offered
by the provider.
Satellite radiomode maybetemporarily
unavail ableorinterrupted foravariety of
reasons. Thesereasons include 148
Satellite
radioAudio