seats MERCEDES-BENZ E-Class WAGON 2012 W212 User Guide
[x] Cancel search | Manufacturer: MERCEDES-BENZ, Model Year: 2012, Model line: E-Class WAGON, Model: MERCEDES-BENZ E-Class WAGON 2012 W212Pages: 396, PDF Size: 17.07 MB
Page 61 of 396

Special seat belt retractor
All seat belts except the driver's seat belt are
equipped with a special seat belt retractor.
When activated, the special seat belt
retractor ensures the seat belt will not
slacken once the child restraint system has
been secured.
Installing a child restraint system:
XAlways comply with the manufacturer's
installation instructions.XPull the seat belt smoothly from the inertia
reel.XEngage the seat belt tongue in the belt
buckle.
Activating the special seat belt retractor:
XPull the seat belt out fully and let the inertia
reel retract it again.
While the seat belt is retracting, you should
hear a ratcheting sound. The special seat
belt retractor is enabled.XPush down on the child restraint system to
take up any slack.
Removing a child restraint system/
deactivating the special seat belt retractor:
XAlways comply with the manufacturer's
installation instructions.XPress the seat belt release button and
guide the belt tongue to the belt outlet.
The special seat belt retractor is
deactivated.GWARNING
Never release the seat belt buckle while the
vehicle is in motion, since the special seat belt
retractor will be deactivated.
LATCH-type (ISOFIX) child seat anchors
in the rear
GWARNING
Children that are too large for a child restraint
must travel in seats using normal seat belts.
Position shoulder belt across the chest and
shoulder, not face or neck.
In order to attain the correct seating position
for children weighing over 41 lb (18 kg), it may
be necessary to use a booster seat until they
reach a height where a normal lap/shoulder
seat belt lies properly across their bodies
without the need for a booster seat.
Install the child restraint system according to
the manufacturer's instructions.
The child restraint system must be installed
firmly on both brackets.
An incorrectly installed child restraint system
can come loose in the event of an accident,
causing the child to be severely or fatally
injured.
Child restraint systems/child restraint
retaining brackets that are damaged or have
suffered damage due to an impact must be
replaced.
LATCH-type (ISOFIX) is a standardized
securing system for specially designed child
restraint systems on the rear seats. Securing
rings for two LATCH-type (ISOFIX) child
restraint systems are installed on the left and
right of the rear seats.
Secure non LATCH-type (ISOFIX) child
restraint systems using the vehicle's seat belt
system. Always install child restraint systems
according to the manufacturer's instructions.
! When installing the child restraint system,
make sure that the seat belt for the center
seat does not get trapped. Otherwise, the
seat belt could be damaged.Children in the vehicle59SafetyZ
Page 62 of 396
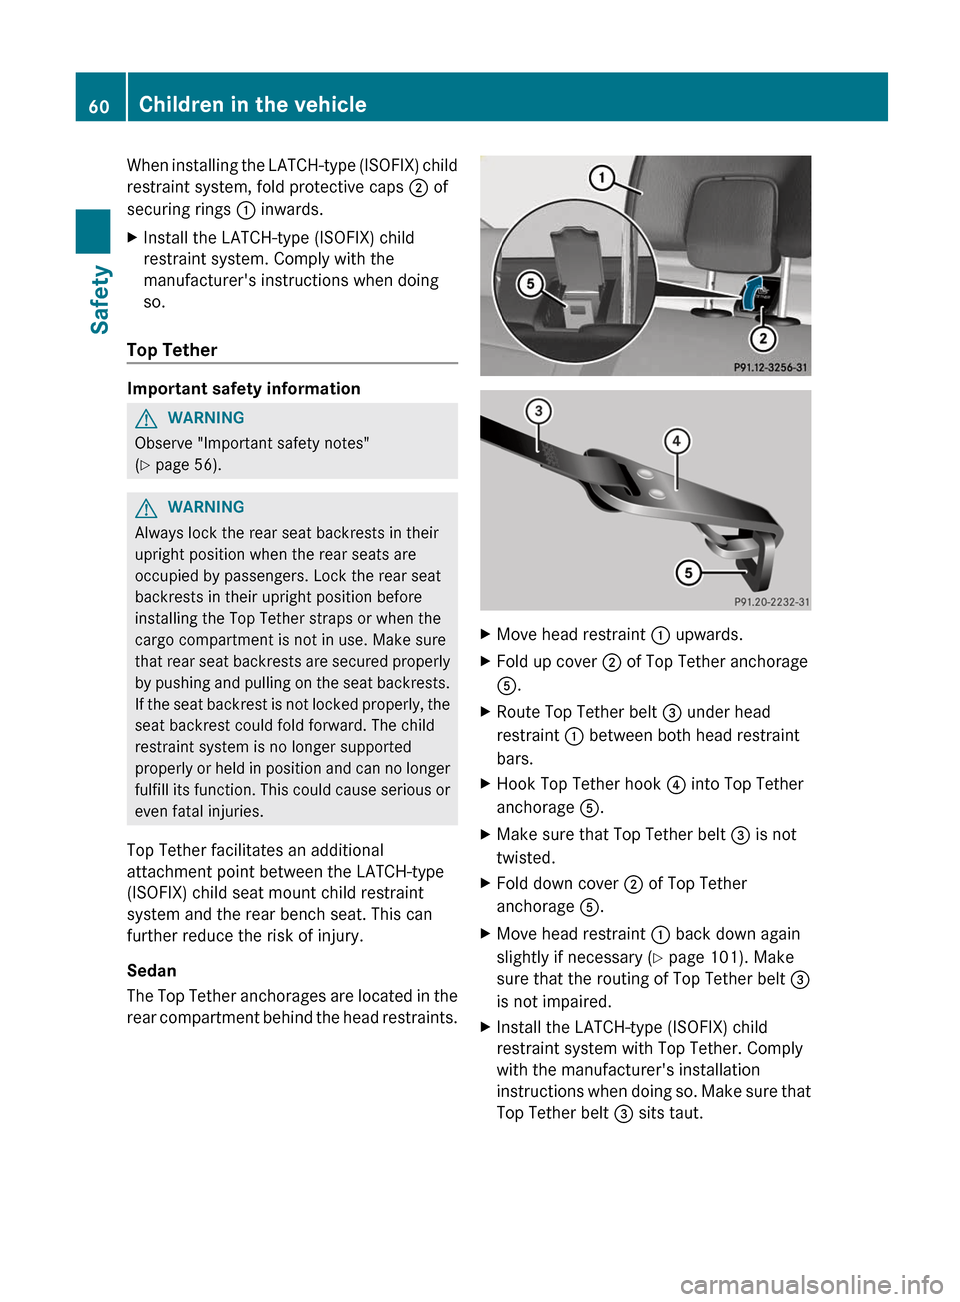
When installing the LATCH-type (ISOFIX) child
restraint system, fold protective caps 2 of
securing rings 1 inwards.XInstall the LATCH-type (ISOFIX) child
restraint system. Comply with the
manufacturer's instructions when doing
so.
Top Tether
Important safety information
GWARNING
Observe "Important safety notes"
( Y page 56).
GWARNING
Always lock the rear seat backrests in their
upright position when the rear seats are
occupied by passengers. Lock the rear seat
backrests in their upright position before
installing the Top Tether straps or when the
cargo compartment is not in use. Make sure
that rear seat backrests are secured properly
by pushing and pulling on the seat backrests.
If the seat backrest is not locked properly, the
seat backrest could fold forward. The child
restraint system is no longer supported
properly or held in position and can no longer
fulfill its function. This could cause serious or
even fatal injuries.
Top Tether facilitates an additional
attachment point between the LATCH-type
(ISOFIX) child seat mount child restraint
system and the rear bench seat. This can
further reduce the risk of injury.
Sedan
The Top Tether anchorages are located in the
rear compartment behind the head restraints.
XMove head restraint : upwards.XFold up cover ; of Top Tether anchorage
A .XRoute Top Tether belt = under head
restraint : between both head restraint
bars.XHook Top Tether hook ? into Top Tether
anchorage A.XMake sure that Top Tether belt = is not
twisted.XFold down cover ; of Top Tether
anchorage A.XMove head restraint : back down again
slightly if necessary ( Y page 101). Make
sure that the routing of Top Tether belt =
is not impaired.XInstall the LATCH-type (ISOFIX) child
restraint system with Top Tether. Comply
with the manufacturer's installation
instructions when doing so. Make sure that
Top Tether belt = sits taut.60Children in the vehicleSafety
Page 64 of 396
children ride in the rear always secure the rear
doors with the child-proof locks.
You secure each door individually with the
child-proof locks on the rear doors. A door
secured with a child-proof lock cannot be
opened from inside the vehicle. When the
vehicle is unlocked, the door can be opened
from the outside.
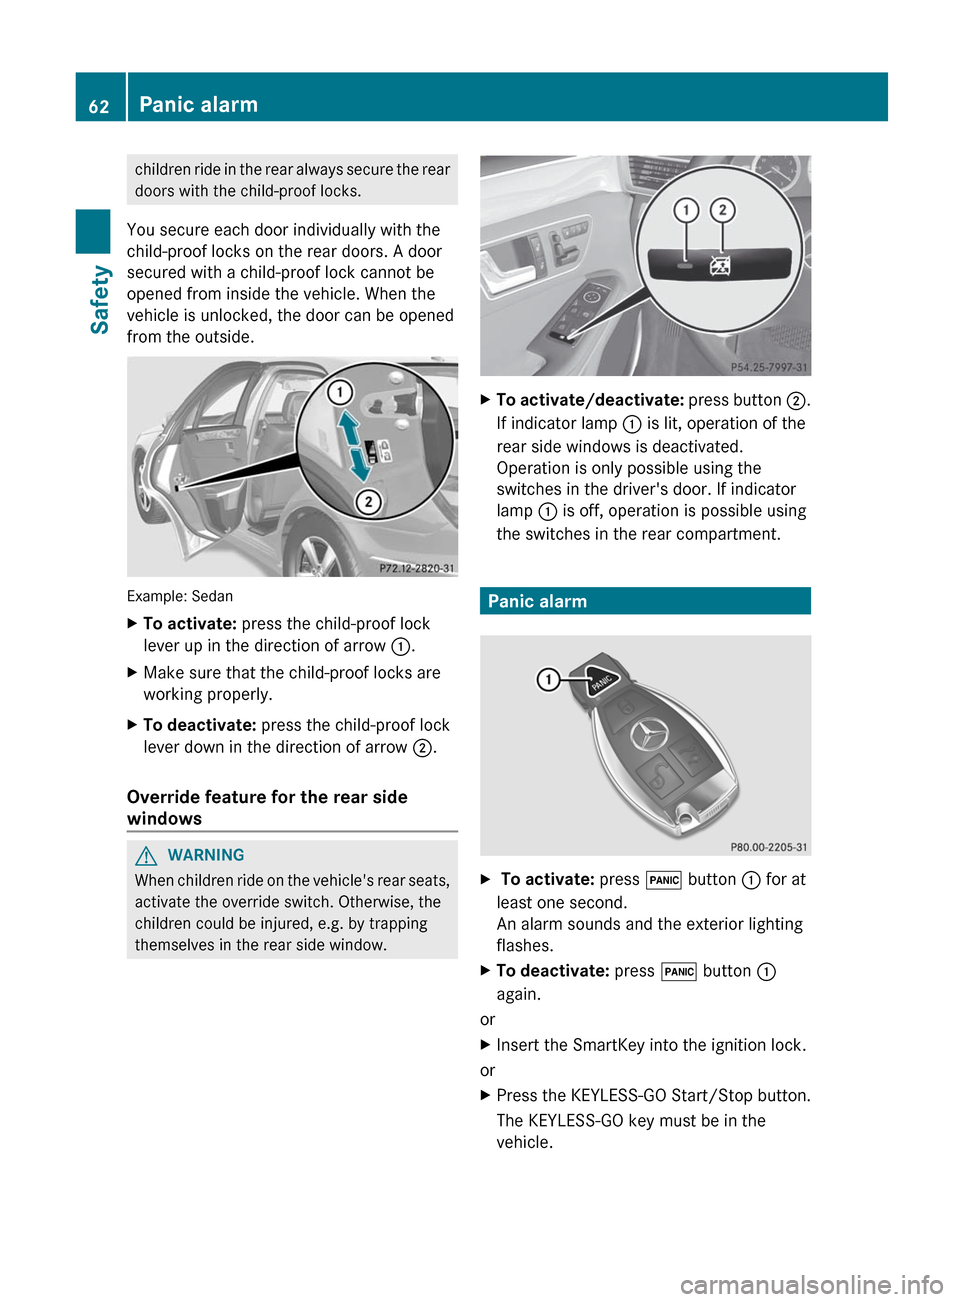
Example: Sedan
XTo activate: press the child-proof lock
lever up in the direction of arrow :.XMake sure that the child-proof locks are
working properly.XTo deactivate: press the child-proof lock
lever down in the direction of arrow ;.
Override feature for the rear side
windows
GWARNING
When children ride on the vehicle's rear seats,
activate the override switch. Otherwise, the
children could be injured, e.g. by trapping
themselves in the rear side window.
XTo activate/deactivate: press button ;.
If indicator lamp : is lit, operation of the
rear side windows is deactivated.
Operation is only possible using the
switches in the driver's door. If indicator
lamp : is off, operation is possible using
the switches in the rear compartment.
Panic alarm
X To activate: press ! button : for at
least one second.
An alarm sounds and the exterior lighting
flashes.XTo deactivate: press ! button :
again.
or
XInsert the SmartKey into the ignition lock.
or
XPress the KEYLESS-GO Start/Stop button.
The KEYLESS-GO key must be in the
vehicle.62Panic alarmSafety
Page 92 of 396
! The tailgate swings upwards and to the
rear when opened. Therefore, make sure
that there is sufficient clearance above and
behind the tailgate.
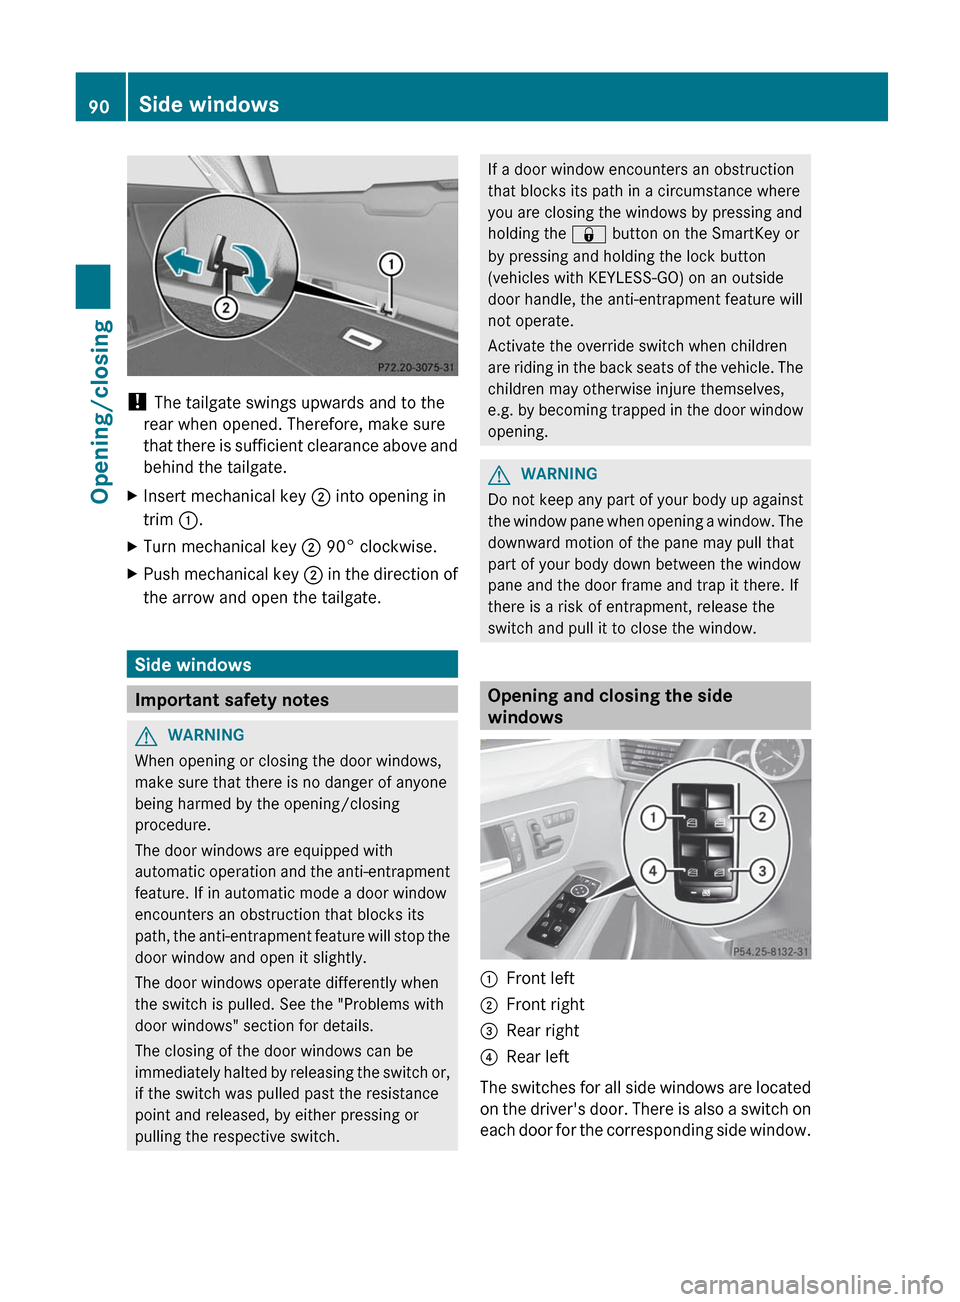
XInsert mechanical key ; into opening in
trim :.XTurn mechanical key ; 90° clockwise.XPush mechanical key ; in the direction of
the arrow and open the tailgate.
Side windows
Important safety notes
GWARNING
When opening or closing the door windows,
make sure that there is no danger of anyone
being harmed by the opening/closing
procedure.
The door windows are equipped with
automatic operation and the anti-entrapment
feature. If in automatic mode a door window
encounters an obstruction that blocks its
path, the anti-entrapment feature will stop the
door window and open it slightly.
The door windows operate differently when
the switch is pulled. See the "Problems with
door windows" section for details.
The closing of the door windows can be
immediately halted by releasing the switch or,
if the switch was pulled past the resistance
point and released, by either pressing or
pulling the respective switch.
If a door window encounters an obstruction
that blocks its path in a circumstance where
you are closing the windows by pressing and
holding the & button on the SmartKey or
by pressing and holding the lock button
(vehicles with KEYLESS-GO) on an outside
door handle, the anti-entrapment feature will
not operate.
Activate the override switch when children
are riding in the back seats of the vehicle. The
children may otherwise injure themselves,
e.g. by becoming trapped in the door window
opening.GWARNING
Do not keep any part of your body up against
the window pane when opening a window. The
downward motion of the pane may pull that
part of your body down between the window
pane and the door frame and trap it there. If
there is a risk of entrapment, release the
switch and pull it to close the window.
Opening and closing the side
windows
:Front left;Front right=Rear right?Rear left
The switches for all side windows are located
on the driver's door. There is also a switch on
each door for the corresponding side window.
90Side windowsOpening/closing
Page 99 of 396
Useful information ..............................98
Correct driver's seat position ............98
Seats .................................................... 99
Steering wheel .................................. 107
Mirrors ............................................... 109
Memory function .............................. 11197Seats, steering wheel and mirrors
Page 100 of 396
Useful information
i This Operator's Manual describes all
models and all standard and optional
equipment of your vehicle available at the
time of publication of the Operator's
Manual. Country-specific differences are
possible. Please note that your vehicle may
not be equipped with all features
described. This also applies to safety-
related systems and functions.
i Please read the information on qualified
specialist workshops ( Y page 25).
Correct driver's seat position
Observe the safety guidelines on seat
adjustment ( Y page 99).
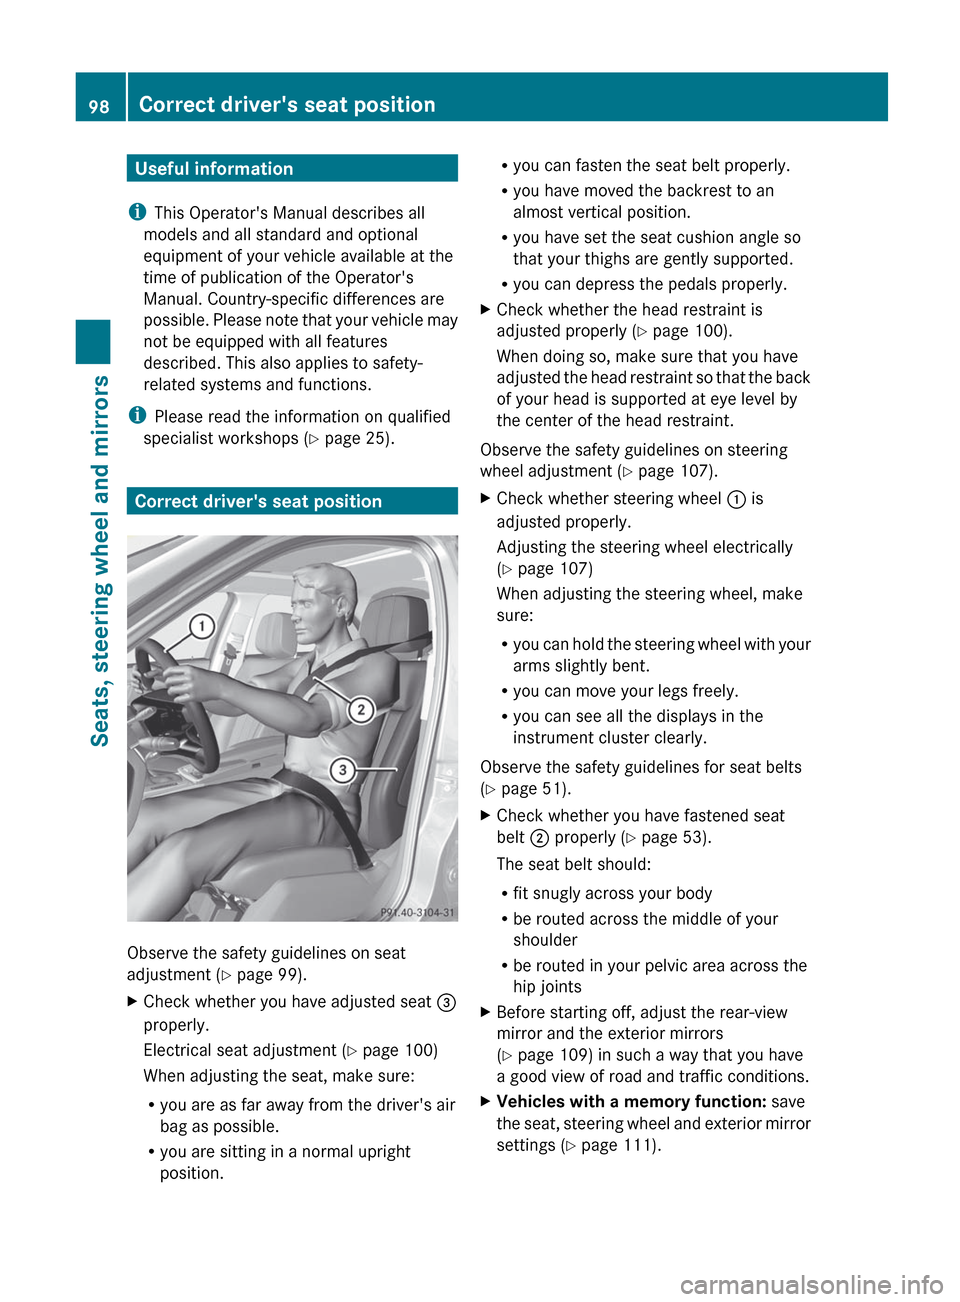
XCheck whether you have adjusted seat =
properly.
Electrical seat adjustment ( Y page 100)
When adjusting the seat, make sure:
R you are as far away from the driver's air
bag as possible.
R you are sitting in a normal upright
position.R you can fasten the seat belt properly.
R you have moved the backrest to an
almost vertical position.
R you have set the seat cushion angle so
that your thighs are gently supported.
R you can depress the pedals properly.XCheck whether the head restraint is
adjusted properly ( Y page 100).
When doing so, make sure that you have
adjusted the head restraint so that the back
of your head is supported at eye level by
the center of the head restraint.
Observe the safety guidelines on steering
wheel adjustment ( Y page 107).
XCheck whether steering wheel : is
adjusted properly.
Adjusting the steering wheel electrically
( Y page 107)
When adjusting the steering wheel, make
sure:
R you can hold the steering wheel with your
arms slightly bent.
R you can move your legs freely.
R you can see all the displays in the
instrument cluster clearly.
Observe the safety guidelines for seat belts
( Y page 51).
XCheck whether you have fastened seat
belt ; properly ( Y page 53).
The seat belt should:
R fit snugly across your body
R be routed across the middle of your
shoulder
R be routed in your pelvic area across the
hip jointsXBefore starting off, adjust the rear-view
mirror and the exterior mirrors
( Y page 109) in such a way that you have
a good view of road and traffic conditions.XVehicles with a memory function: save
the seat, steering wheel and exterior mirror
settings ( Y page 111).98Correct driver's seat positionSeats, steering wheel and mirrors
Page 101 of 396

Seats
Important safety notes
GWARNING
In order to avoid possible loss of vehicle
control, all seat, head restraint, steering
wheel and rear view mirror adjustments, as
well as fastening of seat belts, must be done
before setting the vehicle in motion.
GWARNING
Do not adjust the driver's seat while driving.
Adjusting the seat while driving could cause
the driver to lose control of the vehicle.
Never travel in a moving vehicle with the seat
backrest in an excessively reclined position as
this can be dangerous. You could slide under
the seat belt in a collision. If you slide under
it, the seat belt would apply force at the
abdomen or neck. This could cause serious or
fatal injuries. The seat backrest and seat belts
provide the best restraint when the wearer is
in a position that is as upright as possible and
seat belts are properly positioned on the
body.
GWARNING
Your seat belt must be adjusted so that you
can correctly fasten your seat belt.
Observe the following points:
R adjust the seat backrest until your arms are
slightly angled when holding the steering
wheel.
R adjust the seat to a comfortable seating
position that still allows you to reach the
accelerator/brake pedal safely. The
position should be as far back as possible
with the driver still able to operate the
controls properly.
R adjust the head restraint so that it is as
close to the head as possible and the center
of the head restraint supports the back of
the head at eye level.
R never place hands under the seat or near
any moving parts while a seat is being
adjusted.
Failure to do so could result in an accident
and/or serious personal injury.GWARNING
The electrically adjustable seats can be
operated at any time. Therefore, do not leave
children unattended in the vehicle, or with
access to an unlocked vehicle. A child's
unsupervised access to a vehicle could result
in an accident and/or serious personal injury.
GWARNING
According to accident statistics, children are
safer when properly restrained in the rear
seating positions than in the front seating
position. Thus, we strongly recommend that
children be placed in the rear seats whenever
possible. Regardless of seating position,
children 12 years old and under must be
seated and properly secured in an
appropriately sized infant restraint, toddler
restraint, or booster seat recommended for
the size and weight of the child. For additional
information, see "Children in the vehicle".
A child's risk of serious or fatal injuries is
significantly increased if the child restraints
are not properly secured in the vehicle and/
or the child is not properly secured in the child
restraint.
GWARNING
For your protection, drive only with properly
positioned head restraints.
Adjust the head restraint so that it is as close
to the head as possible and the center of the
head restraint supports the back of the head
at eye level. This will reduce the potential for
injury to the head and neck in the event of an
accident or similar situation.
Seats99Seats, steering wheel and mirrorsZ
Page 102 of 396
Do not drive the vehicle without the seat head
restraints. Head restraints are intended to
help reduce injuries during an accident.
! To avoid damage to the seats and the seat
heating, observe the following information:
R keep liquids from spilling on the seats. If
liquid is spilled on the seats, dry them as
soon as possible.
R if the seat covers are damp or wet, do not
switch on the seat heating. The seat
heating should also not be used to dry
the seats.
R clean the seat covers as recommended;
see the "Interior care" section.
R do not transport heavy loads on the
seats. Do not place sharp objects on the
seat cushions, e.g. knives, nails or tools.
The seats should only be occupied by
passengers, if possible.
R when the seat heating is in operation, do
not cover the seats with insulating
materials, e.g. blankets, coats, bags,
seat covers, child seats or booster seats.
! When you move the seats, make sure that
there are no objects in the footwell or
behind the seats. Otherwise, you could
damage the seats and the objects.
i The head restraints in the front seats are
equipped with the NECK-PRO system
( Y page 50). For this reason, it is not
possible to remove the head restraints
from the front seats.
Vehicles without the through-loading
feature: the head restraints cannot be
removed from the rear compartment seats.
Please contact an authorized Mercedes-
Benz Center for more information.
i Other topics:
R Through-loading feature in the rear
bench seat (Sedan) ( Y page 279)
R EASY-PACK through-loading feature in
the rear bench seat (Wagon)
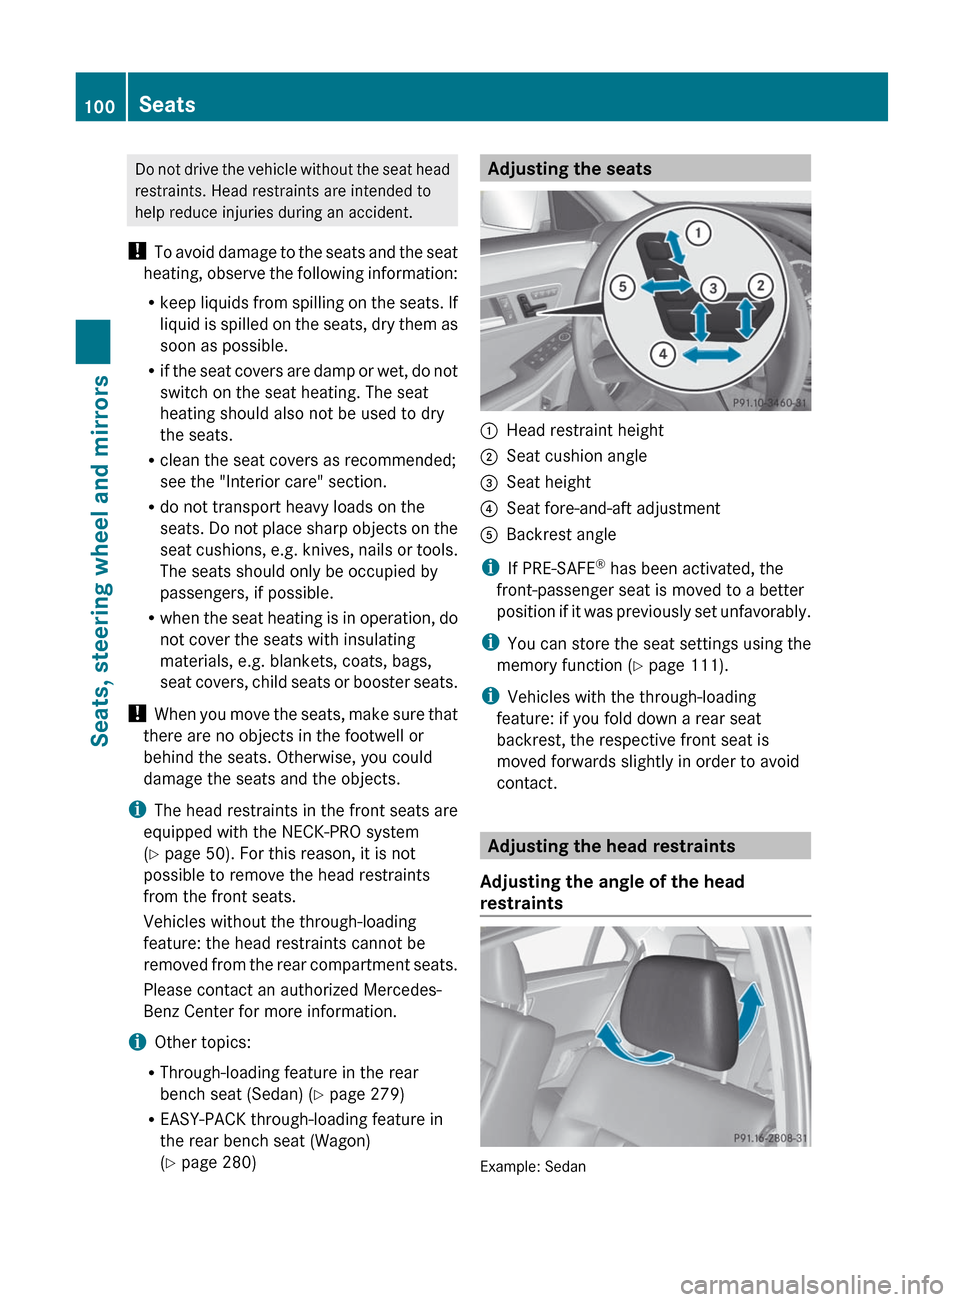
( Y page 280)Adjusting the seats:Head restraint height;Seat cushion angle=Seat height?Seat fore-and-aft adjustmentABackrest angle
i
If PRE-SAFE ®
has been activated, the
front-passenger seat is moved to a better
position if it was previously set unfavorably.
i You can store the seat settings using the
memory function ( Y page 111).
i Vehicles with the through-loading
feature: if you fold down a rear seat
backrest, the respective front seat is
moved forwards slightly in order to avoid
contact.
Adjusting the head restraints
Adjusting the angle of the head
restraints
Example: Sedan
100SeatsSeats, steering wheel and mirrors
Page 103 of 396
XPush or pull the lower edge of the head
restraint in the direction of the arrow.
Adjusting the head restraint height
electrically
XTo adjust the head restraint height: slide
the switch for head restraint adjustment
( Y page 100) up or down in the direction of
the arrow.
Adjusting luxury head restraints
GWARNING
When folding back the side cushions, never
reach between the side cushion and the
mounting post. You could otherwise be
trapped.
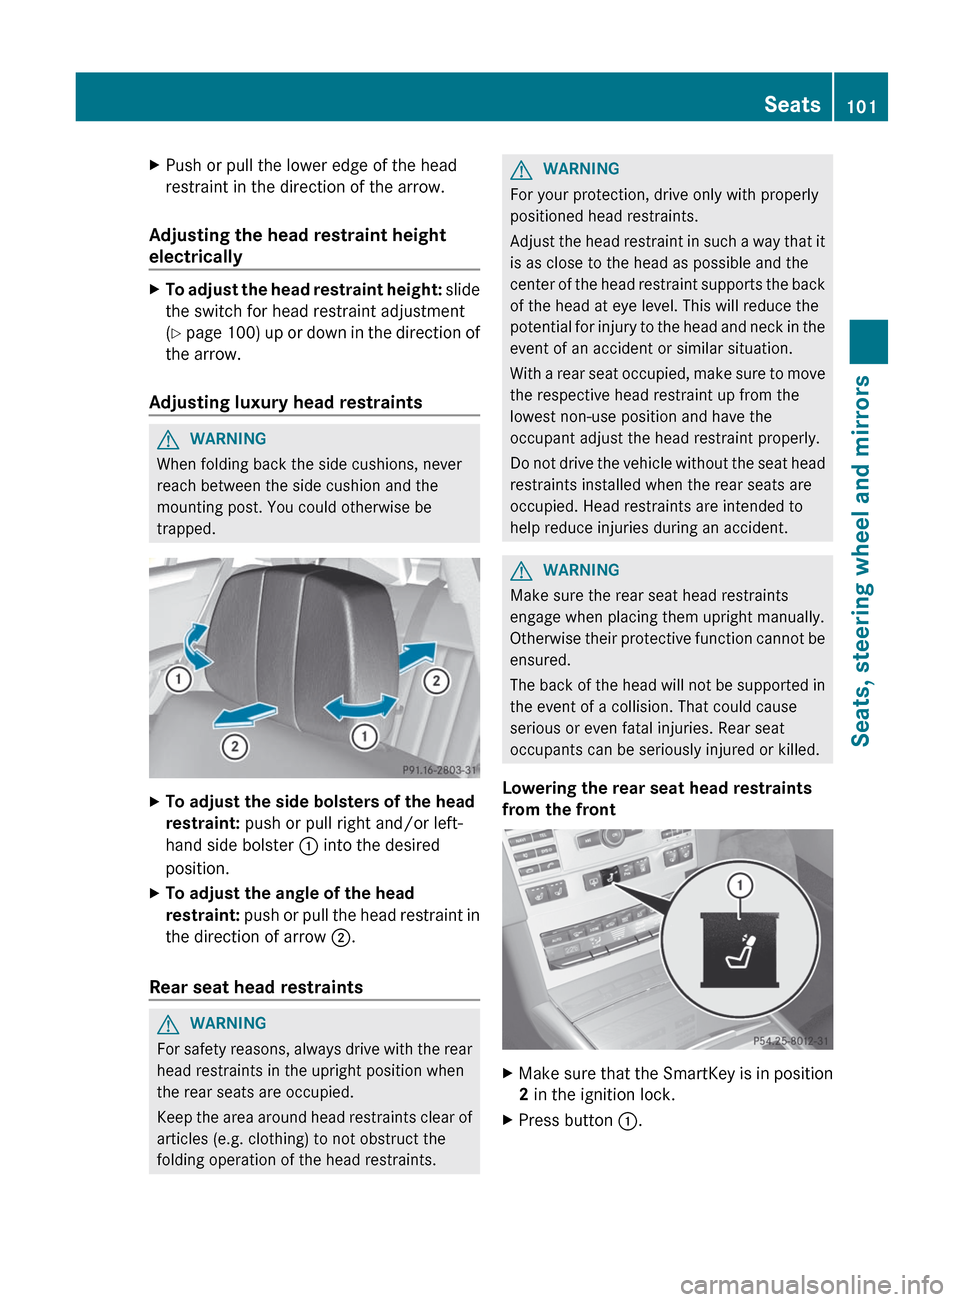
XTo adjust the side bolsters of the head
restraint: push or pull right and/or left-
hand side bolster : into the desired
position.XTo adjust the angle of the head
restraint: push or pull the head restraint in
the direction of arrow ;.
Rear seat head restraints
GWARNING
For safety reasons, always drive with the rear
head restraints in the upright position when
the rear seats are occupied.
Keep the area around head restraints clear of
articles (e.g. clothing) to not obstruct the
folding operation of the head restraints.
GWARNING
For your protection, drive only with properly
positioned head restraints.
Adjust the head restraint in such a way that it
is as close to the head as possible and the
center of the head restraint supports the back
of the head at eye level. This will reduce the
potential for injury to the head and neck in the
event of an accident or similar situation.
With a rear seat occupied, make sure to move
the respective head restraint up from the
lowest non-use position and have the
occupant adjust the head restraint properly.
Do not drive the vehicle without the seat head
restraints installed when the rear seats are
occupied. Head restraints are intended to
help reduce injuries during an accident.
GWARNING
Make sure the rear seat head restraints
engage when placing them upright manually.
Otherwise their protective function cannot be
ensured.
The back of the head will not be supported in
the event of a collision. That could cause
serious or even fatal injuries. Rear seat
occupants can be seriously injured or killed.
Lowering the rear seat head restraints
from the front
XMake sure that the SmartKey is in position
2 in the ignition lock.XPress button :.Seats101Seats, steering wheel and mirrorsZ
Page 104 of 396
Adjusting the rear seat head restraint
height
Example: Sedan
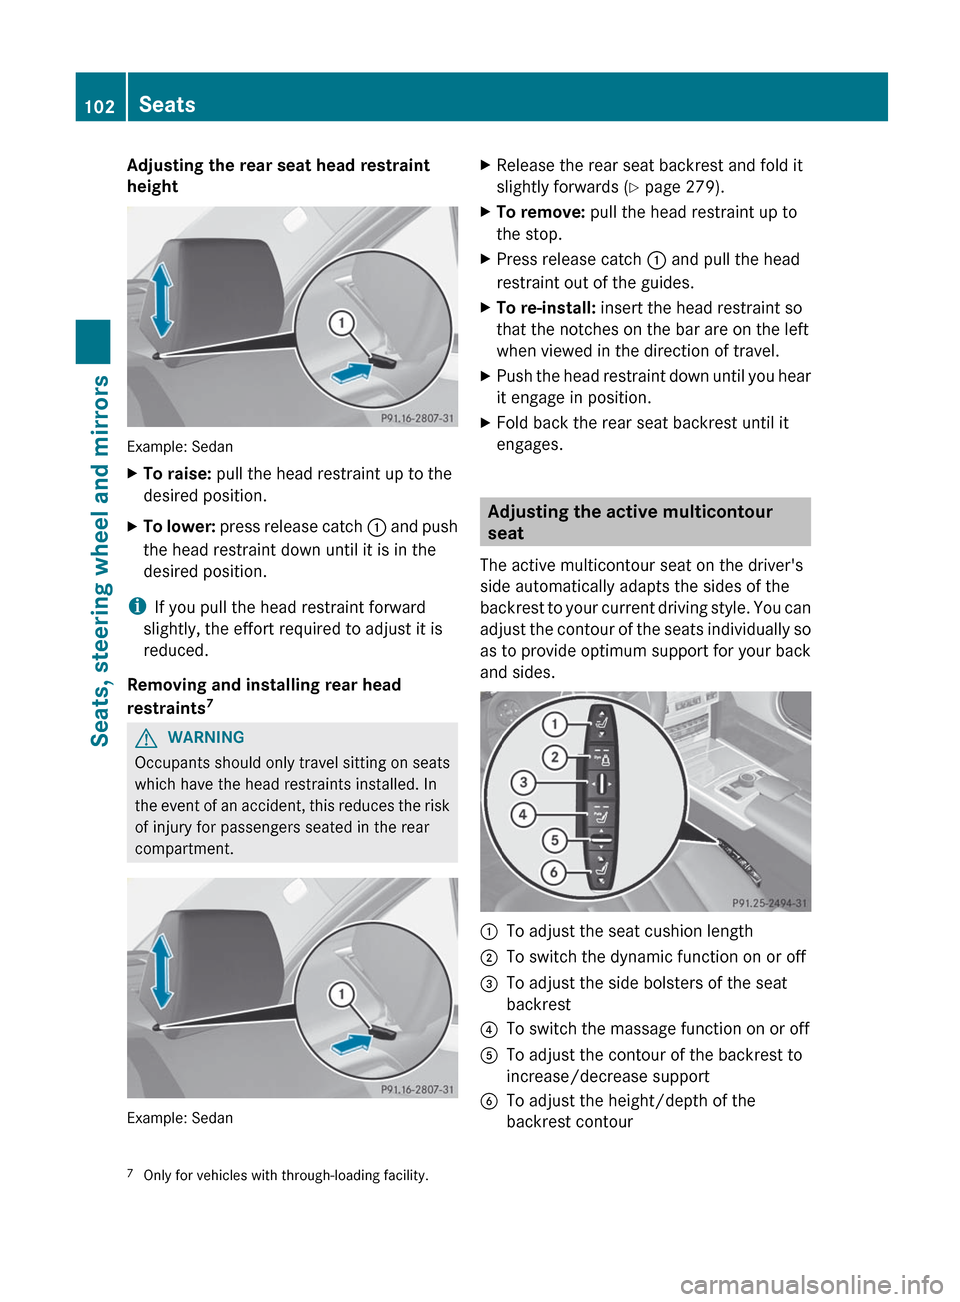
XTo raise: pull the head restraint up to the
desired position.XTo lower: press release catch : and push
the head restraint down until it is in the
desired position.
i If you pull the head restraint forward
slightly, the effort required to adjust it is
reduced.
Removing and installing rear head
restraints 7
GWARNING
Occupants should only travel sitting on seats
which have the head restraints installed. In
the event of an accident, this reduces the risk
of injury for passengers seated in the rear
compartment.
Example: Sedan
XRelease the rear seat backrest and fold it
slightly forwards ( Y page 279).XTo remove: pull the head restraint up to
the stop.XPress release catch : and pull the head
restraint out of the guides.XTo re-install: insert the head restraint so
that the notches on the bar are on the left
when viewed in the direction of travel.XPush the head restraint down until you hear
it engage in position.XFold back the rear seat backrest until it
engages.
Adjusting the active multicontour
seat
The active multicontour seat on the driver's
side automatically adapts the sides of the
backrest to your current driving style. You can
adjust the contour of the seats individually so
as to provide optimum support for your back
and sides.
:To adjust the seat cushion length;To switch the dynamic function on or off=To adjust the side bolsters of the seat
backrest?To switch the massage function on or offATo adjust the contour of the backrest to
increase/decrease supportBTo adjust the height/depth of the
backrest contour7 Only for vehicles with through-loading facility.102SeatsSeats, steering wheel and mirrors