change time MERCEDES-BENZ E-Class WAGON 2012 W212 Owner's Guide
[x] Cancel search | Manufacturer: MERCEDES-BENZ, Model Year: 2012, Model line: E-Class WAGON, Model: MERCEDES-BENZ E-Class WAGON 2012 W212Pages: 396, PDF Size: 17.07 MB
Page 205 of 396

Problems with Night View Assist PlusProblemPossible causes/consequences and M SolutionsThe picture quality of
Night View Assist Plus
has deteriorated.The windshield wipers are smearing the windshield.XReplace the wiper blades ( Y page 125).The windshield is smeared after the vehicle has been cleaned in a
car wash.XClean the windshield ( Y page 317).There is windshield chip damage in the camera's field of vision.XReplace the windshield.The windshield is fogged up on the inside.XDefrost the windshield ( Y page 138).The windshield is iced up.XDe-ice the windshield ( Y page 138).There is dirt on the inside of the windshield.XClean the inside of the windshield ( Y page 317).Lane Tracking package
General notes
The Lane Tracking package consists of Blind
Spot Assist ( Y page 203) and Lane Keeping
Assist ( Y page 205).
Blind Spot Assist
Important safety notes
Blind Spot Assist uses a radar sensor system
to monitor the areas on both sides of your
vehicle. It supports you from speeds of
approximately 20 mph (30 km/h). A warning
display in the exterior mirrors draws your
attention to vehicles detected in the
monitored area. If you then switch on the
corresponding turn signal to change lane, you
will also receive an optical and audible
collision warning. Blind Spot Assist uses
sensors in the rear bumper for monitoring
purposes.
GWARNING
Blind Spot Assist is only an aid designed to
assist driving. It may fail to detect some
vehicles and is no substitute for attentive
driving.
Blind Spot Assist cannot detect road and
traffic conditions. It may fail to detect narrow
vehicles, such as motorcycles or bicycles, or
may only detect them too late.
Monitoring may be affected by dirty sensors,
strong spray or poor visibility caused by snow,
rain or mist, for example. In this case, vehicles
are detected late or not at all.
Always pay attention to traffic conditions and
your surroundings. Otherwise, you may fail to
recognize dangers in time, cause an accident
and injure yourself and others.
i USA only:
This device has been approved by the FCC
as a “Vehicular Radar System”. The radar
sensor is intended for use in an automotive
radar system only. Removal, tampering, or
Driving systems203Driving and parkingZ
Page 208 of 396
The system may be impaired or may not
function if:
R there is poor visibility, e.g. due to
insufficient illumination of the road, or due
to snow, rain, fog or spray.
R there is glare, e.g. from oncoming traffic,
the sun, or reflection from other vehicles.
R the windshield is dirty, fogged up or
covered, for instance by a sticker, in the
vicinity of the camera.
R several or no lane markings for a single lane
are present.
R the lane markings are worn away, dark or
covered up, e.g. by dirt or snow.
R the distance to the vehicle in front is too
small and the lane markings thus cannot be
detected.
R the lane markings on the road are unclear,
e.g. near roadworks.
R the lane markings change quickly, e.g.
lanes branch off, cross one another or
merge.
R the road is narrow and winding.
Lane Keeping Assist cannot detect road and
traffic conditions. It is not a substitute for
attentive driving. You are responsible for the
vehicle's speed, braking in good time, and
steering correctly. Always adapt your driving
style to suit the prevailing road and weather
conditions. Always pay attention to traffic
conditions and your surroundings. Otherwise,
you may fail to recognize dangers in time,
cause an accident and injure yourself and
others.
A warning can be given when a front wheel
passes over a lane marking. It will warn you
by means of intermittent vibration in the
steering wheel for up to 1.5 seconds.
In order that you are warned only when
necessary and in good time if you cross the
lane marking, the system recognizes certain
conditions and warns you accordingly.The warning vibration occurs earlier if:
R you approach the outer lane marking on a
bend.
R the road has very wide lanes, e.g. a
freeway.
R the system recognizes solid lane markings.
The warning vibration occurs later if:
R the road has narrow lanes.
R you cut the corner on a bend.
No warning vibration occurs if:
R you clearly and actively steer, brake or
accelerate.
R you cut the corner on a sharp bend.
R a driving safety system intervenes, e.g.
ABS, BAS or ESP ®
.
R you switch on the turn signals. In this event,
the warnings are suppressed for a certain
period of time.
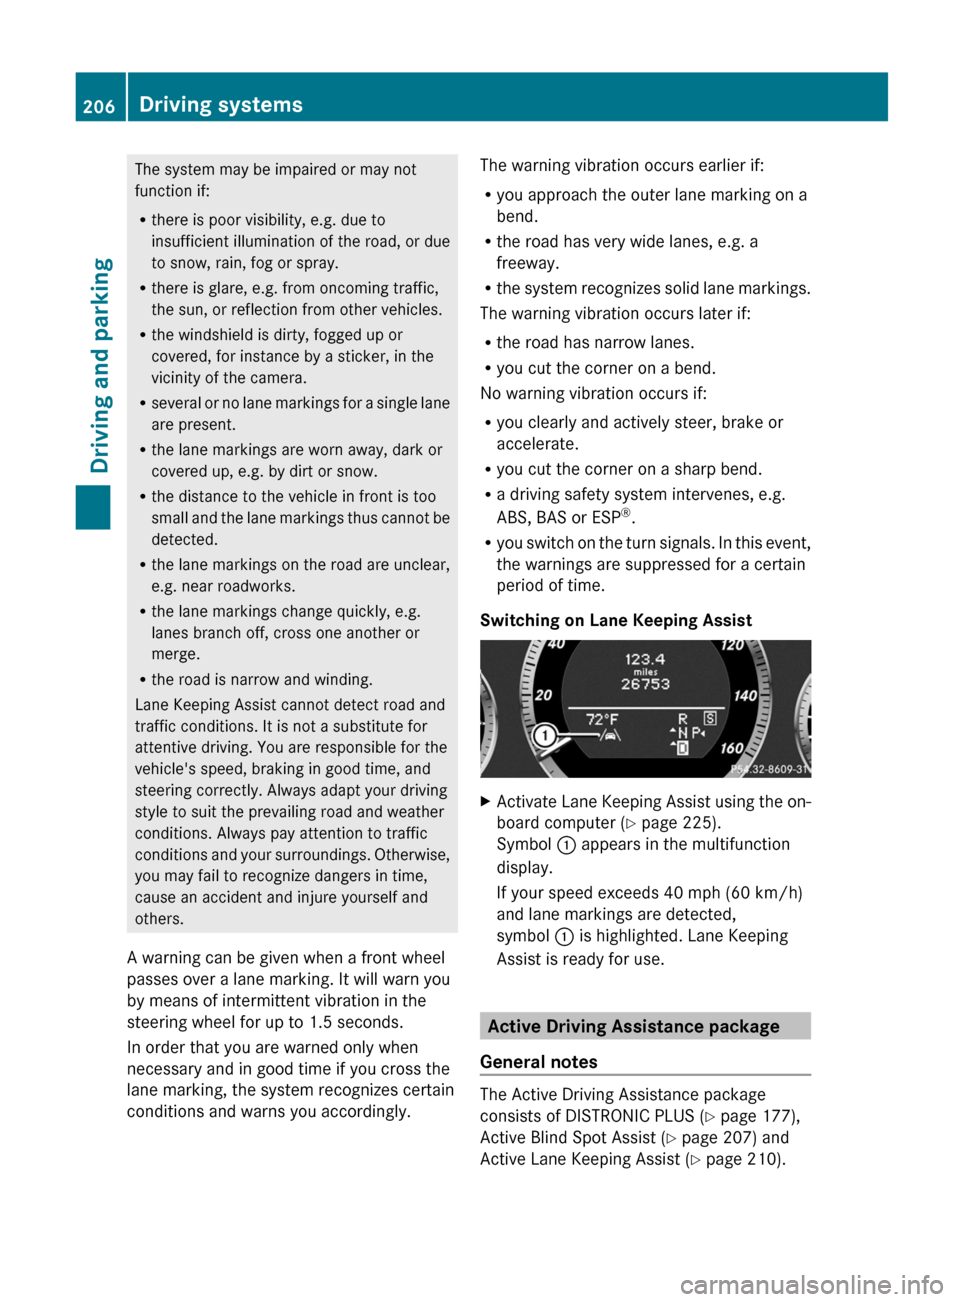
Switching on Lane Keeping AssistXActivate Lane Keeping Assist using the on-
board computer ( Y page 225).
Symbol : appears in the multifunction
display.
If your speed exceeds 40 mph (60 km/h)
and lane markings are detected,
symbol : is highlighted. Lane Keeping
Assist is ready for use.
Active Driving Assistance package
General notes
The Active Driving Assistance package
consists of DISTRONIC PLUS ( Y page 177),
Active Blind Spot Assist ( Y page 207) and
Active Lane Keeping Assist ( Y page 210).
206Driving systemsDriving and parking
Page 209 of 396
Active Blind Spot Assist
Important safety notes
Active Blind Spot Assist uses a radar sensor
system to monitor the side areas of your
vehicle which are in back of the driver. A
warning display in the exterior mirrors draws
your attention to vehicles detected in the
monitored area. If you then switch on the
corresponding turn signal to change lane, you
will also receive an optical and audible
collision warning. If a risk of lateral collision
is detected, corrective braking may help you
avoid a collision. To support the course-
correcting brake application, Active Blind
Spot Assist also uses the forward-facing radar
sensor system. Active Blind Spot Assist
supports you from speeds of approximately
20 mph (30 km/h).
GWARNING
Active Blind Spot Assist is only an aid, and
may detect vehicles/obstacles incorrectly or
not at all.
The system may be impaired or may not
function if:
R there is poor visibility, e.g. due to snow,
rain, fog or spray.
R the rear and/or front sensors are dirty.
Active Blind Spot Assist may not detect
narrow vehicles, such as motorcycles or
bicycles, or may only detect them too late. It
cannot detect vehicles that are overtaken at
a small distance and then enter the blind spot
area.
Active Blind Spot Assist cannot detect road
and traffic conditions. It is not a substitute for
attentive driving. You are responsible for the
vehicle's speed, braking in good time, and
steering correctly. Always adapt your driving
style to suit the prevailing road and weather
conditions. Always pay attention to traffic
conditions and your surroundings. Otherwise,
you may fail to recognize dangers in time,
cause an accident and injure yourself and
others.
i USA only:
This device has been approved by the FCC
as a “Vehicular Radar System”. The radar
sensor is intended for use in an automotive
radar system only. Removal, tampering, or
altering of the device will void any
warranties, and is not permitted by the
FCC. Do not tamper with, alter, or use in
any non-approved way.
Any unauthorized modification to this
device could void the user’s authority to
operate the equipment.
For Active Blind Spot Assist to assist you
when driving, the radar sensor system must
be activated ( Y page 229) and operational.
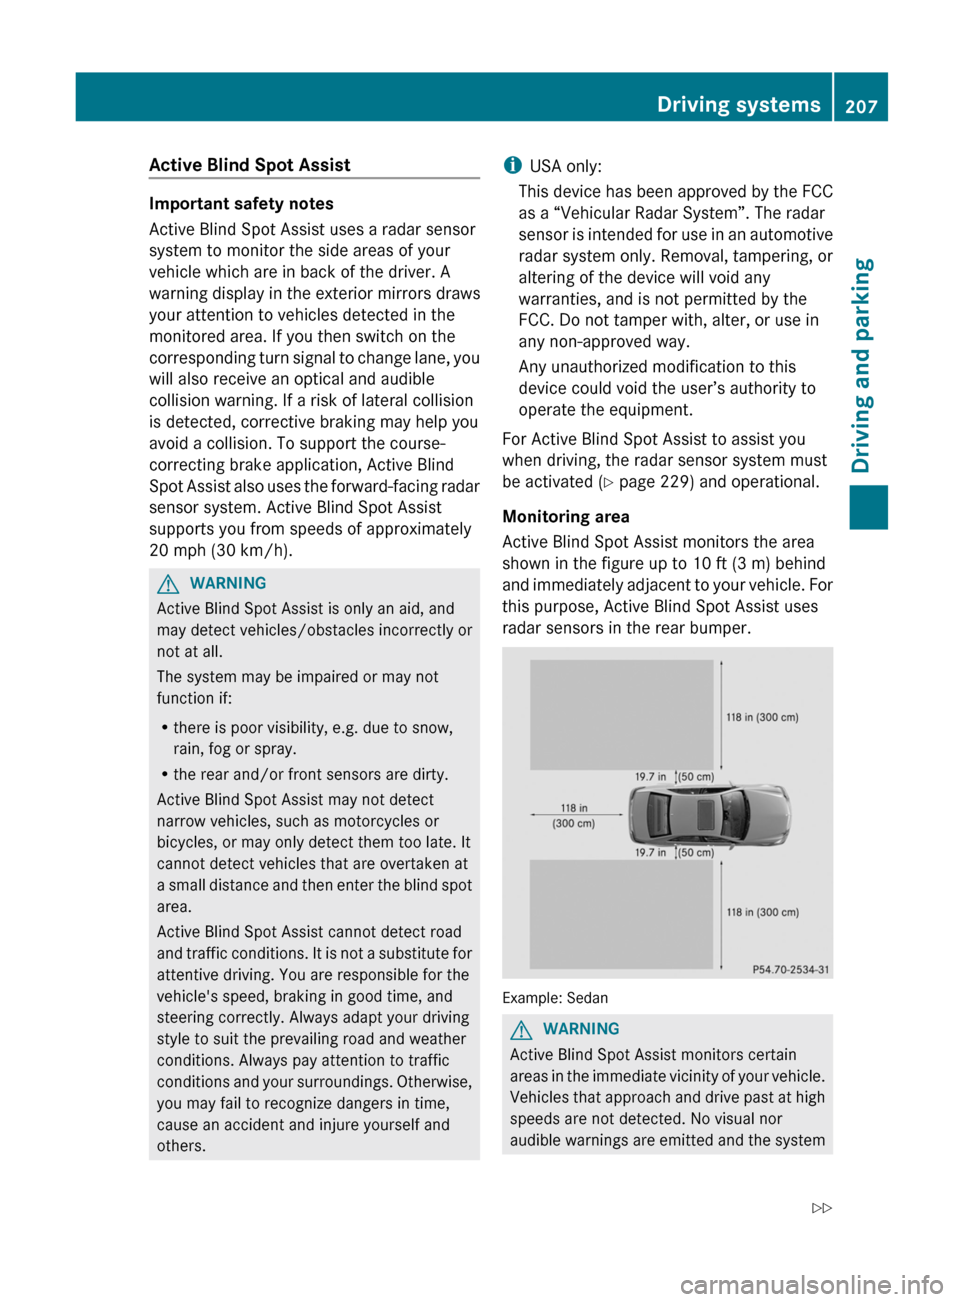
Monitoring area
Active Blind Spot Assist monitors the area
shown in the figure up to 10 ft (3 m) behind
and immediately adjacent to your vehicle. For
this purpose, Active Blind Spot Assist uses
radar sensors in the rear bumper.
Example: Sedan
GWARNING
Active Blind Spot Assist monitors certain
areas in the immediate vicinity of your vehicle.
Vehicles that approach and drive past at high
speeds are not detected. No visual nor
audible warnings are emitted and the system
Driving systems207Driving and parkingZ
Page 212 of 396
Active Lane Keeping Assist
Important safety notes
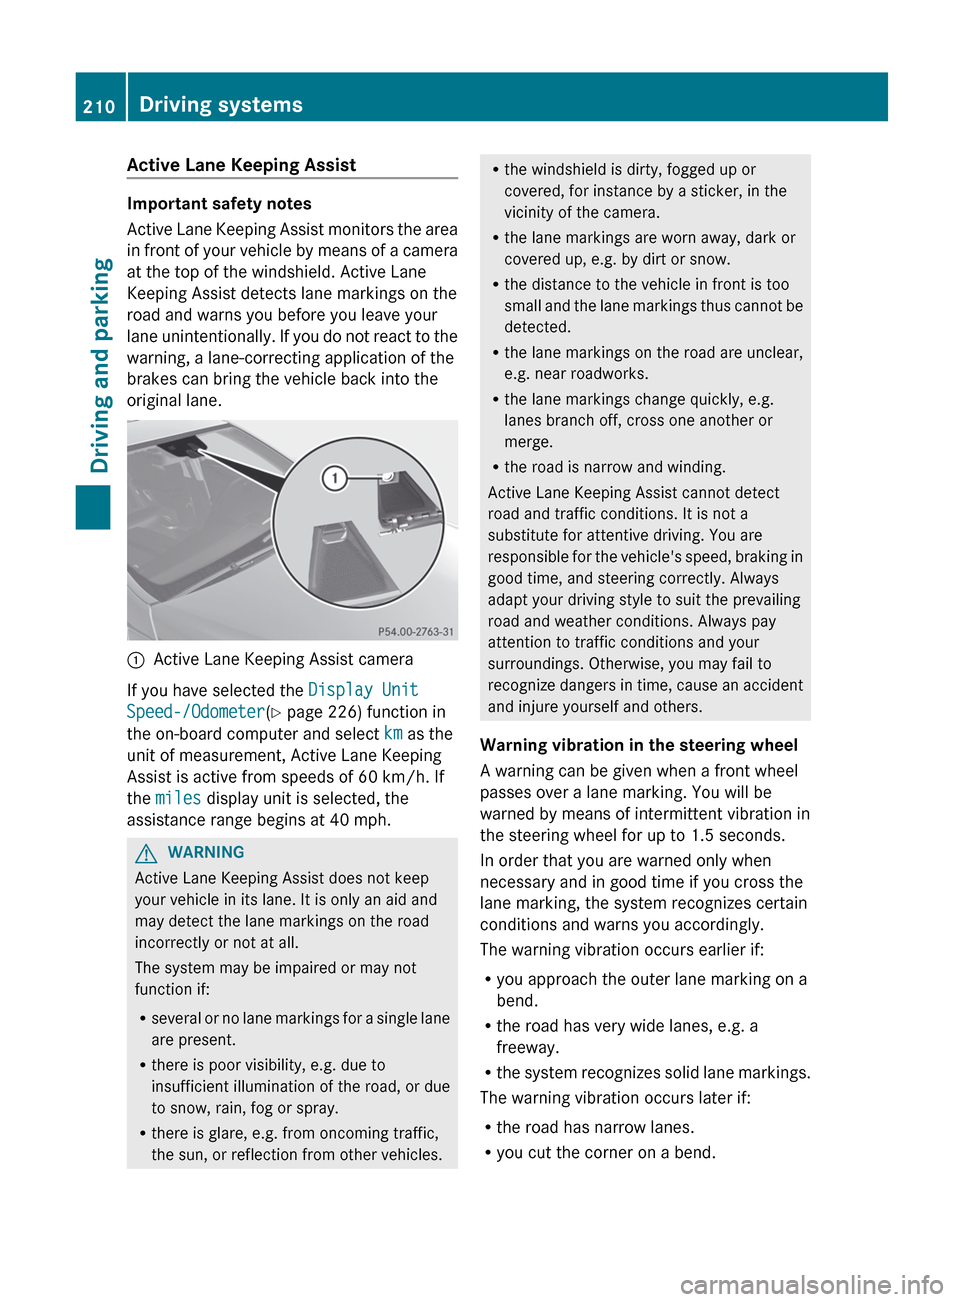
Active Lane Keeping Assist monitors the area
in front of your vehicle by means of a camera
at the top of the windshield. Active Lane
Keeping Assist detects lane markings on the
road and warns you before you leave your
lane unintentionally. If you do not react to the
warning, a lane-correcting application of the
brakes can bring the vehicle back into the
original lane.
:Active Lane Keeping Assist camera
If you have selected the Display Unit
Speed-/Odometer (Y page 226) function in
the on-board computer and select km as the
unit of measurement, Active Lane Keeping
Assist is active from speeds of 60 km/h. If
the miles display unit is selected, the
assistance range begins at 40 mph.
GWARNING
Active Lane Keeping Assist does not keep
your vehicle in its lane. It is only an aid and
may detect the lane markings on the road
incorrectly or not at all.
The system may be impaired or may not
function if:
R several or no lane markings for a single lane
are present.
R there is poor visibility, e.g. due to
insufficient illumination of the road, or due
to snow, rain, fog or spray.
R there is glare, e.g. from oncoming traffic,
the sun, or reflection from other vehicles.
R the windshield is dirty, fogged up or
covered, for instance by a sticker, in the
vicinity of the camera.
R the lane markings are worn away, dark or
covered up, e.g. by dirt or snow.
R the distance to the vehicle in front is too
small and the lane markings thus cannot be
detected.
R the lane markings on the road are unclear,
e.g. near roadworks.
R the lane markings change quickly, e.g.
lanes branch off, cross one another or
merge.
R the road is narrow and winding.
Active Lane Keeping Assist cannot detect
road and traffic conditions. It is not a
substitute for attentive driving. You are
responsible for the vehicle's speed, braking in
good time, and steering correctly. Always
adapt your driving style to suit the prevailing
road and weather conditions. Always pay
attention to traffic conditions and your
surroundings. Otherwise, you may fail to
recognize dangers in time, cause an accident
and injure yourself and others.
Warning vibration in the steering wheel
A warning can be given when a front wheel
passes over a lane marking. You will be
warned by means of intermittent vibration in
the steering wheel for up to 1.5 seconds.
In order that you are warned only when
necessary and in good time if you cross the
lane marking, the system recognizes certain
conditions and warns you accordingly.
The warning vibration occurs earlier if:
R you approach the outer lane marking on a
bend.
R the road has very wide lanes, e.g. a
freeway.
R the system recognizes solid lane markings.
The warning vibration occurs later if:
R the road has narrow lanes.
R you cut the corner on a bend.210Driving systemsDriving and parking
Page 246 of 396
Display messagesPossible causes/consequences and M Solutionsb
Rear Fog LampThe rear fog lamp is defective.XCheck whether you are permitted to change the bulb yourself
( Y page 121).
or
XVisit a qualified specialist workshop.b
Check Front Left
Parking
Lamp or Check Front
Right Parking LampThe front left or front right parking or standing lamp is defective.XCheck whether you are permitted to change the bulb yourself
( Y page 121).
or
XVisit a qualified specialist workshop.b
Check Left Reverse
Lamp or Check Right
Reverse LampThe left or right-hand backup lamp is defective.XCheck whether you are permitted to change the bulb yourself
( Y page 121).
or
XVisit a qualified specialist workshop.b
Check Front Left
Sidemarker
Lamp or Check Front
Right Sidemarker
LampThe left or right front side marker lamp is defective.XCheck whether you are permitted to change the bulb yourself
( Y page 121).
or
XVisit a qualified specialist workshop.b
Check Rear Left
Sidemarker
Lamp or Check Rear
Right Sidemarker
LampThe rear left or right side marker lamp is defective.XCheck whether you are permitted to change the bulb yourself
( Y page 121).
or
XVisit a qualified specialist workshop.b
Check Left Daytime
Running
Light or Check
Right Daytime
Running Light The left or right-hand daytime running lamp is defective.XCheck whether you are permitted to change the bulb yourself
( Y page 121).
or
XVisit a qualified specialist workshop.b
Active Headlamps
InoperativeThe active light function is defective.XVisit a qualified specialist workshop.244Display messagesOn-board computer and displays
Page 273 of 396
TiresProblemPossible causes/consequences and M Solutionsh
USA only:
The yellow tire pressure
monitor warning lamp
(pressure loss/
malfunction) is lit.
Canada only:
The yellow tire pressure
monitor warning lamp
(pressure loss) is lit.GRisk of accident
The tire pressure monitor has detected a loss of pressure in at
least one of the tires.
XStop the vehicle without making any sudden steering or braking
maneuvers. Pay attention to the traffic conditions as you do so.XObserve the additional display messages in the multifunction
display.XCheck the tire pressure. If necessary, correct the tire pressure
( Y page 355).XIf necessary, change a wheel ( Y page 370).h
USA only:
The yellow tire pressure
monitor warning lamp
(pressure loss/
malfunction) flashes for
60 seconds and then
remains lit.The tire pressure monitor is faulty.XObserve the additional display messages in the multifunction
display.XVisit a qualified specialist workshop.GWARNING
Each tire, including the spare (if provided), should be checked at least every two weeks when
cold and inflated to the pressure recommended by the vehicle manufacturer on the Tire and
Loading Information placard on the driver's door B-pillar or, if available, the tire pressure label
on the inside of the fuel filler flap. If your vehicle has tires of a different size than the size indicated
on the Tire and Loading Information placard or the tire pressure label, you should determine the
proper tire pressure for those tires.
As an added safety feature, your vehicle has been equipped with a tire pressure monitoring
system (TPMS) that illuminates a low tire pressure telltale when one or more of your tires are
significantly underinflated. Accordingly, when the low tire pressure telltale illuminates, you should
stop and check your tires as soon as possible, and inflate them to the proper pressure. Driving
on a significantly underinflated tire causes the tire to overheat and can lead to tire failure.
Underinflation also reduces fuel efficiency and tire tread life, and may affect the vehicle's handling
and stopping ability. Please note that the TPMS is not a substitute for proper tire maintenance,
and it is the driver's responsibility to maintain correct tire pressure, even if underinflation has
not reached the level to trigger illumination of the TPMS low tire pressure telltale.
USA only:
Your vehicle has also been equipped with a TPMS malfunction indicator to indicate when the
system is not operating properly. The TPMS malfunction indicator is combined with the low tire
pressure telltale. When the system detects a malfunction, the telltale will flash for approximately
1 minute and then remain continuously illuminated. This sequence will be repeated every time
Warning and indicator lamps in the instrument cluster271On-board computer and displaysZ
Page 306 of 396
integrated garage door opener repeatedly
in succession until the door opens.
The rolling code synchronization is then
complete.
Notes on programming the remote
control
Canadian radio frequency laws require a
"break" (or interruption) of the transmission
signals after broadcasting for a few seconds.
These signals may not therefore last long
enough for the integrated garage door opener
to recognize the signal during programming.
Comparable with Canadian law, some U.S.
garage door openers also have a built-in
"interruption".
If you live in Canada or have difficulties
programming the garage door opener
(regardless of where you live) when using the
programming steps (see above), proceed as
follows:
XPress and hold one of transmitter
buttons ; to ? of the integrated garage
door opener.
Indicator lamp : starts to flash yellow
after a short period.XRelease the transmitter button.XPress transmitter button B of the garage
door remote control and hold for two
seconds, then release for two seconds,
then press again and hold for two seconds.XRepeat this sequence on transmitter
button B of the garage door remote
control until indicator lamp : is green.
Repeat the process if indicator lamp :
turns red.XContinue with the other programming
steps (see above).
Problems when programming
If you are experiencing problems
programming the integrated garage door
opener on the rear-view mirror, take note of
the following instructions:
R check the transmission frequency of
garage door remote control A (usually
found on the reverse side of the remote
control).
The integrated garage door opener is
compatible with devices that can be
operated with units in a frequency range of
280 to 390 MHz.
R change the batteries in garage door remote
control A. This increases the probability
that garage door remote control A will
send a strong and precise signal to the
integrated garage door opener on the rear-
view mirror.
R when programming, hold garage door
remote control A at different distances
and angles from the transmitter button that
you are programming. Try different angles
at a distance between 2 and 12 inches (5
to 30 cm) or the same angle at varying
distances.
R if another remote control for the same
garage door drive is available, repeat the
same programming steps with this remote
control. Before you perform the steps of the
operation, make sure that there are new
batteries in the garage door remote
control.
R note that some remote controls only
transmit for a limited amount of time (the
indicator lamp on the remote control goes
out). Press the remote control button again
before it stops transmitting.
R align the antenna cable of the garage door
opener unit. This can improve signal
reception/transmission.
Opening/closing the garage door
Once programmed, the integrated garage
door opener will assume the function of the
garage door system's remote control. Please
also read the operating instructions for the
garage door system.
304FeaturesStowing and features
Page 337 of 396

This is particularly the case when the vehicle
is heavily laden.
The maximum permissible distance that can
be driven in run-flat mode depends to a large
extent on the loads placed on the vehicle. It
can be shorter due to high speeds, a heavy
load, sudden changes in direction, the road
surface condition, outside temperature, etc.,
or further if you drive carefully and
conservatively.
Do not continue to drive in run-flat mode if:
R you hear banging noises.
R the vehicle starts to shake.
R you see smoke and smell rubber.
R ESP ®
is intervening constantly.
R there are tears in the sidewalls of the tire.
After driving in run-flat mode, you must have
the wheel(s) checked for damage at a
qualified specialist workshop which has the
necessary specialist knowledge and tools to
carry out the work required. The defective tire
must be replaced in every case.
Mercedes-Benz recommends that you use an
authorized Mercedes-Benz Center for this
purpose. In particular, work relevant to safety
or on safety-related systems must be carried
out at a qualified specialist workshop.
i When replacing one or all tires, make sure
that you only use tires marked
MOExtended and of the specified size for
the vehicle.
i Vehicles equipped with MOExtended tires
are not equipped with a TIREFIT kit at the
factory. It is therefore recommended that
you additionally equip your vehicle with a
TIREFIT kit if you mount tires that do not
feature run-flat properties, e.g. winter tires.
A TIREFIT kit can be obtained from an
authorized Mercedes-Benz Center.Battery
Important safety notes
In order for the battery to achieve the
maximum possible service life, it must always
be sufficiently charged.
! Have the battery checked regularly at a
qualified specialist workshop, such as an
authorized Mercedes-Benz Center.
Adhere to the service intervals indicated in
the service booklet or ask a qualified
specialist workshop, such as an authorized
Mercedes-Benz Center.
Have the battery charge checked more
frequently if you use the vehicle mainly for
short trips or if you leave it standing idle for
a lengthy period.
Only replace a battery with a battery that has
been recommended by Mercedes-Benz.
Consult an authorized Mercedes-Benz Center
if you wish to leave your vehicle parked for a
long period of time.
GWARNING
Comply with safety precautions and take
protective measures when handling batteries.
Risk of explosionFire, naked flames and
smoking are prohibited
when handling the battery.
Avoid creating sparks.Battery acid is caustic.
Avoid contact with the skin,
eyes or clothing.
Wear suitable protective
clothing, in particular
gloves, an apron and a face
mask.
Immediately rinse acid
splashes off with clean
water. Consult a doctor if
necessary.Battery335Breakdown assistanceZ
Page 359 of 396
Tire pressure monitor warning
messages
If the tire pressure monitor detects a
significant pressure loss on one or more tires,
a warning message is shown in the
multifunction display. A warning tone also
sounds and the tire pressure warning lamp
lights up in the instrument cluster.
Each tire that is affected by a significant loss
of pressure is highlighted with a color.
If the Correct Tire Pressure message
appears in the multifunction display:
XCheck the tire pressure on all four wheels
and correct it if necessary.
i If the wheel positions on the vehicle are
interchanged, the tire pressures may be
displayed for the wrong positions for a
short time. This is rectified after a few
minutes of driving, and the tire pressures
are displayed for the correct positions.
Restarting the tire pressure monitor
GWARNING
It is the driver's responsibility to set the tire
pressure to the recommended cold tire
pressure. Underinflated tires affect the ability
to steer or brake the vehicle. You might lose
control over the vehicle.
When you restart the tire pressure monitor,
all existing warning messages are deleted and
the warning lamps go out. The monitor uses
the currently set tire pressures as the
reference values for monitoring.
The tire pressure monitor must be restarted
when you set the tire pressure to a new value
(as a result of changed drive or load
characteristics, for example). The tire
pressure monitor then monitors the new tire
pressure values.
i Canada only: in most cases, the tire
pressure monitor recognizes the new
reference values automatically. However,
you can also define reference values
manually as described here.
Restart the tire pressure monitor after you
have set the tire pressure to the value
recommended for the desired driving
situation ( Y page 349). Only correct tire
pressures on cold tires. Comply with the
recommended tire pressures on the Tire and
Loading Information placard on the B-pillar on
the driver's side. Additional tire pressure
values for driving at high speeds or with heavy
loads can be found in the tire pressure table
on the inside of the fuel filler flap.XMake sure that the tire pressure is correct
on all four wheels.XMake sure that the SmartKey is in position
2 in the ignition lock.XPress the = or ; button on the
steering wheel to select the Serv. menu.XPress the 9 or : button to select
Tire Pressure .XPress the a button.
The multifunction display shows the
current tire pressure of the individual tires
or the Tire pressures will be
displayed after driving a few
minutes message.XPress the : button.
The Use Current Pressures as New
Reference Values message appears in
the multifunction display.
If you wish to confirm the restart:
XPress the a button.
The Tire Press. Monitor Restarted
message appears in the multifunction
display.
After driving for a few minutes, the system
checks whether the current tire pressures
are within the specified range. The new tire
pressures are then accepted as reference
values and monitored.Tire pressure357Wheels and tiresZ
Page 372 of 396
These optional extras, such as high-
performance brakes, level control, a roof rack
or a high-performance battery, are not
included in the curb weight and accessory
weight.
TIN (Tire Identification Number)
This is a unique identifier which can be used
by a tire manufacturer to identify tires, for
example for a product recall, and thus identify
the purchasers. The TIN is made up of the
manufacturer's identity code, tire size, tire
type code and the manufacturing date.
Load bearing index
The load bearing index (also load index) is a
code that contains the maximum load bearing
capacity of a tire.
Traction
Traction is the result of friction between the
tires and the road surface.
Treadwear indicators
Narrow bars (tread wear bars) that are
distributed over the tire tread. If the tire tread
is level with the bars, the wear limit of 1
/ 16 in
(1.6 mm) has been reached.
Occupant distribution
The distribution of occupants in a vehicle at
their designated seating positions.
Total load limit
Rated cargo and luggage load plus
68 kilograms (150 lbs) times the vehicle's
designated seating capacity.
Changing a wheel
Flat tire
The "Breakdown assistance" section
( Y page 325) contains information and notes
on how to deal with a flat tire. It also provides
instructions on changing a wheel or mounting
the spare wheel/emergency spare wheel.
Interchanging the wheels
GWARNING
Rotate front and rear wheels only if the tires
are of the same dimension.
If your vehicle is equipped with mixed-size
tires (different tire dimensions front vs. rear),
tire rotation is not possible.
GWARNING
Have the tightening torque checked after
changing a wheel. Wheels could become
loose if not tightened with a torque of
96 lb-ft (130 Nm).
Only use genuine Mercedes-Benz wheel bolts
specified for your vehicle's rims.
The wear patterns on the front and rear tires
differ, depending on the operating conditions.
Rotate the wheels before a clear wear pattern
has formed on the tires. Front tires typically
wear more on the shoulders and the rear tires
in the center.
If your vehicle's tire configuration allows, you
can rotate the wheels according to the
intervals in the tire manufacturer's warranty
book in your vehicle documents. If this is not
available, the tires should then be replaced
every 3000 to 6000 miles
( 5000 to 10,000 km), or earlier if the tire wear
requires this. Do not change the direction of
wheel rotation.
Clean the contact surfaces of the wheel and
the brake disc thoroughly every time a wheel
is interchanged. Check the tire pressures.
Information on changing a wheel and
mounting the spare wheel ( Y page 329).
370Changing a wheelWheels and tires